- 6 - - 23 -
Symptom Cause Remedial Action Prevention
Heating
System Not
Working
(Electric
and AC/DC)
Liquid in
Finishing
Drawer
Drum Will
Not Stay
Vertical
Test to determine
whether failure has
occurred
Thermostat Failure
Heating Element
Failure
Drum Screen
Clogged
Unit tilted to wrong
side
Condensation run-
ning down vent
stack
Drum Locker
Broken
Pull drawer out and put your hand in the evapo-
ration chamber (Not in the liquid). If there is no
warmth rising from the floor of the unit, your
heating system is not working. It is most com-
monly the thermostat that has failed. If you
notice a lack of evaporation, but there is still
warmth in the heating chamber, see “Liquid
Buildup” for solutions.
Have your serial number ready and call Sun-Mar
for a replacement. (Detailed instructions are
included with the replacement part)
If the insulation behind the thermostat access
cover is moist or discolored, or heating does not
work after the new thermostat has been connect-
ed, then the heating element has failed.
Have your serial number ready and call Sun-Mar
for a replacement. (Detailed instructions are
included with the replacement part)
Please note: Because this part is not easy to
replace, and because there is far less chance
that you will need this part than a thermostat; we
recommend trying to replace the thermostat first.
Remove the finishing drawer. By reaching
through the opening, you should be able to
access the drum screen. Scrub vigorously with a
wire brush.
Use a 1/4” to 1/2” (6-12mm) wedge piece under
the right side of the unit to drain liquid more eas-
ily towards the overflow drain of the unit.
Liquid will be clear or yellowish in appearance.
Make sure all vent pipe exposed to the outdoor is
well insulated and there are no horizontal runs.
Have serial number ready and call Sun-Mar for a
replacement part.
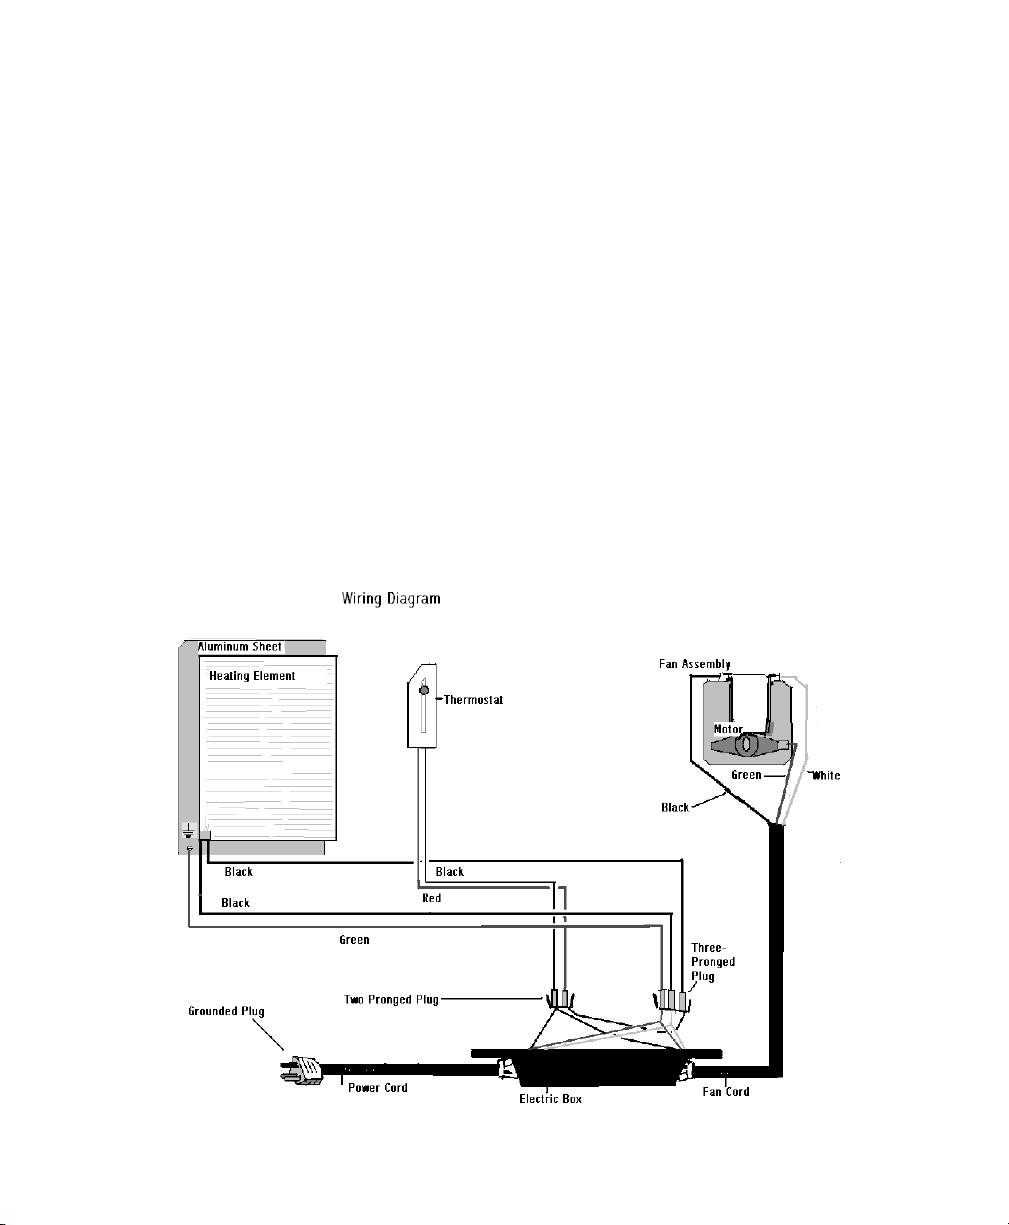
A ground fault interrupt circuit is
recommended to protect your
Centrex 2000 from power surges if
your heating system malfunctions.
Your thermostat and fan are the
two constantly moving parts on the
unit, and so are the most likely to
fail. Both are fairly easy to replace.
DO NOT wash the outside of the
unit with a hose or pressure wash-
er. Install the unit so that ground
water or weather cannot get at the
base of the unit.
When returning the drum to top
dead center position, do not bang
against drum locker with excessive
force. Remember to pull out the
drum locker button before rotating
the drum backwards.
This chapter describes how to inspect your new Centrex 2000 prior to installation for damage and make
sure you have received all of the parts.
Inspecting
the unit for
damage
Check Carton
Contents
and
Familiarize
Yourself with
the
Centrex 2000
Placement of
Unit
Chapter 1
Inspection
i) If there is any visible damage to the carton-
the contents of carton MUST be inspected before signing bill of lading. Damaged units
should be refused. Call Sun-Mar immediately.
ii) Before signing the shipping papers and dismissing the driver.-
ensure that the carton contents have been inspected.
iii) If the shipper has left-
Report the damage immediately to the transport company and call Sun-Mar.
iv) Soon after delivery, remove the Centrex 2000 carefully
from the carton-
If there is hidden damage, or for any service Questions, contact Sun-Mar to determine
the best course of action.
Check that the carton contains the vent stack (pipe, fittings, roof flashing and diffusor);
“Compost Sure”, rake, drain hose and fittings, etc. Notify Sun-Mar if you are missing anything.
i) Turn the drum handle clockwise to rotate the Bio-Drum for mixing and aeration. (The drum
rotates counter-clockwise and the drum door closes). TThhiiss
iiss
hhooww
yyoouu
wwiillll
rroottaattee
tthhee
ddrruumm..
ii) Lift and remove the access door and rotate the drum until the drum opening is visible
through the the access door opening for adding “Compost Sure Blue”. TThhiiss
iiss
hhooww
yyoouu
wwiillll
aadddd
““CCoommp
poosstt
SSuurree
BBlluuee””ppeeaatt
mmoossss
mmiixxttuurree
ttoo
tthhee
ddrruumm
iii) Plug the unit’s electrical cord (Electric and AC/DC units) into a standard three-prong elec-
trical outlet, and feel the air movement from the vent outlet at the front of the unit to
ensure the vent system is working properly.
v) Pull out the compost finishing drawers at the bottom right of the unit.
vi) After the unit has been plugged in for ten minutes, place a hand on the floor of the
evaporating chamber (the area under the finishing drawer) to check it is warm to the
touch, and that the heater is working properly.
vii) Affix the “WARNING/CLEANING” sticker to the underside of the toilet seat cover, and check
that another is on the access port of the composting unit.
The unit should be installed so that the base is protected from weather. The rubber “u” chan-
nel at the bottom of the unit is well-sealed with silicone, but if the unit is sitting in water, has
snow melting against it, or rain pouring on it, this may eventually wear through and short out
the heating element. Install your unit with a protective cover of some kind around this area,
and do not install the unit in a pit where water can accumulate around it.