Sunbeam 9103-9294 User manual
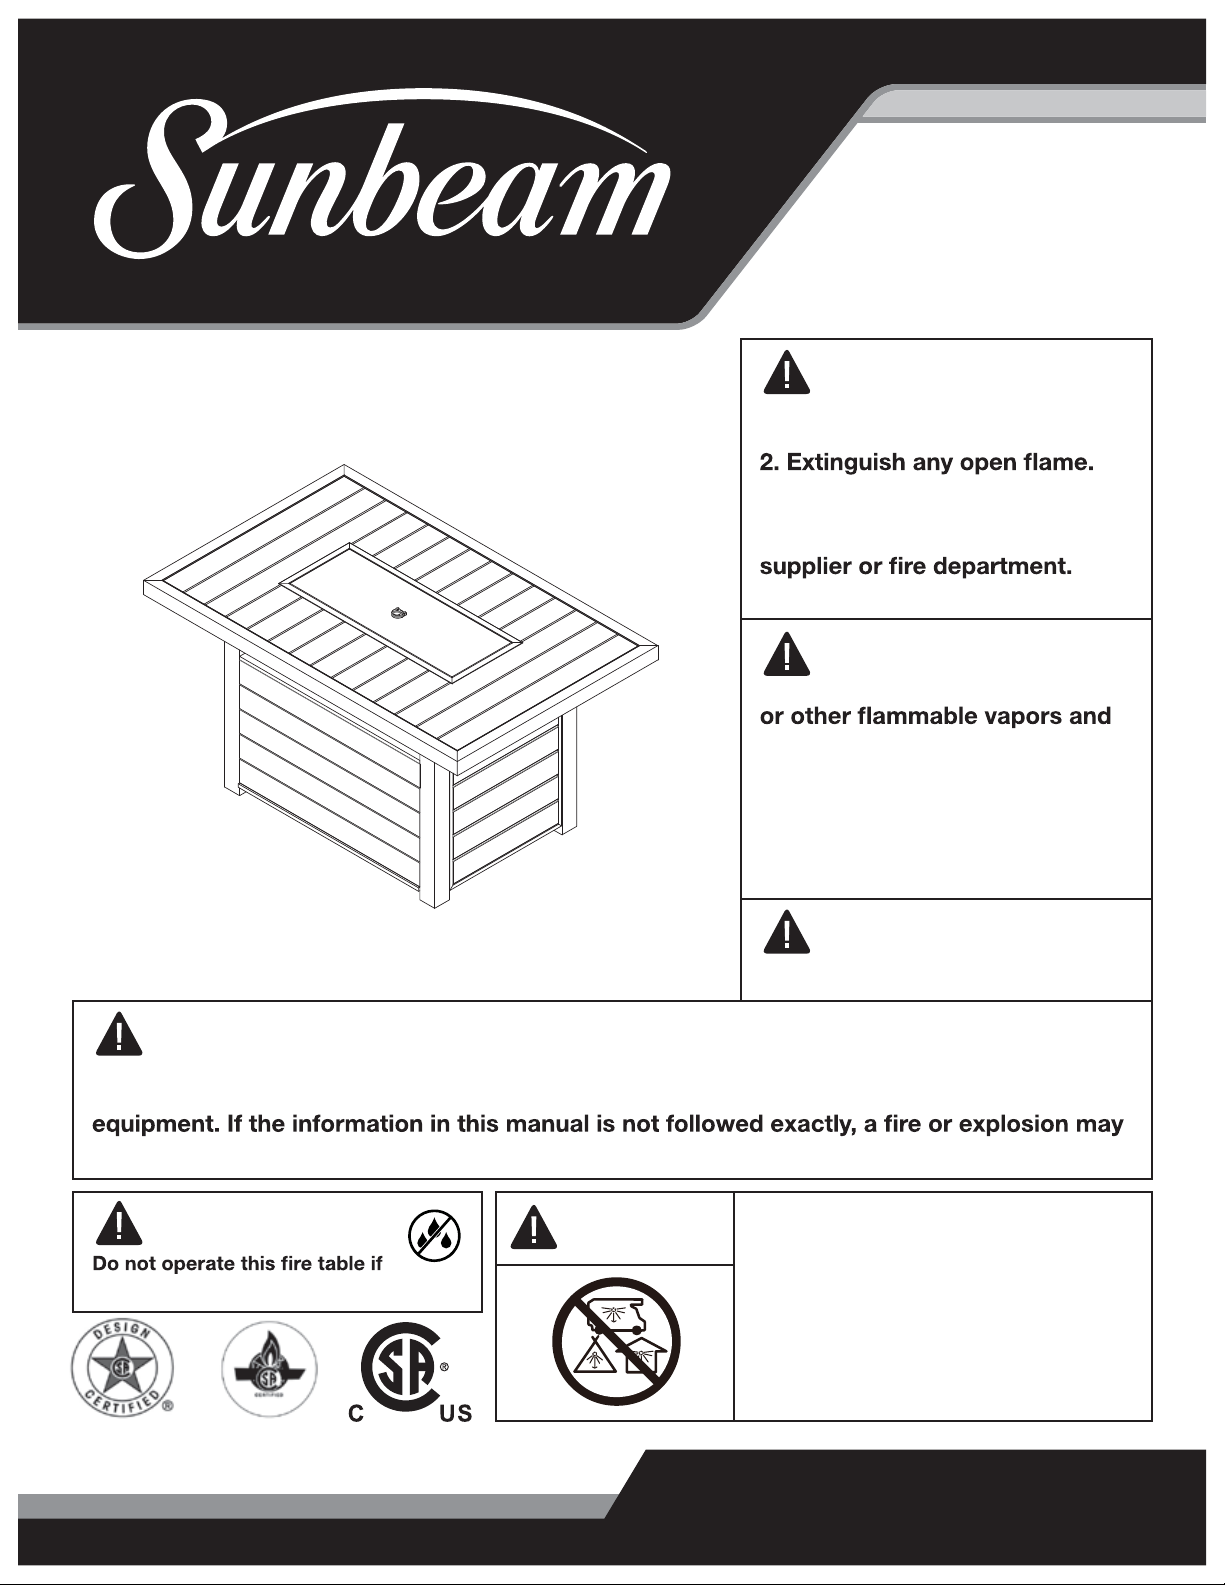
DANGER
Owner’s Manual
Aluminum Fire Table DANGER
If you smell gas:
1. Shut off gas to the appliance.
3. If odor continues, keep
away from the appliance and
immediately call your gas
WARNING
Do not store or use gasoline
liquids in the vicinity of this or
any other appliance.
An LP-cylinder not connected
for use shall not be stored in
the vicinity of this or any other
appliance.
WARNING
For outdoor use only.
WARNING
Improper installation, adjustment, alteration, service or maintenance can cause injury or
property damage. Read the owner’s manual thoroughly before installing or servicing this
result causing property damage, personal injury or loss of life.
CARBON MONOXIDE HAZARD
This appliance can produce carbon monoxide
which has no odor.
Using it in an enclosed space can kill you.
Never use thisappliance in an enclosed space
such as a camper, tent, car or home.
CAUTION
Firebowl Pan and Flame Glass are wet!
Items #
9103-9294

Before you assemble or operate this unit, please carefully read this entire manual. Failure to do so may result in a re,
explosion, injury or death.
WARNING
• The installation of this unit must adhere to local codes or either the National Fuel Gas Code, ANSI Z21.97-2014/CSA
2.41-2014 Standard for Outdoor Decorative Gas Appliances.
• THIS UNIT IS INTENDED FOR OUTDOOR USE ONLY! This product shall be used outdoors, in a ventilated space and
shall not be used in any enclosed area.
• Do not use any solid fuel or charcoal for this unit.
• When igniting this unit, stay away from the burner as the ame will light up and may cause injury.
• LP GAS WARNING: Do not use any more than 1/4 in. depth Flame Glass above the burner holes. Doing so will
suffocate the ame.
• If the propane gas tank is leaking gas, you may hear, see, or smell a hiss. Do the following:
1. Disconnect the propane gas tank. 2. Do not attempt to x the problem yourself. 3. Contact your gas supplier or re
department for help.
• Applying too much propane may result in gas pooling and will not burn. Allow fresh air into the unit so that the
remaining gas may escape.
• Do not use a ame to check for gas leaks.
• The maximum inlet supply pressure: maximum Gas supply 11 in. w.c. (2.74kPa)
• Use LP propane tanks with the following dimensions: diameter 12 in., height 18 in. - capacity 20 lbs.
• You must use a propane tank that has a collar to protect the gas valve.
• DO NOT ll tank over 80 percent full.
• The tank system must be set up for vapor withdrawal.
• Discontinue use if any part of the propane tank is damaged. Rust and dents may be hazardous and should be
inspected by a gas supplier.
• Do not burn anything other than the provided materials for this re table.
• Always ensure that Flame Glass is completely dry before use. Failure to do so may cause them to crack or break.
• Do not operate unit until all parts are fully assembled.
• Do not paint or color any part of this heating unit.
• Unit may be hot while in use, do not attempt to move it while in use.
• Never leave this heating unit unattended while in use.
• This unit is not intended for cooking.
• Keep any ammable items away and do not use any other replace cover for this unit.
• Keep a safe distance to avoid burning skin or clothing.
• Do not sit or rest hands or feet on this heating unit.
• Never place hands or ngers on upper portion of this unit while in use.
• Keep all electrical cords and fuel supply hose away from heated surfaces.
• Combustible material should not be within 72 in. of the top of the unit, or within 48 in. around the entire unit.
• Keep the appliance area clear and free from combustible material, gasoline and other ammable vapors and liquids.
• If the ame goes out while burning, turn the gas valve off. Wait 5 minutes before repeating the initial lighting procedure.
Once you have a ame started, hold down the control knob for 1 minute.
• Do not add water into the unit.
• Do not operate unit if any part has been under water. Immediately call a qualied service technician to inspect the
appliance and replace any part of the control system and any gas control that has been under water.
• Do not disconnect any part while unit is in use.
• Do not store a spare propane tank on or near this unit.
• If the heating unit is indoors, detach the propane tank and leave outdoors.
• Do not operate on a boat or vehicle. This unit must be used on a at surface and outdoors ONLY.
• Always remove protective cover before operating (if applicable).
• Do not set the protective cover over the unit until it is turned off and completely cooled down.
• Check for leaks after not using the unit for long periods of time.
• Children should never operate this unit. Children must be supervised while near this unit.
• Keep gas tank at least 5 feet away from unit when lit. (if external tank)
• The maximum gas supply pressure is 250 psi.
Safety Information
Page 2
Min. Clearance
48 in. (121.9 cm)
Min. Clearance
48 in. (121.9 cm)
Min. Clearance
48 in. (121.9 cm)
Min. Clearance
48 in. (121.9 cm)
• All installation and repair should be done by a qualied professional. This unit should be inspected annually and
cleaned regularly.
• Inspect all elements of this heating unit before each use. If there is damage, the burner must be replaced.
• Keep the hose out from any pathways to eliminate any accidental damage. (if external tank)
• Be aware of the hazards of high temperatures and stay away from the unit to avoid any burns or injury.
• The gas supply tank should be constructed and marked with the specications for the LP gas tanks of the U.S.
Department of Transportation or the National Standard of Canada CAN/CSA-B339, LP gas tanks, spheres and tubes for
Transportation of Dangerous Goods; and Commission.
• The LP gas tank must have a listed overlling prevention device and a QCCI or Type I, (CGA810) LP gas tank
connection.
• This heating appliance should not be used on plastic or articial wood decks.
• Children and adults should be alerted to the hazards of high surface temperatures and should stay away to avoid burns
or clothing ignition.
• Young children should be carefully supervised when they are in the area of the appliance.
• Clothing or other ammable materials should not be hung from the appliance or placed on or near the appliance.
• Any guard or other protective device removed for servicing the appliance shall be replaced prior to operating the
appliance.
• Installation and repair should be done by a qualied service person. The appliance should be inspected before use and
at least annually by a qualied service person. More frequent cleaning may be required as necessary. It is imperative that
the control compartment, burners and circulating airways of the appliance are kept clean.
IF APPLICABLE:
• Allow heating item to cool completely before placing on lid.
• DO NOT use heating item while lid is installed. Always remove the lid while heating item is in use. Only use the
regulator and hose assembly provided with this unit. Replacement parts must be supplied directly by Jay Trends.
Inspect the burner before use of this unit. If the burner shows any kind of damage, do not operate the appliance.
For assistance with repair or replacement of the burner or any other parts, call Jay Trends at 1-877-387-3639.
NOTE: You must follow all steps to properly assemble this heating item. Make sure the gas valve is turned “OFF” before
assembling. Do NOT attempt to assemble without proper tools.
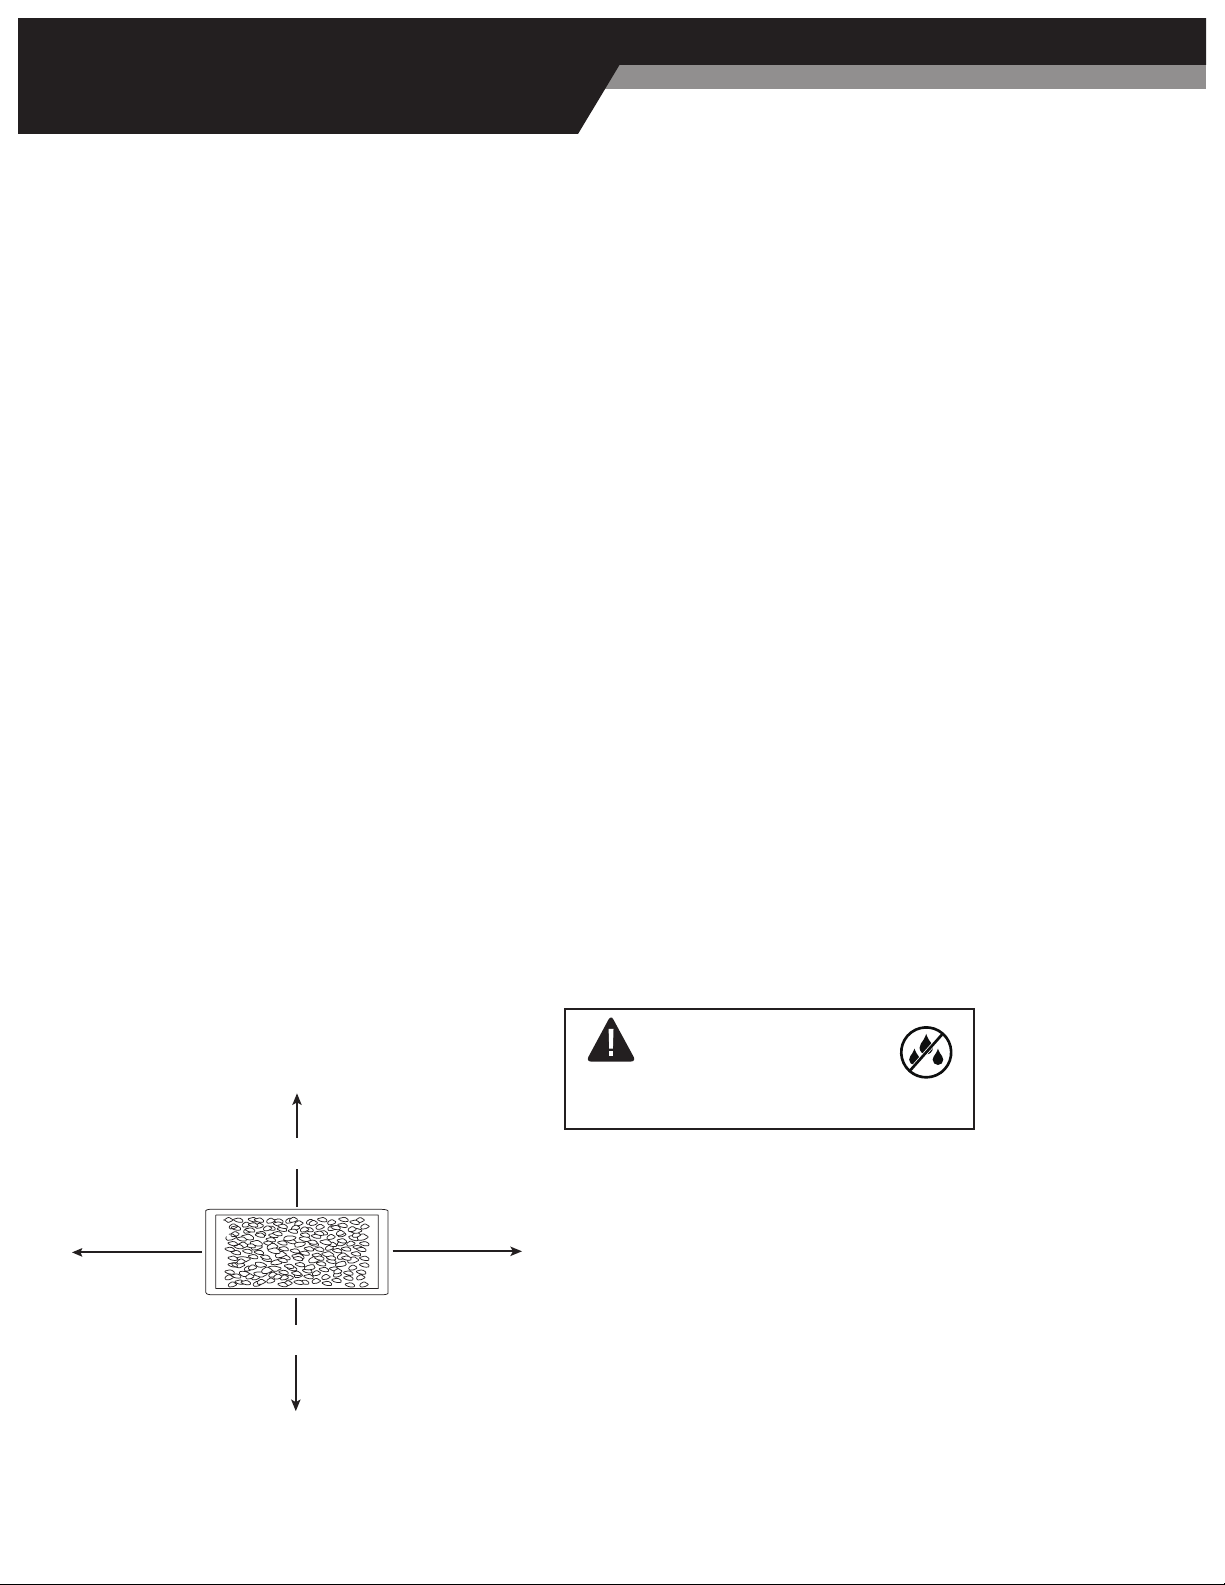
Safety Information
Combustible materials should not be within 72 in. of the top of
the unit, or within 48 in. around the entire unit.
1-877-387-3639 | Page 3
CAUTION
Do not operate this re table if
Firebowl Pan and Flame Glass are wet!
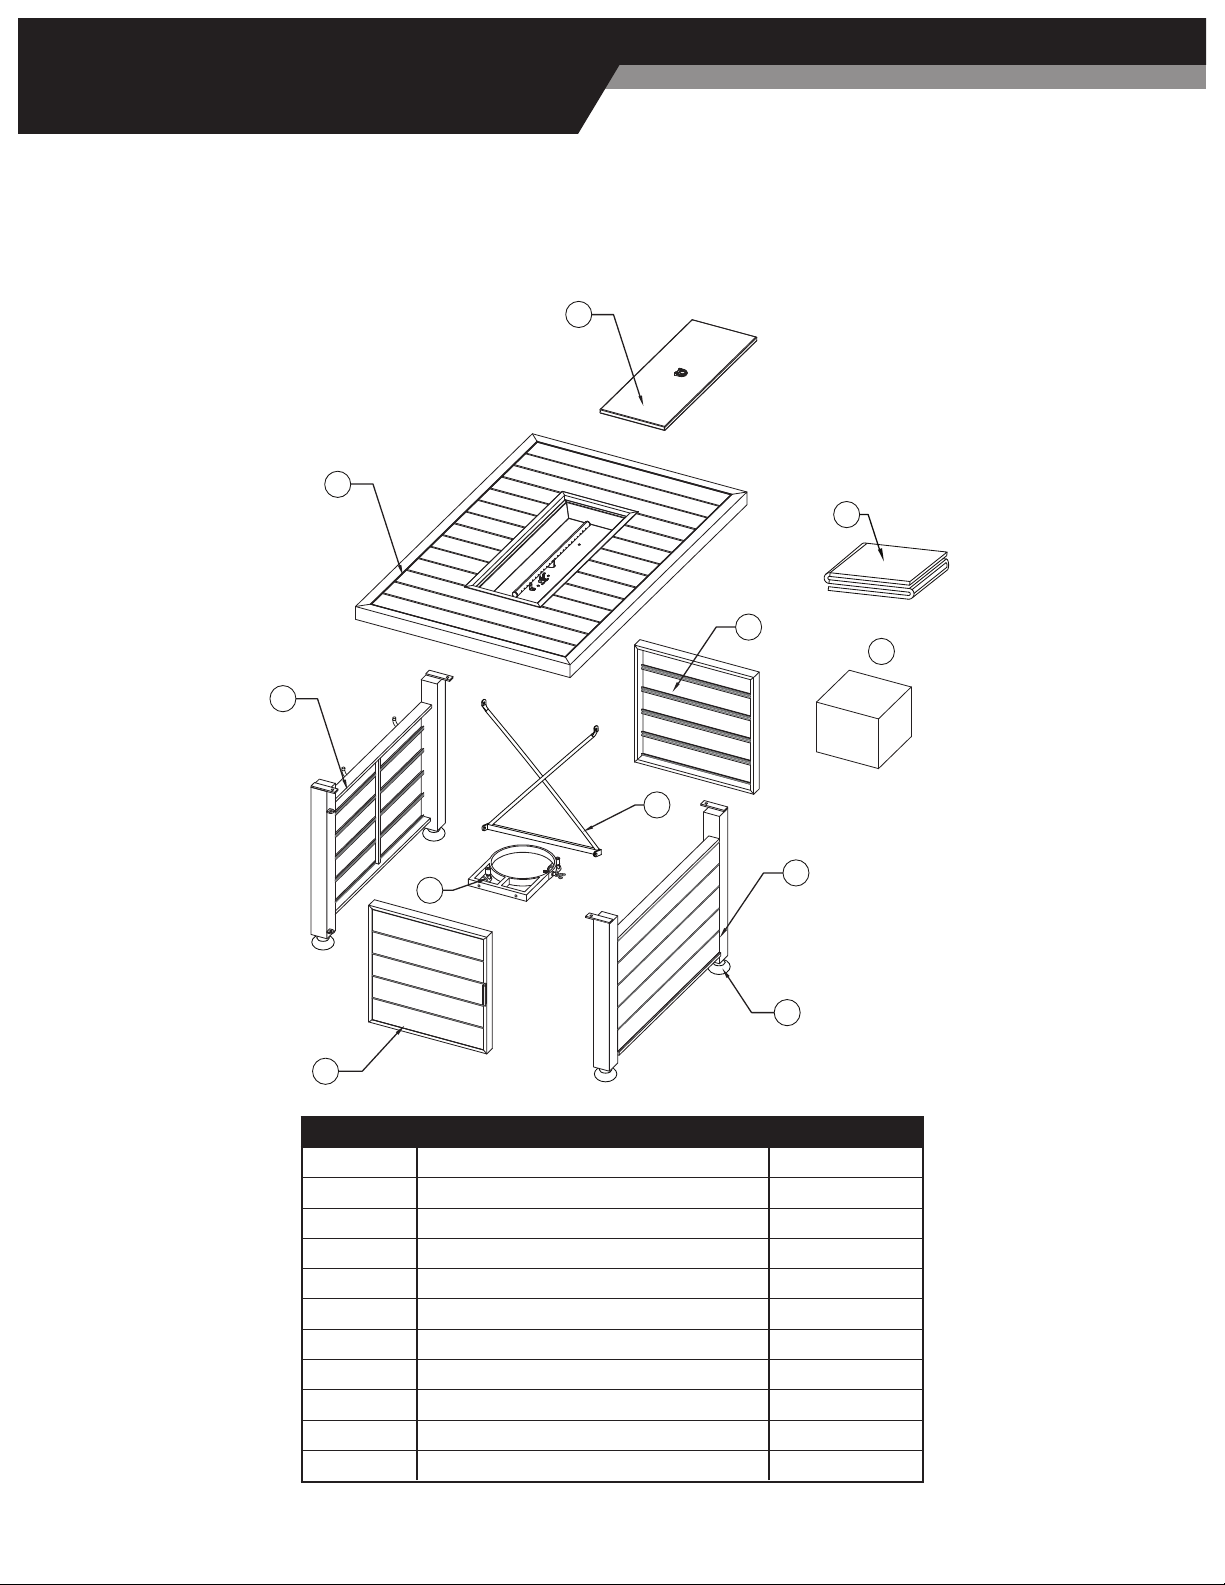
Package Contents
A
J
B
G
F
E
D
K
H
I
C
Before beginning assembly of product, make sure all parts are present. Compare parts with package contents list. If any
parts are missing or damaged, do not attempt to assemble the product.
Tools Required for Assembly (included): Hex bolt driver
Page 4
PART DESCRIPTION QUANTITY
A Table Top With Burner 1
B Back Panel 1
C Side Panel 1
D Front Panel 1
E Bottom Tank Plate 1
F Door 1
G Adjustable Feet 4
H Flame Glass (17.6 lbs) 1 Box
I Protective Cover 1
J Lid 1
K Cross Bar 1
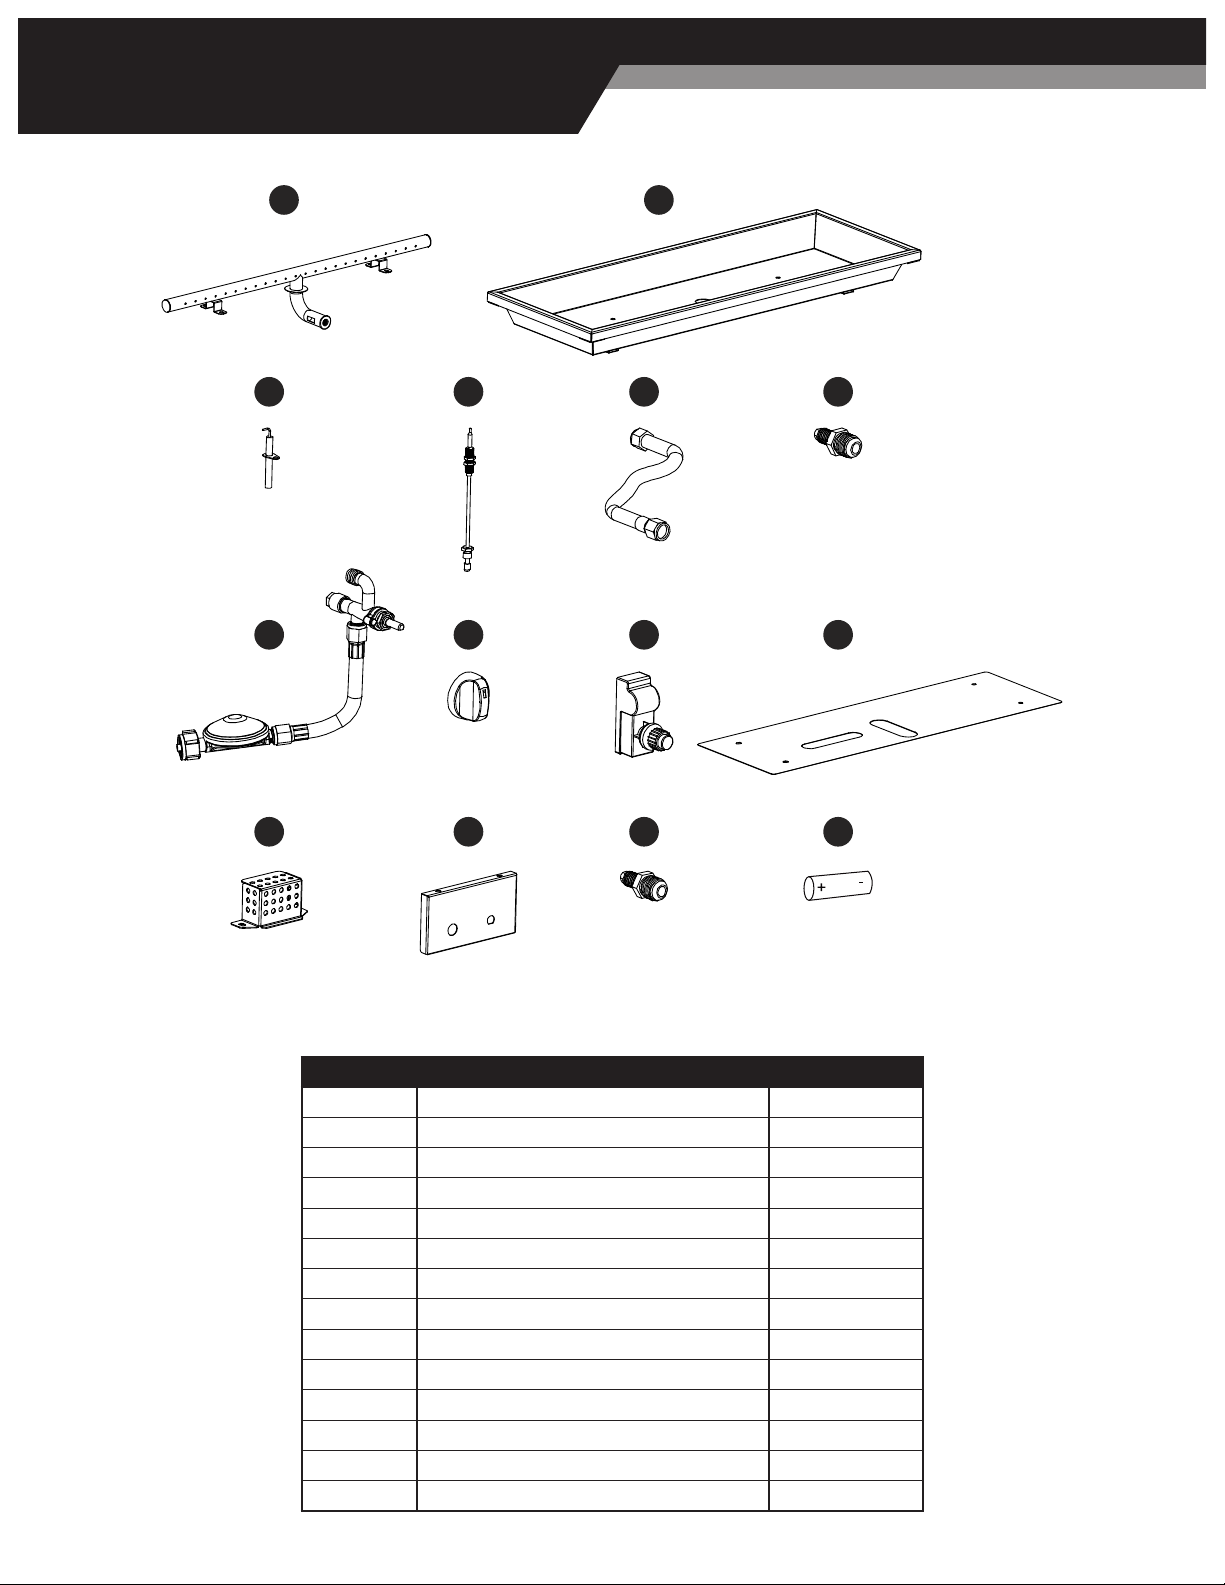
Hardware Contents
1 2
3
9 10
11 12 13 14
4 5 6
7 8
1-877-387-3639 | Page 5
PART DESCRIPTION QUANTITY
1 Burner 1
2 Firebowl Pan 1
3 Ignition Pin 1
4 Thermocouple 1
5 Corrugated Pipe 1
6 LPG Reducer 1
7 Valve with LPG Hose and Regulator 1
8 Control Knob 1
9 Pulse Ignition 1
10 Heat Resistant Panel 1
11 Ignition Screen 1
12 Control Panel 1
13 NG Reducer 1
14 AAA Batteries 1

Page 6
SAFETY INFORMATION
Please read and understand this entire manual before attempting to assemble, operate or install this appliance. If you
have any questions regarding the product, please call customer service 1-877-387-3639, 8 a.m. – 4 p.m., EST, Monday –
Friday. This appliance has been tested to and complies with the ANSI Z21.97-2014/CSA 2.41-2014, Outdoor Decorative
Gas Appliances CGA CR 97-003 Outdoor Gas Fireplaces. The installation must conform to local codes or in the absence
of local codes, to the National Fuel Gas Code. ANSIZ223.1. This manual contains important information about the
is also located throughout this manual. Keep this manual for future reference and to educate new users of this appliance.
This manual should be read in conjunction with the labeling on the appliance. Safety precautions are essential when
any mechanical or propane fueled equipment is involved. These precautions are necessary when using, storing, and
servicing. Using this appliance with the respect and caution demanded will reduce the possibilities of personal injury or
property damage. The following symbols shown below are used extensively throughout this manual. Always heed these
precautions, as they are essential when using any mechanical or propane fueled equipment.
DANGER:
DANGER indicates an imminently hazardous
situation which, if not avoided, will result in death
or seriousinjury.
DANGER:
Failure to complywiththe precautions and
in death, seriousbodily injury and propertyloss
asphyxiation, and/or carbon monoxide poisoning.
Only persons who can understand and follow the
DANGER:
FOR YOUR SAFETY:
If you smell gas:
1. Shut o gas to the appliance.
3. If odor continues, keep away from the appliance
department.
Solid fuels shall not be burned with this appliance.
Hardware Contents
CAUTION
Pan and Flame Glass are wet!
EE
M6x25 Bolt
Qty. 4
AA
Washer
Qty. 16
GG
Allen Key
Qty. 1
HH
-
+
Battery
Qty. 1
FF
M6x30 Bolt
Qty. 6
CC
M6x15 Bolt
Qty. 2
DD
M6x20 Bolt
Qty. 4
BB
Spring Washer
Qty. 1
B
C
FF AA
FF AA
CB
K
AA
CC
AA
D
KB
C
FF
AA
AA
FF
D
B
C
K
CC
AA
EE
AA
Preparation: Before beginning assembly of product, make sure all parts are present. Compare parts with package
contents list and hardware contents above. If any part is missing or damaged, do not attempt to assemble the product.
Contact customer service for replacement parts.
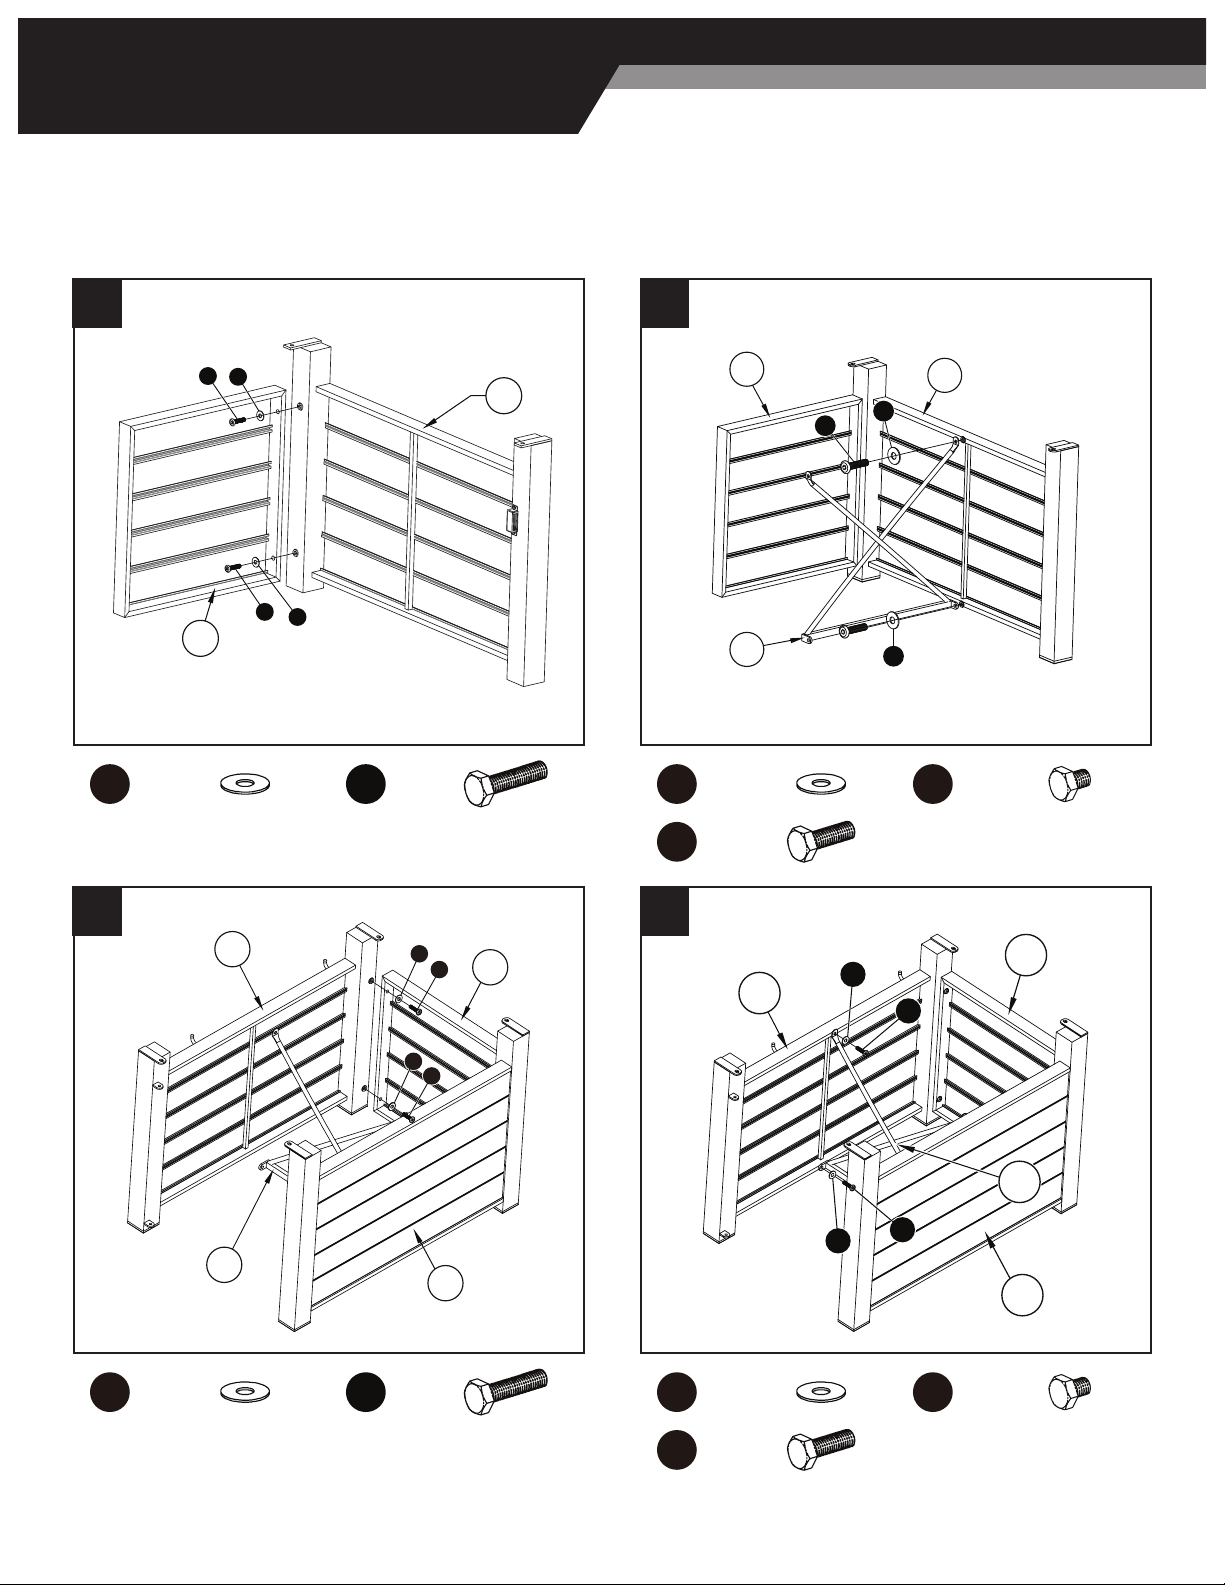
Assembly
1-877-387-3639 | Page 7
1
3
2
4
AA
AA
Washer
Washer
M6x30
Bolt
M6x30
Bolt
M6x25
Bolt
x2
x2
x2
x2
x1
AA CC
Washer M6x15
Bolt
x2 x1
EE
M6x25
Bolt x1
AA CC
Washer M6x15
Bolt
x2 x1
EE
FF
FF
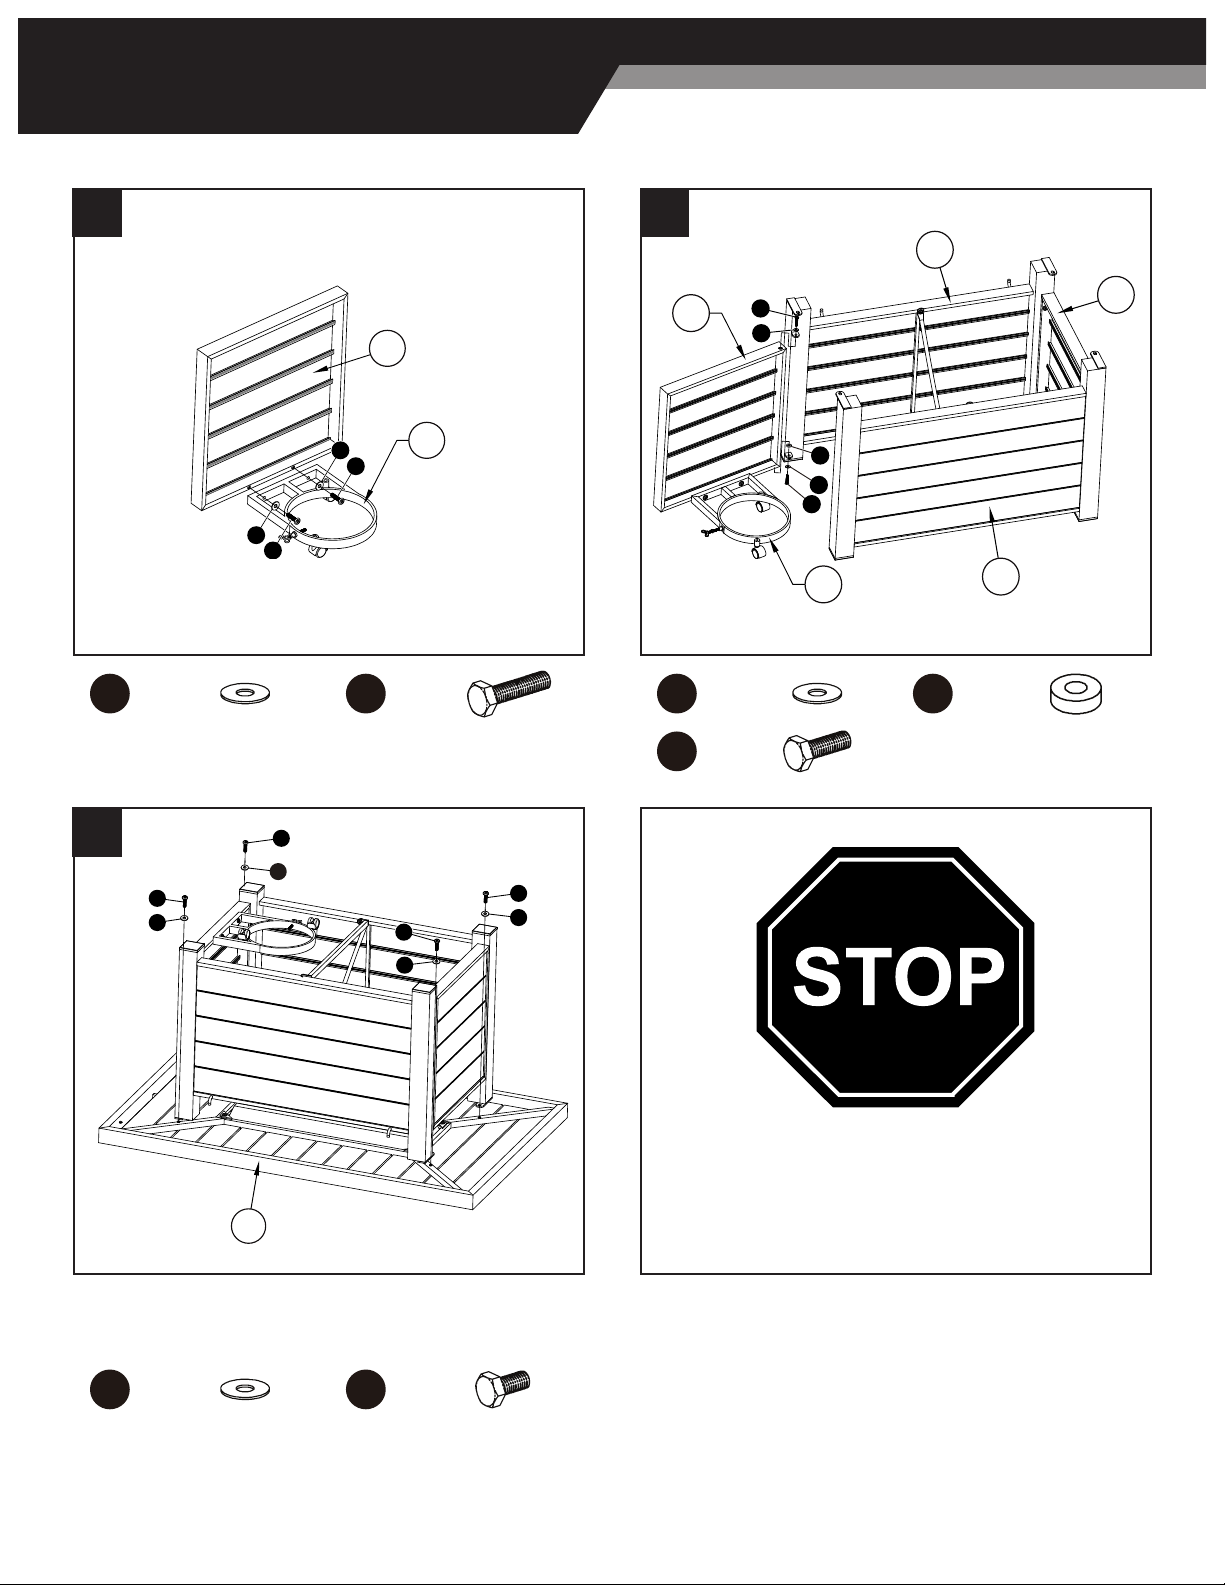
Assembly
Natural Gas Conversion
Natural gas conversion must be performed only
by a natural gas provider or service company.
Refer to pages 9 - 11 for more information.
F
E
C
D
B
AA
EE
EE
AA
BB
A
DD
AA
DD
AA
DD
AA
DD
AA
F
E
AA
FF
AA
FF
7. Place table top (A) face down on at surface.
Flip nished base and place on table top.
Assemble as indicated.
Page 8
5
7
6
AA AA
Washer Washer
M6x25
Bolt
M6x30
Bolt
Spring
Washer
x2 x2
x2
x2 x1
BB
AA Washer M6x20
Bolt
x4 x4
To continue assembly refer to page 12.
FF
EE
DD
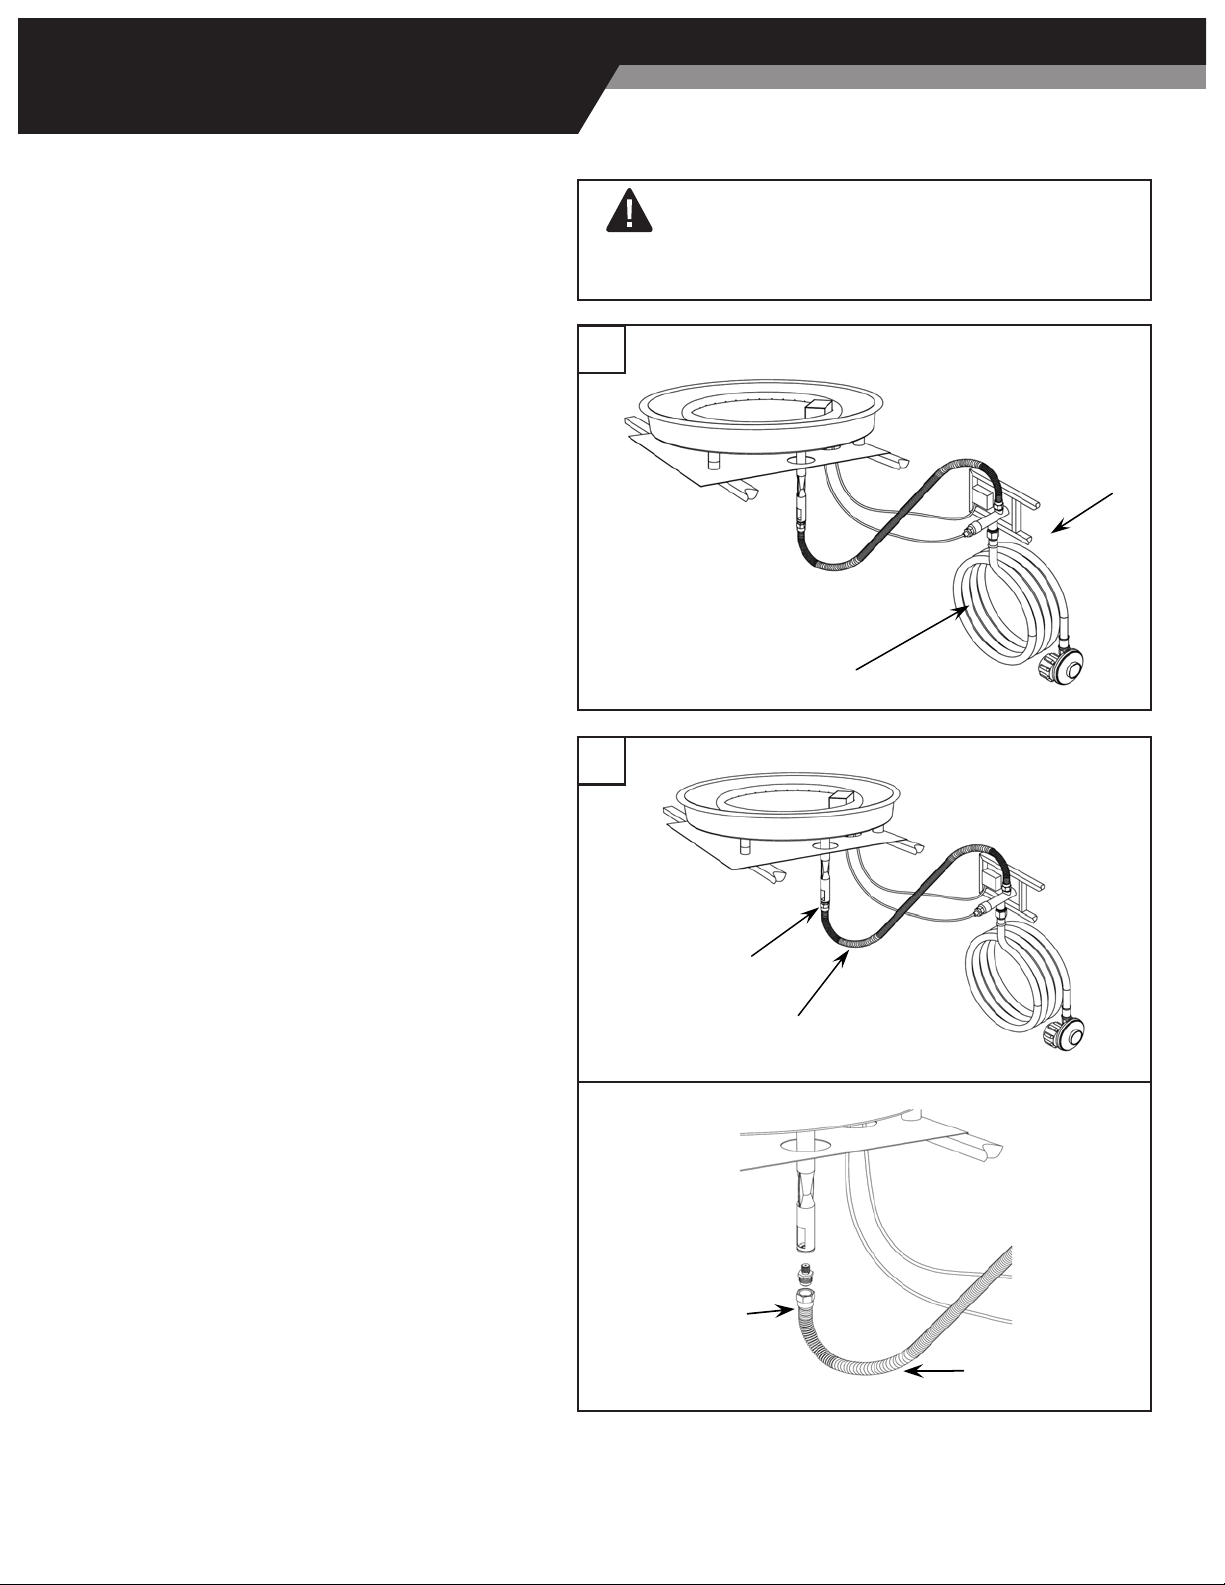
1. Disconnect the propane hose from the gas valve.
2. Unscrew and disconnect the propane orice
from the bellows. Propane orice is painted with
red mark.
propane hose
propane
orice
bellows
gas valve
propane
orice
bellows
Natural Gas
Conversion
2
1
CAUTION
Natural gas conversion must be performed only by a
natural gas provider or service company.
1-877-387-3639 | Page 9

bellows tightly, then connect and tightenthe natural
painted withblack mark.
4. Connect the natural gas hose with the gas valve
Requires a CSA Certified NG Conversion kit
50 000 BTU and 3/8” NG Hose.
by screwing clockwise tightly.
supply piping system.
Natural Gas
Conversion
natural gas supply
piping system
natural gas hose
gas valve
3
4
5
inlet tube
bellows
Page 10

natural gas supply
piping system
6
7
Natural Gas
Conversion
1-877-387-3639 | Page 11
WARNING
instructions and all applicable codes and requirements of the Authority Having Jurisdiction. If the information
proper installation of this kit. The installation is not proper and complete until the operation of the converted
EN VERSION:
ANS Z21.97-2014 / CSA
Decorative Outdoor
Gas Firepit Table
2.41-2014
Outdoor Decorative Gas Appliances
MFG Date:
Series No.:
Model:
Manufacturer: Foshan Genux Metal Products Co.,Ltd
No.11 Beiwei Rd,Xihai Industrial Zone,Beijiao Town, Shunde District, Foshan City, Guangdong, China
Type of Gas: Natural Gas or Propane Gas
ORIFICE SIZE: NG=3.66mm, LPG=2.12 mm
LPG
NG
Manifold pressure for input Adj.
11.0In.w.c(2.7kpa)
7.0 In.w.c (1.7kpa)
BTU input
50,000 Btu/hr
50,000 Btu/hr
CARBON MONOXIDE HAZARD
This appliance can produce carbon monoxide which has no odor. Using it
in an enclosed space can kill you. Never use this appliance in an enclosed
space such as a camper, tent, car or home.
Contact: Jay Trends Sales
1901 Aut. Transcanadienne, Dorval, QC H9P 1J1, Canada
Tel: 1-877-387-3639
WARNING
1. Must not be used for cooking.
2. The current configuration of the appliance is for
LP gas. If need to convert to NG use, please follow
the conversion instruction in manual.
3. For outdoor use only. If stored indoors,
detach and leave cylinder outdoors.
4. An LP-cylinder not connected for use shall not be
stored in the vicinity of this or any other
appliance.
5. If do not keep a safe distant, it will raise up the
temperature of cylinder and cause explosion.
6. Do not connect to a remote gas supply.
7. The gas supply must be turned off at the LP-gas
supply cylinder when this appliance is not in use.
The instruction manual contains important
information necessary for the proper
assembly and safe use of the appliance.
Read and follow all warnings and instructions
before assembling and using the appliance.
Follow all warnings and instruction when
using the appliance.
If instructions or parts are missing, contact
1-877-387-3639.
Minimum clearance from sides and back of unit
to adjacent combustible construction: From top:
6Ft. (72”), From sides: 3Ft. (36”).
WARNING: Improper installation,
adjustment, alteration service or
maintenance can cause injury or property
damaged.
Refer to the owners information manual
provided with this appliance.For assistance
or additional information consult a
qualified installer, service agency or the gas
supplier.
WARNING: Do not store or use gasoline or
other flammable vapors and liquids in the
vicinity of this or any other appliance.An LP-
cylinder not connected for use shall not be
stored in the vicinity of this or any other
appliance.
CAUTION:The gas pressure regulator
provided with this appliance must be
used .This regulator is set for an outlet
pressure of 11 inches water column.
6. Retain the rating label for your records.
7. PerformNatural Gas Leak Test
(I) Make 2-3 oz. of leak test solution(one part liquid
dishwashing detergent and three parts water).
(II) Applyseveral drops of solution where natural gas
connection. If NO bubbles appear, the connections
are secure. If bubbles appear, the connection has a
leak, disconnect, reconnect, perform another leak test.
If you continue to see bubblesafter several attempts,
the part is defective and should be replaced.
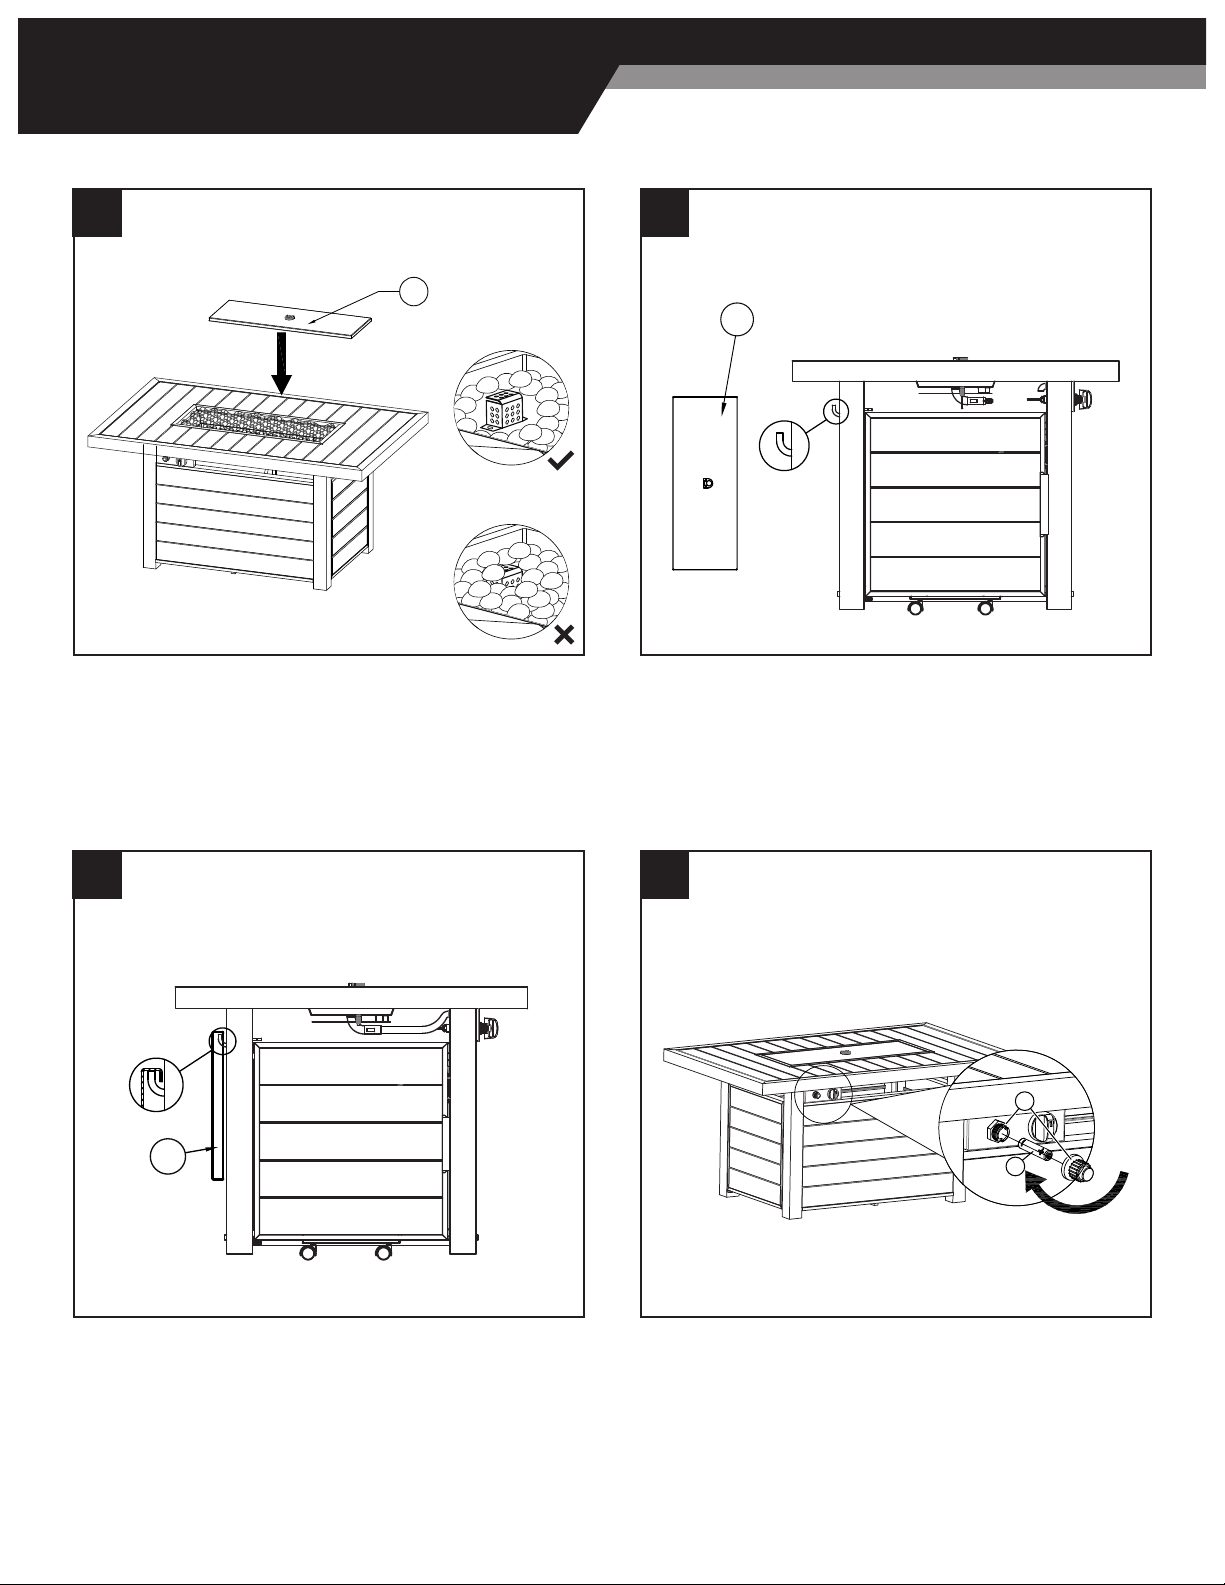
Assembly
J
J
8.1
8.2
98
A
B
J
10 11
10. Lid (J) can be stored on hooks as indicated when re
pit is in use.
8. Turn assembled unit over to stand upright, pour ame
glass (H) around burner and put lid (J) in place.
11. Install Battery to Igniter (9). Remove the rubber cap
on the electronic igniter (A) by unscrewing and slide
battery (B) into the battery slot. Make sure the positive
side of the battery faces outwards. Screw the electronic
igniter cap (A) over the battery tightly.
8.1. Leave adequate space around the Ignition Screen
for ventilation.
8.2. DO NOT block or cover the Ignition Screen with
the ame glass.
Page 12
Assembly
Standard 20 lb. tank
12 B
12 A
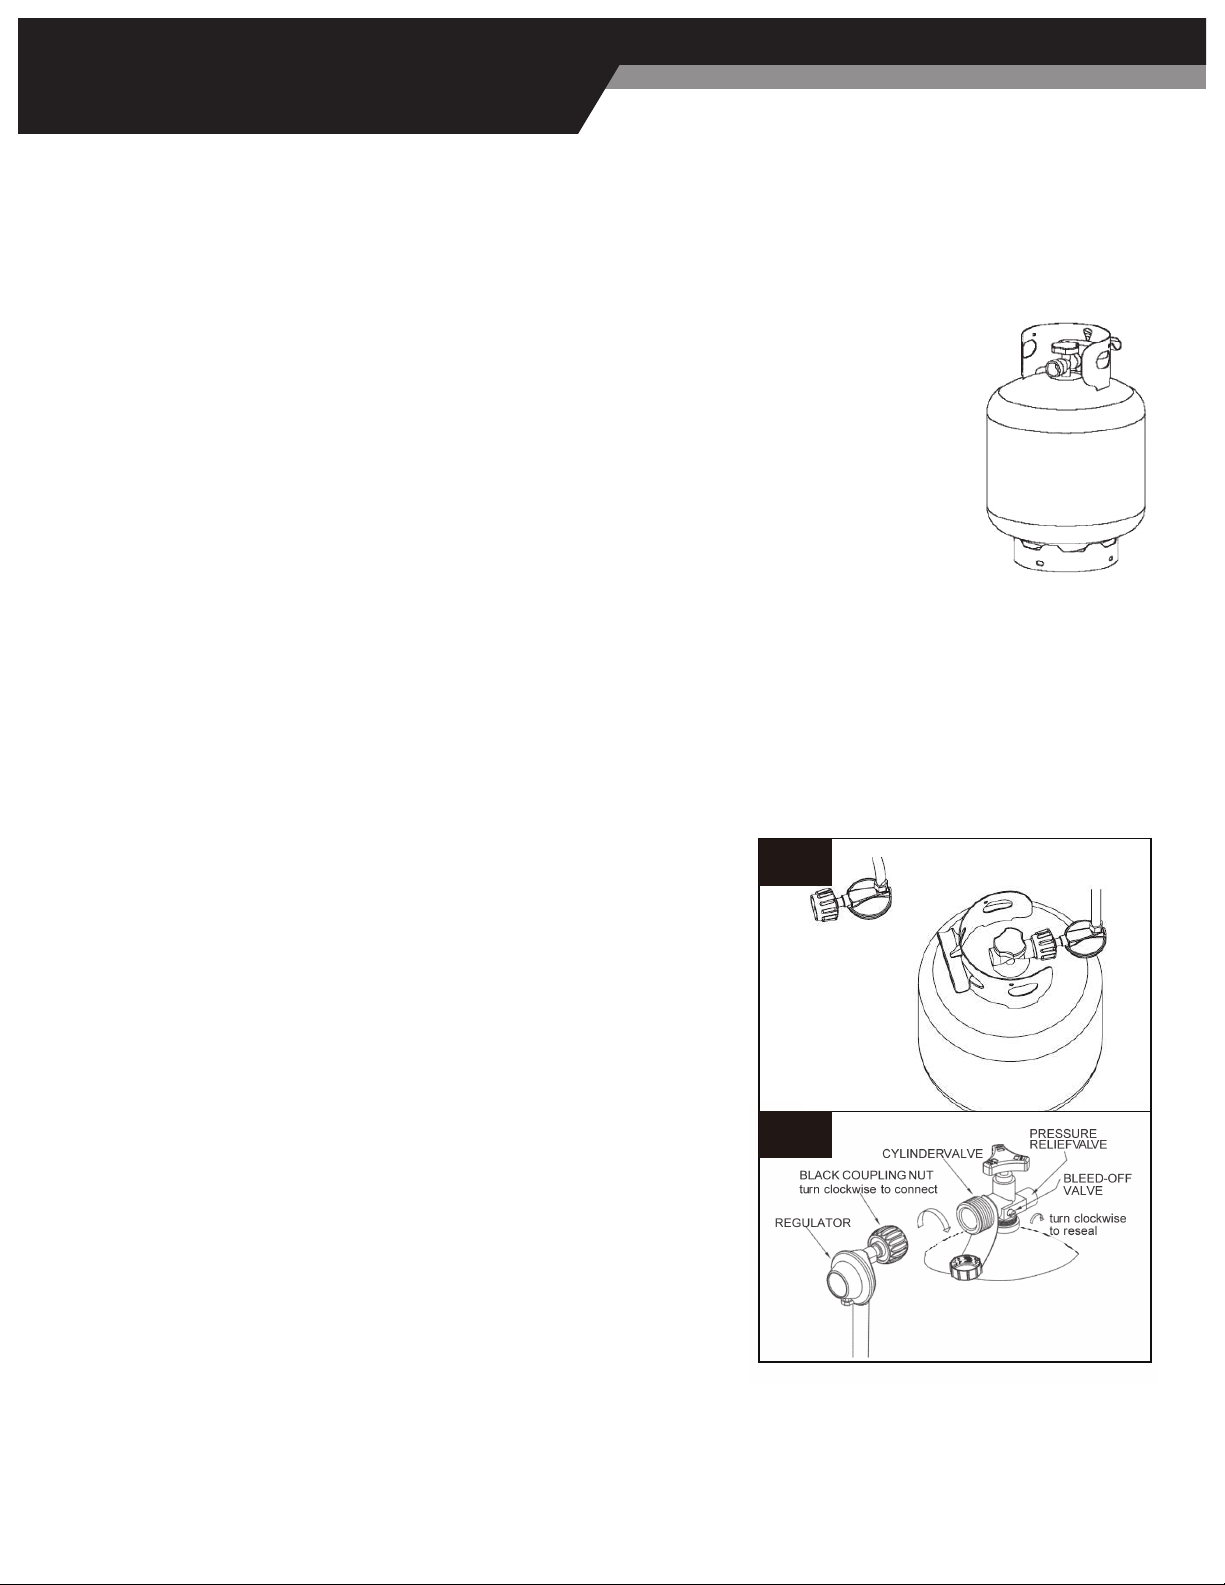
12. Connect Gas Tank
(A) Connect hose and regulator to cylinder.
(B) Turn the cylinder valve clockwise to close the gas supply on the gas
cylinder. Screw the regulator coupling clockwise by hand only. Make
sure it is fastened.
The propane gas and cylinder are sold separately. Use a standard 20 lb. propane cylinder only. Use this re table only
with a vapor withdrawal supply system. See Chapter 3 of the standard for storage and handling of liqueed petroleum
gas, ANSA/NFPA 58. Your local library or re department should have this book.
Storage of an appliance indoors is permissible only if the cylinder is disconnected and removed from the appliance. A
cylinder must be stored outdoors in a well-ventilated area out of reach of children. A disconnected cylinder must have
all dust caps tightly installed and must no be stored in a building, garage or any other enclosed area. The maximum inlet
gas supply pressure: 250 psi. The minimum inlet gas supply pressure: 5 psi.
The minimum hourly rate of 10,000 BTUs is required input rating for a re table for automatic
operation at rating less than full input rating.
The pressure regulator and hose supplied with the appliance must be used. The installation
must conform with local codes or in the absence of local codes, with national fuel gas code,
ANSI Z21.97-2014/CSA 2.41-2014, natural gas and propane Installation Code, CSA B1491.1, or
propane storage and handling code, B149.2.
A dented, rusted or damaged propane cylinder may be hazardous and should be checked by your
cylinder supplier. Never use a propane cylinder with a damaged valve connection.
The propane cylinder must be constructed and marked in accordance with the specications for
LP gas cylinders of the U.S. Department of Transportation (DOT) or the standard for cylinders,
spheres and tubes for transportation of dangerous goods and commission, CAN/CSA-B339.
The cylinder must have a listed overlling prevention device.
The cylinder must have a connection device compatible with the connection for the appliance.
The cylinder used must include a collar to protect the cylinder valve.
Never connect an unregulated propane cylinder to the appliance.
1-877-387-3639 | Page 13
Assembly
F
E
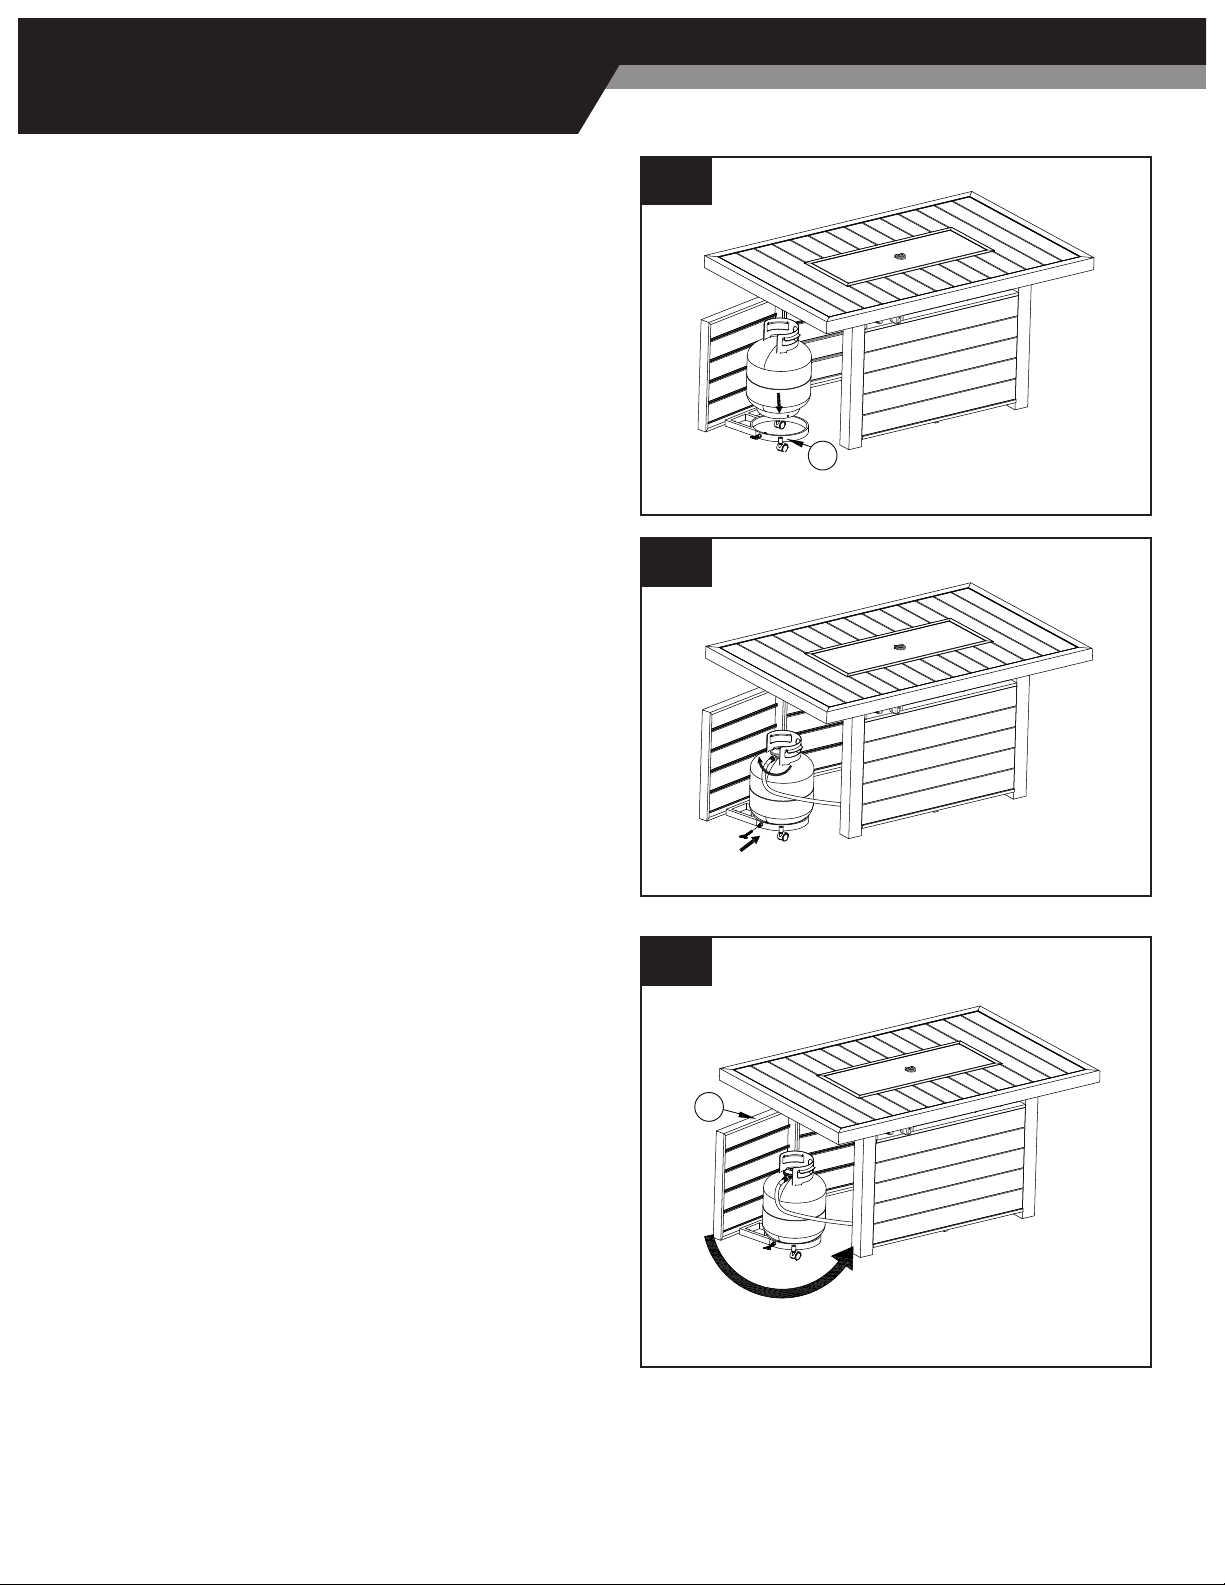
13 A. Install Cylinder. Put the cylinder into bottom Plate (E).
13 B
13 C
13 C. Close the door (F). Fire table assembly is now complete.
13 A
13 B. Secure the cylinder by tightening the screw in the
bottom plate.
Page 14
Assembly
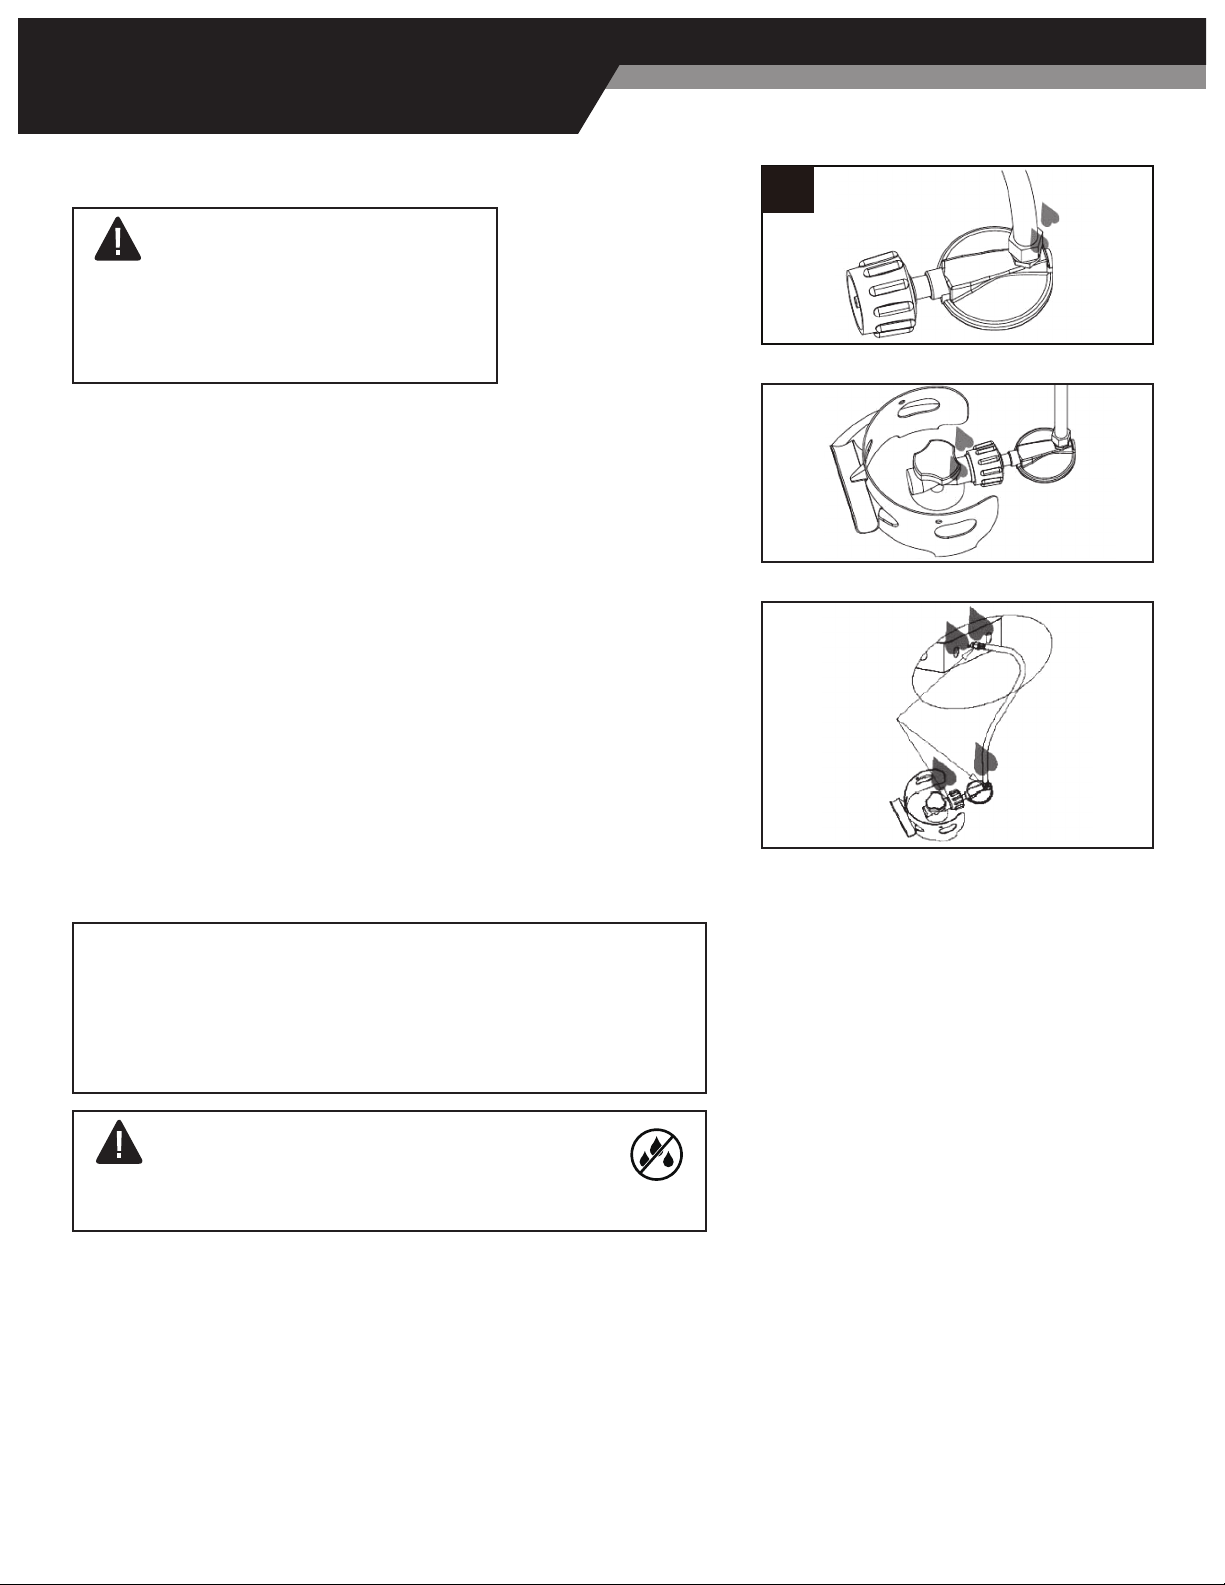
Regulator/Cylinder Connection
Hose/Regulator Connection
14
14. Perform Leak Test
WARNING
Perform all tests outdoors.
Extinguish all open ames.
NEVER leak test when smoking.
Do not use the re table until all connections
have been leak tested and do not leak.
(I) Make 2-3 oz. of leak test solution (one part liquid dishwashing
detergent and three parts water).
(II) Apply several drops of solution where hose attaches to regulator.
(III) Apply several drops of solution where regulator connects to cylinder.
(IV) Make sure all re table and light valves are OFF.
(V) Turn cylinder valve ON.
If bubbles appear at any connection, there is a leak.
(I) Turn cylinder valve OFF.
(II) If leak is at hose/regulator connection: tighten connection and
perform another leak test. If bubbles continue appearing, the hose
should be returned to the place of purchase.
(III) If leak is at regulator/cylinder valve connection: disconnect,
reconnect, and perform another leak test. If you continue to see bubbles
after several attempts, cylinder valve is defective and should be returned
to cylinder place of purchase.
If NO bubbles appear at any connection, the connections are secure.
NOTE: Whenever gas connections are loosened or removed, you must
perform a complete leak test.
• Do not store a spare LP-gas cylinder under or near this
appliance.
• Never ll the cylinder beyond 80 percent full.
• Place the dust cap on the cylinder valve outlet whenever the
cylinder is not in use. Only install the type of dust cap on the
cylinder valve that is provided with the cylinder valve. Other
type of caps or plugs may result in leakage of propane.
CAUTION
Do not operate this re table if Firebowl Pan
and Flame Glass are wet!
1-877-387-3639 | Page 15

Operation
DANGER
CARBON MONOXIDE HAZARD
For outdoor use only. Never use inside house, or
consumesair(oxygen). Donot use in an unventilated
or enclosed areasto avoid endangering your life.
WARNING:
VERY HOT WHILE IN OPERATION
use. Failure to comply with these instructions may
result in seriousbodily injury.
For a safe heating experience, perform these checks before each use.
Before Operating:
1. Familiarize yourself with owner’s manual to understand all precautions.
2. All components are properly assembled, intact and operable.
3. No alterations have been made.
4. All gas connections are secure and do not leak.
5. Do not operate if wind is 10 mph or above.
7. Fire table is outdoors (outside any enclosure).
8. There is adequate fresh air ventilation. Do not use this appliance if any part has been under water. Immediately call a
has been under water.
10. Fire table is away from windows, air intake openings, sprinklers and other water sources.
11. Fire table is at least 24 in. on rear and sides from combustible materials and 62 in. from ceiling.
12. Fire table is on a hard and level surface.
13. There are no signs of spiders or insects.
14. All burner passages are clear.
15. All air circulation passages are clear.
16. Children and adults should be alerted to the hazards of high surface temperature and should stay away to avoid
burns or clothing ignition.
table.
21. More frequent cleaning may be required as necessary. It is imperative that control compartment, burner and
After Operation:
1. Gas control is in OFF position.
2. Gas tank valve is OFF.
3. Gas line has been disconnected.
4. After each use, replace cap on gas tank.
Keep children away during assembly, as this item contains small parts which can be swallowed by children.
Do not use indoors or inside any enclosure.
Retain the assembly instructions for future reference.
Installer – Please leave these instructions with the owner.
CAUTION
and Flame Glass are wet!
1-877-387-3639 | Page 16

Operation
OFF
LOW
IGNITOR
OFF
LOW
IGNITOR
OFF
LOW
IGNITOR
HIGH HIGH HIGH
Figure A Figure B Figure C
P
U
S
H
T
O
T
U
R
N
P
U
S
H
T
O
T
U
R
N
Figure A Figure B Figure C
Caution: Do not attempt to operate until you have read and understand all Safety Information in this manual and all
assembly is complete and leak checks have been performed.
Before Turning Gas Supply On:
enclosed area.
3. Ensure that there is no obstruction to air ventilation. Be sure all gas connections are tight and there are no leaks.
4. Be sure the cylinder cover is clear of debris. Be sure any component removed during assembly or servicing is replaced
and fastened prior to starting.
Before Lighting:
2. Inspect the hose assembly for evidence of excessive abrasion, cuts, or wear. Suspected areas should be leak
manufacturer. The burner must be replaced prior to the appliance being put into operation if it is evident that the burner
Lighting:
1. Make sure the control knob is in the “OFF” position (Figure A).
2. Fully open LP cylinder valve.
Note: For initial start or after any cylinder change, hold Control Knob IN for 2 minutes to purge air from gas lines
before proceeding.
3. Push in gas control knob, turn counterclockwise to “LOW” (Figure B), and press the BLACK Ignitor button to light the
lights (you should hear a clicking sound).
Note: If burner fails to remain lit, all valves should be closed and a waiting period of at least 5 minutes should pass before
attempting to light.
WARNING
FOR YOUR SAFETY
Be careful when attempting to manually ignite this
than 10 seconds before igniting the gas will cause
Re-lighting:
1. Turn control knob to “OFF”.
2. Repeat the “Lighting” steps on prior page.
Turn off:
1. To extinguish burner depress control knob and continue
to turn it clockwise to “OFF”.
2. Turn cylinder valve clockwise to “OFF” and disconnect
WARNING
FOR YOUR SAFETY
Fire table will be hot after use. Handle with
extreme care.
Page 17

Care & Maintenance
you perform the following maintenance activities
on a regular basis:
Keepexterior surfaces clean.
or corrosive cleaning agents.
2. While cleaning your unit, be sure to keep the area around
the burner dryat all times. Do not submerge the control valve
assembly. If the gas control is submerged in water, do NOT use it.It must be replaced.
•Keep the ventilation opening of the cylinder enclosure free and clear from debris.
include:
•Fire table doesNOT reach the desired temperature.
•Fire table glowis excessively uneven.
•Fire table makes popping noises.
use. Clean burner holes by using a heavy-duty pipe cleaner. Compressed air may help clearaway smaller particles.
Note: In asalt-airenvironment (such as near an ocean), corrosion occurs more quickly than normal. Frequently check for
corroded areas and repairthem promptly.
Storage
Between uses:
•Turn Control Knob OFF.
•Disconnect LP source.
•
protect exterior surfaces.
Note:
During periods of extended inactivity or when transporting:
•Turn Control Knob OFF.
•Disconnect LP source and move to a secure, well-ventilated location outdoors.
•
protect exterior surfaces.
•Never leave LP cylinder exposed to direct sunlight or excessive heat.
Note:
Service
Troubleshooting
WARNING
FOR YOUR SAFETY
minutes after use.
Fire table is hot to the touch.
PROBLEM POSSIBLE CAUSE CORRECTIVE ACTION
Burner won’t light Propane cylinder is empty Replace propane cylinder
Clear blockage
Control knob is not in ON position Turn control knob to ON
Gas pressure is low
Outdoor temperature is less than 40°F Use a full cylinder
Control knob is fully on
Carbon build-up Clean burner
Thick black smoke Blockage in burner Remove blockage and clean burner inside & outside
1-877-387-3639 | Page 18
Storage
1
2
3
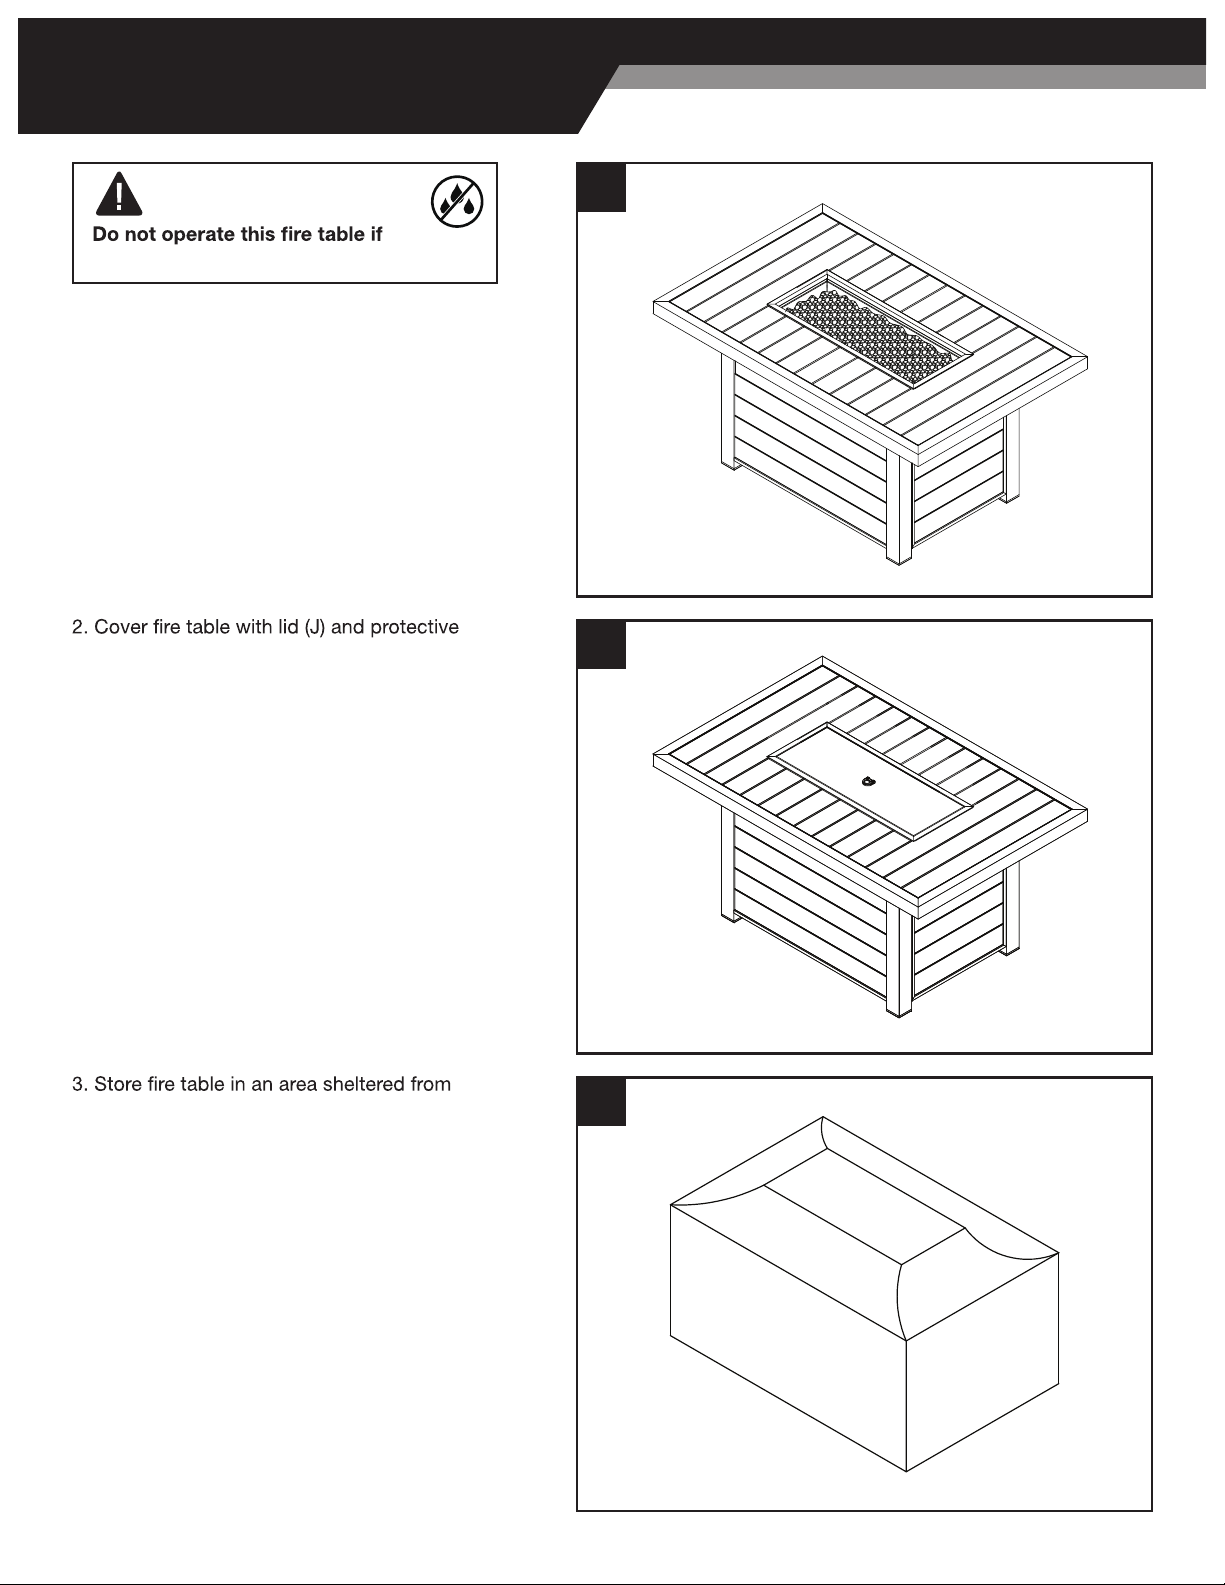
cover (I) to prevent water from accumulating
in the Firebowl Pan and to protect exterior
surfaces.
direct contact with inclement weather (such as
rain, sleet, hail, snow, dust and debris).
CAUTION
Firebowl Pan and Flame Glass are wet!
Page 19
JAY TRENDS SALES LIMITED ONE (1) YEAR WARRANTY
one (1) year from the date of purchase.
Conditions and Limitations
Jay Trends warrants its products against manufacturing defects to the original purchaser only, and is subject to the
following conditions and limitations:
This factory warranty is non-transferable and may not be extended what-so-ever by any of our representatives.
The product must be assembled, maintained, and operated in accordance with the printed instructions accompanying it.
environments, accident, alterations, abuse or neglect and parts installed from other manufacturers will nullify this
warranty. Discoloration to plastic parts from chemical cleaners or UV exposure is not covered by this warranty.
Any damages to the product due to weather damage, hail, rough handling, damaging chemicals or cleaners will not be
the responsibility of Jay Trends.
and chemical cleaners, nor chipping on porcelain enamel parts, nor any components used in the installation of the
product.
Should deterioration of parts occur to the degree of non-performance (rusted through or burnt through) within the
duration of the warranted coverage, a replacement part will be provided.
The bill of sale or copy will be required when making any warranty claims from Jay Trends.
All parts replaced under the Limited One (1) Year Warranty Policy are subject to a single claim.
Jay Trends will not be responsible for the installation, labor, or any other costs related to the re-installation of a warranted
part, and such expenses are not covered by this warranty.
Jay Trends reserves the right to have its representative inspect any product or part prior to honoring any warranty claim.
Jay Trends shall not be liable for any transportation charges, labor costs, or export duties.
Replacement Parts
In the event that an item has been lost or damaged either by the manufacturer or in shipping you may request a
replacement. Replacement parts are not available for all units and only given at Jay Trends’ discretion. We will assess
available for discontinued items or repackaged (open box) products. Please call Jay Trends Customer Service at 1-877-
387-3639 for replacement parts before returning the damaged item. Please have the following information, which can be
found in your instruction manual, ready before you call Customer Service.
1. Model Number of Item #
2. Lot Code Number #
3. Shipping Address
4. A picture of the damaged item may be requested.
Limited Warranty
1-877-387-3639 | Page 20
Jay Trends Sales
1901 Aut. Transcanadienne
Dorval, QC H9P 1J1, Canada
Customer Service: 1-877-387-3639 in USA & Canada
© 2020 Sunbeam Products, Inc. All rights reserved. Distributed by Jay Trends Sales, Dorval, Canada H9P 1J1.
Table of contents
Other Sunbeam Outdoor Fireplace manuals


Popular Outdoor Fireplace manuals by other brands


Vermont Castings
Vermont Castings 085-1589-2 user manual

BCP
BCP SKY5672 instruction manual

Zhejiang Yayi
Zhejiang Yayi GFT-10081E Assembly instructions

PYROMANIA
PYROMANIA ALCHEMY Feature manual

Lennox Hearth Products
Lennox Hearth Products ELITE E36ODGNE installation instructions

MODENO
MODENO York Fire Bowl OFG115 owner's manual