Charmate CM140-072 User manual

FOR OUTDOOR USE ONLY
DO NOT OPERATE THIS APPLIANCE BEFORE READING THE INSTRUCTION BOOKLET
DO NOT PLACE ARTICLES ON OR AGAINST THIS APPLIANCE
DO NOT STORE CHEMICALS OR FLAMMABLE MATERIALS OR SPRAY AEROSOLS NEAR THIS APPLIANCE
DO NOT OPERATE THE APPLIANCE INDOORS
DO NOT OPERATE IN AN ENCLOSED AREA
ACCESSIBLE PARTS MAY BE VERY HOT. KEEP YOUNG CHILDREN AWAY.
Minimum clearance from combustible materials: 3 metres
Cast Stone Fire Pit
Retain these instructions for future use.
Important: The installer or seller must leave these instructions with the consumer.
4766-05/17
Model No. CM140-072

2
• Only use this Fire Pit on a hard, level, non-combustible, stable surface (concrete, ground etc.) capable of
supporting the weight of the Fire Pit. Never use on wooden or other surfaces that could burn.
• Proper clearance of 3m between the Fire Pit and combustible material (bushes, trees, wooden decks, fences,
buildings, etc.) or other combustible construction should be maintained at all times when Fire Pit is in use. Do not
place Fire Pit under a roof overhang or other enclosed area. Not adhering to these clearances will prevent proper
ventilationandmayincreasetheriskofareand/orpropertydamage,whichcouldalsoresultinpersonalinjury.
• For outdoor use only. Do not operate Fire Pit indoors or in an enclosed area.
• For household use only. Do not use this Fire Pit for other than its intended purpose.
• Do not use gasoline, kerosene or alcohol for lighting the Fire Pit. Use of any of these or similar products could
causeanexplosionpossiblyleadingtoseverebodilyinjury.
• Place Fire Pit in an area where children and pets cannot come into contact with unit. Close supervision is
necessary when Fire Pit is in use.
• Do not leave Fire Pit unattended when in use.
• DonotstoreoruseFirePitneargasolineorotherammableliquids,gasesorwhereammablevaporsmaybe
present.
• Use caution when assembling and operating your Fire Pit to avoid scrapes or cuts from sharp edges of metal parts.
Use caution when reaching into or under Fire Pit.
• In windy weather, place Fire Pit in an outdoor area that is protected from the wind.
• Never leave ashes in Fire Pit unattended. Before Fire Pit can be left unattended, remaining ashes must be
removed from Fire Pit. Use caution to protect yourself and property. Carefully place remaining ashes in a
non-combustible metal container and saturate completely with water. Allow ashes and water to remain in metal
container 24 hours prior to disposing.
• Extinguished ashes should be placed a safe distance from all structures and combustible materials.
• With a garden hose, completely wet the surface beneath and around Fire Pit to extinguish any ashes which may
have fallen during use.
• Aftereachuse,cleantheFirePitthoroughly.DonotallowtheFirePittollwithrainwater.CovertheFirePit
to protect it from the elements.
• UsecautionwhenliftingormovingFirePittopreventstrainsandbackinjuries.
• Weadvisethatareextinguisherbeonhand.Refertoyourlocalauthoritytodeterminepropersizeandtypeofre
extinguisher.
• Store the Fire Pit out of reach of children and in a dry location when not in use.
• Although frost resistant, we strongly recommend storing your Fire Pit inside during winter.
• Properly dispose of all packaging material.
• Only use dry wood so you can achieve maximum warmth from your Fire Pit.
Greenwoodwillleadtoasmokycoldre.
• Donotstackover-sizedpiecesofwoodintheFirePit.DonotloadFirePitabovethesolidbaseareaoftheFirePit.
Itisnotafurnaceandroaringresarenotrecommended.
• Do not burn treated or painted wood as this may release toxins harmful to you and the environment.
IMPORTANT SAFETY WARNINGS
READ ALL SAFETY WARNINGS AND INSTRUCTIONS CAREFULLY
BEFORE ASSEMBLING AND OPERATING YOUR FIRE PIT.
WARNING
USE CAUTION AND COMMON SENSE WHEN OPERATING YOUR FIRE PIT.
FAILURE TO ADHERE TO SAFETY WARNING AND GUIDELINES IN THIS MANUAL COULD
RESULT IN BODILY INJURY OR PROPERTY DAMAGE.
SAVE THIS MANUAL FOR FUTURE REFERENCE.
3
Assembly Instructions
For Easiest Assembly:
• To avoid losing any small components or hardware,
assemble your product on a hard level surface that
does not have cracks or openings. You may wish to
lay down a blanket or similar, to avoid possible
damagetothenishduringassembly.
• Clear an area large enough to layout all components
and hardware.
• Great care has been taken during production to
remove sharp edges but you should handle all
componentswithcaretoavoidinjury.
• Check you have all components before beginning.
• When applicable, tighten all hardware connections by
handrst.Oncethestepiscompletedgobackand
fully tighten all hardware.
• Follow all steps in order to properly assemble your
product.
Typical assembly: approximately ½ hour.
Tools required:
• AdjustableSpannerorSocketWrench
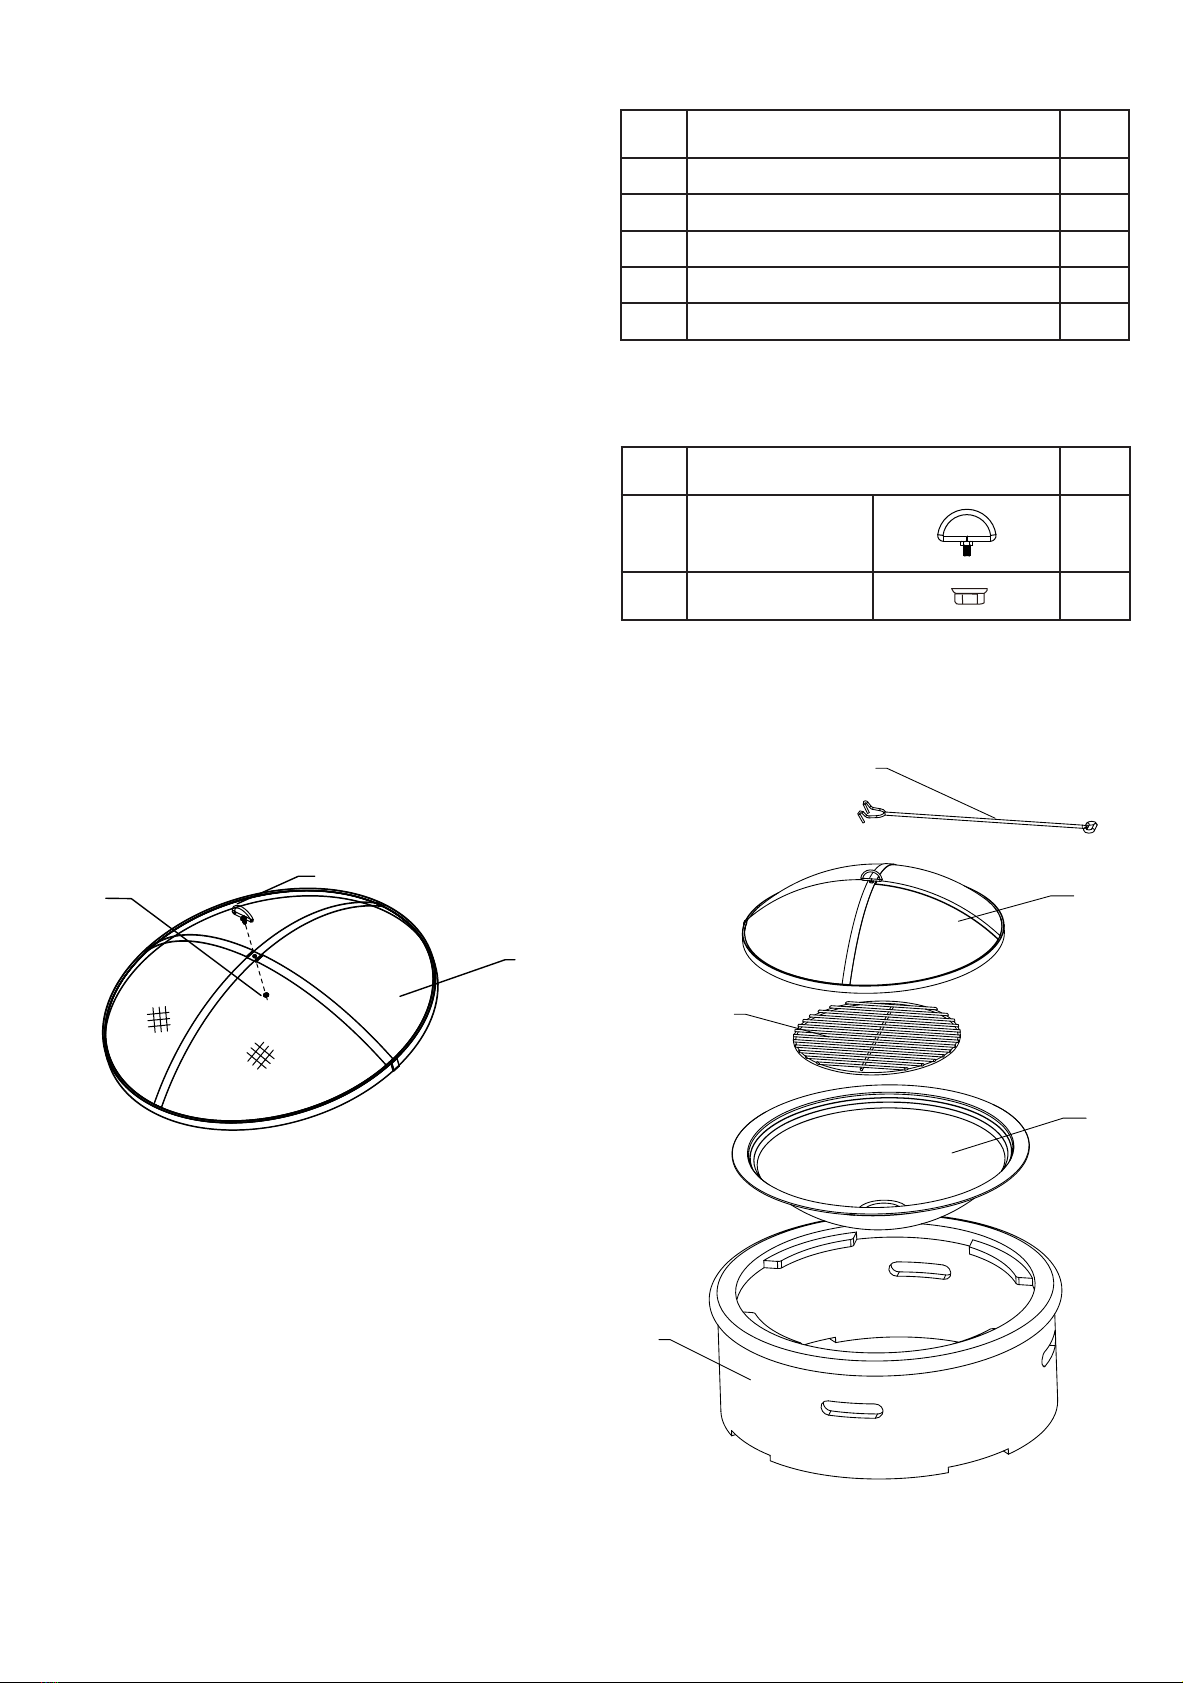
Step 1
AttachtheM6RingScrew(F)tothemeshscreen(D)
using one M6 Nut (G) as shown in Fig. 1.
Step 2
Place all parts on the Cast Stone Base as shown in
Exploded View.
G
D
F
C
B
A
D
E
Part Description Qty
A Cast Stone Base 1
B Fire Bowl 1
C Charcoal Grid 1
D Mesh Screen 1
E Screen Hook 1
Parts List
Exploded View
C
B
A
D
E
Part Description Qty
FM6RingScrew 1
G M6 Nut 1
Hardware List
Fig. 1.

4
Operating Instructions
This Fire Pit is designed for use only with wood.
Beforerstusemakesurealllabels,packagingand
protectivelmshavebeenremovedfromtheFirePit.
Lighting
The secret to lighting the Fire Pit successfully is good
preparationofthereandusingdryfuel.
1. Begin with a base of single sheets of dry newspaper
formedintostsizedballs.Placetheseintothebase
of the Fire Pit.
2. Get dry kindling about matchstick thickness. It is
important they are dry - manuka twigs are ideal.
Place this kindling on top of the newspaper taking
care not to crush the paper down as this will reduce
theairgapandstarvethereofoxygen.
3. On top of the match stick thick kindling add two good
handfuls of sticks about pencil thickness.
4. Finally have to hand a good supply of dry wood about
thumb thickness. Keep this to one side for now.
5. Now place a match or lighter to the dry paper at the
base of Fire Pit. You can light it in a couple of
places.Thevolumeofsmokeandamewillincrease
as the paper catches the match stick thick twigs
alight and in turn this lights the pencil thick twigs.
6. Whentheamesappearthroughthetopofthe
loaded Fire Pit fuel then you can add the thumb
thick wood with care, a few pieces at a time, to build
up the fuel supply in the Fire Pit. Once a good
ember bed is established thicker wood can be added.
Note: Split wood generally burns better than round
wood. All wood should be dry. Burning green wood will
leadtoasmoky‘cold’re.Donotburnplasticasitgives
off harmful smoke for both you and the environment.
Extinguishing
• Allowretoburnitselfoutanddon’tleaveuntilthe
reisfullyextinguished.
• DO NOT use water to extinguish as this is dangerous
and can cause damage to this outdoor Fire Pit.
• Ifyoumustleavebeforethereburnsitselfout,
smothertherewithabucketofsandtoextinguish.
Checkthereisfullyextinguishedbeforeleaving.
Cleaning and Care
CAUTION: All cleaning and maintenance should be done
when Fire Pit is cool and with the fuel supply removed.
Check the Fire Pit regularly to ensure it is safe to use. If
there is any sign of damage DO NOT use until repairs are
made.
Abrasive cleaners will damage this product. Never use
oven cleaner to clean any part of Fire Pit.
1. Wipe surfaces clean with mild dishwashing detergent
or baking soda.
2. For stubborn surfaces use a citrus based degreaser
and a nylon scrubbing brush.
3. Rinsecleanwithwater.
When not in use store in a dry location, and if possible
cover the Fire Pit to protect it from the elements.
ItisquitenormalfortheFirePittodevelopanagedlook
afterseveralres.Overtimeitmaydevelopsurface
rust, which is normal and due to natural weathering,
particularly if it is left outdoors uncovered.
Charmate® is a registered trademark of: Sitro Group Australia Pty Ltd. www.gasmate.com.au
Aber, Hamilton, N.Z. www.charmate.co.nz
Other Charmate Outdoor Fireplace manuals


Popular Outdoor Fireplace manuals by other brands


The Fireplace
The Fireplace JETMASTER 700 D installation instructions

Superior
Superior VRE4543EN Installation and operation instructions

Napoleon
Napoleon PATIOFLAME GPFN Installation and operation instructions

Endless Summer
Endless Summer Dakota GAD19101ES owner's manual

Vermont Castings
Vermont Castings ODGSR36A Homeowner's installation and operating manual

FEUERHAND
FEUERHAND PYRON user manual