User Manual
Wi-Fi Wireless Storage
Content
1. Introduction
2. Specification and system requirement
3. Matters need attention
4. App software download and installation
5. How to use
6. Operation I (IOS System)
7. Operation II (Android System)
8. Accessories
Product model: I-Bank
Memory Card Type : Micro SD (TF) Card
Maximum support: up to 128G
Rate: Class 10 and above
Wi-Fi Standard: IEEE 802.11b /g /n
Wi-Fi wireless encryption : WPA2
Input voltage:DC5V / 500mA
Charging time:1-2 Hours
Play time: Up to 6 Hours
Operating temperature: 0-60℃
IOS System: Above IOS5.1.1
Android System: Above Android 3.0
(1)The Micro SD/TF card must be inserted to this device for using.
(2)You need download App(WiFi U-driver) to your cellphone or IPAD
before using.
(3)The phones and tablets can’t be connected via Bluetooth at the
same time when connecting this device.
(4)The switch must be ON when using this device.
(5)The Micro USB data cable of accessories is with the function of
reading data. This device can be used to upload or download files
when connecting computer via it.
(6)When first the phone (tablet) is connecting to this device and
entered into the WiFi Internet connection mode,the second
phone(tablet) need to connect the WiFi of the first phone(tablet) for
proper using.
App Name : WiFi U-driver
4.1 IOS App Installation:
①Search for "WiFi U-driver" from App store to download and install
②Scan below Quick Response code
4.2 Android App:
①Search for "WiFi U-driver" from Google Play / Android Market to
download and install
②Scan below Quick Response code
5.1 Connect to the PC
Inserted the micro SD/ TF card to the WiFi U-Drive and turned on the
switch, using the Micro USB data cable of accessory connecting to the
PC,the led light is red.
This device can be used as a Flash Drive, with the function of reading,
uploading,downloading data.
5.2 Connect to the cellphone/IPAD
-Inserting a micro SD/ TF card have stored files to this device.
-Turning ON the switch,the led indicator is blue.
-Start the WiFi of your phone or tablet, search the device name “BOX
one”of the WiFi list,click on, Password”99999999”.
- It will auto connected after first connecting completed.
-Note:WIFI signal strength depends on the environment and the
distance you are using with the device.
This use an iPhone 6 as example:
(1)Turn on the switch ,your phone wifi connected “BOX one”.
Select to enter the App.
(2)Home Page
Click on to see the Wireless Storage folder
Click on to see the local drive
Click on Setting
Note: You can only use local folders feature in the App.Without successful
connect to this device in the WiFi list.
(3)Wireless Storage Folder Page
Click on to browse photo, music ,video and documents that you
stored earlier in the Micro SD (TF) card.
Click on to see Photos files
Click on to see Music files
Click on to see video files
Click on to see other files in Micro SD (TF) card, for e.g. xls, doc,
ppt, pdf, txt, zip, rtf
(4)Download photo to the mobile(Download Music/Video is in keep with the same way)
Click on to browse your Wireless Storage files. Then click on
to view your photos list in it.
Click on any photo,it will display the entire photo.
Click the Return to return last page.
Click on to enter the photo editing
Click on to select all photos
Click on to delete the photo that you selected
Click on to download the photo to the cellphone
Note(Video Play):
-For higher resolution or big file, we suggest you download to the local
phone storage and then play.
-Please check if the video format is supported by your native player.
- For a smooth playing please reduce the compression rate on the
setting,if video cannot be played smoothly.
(5)Upload Photo to the Wireless Storage Folder
a.a.Upload by choose :Click on to enter file folder in the phone, click
on “Camera Roll BackUp”,Select the photo , it will changed be grey after
you choose, click on “Complete” ,it will be upload to the Wireless
Storage Folder.
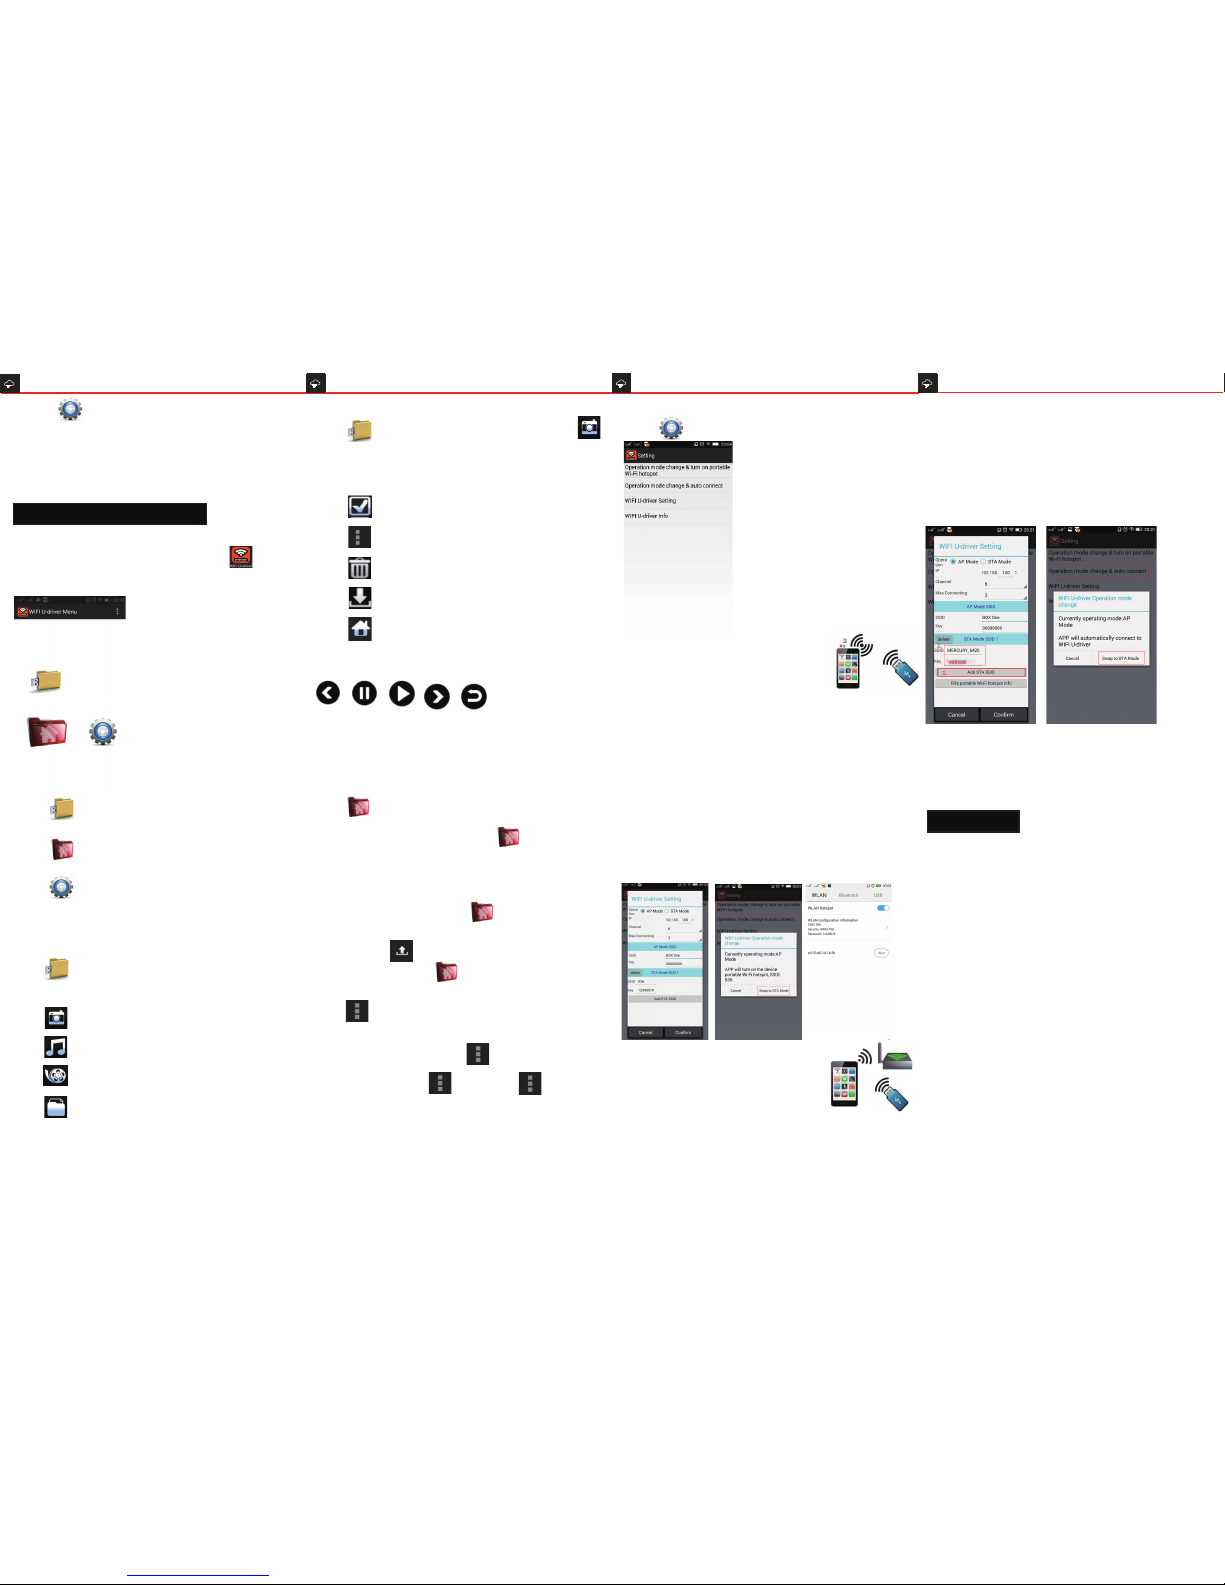
(6)Setting Mode:
(7)Wifi Internet Connection Mode
-Connect your cellphone to the Wireless Storage via the build-in WiFi of
this device.
-Click on Settings, and then select Operation mode change.
-Input your SSID and Key and then click on “change to STA”. It will show
“Operating mode set! Please restart program to take effect” click on
“Confirm”.
-WIFI hotspots will enter automatically match state , then this device
operating point goes out after 5 seconds, The blue light kept flashing until
longer light up indicating successful pairing.
Once successful pairing, so phones can both share information and can
continue to access, correct and timely information.
Note: When using a wireless extranet mode, other handsets to connect
Wireless Storage, it must first connect to external networks for proper use .
1.Introduction
Wireless Storage is a device to resolve the
issue of the mobile phone and tablet storage
capacity is insufficient. It is a wireless device
that uses the micro SD (TF) card. This device build in wifi protocol
and has following advantage:
-support multiplayer online sending and sharing each other
-Fast upload and download by wireless, easy and convenient.
-Support audio and video playback, photo browsing.
-Compatible with Excel, Pdf, Doc and many other file formats.
-Compatible with IOS and Android System.
2.Specification and system requirement
3. Matters need Attention:
4. App software Download and Installation:
5.How to use
6.Operation I (IOS System) :
Click on to enter setting
b.Backup all photos: Click on to enter setting. Click on “Camera
Roll BackUp”, all photo in your phone will be upload the Wireless
Storage Folder.
NOTE: If you could not find any photos and
videos after click on to enter the mobile
storage. Make sure there are photos and videos
in the phone storage. It that still not be able to
see photos, check the privacy setting to enable
the photo Wifi U-driver.