Sunstech TLXRI2485HD User manual

User Manual
ENGLISH
TLXRI2485HD

Dear Customers,
May we take this opportunity to thank you for purchasing this LCD TV. We strongly recommend
that you read the safety and operation instructions throughly before operating your LCD TV.
on your LCD TV and in this manual.FOLLOW ALL INSTRUCTIONS AND WARNINGS
TABLE OF CONTENTS
IMPORTANT SAFETY INSTRUCTIONS 2
PACKAGE CONTENTS 4
CONTROL BUTTONS AND TERMINALS
FRONT PANEL
REAR PANEL
REMOTE CONTROLLER
5
5
6
7
BASIC CONNECTIONS
BATTERY INSTALLATION
9
9
BASIC OPERATION
SWITCHING THE LCD TV ON/OFF
ADJUSTING THE VOLUME
USING MUTE
SELECTING INPUT SOURCE
CHOOSINGATV CHANNEL
10
10
10
10
10
11
USING THE MENUS
CHANNEL SETUP
PICTURE SETUP
SOUND SETUP
TIME SETUP
OPTION SETUP
12
12
15
17
17
18
LOCK SETUP 19
TELETEXT FUNCTION 20
SUPPORTED OPERATING MODES 30
TROUBLESHOOTING 31
SPECIFICATIONS 33
USB FUNCTION
PLAY PHOTO
PLAY MUSIC
PLAY MOVIE
21
21
21
22
SELECTING TV SOUND 11
1
24
23
ABOUT THE DISC
DVD BASIC PLAYBACK
27
DVD SYSTEM SETUP

IMPORTANT SAFETY INSTRUCTIONS
Read this Manual
.
Keep this manual
.
Observe all warnings
.
Follow all instructions
.
Do not insert liquids or objects
.
,,
.
.
,, , .
,
.
Be particularly careful if there are children present near the unit
,,
.
.
Ensure that the unit is stable
,
.
Read this manual throughly before operating the unit
Keep this manual for future reference
All warnings on the product and in the manual must be observed closely
All operating instructions in the manual must be followed
Inserting l quids or objects into the unit could result in fire or an electrical shock If liquids or objects
should enter the LCD TV immediately turn off the power switch disconnect the power plug from the
AC outlet and contact qualified service personnel
Please ensure that children do not hang on the LCD TV.
● Do not place the LCD TV near a bathtub, sink or swimming pool, in the bathroom, a wet basement
or similar.
● Do not expose the LCD TV to rain or moisture
● Do not place flower vases, pots cups cosmetics liquids such as water, etc on or around the LCD TV
● Do not place metals, combustibles etc on or around the LCD TV.
● Do not drip or splash liquid of any kind on the LCD TV
●
If the LCD TV should be dropped and/or broken it could result in an injury and continued use could
result in fire or electrical shock
If the glass panel is broken or damaged, immediately turn off the power switch, disconnect the power
plug from the AC power outlet and contact qualified service personnel
● If the LCD TV is mounted on a wall, please ensure that it is fastened securely.
● Do not place the LCD TV on a bed, sofa, rug or similar surface. Do not place the LCD TV on an un-
stable cart, stand, or table. The LCD TV may fall causing serious damage to the LCD TV and/or
may seriously injury someone
● When the product is on a trolley, it should be moved with caution. Avoid quick stops, and moving
the unit across uneven surfaces that may cause the product and trolley to overturn.
i
Do not subject the LCD TV to any shocks or impact
This symbol indicates
“dangerous voltage”
inside the product that
presents a risk of electric
shock or personal injury.
This symbol indicates
important instructions
accompanying the
product.
RISK OF ELECTRIC
SHOCK DO NOT
OPEN
CAUTION
TO REDUCE THE RISK OF
ELECTRIC SHOCK DO NOT
REMOVE COVER NO
USER-SERVICEABLE
PARTS INSIDE. REFER
SERVICING TO QUALIFIED
SERVICE PERSONNEL.
.
2

.
.
.
.
.
Do not block any ventilation openings
Avoid high temperature environments
Avoid oils
Power cord protection
Handling and cleaning the screen surface of display unit
Cleaning the cabinet
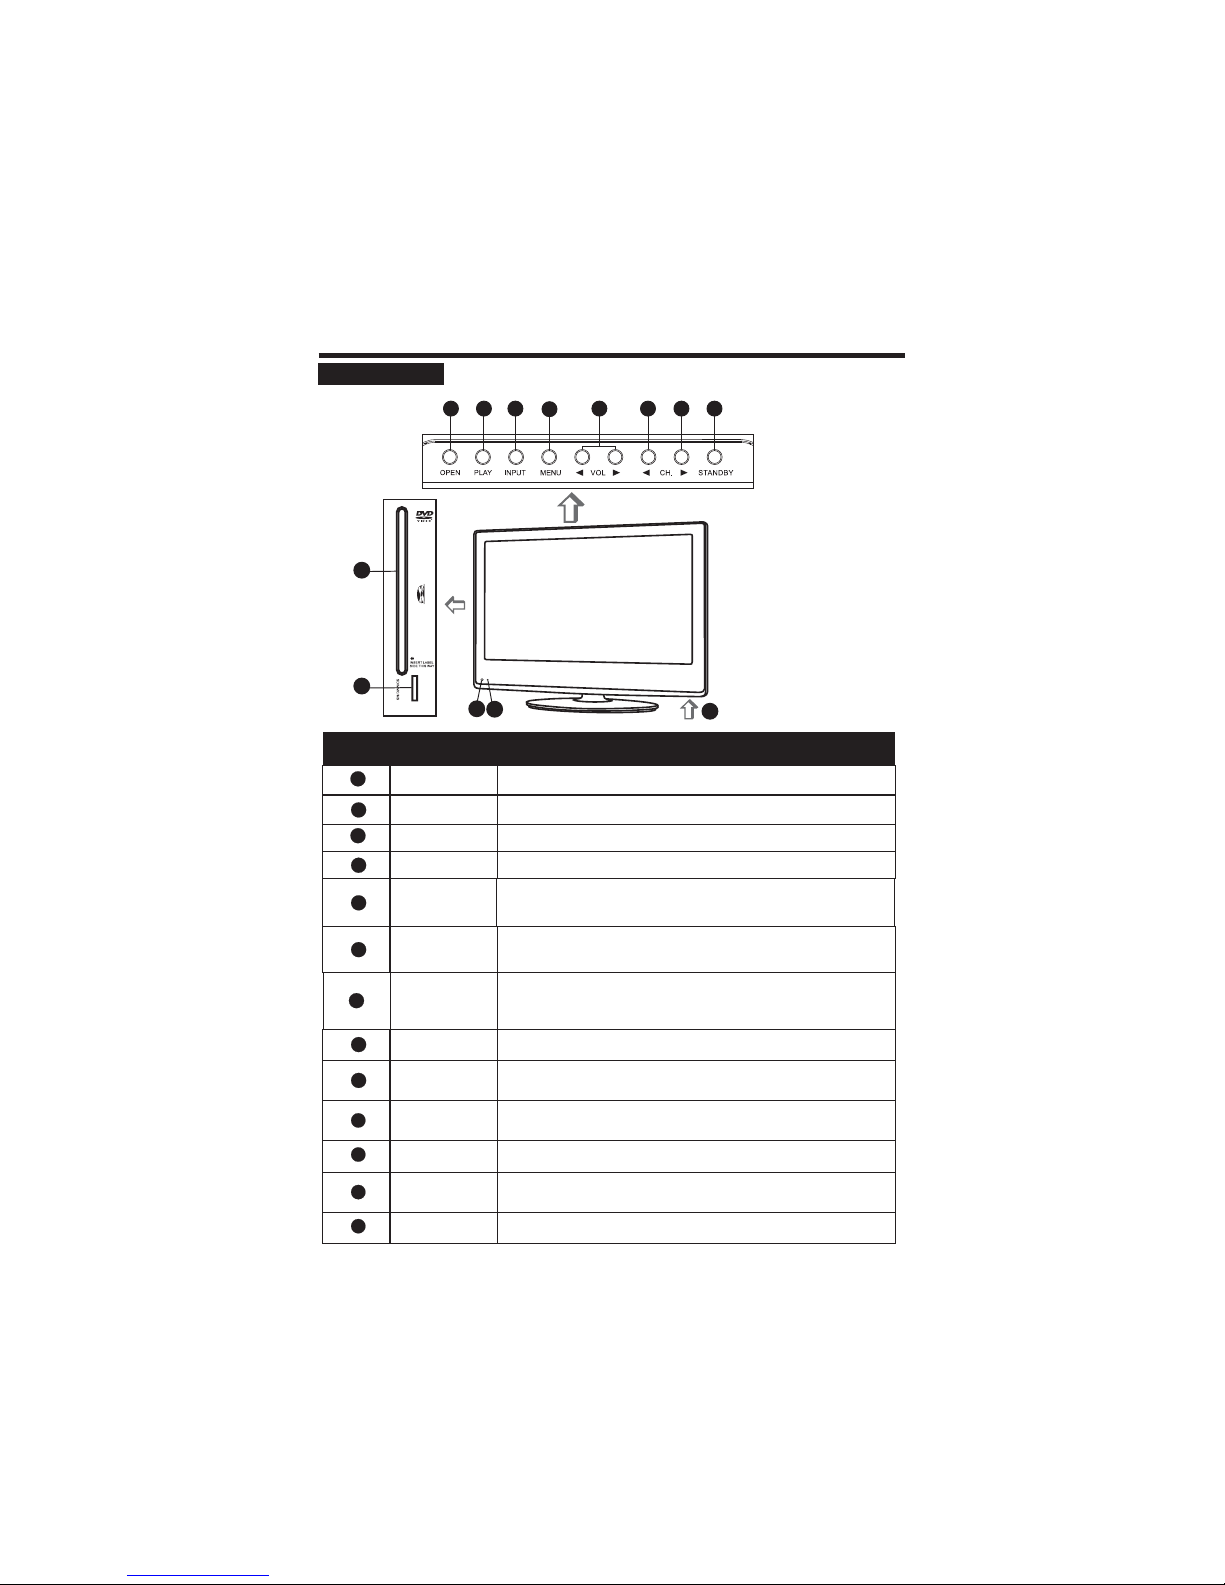
●
●
●
●
●
●
●
●T
●
●
●
●
●
●
●
●
●
●
●
●
●
●
●
●
●
●
●
The vents and other openings in the cabinet are designed to let hot air escape from the LCD TV.
Do not cover or block these vent and openings since insufficient ventilation can cause over-
heating. Do not place the LCD TV on a bed, sofa, rug or other similar surface, since this can block
ventilation openings, causing the TV to overheat, which may result in fire.
Do not cover the LCD TV with cloth, such as curtains, or items such as newspaper, etc.
This unit is not designed for built-in installation, do not place the product in an enclosed place such
as a bookcase or rack, unless proper ventilation is provided or the manufacturer’s instructions are
followed.
The heat may adversely affect the LCD TV and other parts, and could result in serious overheating or risk
of fire.
Do not place the LCD TV, the remote control and other parts in direct sunlight or near a hot object
such as heater, etc.
Do not place the LCD TV in a place where the temperature varies widely.
Do not place the TV near a kitchen or a cooking appliance. Dust saturated with oil may enter into the unit
and damage it.
Incorrect connection of the power cord could result in fire or electrical shock
Do not connect too many appliances to the same mains socket as this could result in fire or electrical
shock
The apparatus must be connected to a mains socket outlet with a protective earthing connection.
he socket outlet for connecting mains plug must be easily accessible and remain readily operable.
Do not overload wall outlet as this can result in fire or electrical shock.
Check that the connecting portion of the AC power cord is clean (with no dust), before using. Use a
soft and dry cloth to clean the power plug.
The AC power cord should be routed so that it is not likely to be walked on or pinched by items
placed upon or against it. Also do not put any heavy objects on the AC power cord
Do not touch the AC power cord with a wet hand
Pull out the AC power cord by the plug. Do not pull on the power cord
Insert the power plug into a power outlet firmly. Avoid using a loose, or damaged outlet.
Do not pinch, bend, or twist the cable excessively. The core lines may be bared or cut, causing a
short circuit which may induce fire or electrical shock
For your own safety, do not touch any part of the unit, power cord or aerial lead during lightning
storms
Do not modify the AC power cord
Disconnect the power cord if the LCD TV is not used for a long time.
Switch off and withdraw the power plug before making or changing connections.
To avoid screen degradation, follow the points mentioned below. Do not push on the screen or scratch
it with hard objects, or throw anything at the screen. The screen may be damaged.
Be sure to unplug the power cord from outlet before cleaning.
Do not push on the surface of the screen or scratch it with hard objects, as this may damage it.
We recommend that the screen surface is touched as little as possible.
To remove dust from the screen surface, wipe gently with a clean, soft and cotton-free dry cloth.
Do not use any type of abrasive pad, alkaline/acid cleaner or strong solvent such as alcohol, thinner
or benzene etc, as this may damage the surface.
Be sure to unplug the power cord from the outlet before cleaning.
Clean the cabinet with a soft cloth.
Note that material deterioration or screen coating degradation may occur if the display unit is ex-
posed to a volatile solvent, such as alcohol, thinner, benzine or insecticide, or if prolonged contact
is maintained with rubber or vinyl materials.
s
.
.
.
-
IMPORTANT SAFETY INSTRUCTIONS
3

Carrying and moving
Servicing
TROUBLESHOOTING
Replacement parts
Other notices
●
●
●
●
●
●
●
●
●
●
●
●
●
●
●
Be sure to always carry the LCD TV by two people holding it with two hands, one hand on each side
of the LCD TV. If you carry the unit in a manner other than that specified, it may drop and a serious
injury may be caused.
Do not open the cabinet or remove the rear cover of the unit. If any of the following conditions occurs,
unplug the AC power cord from the AC outlet, and contact qualified service personnel.
When the power cord or plug is damaged.
When the LCD panel is damaged.
When liquid is spilled on the unit or when objects have fallen into the unit.
When the unit has been exposed to rain or water.
If the unit has been dropped or the cabinet has been damaged in any way.
If the unit does not work properly even after you have referred to the section.
If the unit needs replacement parts, make sure that the service personnel use replacement
parts specified by the manufacturer, or those with the same characteristics and performance as the
original parts. The use of non-compliant parts can result in malfunction, fire, an electrical shock and/
or other accidents.
Upon completion of service or repair work, request the service technician to perform safety checks
to ensure that the unit is in proper operating condition.
Sometimes, the image may have some tiny red, green, blue, white or black spots. This is normal
and does not affect the performance of the LCD TV.
The advanced technology of this LCD TV gives you detailed pictures. Occasionally, a few non-
active pixels may appear on the screen as a fixed point of blue, green, or red. Please note that this
does not affect the performance of your LCD TV.
If the unit is used in a cold place, a smear may occur in the picture or the picture may become dark.
This does not indicate a failure. These phenomena improve as the temperature rises.
In some cases, residual images may remain after the short-term display of still images is displayed.
These will disappear in a few minutes, and the display will return to normal. However, if the unit is
used in high temperatures, it sometimes takes ten minutes or more to return to normal. Please note
that this is not a malfunction.
LCD panels are made of finely processed glass, so please avoid pushing the panel with your hands
or subjecting it to a strong impact.
Do not use immediately after moving from a low temperature to a high temperature environment,
as this causes condensation, which may result in fire, electrical shock or other danger.
IMPORTANT SAFETY INSTRUCTIONS
4
PACKAGE CONTENTS
Your LCD TV package includes:
Note:
1. LCD TV Display
2. Remote Control
3. Power Cord
4. Operation Manual
Your product may also include various other accessories depending on region of purchase.

FRONT PANEL
CONTROL BUTTONS AND TERMINALS
Select a input sources.
To eject the disc.
When you are watching the TV program, press this button to
decrease channel number.
6
Increase or decrease the volume
Adjust the values of the selected menu item in the OSD menu.
.
5
Button Name Description
Item
Power Indicator
Remote Sensor
Switch on the LCD TV when at standby mode or vice versa.
Illuminates red in standby mode
Illuminates green when the LCD TV is switched on
.
.
Infrared sensor for the remote control.
9
10
8
INPUT
3
MENU
4Enter or exit from the menu.
11
When you are watching the TV program, press this button to
increase channel number.
In the main-menu, press to select lower menu item.
7
STANDBY
VOL tu/
CH. ◄
CH. ►
OPEN
1
PLAY
2Press to play the disc.
12
13
10
9
4
8
123
11
56 7
Main Power Switch Turn on /off the power.
12
13
5
DVD window
Memory card port Connect the memory card.
Insert and exit the disc place.

REAR PANEL
CONTROL BUTTONS AND TERMINALS
6
HDMI IN Pb PrY
VIDEO L R
LINE INVGA IN
HDMI IN: Connect to the HDMI socket of a DVD player or other HD ready equipment.
2
5SCART: Connect your AV system using a SCART lead.
6PCMCIA CARD SLOT: This function allows you to watch some pay services. If you remove the CI
(common interface) module, you can't watch the pay services. When you insert the module into the
card slot, you can access the module menu. To buy a module and smart card, contact your dealer.
Avoid regularly removing and inserting the CI module. When the LCD TV is turned on after inserting
the CI module, you often won't be able to hear the sound and there may be problems with the picture.
This function may not be available, depending on the country you are in. Contact your dealer for
further advice.
8Video input: Connect to theAV output of a DVD player or other equipment.
LINE IN: Connect to the audio output of the PC.
4
3VGAIN: Connect to 15-pin analog output connector of the PC using a VGAcable.
7Coaxial Out: Connect to the coaxial input of your amplifier.
11
RF Input Socket: Connect antenna or cable 75 ohm coaxial to receive TV signal.
9YPbPr component video inputs: Connect to the YPbPr component output of a DVD player or
other equipment.
10
Audio-in: Connect to the audio output of a DVD player or other equipment withAV/YPBPR mode.
SCART
CI IN
12
Headphone Jack: connect to your headphone.
USB IN
USB IN: Connect to USB.
1
COAXIAL OUT
AC IN
13
AC Input Socket: Connect toAC outlet with the power cable .

REMOTE CONTROLLER
CONTROL BUTTONS AND TERMINALS
7
1. To switch on the LCD TV when at standby
mode and vice versa.
2.
5.
.
STANDBY
NICAM/EJECT
TV
.
.
.
.
.
0.
NUMBER BUTTONS
-MENU
INDEX /
EPG/PROGRAM
To s
To directly select program number
7
To enter the TV menu, or exit from the TV menu
11. Teletext text.
15 Teletext index button. Go to index.
In /DVD mode, press to select the anterior chapter or song
17
/DVD select backwards play
2In DTV mode, press to show the Electronic Program Guide menu.
elect nicam mode
In DVD mode, press to eject the disc.
.
TV/Teletext select.
In mode, press to
TEXT/AUDIO
.
3.
To display setup information of channel
4. To set the sleep timer.
6This is a hot button for displaying the favourite list
defined by yourself.
8. To select a input signal.
9. InATV mode, used the program edit and teletext function.
10.In ATV/DTV mode, used the program edit and teletext function.
In Media Player DVD mode, select epeat mode.
12 In DTV mode, press toselect TV or Radio mode
13. To select the picture mode.
14 To select a sound mode.
Media Player
16 Teletext reveal button. Reveal any hidden text.
In Media Player/DVD mode, press to play or pause movies and music.
Media Player
18.Teletext hold.
In DTV mode, to display PVR Recorded Channel List menu.
Note: the recorded program play must in DTV mode.
19.In DTV mode, press to record.
In DVD mode, press to select slow play mode.
DISPLAY
SLEEP
FAV
SOURCE
GREEN button/ZOOM
RED button / REPEAT
/MENU
PMODE
SMODE
REVEAL /
REC/SLOW
.
.
.
.
.
In DVD mode, press to large the picture for view.
In DVDmode, press to select audio mode.
In DVDmode, press to display the title menu.
Hold or carry on.
In DVD mode, press to select A-B mode.
In DVDmode, press to enter the edit window.
/r
TV/RADIO
REC.LIST/HOLD/A-B
.
STANDBY
DISPLAY
NICAM/EJECT MUTE
SLEEP ASPECT
FAV
TV MENU- SOURCE DVD SETUP-
REPEAT ZOOM ANGLE GOTO
EXIT
VOL-
VOL+
CH-
CH+
MENU
INDEX REVEAL SUBPAGE
TV RADIO/
SIZE
HOLD/A B
REC LIST
-
./SLOWREC TIME SHIFT
SUBTITLE
PROGRAM TITLE
EPG
AUDIO
TEXT
PMODE
INFO
ENTER
SMODE
3
2
1
4
5
6
7
8
9
10
11
12
13
14
15
16
17
18
19
20

CONTROL BUTTONS AND TERMINALS
8
21.
.
23.
30.
MUTE
RETURN
DVD-SETUP
CH-/+ PROGRAM UP DOWN
TIME SHIFT
.
/)
.
To switch the sound on or off
22
To select a display mode.
To return to previously selected program number inTV mode
24.
To enter or exit from the DVD menu in DVD mode.
(
To select the program in ascending or descending order
34.
In DTV mode, press to execute the time shift function.
ASPECT
.
25.
To adjust menu settings
To select a menu item
C
26
In DVD mode, select different angle to view
InATV/DTV mode, used the program edit and teletext function.
27.
In mode, press to the section you like.
InATV/DTV mode, used the program edit and teletext function.
28.
To exit the current menu.
29. (
To increase or decrease the volume
31.
Teletext sub page. Come into subpage, and again to cancel.
In Media Player/DVD mode, for select the next chapter or song
32.
Teletext size selection, Double height rendering.
In Media Player/DVD mode, press to stop the play
33.
In Media Player/DVD mode, press to select forwarding play.
35.
In EPG menu, press INFO to display the information of digital
channel.
36.
In DVD/DTV mode, p
tu
pq
/
.
/
.
.
.
.
/
.
.
.
ENTER
YELLOW button / ANGLE
CYAN button / GOTO
EXIT
VOL-/+ VOLUME UP DOWN)
SUBPAGE /
SIZE /
INFO/TITLE
onfirm the selection
DVD
Note
SUBTITLE
: the TITLE function is disabled.
ress to display the caption.
STANDBY
DISPLAY
NICAM/EJECT MUTE
SLEEP ASPECT
FAV
TV MENU- SOURCE DVD SETUP-
REPEAT ZOOM ANGLE GOTO
EXIT
VOL-
VOL+
CH-
CH+
MENU
INDEX REVEAL SUBPAGE
TV RADIO/
SIZE
HOLD/A B
REC LIST
-
.REC/SLOW TIME SHIFT
SUBTITLE
PROGRAM TITLE
EPG
AUDIO
TEXT
PMODE
INFO
ENTER
SMODE
21
22
23
24
25
26
27
28
29
30
31
32
33
34
35
36

BATTERY INSTALLATION
Insert the batteries while observing the correct (+) and (-) polarities as illustrated below.
About the batteries
Note
●
●
●
●
●
●
●
●
●
f the remote control unit fails to work even when it is operated near the LCD TV, please replace
the batteries.
Do not use rechargeable (Ni-Cd) batteries.
Do not splash the remote control with water or put it on a wet object .
in
o not mix old and new batteries.
falling
I
Use size UM 4 AAA batteries
Do not attempt to recharge short circuit disassemble heat or throw the batteries into fire
Do not drop, step on or cause any impact to the remote control unit. This may damage it, resulting
malfunction.
D
If the remote control unit is not going to be used for a long time remove the batteries
Strong light such as direct sunlight on the remote sensor can cause operational failure.
Avoid placing the remote control in direct sunlight.
-( ) .
:
,, , .
,.
Caution
Keep batteries out of children’s reach.
BASIC CONNECTION
9

BASIC OPERATION
Press the VOL+/- button to increase or decrease the volume.
SELECTING INPUT SOURCE
1. Press the SOURCE button on the remote control or
press INPUT button on the rear panel of the LCD TV
to display the “ Input Source” menu.
2. Press the button to select the input signal.
3. Press button to confirm your selection.
pq
tu
/
/
At any time, you can temporarily cut off the sound using the MUTE button.
1. Press the MUTE button and the sound cuts off.
2. Press the MUTE button again or press VOL to turn mute off.+ button
USING MUTE
To switch the LCD TV on:
To switch the LCD TV off:
1. Connect the power cord to the LCD TV. Then the LCD TV switches itself to standby mode and the
power indicator on the front of the LCD TV lights up in red.
2. To switch on the LCD TV from standby:
Press the POWER button on the remote control or the button on the front panel of the LCD
TV, the LCD TV switches on and the power indicator lights up in green.
Press the POWER button on the remote control or the button on the front of the unit again, the
LCD TV switches to standby mode and the power indicator lights up in red.
10
36
SWITCHING THE LCD TV ON/OFF
ADJUSTING THE VOLUME
EXIT ENTER
Input Source
DTV
ATV
AV
SCART
YPBPR
PC-RGB
HDMI
Media Player
DVD
Quit Select

BASIC OPERATION
CHOOSING A TV CHANNELCHOOSING A TV CHANNEL
Use the CH+/CH-button on the front panel or the CH+/CH-
CH
,button on the
remote control.
CH
Using 0-9 digital buttons
Example:
Press the + button to increase channel number.
Press the - button to decrease channel number.
You can select the channel number directly by pressing 0 to 9 buttons.
To select 1-digit channel (e.g. Channel 5):
Press the 5 button.
To select 2-digit channel (e.g. Channel 20):
Press the 2 button, follow by 0.
●
●
11
SELECTING TV SOUND
InATV mode, according to the type of sound signal, use the NICAM/EJECT button to select an
appropriate mode from the following: Mono, NICAM Stereo, NICAM DUAL NICAM DUAL .I and II
●
●
●
When a mono program is received, you can only choose .
When a stereo program is received, you can switch between and .
When a bilingual program is received,you can switch among ,
and .
sends the primary broadcast language to loudspeakers.
sends the secondary broadcast language to the loudspeakers.
Mono
NICAM Stereo Mono
NICAM DUAL NICAM
DUAL Mono
NICAM DUAL
NICAM DUAL
I
II
I
II
I
II
Note:
If the stereo signal is weak, it will be switched to Mono automatically.

USING THE MENUS
12
CHANNEL SETUP
1. Press the TV-MENU button on the remote
controller to display the OSD main menu.
2. Press / button to select the CHANNEL menu.
3. Press / button to select each item.
4. Press the TV-MENU or EXIT button to exit from the menu.
tu
pq
CHANNEL
Auto Tuning
DTV Manual Scan
ATV Manual Scan
Program Edit
Signal Information
CHANNEL
ATV Manual Scan
Program Edit
Signal Information
CI Information
Auto Tuning:
This option allows you to tuning theATV and DTV channels stations that can be received automatically.
1. Press prompt menu.
2. Use button to select a country.
3. Select Start to start tuning.
u
tu
button to display the
/ corresponding
4 Press the MENU or EXIT button to .. exit the tuning
DTV Manual Tuning
A
Programme Edit
:
This option allows you to tuning the DTV channels stations that can be received by manual.
:
This function allows you to delete, rename, swap, skip and FAV for a selected channel.
TV Manual Tuning:
This option allows you to tuning theATV channels stations that can be received by manual.
Delete
Program Edit Delete Channel
1. In Program Edit, move the / button to select a channel
which you want to delete.
2. Press the RED button twice to perform the deletion function.
pq
Set FAV Channel
1. Press the / button to select a channel which you favorite.
2. Press the FAV button to perform the favorite function.
pq
Please select country first,
Then select Start to update info.
Country selection Spain
Tune Type ATV
FAV
Favorite MOVE SKIP Rename EXIT
MENU
TV 37 S-35
TV 36 S-32
TV 35 S-31
TV 34 X-30
TV 33 S-28
TV 32 S-27
TV 31 S-26
DTV Manual Scan
Cancel
Start
Auto Tuning
EXIT MENU ENTER
CI Information
Quit Back Select
EXIT MENU ENTER
Quit Back Select
S.NO CH.NAME FAV SKIP LOCK
EXIT MENU
Auto Scan
1 %... 77.25 MHz ( ATV)
TV : 0 Programme(s)
Press <Menu> to skip.
Press <Exit> to exit.
DTV : 0 Programme(s)
Radio : 0 Programme(s)
Data : 0 Programme(s)
Quit Skip

Move Channel
Skip Channel
Rename Channel (for TV mode only)
Signal Information (for DTV mode only):
CI Information:
1. In Program Edit, move the / button to select a channel which you want to moved.
2. Press the YELLOW button to summon the move function.
3. Press the / button to select a position where you moved.
1. Press the / button to select a channel which you want to skipped.
2. Press the CYAN button to perform the skip function.
1. Press the / button to select a channel which you want to rename.
2. Press GREEN button to perform the rename function.
3. Press the / button to select the character.
4. Press the / button to move the cursor position.
Display signal information.
Display CI card information.
pq
pq
pq
pq
pq
tu
USING THE MENUS
13
CHANNEL
PVR
CHANNEL menu of DTV input :
Recorded List
Recorder Mode
Recorder Schedule
PVR File System
PVR
Press the /
button to select
each item, press
/ button to
select or adjust.
pq
tu
Note:
1. Only after formatting the USB or hard disk and can be set the time-Shift Size and recording programs.
2. Using hard disk recording, please select the disk interval first in the "Select Disk" option, and then
format. When the interval recorded filled, it does not automatically go to the next interval recording,
if you need to continue recording, please re-select the disk interval in the "Select Disk" option and
then format. The intervals are mutually independent, formatting does not have an impact on other
range.
Record have one-button record and time record.
1. Insert the USB drive or hard disc to the USB connector.
2. Press the REC button on the remote controller to begin record.
3. Press the button on the remote controller to stop record.
1. Insert the USB drive or hard disc to the USB connector.
2. Press the EPG button on the remote controller to display PROGRAM GUIDE menu, then press
REC button on the remote controller to display recorder set menu.
one-button record:
time record:
EXIT MENU ENTER
Quit Back Select EXIT MENU ENTER
Quit Back Select
Record Start
pq

USING THE MENUS
4. Press / / / button to select or adjust.
5. When you are satisfied with your adjustment, press
ENTER button to begin record .
pqtu
Title
Mode
Start Date
Start Time
End Date
End Time
The Weakest Link
17:15
AUTO
31 Jan 2008
31 Jan 2008
18:00
31 Jan 2008 18:07
RECORDER
record button
time shift button
Time Shift
[-00:00:21/00:04:00]
18:07
Press the TIME SHIFT button to execute the time shift function:
PVR recorded program
list shortcut button
Press the button on the remote control to play continue.
Press button to select recorded programme.
Press ENTER button to play the recorded programme.
Press red color button on the remote control to delete recorded programme.
Press INFO button on the remote control to display programme information.
pq/
Recorded List -Programme
J.S.G. Song Video Cor...
i
J.S.G. Song Video Cor... u
Press the REC.LIST button on the remote control to display Recorded List- Programme menu.
Press the REC button on the remote controller to begin record.
Press the button on the remote controller to stop record.
Recording 18:07
REC
[ 00:11:03] [ 64:11:07]
current time
surplus time of
USB/hard disc
85 High Definiti..
SIZE
HOLD/A B
REC LIST
-
.REC TIME SHIFT
SUBTITLEEPG INFO
Free Disk Space 1216MB
ENTER
Confirm Schedule Back Quite
EXIT
MENU
Buttons for record:
Delete INFO ENTER
Index
14

USING THE MENUS
PICTURE
Picture Mode
Contrast
Brightness
Color
Sharpness
Tint
Standard
0
50
50
50
50
EXIT MENU ENTER
Quit Back Select
1. Press the TV-MENU button on the remote
controller to display the OSD main menu.
2. Press / button to select the PICTURE menu.
3. Press / button to select each item.
4. Press the TV-MENU or EXIT button to exit from the menu.
tu
pq
PICTURE SETUP
Picture Mode:
Dynamic, Standard,Mild User Dynamic, Standard
Mild
User User
Contrast:
Brightness:
Color:
Sharpness:
Tint:
Select a desired picture mode among and . and
are the factory preset picture mode and the parameter of those modes can not be changed. If
you want to adjust any items (e.g. Contrast, Brightness ,Clour and sharpness etc), please select
, and the settings will be stored in mode.
You may select the picture mode directly by pressing the PMODE button on the remote control.
Adjust the color brightness of the image.
Adjust the darkness and lightness of the image.
Adjust the saturation level of color.
Adjust the sharpness level of image.
Adjust the tone of color when your system is in NTSC.
C
Color Temperature:
Aspect Ratio
Noise Reduction
Select a optimum color temperature level(Cool/
Standard/Warm) or customize by selecting User.
The level of Red, Green and Blue are can be
adjusted separately in user mode.
:
Select a display mode.
:
If the broadcast signal received is weak, you can select
this function to reduce the video noise if the option set
the “On”.
Color Temperature
Noise Reduction
User
Aspect Ratio 16:9
On
PICTURE
Red
Green
Blue
50
50
50
EXIT MENU ENTER
Quit Back Select
15

USING THE MENUS
16
Auto Adjust:
Horizontal Pos.:
Vertical Pos.:
Size:
Phase:
Adjusts the screen position automatically, it is recommended you use this option for optimum
adjustment.
Adjusts the screen horizontal position.
Adjusts the screen vertical position.
Removes any vertical interference.
Removes any horizontal interference.
S
S
S
S
PICTURE
PC Setup
50
50
0
60
PC Setup
Auto Adjust
Horizontal Pos.
Vertical Pos.
Size
Phase
EXIT MENU ENTER
Quit Back Select EXIT MENU ENTER
Quit Back Select
PC Setup (for PC-RGB mode only):
This function allows you adjust the screen position .
1. Press / button to select PC Setup in PICTURE menu.
2. Press ENTER button to enter:
pq

USING THE MENUS
17
1. Press the TV-MENU button on the remote
controller to display the OSD main menu.
2. Press / button to select the TIME menu.
3. Press / button to select each item.
4. Press the TV-MENU or EXIT button to exit from the menu.
tu
pq
Clock
Off Time
On Time
Sleep Timer:
Note
Auto Sleep:
Time Zone
:
Set the current time.
:
Set the TV to standby after the set time has elapsed.
:
Set the TV from standby to on automatically after the set time has elapsed.
Automatically switches the unit to standby after the preset time to elapsed.
: You may select the sleep time directly by pressing the SLEEP button repeatedly on the
remote control.
If there is no signal input for 5 minutes, the LCD TV will switch to standby automatically when the
Auto Sleep set the “On”.
:
Press / button to select a time zone where you are.tu
TIME SETUP
1. Press the TV-MENU button on the remote
controller to display the OSD main menu.
2. Press / button to select the SOUND menu.
3. Press / button to select each item.
4. Press the TV-MENU or EXIT button to exit from the menu.
tu
pq
Sound Mode:
Treble:
Bass:
Balance:
Auto Volume
Press / button to select a sound mode among Standard, Music, Movie, Sports and User.
Adjusts the level of higher-pitched sounds.
Adjusts the level of lower-pitched sounds.
Adjusts the sound balance in left and right speakers.
:
If set “On”, it will adjust volume level automatically.
tu
Surround Sound:
This allows you to enjoy powerful sound effects, such as those in a cinema, by producing deep
and rich bass tones and clear treble tones.
SOUND SETUP
SOUND
Sound Mode
Treble
Bass
Balance
Auto Volume
User
Off
TIME
Clock
Off Time
On Time
Sleep Timer
Auto Sleep
Time Zone
Off
Off
Off
Off
Oslo GMT+1
Surround Sound Off
50
50
50
EXIT MENU ENTER
Quit Back Select
EXIT MENU ENTER
Quit Back Select

18
USING THE MENUS
1. Press the TV-MENU button on the remote
controller to display the OSD main menu.
2. Press / button to select the OPTION menu.
3. Press / button to select each item.
4. Press the TV-MENU or EXIT button to exit from the menu.
tu
pq
Language
Note
Audio Languages (for DTV)
Note
Subtitle Language (for DTV)
Note
Country:
Restore Setting
:
Selects your desired language for the OSD menu.
: If your unit does not support multi-language, this
item may not be selected by pressing / button.
:
Selects your desired language for the audio.
: If your unit does not support multi-language, this item may not be selected by pressing
/ button.
:
Selects your desired language for the subtitle.
: If your unit does not support multi-language, this item may not be selected by pressing
/ button.
This item is disabled.
:
This function allows you to replace the settings with the factory default values.
tu
tu
tu
OPTION SETUP
Language
Audio Languages
Subtitle Language
Country
English
English
English
OPTION
Restore Setting
Spain
EXIT MENU ENTER
Quit Back Select

USING THE MENUS
Lock Channel:
Press tu
tu
/ button to select On or Off.
:
It allows you to change the LOCK menu access password.
:
It allows you to block some program.
:
Press / button to select the different block rating or select no block item to ignore this function.
Channel Password
Block Program
Parental Guidance
Please enter password
New
Confirm - - - -
- - - -
1. Enter a new 4-digital number as a code using 0-9.
2. Enter the same 4-digital number to confirm.
1. Press the / button to select a channel which you want
to block.
2. Press the GREEN button to perform the block function.
pq
19
1. Press the TV-MENU button on the remote
controller to display the OSD main menu.
2. Press / button to select the LOCK menu.
3. Enter the password to enter the menu (The factory
initial password is “0000”)
4. Press / button to select each item.
5. Press the TV-MENU or EXIT button to exit from the menu.
tu
pq
LOCK SETUP
Lock Channel
Change Password
Block Program
Parental Guidance
Off
Off
LOCK
Hotel Mode
Hotel Mode:
Press / button to select Hotel Mode, then press ENTER to enter.pq
Hotel Setting
Hotel Lock
Lock Channel
Set Source
Channel Number
Picture Lock
Key Lock
Max Volume
ON
OFF
OFF
2
Source Lock
EXIT MENU ENTER
Quit Back Select
Cancel
Clear Lock
ON
100
Block Program
Lock EXIT
MENU
TV 37 S-35
TV 36 S-32
TV 35 S-31
TV 34 X-30
TV 33 S-28
TV 32 S-27
TV 31 S-26
S.NO CHANNEL FAV SKIP LOCK
1. Use / button to select each item.
2. Use / button to adjust value or select options.
3. Press TV-MENU button to exit.
pq
tu
Table of contents
Other Sunstech LCD TV manuals