Superb CHG Installation instructions

CHG/CHR Page 1
OUTDOOR GAS FIREPLACE
MODELS
CHR-2
CHG-2
EFFECTIVE DATE
JUNE, 2001
INSTALLATION INSTRUCTIONS
AND
OWNER'S MANUAL
WARNING: Iftheinformationinthismanual
isnotfollowedexactly,afireorexplosionmay
result causing property damage, personal in-
jury or loss of life.
— Do not store or use gasoline or other flam-
mable vapors and liquids in the vicinity of
this or any other appliance.
— WHAT TO DO IF YOU SMELL GAS
• Do not try to light any appliance.
• Do not touch any electrical switch; do
not use any phone in your building.
• Immediatelycallyourgassupplierfrom
a neighbor's phone. Follow the gas
supplier's instructions.
• If you cannot reach your gas supplier,
call the fire department.
— Installation and service must be performed
byaqualifiedinstaller,serviceagencyorthe
gas supplier.
WARNING: For Outdoor Use Only.
WARNING:Improperinstallation,adjustment,
alteration, service or maintenance can cause
injury or property damage. Read the installa-
tion, operating and maintenance instructions
thoroughly before installing or servicing this
equipment.
AVERTISSEMENT: Si les informations dans ce
manuel ne sont pas exactement suivies, un feu ou
une explosion peut en résulter causant des
dommagesàlapropriété,desblessurescorporelles
ou la mort.
— Ne pas entreposer ou employer de la gazoline ou
d’autres vapeurs ou liquides inflammables à
proximité de cet appareil ou tout autre appareil.
— Que faire si vous sentez le gaz.
• N’essayer pas d’allumer un appareil.
• Ne toucher pas un interrupteur élec-trique;
n’employerpasuntéléphonedanslebâtiment.
• Appeler immédiatement votre fournis-seur de
gaz en employant le téléphone de votre voisin.
Suivre les instructions du fournisseur de gaz.
• Si vous ne pouvez pas contacter votre
fournisseur de gaz, appeller le poste de
pompiers.
— L’installationetleservicedoiventêtreexécutéspar
un installateur qualifié, une agence d’entretien ou
un fournisseur de gaz.
AVERTISSEMENT: Pour Utilisation à l'Extérieur
Seulement.
AVERTISSEMENT: Si l’installation, l’ajustement,
l’altération,leserviceoul’entretienestincorrectement
fait, des dommages à la propriété ou des blessures
peuvents’ensuivre.Lirecomplètementlesinstructions
pour l’installation, le fonctionnement et l’entretien
avant d’installer ou de réparer cet équipement.
Chimenéa
R-5914

Page 2 CHG/CHR
•Read instructions before lighting.
• Ifignition doesnotimmediately take place,turn the gascontrol
knobtoOFF,wait5minutes,andrepeatthelightingprocedure.
• Certain materials or items, when stored under the outdoor gas
fireplace, will be subjected to radiant heat and could be seri-
ously damaged.
• CAUTION: The LP gas pressure regulator provided with this
outdoor gas fireplace must be used. This LP regulator is set for
an outlet pressure of 11 inches water column.
• Thegas supplymust beturned offattheLPgassupplycylinder
when this outdoor gas fireplace is not in use.
• The LP gas supply cylinder must be disconnected when this
outdoor gas fireplace is not in use.
• Children and adults should be alerted to the hazards of high
surface temperatures and should stay away to avoid burns or
clothing ignition.
• Youngchildrenshouldbecarefullysupervisedwhentheyarein
the area of the outdoor gas fireplace.
• Clothingorotherflammablematerialsshouldnotbehungfrom
the outdoor gas fireplace, or placed on or near the outdoor gas
fireplace.
• Anyguardor other protective deviceremovedfor servicing the
outdoor gas fireplace must be replaced prior to operating the
outdoor gas fireplace.
• Installation and repair should be done by a qualified service
person. The outdoor gas fireplace should be inspected before
use and at least annually by a qualified service person. More
frequentcleaningmayberequiredasnecessary.Itisimperative
thatcontrolcompartment,burnersandcirculatingairpassage-
ways of the outdoor gas fireplace be kept clean.
• DO NOT put anything around the outdoor gas fireplace that
will obstruct the flow of combustion and ventilation air.
• DO keep the outdoor gas fireplace area clear and free from
combustiblematerial,gasolineandotherflammablevaporsand
liquids.
• Do make visual check of burner flames. Clean and replace
damaged parts.
IMPORTANT WARNINGS
For Outdoor Use Only.
If Stored Indoors, Detach and Leave Cylinder Outdoors.
• Lire les instructions avant d’allumer l’appareil.
• Sil’appareilnes’allumepasimmédiatement,tournezlebouton
de commande de gaz dans la position fermée, attendez 5 minu-
tes puis procéder de nouveau à l’allumage.
• Certainsmatériauxouarticleslorsqu’ilssontentreposéssousle
radiateur pour patio, seront exposés à la chaleur radiante et
peuvent être endommagés.
• MISEEN GARDE:Vousdevez utilisezlerégulateur degazPL
de pression à gaz fourni avec ce radiateur pour patio. Ce
régulateurde gazPLest réglépour unepressionde sortiede11
pouces de colonne d’eau.
• L’alimentation du gaz doit être fermée à la bouteille de gaz PL
lorsque ce radiateur pour patio n’est pas utilisé.
• La bouteille d’alimentation en gaz PL doit être débranchée
lorsque ce radiateur pour patio n’est pas utilisé.
• Les enfants et les adultes doivent être avisés des dangers des
parois très chaudes et doivent rester loin pour éviter les brûlu-
res ou l’allumage des vêtements.
• Les petits enfants doivent être surveillés étroitement lorsqu’ils
sont au même endroit que le radiateur.
• Les vêtements ou d’autres matériaux inflammables ne doivent
pas être suspendus, placés sur ou près du radiateur.
• Si un écran ou tout autre dispositif de sécurité est enlevé lors
d’une réparation du radiateur, celui-ci doit être replacé avant
de remettre l’appareil en marche.
• L’installation et la réparation doivent être faites par une per-
sonnequalifiée. Leradiateurdoitêtre inspectéavantl’usageet
aumoins unefoispar annéeparune personnequalifiée. Sicela
est nécessaire, de fréquents nettoyages seront requis. Il est
impératifquelescompartimentsdecommandes,lesbrûleurset
les passages de circulation d’air de l’appareil soient gardés
propres.
• NE RIEN mettre autour du radiateur pour patio qui pourrait
obstruer la circulation d’air de combustion et de ventilation.
• Les matériaux combustibles, la gazoline ou les vapeurs et
liquides inflammables ne doivent jamais être dans le même
endroit que le radiateur pour patio.
• Faireuneinspectionvisuelledelaflammedubrûleur. Nettoyer
et remplacer les pièces défectueuses.
FOR YOUR SAFETY
Do not store or use gasoline or other flammable vapors and liquids
in the vicinity of this or any other appliance.
AVERTISSEMENT
Ne pas entreposer ni utiliser de l'essence ni d'autres vapeurs ou
liquides inflammables dans le voisinage de l'appareil, ni de tout
autre appareil.
TABLE OF CONTENTS
Section Page
Important Warnings ............................................................................................................................................................................2
Specifications ......................................................................................................................................................................................3
Propane (LP) Gas Warnings ...............................................................................................................................................................3
LP Gas Cylinder Information.......................................................................................................................................................... 3-4
Clearances ...........................................................................................................................................................................................5
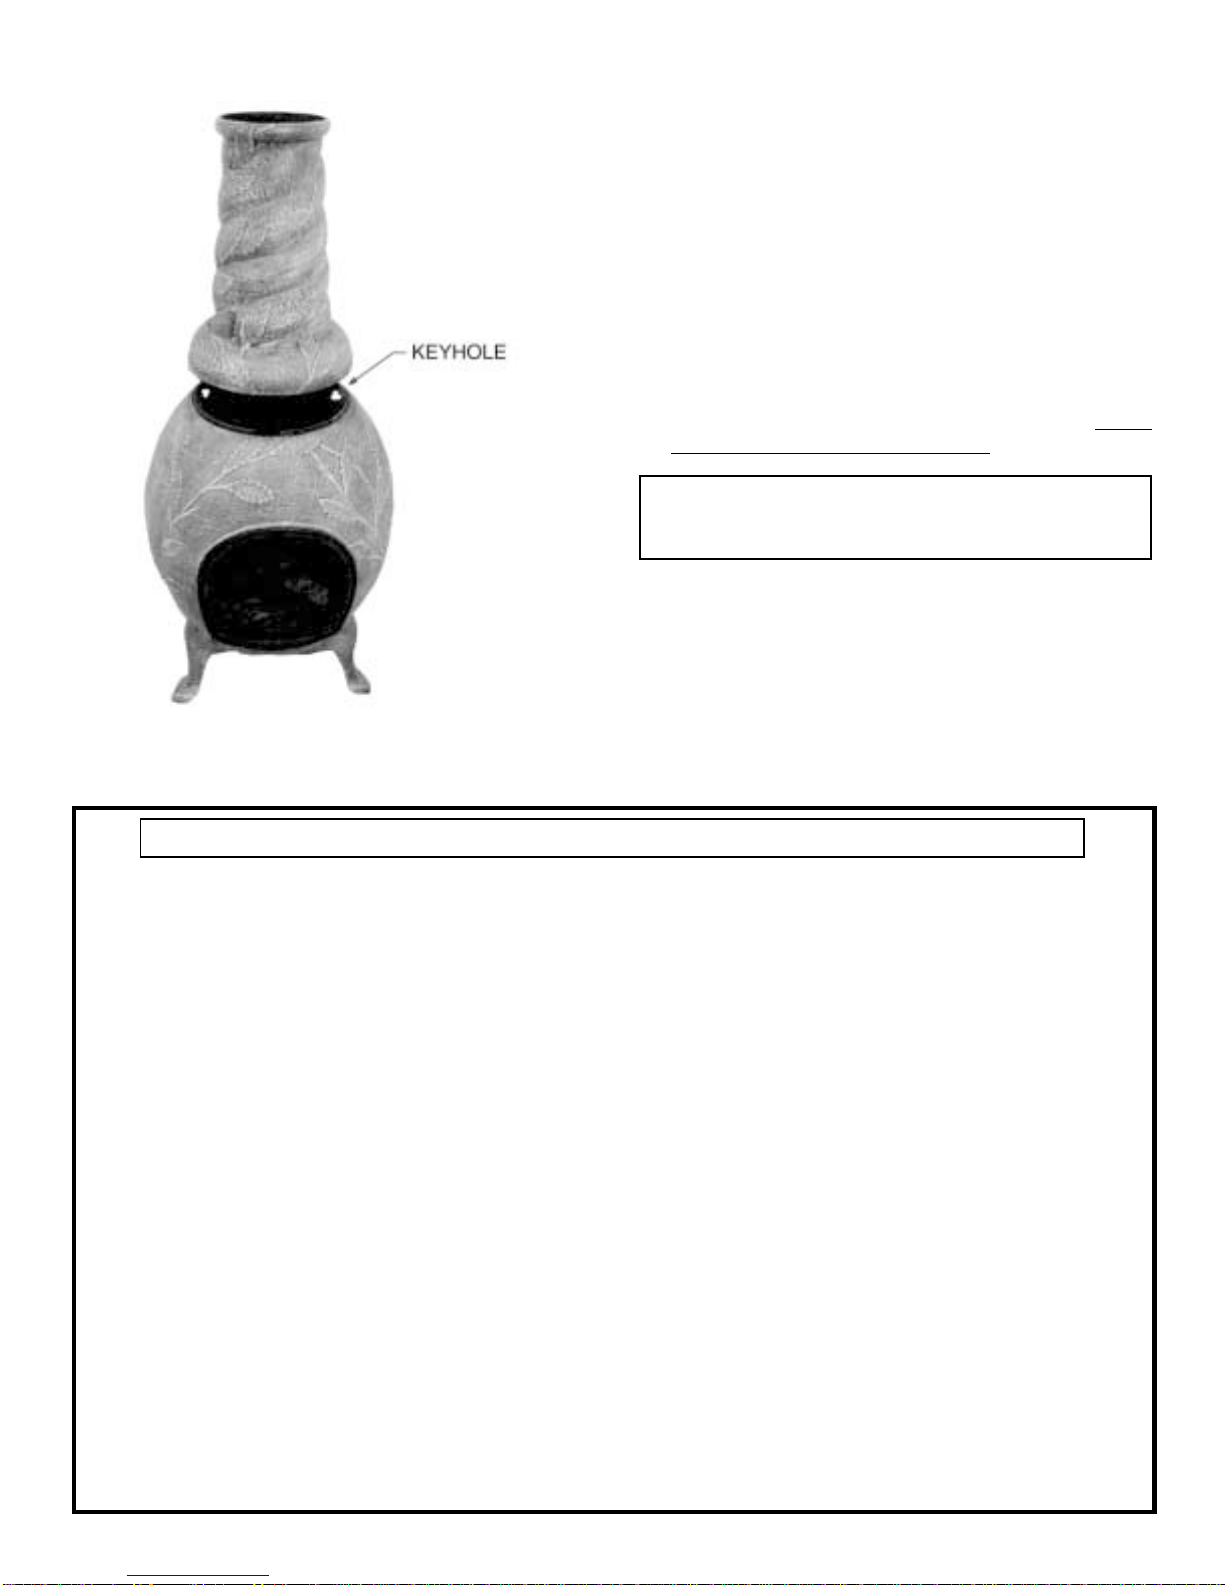
Set-Up Instructions ......................................................................................................................................................................... 6-8
Gas Conversion Instructions ...............................................................................................................................................................8
Leak Testing .......................................................................................................................................................................................9
Lighting Instructions ...........................................................................................................................................................................9
Maintenance and Service ..................................................................................................................................................................10
Main Burner Flame Pattern...............................................................................................................................................................10
Trouble-Shooting ..............................................................................................................................................................................11
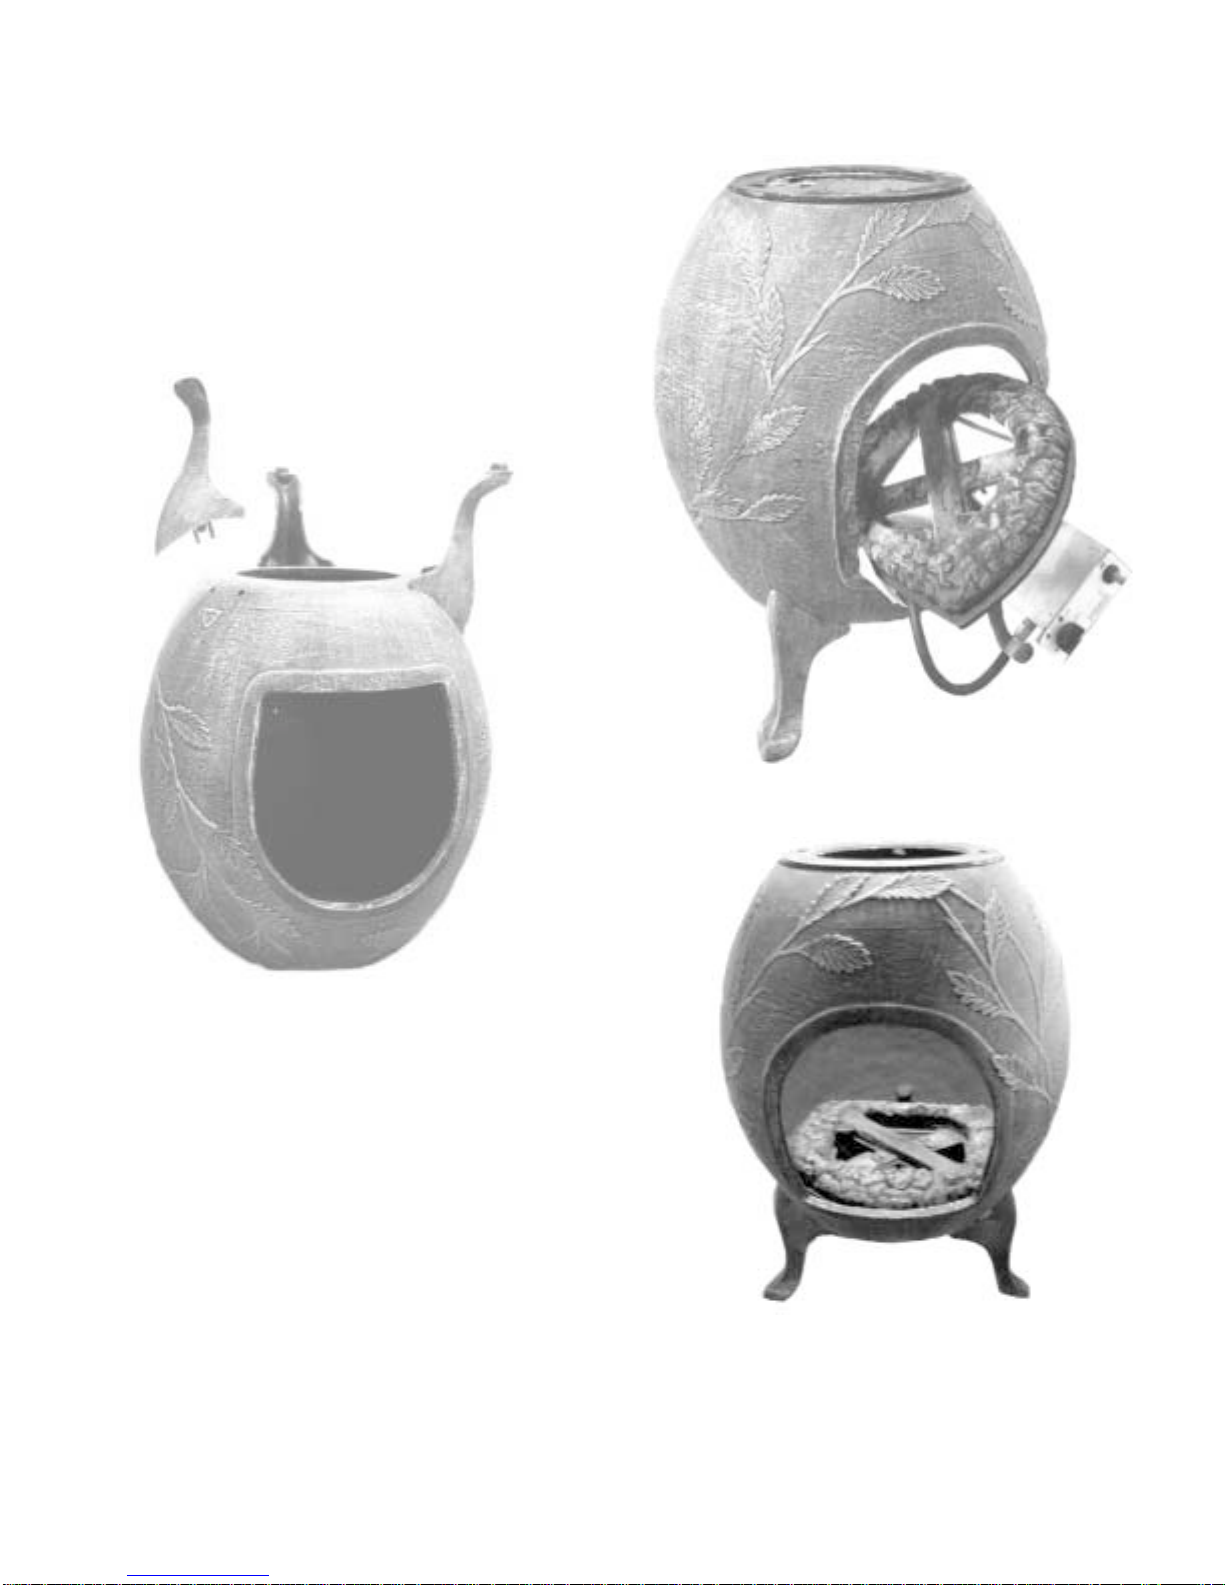
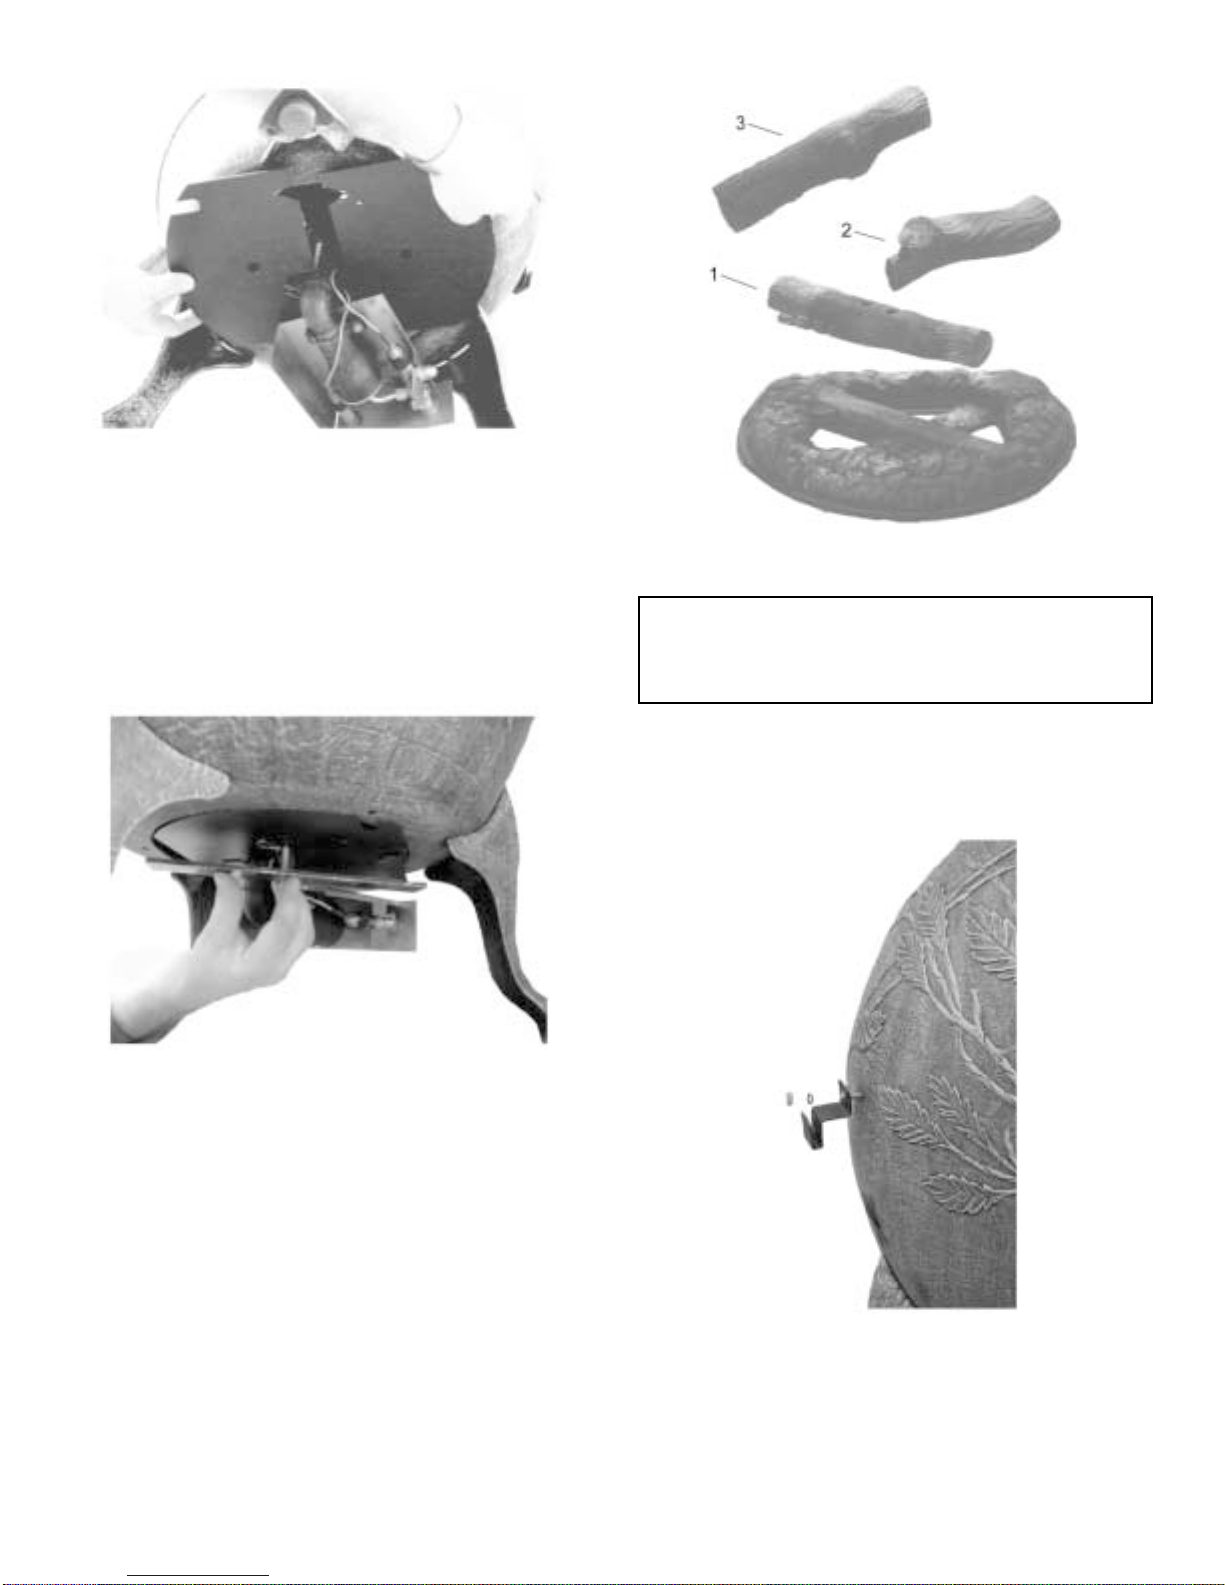
Parts List ...........................................................................................................................................................................................11
Parts View.........................................................................................................................................................................................12

CHG/CHR Page 3
AVERTISSEMENTS POUR LE CONSOMMATEUR:
• Savoir reconnaître l’odeur du gaz PL. Si vous entendez un
sifflement ou si vous sentez une odeur de gaz PL, éloignez
immédiatementtouteslespersonnesquisontprèsdelabouteille
et appelez le service d’incendie. N’essayez pas de réparer.
• Le gaz PL étant plus lourd que l’air, il peut s’accumuler près
du sol avant de se dissiper.
• Tout contact de la peau avec la phase liquide de la bouteille
causera des brûlures par le froid.
• Ne laissez pas les enfants manipuler ou jouer avec la bouteille.
• Lorsquelabouteillen’est pas raccordée à l’appareil, gardezla
soupapedelabouteillefermée. Lesradiateursautonomespour
patiodoiventutiliserunebouteilled’unecapacitémaximalede
20 lb. (9kg) ou moins.
• Ne pas utiliser, entreposer ou transporter la bouteille en l’ex-
posant à une température excessive car la soupape de sûreté
risquedes’ouvriretdelaisseréchapperunegrandequantitéde
gaz inflammable.
• Pour transporter une bouteille de gaz PL, la maintenir solide-
ment fixée en position verticale avec la soupape fermée.
CUSTOMER WARNING:
• KnowtheodorofLPGas.Ifyouhear,seeorsmellleakingLP
gas, immediately get everyone away from the cylinder and
call the Fire Department. Do not attempt repairs.
• LPGas is heavierthanair and maysettlein low placeswhile
dissipating.
• Contactwith theliquid contentsof cylinderwill causefreeze
burns to the skin.
• Do not allow children to tamper or play with cylinder.
• When not connected for use, keep cylinder valve turned off.
Self contained outdoor gas fireplaces shall be limited to a
cylinder of 20 lb. capacity or less.
• Do not use, store or transport cylinder where it would be
exposed to high temperatures. Relief valve may open allow-
ing a large amount of flammable gas to escape.
• When transporting, keep cylinder secured in an upright
position with cylinder valve turned off.
PROPANE (LP) GAS WARNINGS
LP GAS CYLINDER INFORMATION
WARNING: Inspectthefuelsupplyhosebeforeeachuseofthe
outdoorgasfireplace.Ifitisevidentthereisexcessiveabrasion
or wear, or the hose is cut, it must be replaced prior to the
outdoor gas fireplace being put into operation. Contact Em-
pireComfortSystems,Inc.toobtainareplacementfuelsupply
hose.
• LP-gas supply cylinder to be used must be constructed and marked
in accordance with the specifications for LP-gas cylinders of the
U.S. Department of Transportation (DOT) or the National Standard
of Canada, CAN/CSA-B339, Cylinders, Spheres and Tubes for the
Transportation of Dangerous Goods.
• Thecylindersupplysystemmustbearrangedforvaporwithdrawal.
• The cylinder used must include a collar to protect the cylinder
valve.
• This outdoor gas fireplace shall be used only outdoors in a well-
ventilated space and shall not be used in a building, garage or any
other enclosed area.
• If the outdoor gas fireplace is not in use, the gas must be turned off
at the supply cylinder.
• Storage of an outdoor gas fireplace indoors is permissible only if
the cylinder is disconnected and removed from the outdoor gas
fireplace.
Cylinders must be stored outdoors in a well-ventilated area out of
the reach of children. Disconnected cylinders must have threaded
valve plugs tightly installed and must not be stored in a building,
garage or any other enclosed area.
• The pressure regulator and hose assembly supplied with the out-
door gas fireplace must be used. A replacement pressure regulator
andhoseassemblyforthisoutdoorgasfireplacecanbeobtainedby
contacting Empire Comfort Systems, Inc.
Models CHR and CHG
Input BTU/HR Natural Gas LP Gas
High 35,000 32,000
Medium 23,000 29,000
Low 20,000 27,000
Height 49"
Width 23"
Gas Inlet 3/8" flare
Accessories
GHK-12 Quick Disconnect 12 Ft. Hose LP & Nat.
CHKN-1 Natural Gas Conversion Kit
CHKT-1 Tank Cover for 20lb. Cylinder
Note: This outdoor gas fireplace is not portable.
Attention:Solidfuelsshallnotbeburnedinthisoutdoorgasfireplace.
Donotusethisoutdoorgasfireplaceifanyparthasbeenunderwater.
Immediatelycallaqualifiedservicetechniciantoinspecttheoutdoor
gasfireplaceandtoreplaceanypartofthecontrolsystemandanygas
control which has been under water.
Instructions to Installer
1. Installermustleaveinstructionmanualwithownerafterinstallation.
2. The owner shall retain this instruction manual for future reference.
3. Installer must have owner fill out and mail warranty card supplied
with outdoor gas fireplace.
4. Installer should show owner how to start and operate outdoor gas
fireplace.
General Information
This appliance is design certified in accordance with requirement 4.96
US and CGA certification requirement CR97-003 by the Canadian
Standards Association as an outdoor gas fireplace. The outdoor gas
fireplace shall be installed according to these instructions.
Important
All correspondence should refer to complete Model number, Serial
number and type of gas.
Any alteration of the original design, installed other than as
shown in these instructions or use with a type of gas not shown
on the rating plate is the responsibility of the person and
company making the change.
Attention: Remove rain cap from top of stack before operating
outdoor gas fireplace.
SPECIFICATIONS

Page 4 CHG/CHR
OVERFILL PROTECTION DEVICE (OPD) ON
20 LB. PROPANE CYLINDER
Attention: Consumer be advised, this outdoor gas fireplace
must be connected to an LP gas cylinder incorporating an
OPD.
The OPD will help reduce the potential for the overfilling of the
propane cylinder, thus reducing the possibility of hydrostatic
relief valve discharges.
Overfill Protection Device Valve Function
1. Asthe cylinder isfilled, the rising level of liquid propanelifts
the float to the stop position to prevent dangerous overfilling.
Does not affect the filling process or use of the cylinder.
2. At a safe filling level, the float cam triggers the pin to fall into
the recess of the cam, sealing this path off and preventing any
more liquid propane from flowing through the lower valve
body into the cylinder.
3. Thepropanebuildsuppressureinthechamber(center spring)
and pushes the piston up to form a seal, effectively stopping
the filling process.
4. The use of the propane from the cylinder allows the OPD to
reset itself for the next fill.
5. Connects to all standard or quick-connect couplings.
6. The Overfill Protection Device affects incoming liquid pro-
paneflow only.Doesnot affectnormalpropanegasdischarge
when properly connected to the appliance regulator.
7. Allpropanecylindersshouldbefilledbyqualifiedprofession-
als only.
Purging
1. Due to the decreased Btu delivery, purging may take longer.
2. Toincreasethespeedofpurging,opentheoutagevalveduring
release.
3. Reminder: Each new cylinder must be purged before filling.
4. For purging instructions, refer to NPGA 133-89(a).
Btu Delivery
The OPD valve has a size 56 orifice through which the propane
is released for consumption. Depending on the propane's tem-
perature and pressure, the release from the cylinder is approxi-
mately 125,000 Btu/hour.
IMPORTANT INFORMATION ABOUT YOUR
NEW TYPE-1 OUTDOOR GAS FIREPLACE
CONNECTION
Read all outdoor gas fireplace and related product literature
before connecting or using your outdoor gas fireplace, and read
the following information completely before attempting to con-
nect your outdoor gas fireplace to a propane cylinder.
Keep these instructions in a safe place. You may need to refer to
them when connecting other cylinders after filling.
Your new outdoor gas fireplace regulator is equipped with a
couplingnut.Donotattemptto connect any propane cylinder not
equipped with a mating Type-1 cylinder valve.
Connecting the Regulator to the Valve (Figure 1)
This Type-1 cylinder valve contains a backcheck which is
designed to prevent propane from flowing until the valve is
properly connecting to a regulator.
WhenconnectingtheregulatortotheType-1cylindervalve,be
sure the pressure relief valve is directed away from the front of
the outdoor gas fireplace and away from any building. If the
pressure relief valve should open, the propane will then be
directed where it is likely to do the least harm if ignited.
WARNING: Do not insert any foreign objects into the
valveoutlet. You maydamage the backcheck.A damaged
backcheck can be the source of a leak. Leaking propane
may result in explosion, fire, personal injury or death.
Regulator Coupling Nut
The coupling nut connects to the large outside threads on the
valveoutlet.Tocompletetheconnection,followthestepsbelow.
1. Be sure main burner knob is in the OFF position.
2. Make sure the cylinder valve handwheel is in the closed
position. Turn clockwise (left to right) to a full stop.
3. Remove the protective caps from the cylinder valve and
coupling nut.
4. Turn the coupling nut clockwise (left to right), to tighten to
a full stop. Be sure the coupling nut is not cross-threaded.
Figure 1
Qualified Installing Agency
Installation and replacement of gas piping, gas utilization equip-
ment or accessories and repair and servicing of equipment shall
be performed only by a qualified agency. The term "qualified
agency" means any individual, firm, corporation or company
which whether in person or through a representative is engaged
in and is responsible for (a) the installation or replacement of gas
piping or (b) the connection, installation, repair or servicing of
equipment, who is experienced in such work, familiar with all
precautions required and has complied with all the requirements
of the authority having jurisdiction.
Theinstallation must conform withlocal codes or, inthe absence
of local codes, with either the American National Standard
(National Fuel Gas Code) known as NFPA 54 and ANSI Z223.1
orCAN/CGA-B149.1NATURALGASINSTALLATIONCODE
or CAN/CGA-B149.2 PROPANE INSTALLATION CODE.
*Available from the American National Standards Institute, Inc., 11 West 42nd
St., New York, NY 10036.

CHG/CHR Page 5
Figure 2
Figure 3
CLEARANCES
Minimum Clearances From Combustible Construction
(Figures 2 and 3)
Side 6"
Rear 6"
Top 47" from top of unit or 96" from floor
Floor Combustible
Minimum Clearances From Combustible Construction with
20lb.Propane(LP)TankAttachedtoOutdoorGasFireplace
(Figure 4)
Side 6"
Side, Corner Installation 7"
Top 47" from top of unit or 96" from floor
Floor Combustible
Warning:Whenselectingalocationforyouroutdoorchimenea,
it is important to consider that any ceiling, overhang or other
surface located above the chimenea can discolor due to heat or
carbon particles generated while unit is operating.
Attention:Raincapmustbeplacedonoutdoorchimeneawhen
not in use. Rain cap will prevent rain from entering top of
chimenea.Withoutraincapinplace,raincanwashsootofflogs
on burner. Soot from logs will stain your patio or deck.
Figure 4

Page 6 CHG/CHR
1. Remove packing material from top of box.
2. Lift chimney section out and set aside.
3. Remove remaining items and packing from inside outdoor
gas fireplace firebox.
4. Liftfireboxoutofboxandsitonflatsurfaceneardesiredfinal
location. Leave adequate room around outdoor gas fireplace
to work. Locking ring for chimney should be facing down.
Figure 5
5. Remove washers and nuts from three legs. Install the three
legs using the bolts, washers and nuts provided. Reach
throughtheopeningintheoutdoorgasfireplacetotightenthe
leg bolts securely.
Figure 5
6. Invert the outdoor gas fireplace firebox to sit on its legs.
7. Remove the 4 5/8" bolt and 5/16 nut that are holding the
burnerinplace.Carefullyremovetheburnerfromthefirebox.
Removethe2 screws and nuts thatareholding the hold down
bar in place. Remove the packing materials from the burner.
Unpack the cast iron logs and set aside.
Figures 6 and 7
8. Holdingtheburner assembly securely withtwohands,tipthe
burner to a position where it will fit through the front door
opening. The gas inlet plumbing, control panel and regulator
hose assembly should be pointing to the left and somewhat
downasyoumaneuvertheburnerthroughthedoor.Guidethe
regulator hose and control panel through the large hole in the
bottom of the outdoor gas fireplace. The burner should come
torestonthethreeflattabsthatprotrudefromthefireboxwall
and the control panel should be approximately centered
between the left front leg and the rear leg. The burner should
be repositioned if needed so that there is an equal gap of
approximately 1/2" between the outer curved perimeter of
the burner and inner firebox wall. The flat edge on the rear of
theburnershouldbeparallelwithanimaginarylineconnecting
the front legs.
Figure 6
Figure 7
Figure 8
9. The installation sequence is to interlock the flicker shield
halves first to prebend the tabs. Place the left half under the
outdoorgasfireplacewiththecut-outaroundthepipe.Interlock
the right half with the left half.
SET-UP INSTRUCTIONS

CHG/CHR Page 7
Figure 8
10. Place the hold-down bar under the flicker shield. Push the
flicker shield and hold-down bar up to the bottom of the
outdoor gas fireplace.
Figure 9
11. Insertthe45/8"holddownboltthroughtheholeinholddown
bar and flicker shield and rear burner cross support. Secure
with 5/16" nut from inside of firebox.
Figure 9
12. Move the outdoor gas fireplace to its permanent location.
Follow installation instructions to determine the proper
distances to adjacent combustible materials. Adequate room
must be left behind the outdoor gas fireplace for the LP tank
and to the left side for access to the control panel.
Figure 10
13. Install the three cast iron logs. Install the diagonal center
bottom (#1) log first. Holes in (#1) log are to be positioned
closerto front of burner assembly. Add the leftcross (#3) log
and then the right cross (#2) log. Recesses, tabs and holes are
providedtolocatethelogsproperly.SeeFigure10 for proper
placement. Installation of logs is completed.
Figure 10
Refer to the following warning.
Warning: Failure to position the parts in accordance with
this photograph or failure to use only parts specifically
approved with this appliance may result in property damage
or personal injury.
Figure 11
14. Attach the 20 lb. LP tank support hook to the hole located in
the rear center of the outdoor gas fireplace firebox wall. This
holeisapproximately18"fromthefloor.Usethebolt,washer
and nut provided and tighten by reaching into the firebox.
Figure 11
15. Set the LP tank in place. The gas outlet fitting on the tank
should be facing toward the left when viewed from the front.
The alternate is to face the outlet connection toward the rear.
Lift the tank slightly and hook onto the tank support hook.
One of the holes in the tank handle will fit over the hook.
16. Connectthe QCC-1 fittingon the regulatorhose to the fitting
on the tank and tighten securely by hand.

Page 8 CHG/CHR
Figure 12
Figure 12
GAS CONVERSION INSTRUCTIONS
Warning: Conversion must be done by a qualified service technician.
Conversion Instructions from Propane (LP) gas to Natural gas.
1. If installed, turn off gas supply to outdoor gas fireplace.
2. If installed, remove Propane (LP) gas hose from gas valve.
3. Remove electrode wire piezo ignitor.
4. Remove thermocouple from gas valve.
5. Remove two (2) bolts and two (2) nuts from valve bracket at bottom of outdoor gas fireplace.
6. Carefully remove valve bracket from outdoor gas fireplace. As the valve bracket is being removed from
outdoor gas fireplace an air shutter and spring will be removed with the main burner orifice from the end
(venturi) of main burner. Do not lose the spring or air shutter.
7. Remove Propane (LP) main burner orifice and tubing from gas valve.
8. Attach Natural gas main burner orifice MARKED 38 and tubing onto gas valve.
9. Place 1/2" diameter air shutter washer inside air shutter.
10. PlacesmalldiameterendofspringoverNaturalgasmainburnerorifice.Holdspringinplaceasyouplaceairshutter
(with lip of air shutter facing away from main burner orifice) over main burner orifice.
11. ContinuetoholdairshutterandspringasyouinsertNaturalgasmainburnerorificeintoend(venturi)ofmainburner.
12. Attach valve bracket at bottom of outdoor gas fireplace with two (2) bolts and two (2) nuts from Step 5.
13. Adjust air shutter to closed position.
14. Attach thermocouple into gas valve.
15. Insert electrode wire into piezo ignitor.
16. Attach conversion label onto top portion of rating plate.
17. Attach 3/8" flared fitting from Natural gas supply line or hose kit onto gas valve.
18. Turn on Natural gas supply to outdoor gas fireplace and check all gas connections for leaks with soap solution,
watching for bubbles on all gas connections.
19. The Natural gas inlet supply pressure to the gas valve on outdoor gas fireplace will be from a minimum of 7.0" w.c.
(1.743 kPa) for the purpose of input adjustment to a maximum of 10.5" w.c. (2.615 kPa).
20. Ignite and operate outdoor gas fireplace according to lighting instructions on Page 9.
21. Attention: The main burner flame must be checked for proper flame characteristics, as outlined on Page 10.
22. Gas conversion is completed.
17. Locatedonbottomofstackaretwosecuringbolts.Unscrew
securing bolts approximately 1/2". Attention: Do not
remove securing bolts from bottom of stack. Place the
stack on top of the body aligning the two securing bolts on
thechimneywiththelargeendofthe"keyhole"slotsonthe
securing ring. Once the chimney is in place, twist to lock
it down. Note that aesthetic pattern on the chimney should
align with that on the firebox section. If it doesn't, remove
the chimney, rotate 180 degrees and reinstall.
18. Insert the cast iron stack restrictor plate in the top of the
chimney.
19. To install door screen, hook top of door screen onto firebox.
Raise door screen upward. Pivot bottom of door screen
inwardtohookbottomofdoorscreen,andthenlowerscreen.
20. Youarenowreadytolightyouroutdoorgasfireplace.Seethe
lighting instructions before proceeding.
WARNING:Failuretoreadandfollowthoseinstructions
mayresultinafireorexplosioncausingpropertydamage,
personal injury or loss of life.

CHG/CHR Page 9
LEAK TESTING
WARNING! Before lighting your outdoor gas fireplace
be sure to read this section carefully.
Turn gas valve knob to the OFF position. Inspect the gas supply
piping or hose prior to turning the gas ON. If there is evidence of
cuts, wear, or abrasion, it must be replaced prior to use. The
replacement pressure regulators and hose assembly must be the
type specified by the manufacturer. Do not use the outdoor gas
fireplace if the odor of gas is present.
For LP gas, the pressure regulator and hose assembly supplied
with the unit must be used. Install the regulator into the 20 lb.
propane cylinder and check the hose and regulator connections
for leakage with a soap and water solution before operating your
outdoor gas fireplace. Be sure there is gas in the 20 lb. propane
cylinder.
1. Before lighting your outdoor gas fireplace, check all
connections for leaks using a mild soapy water solution.
DONOTusematches,lightersorflametocheckforleaks,
— you could cause an explosion. With the outdoor gas
fireplace burner control turned OFF, slowly open the
cylinder valve by turning the handwheel counterclockwise
(righttoleft).Applymildsoapywatertotheconnection.If
bubbles appear, a leak is indicated. Do not put the product
in service! Immediately close the cylinder valve handwheel
for propane gas or the manual shutoff valve for natural gas. A
qualified service person must be contacted to make the
needed repairs.
2. DO NOT SMOKE WHILE LEAK TESTING!
3. For LP gas (propane) models, leak test with a full propane
cylinder.
4. For systems other than self-contained LP gas (propane)
systems:
A. The outdoor gas fireplace and its individual shut-off
valve must be disconnected from the gas supply piping
system during any pressure testing of that system at test
pressures in excess of 1/2 psig (3.5kPa).
B. The outdoor gas fireplace must be isolated from the gas
supply piping system by closing its own manual shut off
valveduringanypressuretestingofthegassupplypiping
systematpressuresequaltoorlessthan1/2psig(3.5kPa).
5. Aftertheinstallationofallgas-relateditems:i.e.hose,regulator,
LP gas cylinder, natural gas hose or natural gas regulator; the
outdoorgasfireplace control valveshouldbeturnedOFFand
the gas turned ON. This is known as "charging the system."
All gas connections must be checked with a soapy solution
while the whole system is under pressure.
To make a soap solution, mix together an equal amount of
liquid detergent and water.
6. Apply soap mixture to all gas connections. Soap bubbles will
appearifthere is a leak.Tightenconnectionstomakea proper
seal.
Ifyou cannotstop a gasleak turnoff the gassupply andcall
your local gas utility, or the dealer from whom the outdoor
gas fireplace was purchased.
Onlythosepartsrecommendedbythemanufacturershould
be used on the outdoor gas fireplace. Substitutions will
void the warranty. Do not use the outdoor gas fireplace
until all connections have been checked and do not leak.
A gas system MUST be tested yearly, or whenever the LP gas
cylinder is replaced, or any other gas system part.
WARNING: Locate the gas hose out of pathways where
people may trip over it or in areas where the hose may be
subject to accidental damage.
When lighting your outdoor gas fireplace always keep
your face and body as far away from the burner housing
screen as possible.
GAS PRESSURE
Natural Gas
TheNaturalgasmodelswillhaveaninletpressuretothegasvalve
from a minimum of 7.0" w.c. (1.743kPa) for the purpose of input
adjustment to a maximum of 10.5"w.c. (2.615kPa).
Propane Gas
The Propane gas models will have a manifold pressure of
approximately 11.0"w.c.(2.739kPa)at the orifice holderwiththe
inlet pressure to the gas valve from a minimum of 11.0"w.c.
(2.739kPa) for the purpose of input adjustment to a maximum of
13.0"w.c. (3.237kPa).
A 1/8" (3mm) N.P.T. plugged tapping, accessible for test gauge
connection, is located on the orifice holder.
1. Pushin gascontrolknobslightly andturnclockwise
to "OFF". Note: Knob cannot be turned from "HIGH" to
"OFF" unless knob is pushed in slightly. Do not force.
2. Wait five (5) minutes before attempting to light the burner
from a cold start or when a hot outdoor gas fireplace is relit.
3. Turn knob on gas control counterclockwise to
"HIGH".
4. Pushincontrolknoballthewayandholdin.Immediatelylight
the burner with the piezo ignitor. Continue to hold the control
knob in about one (1) minute after the burner is lit. Release
knob, and it will pop back up. Burner should remain lit. If it
goes out, repeat steps 1 through 4.
LIGHTING INSTRUCTIONS
If knob does not pop up when released, stop and immediately
call your service technician or gas supplier.
If the burner will not stay lit after several tries, turn the gas
control knob to OFF and call your service technician or gas
supplier.
5. Turn gas control knob counterclockwise from
"HIGH" to "MED." or to "LOW".
To Turn Off Gas to Outdoor Gas Fireplace
1. Pushingascontrolknobslightlyandturnclockwise
to "OFF". Do not force.
2. Turn off gas supply to outdoor gas fireplace when not in use.

Page 10 CHG/CHR
ADJUSTING FOR PROPER FLAME
Air Shutter (Figure 13)
Eachburneristestedandadjustedatthefactorypriortoshipment.
However,variationsinthelocalgassupplymaymakeitnecessary
to adjust the burner. The flames of the burner should be visually
checked. The burner flames should be yellow. If the burner does
not operate correctly, check if the air shutter or burner ports are
blocked by dirt, debris, spider webs, etc. and proceed with air
shutter adjustment. The amount of air which is drawn into a
burner is governed by a metal cup at the inlet of the burner called
an air shutter.
ROTATE TO ADJUST
AIR SHUTTER
AIR SHUTTER
Figure 13
Air Shutter Adjustment
Be careful as the burner may be very HOT! The air
shutter is located behind the valve cover. There is an
accessareaatthebottomofthevalvecoverwhereyoucan
adjust the air shutter, with your fingers. A sooty, yellow
flame indicates insufficient air. Open the air shutter to
allow more air to the burner. If flame is noisy, blows out,
orliftsawayfromburnerorwillnotlight,thisindicates too
much air. Close the air shutter to decrease the amount of
air to the burner.
BURNER MAINTENANCE AND CLEANING
Inspect the burner before each use of the outdoor gas fireplace.
The burner must be replaced prior to the outdoor gas fireplace
beingputintooperationifitisevidentthattheburnerisdamaged.
A replacement burner for this outdoor gas fireplace can be
obtained by contacting Empire Comfort Systems, Inc.
Flashback from Spiders (Figure 14)
In some areas of the country, spiders or small insects have been
found to create "flashback" problems. The spiders spin webs and/
or insects build nests in the burner venturi tube. The web and/or
nestscanleadtogasflowobstructionwhichresultsina"flashback"
(afireintheventuritube).Cleaninteriorof burnerwithaflexible,
soft bristle, bottle brush in order to remove spiders, spider webs
and debris. Apply air pressure to burner ports to remove debris.
Figure 14
Burner Orifice Cleaning
Apply air pressure into the burner orifice and orifice tubing to
removespiders,spiderwebs,dust,lintanddebris.Aflexible,soft
bristle, bottle brush can be used to clean the orifice tubing.
MAIN BURNER FLAME PATTERN (Figure 15)
Refer to the following photograph for proper main burner flame
characteristics.
Figure 15
MAINTENANCE AND SERVICE

CHG/CHR Page 11
1. Fireplace won't light when the piezo ignitor is depressed.
a. Withthegastuned offdepressthepiezo ignitortocheckthe
spark.Youshouldseeasparkjumpfromtipoftheelectrode.
If there is a spark, check the gas supply. Is the tank full? Is
the line purged of air? Can you light the burner with a
match?
b. Check air shutter adjustment, close as needed.
c. Check the orifice for blockage.
d. Is the electrode tip clean and free from debris?
e. Clean electrode tip.
2. Burner flame is yellow or orange and there is a smell of gas.
a. Check the burner inlet for obstructions.
b. Check the air shutter for proper adjustment.
c. Check for spiders, spider webs and debris.
3. Low heat with control knob set on "HI."
a. Is the fuel hose bent or kinked?
TROUBLE-SHOOTING
If your outdoor gas fireplace does not function properly, use the following checklist for possible solutions.
b. Is there an adequate gas supply?
c. Does the orifice or burner need cleaning?
d. Is the air shutter too far open or closed?
e. Is the gas supply, or gas pressure low?
4. The smell of gas with flames appearing sooty yellow.
a. Check for spiders or insects.
b. Spiders and insects can nest in the burner and cause a
disruption in the flow of gas from the burner. This is
dangerous and can cause a fire behind the valve cover,
damaging the outdoor gas fireplace and making it unsafe to
operate.
You should inspect the burner immediately if any of these
conditions occur or persist.
5. The burner makes popping noises.
a. Check air shutter adjustment.
b. Check burner for clogged ports.
PLEASE NOTE: When ordering parts, it is very important that part number and description of part coincide.
Index Part
No. Number Description
Index Part
No. Number Description
1 R-5647 BOTTOM LOG
2 R-5649 RIGHT CROSS LOG
3 R-5648 LEFT CROSS LOG
4 R-5634 RAIN CAP WITH KNOB AND
HANGER CLIP - RED
4 R-5659 RAIN CAP WITH KNOB AND
HANGER CLIP - GREEN
5 R-5631 CHIMENEA STACK CASTING -
RED
5 R-5657 CHIMENEA STACK CASTING -
GREEN
6 R-5630 CHIMENEA BODY CASTING -
RED
6 R-5656 CHIMENEA BODY CASTING -
GREEN
7 R-5651 DOOR SCREEN
8 R-5633 LEG WITH RUBBER FEET - RED
(3 REQ’D)
8 R-5658 LEG WITH RUBBER FEET -
GREEN (3 REQ’D)
9 R-5636 BURNER ASSEMBLY
9.1 R-5909 CAST BURNER ASSEMBLY
WITH PIPE AND VENTURI
9.2 R-5638 VALVE COVER
9.3 R-5639 ORIFICE - LPG
9.4 R-5640 ORIFICE - NAT
9.5 R-5641 SAFETY VALVE
9.6 R-5642 THERMOCOUPLE
9.7 R-3992 REGULATOR HOSE ASSEMBLY
- LPG (26")
9.8 R-2708 PIEZO IGNITOR
9.9 R-5908 ELECTRODE AND WIRE
ASSEMBLY
9.10 R-5644 LABEL SET ON CHAIN
(ATTACHED TO VALVE COVER)
9.11 R-3357 VALVE SPRING
9.12 R-3358 AIR SHUTTER
9.13 R-5645 VALVE KNOB
10 R-5653 TANK SECURING HOOK WITH
BOLT, WASHER AND NUT
NOT SHOWN R-5635 STACK RESTRICTOR PLATE
NOT SHOWN R-5646 BURNER MOUNTING BAR
NOT SHOWN R-5650 FLICKER SHIELD (2 REQUIRED)
NOT SHOWN R-5913 IGNITOR BRACKET

Page 12 CHG/CHR
HOW TO ORDER REPAIR PARTS...
All parts listed in the Parts List have a Part Number When ordering parts, first obtain the Model Number from the nameplate on your
equipment.Then determine thePart Number (not the Index Number) andthe Description ofeach part from the appropriate illustration and
list. Be sure to give all this information...
Fireplace Model Number Part Description
Fireplace Serial Number Type of Gas (Propane or Natural)
Part Number
Donotorderbolts,screws,washersornuts.Theyarestandardhardwareitemsandcanbepurchasedatanylocalhardwarestore.Orderparts
through your local dealer.
Shipments contingent upon strikes, fires, and all causes beyond our control.
Empire Comfort Systems, Inc. Nine Eighteen Freeburg Ave. Belleville, Illinois 62222-0529
This manual suits for next models
3
Table of contents
Popular Outdoor Fireplace manuals by other brands

Sunnydaze Decor
Sunnydaze Decor CROSSWEAVE FIRE RING manual

Alice's Garden
Alice's Garden BROMO FP90XFT manual

Masport
Masport MAWSON CAMPFIRE Assembly & Usage Instructions

tropitone
tropitone 800154FTBL Installation and operating instructions

Bond
Bond 52147 owner's manual

Courtyard
Courtyard PASADENA owner's manual

Bond
Bond Newcastle HYFP40205-87 owner's manual

BONFEU
BONFEU BONBONO Assembly instructions

Apana
Apana BELLAMENTE FUEGO instruction manual

Better Homes and Gardens
Better Homes and Gardens BH10-093-999-05 Assembly instructions

höfats
höfats BOWL 57 Instructions for use

Prism Hardscapes
Prism Hardscapes Embarcadero 60 Installation, operation & maintenance manual