manuals.online logo
Brands
  1. Home
  2. •
  3. Brands
  4. •
  5. Superior
  6. •
  7. Indoor Fireplace
  8. •
  9. Superior MHW36CB Operating manual

Superior MHW36CB Operating manual

NOTE: DIAGRAMS & ILLUSTRATIONS ARE NOT TO SCALE. 1
INSTALLING THE CHIMNEY SYSTEM
Step 1. Before continuing, checkthe operation
of the damper, as described on Page 4, (refer
to Figure 2)of the Installation Instruction and
Care and Operations (IICO) manual.
Step 3. Position appropriate thimble/firestop
spacercombinationatceilingandnailtemporar-
ily with two (2) 8d nails or equivalent fasteners
(see Figures 3, 4 and 5). Use one fastener on
opposite sides to hold thimble/firestop spacer
combination in position.
In newconstruction, todetermine chimneycenter
line, use plumb line from roof or ceiling above
fireplace to center of flue collar on fireplace.
For remodeling, plumb to center of flue collar
from ceiling above, drive nail through ceiling
from below to mark position, then mark and
cut to passage from above ceiling (around
nail) (Figure 1). Then plumb from ceiling or
roof level directly above hole which has just
been completed.
CAUTION
Allow minimum 1" chimney
air space to framing members
throughout chimneyinstallation.
A minimum 1" air space must be
maintained from all insulation
and building materials extend-
ing for any continuous length
surrounding the chimney.
Reference Figures 10 and 11 in the IICO and
their charts for framing dimensions at Ceilings
and Roofs.
Figure 4
Nail permanently, using at least two (2) more
fasteners, after chimney sections have been
assembled through the thimble/firestop spacer
combination and after any necessary adjust-
ments have been made. Firestop spacer must
be secured by at least four (4) fasteners when
completely installed.
Note: If there is a room above ceiling level,
firestop spacer must be installed on the bottom
side of the ceiling. If an attic is above ceiling
level, firestop thimble must be installed on the
bottom side of ceiling joist (Figure 2).
Step 2. Using standard construction framing
techniques, construct opening for chimney
route up through the ceiling(s) and roof or
through an outside chase.
Framing must maintain adequate minimum air
space clearance at all times.
Figure 3
Figure 1
Note: Trim Thimble/
Extension To Desired Length
And Pitch At The Rood Line
14" Min.
Pitched Roof
Pitched Roof
Bow Roof
14" Min.
Outer Pipe Of
Chimney
Outer Pipe Of
Chimney
Outer Pipe Of
Chimney
14" Min.
Thimble
FM8-AT1
13"
Thimble
FM8-AT1
Thimble
FM8-AT1
Thimble
Extension
F8-TE26
Firestop Thimble
Attic Above
1”
Clearance
Minimum
Firestop Spacer
F8FS-2
Room Above
Figure 2
Addendum to Installation Instructions
Additional Instructions for Alternative Chimney
Installation for Superior™ Round Back Fireplaces with
Bi-Fold Doors and Combustion Air Kit
P/N 900284-00 Rev. NC 10/2014 For use with Models
MHW36R
MHW36CB
P900284-00
NOTE: DIAGRAMS & ILLUSTRATIONS ARE NOT TO SCALE.
2
Note: The installation of the thimble extension
(F8-TE26 in the US or F8-TE26-2 in Canada )
is not required in manufactured homes having
ventilated attic spaces, when thechimney height
is equal to or greater than 12 feet.
Ensure the thimble penetrates the roof opening.
The thimble must extend completely through the
ceiling or roof cavity to the outermost plane of
the roof. Note: Thimble extensions (F8-TE26)
are available from your dealer for constructions
in which the distance between the outside of the
roof and the inside of the ceiling exceeds 13".
The thimbles and their extensions provide for
zero clearances to combustibles and must be
used at the ceiling/roof in manufactured homes
(see Figures 4 and 5 ).
Step 4. Note: Chimney sections are con-
structed with a unique locking tab design,
which ensures an immediate, tight assembly
between sections. Plan your chimney require-
ments carefully before assembly as chimney
is difficult to disassemble after installation. If
disassembled, thetabs mightbecome damaged.
Be certain tabs are properly formed to ensure
locking tabs engage properly.
TheSecurity Chimneys FTF8 chimney system is
a two piece chimney, which snap together from
the fireplace up. Start with the inner flue section
with the lanced end up, snap lock it in to the
matching collar on top of the fireplace.
Note: Assemble one component of chimney
at a time (inner section first, then outer section
last) before proceeding with the next complete
section.
Continue to assemble the chimney up through
framed opening. Assemble just enough to
penetrate the roof flashing openings (Figure
8). Maintain 1"* minimum air space to insula-
tion and building materials and always check
each chimney joint (inner and outer) to ensure
proper engagement. Check vertical alignment
of chimney so that it projects from the roof
in true vertical position.
Security's chimney sections do not need to be
screwed together. Additional reinforcement is
not necessary except in certain offset conditions
(refer to Page 7, Figure 22).
Step 5. The height of vertical chimney pipe
supported only by the fireplace must not exceed
30'. Chimney heights above 30' must be sup-
ported by a Model FTF8-S4 stabilizer installed
at 30' intervals.
Note: The Model FTF8-S4 adds 3" net effective
height to the total chimney system.
Install the Model FTF8-S4 stabilizer by fitting
inner section down into respective section of
proceeding flue pipe and locking outer stabilizer
section into place over the outer chimney pipe.
Position for proper clearance through framed
opening and nail straps securely (under tension
in “shear”) into place on framing. Use 8d nails.
Attach successive lengths of chimney pipe
directly to stabilizer using same techniques as
described in Step 4 (Figure 9).
Note: Do not apply excessive pressure to any
subsequent chimney sections following the
stabilizer when installing. Ensure each subse-
quent chimney section is securely attached by
testing as noted in Step 4.
Step 6. Select the proper Security Chimneys
roof flashing based on pitch of roof. Use chart
below for selection:
WARNING
Donotallowinsulatingmaterialsto
be blown into the space inside the
thimble and the chimney. To do so
could result in a fire hazard.
Figure 9
FTF8-S4 Stabilizer
Roof Pitch FTF8
Flat to 6/12 F8-F6
6/12 to 12/12 F8-F12
Table 1
Figure 6
Outer pipe section installs in just the opposite
way; the lanced end goes down and each new
section goes OVER the outside of the previous
section installed (Figure 7).
Figure 7
Locking
Tabs
(Lances)
Thimble Cathedral
Ceiling
14" Min.
Outer Pipe Of
Chimney
Use Adjustable Thimble
FM8-AT1 For All Ceiling
Piches, From Flat To
3/12 Pitch.
**Note: 2” clearanceto combustibles required
in Canada.
At all subsequent joints, the upper flue section
fits into the preceding flue section. Each piece
snaps together by means of locking tabs (9
locking tabs per joint). Check each piece by
pulling up slightly from the top to ensure proper
engagement before installing the next section.
If the flue has been installed correctly, it will not
separate when you REV. NC it. Also, the inner
flue joint where each section is joined should
be tight and flat without gaps (Figure 6).
Figure 5
Note: For Canadian installations, all chimney
installed outsidethe building mustbe constructed
with galvalume (outer sections only) effective
January 1,1992. The appropriatemodeldesigna-
tions are located in the back of this manual.
1"** Min. Air Space
To Combustibles
Figure 8
NOTE: DIAGRAMS & ILLUSTRATIONS ARE NOT TO SCALE. 3
NOTE: DIAGRAMS & ILLUSTRATIONS ARE NOT TO SCALE.
Step 10. Using a CTD Termination:
1. HoldtheCTDovertopoflastchimney section
(Figure 14).
3. Center outer locking section over outer flue
pipe. Push down until locking tabs are firmly
engaged.
4. Pull up slightly on CTD to ensure locking
joint has firmly engaged.
Note: It is recommended that all exterior
exposed metal fireplace components; such as
terminations, flashings, storm collars and/or
flue be painted with a premium quality, high
temperature, rust preventative paint designed
for metal. This is especially important when
installations are made in abnormally adverse
or corrosive environments; such as near lakes,
oceans or in areas with consistently high
humidity conditions. Consult the paint manu-
facturers instructions for proper preparation
and application.
TEN FOOT RULE SUMMARY
The minimum chimney height above the roof
and/or to adjacent walls and buildings is speci-
fied by all major building codes.
Step 8. The standard Security Chimneys FTF8
roof flashing assemblies include a storm collar.
Slide the storm collar over outer chimney, rest
on flashing spacers and align with top surface
of flashing. Insert tab in slot, pull tight and bend
tab back over slot.
Seal storm collar to outer chimney with roof
caulking or mastic around entire circumfer-
ence of pipe. Also add extra roof caulking to
the tab/slot area to seal completely against
water penetration (Figure 12). Check all joints
very carefully to ensure no water intrusion can
take place.
Step 9. FTF locking bands, Model FLB, may be
required if the chimney extends too high above
the roof flashing. Asa general rule, if the chimney
extends more than 6' above theroof flashing, the
use of locking bands is advisable to strengthen
the chimney assembly. Align the locking band at
the chimney joint. Locking bands wrap around
pipe joints equally covering the joints of both
pipe sections. Usethe nut provided andTIGHTEN
snugly. Do not overtighten as this might damage
the chimney section (refer to Figure 12).
Note: If chimney extends more than 8' above
roof surface, guy wires are also recommended.
Use three (3) guy wires, attach to locking band
assembly, extend and secure to roof in a trian-
gular pattern (Figure 13). Guy wires are not
supplied by the manufacturer.
Step 7. Secure flashing by nailing along the
perimeter into roof using 8d nails or equivalent
fasteners. If shingled roof, slide upper end and
sides of roof flashing under shingles (trim if
necessary), seal the top and both sides of the
flashing to the roof with roof caulking. Cover
fastener heads with roof caulking (Figure 11).
Figure 11
Figure 12
Locking Band
Mastic
Or Roof
Caulking
Roof Ridge
120
°
Figure 13
Figure 14
Figure 15
Less than
10' (3m)
3' (914mm)
Min.
2' (610mm) Min.
10' (3m) 3' (914mm)
Min.
CTD
Termination Chimney
2. Center inner slip section in inner flue pipe-
slip down.
Next, slide roof flashing over extended chimney
section that previously has been installed above
the roof opening in Step 4. Slide flashing all the
way down until the flashing base rests flat on
the roof (Figure 10). Again, check the vertical
position of the chimney and the 1"** minimum
air space to combustibles.
**Note: 2” clearance to combustibles required in Canada.
FTF8 Chimney
FTF8 Flashing
Do Not Seal
Figure 10
NOTE: DIAGRAMS & ILLUSTRATIONS ARE NOT TO SCALE.
4
If the horizontal distance from the peak of the
roof is less then 10', thetop of the chimney must
be at least 2' above the peak of the roof.
If the horizontal distance from the chimney
edge to the peak of the roof is more than 10' a
chimney height reference point is established
on the roof surface 10' horizontally from the
chimney edge. The top of the chimney must
be at least 2' above this reference point. In all
cases, the chimney cannot be less then 3' above
the roof at the edge of the chimney.
The 2' in 10' rule is necessary in the interest
of safety but does not ensure smoke-free op-
eration. Trees, buildings, adjoining roof lines,
adverse wind conditions, etc., may require a
taller chimney should the fireplace not draft
properly (Figure 15).
FTF8 CHIMNEY COMPONENT
CALCULATIONS
The minimum installed height of the completed
fireplace system is 10' 6". The maximum height
is 40' 0" when the chimney is exposed.
To determine the number of chimney sections
and chimney components required, follow
these steps:
1. Determine total vertical height of thefireplace
installation. This dimension is the distance from
the surface the fireplace sets on to the point
where smoke exits from the termination.
2. Determine the number of chimney com-
ponents required, except chimney sections.
This would include thimbles, extensions, roof
flashing, etc.
3. The effective heights of the components
are:
The Fireplace = 37”
FTF8-12 = 10-1/4”
FTF8-18 = 16-1/4”
FTF8-24 = 22-1/4”
FTF8-36 = 34-1/4”
FTF8-48 = 46-1/4”
FTF8-CTD Termination = 6”
4. Determine amounof chimneyheight required
by subtracting total combined height of all pre-
selected components (fireplace and chimney
components from total desired height).
Reference Vertical Elevation Chart and deter-
mine the number of chimney sections (quantity
and length) required.
To clear any overhead obstructions, you may
offset your chimney systemusing Security's 30°
offset and return elbows. Use two elbows - an
offset elbow to initiate the offset and a return
elbow to terminateit. A 30° offset elbow, angling
in any direction,may be thefirst component used
off the top of the fireplace flue collar.
The offset and return elbows may be attached
together, or a section or sections of chimney
may be used between, but do not exceed 20' in
total length between elbows. If sections of pipe
exceed 10' between elbows,a chimney stabilizer
must be used at the midpoint (see Figure 17).
The stabilizer support straps must be attached
under tension (in shear) to structural framing
members above. When two sets of elbows
are used, the maximum combined length of
chimney used between elbows cannot exceed
20' (see Figure 18). Example: If C1= 10' then
C2cannot exceed 10'.
If an offset exceeds 6' in length, each chimney
joint beyond the first 6' of offset to the return
elbow, must be secured by a No. 8 x 1/2" sheet
metal screw located at the underside of the joint
(see Figure 20).
A 1/8" diameter hole must be drilled in the
chimney joint using a 1/8” diameter drill. Hole
should be drilled in center of joint overlap (see
Figure20). Be sureto drill only through theouter
chimney casting. Do not puncture the inner flue.
Maximum offset of chimney system is 30°.
Two offsets must not be assembled to form
a 60° offset. However, two sets of offset and
return elbows may be used on a single flue
system, provided the total height of the system
exceeds 25'.
Return elbow support straps must be securely
attached under tension (in shear) to structural
framing members above. Do not substitute a
FTF8-30 offset elbow in place of a FTF8-E30
return elbow.
OFFSET CALCULATIONS
Step 1. Use Offset Chart to determine amount of
horizontal offset (A) and height (B) for various
chimney section assemblies.
Step 2. Use “Height of Chimney Only” column
in The Vertical Elevation Chart to determine
combinations of chimney used above return
elbow to achieve desired heights. Reference
Components Effective Height Chart in vertical
elevation chart section.
Step 3. Use Elevation Chart as job estimator
only. Add necessary firestop spacers and sta-
bilizers as required. Firestop spacers must be
used as shown in Figure 16 and stabilizers as
shown in Figure 9.
Stabilizer
A
1
20'
Max.
B
1
10' Max.
Offset
Elbow
Return
Elbow
C
2
C
1
Figure 17
Figure 16
F8FS30
Firestop Spacer
FTF8-S4 Stabilizer
30°Firestop
And Room Above
10'
Max.
Room Above
1" Min.
Air Space
1" Min.
Air Space
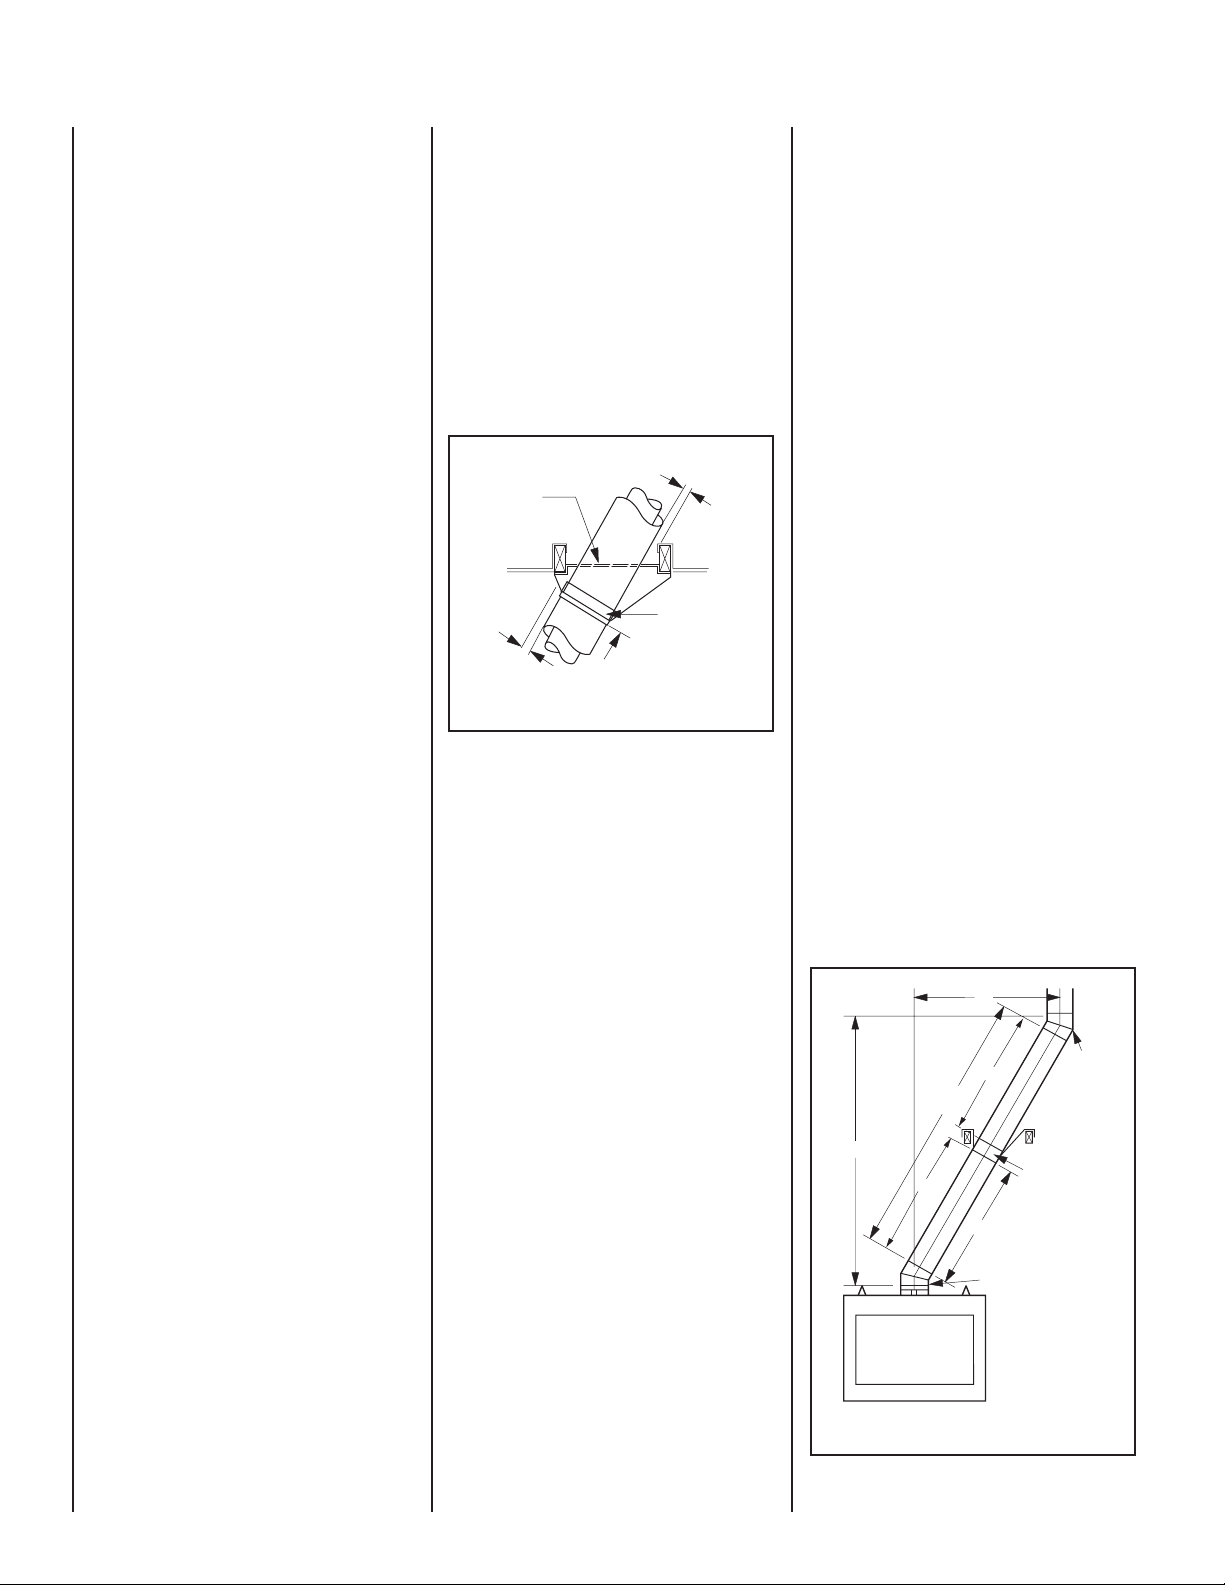
SPECIAL OFFSET INSTRUCTIONS
Chimney 30° Offset through Floor or Ceiling
It may be necessary to assemble the chimney
at 30° when passing through the floor or ceil-
ing area. Use the F8FS30-2 firestop spacer as
shown in Figure 16. Support the chimney at
floor or ceiling penetration with a FTF8 stabilizer
if distance of chimney below ceiling is 10' or
more. Maintain 1" minimum air space to com-
bustibles from chimney sections. The chimney
must pass vertically through the attic space.
NOTE: DIAGRAMS & ILLUSTRATIONS ARE NOT TO SCALE. 5
FTF8 VERTICAL ELEVATION CHART
Table 3a
Height Of Chimney
Only
Number Of FTF8
Chimney Components
Height Of
Chimney
Only
Inches Feet/Inches 12" 18" 24" 36" 48" -S4 Meters
247-1/2 20' 7-1/2" 0 1 0 0 5 – 6.29
253-1/2 21' 1-1/2" 0 0 1 0 5 – 6.44
257-3/4 21' 5-3/4" 1 1 0 0 5 – 6.55
263-3/4 21' 11-3/4" 1 0 1 0 5 – 6.70
269-3/4 22' 5-3/4" 0 1 1 0 5 – 6.85
275-3/4 22' 11-3/4" 1 0 0 1 5 – 7.00
277-1/2 23' 1-1/2" 0 0 0 0 6 – 7.05
281-3/4 23' 5-3/4" 0 1 0 1 5 – 7.16
287-3/4 23' 11-3/4" 1 0 0 0 6 – 7.31
293-3/4 24' 5-3/4" 0 1 0 0 6 – 7.46
299-3/4 24' 11-3/4" 0 0 1 0 6 – 7.61
304 25' 4" 1 1 0 0 6 – 7.72
310 25' 10" 1 0 1 0 6 – 7.87
316 26' 4" 0 1 1 0 6 – 8.03
322 26' 10" 1 0 0 1 6 – 8.18
323-3/4 26' 11-3/4" 0 0 0 0 7 – 8.22
328 27' 4" 0 1 0 1 6 – 8.33
334 27' 10" 1 0 0 0 7 – 8.48
340 28' 4" 0 1 0 0 7 – 8.64
346 28' 10" 0 0 1 0 7 – 8.79
350-1/4 29' 2-1/4" 1 1 0 0 7 – 8.90
356-1/4 29' 8-1/4" 1 0 1 0 7 – 9.05
365-1/4 30' 5-1/4" 0 1 1 0 7 1 9.28
371-1/4 30' 11-1/4" 1 0 0 1 7 1 9.43
373 31' 1" 0 0 0 0 8 1 9.47
377-1/4 31' 5-1/4" 0 1 0 1 7 1 9.58
383-1/4 31' 11-1/4" 1 0 0 0 8 1 9.73
389-1/4 32' 5-1/4" 0 1 0 0 8 1 9.89
395-1/4 32' 11-1/4" 0 0 1 0 8 1 10.04
399-1/2 33' 3-1/2" 1 1 0 0 8 1 10.15
405-1/2 33' 9-1/2" 1 0 1 0 8 1 10.30
411-1/2 34' 3-1/2" 0 1 1 0 8 1 10.45
417-1/2 34' 9-1/2" 1 0 0 1 8 1 10.60
419-1/4 34' 11-1/4" 0 0 0 0 9 1 10.65
423-1/2 35' 3-1/2" 0 1 0 1 8 1 10.76
429-1/2 35' 9-1/2" 1 0 0 0 9 1 10.91
435-1/2 36' 3-1/2" 0 1 0 0 9 1 11.06
441-1/2 36' 9-1/2" 0 0 1 0 9 1 11.21
445-3/4 37' 1-3/4" 1 1 0 0 9 1 11.32
451-3/4 37' 7-3/4" 1 0 1 0 9 1 11.47
457-3/4 38' 1-3/4" 0 1 1 0 9 1 11.63
463-3/4 38' 7-3/4" 1 0 0 1 9 1 11.78
465-1/2 38' 9-1/2" 0 0 0 0 10 1 11.82
469-3/4 39' 1-3/4" 0 1 0 1 9 1 11.93
475-3/4 39' 7-3/4" 1 0 0 0 10 1 12.08
481-3/4 40' 1-3/4" 0 1 0 0 10 1 12.24
486 40' 6" 1 0 1 1 9 1 12.34
Height Of Chimney
Only
Number Of FTF8
Chimney Components
Height Of
Chimney
Only
Inches Feet/Inches 12" 18" 24" 36" 48" -S4 Meters
10-1/4 0' 10-1/4" 1 0 0 0 0 – 0.26
16-1/4 1' 4-1/4" 0 1 0 0 0 – 0.41
22-1/4 1' 10-1/4" 0 0 1 0 0 – 0.57
26-1/2 2' 2-1/2" 1 1 0 0 0 – 0.67
32-1/2 2' 8-1/2" 1 0 1 0 0 – 0.83
34-1/4 2' 10-1/4" 0 0 0 1 0 – 0.87
38-1/2 3' 2-1/2" 0 1 1 0 0 – 0.98
44-1/2 3' 8-1/2" 1 0 0 1 0 – 1.13
46-1/4 3' 10-1/4" 0 0 0 0 1 – 1.17
50-1/2 4' 2-1/2" 0 1 0 1 0 – 1.28
56-1/2 4' 8-1/2" 1 0 0 0 1 – 1.44
62-1/2 5' 2-1/2" 0 1 0 0 1 – 1.59
68-1/2 5' 8-1/2" 0 0 1 0 1 – 1.74
72-3/4 6' 3/4" 1 1 0 0 1 – 1.85
78-3/4 6' 6-3/4" 1 0 1 0 1 – 2.00
84-3/4 7' 3/4" 0 1 1 0 1 – 2.15
90-3/4 7' 6-3/4" 1 0 0 1 1 – 2.31
92-1/2 7' 8-1/2" 0 0 0 0 2 – 2.35
96-3/4 8' 3/4" 0 1 0 1 1 – 2.46
102-3/4 8' 6-3/4" 1 0 0 0 2 – 2.61
108-3/4 9' 3/4" 0 1 0 0 2 – 2.76
114-3/4 9' 6-3/4" 0 0 1 0 2 – 2.91
119 9' 11" 1 1 0 0 2 – 3.02
125 10' 5" 1 0 1 0 2 – 3.18
131 10' 11" 0 1 1 0 2 – 3.33
137 11' 5" 1 0 0 1 2 – 3.48
138-3/4 11' 6-3/4" 0 0 0 0 3 – 3.52
143 11' 11" 0 1 0 1 2 – 3.63
149 12' 5" 1 0 0 0 3 – 3.78
155 12' 11" 0 1 0 0 3 – 3.94
161 13' 5" 0 0 1 0 3 – 4.09
165-1/4 13' 9-1/4" 1 1 0 0 3 – 4.20
171-1/4 14' 3-1/4" 1 0 1 0 3 – 4.35
177-1/4 14' 9-1/4" 0 1 1 0 3 – 4.50
183-1/4 15' 3-1/4" 1 0 0 1 3 – 4.65
185 15' 5" 0 0 0 0 4 – 4.70
189-1/4 15' 9-1/4" 0 1 0 1 3 – 4.81
195-1/4 16' 3-1/4" 1 0 0 0 4 – 4.96
201-1/4 16' 9-1/4" 0 1 0 0 4 – 5.11
207-1/4 17' 3-1/4" 0 0 1 0 4 – 5.26
211-1/2 17' 7-1/2" 1 1 0 0 4 – 5.37
217-1/2 18' 1-1/2" 1 0 1 0 4 – 5.52
223-1/2 18' 7-1/2" 0 1 1 0 4 – 5.68
229-1/2 19' 1-1/2" 1 0 0 1 4 – 5.83
231-1/4 19' 3-1/4" 0 0 0 0 5 – 5.87
235-1/2 19' 7-1/2" 0 1 0 1 4 – 5.98
241-1/2 20' 1-1/2" 1 0 0 0 5 – 6.13
Table 3b
NOTE: DIAGRAMS & ILLUSTRATIONS ARE NOT TO SCALE.
6
A1
C1
B1
B2
C2
A2
A1
C1
B1
B2
C2
A2
Chimney
Section
Joints
No. 8 x 1/2" SMS
tAderiuqeRswercS
'6tsaPtnioJyrevE
nIderiuqeRswercSoN
tesffOfo'6tsriFroFstnioJ
4'
6'
Figure 18
Figure 19
FTF8 OFFSET ELEVATION CHART
A
Offset
(inches)
B
Offset
(inches)
FTF8-S4
Stabilizer
Number of FTF8 Chimney Sections A
Offset
(meters)
B
Offset
(meters)
12" 18" 24" 36" 48"
4 15 – 0 0 0 0 0 0.10 0.40
9 24 – 1 0 0 0 0 0.23 0.63
12 29 – 0 1 0 0 0 0.31 0.76
14 33 – 2 0 0 0 0 0.36 0.85
15 35 – 0 0 1 0 0 0.38 0.89
17 38 – 1 1 0 0 0 0.44 0.98
20 43 – 0 2 0 0 0 0.51 1.11
21 45 – 0 0 0 1 0 0.54 1.15
22 47 – 2 1 0 0 0 0.57 1.21
23 49 – 0 1 1 0 0 0.59 1.25
25 52 – 1 2 0 0 0 0.64 1.34
27 55 – 0 0 0 0 1 0.69 1.42
28 57 – 1 1 1 0 0 0.72 1.47
29 59 – 0 1 0 1 0 0.74 1.51
31 63 – 0 2 1 0 0 0.80 1.60
32 64 – 0 0 1 1 0 0.82 1.64
33 66 – 2 1 1 0 0 0.85 1.70
35 69 – 0 1 0 0 1 0.90 1.77
36 72 – 2 0 2 0 0 0.93 1.83
38 75 – 0 0 0 2 0 0.97 1.91
40 78 – 0 1 1 1 0 1.03 2.00
42 82 – 0 2 2 0 0 1.08 2.09
44 85 – 0 0 0 1 1 1.12 2.17
46 89 – 0 1 0 2 0 1.18 2.26
50 95 – 0 0 0 0 2 1.28 2.43
52 99 – 0 1 0 1 1 1.33 2.53
55 104 – 0 0 1 1 1 1.41 2.66
58 109 – 0 1 0 0 2 1.48 2.79
61 115 – 0 0 0 2 1 1.56 2.92
63 118 – 0 1 1 1 1 1.61 3.02
68 128 1 0 0 0 1 2 1.75 3.25
71 131 1 0 1 0 2 1 1.80 3.35
74 138 1 0 0 0 0 3 1.90 3.52
77 142 1 0 1 0 1 2 1.96 3.61
80 147 1 0 0 1 1 2 2.03 3.74
83 152 1 0 1 0 0 3 2.11 3.88
86 157 1 0 0 0 2 2 2.18 4.01
88 161 1 0 1 1 1 2 2.24 4.10
92 168 1 0 0 0 1 3 2.34 4.27
94 171 1 0 1 0 2 2 2.39 4.36
98 178 1 0 0 0 0 4 2.49 4.54
100 182 1 0 1 0 1 3 2.54 4.63
103 187 1 0 0 1 1 3 2.62 4.76
106 192 1 0 1 0 0 4 2.70 4.89
109 197 1 0 0 0 2 3 2.77 5.02
115 208 1 0 0 0 1 4 2.92 5.29
121 218 1 0 0 0 0 5 3.08 5.55
Table 4
NOTE: DIAGRAMS & ILLUSTRATIONS ARE NOT TO SCALE. 7
Offset Elbow Assembly
Offset elbows install the same as chimney
sections. First, snap the inner section INTO the
preceding inner section of flue. Check connec-
tion by pulling up slightly to ensure a tight fit.
Next, the outer sections snap lock OVER the
preceding outer section of chimney. Again,
check outer section by pulling up slightly to
ensure proper connection is made.
Return Elbow Assembly
Return elbows install the same way as round
terminations and stabilizers:
Step 1. Hold return elbow over top of last
chimney section.
Step 2. Center inner slip section into inner flue
pipe-slip down.
Step 3. Center outer-locking section over outer
chimney pipe. Push down until locking
joint has firmly engaged.
Step 4. Pull up slightly on return elbow to ensure
locking joint has firmly engaged.
Step 5. Secure support straps to framing
members by nailing under tension in
sheer (Figure 22).
INSTALLING OFFSETS
First, review the Offset Elevation Chart and
Figure 21 for reference.
Step 1. Determine the offset distance where
chimney is to pass through the first
ceiling-dimension “A.” To find this
point on your ceiling, first determine
the center point for a vertical chimney
following the instructions for vertical
installation.
Measure height to the ceiling from the
top of fireplace-dimension “B.” Use
the appropriate Offset Elevation Chart
to find dimension “A.” Mark point
where you will drive your nail to show
the center point for your offset ceiling
cut.
Step 2. Proceed by using the Straight Up In-
stallation Instructions for cutting and
framing ceiling and roof openings.
Note: See Framing and Dimension Chart for
the sizes of the ceiling and roof openings. The
size of the roof opening varies with the degree
of pitch of the roof.
Notes:
• The return elbow assembly performs the
same function as a stabilizer. Consider this
when determining the need for a stabilizer.
• Do not apply excessive pressure to any
subsequent chimney sectionfollowing return
elbow assembly when installing. Ensure that
each subsequent chimney section is securely
attached by testing as noted above.
Underside Of Chimney
Figure 20
Figure 21
Chimney Section (S)
FTF8-E30 Return Elbow*
FTF8-30 Offset Elbow* B
A
*Part of Offset/Return Package Model FTF8-ES30
Figure 22
Return
Elbow
NOTES
NOTE: DIAGRAMS & ILLUSTRATIONS ARE NOT TO SCALE.
8
63L10 FTF8-12
63L13 FTF8-18
H0522 FTF8-24
63L14 FTF8-36
63L15 FTF8-48
63L92 FTF8-18C**
Chimney Section 63L93 FTF8-36C**
91L46 F8-TE26
Thimble Extension 26" 19M52 F8-TE26-2**
HO325 FM8-AT1
Adjustable Firestop/Thimble HO326 FM8-AT2**
HO559 FM8-PK10
Adjustable Chimney Pipe Kits HO560 FM8-PK20**
Stabilizer 63L25 FTF8-S4
INSTALLATION COMPONENTS
Firestop Spacer (Flat) (Single Pack) 63L29 F8FS
Firestop Spacer (Flat) (Single Pack) 63L31 F8FS-2**
Firestop Spacer (Flat) (12 Pack) 94L76 F8FS-12
Firestop Spacer (30°) 63L30 F8FS30
Firestop Spacer (30°) 63L32 F8FS30-2**
Contemporary Termination -
Round 63L42 FTF8-CTD
Contemporary Termination -
Round, Black H2238 FTF8-CTDP
19M55 F8F6MH
19M56 F8F12MH
63L38 (0-6/12) F8F6
Flashing 63L39 (6/12-12/12) F8F12
Storm Collar 63L59 FSC
Storm Collar (12 pack) 94L77 FSC-B-12
Offset/ Return Package
30 Degree Offset/Return Elbow FTF8-ES30 63L22
15 Degree Offset/Return Elbow FTF8-OR15 63L28 Cold Climate Kits 63L61 FTF8-CCK1-LD**
**Required For Canadian Installations 2"
Clearances - As Applicable.
900284-00
Rev. NC
07/2014 1508 Elm Hill Pike, Suite 108
Nashville, TN 37210
www.IHP.US.com P900284-00

This manual suits for next models

1

Other Superior Indoor Fireplace manuals

Superior DS-36TN User manual

Superior

Superior DS-36TN User manual

Superior BRT4036TEN User manual

Superior

Superior BRT4036TEN User manual

Superior Signature DRT63STTEN User manual

Superior

Superior Signature DRT63STTEN User manual

Superior VRT2036B User manual

Superior

Superior VRT2036B User manual

Superior DRL6542TEN User manual

Superior

Superior DRL6542TEN User manual

Superior UVF-36 and User manual

Superior

Superior UVF-36 and User manual

Superior VRL4543ZMN User manual

Superior

Superior VRL4543ZMN User manual

Superior VRE6036 Owner's manual

Superior

Superior VRE6036 Owner's manual

Superior WRE3036WH User manual

Superior

Superior WRE3036WH User manual

Superior DRT3033 User manual

Superior

Superior DRT3033 User manual

Superior VRE6000 Series Owner's manual

Superior

Superior VRE6000 Series Owner's manual

Superior DRT35STDMN User manual

Superior

Superior DRT35STDMN User manual

Superior VRE4336ZEN User manual

Superior

Superior VRE4336ZEN User manual

Superior BRT40STTMN User manual

Superior

Superior BRT40STTMN User manual

Superior DRL4543TEN User manual

Superior

Superior DRL4543TEN User manual

Superior SSDVST-CNM-B User manual

Superior

Superior SSDVST-CNM-B User manual

Superior SDV35-N User manual

Superior

Superior SDV35-N User manual

Superior VRE4032RS Owner's manual

Superior

Superior VRE4032RS Owner's manual

Superior VRT4032ZMN User manual

Superior

Superior VRT4032ZMN User manual

Superior SDV35-2 User manual

Superior

Superior SDV35-2 User manual

Superior SVFS32NRK Quick start guide

Superior

Superior SVFS32NRK Quick start guide

Superior DRL4543TEN User manual

Superior

Superior DRL4543TEN User manual

Superior SLDVT Series User manual

Superior

Superior SLDVT Series User manual

Superior VCM3026ZTN User manual

Superior

Superior VCM3026ZTN User manual

Popular Indoor Fireplace manuals by other brands

Heat & Glo I25X-N-AU owner's manual

Heat & Glo

Heat & Glo I25X-N-AU owner's manual

bemodern 2983 Instructions for use

bemodern

bemodern 2983 Instructions for use

Heat & Glo SL-550TR-E owner's manual

Heat & Glo

Heat & Glo SL-550TR-E owner's manual

Boldflame SP5768W user manual

Boldflame

Boldflame SP5768W user manual

Evonicfires E Series instruction manual

Evonicfires

Evonicfires E Series instruction manual

Heat & Glo 550TRSI-AUF owner's manual

Heat & Glo

Heat & Glo 550TRSI-AUF owner's manual

Focal Point F500115 installation instructions

Focal Point

Focal Point F500115 installation instructions

Evonicfires NEWTON instruction manual

Evonicfires

Evonicfires NEWTON instruction manual

Heat & Glo Cyclone-BC owner's manual

Heat & Glo

Heat & Glo Cyclone-BC owner's manual

crystal fires Manhattan User, installation and servicing instructions

crystal fires

crystal fires Manhattan User, installation and servicing instructions

Heat & Glo ST-HVB-CE Specifications

Heat & Glo

Heat & Glo ST-HVB-CE Specifications

Focal Point Charmouth Installation & user's instructions

Focal Point

Focal Point Charmouth Installation & user's instructions

RealFlame Aspen Assembly instructions

RealFlame

RealFlame Aspen Assembly instructions

Quality Craft MW914T-35BK manual

Quality Craft

Quality Craft MW914T-35BK manual

Evonicfires COLORADO Installation & user's instructions

Evonicfires

Evonicfires COLORADO Installation & user's instructions

Classic Flame CFI-950-4 manual

Classic Flame

Classic Flame CFI-950-4 manual

Haas+Sohn DK LAUSITZ easy Instructions for emplacement and operation

Haas+Sohn

Haas+Sohn DK LAUSITZ easy Instructions for emplacement and operation

Vanguard VI33NR OWNER'S OPERATION AND INSTALLATION MANUAL

Vanguard

Vanguard VI33NR OWNER'S OPERATION AND INSTALLATION MANUAL

manuals.online logo
manuals.online logoBrands
  • About & Mission
  • Contact us
  • Privacy Policy
  • Terms and Conditions

Copyright 2025 Manuals.Online. All Rights Reserved.