SUPREME Diamond User manual


TABLE OF CONTENTS
Warranty……………………………………………………………………………………...3
Technical Specicaons………………………………………………………………..3
Important Safety Instrucons……………………………………………………….4
Unpacking/ Standard Accessories………………………………………………...4
Installaon……………………………………………………………………………………5
Operaon …………………………………………………………………………………….7
Maintenance………………………………………………………………………………..7

The Supreme Comprehensive Hand Dryer Warranty—36 Month Warranty
36 month warranty on all operang parts against the defecve materials and faulty workmanship for a period of
36 months from date of sale, subject to it being installed, maintained and used in accordance with the
manufacturers instrucons.
SPL Limited warrants that should any operang part of the dryer fail within 36 months of installaon, that part
will be replaced or repaired free of charge. Mileage and travelling me outside metropolitan areas by
tradesperson or accredited service is payable by the customer. Alternavely, the dryer may be returned to SPL
Limited or its accredited service agents for repair under warranty when the cost of the removal, re-installaon
and cartage will be payable by the customer.
This warranty does not cover the damages from non-operaon of the hand dryer, the use of non-authorised
parts, failure due to accident, misuse, abuse or failure to follow installaon and maintenance instrucons or
consequenal damage to any other goods, furnishings or property.
This warranty does not displace any statutory warranty in relaon to the dryer but any liability of SPL Limited
under any statutory warranty will be limited to a replacement or repair of the dryer or payment of the cost of
such replacement or repair at the opon of SPL Limited.
3

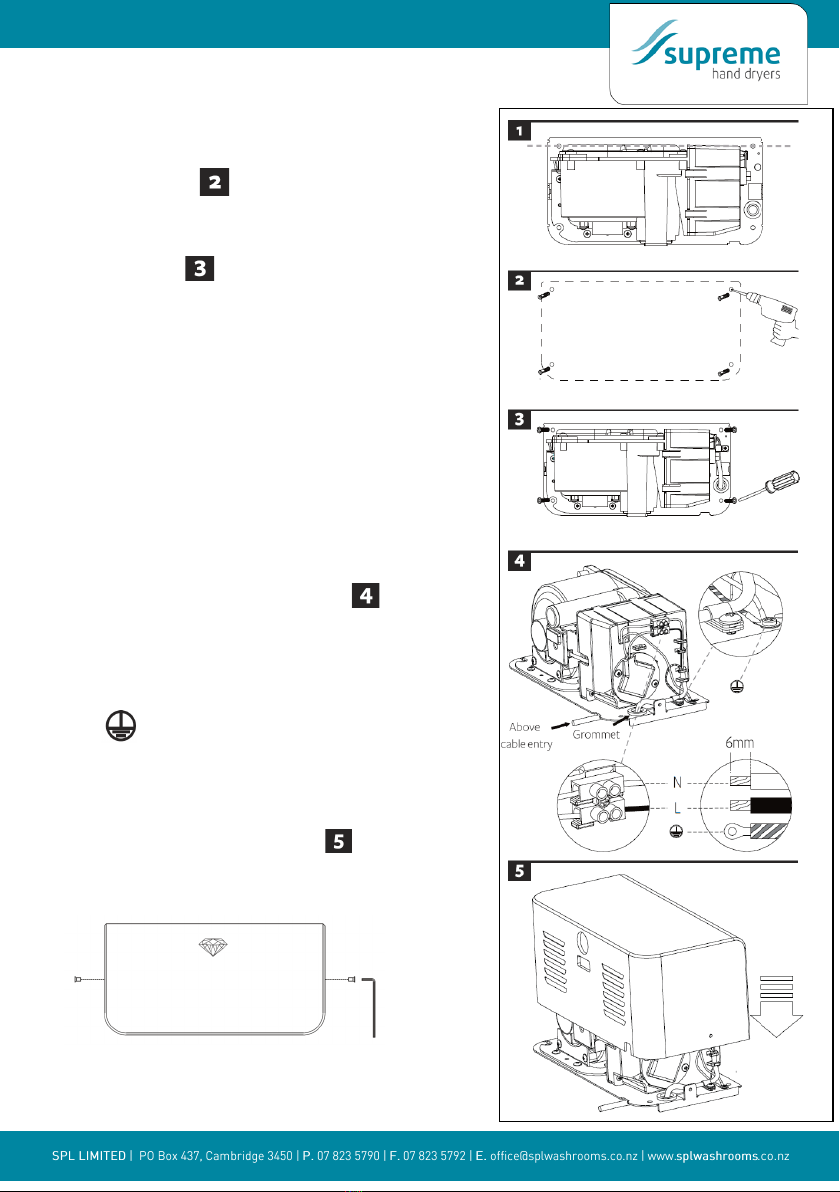
1. Remove all packing material. Recycling is recommended
2. Carefully remove the hand dryer from the shipping carton.
3. Use cauon when removing the casing. The casing may have sharp edges/ corners which may cut
or cause harm.
4. Inspect carefully for any damage that may have occurred during transit. Check for any loose,
missing or damaged parts. If the hand dryer is damaged, promptly inform the shipper or dealer
where you purchased it.
WARNING - TO REDUCE THE RISK OF FIRE, ELECTRICAL SHOCK, OR INJURY TO PERSONS, OBSERVE
THE FOLLOWING:
• Use this unit only in the manner intended by the manufacturer. Manufacturer is not
responsible for damage caused by misuse or defecve installaons.
• The instrucons contained within the installaon template enclosed must be followed carefully when
installing this unit. Failure to accurately follow the instrucons may result in the incorrect operaon of
this unit, damage to property and/or personal injury.
• Installaon work and electrical wiring must be carried out by qualied person(s) in accordance with all
applicable codes and standards.
• When cung or drilling into wall or ceiling, do not damage electrical wiring and other hidden ulies.
• This unit has been designed for indoor use only, protected from water, sun and extreme temperatures.
Do not use it outdoors or close to moisture and heat generators.
• This appliance can be used by children and persons with reduced physical, sensory or mental capabilies
or lack of experience and knowledge if they have been given supervision or instrucon concerning use of
the appliance in a safe way and understand the hazards involved. Do not allow children to play with the
appliance or carry out cleaning and user maintenance on the hand dryer.
• If the supply cord is damaged, it must be replaced by the manufacturer, its service agent or similarly
qualied persons in order to avoid a hazard.
Hex Key
Wall Mounng
Anchors
Flat cable clamp
and screw
Main Unit
Standard items included with the hand dryer are:
4

CAUTION
• Make sure power supply is switched o.
• All electrical installaon and repair work should be carried out by a qualied person in accordance with
current local codes or regulaons.
• Check that the electrical supply corresponds to that shown on the rang plate. If the unit is connected to
any electrical supply other than stated on the rang plate of the unit, permanent damage or unsafe
operaon of the unit may result.
• The unit must be mounted on a at vercal wall capable of supporng the full weight of the unit.
• Do not use the backplate as a guide when drilling. Ensure no pipe work (gas, water, air) or electrical
cables, wires or ductwork are located directly behind the drilling/mounng area.
1. UNPACKING
• 1.1 Place the main cover on a cloth to avoid marking its
surface.
• 1.2 Remove the (2) security screws from the main body,
using the hex key provided. Store safely.
• 1.3 Li the front cover o the main body.
CAUTION: Before installaon decide if the cable entry is to be from the rear or the above. Follow the relevant
instrucons. Do not use the backplate as a guide when drilling.
5
Mens Washroom 1300mm
Ladies Washroom 1265mm
Children 11-14yrs 1108mm
Children 8-11yrs 1028mm
Children 5-8yrs 928mm
Disabled persons 1050mm
Recommended height measurements
from the oor to top screws

2. POSITIONING
• 2.1 Mark the locaon on the wall with a pencil. Use
the drilling template to mark the locaons for the four
xing points.
• 2.2 Pre-drill the wall in the marked locaons using a
5/16 (8mm) drill, inset the plasc anchors and tap ush
to the wall.
• 2.3 Fix the backplate to the wall. Screw to the wall and
secure with the appropriate ng.
3. INSTALLING THE POWER CABLE & CONNECTION
TERMINAL BLOCK
WARNING: ENSURE POWER IS NOT CONNECTED
3.1 Pull the cable through the grommet. Ensure the cable is
long enough to route correctly through the backplate to the
terminal block.
3.2 The cable must sit in the dedicated channel.
3.3 As shown, connect cable to terminal block
3.4 Screw in terminal block.
3.5 Fix the cable clamp with screw in the backplate.
CAUTION: Connect the earthing wire to the terminal block
marked
4. ATTACHING MAIN BODY
4.1 Posion cover over backplate
4.2 Insert and ghten the (2) security screws into the side of the
main body with the hex key as illustrated below.
4.3 Turn power on.
4.4 Test unit for correct operaon.
6

1. Non touch operaon.
2. Shake excess water from hands
3. Place hands under the outlet to start operaon.
4. Slowly move hands back and forth through the hand dryer.
5. Sensor has blue light assist.
6. Stops automacally aer hands are removed.
If there is an electrical or motor problem a blue LED will blink when
hands are placed under sensor.
REGULAR MAINTENANCE
Regularly clean the outer casing using a so, damp cloth to gently wipe away any dirt.
CAUTION: Never use abrasives or chemicals to clean the cover. Do not soak.
PERIODICAL DEEP CLEAN
Cleaning and maintenance must be performed by qualied electrical personnel.
1. Disconnect the electrical supply.
2. Use the hex key to remove the two cover security screws.
3. Remove the cover.
4. Clean all dust and lint from the interior of the hand dryer.
5. Replace the cover.
6. Wipe the cover with a damp cloth.
CAUTION: Do not overghten the screws.
7

This manual suits for next models
1
Table of contents
Other SUPREME Dryer manuals
Popular Dryer manuals by other brands

Bosch
Bosch WTH85VM8SN Installation and operating instructions

Adexi
Adexi Melissa 16720008 manual

Maytag
Maytag MDG28PNCGW installation instructions

ASI JD MACDONALD
ASI JD MACDONALD AUTOBEAM Operating instructions and parts manual

Hotpoint
Hotpoint TCD975 Instruction booklet

Hotpoint Ariston
Hotpoint Ariston AAQCF81U IT Service information