Sur la table SLT-2209 User manual

BEFORE USE, PLEASE READ AND FOLLOW ALL IMPORTANT
SAFEGUARDS, WARNINGS, CAUTIONS AND OPERATING INSTRUCTIONS.
www.mcappliances.us
HAND BLENDER
WITH EASY STORAGE
USER MANUAL
SLT-2209 MODEL

Congratulations!Congratulations! You now own an
incredibly versatile, convenient and
powerful hand blender.
To get the most out of your hand blender,
please read the manual carefully before
use, and keep this manual for easy
reference. Enjoy!Enjoy!
*This manual is only applicable to SLT-2209. All the contents in the manual are for
reference only during the user’s use and maintenance.
The pictures are for reference only.
*All the contents in the manual have been carefully checked. If there are any printing errors
or misunderstandings in the contents, the company reserves the right to interpret.
3

1. Read all instructions before use.
2. Do not let the cord hang over the edge of the table or countertop.
3. Do not use the hand blender for anything other than its intended use.
4. Always operate the hand blender from a power source of the same voltage,
frequency, and rating as indicated on the product rating plate.
5. This appliance is not intended for use by persons (including children) with reduced physical,
sensory, or mental capabilities, or lack of experience and knowledge, unless they are closely
supervised and instructed concerning use of the appliance by a person responsible for their
safety. Close supervision is necessary when any appliance is used by or near children. Children
should be supervised to ensure that they do not play with the appliance.
6. Do not operate hand blender with a damaged cord or plug, or if the appliance is damaged in
any manner.
7. Do not immerse the hand blender under water or any other liquid.
8. Do not continuously blend for longer than 1 minute. Allow the blender to cool off
for 2 minutes after every minute of operation.
9. Do not attempt to blend hard materials, such as fruit pits or bones, as that will
damage the blades.
10. Do not operate the hand blender in the presence of explosives and/or flammable fumes.
11. Do not pull on the cord when unplugging it from the outlet.
12. Do not touch the blade or whisk when the hand blender is on.
13. Do not place the hand blender on or near a hot burner or in a heated oven.
14. Do not use hand blender over a stove or other heat source. When mixing soups or
other hot foods, remove the pan from the heat source prior to using the hand blender.
15. Do not use outdoors.
16. Do not leave hand blender unattended.
17. Do not chop ice with hand blender.
18. Blades are very sharp. Handle with extreme care.
19. Turn the hand blender off and unplug from outlet while not in use, before putting
on or taking off parts, and before cleaning. Remove by grasping the plug. Do not
pull on the cord.
20. Avoid contacting moving parts.
21. The use of attachments not recommended or sold by the manufacturer may cause fire, electric
shock or injury.
22. Keep hands and utensils, other than the blending shaft or whisk attachment provided, out of
container while blending to reduce the risk of severe injury to persons or damage to the blender.
SAVE THESE INSTRUCTIONS
HOUSEHOLD USE ONLY
Power Cord Instructions:
A short power-supply cord or detachable power-supply cord is provided to reduce risks
resulting from becoming entangled in or tripping over a longer cord. Longer detachable
power-supply cords or extension cords are available and may be used if care is
exercised in their use. If a long detachable power-supply cord or extension cord is used:
a. The marked electrical rating of the cord set or extension cord should be at least as
great as the electrical rating of the appliance;
b. The cord should be arranged so that it will not drape over the counter top or table
top where it can be pulled on by children or tripped over unintentionally; and
c. If the appliance is of the grounded type, the cord set or extension cord should be
grounding type 3-wire cord.
Do not pull, twist or otherwise abuse the power cord.
NOTICES:
1. Some countertop and table surfaces are not designed to withstand the prolonged
heat generated by certain appliances. Do not set the heated unit on a finished wood
table.
2. During initial use of this appliance, some slight smoke and/or odor may be detected.
This is normal with many heating appliances and will not occur after a few uses.
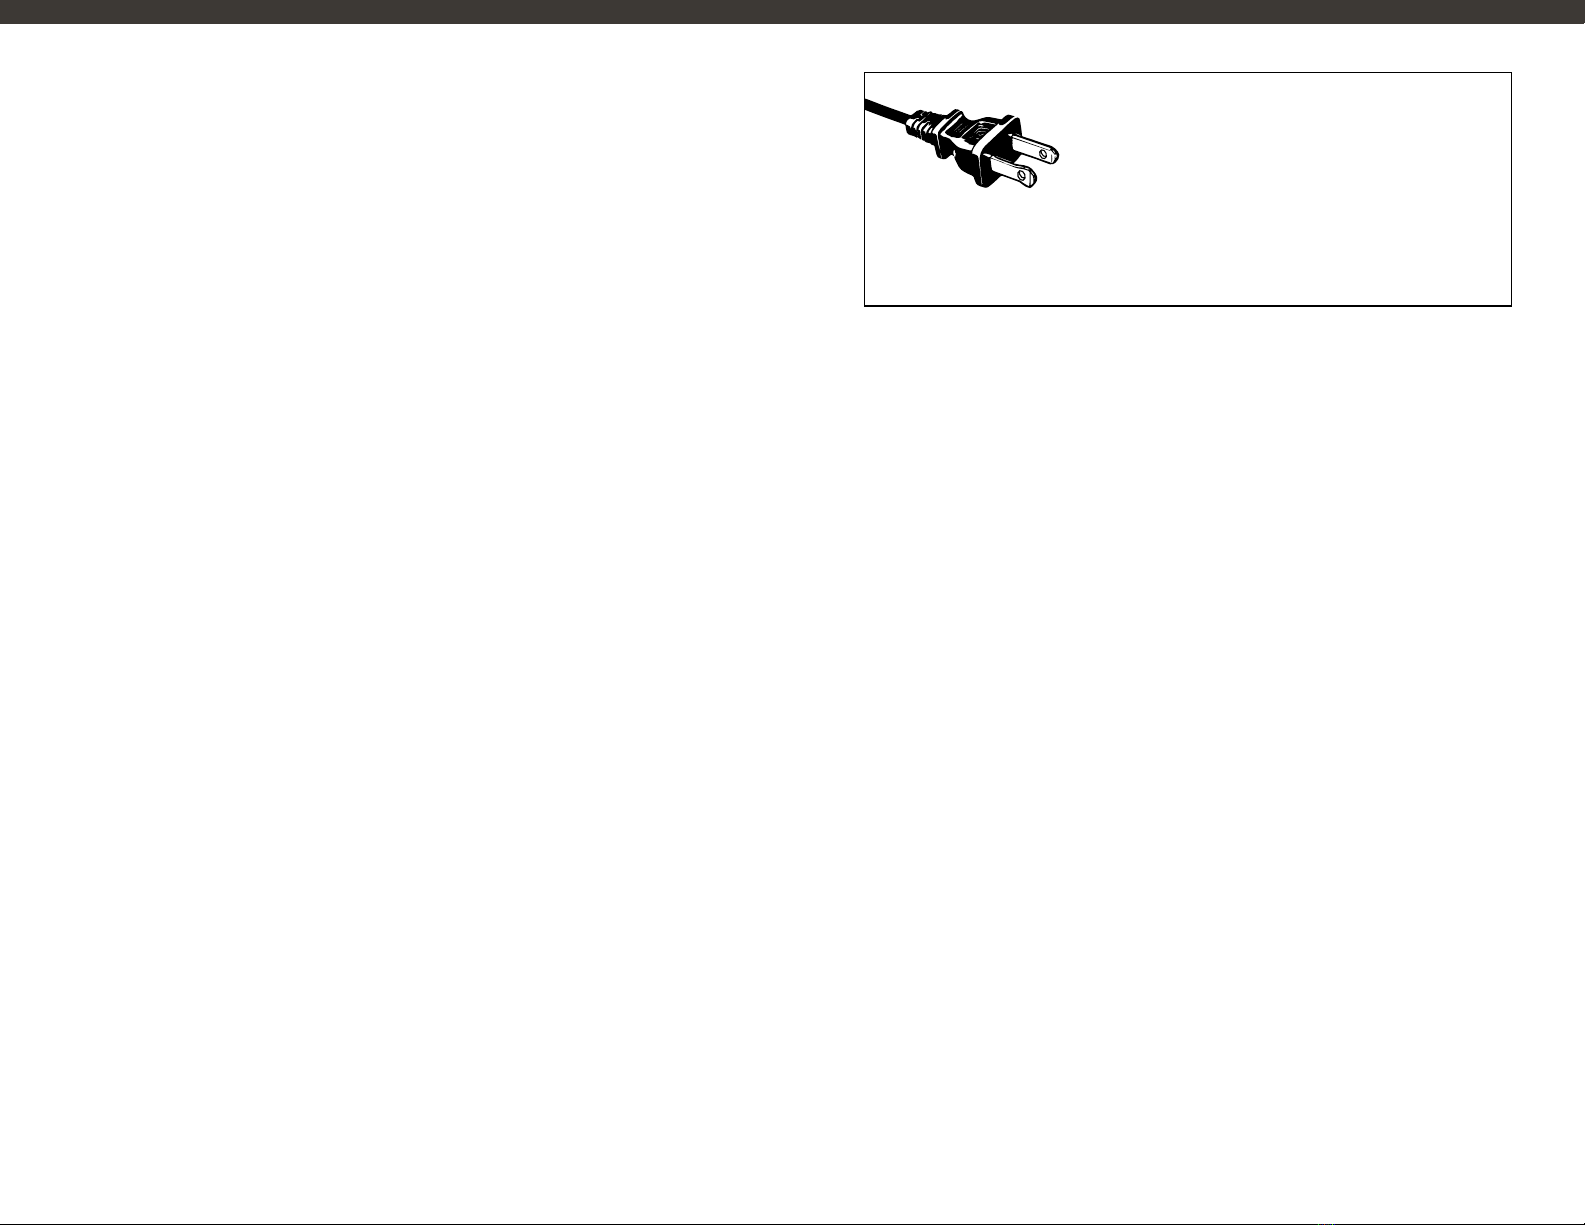
IMPORTANT SAFEGUARDS POLARIZED PLUG
This appliance has a polarized plug (one blade is wider
than the other). As a safety feature to reduce the risk of
electrical shock, this plug is intended to t in a polarized
outlet only one way. If the plug does not t fully in the
outlet, reverse the plug. If it still does not t, contact a qualied electrician. Do not
attempt to defeat this safety feature or modify the plug in any way. If the plug ts
loosely into the AC outlet or if the AC outlet feels warm do not use that outlet.
54

GETTING TO KNOW YOUR
HAND BLENDER WITH EASY STORAGE
3
5
8
11
1 Storage Case & Pitcher
2LED Indicator Lights
3Variable Speed Control
4Lock/Unlock
5ON/OFF Button
6Motor Boby Housing
7Detachable Gearbox
8Detachable Blending Shaft
9Whisk Attachment
10 Storage Base
11 Pitcher Cover
2
4
6
7
9
10
1
Product may vary slightly from illustration.
76

Assembly
Blending Attachment
1. Align the motor body housing with the blending
shaft and push the pieces together until you hear
them click and connect.
2. To remove the blending shaft from the motor body
housing, press the both buttons on the side of the
motor body house and pull the blending shaft off.
Whisk Attachment
1. Align the end of the whisk with the small opening
of the whisk gearbox.
2. Push the end of the whisk into the gearbox opening until it locks into
position.
3. Align the motor body with the whisk attachment and push the whisk
gearbox and motor body together until you hear and feel them click
and connect.
Before using the hand blender for the first time, remove all packaging
material, decals, and plastic from the appliance. We recommend that
you wipe the motor body housing with a clean, damp cloth to remove any
dirt or dust. Then, dry it thoroughly with a soft absorbent cloth. Wash all
the parts that will come in contact with food using hot water and a soft
detergent. Then, dry them with a soft absorbent cloth.
FIRST USE INSTRUCTIONS
USING YOUR HAND BLENDER
Operation
Blending
Designed to blend and puree all types of foods, including soups,
dressings, smoothies, and sauces.
1. Connect the blending shaft to the motor body housing (see assembly
for blending attachment).
2. Plug cord into a wall outlet.
3. Immerse the blade end of the blending shaft into the ingredients that
need to be blended. You can blend in the pitcher or a bowl.
NOTE: Do not immerse motor body housing in water or any other
liquid.
4. Turn the variable speed control to the speed recommended in your
recipe.
5. Press and hold the lock ( ) and ON buttons simultaneous. The
hand blender will run as long as both buttons are pressed. To turn the
hand blender off, simply release the buttons.
NOTE: Do not continuously blend for longer than 1 minute. Allow the
blender to cool off for 2 minutes after every minute of operation.
6. Unplug hand blender immediately after use.
WARNING: The blade is extremely sharp! Handle with care.
Amount of food and processing time
Food Maximum amount Time
Children’s food, soups, sauces 3.4 - 27 fl oz 60 s
Shakes and cocktails 3.4 - 27 fl oz 60 s
Food and vegetables 3.5 - 17.6 oz 30 s
98

USING YOUR HAND BLENDER
(CONT.)
Operation (cont.)
Whisking
Designed to whisk eggs, whipping cream, foam, dessert creams,
puddings, and other foods of similar consistency.
1. Connect the whisk gearbox to the motor body housing (see assembly
for whisk attachment).
2. Plug cord into a wall outlet.
3. Immerse the whisk attachment into the ingredients that need to
be whisked. NOTE: Do not immerse motor body housing or whisk
gearbox in water or any other liquid.
4. Turn the variable speed control to the speed recommended in your
recipe.
5. Press and hold the lock ( ) and ON buttons simultaneous. The
hand blender will run as long as both buttons are pressed. To turn the
hand blender off, simply release the buttons.
NOTE: Do not continuously whisk for longer than 2 minute. Allow
the hand blender to cool off for 2 minutes after every 2 minutes of
operation.
6. Unplug hand blender immediately after use.
Amount of food and processing time
Food Maximum amount Time
Cream 16.9 fl oz 20 s – 90 s
Egg white 4 oz 120 s
Tips For Blending and Whisking:
• To blend ingredients uniformly, gently move the hand blender in an
up-and-down motion.
• To prevent splashing, turn the hand blender on once the blade is
beneath the surface of the ingredients. When you have finished
blending, allow the blade to come to a full stop before removing it
from the mixture.
• Cut solid foods into ½-inch cubes for easier blending.
• Soak hard ingredients, such as legumes and soybeans, in water
before blending. Do not attempt to blend hard materials, such as
fruit pits or bones, as that will damage the blades. The recommended
ratio of ingredients and water is 2:3.
CLEANING AND MAINTENANCE
This appliance requires little maintenance. It contains no user serviceable
parts. Do not try to repair it yourself. Contact the customer service
department (877) 246-0990 for any unusual issues you may experience.
To clean the hand blender:
1. Unplug hand blender from outlet.
2. Carefully remove the attachment used from the motor body housing.
3. Wipe the motor body housing with a damp cloth and dry thoroughly.
NEVER immerse the motor body in water.
4. Wash the attachment using hot water and mild dish soap and dry
thoroughly.
WARNING: The blade is extremely sharp!
1110

1 YEAR
LIMITED WARRANTY
Customer Service:
(877) 246-0990
1312

RECIPES GREEN GODDESS
DRESSING
RECIPE LEVEL: Easy I Makes about 1 ¼ Cups
INGREDIENTS
• ½ cup mayonnaise
• 1/3 cup Greek yogurt
• 1 small clove garlic
• ½ cup packed fresh basil leaves
• ½ cup packed fresh parsley
• ¼ cup snipped fresh chives
• 3 tablespoon chopped fresh tarragon
• 1 tablespoon drained capers
• 2 tablespoons lemon juice
• Kosher salt and black pepper
PROCEDURE
1. In a deep medium bowl, place mayonnaise, yogurt, garlic, basil, parsley, chives, tarragon,
capers, and lemon juice in the order given.
2. Secure the Immersion Shaft to the Blending Handle and place the Blender in the bowl.
3. Starting on Low speed and using a slight up and down motion, begin to process the
mixture. Gradually increase speed to Medium, then High and continue to process until
mixture is smooth and evenly blended.
4. Season to taste with salt and pepper.
5. Store in airtight container in refrigerator for up to 3 days.
1514

CREPES GARLICKY
HUMMUS
RECIPE LEVEL: Easy I Makes 12 to 15
INGREDIENTS
• 1 cup all-purpose flour
• 1 tablespoon granulated sugar
• 2 extra-large eggs
• 1 cup milk
• 3 tablespoons unsalted butter, melted
• 1 teaspoon canola oil
PROCEDURE
1. Secure the Whisk Attachment to the Blending Handle.
2. In a medium bowl, stir together the flour and sugar; add the eggs and 1/3 cup of the milk.
Place the Blender
In the bowl and on Low speed, whisk until smooth (mixture will be thick).
3. Add the remaining milk and the melted butter and whisk on Medium speed until mixture is
smooth and no lumps remain.
4. Lightly brush the bottom of a 6-to 8-inch nonstick skillet with the canola oil and heat the
pan over medium-high heat. When pan is hot, add a scant ¼-cup of the batter to the skillet
and quickly lift and tilt the skillet to coat the entire bottom of the pan with batter.
5. Cook until bottom is lightly browned and top is no longer wet, about 1½ minutes. With with
a fork or thin spatula, flip the crepe over and cook for a few seconds on the second side.
6. Remove crepe from the pan and place browned-side-down on a flat plate.
7. Repeat the process, stacking finished crepes on top of each other, until all the batter is
used.
Note: Crepes can be made up to 2 days ahead. Cover the stack with plastic wrap and
refrigerate. Warm before serving.
SERVING SUGGESTIONS:
Fold 2 crepes into quarters and place on a plate. Sprinkle with cinnamon sugar and drizzle
with maple syrup.
Spread jam, marmalade or chocolate-hazelnut spread over un-browned side of crepe;
roll up, place on a plate, and sprinkle with confectioners’ sugar.
RECIPE LEVEL: Easy I Makes about 4 Cups
INGREDIENTS
• 1 can (15 ounces) garbanzo beans (chickpeas), rinsed and drained
• 1/2 cup tahini (sesame seed paste)
• 3 cloves garlic
• 1 teaspoon ground cumin or to taste
• 1/3 cup extra-virgin olive oil, divided
• Juice of 1 lemon
• Kosher salt and black pepper
• Chopped fresh parsley
• Accompaniments: Warm pita bread or pita chips and/or cut raw vegetables
PROCEDURE
1. In a deep large bowl, place garbanzos, tahini, garlic, cumin, 1/4 cup of the olive oil,
and the lemon juice.
2. Secure the Immersion Shaft to the Blending Handle and place the Blender in the bowl,
pressing down so the Blender Blade reaches into the garbanzos.
3. Using a slight up and down motion and starting on Low speed, begin to process the
mixture. Gradually increase speed to High, adding water as needed to blend mixture to
desired consistency. If a creamier consistency is desired, add more water 1 or 2 tablespoons
at a time, continuing to blend to desired creaminess.
4. Season to taste with salt and pepper.
5. Spoon hummus into a serving bowl; top with the remaining olive oil and sprinkle
with parsley.
6. Serve with suggested accompaniments.
7. Cover and refrigerate any leftover hummus; will keep about 1 week.
1716

RED BERRY
SMOOTHIE
RECIPE LEVEL: Easy I Makes about 32 ounces / 2 to 4 Servings
INGREDIENTS
• 1 cup cold cranberry juice cocktail
• 1 cup fresh strawberries, hulled and each cut into eighths
• ½ cup frozen whole raspberries
• 1 cup Greek yogurt
• 1 tablespoon vanilla protein powder
• 2 tablespoons seedless strawberry or raspberry jam
PROCEDURE
1. Place all ingredients in the Blending Pitcher in the order given.
2. Secure the Immersion Shaft to the Blending Handle and insert the Blender into the Pitcher.
3. Using an up and down motion, begin blending on Medium speed, increasing speed to
High until mixture is smooth and thick.
4. Pour into glasses to serve.
VARIATIONS:
Substitute honey for the jam.
Substitute cranberry-raspberry juice for the cranberry juice.
Use a single fruit variety in the same proportion as the recipe: 1 cup fresh to ½ cup frozen.
BLUEBERRY LEMON MERINGUE
PUDDINGS
RECIPE LEVEL: Easy I Makes 4 servings
INGREDIENTS
• 4 whole cinnamon or plain graham crackers
• 2 tablespoons unsalted butter, melted
• 1 cup + 2 Tablespoons’ granulated sugar, divided
• ½ cup fresh blueberries
• 1 package (2.75 ounces) lemon pudding & pie filling
• 2 eggs, separated and at room temperature
• ½ teaspoon cream of tartar
• ½ teaspoon vanilla extract
PROCEDURE
1. Spray four 8-ounce ramekins with vegetable cooking spray.
2. Break the graham crackers into pieces in the Blending Pitcher; pour butter over the
crackers, then add 1 tablespoon sugar.
3. Secure the Immersion Shaft to the Blending Handle and Insert the Blender into the Pitcher,
gently pressing down so the Blender reaches into the graham cracker pieces.
4. Process on Low speed until the mixture is crumbly. Divide crumb mixture evenly into the
four ramekins, using fingers to press the mixture into the bottom of the each, then divide
the blueberries over each.
5. Prepare the lemon pudding according to package directions using 1//2 cup of the sugar,
water as called for, and the 2 egg yolks. When pudding is cooked, remove from stove, and
place a piece of wax paper directly on the hot pudding so a skin does not form; cool 10
minutes.
6. While pudding is cooling, in a clean, dry medium glass or metal mixing bowl, place the egg
whites, cream of tartar, and vanilla.
7. Secure the Whisk Attachment to the Blending Handle. Whisk until egg whites are foamy.
On Medium speed, add the remaining sugar 1 tablespoon at a time until sugar is
thoroughly dissolved and stiff peaks form.
8. Preheat the oven to 350º F. Spoon pudding evenly into each ramekin. Spoon meringue over
each the pudding and spread, making swirls and peaks, being sure to spread meringue to
the edges of the ramekin to seal.
9. Place ramekins on a cookie sheet in the oven for 10 to 12 minutes until meringue is nicely
browned.
10. Remove from oven to a cooling rack for 15 minutes; chill until ready to serve.
1918
Table of contents
Other Sur la table Blender manuals
Popular Blender manuals by other brands

H.Koenig
H.Koenig SMOO9 instruction manual

MasterChef
MasterChef MCBL600 Use and care guide

Best Choice Products
Best Choice Products SKY4099 instruction manual

Silvercrest
Silvercrest SSM 550 E1 User manual and service information

BLACK DECKER
BLACK DECKER BXJBA350E Original instructions

Magic Chef
Magic Chef MCBL5CG product manual