manuals.online logo
Brands
  1. Home
  2. •
  3. Brands
  4. •
  5. Sur la table
  6. •
  7. Coffee Maker
  8. •
  9. Sur la table SLT-4209 User manual

Sur la table SLT-4209 User manual

MODEL:SLT-4209
Customer Service: (877) 246-0990 – [email protected]
www.mcappliances.us
Scan Here to
Learn More!
WITH DUAL BOILER
HEATING SYSTEM
ESPRESSO
MACHINE
QUICK START GUIDE
OPERATION INSTRUCTIONS
Setting up espresso machine:
1. Fill the water tank to the max marking.
2. Add coffee beans to the bean hopper.
TIP: To obtain the best flavor, use filtered water and freshcoffee beans.
3. Press the power button ( ).
4. Allow the espresso machine to heat up. Once the machine is ready, the full display
will illuminate.
Grinding Coffee:
1. Select the filter basket and insert into the portafilter.
2. Place the portafilter in the grinding cradle.
3. Adjust the bean hopper to the grind settings desired by turning the bean hopper left or right.
4. Select single ( ) or double ( ) grind.
5. Once the grinding process has beencompleted, carefully remove the portafilter.
6. Use the tamper to evenly press the coffee grinds.
7. Wipe excess grinds.
Brewing Espresso:
1. Insert the portafilter into the group head and lock into place.
2. Place cup beneath the portafilter.
3. Press the espresso extraction shot of choice:single( )or double ( ). Coffee will begin
brewing and automatically stop when cycle ends.
4. Carefully remove the cup.
5. Remove the portafilter by turning left and lowering it.
6. Remove the espresso puck from the portafilter.
Frothing Milk:
1. Fill the milk pitcher with cold milk right below the bottom of the spout.
2. Point the steam wand over the steamopening on the drip tray.
3. Turn the dial to steam ( ). Some water may come out of the steam wand.
4. Turn the dial back to standby
( )
and insert the steam wand into the milk pitcher. Make sure
to insert the tip of the steam wand right below the surface of the milk.
5. Turn the dial back to steam ( ).
6. Froth the milk. Lower the pitcher to keep the tip right below the surface of the milk as the milk
level rises.
7. When desired texture is reached,turn the dial back to the standby position( ) and remove
the steam wand from the pitcher.
8. Point the steam wand to the steamwand opening onthe drip tray.
9. Turn the dial to hot water ( ) for 5 seconds.
10. Return dial to the standby position ( ).
11. Wipe the steamwand with a damp cloth.
Customize your Espresso Shot:
1. Press and hold the single ( ) or double shot ( ) button for the length oftime you want
the shot to last using the brew count-up timer to guide you.
NOTE:The menu button ( ) will flash throughout this process.
2. Once the brew cycle reaches your desired brew length, release the button.
3. Next time you press that button (single or double shot), the espresso machine will remember
your customized programming!
Customize the Grinding Length:
1. Press and hold the single ( ) or double ( ) grind button for the length of time you want
the grinding cycle to last using the grinding timer to guide you.
NOTE:The menu button ( ) will flash throughout this process.
2. Once the grinding cycle reaches your desired grinding length, release the button.
3. Next time you press that button (single or double grind), the espresso machine will
remember your customized programming!
Customize Brewing Temperature:
Adjust the temperature the espresso machine heats up to:
1. Press the Menu button ( ) for 3seconds, until the buzzer sounds.
2. Select the temperature you want your espresso machine to heat up to by pressing the
button that matches the temperature desired:
A. Single shot grind ( ) = 194 F / 90 C
B. Double shot grind ( ) = 198 F / 92 C
C. Single shot ( )= 201 F / 94 C
D. Double shot ( )= 205 F / 96 C
3. Press the Menu button ( ) to save the new temperature selection.
Restore to Factory Settings:
1. Press and hold the power button ( ), the single grinder shotselection button( ), single
shot extraction button ( ), and double shot extractionbutton( )at the same time.
2. Once the four buttons begin flashing, release the buttons.
OPERATION INSTRUCTIONS
1 YEAR
LIMITED WARRANTY
PLEASE UNPACK AND WASH ALL PARTS WITH WARM SOAPY WATER BEFORE FIRST USE.
WHAT’S IN THE BOX
B
F
G
K
J
L
D
E
A
I
C
H
M
N
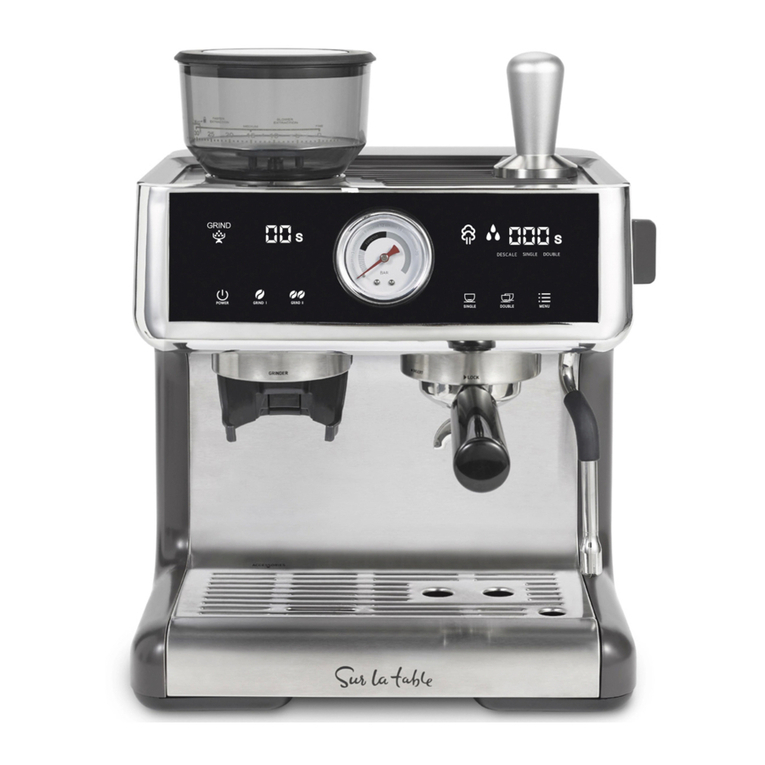
REMOVABLE BEAN HOPPER The removable bean hopper offers a 250 g capacity to store
your favorite coffee beans. It also features 30 adjustable grind settings, from coarse to fine,
so you can brew espresso just the way you like it!
GRIND DISPENSER Once you have made your grind shot selection, the conical burr grinder
will dispense the right amount of coffee grinds through the grind dispenser.
GRINDING CRADLE The grinding cradle holds the portafilter, so that the coffee grinds fall
directly from the grind dispenser to the portafilter for an easy and seamless experience.
ACCESSORIES STORAGE SPACE Behind the drip tray, an accessory storage compartment
was designed to store a filter basket, the cleaning pin, and the cleaning brush.
REMOVABLE DRIP TRAY The removable drip tray collects all the drips to prevent messes
and the convenient water-level indicator floats to the surface to indicate when the drip tray
needs to be emptied.
TAMPER STORAGE Place the tamper on top of the espresso machine to store.
REMOVABLE WATER TANK The removable water tank offers a 95 oz. capacity.
It has a built-in handle to make the refilling process a breeze.
GROUP HEAD This espresso machine features a commercial size group head, 58 mm,
which allows for optimal extraction to obtain the best flavors from your coffee.
PORTAFILTER This commercial size portafilter, 58 mm, provides more space for the coffee
grinds to be spread out evenly and release the best flavors from the coffee.
STEAM & HOT WATER WAND Use to heat or froth milk. The steam wand and hot water
dispenser is managed using the dial on the side of the espresso machine. The silicone cover
on the steam and hot water wand should be gripped when changing the position of the
steam wand to prevent burns.
15 OZ. FROTHING PITCHER Use the frothing pitcher to steam milk to your desired
texture preference.
FILTER BASKETS (ONE CUP & TWO CUPS) Use the one cup filter basket to brew
one shot of espresso or use the two cups filter to brew a double shot of espresso.
CLEANING BRUSH Use the cleaning brush to remove coffee grounds that get stuck.
Refer to the cleaning section in the User Manual for more details.
CLEANING PIN Use the cleaning pin to clean the steam wand or the filter baskets.
Refer to the cleaning section in the User Manual for more details.
A
B
C
D
E
F
G
H
I
J
K
L
M
N
8
Power Button ( )
Press the power button to turn ON/OFF the espresso machine. When the espresso machine is turned
on the display will illuminate. Once the espresso machine has heated up, the espresso extraction
selection buttons will illuminate. The espresso machine will shut off after 15 min of inactivity.
DISPLAY ONE indicates the grinding process.
Grind Icon ( )illuminates when coffee is grinding.
Grinder Count-Down Timer indicates the grinding time.
GRINDER SHOT SELECTION
Single shot ( ): Dispenses one shot of espresso and automatically stops.
Double shot ( ): Dispenses two shots of espresso and automatically stops.
Note: You can customize amount of espresso you would like each option to dispense.
See the Customize Grinder Settings section on page 12 of User Manual.
PRESSURE GAUGE
DISPLAY TWO
Steam Light ( ):
When flashing, it indicates that the dial is turned to steam and the steam
wand is on.
Hot Water Light ( ): When flashing, it indicates that the dial is turned to hot water and hot
water is dispensing.
Brew Count-Up Timer Indicates the length of time to dispense the espresso shot.
ESPRESSO EXTRACTION SELECTION
Single Shot ( ): Brews one shot of espresso and automatically stops.
Double Shot ( ): Brews two shots of espresso and automatically stops.
Note: You can customize how long you want each espresso shot to run for. See the Customize
Espresso Extraction settings on page 12 of User Manual to learn more.
Menu Selection ( ): This button used in combination with the grinder shot selection or
espresso extraction selection provides you with the flexibility to customize these settings.
See the Customize Grinder Settings and Customize Espresso Extraction settings on page 12
of User Manual to learn more.
DIAL
Standby ( ): When the dial is on the vertical position it is on the standby position. In this
position, the steam and hot water wand are OFF.
Steam ( ): When the dial is turn to the LEFT Position, the steam function is turned on.
Hot Water ( ):
When the dial is turned to the RIGHT Position, the hot water function is turned on.
Removable Top Burr The top burr removes easily using the handle and turning left.
Remove when cleaning the grinder.
1
2
3
4
5
6
7
8
9
1
2
76
4 5
3
9
8
GETTING TO KNOW YOUR
ESPRESSO C O FFEE MACHINE

Other manuals for SLT-4209

2

Other Sur la table Coffee Maker manuals

Sur la table SLT-4207 User manual

Sur la table

Sur la table SLT-4207 User manual

Sur la table SLT-4209 User manual

Sur la table

Sur la table SLT-4209 User manual

Sur la table SLT-4209 User manual

Sur la table

Sur la table SLT-4209 User manual

Popular Coffee Maker manuals by other brands

Nespresso ES 80 DESCALING INSTRUCTIONS

Nespresso

Nespresso ES 80 DESCALING INSTRUCTIONS

Livoo DOD117 instruction manual

Livoo

Livoo DOD117 instruction manual

Miele CVA 5068 Installation and maintenance guide

Miele

Miele CVA 5068 Installation and maintenance guide

Bosch TES502 series instruction manual

Bosch

Bosch TES502 series instruction manual

Chefman FROTH+BREW Quick start and user guide

Chefman

Chefman FROTH+BREW Quick start and user guide

Breville Barista Touch BES880BSS2JAN1 Instruction book

Breville

Breville Barista Touch BES880BSS2JAN1 Instruction book

Philips HD 5665 operating instructions

Philips

Philips HD 5665 operating instructions

Logik L15DCW16E instruction manual

Logik

Logik L15DCW16E instruction manual

Bonavita THE ENTHUSIAST manual

Bonavita

Bonavita THE ENTHUSIAST manual

Saeco s-class Incanto rondo operating instructions

Saeco

Saeco s-class Incanto rondo operating instructions

Krups Nescafe Dolce Gusto PICCOLO XS user manual

Krups

Krups Nescafe Dolce Gusto PICCOLO XS user manual

Gourmia GCM4225 user manual

Gourmia

Gourmia GCM4225 user manual

Krups Nescafe Dolce Gusto Genio 2 Series Get me started

Krups

Krups Nescafe Dolce Gusto Genio 2 Series Get me started

Bunn CRTF5 Installation & operating guide

Bunn

Bunn CRTF5 Installation & operating guide

Kenwood ES020 series instructions

Kenwood

Kenwood ES020 series instructions

Krups Cafe Express Instructions for use

Krups

Krups Cafe Express Instructions for use

Oursson EM1505 instruction manual

Oursson

Oursson EM1505 instruction manual

Orbegozo EX 5000 instruction manual

Orbegozo

Orbegozo EX 5000 instruction manual

manuals.online logo
manuals.online logoBrands
  • About & Mission
  • Contact us
  • Privacy Policy
  • Terms and Conditions

Copyright 2025 Manuals.Online. All Rights Reserved.