SureShot MGI Ai Series User manual

Quick Start Guide
VERSION 1.1

WHAT’S INCLUDED:
MGI Ai Navigator GPS+
2 x Front Wheels
2 x All-terrain Rear Wheels
High Performance Lithium Battery
MGI Pouch
– O Rings
– Axle Lubrication Cloth
– Battery Charger Manual
– USB Lead
– Remote Holder
– Remote Control
MGI Ai Navigator GPS+User Manual (online)
Battery Charger and Manual
THANK YOU FOR
LEADING THE WAY AND
PURCHASING AN MGI Ai
NAVIGATOR GPS+
For future reference, please record the serial number of
your Ai Navigator GPS+below.
This can be located on the aluminium shaft in the
battery tray of the Ai Navigator GPS+.
Please keep your receipt as proof of purchase.
To register you Ai Navigator GPS+please have Wi-Fi
available.
YOUR SERIAL NUMBER:
MGI Ai NAVIGATOR GPS+Quick Start Guide 1.1 2

MGI Ai NAVIGATOR GPS+Quick Start Guide 1.1 3
Reading this information will ensure you get the most positive
experience rst time.You are also strongly advised to properly read
the User Manual which is located on the website mgigolf.com
1. INITIAL SETUP
When powering your Ai Navigator GPS+ on, please note it will take a
few moments to boot.
The Ai Navigator GPS+will need to be connected to a Wi-Fi network
to allow user registration and complete the latest rmware
updates.
If an update is required, the Ai Navigator GPS+ will prompt you to
update rmware – MGI recommends the Ai Navigator GPS+ is always
up to date prior to usage.
2. HOW BEST TO UNFOLD YOUR Ai NAVIGATOR GPS+
1: Ensure both rear
wheels are attached.
4: The handle will
naturally unfold as you
lift.
2: Depress blue locking
toggle.
5: Position handle
to desired height.
3: Lift the top bag rest
vertically.
6: Push bag support
forward until it clicks
into place.At the same
time, the lower handle
will lock into place.
4. BATTERY
CONNECTING BATTERY
Position battery on the chassis of the Ai Navigator GPS+with the red
indicator closest to the handle.Then slide the switch into position
so you can see green. Once connected your Ai Navigator GPS+will
automatically turn on and commence start up mode.
This slide switch should be cleaned regularly especially when
playing on sandy or dusty courses.
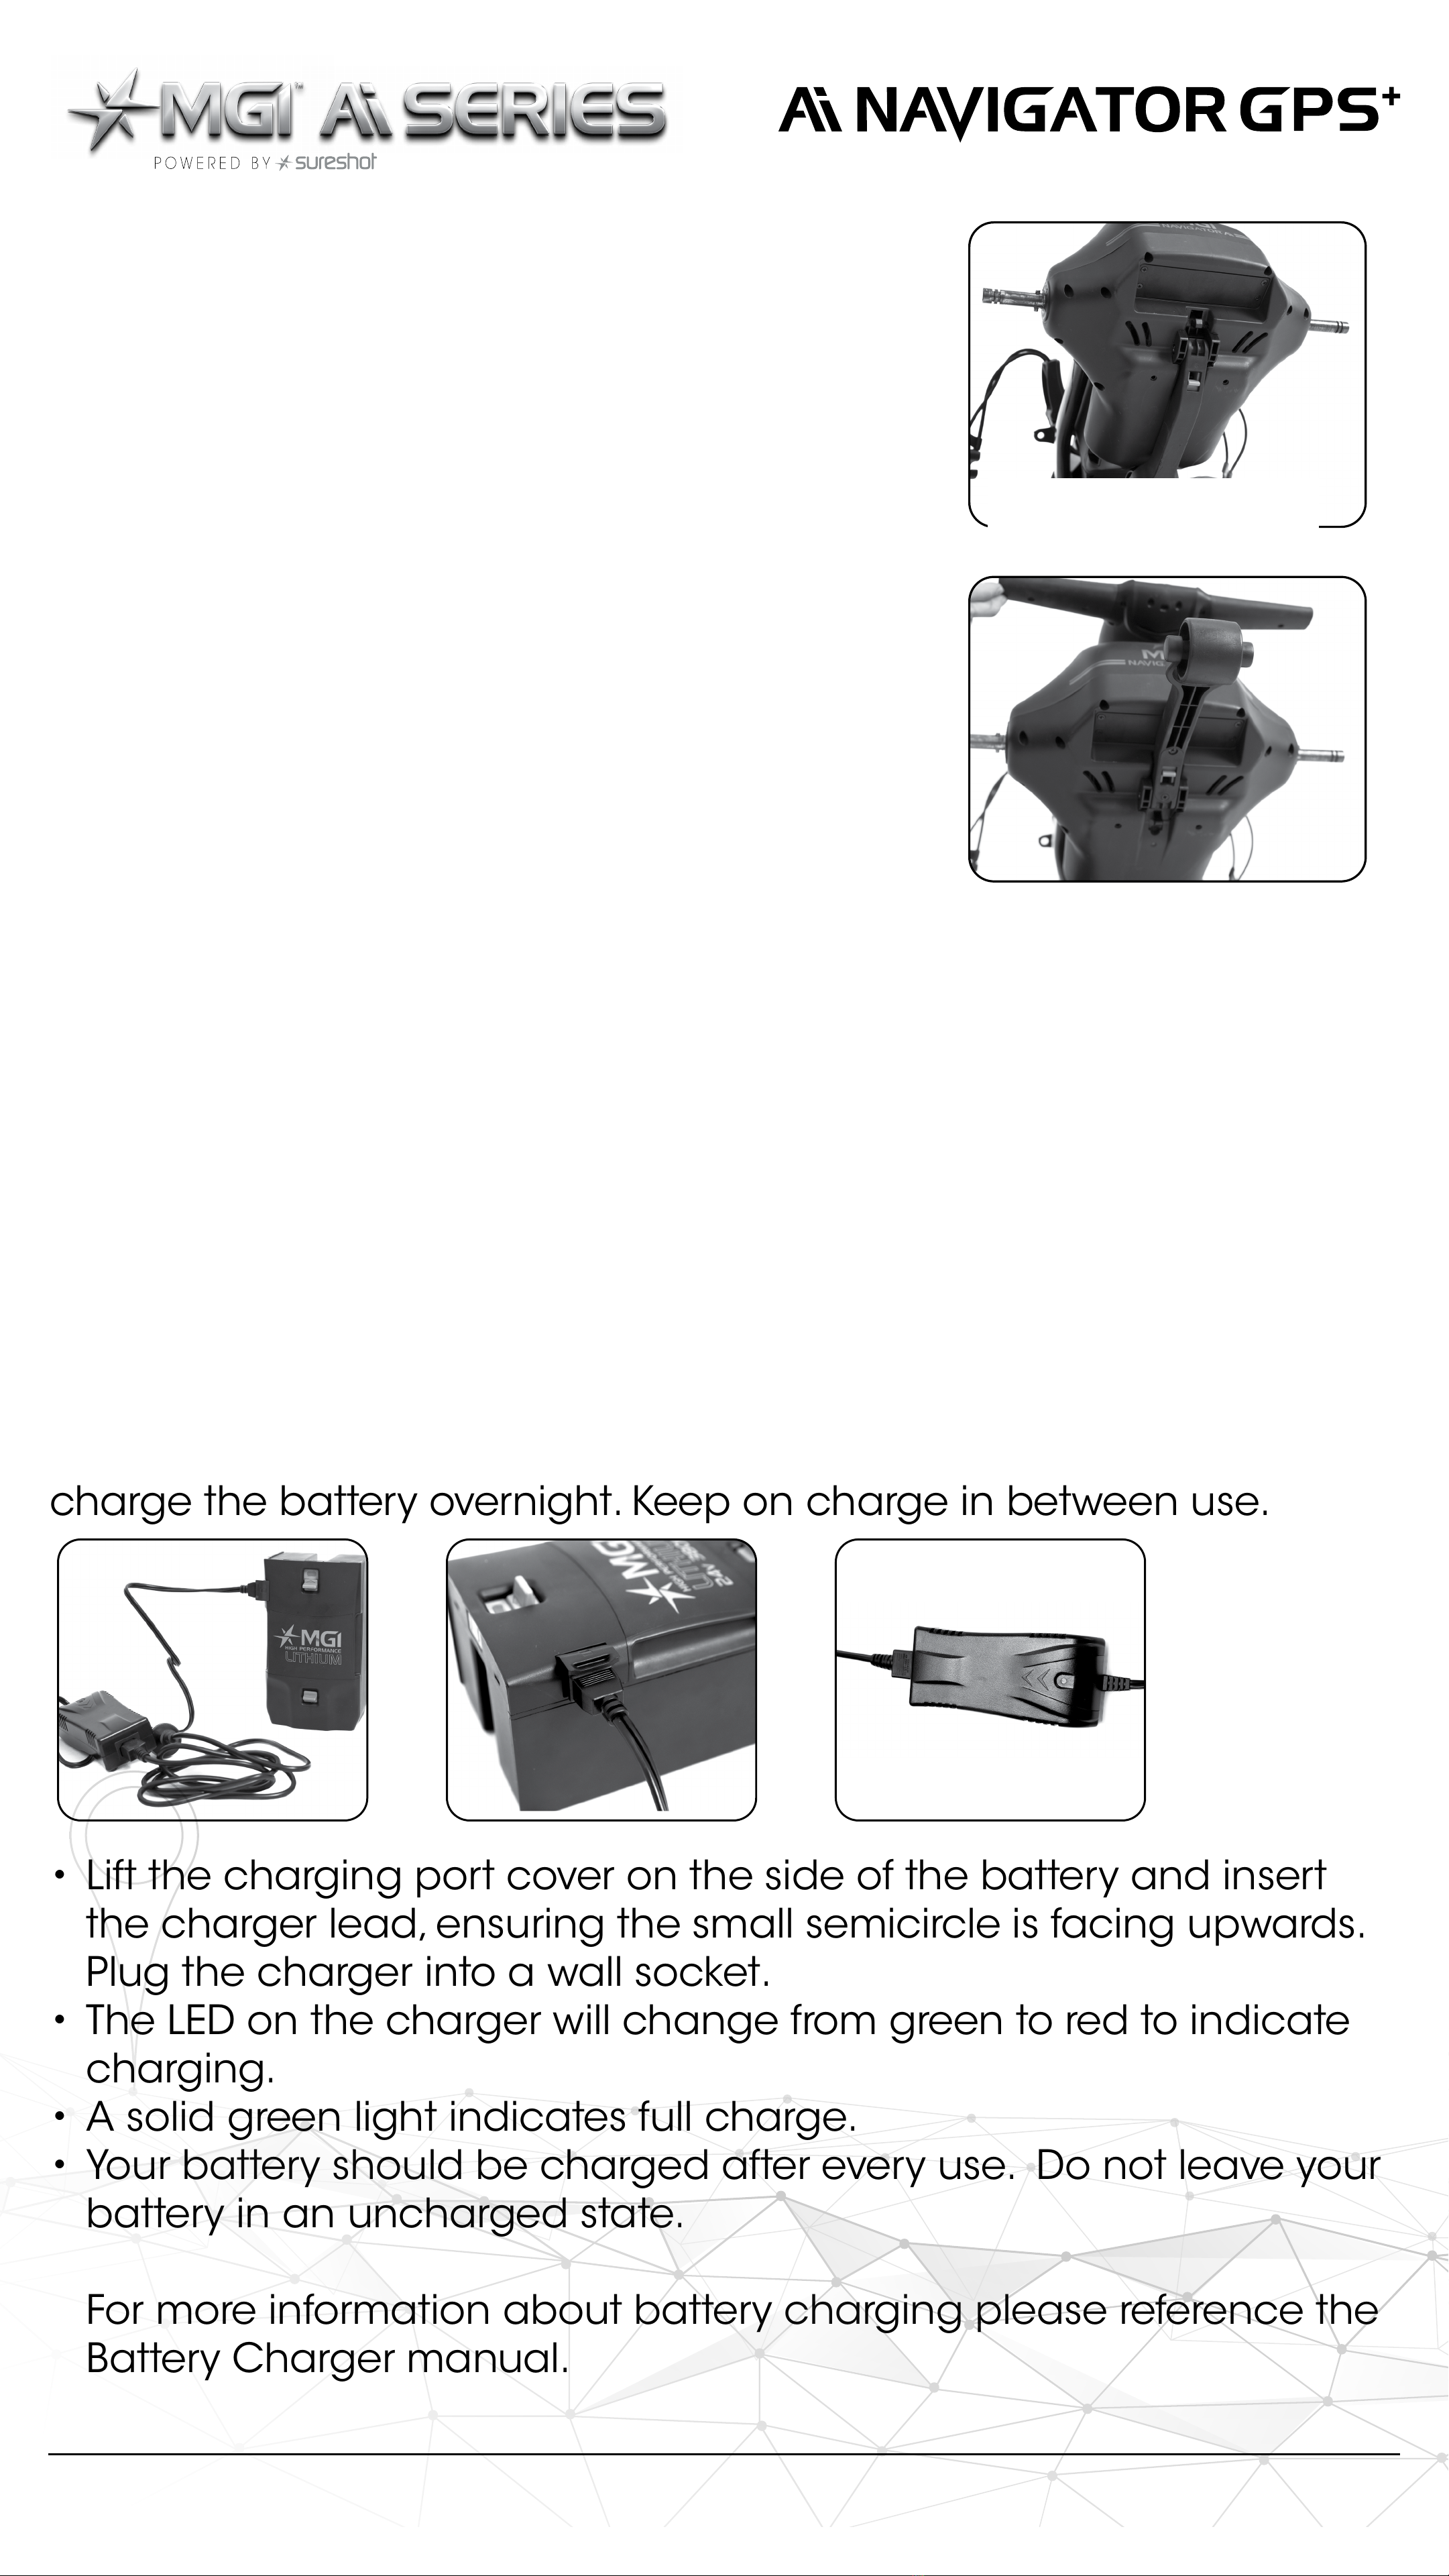
BATTERY CHARGING
Before using your Ai Navigator GPS+for the rst time you must fully
charge the battery overnight. Keep on charge in between use.
• Lift the charging port cover on the side of the battery and insert
the charger lead, ensuring the small semicircle is facing upwards.
Plug the charger into a wall socket.
• The LED on the charger will change from green to red to indicate
charging.
• A solid green light indicates full charge.
• Your battery should be charged after every use. Do not leave your
battery in an uncharged state.
For more information about battery charging please reference the
Battery Charger manual.
3.THE 5TH REAR WHEEL
Your Ai Navigator GPS+comes standard
with a 5th foldable rear wheel (please see
images to unfold your 5th wheel).The 5th
wheel MUST be unfolded and in use on the
Ai Navigator GPS+. If you do not engage
the 5th wheel, your Ai Navigator GPS+
might tip backwards if travelling uphill.
Any damage caused to the Ai Navigator
GPS+ due to this will not be covered under
warranty.The 5th wheel should be cleaned
regularly with a cloth to ensure it can be
folded as required for storage.
The grey latch as seen
in the photo is the way
to unfold the 5th wheel.
MGI Ai NAVIGATOR GPS+Quick Start Guide 1.1 4

LITHIUM BATTERY CARE
Your lithium battery casing and connections should be regularly
inspected for damage and wear. If your connections are in need of
repair or replacement, please contact your local MGI repair centre
for assistance immediately. Under no circumstances should a Lithium
Battery that has been dropped, damaged or immersed – partially
or fully in water, be connected to an Ai Navigator GPS+ or charger. By
doing so, the battery will become a re hazard and may cause the
Lithium cells to combust. Please contact the MGI Service Centre to
arrange a replacement.
STRONG BATTERY WARNING
Under no circumstances should a lithium battery that has been
dropped, damaged or immersed in water be connected to an Ai
Series or charger.
It is not covered under warranty and you will need to purchase
another battery.Your Ai Navigator GPS+is designed to be used in all
conditions however a level of caution is required when operating
your Ai Navigator GPS+ in wet conditions.When playing in wet
conditions, we recommend carrying a hand towel to wipe away any
excessive water from the top box. Keep your Ai Navigator GPS+ on
the fairway and paths when possible and avoid boggy terrain and
puddles.Your Ai Navigator GPS+is designed to be as resistant to wet
conditions as possible however they are not waterproof.
Under no circumstances should you clean your Ai Navigator GPS+
using a pressure washer or hose. MGI recommends cleaning away
excess debris with a brush and wiping the Ai Navigator GPS+ down
with a damp cloth.
Ingress of water or moisture into the battery will void all stipulated
warranties on the battery.
5.REMOTE CONTROL
Before using your Ai Navigator GPS+you must
fully charge your remote control. Charge time is
approximately 6 hours.
To turn on your remote hold the button located on
the top of the remote until the blue light appears.
If no light appears then it needs to be charged.
To charge the remote, plug in the USB cord into the USB port on
the base of the remote.The cable can be plugged into your PC or
Laptop for charging; alternatively, plug the cable into an AC adapter
(not included).
MGI Ai NAVIGATOR GPS+Quick Start Guide 1.1 5

Whilst charging, the LED will ash. Once fully charged, the LED will
remain solid.
It is recommended to charge your remote control after every use.
SAFETY FEATURES – YOUR Ai NAVIGATOR GPS+WILL HALT IF ANY OF
THE BELOW CONDITIONS ARE MET
• It becomes out of range of the remote.
• If there is more than 2 minutes between commands from the
remote.
6. REAR WHEEL POSITIONS
The Ai Navigator GPS+ is designed to allow the rear wheels to be
in two positions.The position is determined by where the wheel is
locked on the axle in either of the two grooves (see picture at the
top of the next page).The drive position is used during the normal
operation of the Ai Navigator GPS+.The free wheel position is used to
push the Ai Navigator GPS+ freely, if required.
i. Drive position – Lock the wheel into the inner groove.To do so, press
the black release toggle on the wheel hub, push the wheel onto the
axle as far as possible and gently pull back until you hear a click.
To test for drive position try rolling the wheel backwards. If you feel
resistance then the wheel is now in drive position and ready to use.
Repeat for both wheels.
ii. Free wheel – Lock the wheel into the outer groove.To do this, press
the black release button on the wheel hub, push the wheel on to
the axle and push the release button onto the groove.To test for free
wheel position try rolling the wheel backwards.The wheel should spin
freely with no resistance. Repeat for both wheels.
7. LUBRICATE AXLES
To avoid wear on the Ai Navigator GPS+ axles and wheels, apply
some petroleum jelly to the exposed shaft (included in MGI pouch).
This will need to be cleaned and re-applied monthly. Please refer to
the user manual for further information.
Free wheel position
Drive position
MGI Ai NAVIGATOR GPS+Quick Start Guide 1.1 6

GETTING YOUR
MGI AiNAVIGATOR GPS+
ON THE GOLF COURSE.
FULL USER MANUAL
To view our full user manual, scan the QR code
below or visit our website mgigolf.com
For customer support, please contact MGI directly
for immediate and professional advice by visiting
mgigolf.com
8. ENGAGING THE MOTOR BRAKE
The Ai Navigator GPS+features a motor brake to prevent it from rolling
away on uneven surfaces when idle.
To activate the brake, stop the Ai Navigator GPS+and turn the speed
control on the top box anticlockwise past 0 until you hear a click.
The brake will be activated and a P will be displayed.The brake can
also be activated using the remote by stopping the Ai Navigator
GPS+and then clicking the park brake button located in the top right
corner of the remote.You will hear a click and a P will be displayed.
Release the brake by starting the Ai Navigator GPS+from the Top Box
or Remote.
9. LOAD-BEARING LIMITATION
The Ai Navigator GPS+ is designed to transport one golf bag, 14 clubs,
accessories and other paraphernalia. It is not to be used as an aid
to help users traverse up/down hills or slopes. Doing so will cause
damage to the drive system of the Ai Navigator GPS+and, as such,
will void all stipulated warranties on parts affected.
MGI Ai NAVIGATOR GPS+Quick Start Guide 1.1 7

mgigolf.com
MGI AUSTRALIA
Service Email: customerservice@mgigolf.com
Live Chat: visit mgigolf.com
Toll Free within Australia: 1300 644 523 (excludes mobiles)
Western Australia/ Internal phone +61 3 8872 6700
Local Service Centres: visit mgigolf.com
to locate your local service centre.
MGI USA
Service Email: serviceusa@mgigolf.com
Live Chat: visit mgigolf.com
Telephone: 1800 617 2990
MGI CANADA
Service Email: servicecanada@mgigolf.com
Live Chat: visit mgigolf.com
Telephone: 1800 617 2990
MGI GLOBAL
Sales Email: globalsales@mgigolf.com
Service Email: globalservice@mgigolf.com
Live Chat: visit mgigolf.com
Follow us on
NOTE:This quick start guide was correct at time of printing.The online version is the most up-to-date and must be
referred to as the correct version.To download the most current user manual please visit mgigolf.com. Images
shown throughout this manual may not be of the particular model you have purchased. MGIG_2075 05/23.
Other manuals for MGI Ai Series
2
This manual suits for next models
1
Table of contents
Other SureShot Golf Trolley manuals


