SurfSTOR SurfBurner User manual

2
Copyright
Copyright © 2007 Partners Data Systems, Inc. All rights reserved. This item and the information contained herein
are the property of PARTNERS Data Systems, Inc. No part of this document may be reproduced, transmitted,
transcribed, stored in a retrieval system or translated into any language or computer language in any form or by any
means, electronic, mechanical, magnetic, optical, chemical, manual, or otherwise, without the express written
permission of Partners Data Systems, Inc. La Mesa, CA.
Sun® is a registered trademark of Sun Microsystems International, Mountain View, CA.
Call Toll Free: 800.550.3005
Web: www.partnersdata.com
e-mail: support@partnersdata.com

3
Table of Contents
Cover ...................................................................................1
Copyright ............................................................................2
Table of Contents ...............................................................3
Unit Overview.....................................................................4
STEP 1: Halting the System..............................................5
STEP 2: Addressing...........................................................5
STEP 3: SCSI Termination...............................................6
STEP 4: Attaching the SCSI Cable ..................................7
STEP 5: Power Connection & Consumption ..................7
STEP 6: Probing SCSI Devices.........................................7
STEP 6A: Probing IDE Devices........................................8
STEP 7: OS Configuration Start Point............................8
STEP 8: Initial Check..........Error! Bookmark not defined.
STEP 9: Manually Mounting the DVD-RW....................9
SurfBURNER CD/DVD Writer......................................10
STEP 1: SurfBURNER Patches......................................10
STEP 2: SurfBURNER Install........................................10
STEP 3: SurfBURNER Registration..............................11
STEP 4: Running SurfBURNER....................................12
STEP 5: Creating a CD or DVD.....................................13
Using the CLI Interface...................................................15
Booting from the SurfBURNER Unit ............................16
Creating A DVD from Sun ISO Files.............................16
Technical Support............................................................18
Reference Documents ......................................................18
ISO Options ......................................................................19
Glossary of Terms ............................................................20

4
Congratulations on purchasing a SurfSTOR DVD-RW Drive! Your new SurfSTOR DVD-RW is made from the
finest components and drive mechanisms available and is backed by Partners’ years of experience providing
consistently high quality SCSI solutions for Sun Workstation users.
This booklet will give beginners step by step instructions and more experienced administrators a reference to
install any SurfSTOR SCSI DVD-RW drive, both internal and external. Prior System Administration experience is
not necessary but a basic UNIX familiarity is highly recommended. As you go through each of the steps be sure to
read the entire section before starting each step. Go carefully through the manual and you should be up and
running in no time.
This manual includes information for Solaris 8 (2.8) and higher. This manual also assumes that you are attaching
the new DVD-RW as an additional unit. Technical support is available by phone, fax, e-mail, and via the web.
La Mesa, CA: 619-415-2000
Toll Free: 800-550-3005
Fax: 619-415-2001
E-mail: support@partnersdata.com
WWW: http://www.partnersdata.com
• Experienced:
If you are experienced at installing DVD-RW drives on Sun you can use this booklet as a reference.
• First Time Installer:
If you need step by step information please start at STEP 1. Follow the next few steps and you should be up and
running in no time.
Unit Overview
The SurfSTOR DVD-RW is a Sun Compatible DVD-RW that has the same recording capabilities as any other DVD-RW on
the market. Below, in Figure A is a front view of the unit and its functions.
Figure A: Front View Figure B: IDE Rear View
For purchasers of the Internal IDE Unit, the following Figure B is provided to help aide in the configuration and
installation of the unit into the computer.

5
STEP 1: Halting the System
If you are installing an internal DVD-RW or adding an external DVD-RW to a SCSI channel that already has
devices on the system bus, you must shutdown the system. If you are adding an external unit to a new, empty
channel you do not need to shut down and may continue to step 3. Before halting your system find out what
operating system you are running by typing:
# /usr/bin/uname -sr
Write down your operating system here ________________
You must have root permission and be sure that all users are logged off. Use any command you would use to halt
your system normally or use the commands listed below.
# sync;/etc/halt
Once the system is halted turn off the power to the system and any devices attached to it.
STEP 2: Addressing
External SCSI: SurfSTOR subsystems have an
external SCSI ID select switch on the bottom or rear
panel of the enclosure. This switch corresponds with
the SCSI address of the DVD-RW unit inside the
enclosure. See Figure 2A below for a view of the ID
Selector:
ID
Selector
N/A
Power
Switch
Power
Plug
Figure 2A: ID Selector
Internal SCSI: If you are installing an internal
DVD-RW
please note that all of the jumpers have
already been preset by Partners’ technicians to ID6
for compatibility with most Sun systems. Please do
not add or take off any other jumpers aside from the
SCSI ID selection jumpers.
For a reference of the standard SCSI addresses on
Sun Workstations refer to the following GENERIC
Solaris kernel setup below. The main point with
addressing is to make sure that no two devices have
the same address. See Figure 2B below for a view of
the unit and its connections:
Figure 2B: Internal SCSI Rear View
Key:
CN1 --- 68-pin female SCSI connector.
CN2 --- 40-pin female IDE connector.
CN3 --- 4-pin power connector.
JP1 --- Sets Term Power to unit. Use pins 1 and 2
(left side).
JP2 --- Sets SCSI ID Selection and LED.
Typical SCSI Reservations:
IDs 0, 1, 2 and 3 are typically disk drives
(ID3=sd0 and is normally the boot disk mounted
internally).
IDs 4 & 5 are for tape drives or DVD-RW devices.
ID 6 is for bootable CD-ROM or DVD-RW devices.
ID 7 is for the SCSI Controller.
IDs 8 through 15 are for Tape Libraries and RAID
systems
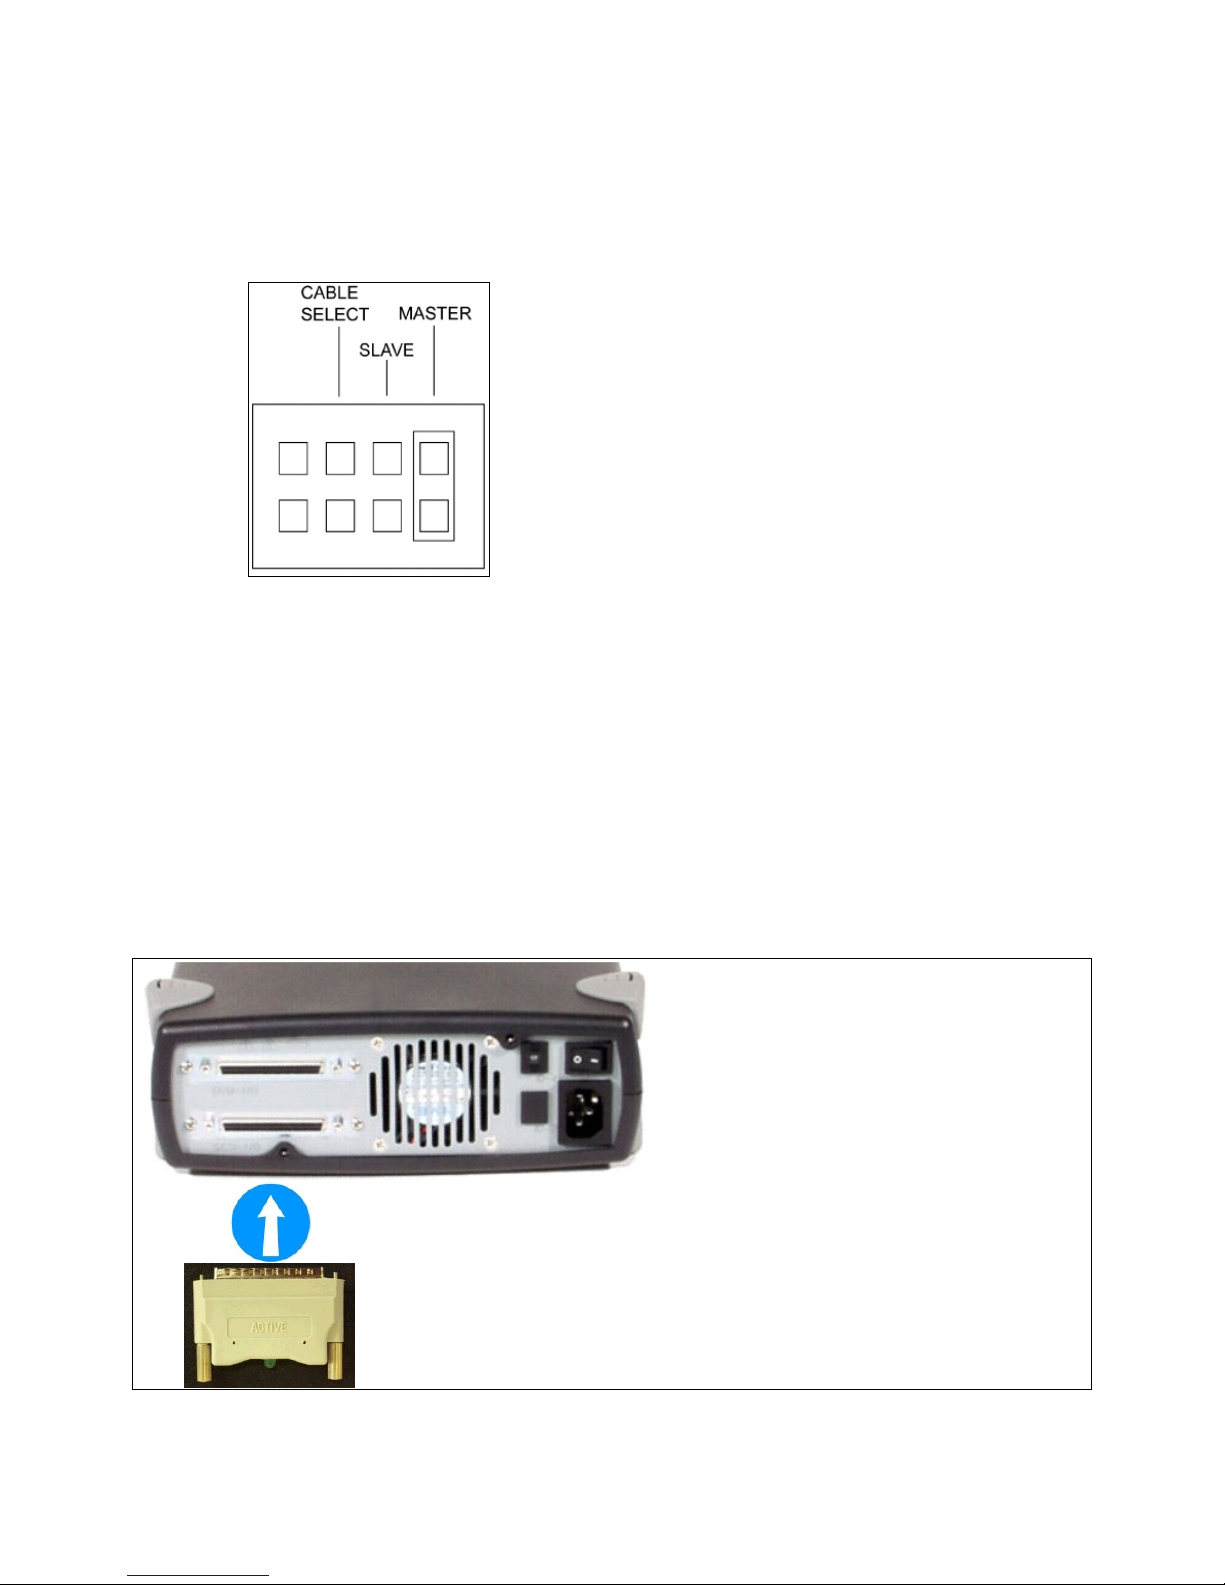
Internal IDE: SurfSTOR DVD-RW subsystems ship in both IDE and SCSI flavors. If you are installing an
internal IDE DVD-RW, please select the appropriate Master, Slave, or Cable Select jumper setting from the rear of
the unit before installing and be sure to verify that it does not conflict with another device on the channel. It may
also be noted that some systems do not support Cable Select and you may have to choose Master or Slave. See
Figure 2C below for a view of the unit and its connections.
Figure 2C: Internal IDE Jumper Block
The Master/Slave/Cable Select setting for the drive
is determined by the mode jumper. The jumper is
placed over one of the sets of mode pins. To change
the drive from Master to Slave or to Cable Select,
you must move the jumper.
For example, to change the drive to be a Slave,
move the
jumper to the middle set of mode pins, leaving the
other pins uncovered. To change the drive for Cable
Select, move the jumper to the left set of mode pins.
NOTE: If you are using an Internal IDE, proceed to Step 5 and then Step 6A.
STEP 3: SCSI Termination
The SCSI bus is a daisy chaining system. Several devices can be attached to the bus by connecting each of the
devices together in a single line. The end of the SCSI bus needs to have a terminator installed either internally or
externally. The SurfSTOR subsystems utilize the external termination method while the internal units use JP1 pins 1
and 2 (see Figure 2B for the location of JP1). The terminator will match the characteristic impedance of the cable to
keep signals from reflecting back and forth on the bus creating noise and mixed signals. Each of the devices in the
middle of the SCSI chain should not have terminators installed so the signal will be at full power as it goes on to the
next device in the chain. If you are installing the device in the middle of the chain do not use a terminator. If you
install this unit at the end of the chain, put a terminator at the end of the SCSI chain. See Figure 3 below.
Figure 3: Termination

7
STEP 4: Attaching the SCSI Cable
The Sun SCSI host adapter (controller) accesses the SCSI bus through the rear of the Sun chassis with a 50 pin (8-
bit SCSI), 68 pin (16-bit SCSI) D type connector, or Very High Density Connection Interface (VHDCI). Plug the
SCSI cable into the Sun SCSI controller (usually in the back of the system). If the subsystem is in the middle of the
SCSI chain, plug in the cable from the new subsystem into the back of the next subsystem in the SCSI chain. See
Figure 4 for possible connection types to the Host Computer System.
Figure 4: SCSI Connectors
STEP 5: Power Connection & Consumption
Plug the power cord into the SurfSTOR subsystem and into an appropriate power outlet. All SurfSTOR
subsystems have an auto-ranging circuit to support single phase 100-260VAC 47Hz-63Hz automatically.*
*If power in your area has voltage spikes (power goes high) or brownouts (power goes low), it is recommended that
you use a UPS (Uninterruptible Power Supply) or a surge protector to minimize the risk of damaging the subsystem
and losing data. For more information contact your sales representative at Partners, 800-550-3005.
Auto-Ranging Power Supply Performance:
Typical Peak
+5V 40W 60W
+12 3A 5A
AC Input 96-276 VAC: 50-60 HZ
Fan/CFM 60mm2 ball barring fan / 22CFM
STEP 6: Probing SCSI Devices
Read STEP 6 entirely before proceeding! The following is for SCSI Devices, if you have an IDE unit, proceed to
STEP 6A. The easiest way to make sure that you have attached the new DVD-RW to the system correctly is to use
‘probe-scsi-all’. At this point the Sun and the new DVD-RW should be physically connected together and set up
correctly. Turn on all of the external devices and then turn on the computer. Your workstation will check
memory and run various internal tests. It may also automatically boot itself. If your system starts to boot, stop it
immediately by pressing and holding down the ‘STOP’ key (upper left hand corner) and then the ‘A’ at the same
time - also known as ‘L1-A’. This should bring you to an ‘ok’ prompt. This is the “new command mode” and has a
variety of diagnostic and system setup options available.
Now you can test the device and SCSI ID. At the ‘ok’ prompt type ‘probe-scsi-all’. You should see a listing of all
the SCSI devices attached to your primary SCSI interface.
ok probe-scsi-all
/pci@1f,4000@scsi3
Target 1
Unit 0 SCSI Disk Seagate Disk ST373307LC
Target 6
Unit 0 Removable Read Only Device Plextor DVDR PX-800A
The ‘Target” is the SCSI ID that you set on the DVD-RW before attaching it to the system. You should see a
listing of all the SCSI devices on your system including the new DVD-RW. If you do, proceed to the next step. If
you do not, check the SCSI IDs being used on the system and choose one that is not being used for your new DVD-
RW.

8
STEP 6A: Probing IDE Devices
Read STEP 6A entirely before proceeding! The easiest way to make sure that you have attached the new DVD-
RW to the system correctly is to use ‘probe-ide’ command. At this point the Sun and the new DVD-RW should be
physically connected together and set up correctly. Your workstation will check memory and run various internal
tests. It may also automatically boot itself. If your system starts to boot, stop it immediately by pressing and
holding down the ‘STOP’ key (upper left hand corner) and then the ‘a’ at the same time - also known as ‘L1-A’.
This should bring you to an ‘ok’ prompt. This is the “new command mode” and has a variety of diagnostic and
system setup options available. At the ‘ok’ prompt type ‘probe-ide’. You should see a listing of all the IDE devices
attached to your IDE interface.
ok probe-ide
Device 0 ( Primary Master )
ATA Model: ST3120026A
Device 1 ( Primary Slave )
Removable Read Only Device Plextor DVDR PX-800A
Device 2 ( Secondary Master )
Not Present
Device 3 ( Secondary Slave )
Not Present
Assuming that the DVD-RW device jumper was set to Slave mode, it would show up as either Device 1 or Device
3 (depending on the cable used). Setting the DVD-RW as a Master device is not recommended as Master is usually
reserved for Hard Drives.
Note: If you do not see the new DVD-RW and all the other devices previously attached to the system, repeat
all the steps starting at step 2
4. Boot the system using the -rv switch option, which will reconfigure the system for new devices added since the
last reconfigure, including your new SurfSTOR DVD-RW and verbosely log these changes.
ok boot -rv
As the Sun is booting you should be able to see it recognize the new device(s) during post.
STEP 7: OS Configuration Start Point
The following steps are intended to aide you in determining if the SurfSTOR DVD-RW drive unit has been
successfully loaded by the Solaris Operating System.
1. When the computer is done booting it will give you a login prompt. Login as root:
login: root
Password:
2. You may have been able to see that the drive was recognized during the boot up sequence at the correct address.
By default, Solaris starts an application called the “Volume Manager” which automatically mounts and dismounts
CD-ROM and DVD type units. This makes it easy to place a CD or DVD into the drive and automatically start
reading from it. To see if the “Volume Manager” has mounted and recognized the DVD-RW device, open an XTerm
to see if a symlink has been created for the device by changing directories to /cdrom and listing the directory
contents:
mycomputer# cd /cdrom
mycomputer# ls
cdrom0
9
This will give you a listing of all the CD-ROM’s and DVD’s attached to the system, including the SurfSTOR DVD-
RW. If you have more than one SurfSTOR DVD-RW, then be careful to note the NEW SurfSTOR DVD-RW that
has been added. If you do not know which one that is and have multiple units listed, it is recommended that you put
a CD or DVD with information on it already into the SurfSTOR and type: “ls” for each cdromX(where Xis the
cdrom number assignment) until you see the contents of the disk. Make note of the cdrom# as it will list them as
cdrom0, cdrom1, and so on.
3. Now determine if your SurfSTOR DVD-RW device mapped to the system correctly by running the iostat -En
command:
mycomputer# iostat -En
c0t6d0 Soft Errors: 1 Hard Errors: 0 Transport Errors: 0
Vendor: PLEXTOR Product: DVDR PX-800A Revision: 1.0 Serial No:
Size: 0.00GB <0 bytes>
Media Error: 0 Device Not Ready: 0 No Device: 0 Recoverable: 0
Illegal Request: 1 Predictive Failure Analysis: 0
STEP 8: Manually Mounting the DVD-RW
The Volume Manager needs to be turned off any time you write to a CD or DVD (This will be discussed further
in the SurfBURNER portion of the manual). Once it has been turned off however, the DVD-RW and any other
ROM type unit will not be automatically mounted and will need to be mounted manually. To mount the SurfSTOR
DVD-RW with volmgt stopped, you must do the following:
1. To mount the DVD-RW drive to a directory, put a written CD or DVD in the drive and mount it by typing the
following:
# mount -o ro -F hsfs /dev/dsk/c#t#d#s0 /some_directory
(Note: Put the desired mount point directory in place of /some_directory - i.e. /cdrom)
The actual SurfSTOR device varies based on where it is plugged in on the SCSI chain. You can find this
information from the output of the probe command done in STEP 7 or by typing: iostat -En and looking for the
c#t#d# number.
mycomputer# iostat -En
c0t6d0 Soft Errors: 1 Hard Errors: 0 Transport Errors: 0
Vendor: PLEXTOR Product: DVDR PX-800A Revision: 1.08 Serial No:
Size: 0.00GB <0 bytes>
Media Error: 0 Device Not Ready: 0 No Device: 0 Recoverable: 0
Illegal Request: 1 Predictive Failure Analysis: 0
3. At this point, you should have your # prompt back and the drive mounted to the desired directory. To confirm this
you can use the ‘df’ command with a -k option. The ‘df -k’ command will report free disk space in kilobytes on a
mounted partition. This will confirm that the disk drive is mounted.
mycomputer# df -k
Filesystem kbytes used avail capacity Mounted on
/dev/dsk/c0t6d0s0 503084 503084 0 100% /cdrom
Note: If you don’t see the drive, then repeat step 9.

10
SurfBURNER CD/DVD Writer
The following has been provided to help in the installation, configuration, usage, and basic features. If you find
yourself having any problems with the steps herein, please contact Partners Data Systems Technical Support.
Support numbers and hours are provided at the end of this manual.
A DVD, for all general purposes of this document is nothing more than a CD with approximately 4.7GB of
storable Data. Because of this, the term CD and DVD can be used interchangeably.
SurfBURNER is an easy to use JAVA based CD and DVD Recording Software that has been specifically
designed to interface with the SurfSTOR DVD-RW units. SurfBURNER has the ability to easily drag-and-drop
files between the Solaris Filesystem and a CD or DVD, enabling you to make quick backups of files or sharable
copies of files that can be read on various types of computer systems.
STEP 1: SurfBURNER Patches
1. Log into the X Windows Session as root.
2. Insert the SurfBURNER CD/DVD Writer disk.
3. Wait for the file manager to open the CD Contents.
4. Open a Terminal session or command window.
5. cd /cdrom/cdrom0/Patches/J2SE_Solaris_X_Recommended (NOTE: X= OS version you are running)
6. sh ./install_cluser
7. Answer yes when asked: “Are you ready to continue with install? [y/n]:” yes
(NOTE: If you receive error codes: 5,9,18, or 19 and up, please review the detail logfile.
All other error messages can safely be ignored.)
8. When the installation completes, it will ask you to reboot, but you will want to install the SurfBURNER
software first before doing so. Proceed to STEP 2.
STEP 2: SurfBURNER Install
To install the SurfBURNER CD/DVD Writer application, run the sun package located under /cdrom/cdrom0. It is
suggested that you read the following install example carefully as the script will create a dir named PDSIdvdrw in
your /opt filesystem directory.
1. Change directories to the /cdrom/SurfBURNER folder. This assumes that the volume manager is turned on.
2. Once in the install directory, run the package manager to install the software using the following command:
mycomputer# pkgadd -d ./PDSIdvdrw-1.XX-sparc-local
The following packages are available:
1 PDSIdvdrw http://www.partnersdata.com SurfBURNER CD/DVD Writing utility.
(sparc) 1.XX
Select package(s) you wish to process (or 'all' to process
all packages). (default: all) [?,??,q]:
(NOTE: X= OS version you are running)
3. Type all and hit enter
4. Read the Software License Agreement and type: yes and hit enter to agree to the License.
5. The installation will copy all necessary files, finish, and display the options on how to run the application.
6. You will now need to reboot in order for the process to finish and run the software correctly. Type: init 6
7. Once the system as rebooted, continue to STEP 3: SurfBURNER Registration
(NOTE: To execute the software after rebooting, type: /opt/PDSIdvdrw/bin/surfburner to start the SurfBURNER
application.)

11
STEP 3: SurfBURNER Registration
Now that SurfBURNER has been installed, you should be able to launch the application either by running the
application from a self-made shell script or by running the /opt/PDSIdvdrw/bin/surfburner application from a
terminal window as shown below:
mycomputer# /opt/PDSIdvdrw/bin/surfburner
When you first launch SurfBURNER, the
application will notify you that it does not have a
valid license to run and will run in demo mode until
registered (See Figure 5 for a view of the message).
Demo mode will run with all features turned on, but
will only allow write jobs of less than 50MB until it
is registered. Click OK to the message and it will
disappear until the next use of the product or will
disappear when it has been registered.
Figure 5: License Warning
To register your copy of SurfBURNER:
1. Open a shell prompt and type: hostid
2. The output should be something similar to the following:
mycomputer# hostid
80d1f45e
3. Write down the number and E-mail or Fax it along with your Name, Company, Address, Phone number, E-mail
Address, and SurfBURNER Software Serial # as provided in the form shipped with the product to:
FAX: 619-415-2001
E-Mail: Support@Partnersdata.com Subject: Register SurfBURNER
4. Once we have received you request, we will generate you a license key and E-mail it to you.
5. Edit the license file in the /opt/PDSIdvdrw directory using your favorite text editor and copy the license key
information in the first line. Save the file with just the License key text without spaces and exit.
mycomputer# vi /opt/PDSIdvdrw/license
1234567890
~
~
:wq!
"license" 1 lines, 11 characters
6. Once the license file has been edited, you will need to restart the software to activate the key. You may also
register the key in the software under the Help/Register menu. You may review the Help/ About menu to
ensure the product licensed correctly.
7. Should you experience any trouble in this process, feel free to contact us:
Monday - Friday 8am-5pm PST (-08:00 GMT)
E-mail: support@partnersdata.com
US and Canada: (800) 550 3005 extension 501
International: 011 01 619 415 2000 extension 501

12
STEP 4: Running SurfBURNER
Assuming everything has installed correctly, you should now be able to run the SurfBURNER software. To be
able to write with the SurfBURNER software you will need to run the application as root. Otherwise, the entire
program group directory permissions for the recording application will need to be changed. This can be done using
the following commands:
mycomputer# chown <user>:<group> /opt/PDSIdvdrw/bin/cdwriter
mycomputer# chmod 4711 /opt/PDSIdvdrw/bin/cdwriter
Turn off any volume manager software. You must do this in order to burn disks.
On Solaris (pre-Solaris 10 06/06), this can be done by running this command:
mycomputer# /etc/init.d/volmgt stop
When you are done recording, turn it back on with:
mycomputer# /etc/init.d/volmgt start
NOTE: Solaris 10 6/06 and up no longer utilizes the volmgt init.d script for starting and stopping the volume
manager. You must use the svcadm command to disable the service. All Solaris 10 6/06 and greater users must do
the following:
mycomputer# svcadm disable svc:/system/filesystem/volfs:default
The service can be re-enabled any time by using the same command above, except replacing disable with enable.
To start SurfBurner by typing the following:
mycomputer# /opt/PDSIdvdrw/bin/surfburner
This will launch SurfBurner and allow you to start making disk compilations using the software. Please note the
following however:
To manually mount the CD or DVD disc on Solaris after writing refer to “STEP 9: Manually Mounting the DVD-
RW” or restart the Volume Manager and change directories to the /cdrom/cdrom0 folder to view the contents of the
CD or DVD just created.
Before writing, ensure the recording device is found under the "Recorder" tab as shown in Figure 6. If you do not
see any devices listed, you probably have volume management turned on or you may need to be root.
Figure 6: Recorder Tab

13
STEP 5: Creating a CD or DVD
SurfBurner has 5 toolbar icons which are intended to make recording a CD or DVD easier. Holding the mouse
over any item in SurfBURNER will provide an explanation of each item. From left to right they are:
Record Cancel Logs Help Exit
Record is used to Record a disk once you have created a file selection list. The Cancel button is used to cancel a
recording. The Logs button is used to review errors or verify the burned disk. The Help button is used for
registration and basic help. The Exit button is used to exit out of the application.
NOTE: Even though the physical DVD-RW unit may support various media types and media, Partners
Data Systems, Inc. has only qualified CD-R, CD-RW, DVD-R, and DVD-RW media for use with the
SurfBURNER software. Please do NOT use DVD+R, DVD+RW, DVD+DL, or DVD+Lightscribe media in
this unit.
The left window pane will contain
the file system of your machine. You
may browse through the entire
filesystem or any mounted remote
filesystems. Left-click and drag files
from the left window to the right
window pane; these will be the files
you will write to the CD/DVD disc.
See Figure 7:
Figure 7: File Selection
Once you have finished dragging all the
files you wish to copy to DVD, review the
bottom of the screen to ensure you have
enough space on the disk for your CD or
DVD. You may have a total of 4.37GB of
files that can be recorded to a DVD-R disc
and 700MB for a CD-R and since the space
is calculated for you in the lower left window
under the file system listing, you need only
review it before writing. See Figure 8:
Figure 8: Data Allocation
14
Should you need to delete files or folders
that have been added to the right window
pane for recording, you may delete them by
selecting the line and clicking the “Delete
Line” button at the bottom of the right
window pane. The “Clear All” button will
delete all the files in the right window
without having to select any of them. It will
also clear the total MB value in the lower left
window pane. See Figure 9:
Figure 9: Deleting Files and Folders
While it is not necessary to select any options other than the default selected ones listed, it is recommended that you:
1. Review the “ISO Options” tab to determine which write method is best for your needs before actually
writing the data to disk. Again, moving the mouse pointer over any item will give you an explanation of
each item. Refer to the end of this document under ISO Options for a full explanation of each option.
2. Create a label for the disk you are creating. Under the Recorder tab, change the text field that states:
“my_data” to something pertaining to the data in which you are copying to disk.
3. Verify you have enough space on the CD or DVD after you’ve dragged and dropped the files to the session
file selection folder. You can do this by reviewing the “File Selection” data count total at the bottom right
of the screen.
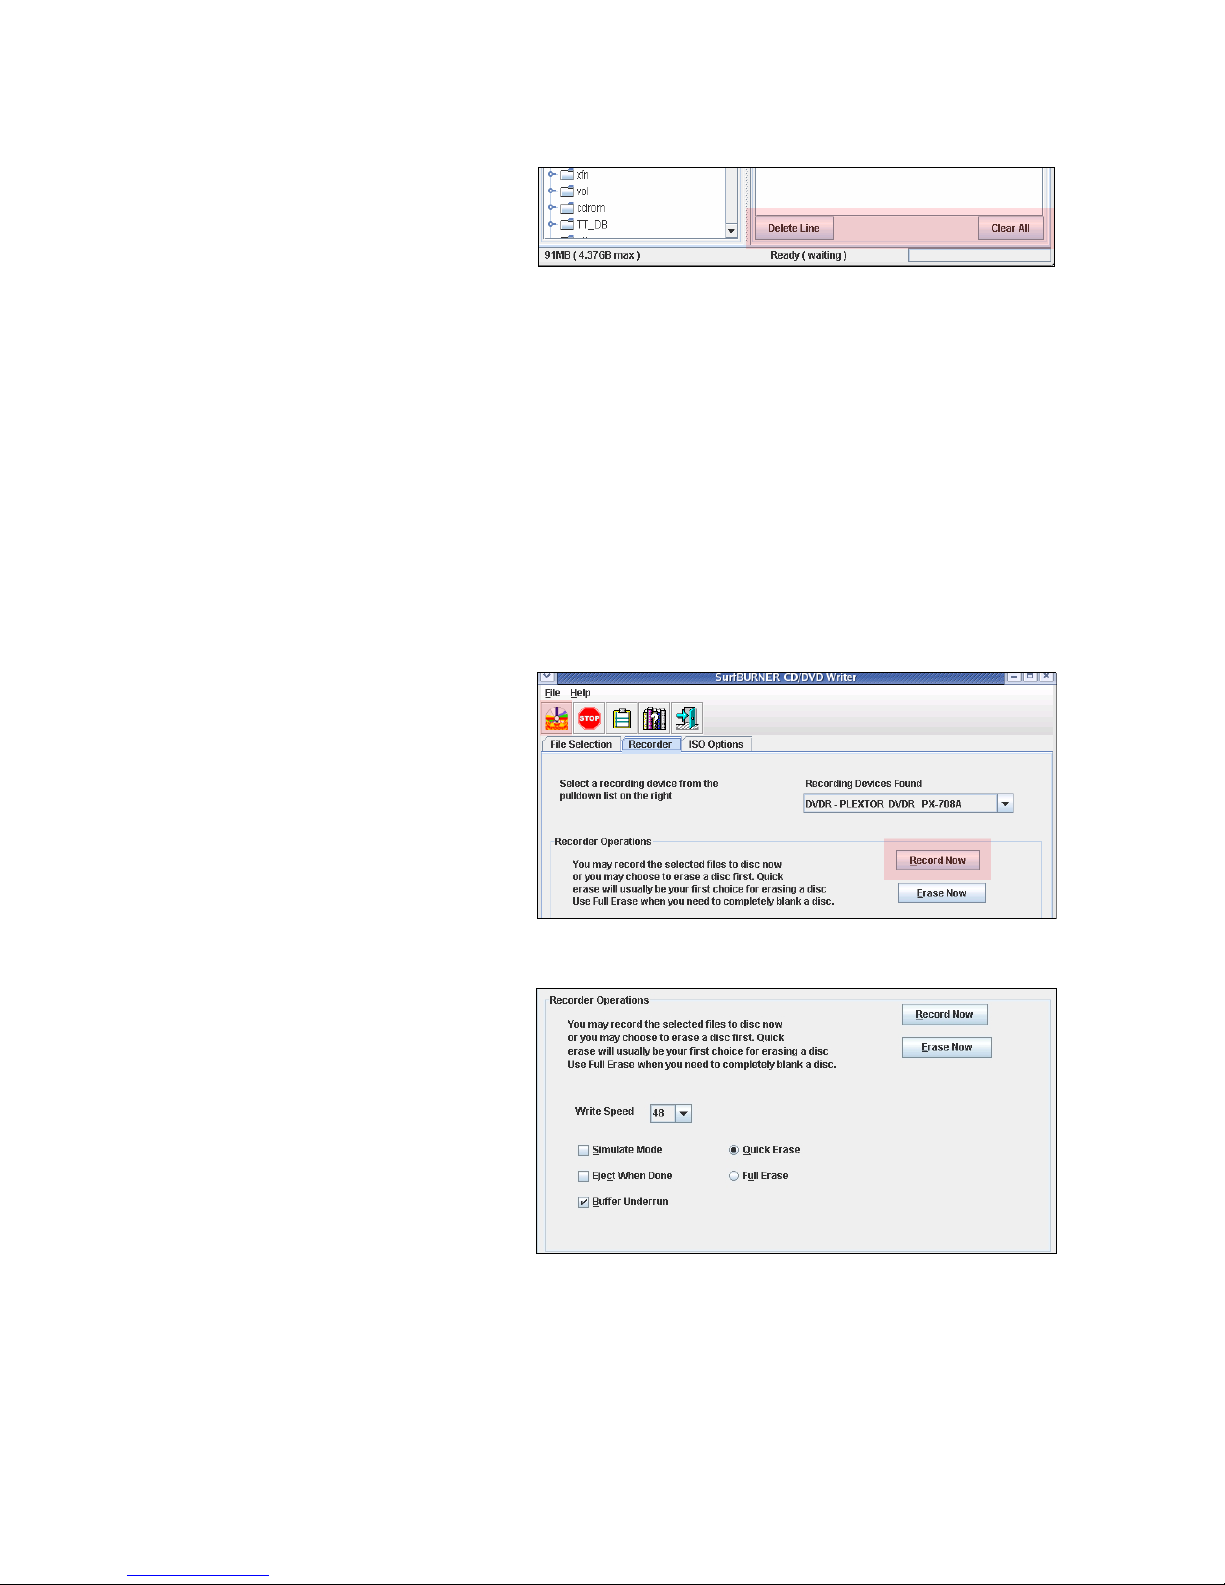
When you are ready to record the files to
the CD or DVD, click the record icon in
the tool bar or the “Record Now” button
found under the Recorder tab at the top of
the application. See Figure 10:
Figure 10: Recording
If you are using a re-writable disk, you may
wish to erase it prior to creating a new
compilation. To erase a disk, navigate to the
Recorder tab and review the information
under the “Erase Now” button. Review the
“Recorder Options” to determine which
erase type is best for your needs. The
“Quick erase” is the most commonly used
approach as it will delete the header of the
disk and overwrite data as needed. You
should only choose Full erase when the
Quick method does not work. See Figure 11:
Figure 11: Disk Erasing Options

15
Using the CLI Interface
If for some reason you would prefer to use the command-line to create a disk, you may do so using the below
commands. This can be useful when you can not be in front of the monitor and wish to use a remote connection such
as Telnet or SSH. Below is a basic example of how to create a CD or DVD with data from the system.
1. Stop the volume manager first:
mycomputer# /etc/init.d/volmgt stop
2. Change directories to the /opt/PDSIdvdrw/bin
mycomputer# cd /opt/PDSIdvdrw/bin
3. Create an ISO image of the data you wish to burn to disk using the mkisofs command. (NOTE: You may
use the mkisofs -help command for a full list of options):
mycomputer# # mkisofs -r -l -D -o data.iso -volid /some_directory /some_file /
88.84% done, estimate finish Mon Jan 15 13:57:54 2007
Total translation table size: 0
Total rockridge attributes bytes: 245
Total directory bytes: 0
Path table size(bytes): 10
Max brk space used a000
5629 extents written (10 MB)
4. Once done, an iso image will be created in the current working directory. To burn the ISO to disk, ensure
you know the path to the writer. If not, run the scan.sh command found in the /opt/PDSIdvdrw/bin folder
or refer to using iostat in Step 7 of the Unit Overview section.
5. Burn the disk using the /opt/PDSIdvdrw/bin/cdwriter command.
mycomputer# /opt/PDSIdvdrw/bin/cdwriter dev=1,6,0 -v -eject data.iso
Note: You will need to change the “dev=1,6,0” to match your system. The structure is <cntrlr>,<scsi id>,<lun>.
Also, this will only work on a CDROM disc. For a DVD disc you need to add the “-dao” switch as follows:
mycomputer# /opt/PDSIdvdrw/bin/cdwriter dev=1,6,0 -dao -v -eject my_data.iso
6. Once it finishes you can mount it up to use:
mycomputer# mount -F hsfs -o ro /dev/dsk/c0t6d0s0 /mnt
7. You may now change directories into the /mnt folder and view the contents of the newly created disk to
verification.
8. Once you’ve completed burning, restart the volume manager:
mycomputer# /etc/init.d/volmgt start
An ISO image that has been created either under Windows or UNIX should work with the above instructions as
long as the image was created within ISO standards.

16
Booting from the SurfBURNER Unit
This is an example of how to boot from a Blade 150. Your particular configuration will vary from system to
system and this is why it is suggested you pay special attention to these instructions:
1. Hit Stop + A when the system is counting memory and probe for SCSI Devices. In this instance, an
external CD-ROM was connected to a Sun Combo Card on the top channel.
OK> probe-scsi-all
/pci@1f,0/pci@5/pci@0/scsi@2,1
Target 6
Unit 0 Removable Read Only Device ‘PLEXTOR ‘ ‘DVDR PX-800A ‘ ‘1.04’ Removable CD-ROM
2. Looking on the back of the SCSI caddy, we can see that a SCSI ID has been set to assign an ID of 6 to the
CD-ROM. Once you know your SCSI ID for the CD-ROM we can now translate this and boot directly
from the address with the following command:
OK> boot /pci@1f,0/pci@5/pci@0/scsi@2,1/disk@6,0:f
3. If you need to boot off of this device again in the future, it is suggested that you make a simple alias to this
device as well as note the cable and ID settings. To make an alias, simply type: devalias <some_name>
<hardware_address>
OK> devalias xcdrom /pci@1f,0/pci@5/pci@0/scsi@2,1/disk@6,0:f
4. Now that an alias has been created, you can type the following from the OK> prompt to save and boot from it:
OK> nvstore
OK> boot xcdrom
Creating A DVD from Sun ISO Files
If you have a login for Sun Solve, then you more than likely have the ability to download the latest Solaris Disk
Images. The following is outlined at Sun’s site at: www.sun.com/software/solaris/download_instruction.xml, but
the basic steps for taking the files downloaded from Sun’s site at: http://www.sun.com/software/solaris/get.jsp and
creating a single, unified ISO image that can be burned to disk.
If the software is obtained via download, selecting DVD has an additional benefit: you only have to burn a single
disk. However, many utilities found on the Internet or included with various operating systems do not function
properly with files that exceed 2GB in size, and a DVD image can be much larger than that. To minimize this
problem, Sun has broken the Solaris 10 OS DVD image into five parts. To reconstitute the full DVD image:
NOTE: Once one has downloaded an .ISO file, checking the ISO files to see if it has been corrupted during the
download, before burning it to a DVD is recommended. For that, one will need to compare checksums of the
downloaded file against the file found on the download server. With Solaris 10 and beyond, use the digest
application supplied with the Solaris 10 operating system.
Example1:
# digest -a md5 filename
This will create an md5 sum that can be compared against the published value at the download site.
Another option is to install the free downloads of md5-sparc or md5-x86 available at
http://sunsolve.sun.com/md5/md5.tar.Z .
Make sure to use the same kind of media as supported by your DVD burner. There are CD-R, CD-RW, DVD-R, and
DVD-RW disks that can be used. Do not use DVD+R DL (dual layer) discs.
17
1. Download all 5 parts of the image. Each of these parts is an individual slice of the DVD Filesystem, or an
individual CD that can be burned on 5 separate CD’s.
2. Use the command: #unzip sol-XX-u2-ga-sparc-dvd-iso-Y where XX is the OS version and Y is the part. Unzip
all of the files into a single directory.
3. In order to make a single DVD image, instead of 5 separate CD’s, one will need to concatenate them all
sequentially at once and redirect the output to a single file. An example of this is using the Solaris 10
distribution is as follows:
mycomputer# cat sol-10-u2-ga-sparc-dvd-iso-a sol-10-u2-ga-sparc-dvd-iso-b sol-10-u2-ga-sparc-dvd-
iso-c sol-10-u2-ga-sparc-dvd-iso-d sol-10-u2-ga-sparc-dvd-iso-e > sol-10-GA-sp-dvd.iso
4. The end result is a single ISO image that can be burned to DVD.
5. To burn the ISO image, insert a blank DVD-R media into the SurfSTOR DVD/CD Writer
6. Open a terminal window under Solaris, su to root, and turn off volmgt as follows:
mycomputer# su -
mycomputer# /etc/init.d/volmgt stop
7. Now burn the image to disk by running the cdwriter program from the SURFBurner Directory such as follows:
mycomputer# /opt/PDSIdvdrw/bin/cdwriter dev=X,Y,Z -dao -v -eject sol-10-GA-sp-dvd.iso
NOTE: dev=X,Y,Z is the device path to your particular DVD+/-RW and can be determined by running the
following command:
mycomputer# /opt/PDSIdvdrw/bin/scan.sh
The output of the scan.sh should appear similar to the following:
scsibus1:
1,0,0 100) 'FUJITSU ' 'MAP3735N SUN72G ' '0401' Disk
1,1,0 101) *
1,2,0 102) *
1,3,0 103) *
1,4,0 104) *
1,5,0 105) *
1,6,0 106) ‘PLEXTOR ‘ ‘DVDR PX-800A ‘ ‘1.08’ Removable CD-ROM
In this case, 1,6,0 is the target of dev=X,Y,Z and should be used in the above cdwriter command to make the
DVD.
8. Depending on the amount of data being recorded to the device, this process may take up to an hour to record to
disk. Once completed however, put the CD into the drive again and mount it using the following command:
mycomputer# mount -F hsfs -o ro /dev/dsk/c0t6d0s0 /cdrom
9. Now change directories into the /cdrom folder and list the contents using the ls command.
NOTE: On bootable disks, there are various slices, not all of which are viewable using the mount command. It is
advisable to try mounting slices 1 and 2 (ex: c0t6d0s1 and c0t6d0s2) as further tests before trying to boot the CD or
DVD.
Once completed, be sure to restart the volume manager again.

18
Technical Support
Technical Support is available 8:00 A.M. - 5 P.M. Pacific Standard Time, Monday - Friday excluding holidays.
We are not responsible for products other than those provided by Partners, but we will make every attempt to
interface and integrate with other vendors’ products as necessary to the best of our ability. Technical Support can
help with installations, defective equipment, and support questions. Your Account Manager can assist you with
incorrect shipments, missing parts, and general information. Our goal is to get you up and running as quickly and
easily as possible. Please do not hesitate to call.
If you need Technical Support your technician will need the following information:
1. Company name, your name, and phone #.
2. Serial #.
3. IMPORTANT! If at all possible, have the system you are working on available when you call so we may better
assist you with the installation of the equipment. Technicians are normally available immediately when you call
except during peak times (10AM-2PM PST). If a technician is not available you will receive a call back typically
within 60 minutes.
Call 619-415-2000 within California
Call 800-550-3005 outside California
Fax 619-415-2001
E-Mail: support@partnersdata.com
WWW: http://www.partnersdata.com
To help us serve you better, send comments or suggestions:
Partners Data Systems, Inc.
3663 Via Mercado
La Mesa, CA 91941
Attn: Customer Service
or
Via e-mail: comments@partnersdata.com
Thank you very much for your purchase and support.
Reference Documents
•Partners Data Systems, Inc. website: http://www.partnersdata.com
•Mkisofs website: http://cdrecord.berlios.de/old/private/mkisofs.html
•BigAdmin System Administration Portal: http://www.sun.com/bigadmin/home/index.html
•Sun BluePrints: http://www.sun.com/blueprints/
•cdrecord website: http://freshmeat.net/redir/cdrecord/35795/url_homepage/cdrecord.html

19
ISO Options
Rock Ridge - (-R or -rock option) Makes the disk UNIX readable with longer than 8.3 filenames. This allows the
ISO-9660 extension to allow long file names, UNIX symlinks and file protection (rwx). You may use this with
Joilet to create a Windows and UNIX compatible hybrid readable disk.
Joilet - (-J or -joliet option) Required in addition to Rock Ridge to create a Windows readable disk as it makes
MS/Windows 95 like 8.3 file names with translation to 64 character names. This is the Microsoft extension to
ISO-9660.
Deep directories - (-D option) This means that you can have more than 8 directory levels even when not rock-ridge
is used as it disables deep directories, putting them in the format as seen on the disk. This is useful under
Windows, but it violates the ISO-9660 standard and should be used with caution as it can cause for invalid
directory interpretation under certain systems.
Long Names - (-l, -full-iso9660-filenames option) Allows for long file names using 31 characters. By default, the
disk will only allow for DOS-like 8.3 characters to be written. This must selected or you will otherwise end up
with files such as: “somefil~1.con”.
Backup - (-nobak option) Do not copy any file that ends with .bak, ~, or # to the CD or DVD upon creation.
Follow Symbolic Links - (-f or -follow-links) This is set so files and directories that are links under a UNIX
filesystem will be included and followed from within the Disk.
Hide RR_Moved Dir - (-hide-rr-moved option) This moves the RR_Moved to a .rr_moved directory so it is hidden
in the filesystem when using Rock Ridge. This is useful when you want to have a clean disk without these
directories.
Rationalized - (-r or -rational-rock option) This resets the security attributes of the files and folders with
rationalized owner and mode information.
Relaxed Filenames - (-relaxed-filenames option) Allows for uppercase and lowercase characters, as well as
numbers to all exist in a single filename, but it also violates the ISO-9660 standard and should be used with
caution even though it can be very useful to some.
Allow Lowercase - (-allow-lowercase option) Allows just lowercase characters. This is not needed if Relaxed
Filenames is selected and all you want is lowercase characters, but please note that this technically violates the
ISO-9660 standard.
Allow Multidot - (-allow-multidot option) This option allows more than one dot to appear in filenames. This
violates the ISO9660 standard, but it happens to work on many systems. Use with caution.
Omit Trailing Period - (-d option) This omits trailing periods from files that do not have a period. This too violates
the ISO9660 standard, so use with caution.
Leading Period - (-L or -allow-leading-dots option) This option allow filenames, such as hidden ones, to begin with
a period. Usually, a leading dot is replaced with an underscore in order to maintain MS-DOS compatibility, but
please use with caution as this is for legacy support only (pre-2001).

20
Glossary of Terms
boot disk - The disk that holds the system kernel and boot information, typically a swap partition, and executable files (except
for data-less setup) necessary to run the computer.
cat - Concatenate and display. Similar to “more” but displays entire file at once even if the file output is larger than the
display.
cp - Copies a file from one location to another.
data disk -A disk typically made with maximum size partitions with the fewest total partitions allowable by the operating system
using UFS.
OS Release Single file File system
Solaris 2.5.1 2 Gbyte 1 Tbyte
Solaris 2.6 - 9 12/02 ~1012 Gbyte 1 Tbyte
Solaris 9 08/03 - Solaris 10 ~1023 Gbyte 16 Tbyte
dev - Stands for device. The directory /dev has all the supported devices.
df - Reports information about a disk’s geometry and partitioning.
du - Reports the information about a folder’s size.
format - Enables one to format, label, repair and analyze disks on your system.
iostat - The iostat utility iteratively reports terminal, disk, and tape I/O activity through kernel level calls.
kernel - The SunOS kernel has a listing of the supported devices for that machine. As the system boots up, it polls each device
in the kernel to confirm it responds. When adding new devices kernel support is required.
man - Stands for “manual”. Running man <some_command> results in a description and usage of a particular command.
Example: “man fsck”.
mkdir - Makes a directoryX/
more - Browse or page through a text file. Similar to “cat” except that “more” scrolls down to display one more line or page of
text at a time
mv - Allows one to move files from one location to another.
newfs - New file system, creates a new file system.
NFS - Network File System, allows transparent file access over networks.
prtvtoc - Prints the disk’s partition map.
root - Usually used by the System Administrator. Root, also referred to as the “Super User”, has permission and access to all
computer files and functions.
SCSI - Small Computer System Interface, pronounced “scuzzy”, which is an industry standard for connecting peripheral
devices and their controllers to a microprocessor. The SCSI defines both hardware and software standards for communication
between a host computer and a peripheral device. Computers and peripheral devices designed to meet SCSI specifications should
work together.
UFS - Default Disk based file system for the Solaris OS.
vfstab - Is the file system table, static file system mounting table, mounted file system table used by the computer to mount
disks, NFS, etc during boot.
vi - Visual display editor based on ex. Used to modify files.
ZFS - ZFS is a new files system that eliminates volume management altogether. Instead of forcing you to create virtualized
volumes, ZFS aggregates devices into a storage pool. It acts as an arbitrary data store from which file systems can be created.
Table of contents


