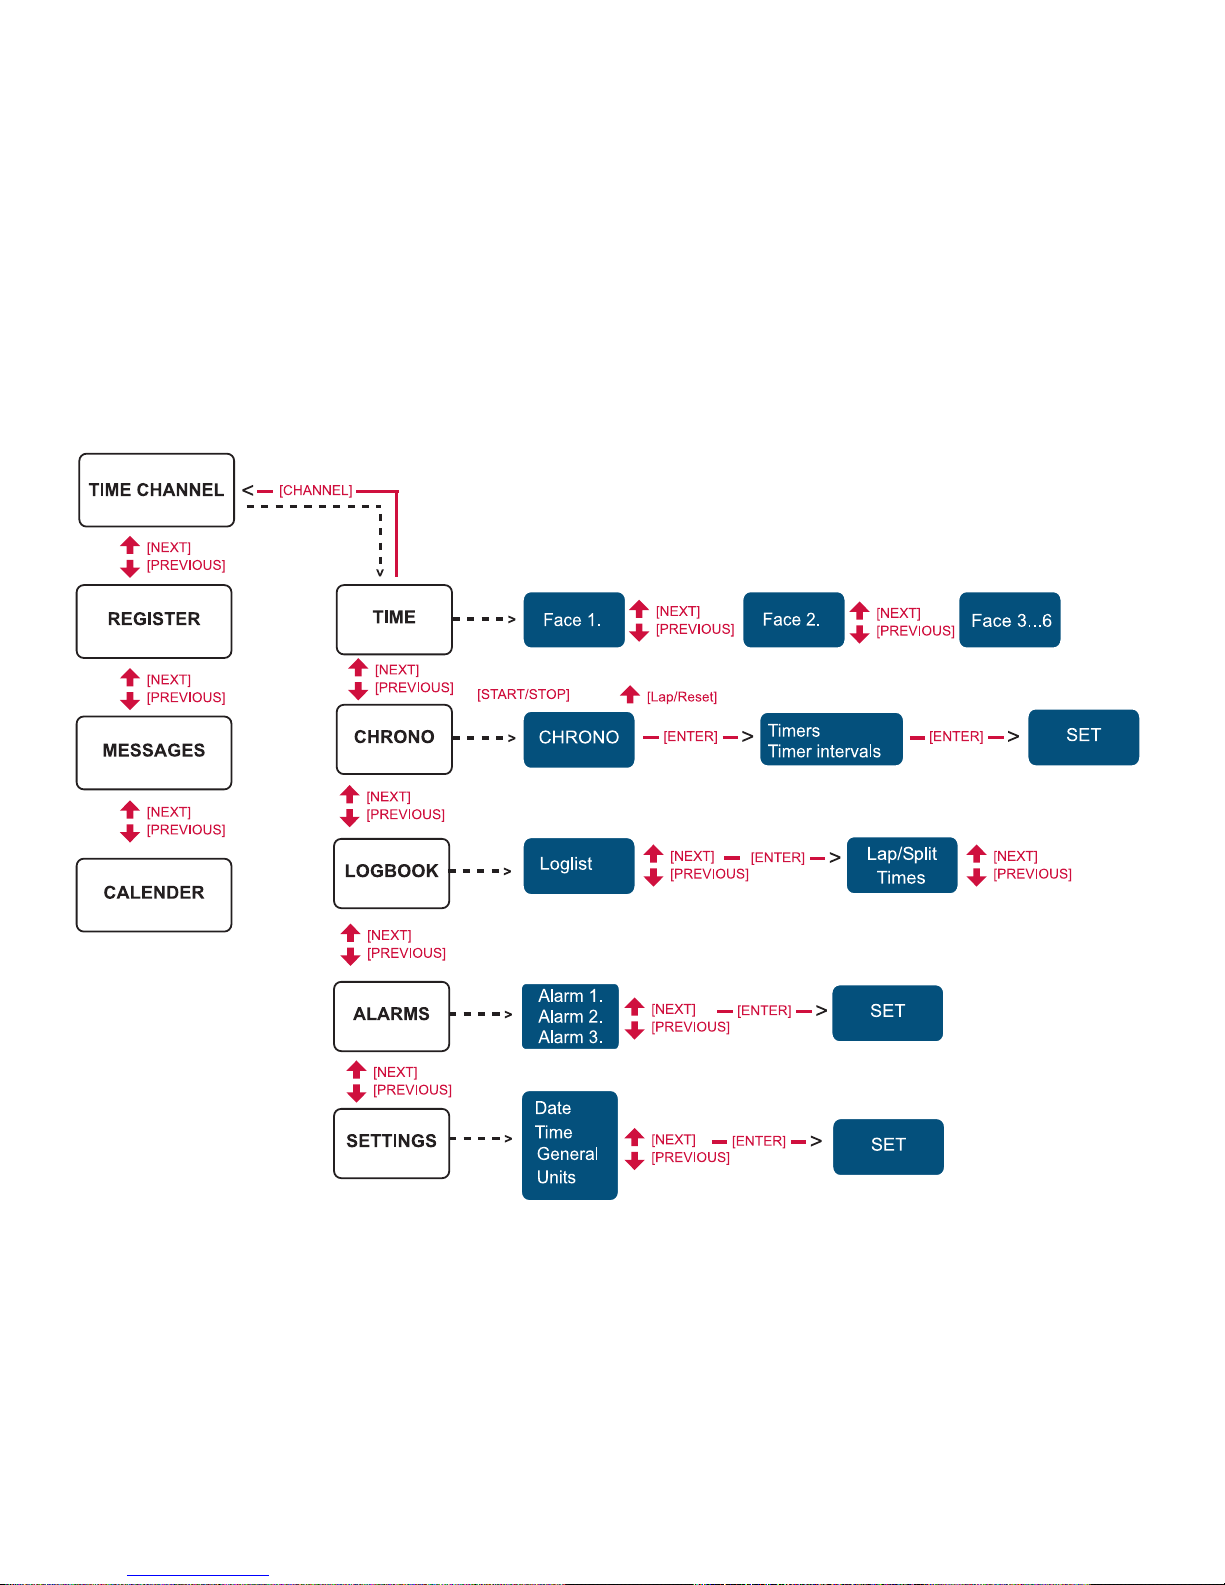
Suunto N3i User manual


Suunto n3i Menu Structure

1
CUSTOMER SERVICE CONTACTS
Suunto USA Phone 1 (800) 543-9124
Canada Phone 1 (800) 776-7770
Suunto Website www.suunto.com
EN

2
1. GENERAL INFORMATION ...................................................................................4
2. HOW TO USE YOUR SUUNTO n3i...................................................................... 4
2.1. Buttons .........................................................................................................5
2.2. Channels ......................................................................................................8
2.3. Modes ..........................................................................................................9
2.4. Signal coverage ...........................................................................................9
2.5. Status icons ...............................................................................................10
3. TIME CHANNEL ..................................................................................................12
3.1. Receiving the time .....................................................................................13
3.2. Choosing a watch face ...............................................................................14
3.3. Watch face sub-modes ..............................................................................15
3.3.1. Downloading a watch face ..............................................................15
3.4. Chronograph ..............................................................................................16
3.4.1. Timers .............................................................................................16
3.5. Alarms ........................................................................................................20
4. BATTERY ............................................................................................................21
4.1. Battery level indicator .................................................................................21
4.2. Charging the battery ..................................................................................23
5. SUUNTO N3I USB DRIVER ................................................................................24
5.1. Installing Suunto n3i USB driver ................................................................24
5.2. Uninstalling Suunto n3i USB driver ............................................................24

3
6. SETTINGS .......................................................................................................... 25
6.1. Time .......................................................................................................... 26
6.1.1. Setting the time ............................................................................... 26
6.1.2. Setting the time zone ...................................................................... 27
6.1.3. Setting the dual zone ...................................................................... 27
6.2. Date ........................................................................................................... 28
6.3. General ...................................................................................................... 28
6.4. Units .......................................................................................................... 30
7. FREQUENTLY ASKED QUESTIONS ................................................................ 31
8. GETTING HELP ................................................................................................. 36
9. TERMS AND CONDITIONS ............................................................................... 37
9.1. Copyright ................................................................................................... 37
9.2. Trademarks ............................................................................................... 37
9.3. Patents ...................................................................................................... 37
9.4. About your Suunto n3i and service ........................................................... 38
9.5. FCC compliance ........................................................................................ 38
9.6. CE compliance .......................................................................................... 39
9.7. ISO 9001 compliance ................................................................................ 39
10. WARRANTY .................................................................................................... 40
10.1. Limits of liability ....................................................................................... 40
10.2. After sales service ................................................................................... 41

4
1. GENERAL INFORMATION
Ready, Set, Go! Wherever life takes you, your new Suunto n3i keeps you current.
When you sign up for the MSN®Direct service, you can choose exactly what
information you want to receive. This dynamic wireless technology discreetly displays
the information that matters most to you. With a quick glance at your wrist, you stay
informed about news, stocks, weather, sports and more. MSN Direct-ready watches
are every bit as fun as they are informative. Enjoy making fashion statements with
different watch faces and customizing your Suunto n3i to fit your lifestyle.
To learn more about your new Suunto n3i and how to use it, follow the instructions in
this guide.
2. HOW TO USE YOUR SUUNTO n3i
To get acquainted with your new Suunto n3i and learn about channels, modes, signal
coverage, and status icons, keep reading. If you have not already done so, follow the
steps in the Quick Start Guide to charge your Suunto n3i, activate the MSN Direct
service at http://direct.msn.com/go, and follow the instructions on the screen.

5
2.1. BUTTONS
Your Suunto n3i includes five buttons each of which has several different functions.

6
START/LAP/LIGHT
Short press
• Starts the Chronograph (Chrono mode).
• Stores lap/split times (Chrono mode).
Long press
• Activates the backlight in all the modes. (For personalized use of the backlight, see
Chapter 6. Settings.)
CHANNEL/MODE
Short press
• Returns to the mode or channel splash screen.
• Scrolls the channel splash screens on the display.
Long press
• Returns to the Time channel splash screen.
NEXT/STOP
Short press
• If a mode/channel splash screen is active, it navigates to the next splash screen.
• Scrolls the menus up.
• When setting/changing a selected item, it scrolls the options on the display.
• When changing values, it increases the value.
• Changes watch faces (Time mode).
• Stops the chronograph (Chrono mode).
• After you have stopped the chronograph, it scrolls the stored lap/split times on the
display.

7
Long press
• When you press and hold the button for two seconds in menus, watch face
selections and splash screens, it starts to scroll through the options until you
release it.
• Resets the display after you have stopped the chrono time (Chrono mode).
PREVIOUS
Short press
• If a mode/channel splash screen is active, you can use this button to navigate to
the previous splash screen.
• Scrolls the menus down.
• When setting/changing a selected item, it scrolls the options on the display.
• When changing values, it decreases the value.
• Changes watch faces (Time mode).
• It selects either the lap/split reading or the timer reading for the lowest field of the
Chrono mode’s main display.
Long press
• When you press and hold the button for two seconds in menus, watch face
selections and splash screens, it starts to scroll through the options until you
release it.
ENTER
Short press
• In Chrono, Settings and Alarms modes, it navigates to the main display. (The main
display opens automatically after a few seconds if you do not push any buttons)
• Navigates to submenus.
• Accepts settings.

8
• Changes watch face sub-modes (Time mode).
• After the last setting, it takes you back to the main display.
Long press
• Accepts the settings and returns to the main display.
2.2. CHANNELS
Channels and their modes organize the information on your Suunto n3i. Similar to the
channels on your television set, you see different types of content—such as news
and weather—when you switch channels on your Suunto n3i. When you activate the
MSN Direct service, you can select the channels you want to display on your Suunto
n3i. Each channel appears on the Suunto n3i display with an icon and the name of
the channel.
•To return to the Time channel, long press CHANNEL/MODE.
• To view the next channel, press CHANNEL/MODE, NEXT/
STOP or PREVIOUS.
• To display the contents of the current channel, release the
button pressed.

9
2.3. MODES
Each channel has one or more modes. For example, the Time channel includes the
Time, Chrono, Logbook, Alarms and Settings modes. The name of the current mode
appears on the Suunto n3i splash screen.
• To view the current mode, press CHANNEL/MODE once.
• To view the next mode within that channel, press NEXT/
STOP or PREVIOUS.
2.4. SIGNAL COVERAGE
The MSN Direct service is delivered over a wireless network that is based on FM
radio broadcast signals. Your Suunto n3i indicates the strength of the broadcast
signal by displaying a signal strength icon. The icon appears in the upper-right corner
of the status bar on most channel screens. The status bar will appear on most
channel screens a few seconds after the last button press. Even at low signal
strength, your Suunto n3i should receive information. Signal strength can vary based
on your location. Sometimes topography (hills, valleys), building structures, or nearby
electronics can interfere with the broadcast signal that your Suunto n3i uses to
receive information.
The network sends two types of information to your Suunto n3i—broadcast and
personal. Broadcast information—such as news stories and current temperatures—is
sent to every Suunto n3i with MSN Direct, but only the information that you want to
see is actually captured by your Suunto n3i. Regardless of where you travel in North

10
America, as long as you are within an MSN Direct coverage area, you should receive
broadcast information.
Your personal information—such as your messages and calendar appointments—is
encrypted with a unique key to help maintain your privacy. You receive personal
information when you are within the range of your home coverage area. Your home
coverage area is the metropolitan area where you live.
For more information about your home coverage area, including what to do when you
travel, go to the MSN Direct Web site at www.msndirect.com and click the Help link.
2.5. STATUS ICONS
Your Suunto n3i displays various icons. The location of the icons depends on the
watch face used. The following table describes each icon.
Icon Description
New Message: Indicates that a new message has
arrived.
Battery Charging: Indicates that the battery is
currently charging.
Battery Low: Appears when the battery level is
reduced to 30%. You need to charge your Suunto n3i
soon.

11
Alarm On: Indicates that one of the alarms is set and
will sound at the appropriate time.
Chrono Running: Indicates that the Chronograph is
currently running.
Signal Strength: Shows you the strength of the
broadcast signal that your Suunto n3i is receiving.
• A full signal is indicated by .
• A remote signal is indicated by and it means that
your Suunto n3i may not be receiving your personal
information. This can happen before the signal
confirms the home coverage area for your Suunto
n3i, or if you travel out of your home coverage area.
• No signal is indicated by and it means that your
Suunto n3i has been out of your home coverage
area longer than 10 minutes and cannot find a
signal.
Radio Off: Means that the watch radio is off and your
Suunto n3i cannot receive a broadcast signal.

12
3. TIME CHANNEL
Your Suunto n3i comes with three channels—Time, Messages, and Calendar—that
are available for use even before you activate the MSN Direct service. The Time
channel is fully operational and ready to go. The Messages and Calendar channels
have limited capabilities until you activate and personalize MSN Direct. The
Messages channel is available for emergency and public service announcements,
and the Calendar channel includes a month view calendar. Once you activate MSN
Direct, you can receive messages from others, view personal appointments, and view
an events calendar for the things that interest you, such as sports schedules, financial
events, and local cultural events. You can also subscribe to a number of additional
channels, such as news, weather, stocks, and sports.
This guide provides instructions for using the Time channel. For instructions on using
the other channels—including Messages and Calendar—go to the MSN Direct Web
site at www.msndirect.com and click the Help link.
Note: Before you activate MSN Direct, you also see the Register channel on your
Suunto n3i. This is a temporary channel that displays the information you need to
activate the service, including the MSN Direct Web site address and your Suunto n3i
ID. The instrument ID is a number that uniquely identifies your Suunto n3i so that you
can receive personal messages and information. The Register channel disappears
when you activate MSN Direct.

13
3.1. RECEIVING THE TIME
When your Suunto n3i receives a broadcast signal, it should automatically receive the
correct time from an atomic clock. This happens even if you have not yet activated
the MSN Direct service. As long as your Suunto n3i is receiving a signal, you do not
need to set the time. The time is accurate to a few thousands of a second and
automatically adjusts for daylight savings time and leap years. In addition, your
Suunto n3i automatically changes to different time zones as you travel from place to
place.
Note: When you turn on your Suunto n3i, it may take a few minutes to receive the
time from an atomic clock.
If you are in an area where your Suunto n3i cannot receive a signal, you can set the
time manually. You can also change the time display from a 12-hour clock to a 24-
hour clock, and you can override the automatic time zone setting. For details, see
Chapter 6. Settings.

14
3.2. CHOOSING A WATCH FACE
You can change the face that is displayed on your Suunto n3i.
To choose a new watch face:
1. Long press CHANNEL/MODE to go to the Time channel. Wait for the current
watch face to appear.
2. Select a suitable watch face with PREVIOUS or NEXT/STOP
.

15
3.3. WATCH FACE SUB-MODES
The watch faces have two to three sub-modes that you can adjust with the ENTER
button. With the sub-modes you can customize the watch face to display date and
dual time (and on some watch faces seconds) in addition to the regular time display. If
you change the watch face, the selected sub-mode will also be visible there provided
that the watch face supports it. So, for example, if you have selected to display the
date, and you then decide to choose a new watch face, the date will be visible there,
too. However, if your current watch face displays seconds, and you then select a
watch face that does not support such a sub-mode, the seconds will not be displayed.
3.3.1. Downloading a watch face
When you personalize the MSN Direct service, you can sign up to receive new watch
faces. When you receive a new watch face, a specific message appears on the
display (see the image below):
To view the new watch face and decide whether to keep it:
1. When you receive the message, press ENTER.
The new watch face appears for a few seconds.
2. Do one of the following:
• To keep the watch face, press NEXT/STOP (Yes).
• To discard the watch face, press PREVIOUS (No).
Note: You can only store one downloaded watch face at a time
on your Suunto n3i. If you decide to keep a face, the last watch
face that you downloaded is removed.

16
3.4. CHRONOGRAPH
With the chronograph you can time events—such as your daily
run—and record lap times. You can start the chronograph, stop it,
and then restart it without having to reset it. You can record up to
50 laps.
To use the Chronograph:
1. Enter the Chrono mode.
2. Press START/LAP/LIGHT to start the chronograph.
3. Press START/LAP/LIGHT while the chronograph is running to
store a split time.
Note: The chronograph will temporarily freeze then continue counting. Your split time
and number are displayed in the bottom left corner of the screen.
4. Press NEXT/STOP to stop the chronograph.
5. Press NEXT/STOP to view your individual splits.
6. Press and hold NEXT/STOP for 2 seconds to reset the chronograph.
3.4.1. Timers
Suunto n3i has three different training timers that you can use alongside the
chronograph. For example, you can use these versatile timers for countdown time
measurement before the start of a competition, for work and rest intervals in circuit
training or to automatically start the chronograph after a warm-up period. Different
timers function differently according to their type and purpose.

17
Timer-Stop
This is a countdown timer. It starts the set countdown time
when activated and stops it after the time has run out.
1. Enter the Chrono mode.
2. Press ENTER to access the chronograph sub-menu.
3. Select Timer Intervals
4. Select Timer-Stop
5. Set the desired countdown time (seconds and minutes)
with PREVIOUS or NEXT/STOP and accept the selections with ENTER. The
message ‘TIMER-STOP INTERVAL SET’ is displayed and you return to the
chronograph display.
6. Press ENTER to access the chronograph sub-menu.
7. Select Timer.
8. Select Timer-Stop. The message ‘TIMER-STOP ACTIVATED’ is displayed and you
return to the chronograph display.
9. Use PREVIOUS to toggle between your selected countdown time and 0.00,0.
10.Press START/LAP/LIGHT to start the countdown. When the countdown reaches
zero, the chronograph stops automatically. You can also stop the chronograph
manually by pressing NEXT/STOP.
11.Press and hold NEXT/STOP for 2 seconds to reset the chronograph.

18
Timer-Chrono
This is a combination countdown timer and chronograph. You can set a countdown
time, and when it reaches zero, this will activate the chronograph.
1. Enter the Chrono mode.
2. Press ENTER to access the chronograph sub-menu.
3. Select Timer Intervals.
4. Select Timer-Chrono.
5. Set the desired countdown time (seconds and minutes) with PREVIOUS or NEXT/
STOP and accept the selections with ENTER. The message ‘TIMER-CHRONO
INTERVAL SET’ is displayed and you return to the chronograph display.
6. Press ENTER to access the chronograph sub-menu.
7. Select Timer.
8. Select Timer-Chrono. The message ‘TIMER-CHRONO ACTIVATED’ is displayed and
you return to the chronograph display.
9. Use PREVIOUS to toggle between your selected countdown time and 0.00,0.
10.Press START/LAP/LIGHT to start the countdown. When the countdown reaches
zero, the chronograph starts counting up.
11.Press START/LAP/LIGHT to store splits.
12.Press NEXT/STOP to stop the chronograph.
13.Press NEXT/STOP to view your individual splits.
14.Press and hold NEXT/STOP for 2 seconds to reset the chronograph.
Other manuals for N3i
1
Table of contents
Other Suunto Watch manuals

Suunto
Suunto T1 User manual

Suunto
Suunto AMBIT2 S User manual

Suunto
Suunto AMBIT User manual

Suunto
Suunto M9_en.p65 User manual

Suunto
Suunto Lumi Florette User manual

Suunto
Suunto SPARTAN ULTRA User manual

Suunto
Suunto VYTEC DS User manual

Suunto
Suunto G3 User manual

Suunto
Suunto LUMI User manual

Suunto
Suunto G6 User manual

Suunto
Suunto AMBIT3 SPORT 1.5 User manual

Suunto
Suunto SPARTAN SPORT 2.6 User manual

Suunto
Suunto 9 Peak User manual

Suunto
Suunto AMBIT3 VERTICAL 1.0 User manual

Suunto
Suunto Kailash 1.5 User manual

Suunto
Suunto AMBIT3 SPORT 2.0 User manual

Suunto
Suunto 9 2.0 User manual

Suunto
Suunto 7 User manual

Suunto
Suunto D9tx User manual

Suunto
Suunto n6HR User manual