Suunto N3 User manual

EN
www.msndirect.com
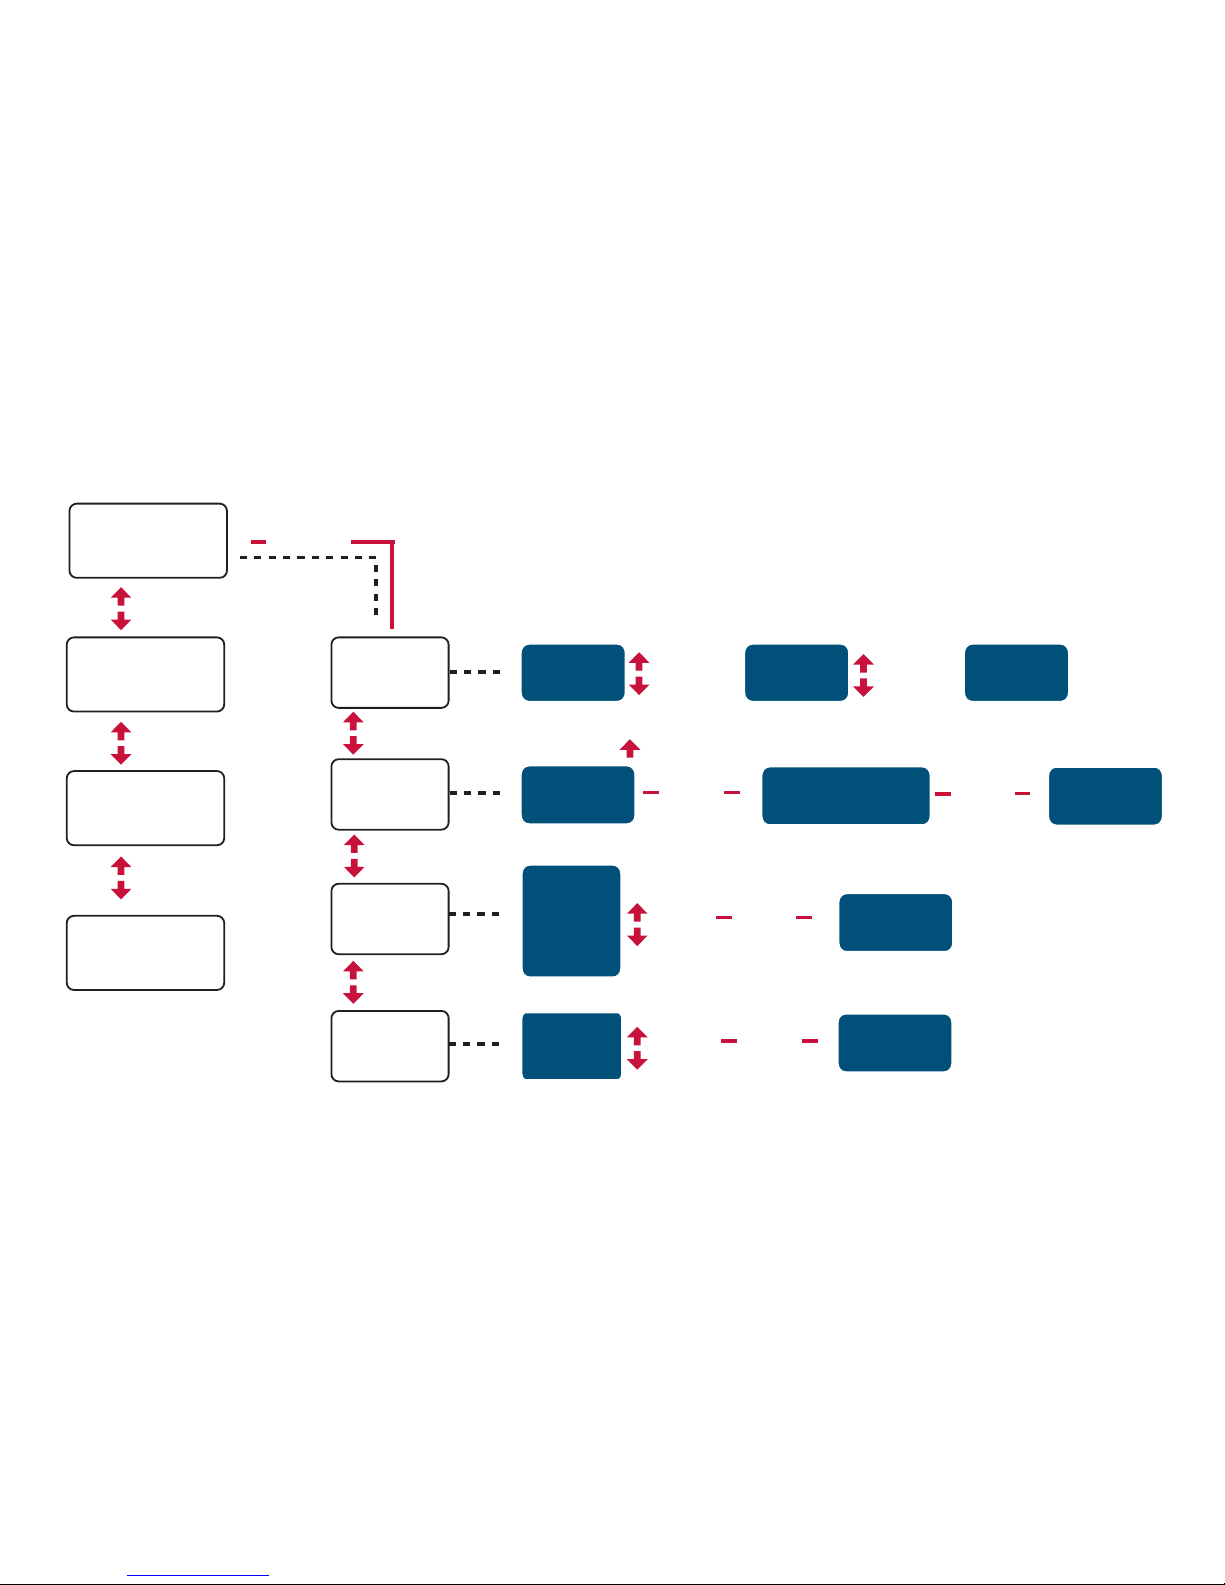
SET
Time
Hr LIMITS
TIME
CHRONO
SETTINGS
ALARMS
Face 1.
>
>
TIMERS
TIMER INTERVALS
[NEXT]
[PREVIOUS]
[NEXT]
[PREVIOUS]
[NEXT]
[PREVIOUS]
[NEXT]
[PREVIOUS]
[NEXT]
[PREVIOUS]
Face 3.
Face 2.
Face 3.
>
Time
ate
General
Units
Alarm 1.
Alarm 2.
Alarm 3.
>
>
[ENTER]
>
>
[ENTER]
[NEXT]
[PREVIOUS]
[NEXT]
[PREVIOUS]
[Lap/Reset]
SET
SET
<
[CHANNEL]
TIME CHANNEL
[NEXT]
[PREVIOUS]
>
REGISTER
[NEXT]
[PREVIOUS]
MESSAGES
[NEXT]
[PREVIOUS]
CALENDER
CHRONO
>
[ENTER]
[START/STOP]
[ENTER]
Suunto n3 Menu Structure

1
CUSTOMER SERVICE CONTACTS
Suunto USA Phone 1 (800) 543-9124
Canada Phone 1 (800) 776-7770
Suunto Website www.suunto.com
EN

2
1. GENERAL INFORMATION .................................................................................4
2. HOW TO USE YOUR SUUNTO N3 ....................................................................4
2.1 Buttons ..........................................................................................................5
2.2 Channels .......................................................................................................8
2.3 Modes ...........................................................................................................8
2.4 Signal coverage ............................................................................................9
2.5 Status icons ................................................................................................10
3. TIME CHANNEL ..................................................................................................12
3.1 Receiving the time ......................................................................................12
3.2 Choosing a watch face ................................................................................13
3.3 Downloading a watch face ..........................................................................14
3.4 Chronograph ...............................................................................................14
3.5 Timers .........................................................................................................15
3.6 Alarms .........................................................................................................17
4. BATTERY ............................................................................................................18
4.1 Charging the battery ...................................................................................19
5. SUUNTO SPORTS INSTRUMENT DRIVERS ....................................................21
5.1 Installing Suunto sports instrument drivers (Windows 98) ..........................21
5.2 Installing Suunto sports instrument drivers (Windows 2000) ......................22
5.3 Uninstalling Suunto sports instrument drivers .............................................24
6. SETTINGS ..........................................................................................................25
6.1 Time ............................................................................................................25

3
6.2 Date ............................................................................................................27
6.3 General .......................................................................................................28
6.4 Units ...........................................................................................................30
7. FREQUENTLY ASKED QUESTIONS ................................................................31
8. GETTING HELP .................................................................................................36
8. TERMS AND CONDITIONS ...............................................................................37
8.1 Copyright ....................................................................................................37
8.2 Trademarks ................................................................................................37
8.3 About your Suunto n3 and service .............................................................37
8.4 FCC COMPLIANCE ...................................................................................38
8.5 CE compliance ...........................................................................................38
8.6 ISO 9001 compliance .................................................................................38
9. WARRANTY .......................................................................................................39
9.1 Limits of liability ..........................................................................................39
9.2 After sales service ......................................................................................40

4
1. GENERAL INFORMATION
Ready, Set, Go! Wherever life takes you, your new Suunto n3 keeps you current.
When you sign up for the MSN®Direct service, you can choose exactly what
information you want to receive. This dynamic wireless technology discreetly displays
the information that matters most to you. With a quick glance at your wrist, you stay
informed about news, stocks, weather, sports and more. MSN Direct-ready watches
are every bit as fun as they are informative. Enjoy making fashion statements with
different watch faces and customizing your Suunto n3 to fit your lifestyle.
To learn more about your new Suunto n3 and how to use it, follow the instructions in
this guide.
2. HOW TO USE YOUR SUUNTO N3
To get acquainted with your new Suunto n3 and learn about channels, modes, signal
coverage, and status icons, keep reading. If you have not already done so, follow the
steps in the Quick Start Guide to charge your Suunto n3, activate the MSN Direct
service at www.msndirect.com/go, and personalize the content you want to receive.
5
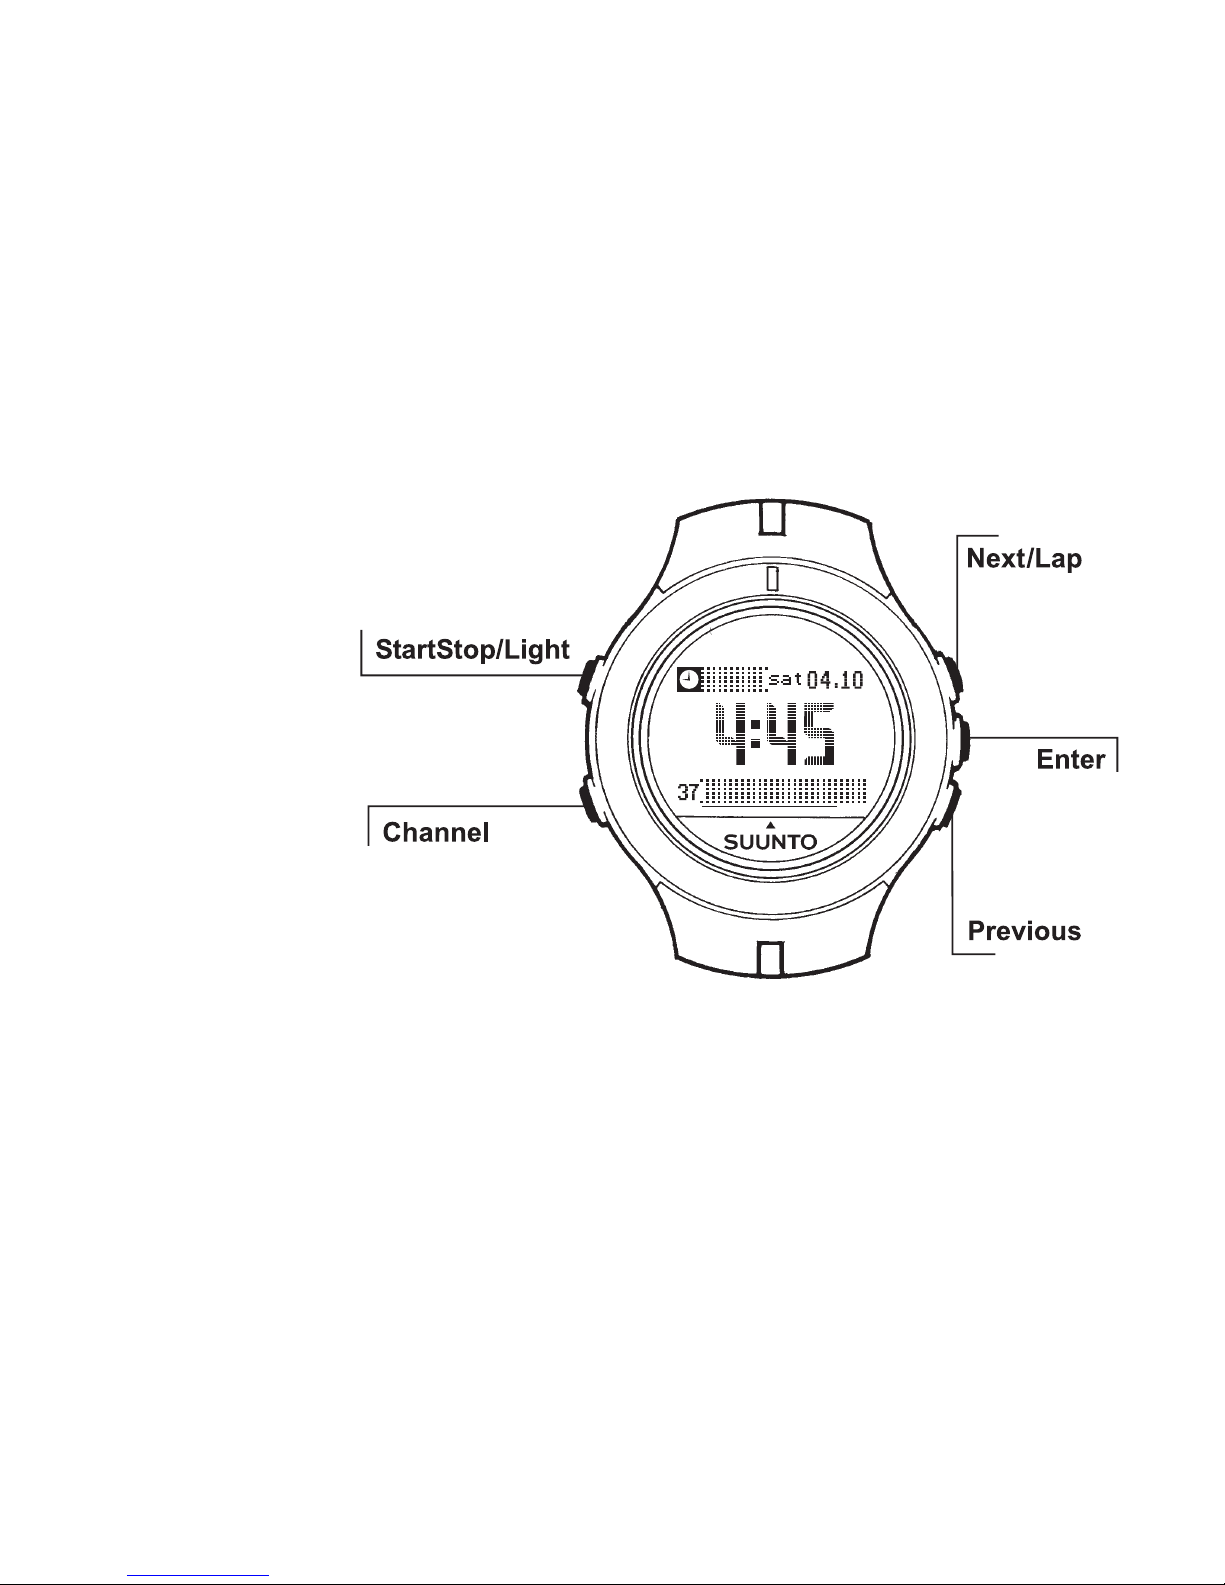
2.1 BUTTONS
Your Suunto n3 includes five buttons each of which has several different functions.

6
STARTSTOP/LIGHT
Short press
• Starts and stops the Chronograph in the Chrono mode.
Long press
• Activates the backlight in all the modes. (For personalized use of the backlight, see
chapter 6. Settings.)
CHANNEL
Short press
• Returns to the mode or channel splash screen.
• Scrolls the channel splash screens on the display.
Long press
• Returns to the Time channel splash screen.
NEXT/LAP
Short press
• If a mode/channel splash screen is active, you can use this button to navigate to
the next splash screen.
• Allows you to scroll up the menus.
• When setting/changing a selected item, it scrolls the options on the display.
• When changing values, it increases the value.
• Changes watch faces.
• In the Chrono mode, it stores lap/split times. After you have stopped the
Chronograph, it scrolls the stored lap/split times on the display.
Long press
• When you press and hold the button for two seconds in menus, watch face

7
selections and splash screens, it starts to scroll through the options until you
release it.
• In the Chrono mode, it resets the display after you have stopped the chrono time.
PREVIOUS
Short press
• If a mode/channel splash screen is active, you can use this button to navigate to
the previous splash screen.
• Allows you to scroll down the menus.
• When setting/changing a selected item, it scrolls the options on the display.
• When changing values, it decreases the value.
• Changes watch faces.
• It selects either the lap/split reading or the timer reading for the lowest field of the
Chrono mode’s main display.
Long press
• When you press and hold the button for two seconds in menus, watch face
selections and splash screens, it starts to scroll through the options until you
release it.
ENTER
Short press
• In Chrono, Settings and Alarms modes, it navigates to the main display.
• Navigates to submenus.
• Accepts settings.
• After the last setting, it takes you back to the main display.
Long press
• Returns to the main display.
8
2.2 CHANNELS
Channels and their modes organize the information on your Suunto n3. Similar to the
channels on your television set, you see different types of content—such as news
and weather—when you switch channels on your Suunto n3. When you activate the
MSN Direct service, you select the channels you want to display on your Suunto n3.
Each channel appears on the Suunto n3 display with an icon and the name of the
channel. •To return to the Time channel, long press CHANNEL.
•To view the next channel, press CHANNEL, NEXT/LAP or
PREVIOUS.
•To display the contents of the current channel, release the
button pressed.
2.3 MODES
Each channel has one or more modes. For example, the Time channel includes the
Time, Chrono, Alarms and Settings modes. The name of the current mode appears
on the Suunto n3 splash screen.
•To view the current mode, press CHANNEL once.
•To view the next mode within that channel, press NEXT/LAP
or PREVIOUS.
Table of contents
Other Suunto Watch manuals

Suunto
Suunto MARINER | REGATTA | YACHTSMAN User manual

Suunto
Suunto OW202 User manual

Suunto
Suunto AMBIT3 VERTICAL 1.0 User manual

Suunto
Suunto N3i User manual

Suunto
Suunto X6 User manual

Suunto
Suunto 9 2.0 User manual

Suunto
Suunto KAILASH User manual

Suunto
Suunto X6HR User manual

Suunto
Suunto N3i User manual

Suunto
Suunto T6C User manual

Suunto
Suunto SPARTAN ULTRA User manual

Suunto
Suunto G9 User manual

Suunto
Suunto G3 User manual

Suunto
Suunto Companion Setup guide

Suunto
Suunto TRAVERSE series User manual

Suunto
Suunto CORE User manual

Suunto
Suunto D9tx User manual

Suunto
Suunto Observer User manual

Suunto
Suunto AMBIT3 RUN 2.0 User manual

Suunto
Suunto AMBIT2 S User manual


