Suzuki Musical Instrument MFG Hammond CU-1 User manual
*#1 LESLIE SWITCH Owner’s Manual
Attaching the CU-1 to the XK-3/3C
%7
ank you and congratulations on your purchase of the
Hammond CU-1 Leslie switch. e lever switch on the
“Half-Moon” shaped CU-1 unit is used to control the Leslie
eects just like on the original B-3. Please read the installa-
tions instructions carefully before you install the CU-1.
Purchased items:
CU-1 unit
(w/2 Thumb screws) ................. 1
Spacer............................................ 1
Setting up the XK-3/3C
For your safety, please operate your Hammond prod-
uct on a level, stable surface.
1. Attaching the CU-1 unit.
Remove the protective paper from the adhesive tape on the spacer,
and attach the spacer to the CU-1 unit as shown above.
No spacer is needed for mounting the CU-1 Unit on the Lower Key-
board Unit XLK-3.
e CU-1 can be mounted to the front rail of the XK-3/3C is two dif-
ferent locations. Chose the location that is most comfortable to you.
Line up the screws attached to the CU-1 unit with the pair of chosen
holes located on the bottom side of the XK-3/3C’s front rail and se-
curely tighten these screws.
NOTE: Do not place the XK-3/3C with the CU-1 unit attached onto a at
desk type surface. Since the CU-1 extends past the bottom of the
XK-3/3C, the CU-1 unit and front rail of the XK-3/3C could be seri-
ously damaged.
NOTE: Before placing your XK-3/3C into an ATA keyboard type case, make
sure you remove the CU-1 unit rst.
2. Connecting to XK-3/3C
Insert the plug on the CU-1 unit into the jack located on the rear of the
XK-3/3C labeled “Foot Switch 1”.
For other compatible model, see owner’s manual of your instrument
which attach the CU-1 for detail.
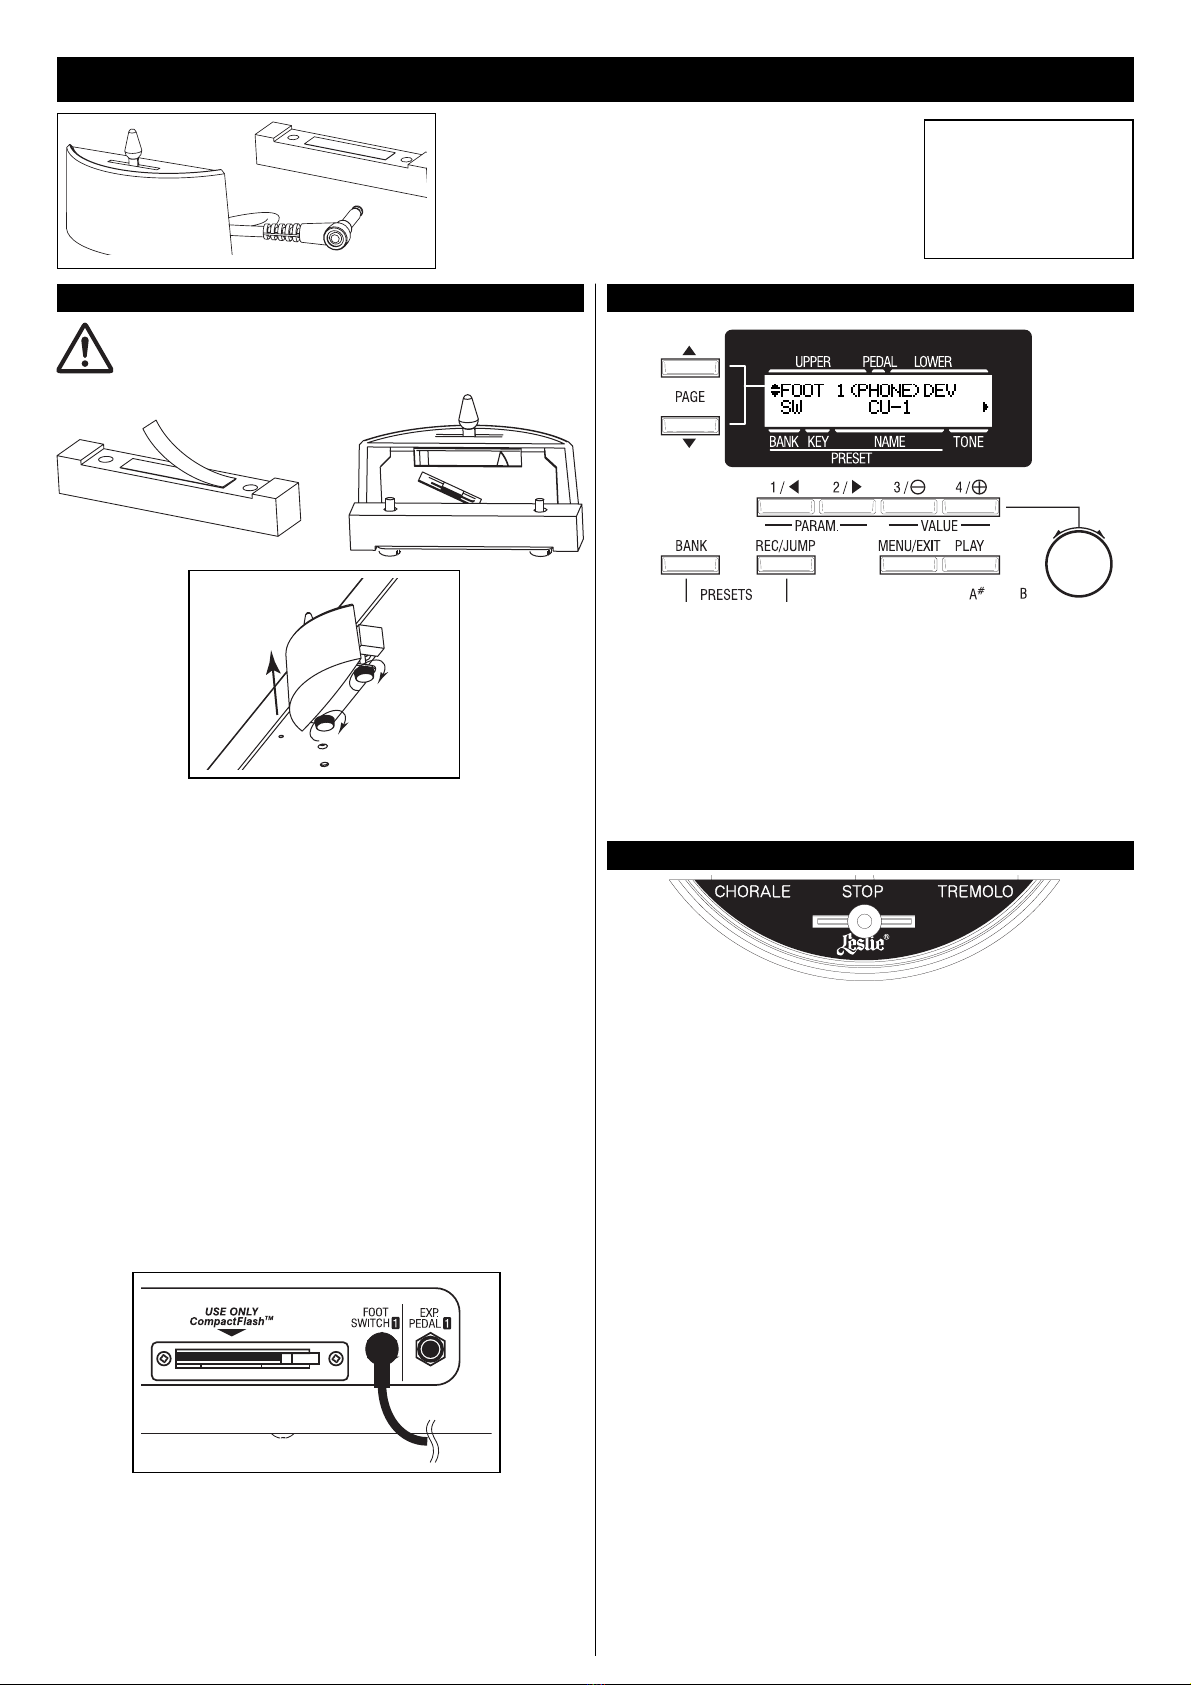
1. Go to the foot switch page.
Turn on the XK-3/3C, touch the [MENU], [4]Control and choice the
“FOOT SW” page using [PAGE] buttons.
2. Set the device for CU-1.
Select “CU-1” using [VALUE] buttons.
is setting is memorized when you turn o the power.
For other compatible model, see owner’s manual of your instrument
how to set up the CU-1.
Playing with your CU-1 Switch
CHORALE:
e Leslie’ s rotation speed is slow.
TREMOLO:
e Leslie’ s rotation speed is fast.
STOP:
In this position, the Leslie is not rotating, It takes a few seconds for
the Leslie to completely stop rotating when switched from either the
Chorale or Tremolo positions. You can choose the Brake button while
the Leslie is in the O position. e “Brake” eect gets the sound of
a stopped rotor or you make select “rough” which by-passes the
Leslie eect.
NOTE: On newer Hammond products, the speeds of the Leslie can also
be selected by means of a kick switch on the expression pedal or a
switch button on the product itself. Thus the selected speed on the
CU-1 unit may occasionally not match the action speed (slow-fast-
o) of the Leslie. If this occurs, simply move the lever switch on the
CU-1 to the adjacent position and the actual rotor speed will then
mach the CU-1 selection.
Manufacturer:
SUZUKI MUSICAL INSTRUMENT MFG. CO., LTD.
25-12, Ryoke 2 Chome, Naka-ku,
Hamamatsu 430-0852 (Shizuoka)
JAPAN

〒 430-0852静岡県浜松市中区領家 2-25-12
℡ 053-461-2325
Printed in Japan
00457-50041 V1.2-140212
*#1 レスリースイッチ 取扱説明書
XK-3/3Cへの取り付けかた
%7
お買い求めいただきまして誠にありがとうございます。CU-1
はレスリー効果の切り替えをオリジナル B-3 と同じレバー操
作で行うための「ハーフムーン」シェイプのレスリースイッチ
です。B-3の演奏テクニックを XK-3/3Cでも可能にします。
ご使用の前に、この取扱説明書を必ずお読みください。
製品内容
CU-1本体
(つまみネジ 2 個付)............. 1
スペーサー.............................. 1
XK-3/3C の設定のしかた
安全のため、かならず安定した場所で作業を行ってく
ださい。
1. CU-1本体の取り付け
図を参考に取り付けを行ってください。
スペーサーの両面テープに付いている保護紙をはがし、CU-1 本体と接
着します。
下伴盤ユニット XLK-3に本機を取り付ける場合は、スペーサーは使用
しません。
XK-3/3Cの底面手前側には CU-1 取り付け用の穴が3個あり、取り
付け位置を2ヶ所から選べるようになっています。
取り付け位置を決めたら、つまみネジをしっかりと締めます。
NOTE:取り付け後は CU-1本体が XK-3/3Cの底面に対して出っ張るため、楽器
を直接机などの上に置くことはできません。机を傷つけたり、本体が破損す
る恐れがあります。
NOTE:XK-3/3C を専用ハードケース HC-300へ収納される場合は、必ず本機を
取り外してください。
2. XK-3/3Cへの接続
CU-1 本体から出ているコードを XK-3/3C の「FOOT SWITCH 1」
ジャックへ差し込みます。
その他の対応機種で CU-1 をお使いになる場合は、お手持ちの楽器の
取扱説明書をご覧ください。
1. フットスイッチ設定画面へ行く
XK-3/3C の 電 源 を 入 れ、[MENU] → [4]CONTROL と 操 作 し、
[PAGE] ボタンで「FOOTSW」ページを選びます。
2. CU-1に設定する
[VALUE] ボタンで「CU-1」を選びます。
電源を切っても、この設定は記憶されています。
その他の対応機種で CU-1 をご使用の場合は、お手持ちの楽器の取扱
説明書を参照して設定を行ってください。
CU-1 を使って演奏する
C
HORALE
レスリーオン、スロー状態になります。
T
REMOLO
レスリーオン、ファースト状 態 になります。
S
TOP
レスリーオフ状態になります。スロー←→ファースト状態の移行をスムー
ズに行うため、この位置にしてから実際にレスリーオフになるには約1
秒かかります。
また、この状態でブレイク(停止したローターのサウンドを得る)か、スルー
(レスリー効果をバイパスする)かは、XK-3/3C の [BRAKE] ボタン
で選びます。
NOTE:レスリー効果は CU-1の操作以外にも様々な方法で状態を変化させられるた
め、実際の状態と CU-1のレバー位置とが異なってしまうことがあります。こ
のような場合には、CU-1のレバーを一旦現在とは異なる位置に動かしてく
ださい。レバー位置と状態が一致します。
Popular Switch manuals by other brands


Hama
Hama 179567 quick start guide

Curtiss-Wright
Curtiss-Wright DuraNET 3300 user manual

Enterasys
Enterasys Vertical Horizon VH-8G Management guide

Allied Telesis
Allied Telesis IE340 Series installation guide

Meridian
Meridian Component Interlink Hub AC11 Technical specifications

M-Audio
M-Audio AIR Hub user guide

Lem Elettronica
Lem Elettronica SCF316/8 user manual

JenLogix
JenLogix Palert PX-01 Series user manual

Avocent
Avocent SwitchView SC200 Series brochure

Huawei
Huawei Enterprise S2700 Series Product documentation

Endress+Hauser
Endress+Hauser Liquiphant FTL51B Brief operating instructions

Hawking
Hawking CS164 user manual