Sweet Treals STWSM001 User manual

User Instructions
Recipes
included
WAFFLE STICK M AKER
Model: STWSM001

The Sweet Treats Waffle Stick Maker
makes the most mouth-watering
waffle sticks for any occasion.
Made in just minutes, why not share
the treats with all your family and friends.
www.mplhome.com

3
Introduction
Thank you for purchasing this product
You may already be familiar with using a similar product, but do please take time to read
these instructions - they have been written to ensure you get the very best from
your purchase.
Safety is Important
To ensure your safety and the safety of others, please ensure you read the Product Safety
and Electrical Safety information before you operate this product.
Keep these instructions in a safe place for future reference.
Contents
Introduction ................................................................................................................................... 3
Product Safety............................................................................................................................... 4
Electrical Safety.......................................................................................................................... 5-6
Features.......................................................................................................................................... 7
Before First Use............................................................................................................................... 8
Using Your Wafe Stick Maker ................................................................................................. 9-10
Wafe Baking Tips........................................................................................................................ 11
Recipes.................................................................................................................................... 12-24
Care and Cleaning Instructions ................................................................................................ 25
Servicing....................................................................................................................................... 26
Guarantee ................................................................................................................................... 26
Due to our policy of continuous improvement, the actual product may differ slightly
from the one illustrated in this booklet.
WAFFLE STICK MAKER

4
Product Safety
Please read these instructions before operating the appliance.
Always ensure the appliance
is only used by a responsible adult.
Always use this appliance on a stable,
level surface, close to a power socket
and out of reach of children.
Always ensure that hands are dry
before handling the plug or switching
on the appliance.
Always carry out regular checks
on the appliance and power cord.
Should there be any signs of damage,
do not attempt to use or repair.
This appliance has no user
serviceable parts.
Always grease the Wafe Stick Maker
before lling with batter; this will aid
the removal of the cooked wafe.
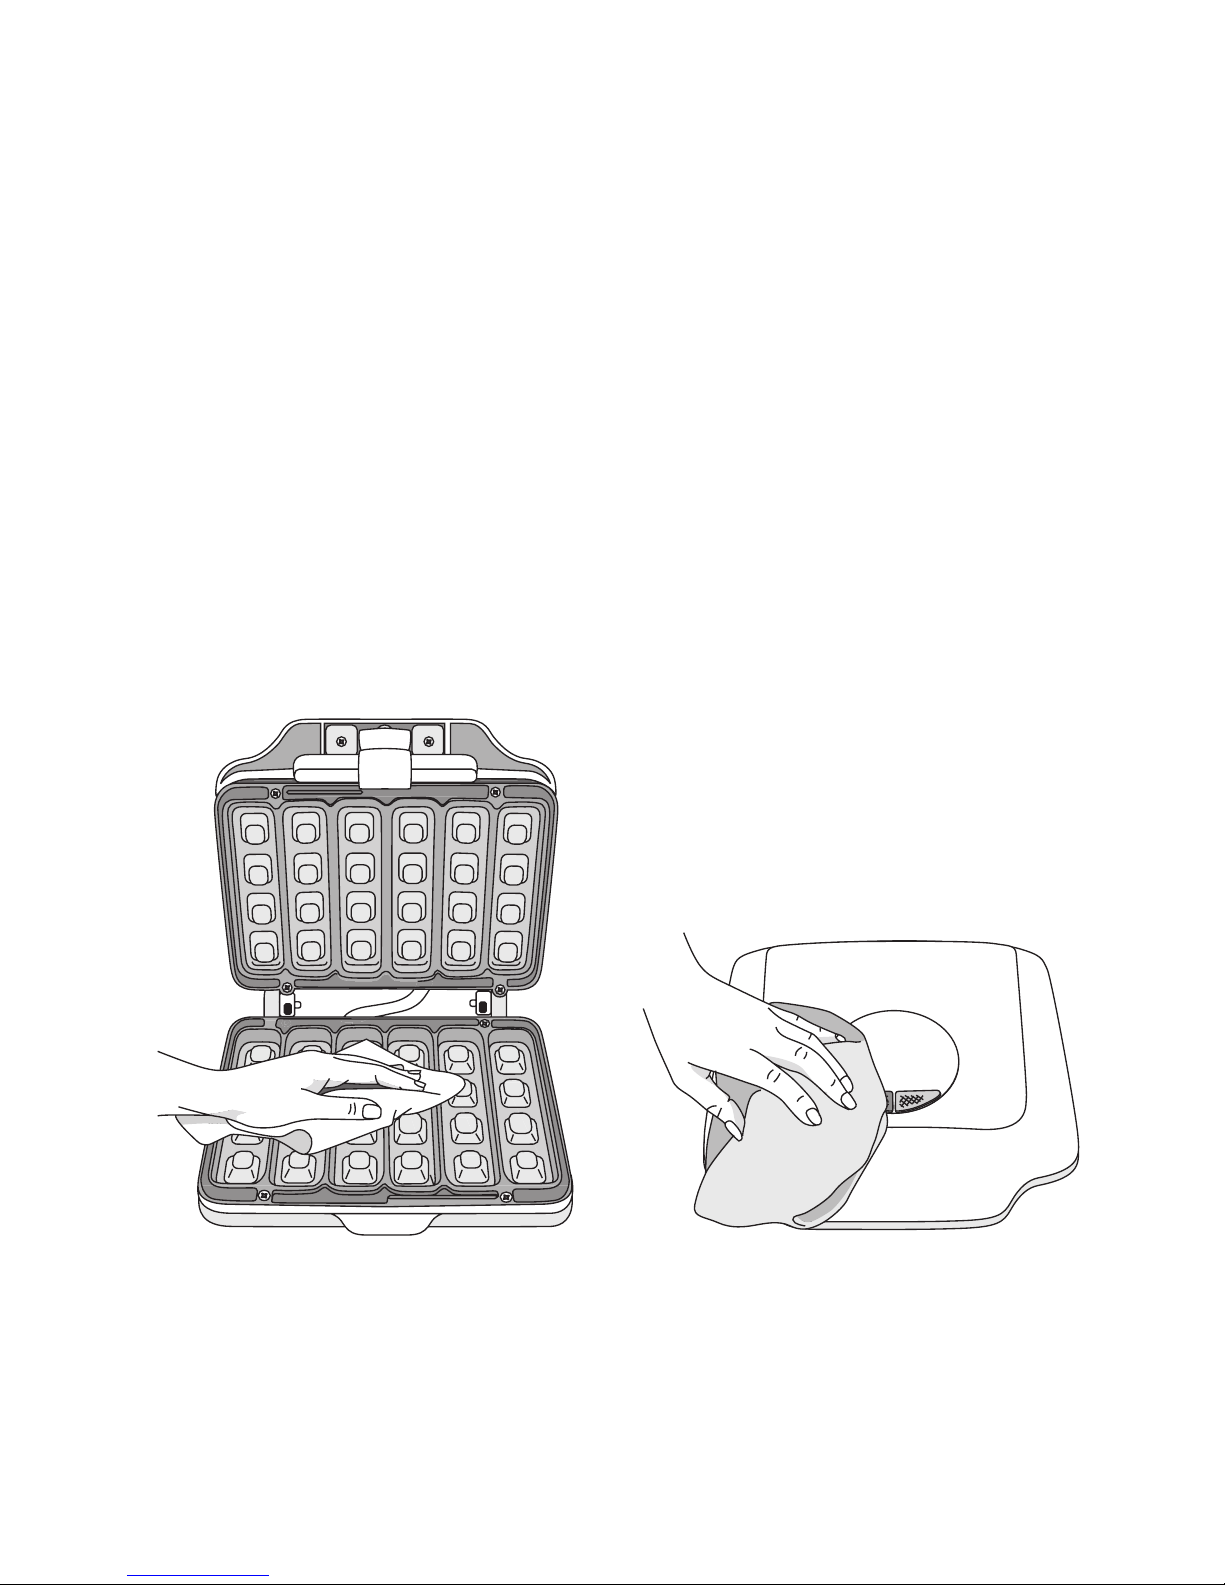
Always unplug this unit when not in use
and before cleaning.
Always allow the appliance to fully
cool down before cleaning or storing.
Never immerse the appliance, cord
or plug into water or any other liquid.
This is to protect against electrical
shock.
Never use this appliance for other
than intended use. This appliance
is for household use only.
Never allow children to use
this appliance. Close supervision
is necessary when this appliance
is in use near children.
Never let the power cord hang
over the edge of a worktop, touch
hot surfaces or become knotted,
trapped or pinched.
Never place on or near heat sources.
Never leave this appliance
unattended during use.
Never touch the external surfaces
of the appliance during use
as they may become very hot.
Never allow this appliance to touch
ammable materials when in use,
as this may be a re risk.
Never operate the appliance
by means of an external timer.
Never overll the cooking plate.
This may result in the lid popping open
and result in soggy wafes.
Never use this appliance outdoors.
read before first use!

5
Electrical Safety
WARNING!
Read these instructions thoroughly before using this appliance or connecting
it to the mains supply.
A 13 amp BS1362 ASTA approved fuse must be tted.
This appliance must be earthed.
There are no user-serviceable parts inside this appliance.
Always refer servicing to qualied service personnel.
The mains lead of this product is not replaceable by the user. If the mains lead is
damaged, the entire appliance should be returned to the Customer Service Department.
Do not allow this product to be exposed to rain or moisture during use or storage.
Before switching on, make sure that the voltage of your electricity supply is the same
as that indicated on the rating plate. Connecting it to any other power source may
cause damage.
This product may be tted with a non-rewireable plug. If it is necessary to change
the fuse in the plug, the fuse cover must be retted. If the fuse cover becomes lost
or damaged, the plug must not be used until a suitable replacement is obtained.
If the plug has to be changed because it is not suitable for your socket, or due to
damage, it should be cut off and a replacement tted, following the wiring instructions
shown. The old plug must be disposed of safely because inserting it into a 13 amp socket
could cause an electrical hazard.

6
Electrical Safety
The wires in the power cable of this product are coloured in accordance with
the following code:
Blue = Neutral Brown = Live Green/Yellow = Earth
If the markings on the terminals of your plug do not correspond to the colours of the wires
in the power cable, proceed as follows:
• The wire which is coloured Blue must be connected to the terminal which is marked
N or coloured Black.
• The wire which is coloured Brown must be connected to the terminal which is marked
L or coloured Red.
• The wire which is coloured Green/Yellow must be connected to the terminal which
is marked with the earth symbol ( ) or coloured Green, or Green/Yellow.
Plug should be BS1363/A approved.
Fit a 13 Amp fuse.
Ensure that the outer sheath of the
cable is rmly held by the clamp.
EARTH
(Green/Yellow)
NEUTRAL
(Blue)
LIVE
(Brown)
13 Amp Fuse

7
Features
1. Orange power light
This illuminates when your Wafe Stick Maker is plugged into mains supply.
2. Green ready-to-cook light
This will illuminate when the Wafe Stick Maker is ready to use, which will take
approximately 2-3 minutes.
3. Lid handle with a locking latch
This allows you to open and close the appliance and the latch keeps the plates
closed during cooking and storage.
4. Upper non-stick cooking plate
5. Lower non-stick cooking plate
6. Measuring cup
Open View
Closed View
4
5
1
3
36
2

8
Before First Use
Caution: Do not immerse the Wafe Stick Maker MAIN BODY, POWER CORD
or the PLUG in water or any other liquids.
Before using your Wafe Stick Maker for the rst time, remove any packaging material
and promotional labels. You may wish to keep the packaging for future use.
Ensure the Wafe Stick Maker is switched off at the power outlet and the power cord
is unplugged.
Check that the cooking plates are clean and free of manufacturing dust, by wiping
each mould with a slightly damp soft cloth.
Wipe the outside of your Wafe Stick Maker with a slightly damp soft cloth.

9
Using your Waffle Stick Maker
Caution: The surface of your Wafe Stick Maker will become hot, so exercise
caution. Steam may escape during cooking and when lifting the lid. This is normal,
but take care. Use oven gloves to open and close the lid.
1. Pre-heat your Wafe Stick Maker. The orange light will illuminate immediately.
When the green light illuminates (allow 2-3 minutes), your Wafe Stick Maker
is ready to use. The green light will cycle on and off as the unit maintains
baking temperatures.
2. For best results, lightly coat the plates with vegetable oil using a pastry brush.
Brush the plates before cooking each batch of wafes; this will aid the removal
of the wafes. Add 1 measuring cup (which is provided) of batter to the moulds
and spread slightly with a knife to ll the entire shape. Taking care not to scratch
the non-stick coating. It is important not to overll, as the mixture will expand
when baked. Just ensure there is enough wafe batter to ll the base of the plates,
this way you will get a good sized well risen wafe stick.
3. Close the lid and secure the latch.
4. Cook the wafes for approximately 2 minutes. During cooking steam will escape,
when the wafes stop steaming this is a good indicator that they are ready.
5. Open the latch and lift the lid gently, if it pulls slightly they are not ready, continue
the cook for 30 seconds and test again. The wafe should be golden and crispy,
if necessary close the lid again and continue cooking for 30 seconds at a time.
Use a heatproof plastic or wooden spatula to remove the wafes. To keep wafe
sticks crispy, put them in a pre-heated oven directly on the racks, at 90-120ºC
for up to 20 minutes
6. If additional wafes are to be baked, wipe the cooking plate clean with a dry cloth
or kitchen paper to remove any residue, and repeat the process above. Wafes may
bake faster as extra heat has been retained, so it may be necessary to reduce
the cooking time.
7. When all the wafes have been baked, unplug the machine and leave to cool
completely before cleaning.

10
1 2
3 4
Make me, Bake me, Eat me.

11
Waffle Baking Tips
• Do not open the Wafe Stick Maker during the rst minute of baking or the wafes
will separate. Completely bake the wafes before removing.
• When the wafes are done, the top lid should lift easily. Lift the lid gently; if it pulls,
continue cooking for 30 seconds and test again.
• When preparing the wafe batter, do not over-mix or the wafes will be tough.
Stir the batter only until the large lumps of dry ingredients disappear.
• The optimal amount of batter to produce a full shaped wafe, without overowing,
will vary with different wafe batters.
• For more evenly shaped wafes; spread thick batters to the outer edge of the moulds
using a knife before closing the lid, but do take extra care not to scratch the premium
non-stick coating on the plates.
• To retain crispness, cool the wafes on a wire rack.
• To keep wafes hot and crispy, place them directly on the racks in the oven
at between 90-120°C, these will keep for about 20 minutes before they begin
to dry out. This is especially good if you want to serve all the wafe sticks at once
for a party.
• Cooled wafes and be re-warmed and crisped up by popping them into a toaster
on the lowest setting, or by returning them to the hot wafe maker. Place them back
in the wafe maker on the lower cooking plate to match the moulds and heat
for 1-2 minutes, taking care not to burn them.
• Cooked wafes freeze well, rstly cool them completely on a wire rack and store
them in a plastic freezer bag, separate each wafe with a piece of baking
parchment. Frozen wafes can be re-heated in the oven or toaster until
hot and crisp.

12
Recipes
Fresh crispy wafes take no time at all to cook, and are so much tastier than the shop
bought variety. Your Wafe Stick Maker will make six wafe sticks for a fun breakfast
or quick dessert. They would also make a great treat for a birthday party or celebration.
You can experiment with different ingredients and add your favourite avours.
The following recipes use plain our as a standard, but they can be made with a mixture
of plain our and wholemeal our or spelt our for extra avour and more added bre
to the diet.
Wafe sticks are fab for dipping into yummy sauces, all the recipes in this section
have an accompanying dipping sauce, but you can mix and match to whatever
you fancy. If you just require wafes with no dipping sauce you can serve them drizzled
with syrup or served with ice-cream, the choice is yours.
Chocolate wafe sticks
What you will need...
• 150g plain our
• 25g cornour
• 150g sugar
• 50g cocoa powder
• 1 tbsp baking powder
• 70g mini chocolate chips
• 70 g unsalted butter, melted
• 2 large eggs
• 280 ml buttermilk
• ½ tsp pure vanilla extract
• 1 tablespoon golden syrup
• Small amount of vegetable oil for greasing
lots of tasty easy
to follow recipes!

13
How to make them...
1. In a medium sized bowl combine the our, cornour, sugar, cocoa, baking powder
and the chocolate chips and whisk to combine, whisking distributes
the ingredients evenly.
2. In a separate bowl combine the melted butter, eggs, buttermilk, vanilla
and golden syrup and whisk these together until thoroughly combined.
3. Pour the liquid ingredients into the dry ingredients and fold the mixture together,
do not over mix. Just combine until all the dry ingredients have been incorporated.
4. Brush the plates of the Wafe Stick Maker with vegetable oil and heat until
the green light appears. Pour approximately 1 measuring cup of batter over
the plates from one side to the other and using a knife very carefully spread
the batter over the plates making sure the batter lls all the moulds, do not overll
otherwise the machine will pop open.
5. Bake the wafe sticks for 1 ½ - 2 minutes, the wafes should be well risen.
Remove the wafes from the machine and place them on a wire rack or to keep
them crispy in a low oven directly on the oven shelf. Repeat the process above
for the remaining batter mix.
Great served with melted chocolate for dipping
To melt the chocolate, break a bar of your favourite chocolate into pieces into
a microwave safe bowl and heat on 50% stirring occasionally until melted.
try them all and
decide your favourite!

14
Buttermilk Wafe Sticks with
Warm Chocolate Fudge dipping sauce
Light uffy wafe sticks with a gooey sticky chocolate sauce, perfect for a birthday party
treat. Prepare the chocolate sauce before you start cooking the wafes, this allows
the dipping sauce time to cool.
Makes 36 wafe sticks
What you will need...
• 145g plain our
• 145g wholemeal our
• 60g light brown sugar
• 1 tsp bicarbonate of soda
• ¼ tsp cinnamon
• ¼ tsp grated nutmeg
• ¼ tsp salt
• 375ml buttermilk
• 2 large eggs, separated
• 110g melted butter
• Small amount of vegetable oil for greasing
Chocolate fudge dipping sauce
• 30g butter
• 110g golden caster sugar
• 75ml milk
• 125ml double cream
• 110g golden syrup
• 100g plain chocolate, broken into pieces

15
How to make them...
1. In a medium sized bowl combine the ours and sugar together, mix together
and using your ngers break up any large lumps of sugar. Add the bicarbonate
of soda, spices and salt and whisk together.
2. In a small bowl whisk together the buttermilk, egg yolks and the melted butter
and add this to the dry ingredients and fold together. In a separate bowl,
using an electric whisk beat the egg whites until stiff peaks form. Add the egg whites
to the mixture and gently fold together making sure there is no visible egg white left.
3. Brush the plates of the Wafe Stick Maker with vegetable oil and heat until
the green light appears. Pour approximately 1 measuring cup of batter over
the plates from one side to the other and using a knife very carefully spread
the batter over the plates making sure the batter lls all the moulds, do not overll
otherwise the machine will pop open.
4. Bake the wafe sticks for 2 - 3 minutes, the wafes should be golden and crispy.
Remove the wafes from the machine and place them on a wire rack or to keep
them crispy in a low oven directly on the oven shelf. Repeat the process above
for the remaining batter mix.
5. To make the chocolate fudge dipping sauce combine all the ingredients except
the chocolate into a medium sized saucepan and heat until the ingredients have
melted together. Turn up the heat and bubble for about 10 minutes until the colour
resembles caramel. Remove from the heat and add the chocolate. Stir until melted
and the sauce is glossy and smooth, leave to cool slightly. The sauce will thicken
on cooling.

16
Lemon and Poppy seed Wafe Sticks
with Lemon Cream Dipping Sauce
These are delicious served on their own but even better with the lemon cream,
which is reminiscent of lemon curd. If serving with the lemon cream, make this
in advance and let it cool down it is better served at room temperature or slightly chilled.
Makes 36 wafe sticks
What you will need...
• 380g plain our
• 100g caster sugar
• ¾ tsp baking powder
• ½ tsp bicarbonate of soda
• 2 tbsp poppy seeds
• 250ml sour cream
• 125ml milk
• 3 large eggs, separated
• 45g butter, melted
• 2 lemons, zested
• 2 tbsp fresh lemon juice
• Small amount of vegetable oil for greasing
Lemon Cream
• 1 large egg and 1 egg yolk
• 70g sugar
• 5 tbsp lemon juice
• 1 tsp lemon zest
• 200ml double cream

17
How to make them...
1. In a medium sized bowl combine the dry ingredients and whisk together.
In a separate bowl combine the sour cream, milk, egg yolks, melted butter, zest
and lemon juice and whisk together. Add this to the dry ingredients and mix together.
2. In a separate bowl, using an electric hand mixer beat the egg whites until they form
stiff peaks. Add these to the mixture and fold together gently, making sure there is
no visible egg white remaining.
3. Brush the plates of the Wafe Stick Maker with vegetable oil and heat until
the green light appears. Pour approximately 1 measuring cup of batter over
the plates from one side to the other and using a knife very carefully spread
the batter over the plates making sure the batter lls all the moulds, do not overll
otherwise the machine will pop open.
4. Bake the wafe sticks for 2 - 3 minutes, the wafes should be golden and crispy.
Remove the wafes from the machine and place them on a wire rack or to keep
them crispy in a low oven directly on the oven shelf. Repeat the process above
for the remaining batter mix.
To make the Lemon Cream
In a small bowl whisk together the eggs and the sugar, add the lemon juice a tablespoon
at a time and whisk after each addition. Transfer to a small saucepan and heat over
a low heat whisking continuously until it thickens. Add the lemon zest and the double
cream and whisk together. Remove from the heat. Transfer to a bowl and allow to cool,
before serving give it a good whisk. Place in a serving bowl surrounded by crispy lemon
and poppy seed wafe sticks.

18
Pecan Wafe Sticks with a Toffee Dipping Sauce
Delicious nutty wafe sticks served with a warm toffee dipping sauce, pure heaven!
Makes 36 wafe sticks
What you will need...
• 240g plain our
• 100g dark brown sugar
• 60g toasted pecan nuts, chopped
• 1 ½ tsp baking powder
• ½ tsp bicarbonate of soda
• ½ tsp cinnamon
• 300ml milk
• 3 large eggs, separated
• 2 tbsp maple syrup
• 35g butter, melted
• Small amount of vegetable oil for greasing
Toffee sauce
• 50g dark brown sugar
• 20g unsalted butter
• 1 tsp vanilla extract
• 1 tbsp maple syrup
• 125ml double cream

19
How to make them...
1. In a medium sized bowl combine the plain our and the sugar together if the sugar
is slightly lumpy; use your ngertips to break it up. Add the nuts, baking powder,
bicarbonate of soda, and cinnamon and whisk to combine.
2. In a separate bowl combine the milk, egg yolks, maple syrup and melted butter
and whisk together. Add this to the dry ingredients and mix together. In a separate
bowl beat the egg whites until they form stiff peaks and add this to the mixture
and fold together gently, making sure there is no visible egg white remaining.
3. Brush the plates of the Wafe Stick Maker with vegetable oil and heat until
the green light appears. Pour approximately 1 measuring cup of batter over
the plates from one side to the other and using a knife very carefully spread
the batter over the plates making sure the batter lls all the moulds, do not overll
otherwise the machine will pop open.
4. Bake the wafe sticks for 2 - 3 minutes, the wafes should be golden and crispy.
Remove the wafes from the machine and place them on a wire rack or to keep
them crispy in a low oven directly on the oven shelf. Repeat the process above
for the remaining batter mix.
To make the toffee sauce, add the sugar, butter, vanilla and maple syrup to a small
saucepan and heat gently until it melts and turns a toffee colour, add the cream
and stir well, bubble until it thickens and remove from the heat, serve warm in a serving
bowl with nutty wafe sticks for dipping.

20
Apple and Cinnamon Wafe Sticks
with Caramel Dipping Sauce
These are a great way to introduce extra fruit into your diet.
Makes 36 wafe sticks
What you will need...
• 300g plain our
• 50g light brown sugar
• 1 tsp baking powder
• ½ tsp bicarbonate of soda
• ½ tsp ground cinnamon
• 250ml of milk
• 3 large eggs
• 50g butter melted
• 250g peeled and grated Bramley apples
(grate at the last minute to prevent from going brown)
• Small amount of vegetable oil for greasing
Caramel Dipping sauce
• 50g light brown sugar
• 20g unsalted butter
• 1 tsp vanilla extract
• 1 tbsp golden syrup
• 125ml double cream
Table of contents