SWEEX TV022 - QUICK_START_GUIDE User manual

1
Contents
1
PREFACE
3
2
SAFETY
PRECAUTIONS
3
3
IN THE CARTON
5
4
FRONT&BACK
CONNECTIONS OF
LCD
6
5
INSTALLTION
DRAWINGS
Power Cord Connection 7
Antennas Connection 7
SCART Connection 8
YPbPr Connection 8
S-Video Connection 9
VGA Connection 9
HDMI Connection 10
6
REMOTE CONTROL
Remote control instructions in TV mode 11
Remote control instructions in TELETEXT mode 12
Remote control instructions in DVD mode 13
Remote control setup 14
7
ACCESSORIES
14
8
TV OPERATION
First Time Installation 15
TV Information 16
VIDEO menu options 17
Audio menu options 18
Setup menu options 18
Timer menu options 22
Function menu options 22

2
9
DVD OPERATION
Basic operation 24
MP3/JPEG Playback 24
Function Settings 25
DVD Function General setup 25
System Setup 25
Language Setup 28
Audio Setup 29
Digital Setup 30
10
TROUBLESHOOTING
AND ADVICE
31

3
1. PREFACE
Thank you for buying this TV ! Please read this manual thoroughly before operating the TV.
Make sure the TV was not damaged in transit. Should the TV is damaged, do no install your dealer. Check that you
have all the accessories according to the model.
it and contact
2. SAFETY PRECAUTIONS
Put the TV on a stable surface.
Do not place any material on the TV.
10cm
20cm
10cm 5cm
Minimum distances Do not use the with fixtures other than those provided or suggested by the
manufacturer.
Do not block or cover the ventilation openings on the TV.
If you have a wall mount, check that it is steady.
Power cord and cables must be properly routed and protected to prevent people
from stepping on them and causing the TV to fall.

4
Keep the TV dry and away from humidity.
Keep the TV away from heat sources.
Unplug the before cleaning it. Do not use solvent or liquid TV to clean the TV.
Only clean the TV with a soft and dry cloth.
In case of troubleshooting, do not use spare parts other than those suggested by
the manufacturer. Using inadequate spare parts can lead to electric shocks, short-
circuits fire or other incidents.
Unplug the TV during lightening storms or when unused for long periods of time.

5
3. IN THE CARTON
-/--
LCD TV SET Remote Control
9
User Manual AAA Batteries

6
4. FRONT&BACK CONNECTIONS OF LCD
Front View
LED & IR
1. Press “SOURCE” to select the input source;
2. Press “P+” or “P-” to scan through channels;
3. Press “V+” or “V-” to increase or decrease the sound level;
4. Press “MENU” to bring up the main menu on the screen;
5. Press “POWER” button to turn standby mode on or off;
6. POWER INDICATOR: show red in standby mode, show
green when your TV is switched on;
7. REMOTE SENSOR: infrared sensor for the remote
control.
8. OPEN/CLOSE in DVD mode;
9. PLAY/PAUSE in DVD mode;
10. STOP in DVD mode;
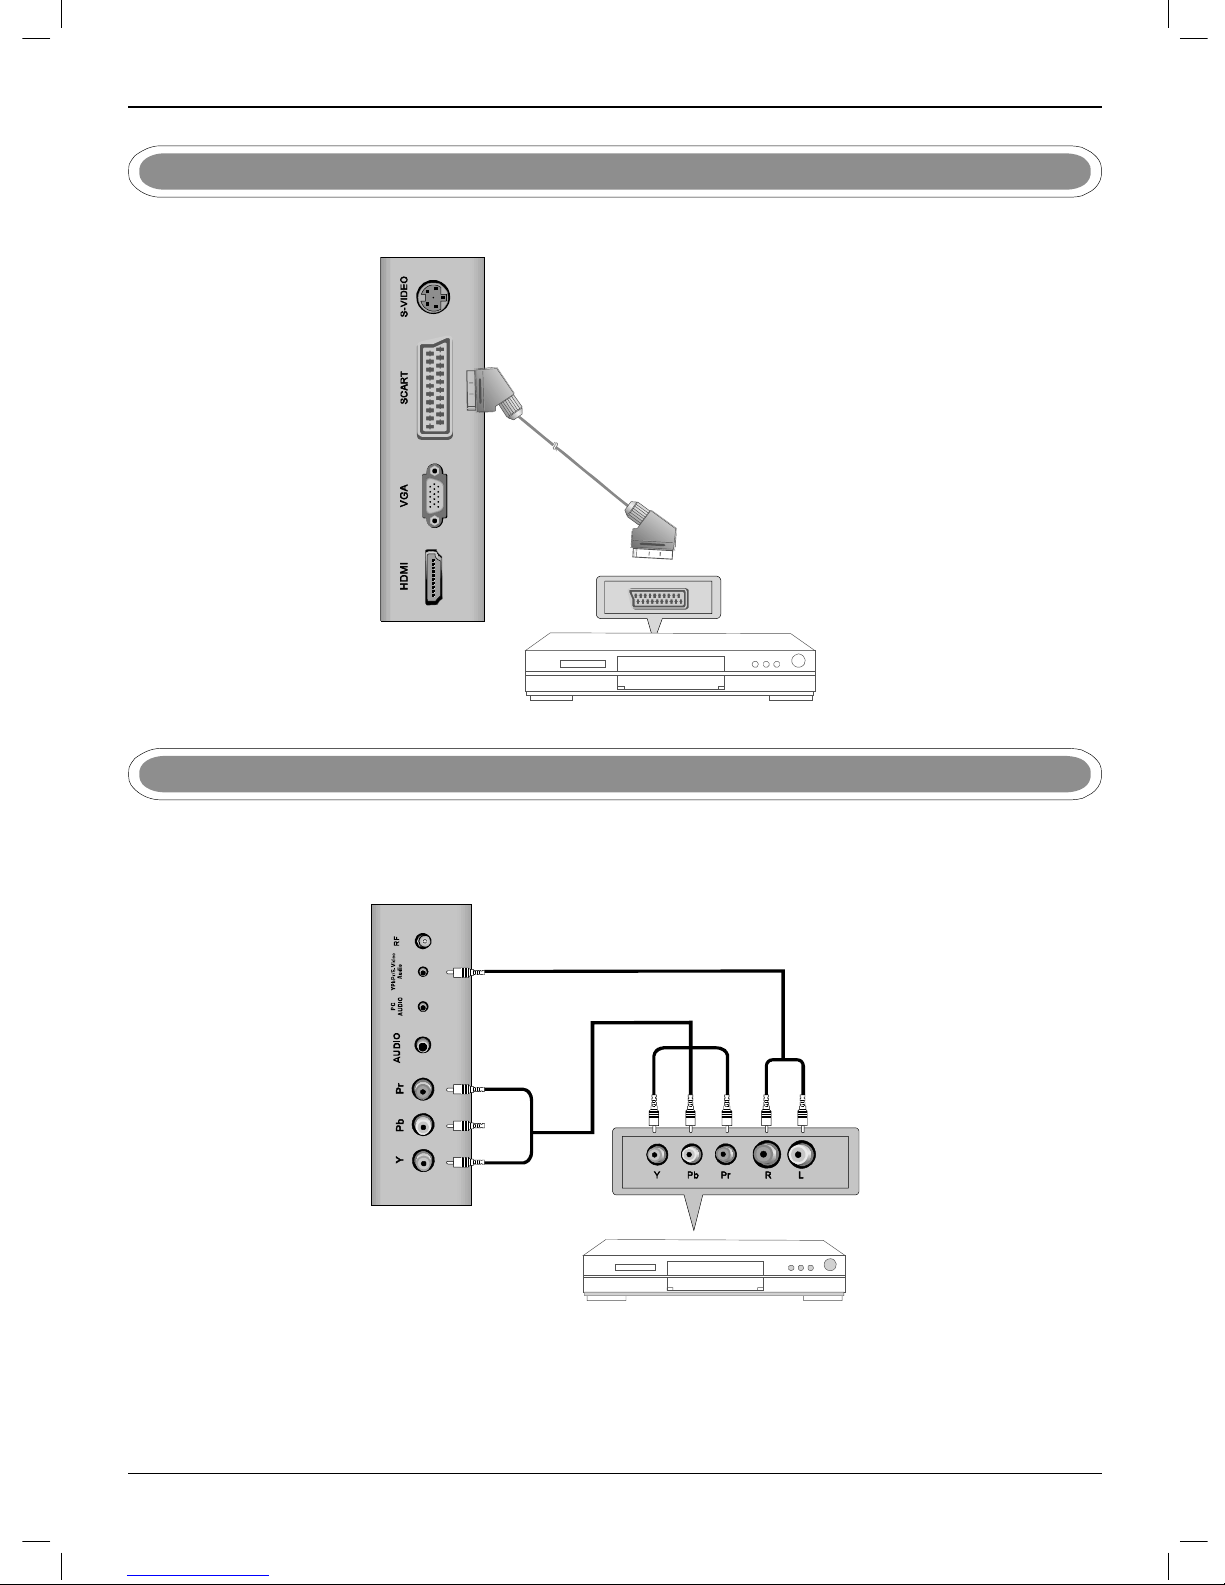
Back View and Control Connections
RF
PC
AUDIO
VGA SCART
YP b Pr/ S - Vid eo
Audio
HDMI
1. HDMI: Connect the HDMI output jack of DVD.
2. VGA: Connect the PC-RGB output jack of PC.
3. SCART: Connect the SCART jack of VCR or DVD.
4. S-VIDEO: Connect the S-VIDEO output jack of DVD or
VCR.
5. YPbPr: Connect the YPbPr output jack of DVD or VCR.
6. PCAUDIO: Connect the Audio output jack of PC;
7. YPbPr S-VIDEOAUDIO: Connect the Audio output jack of
DVD or VCR for YPbPr S-VIDEO
8. RF: Connect the antenna.

7
5. INSTALLATION DRAWINGS
Power Cord Connection
1. Connect the power cord correctly as shown.
2. Press the POWER switch of your LCD V to switch on the LCD TV. The power indicator on the front panel lights up
in Green
Antennas Connection
RF
PC
AUDIO
YPbPr/S-Video
Audio
75 OHM
ANTENNA
PLUG
VHF ANTENNA VHF ANTENNA
OUTDOOR
ANTENNA
AMPLIFIER
INDOOR
ANTENNA
AMPLIFIER
POWER PLUG
OF ANTENNA
AMPLIFIER
To ensure good picture and sound, TV antenna system needs to be installed. The antenna system as Shown above
can be sourced from TV equipment shops, which will provide service for correct installation and connection. After
installation, insert the 75-ohmantenna plug into the antenna jack as shown above.

8
SCART Connection
Connect the SCART connector on the external video device to the SCART connector on the set using a SCART cable.
Scart cable
TV Back DVD or VCR Back
DVD or VCR
YPbPr Connection
Connect the YPbPr output of the DVD or VCR to the YPbPr input on the set. The picture quality is improved;
compared to connecting a regular VCR to the video input. Connect the Audio output of the DVD or VCR to the Audio
input jacks on the set using the RCA cable.
RCA Audio Cable
RCA Video Cable
TV Back DVD or VCR Back
DVD or VCR

9
S-Video Connection
Connect the S-VIDEO output of the DVD or VCR to the S-VIDEO input on the set. The picture quality is improved
compared to connecting a regular VCR to the video input.
Connect the Audio output of the DVD or VCR to the Audio input jacks on the set using the RCA cable.
Select S-VIDEO input source with using the SOURCE button on the remote control.
LR SVIDEO
DVD or VCR
Audio Cable
S-Video Cable
TV Back
DVD or VCR Back
VGA Connection
Connect the RGB output of the PC to the VGA jack on the set. Connect the AUDIO output of the PC to the PC AUDIO
jack on the set. Select the VGA input source with using SOURCE button on the remote control.
Stereo Audio Cable
VGA Cable
TV Back

10
HDMI Connection
HDMI Cable
TV Back
DVD or VCR
DVD or VCR Back
Connect HDMI output of the DVD to the HDMI input jack on the set. Select the HDMI input source with SOURCE
button on the remote control.

11
6. REMOTE CONTROL
Remote control instructions in TV mode
-/--
POWER
Turn the LCD TV ON or OFF.
MUTE
Press to mute the sound. Press again or press V+ to
un-mute the TV.
SOURCE
Press to cycle through the input source in following:
TV SCART S-VIDEO VGA
DVD HDMI
YPbPr
PMODE
Press repeatedly to cycle through the available video
picture modes.
SMODE
Press to cycle through the different sound settings.
AUDIO(I/II)
Press to search the NICAM modes.
SLEEP
Lets you select amount of time before your TV turn itself off
automatically.
NUMBER BUTTONS
Press 0-9 to select a TV channel directly when you are
watching TV. The channel change after 2 seconds.
-/--
Press this button to enter a program number for multiple
program channel such as 2-1,etc.
Return to the previous channel viewed.
DISPLAY
Press to display the source and channel‘s information.
THUMBSTICK (▲/▼/◄/►/ OK ENTER)
Allows you to navigate the on-screen menus and adjust the
system settings to your preference.
TV MENU
Brings up the main TV menu to the screen.
EXIT
Exit the main TV menu to the screen.
V+/V-
Press to increase / decrease the sound level.
P+/P-
Press to scan through channels.
SIZE
Change the picture format.
FAV+/FAV/FAV-
Press to increase decrease your favourite program in TV
mode.

12
Remote control instructions in TELETEXT mode
-/--
NUMBER BUTTONS
Press 0-9 to select a teletext page.
TEXT
Press to switch between TV and Teletext mode.
P+/P-
Page up and Page down.
COLOR BUTTONS
Select 4 Preferred TELETEXT page.
SUBTITLE
To display subtitle.
HOLD
Freeze the current page.
SIZE
Change the picture size.
REVEAL
Reveal or hide the hidden words.
MIX
TV and TXT pictures are mixed together in transparent
background.
INDEX
Request index page when index link is valid.
SUBPAGE
TELETEXT Subpage.

13
Remote control instructions in DVD mode
-/--
AUDIO(I/II)
AUDIO selection buttons in DVD mode.
NUMBER BUTTONS
Numerical buttons for various data.
PROGRAM
Program a disc playing in a desired sequence.
GOTO
It is possible to get access to any point on the directly using
the “GOTO” menu.
Press GOTO to access the “GOTO” menu.
THUMBSTICK (▲/▼/◄/►/ OK ENTER )
Allows you to navigate the on-screen menus and adjust the
system settings to your preference.
DVD SETUP
Used for selecting programs. It may also be used to execute
commands.
A-B
This button enables you to repeat a selected section from
the disc.
ANGLE
Selects various camera angles for certain scenes or
passages on the DVD during playback.
REPEAT
Press REPEAT to cycle through the repeat play options.
SUBTITLE
Select a different subtitle language(the DVD disc must have
the subtitle you selected.
PLAY/PAUSE in DVD mode.
D.DIS
Press to display the DVD information of DVD mode.
SIZE
Change the picture format.
D.MENU
DVD disc menu Access to menu.
ZOOM
In play state, press ZOOM, the player will zoom in the
picture one time.
Jump to previous and next track.
DVD STOP
Fast backward and forward key.
To eject the disc.

14
Remote control setup
1. Open the cover;
2. AAA size batteries, When inserting the batteries, make sure correct polarities as per “+” and “-” marks on the
batteries and within the battery compartment;
3. Replace the battery cover.
To prevent battery leakage which may result in bodily injury or damage to the remote:
1. Install all batteries correctly as marked on the remote control.
2. Do not mix batteries:(OLD and NEW or CARBON and ALKALINE, etc)
Remove batteries when the remote is not used for a long time.
7. ACCESSORIES
1. One Remote Control;
2. Two Batteries 1.5V;
3. One User Manual.

15
8. TV Operation
In this manual, the OSD ( On Screen Display) may be different from your TV’s, because this is just an example
for the TV operation.
First Time Installation
Other
If this is the first time you open the TV and there is no programs in the
TV memory, the First Time Installation menu will appear in the picture.
Country
Press ▼/▲ button and then use ◄/► to select the country.
Language
Press ▼/▲ button and then use ◄/► to select the OSD language.
Delete Analog Program
Press ▼/▲ button and then use ◄/► to select whether to delete all the analog programs.
Analog Program Search
Press ▼/▲ button and then use ◄/► to select whether to start searching analog programs.
Delete Digital Program
Press ▼/▲ button and then use ◄/► to select whether to delete all the digital programs.
Digital Program Search
Press ▼/▲ button and then use ◄/► to select whether to start searching digital programs
After setting the items, select OK to finish the first time installation, or select Cancel to exit this menu.
If you cancelled the first time installation, it will remind you whether to set the first time installation next time.
Yes Do it next time No

16
TV Information
Program Information
Press DISPLAY or NICAM button to display the program information.
1. The number of current program.
2. The colour system of current program, could be selected in Manual Tuning menu(an option of SETUP menu).
3. The name of current program.
4. The label of current program, you can label it in Manual Tuning menu(an option of SETUP menu).
5. The sound system of current program, could be selected in Manual Tuning menu (an option of SETUP menu).
6. The NICAM mode of current program.
If the icon of NICAM mode is red, it means the current program supplies multi NICAM signals, and you can select it by
pressing NICAM button.
The NICAM modes and relative icons:
Mono Stereo Duel I Duel II

17
VIDEO menu options
Press MENU button on the front panel or TV MENU on the remote control to display the main menu.
1. Press ◄/► button to select PICTURE in the main menu.
2. Press ▼/▲ button to select the option that you want to adjust in
the PICTURE menu.
3. Press ◄/► button to adjust.
4. When you are satisfied with your adjustment, press the TV MENU
button to return to the previous menu or press the EXIT button to
exit the main menu.
Picture Mode
Select Picture Mode in PICTURE menu. (Available picture mode: Standard, Personal, Movie, Sport, Mild, Game.)
If you change the value of Contrast, Brightness, Colour, Tint, Sharpness or Colour temperature on the picture menu, the picture
mode will be changed to “Personal” automatically. You may select the picture mode directly by pressing PMODE button.
TIPS: You can press PMODE button on the remote control to select the Picture Mode directly.
Contrast
Press ▼/▲ button and then use◄/►to adjust the contrast of the picture.
After adjust the value you want, press TV MENU button to return to the preview MENU.
Brightness
Press ▼/▲ button and then use ◄/► to adjust the brightness of the picture.
Colour
Press ▼/▲ button and then use ◄/► to adjust the colour saturation.
NOTE: This option is invalid in PC mode, and it will be shown in gray.
Tint
Press ▼/▲ button and then use ◄/► to adjust the tone of colour when your system is in NTSC.
Sharpness
Press ◄/► to select the sharpness mode of your TV. (Available
Sharpness Mode: Normal, Sharp, Sharpest, Softest, Soft.)
Colour temperature
Select an optimum colour temperature mode to suit your eyes for
viewing among Normal, Warm and Cold.
NOTE: This option is available only in PC mode.
DNR (Digital Noise Reduction)
If the broadcast signal received is weak, you can select the DNR
option to reduce the video noise level between Off, Low, Mid and
High.

18
AUDIO menu options
Press MENU button on the front panel or TV MENU on the remote control to display the main menu.
1. Press the ◄/► button to select in SOUND the main menu.
2. Press the ▼/▲ button to select the option that you want to adjust
in the SOUND menu.
3. Press the ◄/► button to adjust.
4. When you are satisfied with your adjustment, press the TV MENU
button to return to the previous menu or press the EXIT button to
exit the main menu.
Volume
Press ▼/▲ button and then use ◄/► to adjust the sound level.
After adjust the value you want, press TV MENU button to return to the preview MENU.
Sound Mode
Select Sound Mode in SOUND menu. (Available sound mode: Peraonal, Voice, Music, Theatre.)
If you change the value of Bass and Treble on the Sound menu, the sound mode will be changed to “Personal” automatically.
You may select the sound mode directly by pressing SMODE button.
TIPS: You can press SMODE button on the remote control to select the Sound Mode directly.
Bass
Press ▼/▲ button and then use ◄/► to increase or decrease the level of the lower-pitched sounds.
Treble
Press ▼/▲ button and then use ◄/► to increase or decrease the level of the higher-pitched sounds.
Balance
Press ▼/▲ button and then use ◄/► to adjust the audio output between ◄/► speakers.
Setup menu options
Other

19
1. Press the ◄/► button to select SETUP in the main menu.
2. Press the ▼/▲ button to select your option what you want to adjust in the SETUP menu.
3. Press the ◄/► button to adjust.
4. When you are satisfied with your adjustment, press the TV MENU button to return to the previous menu or press the EXIT
button to exit the main menu.
Country
This option allows you to select the country.
Auto tuning
This option allows you to tune the channels that can be received automatically.
Note: Before you perform Auto Tuning, you must choose the country where you are by selecting COUNTRY option.
Press ENTER key to start.
You can press TV MENU button to stop auto tuning and close the OSD menu.
Manual Tuning
This option allows you to perform Manual Tuning.
Note: Before you perform Manual Tuning, you must choose the country where you are by selecting Country option in the
FUNCTION menu.
1. Press ◄/► to select Manual tuning in SETUP menu.
2. Press ▼/▲ to perform your selection, the menu of Manual tuning will display on the screen.
Program
The current program number. Press ◄/► to select the upper or lower program.
Sound System
Press ◄/► to select a corresponding sound system, such as DK, L/L’, BG, I.

20
Colour System
Press ◄/► to select a corresponding colour system, such as Auto, PAL, SECAM.
ProgramLabel
This option allows you to label a channel, you can also relabel the programs have been labeled.
1. Select a channel you want to labeled.
2. Press▼/▲ select Program Label in SETUP menu.
3. Press▼/▲ to perform your selection. The menu of program label will display as below:
4. Press the numeric buttons to input the numbers directly or press ▼/▲ to select the letters.
5. Press ◄/► to move the cursor.
6. Press ENTER, TV MENU or EXIT button to confirm and return to previous menu.
AFT (Auto Fine Tune)
Due to weak signals or a wrong antenna configuration, some of the channels may not be tuned to the best reception condition. AFT
function allows you to fine tune channel selected(the frequency of channel is around the value in Manual Search option.
Manual Search
This option has two functions:
1. Set the frequency of channel for AFT option.
2. Press ► button for 3+ seconds and it will start auto tuning from this frequency.
Program Edit
This function allows you to sort the TV programs according to your preferences, as following:
1. Press ▼/▲ to select Program Edit in SETUP menu.
2. Press ◄/► to enter into the sub menu, a channel list will display.
3. Press ▼/▲ to select the channel in the list which you would like to sort.
4. Press ► to perform your selection.
5. Press ▼/▲ to select the location you would like to place the channel.
6. Press ◄ to perform you selection.
7. Press TV MENU to return to the previous menu or press EXIT to exit.
Table of contents
Other SWEEX LCD TV manuals