INSTALLATION INSTRUCTIONS:
1. Begin by assembling the wide mouth extension to the skimmer housing using (8) SS Philips Head screws and the 8946 Gasket. The eight holes are the ones that are
recessed in the extension piece.There are 2 holes on all four sides at the rear of the extension.
2. If pool wall IS factory pre-cut for a skimmer and return tting follow these instructions, otherwise go to step 3 below.
a. Locate the wall opening, and punch out the (22) twenty two 1 /4" holes, and rectangular cut out.
b. Find the pre-cut area for the return tting and knock out the cut out.
c.With a le or piece of sandpaper remove any metal burrs that may cut the liner or yourself during the assembly.
d. Skip step 3 and go directly to step 4.
3. If the pool wall is NOT factory pre-cut for a skimmer and return follow these instructions.
a. Using the Hole Template Guide, locate the area against the metal wall at your desired position. (The water level should be approximately at the mid point
of the face plate.) Be careful that the skimmer body and face plate will not interfere with the top coping or the lip of the pool structure.
b. Using the Hole Template Guide drawing for spacing details, drill (22) 1/4" holes.With a pair of tin snips cut a 5-5/8" x 12" opening in the wall, again using
the drawing as a guide.
c. Next, nd a desired location for the return tting.The cutout should be approximately 8" below the desired water level. Cut a 2-3/8" diameter circle at
the location.
d.With a le or piece of sandpaper remove any metal burrs that may cut the liner or yourself during assembly.
4. Skimmer Housing Installation procedure:
a. Select one of the 8905 hose adapters and screw into the bottom of the skimmer housing using theTeon tape. CAUTION: these are pipe threads and over
tightening can crack the housing. Never use any type of glue or sealant on these threads.
b. Place one of the 8917Wide Mouth skimmer gaskets on the skimmer face, making sure that the holes in the gasket align with the holes in the skimmer face.
c. Align the skimmer face and gasket with the drilled holes in the wall panel and fasten with (4) four pan head screws.These are the 4 short screws in the
hardware set.The holes are located on the top and bottom of the housing. They are the 3rd hole in from each side of the housing.
d. Install the vinyl liner according to the swimming pool manufacturer's instruction. Do not cut any holes in the liner at this time. Fill the pool to
approximately 2" below the return tting before proceeding to the next steps. Adjust the liner as necessary as pool is lling.
e. Align the second 8917 gasket and face plate (8918).
f.You should have a sandwich of materials between the face plate and the skimmer housing as follows: the 8918 Face plate, 8917 gasket, the vinyl liner, the
metal wall panel, 8917 gasket and nally the skimmer housingWide Mouth extension.
g. Fasten tightly to the skimmer face with the 18 remaining stainless steel Philips head screws. Alternate tightening screws from left to right and top to bottom.
h. Connect the lter hose on the suction side of your ltration unit to the 8905 hose adapter on the bottom of the skimmer housing. Secure with a hose clamp.
(If air is getting into your pump system white you are ltering or vacuuming your pool. Check the hose connections between the skimmer housing and
pump inlet tor an airtight t and that you have a good seat with the hose adapters by using the Teon tape on all pipe threads, or check water level to
make sure it's at least midway up on the face plate)
i. Using the skimmer face plate as a guide, use a razor blade or sharp knife to trim only the liner, being careful not to cut the gasket.
5. Return Fitting Installation Procedure:
a. Gently press the vinyl liner at the circular wall-tting opening to locate the exact position. Make a circular cutout in the vinyl approximately 3/4" smaller
than the opening in the wall.
b. Disassemble the 8949 return tting.
c. Screw the remaining 8905 hose adapter into the return tting opposite of the ange end. Use theTeon tape for a sealant. Use caution not to
over tighten as it may crack the tting. Never use any type to glue or sealant on the pipe threads.
d. Place one of the rubber gaskets, from the 3 pc gasket set, on the tting and insert through the vinyl liner and wall panel.The eyeball side should be inside
the pool. Next, place the cork gaskets followed by the rubber gasket over the rear of the tting and screw the locknut hub up tightly.
e. Screw the adjustable directional ball tting into the ange side of the tting. Direct the ow of water away from the skimmer opening.
f. Connect the return hose to the pressure side of your ltration system. Secure with a hose clamp.
2
OPERATING INSTRUCTIONS:
1. Make sure you keep the water level in the pool midway up the face plate. If the water level falls below the recommended level, water may cavitate in the housing
and cause the pool pump to lose its prime.
2.To adjust the inlet ow direction loosen the knurled outer ring of the "eyeball" portion and move the ball to the desired position.
3.To clean the 8928-skimmer basket, remove the 8927 top cover; and remove the basket. It is recommended that the pool pump be shut o.
4.To vacuum the pool follow these directions:
a. Remove the top cover or fold the 8926-weir ap forward and squeeze pins toward the center and remove. It is not necessary to remove the 8928 basket.
b. Fill your vacuum hose with water by temporarily inserting the hose cu into the return tting while the pool pump is on. Make sure all the air is removed from the hose.
c.Take the 8929Vac adapter, which consists of the plate and elbow, and attach to the hose through the opening of the wall and place down inside the housing.
Try to keep the hose cu submerged during this process so no air gets back into the hose to cause the pump to cavitate and lose its prime.
WINTERIZING PROCEDURE:
Drain pool level approximately 2" to 4" below skimmer opening. Remove the"eyeball" tting in return and securely plug wall tting with 1-1/2" plugs from your dealer.
Disconnect lter hoses from the skimmer and wall tting. Be sure that the skimmer is kept free from water accumulation.
Your warranty does not cover damages caused by the formation of ice in the skimmer housing.
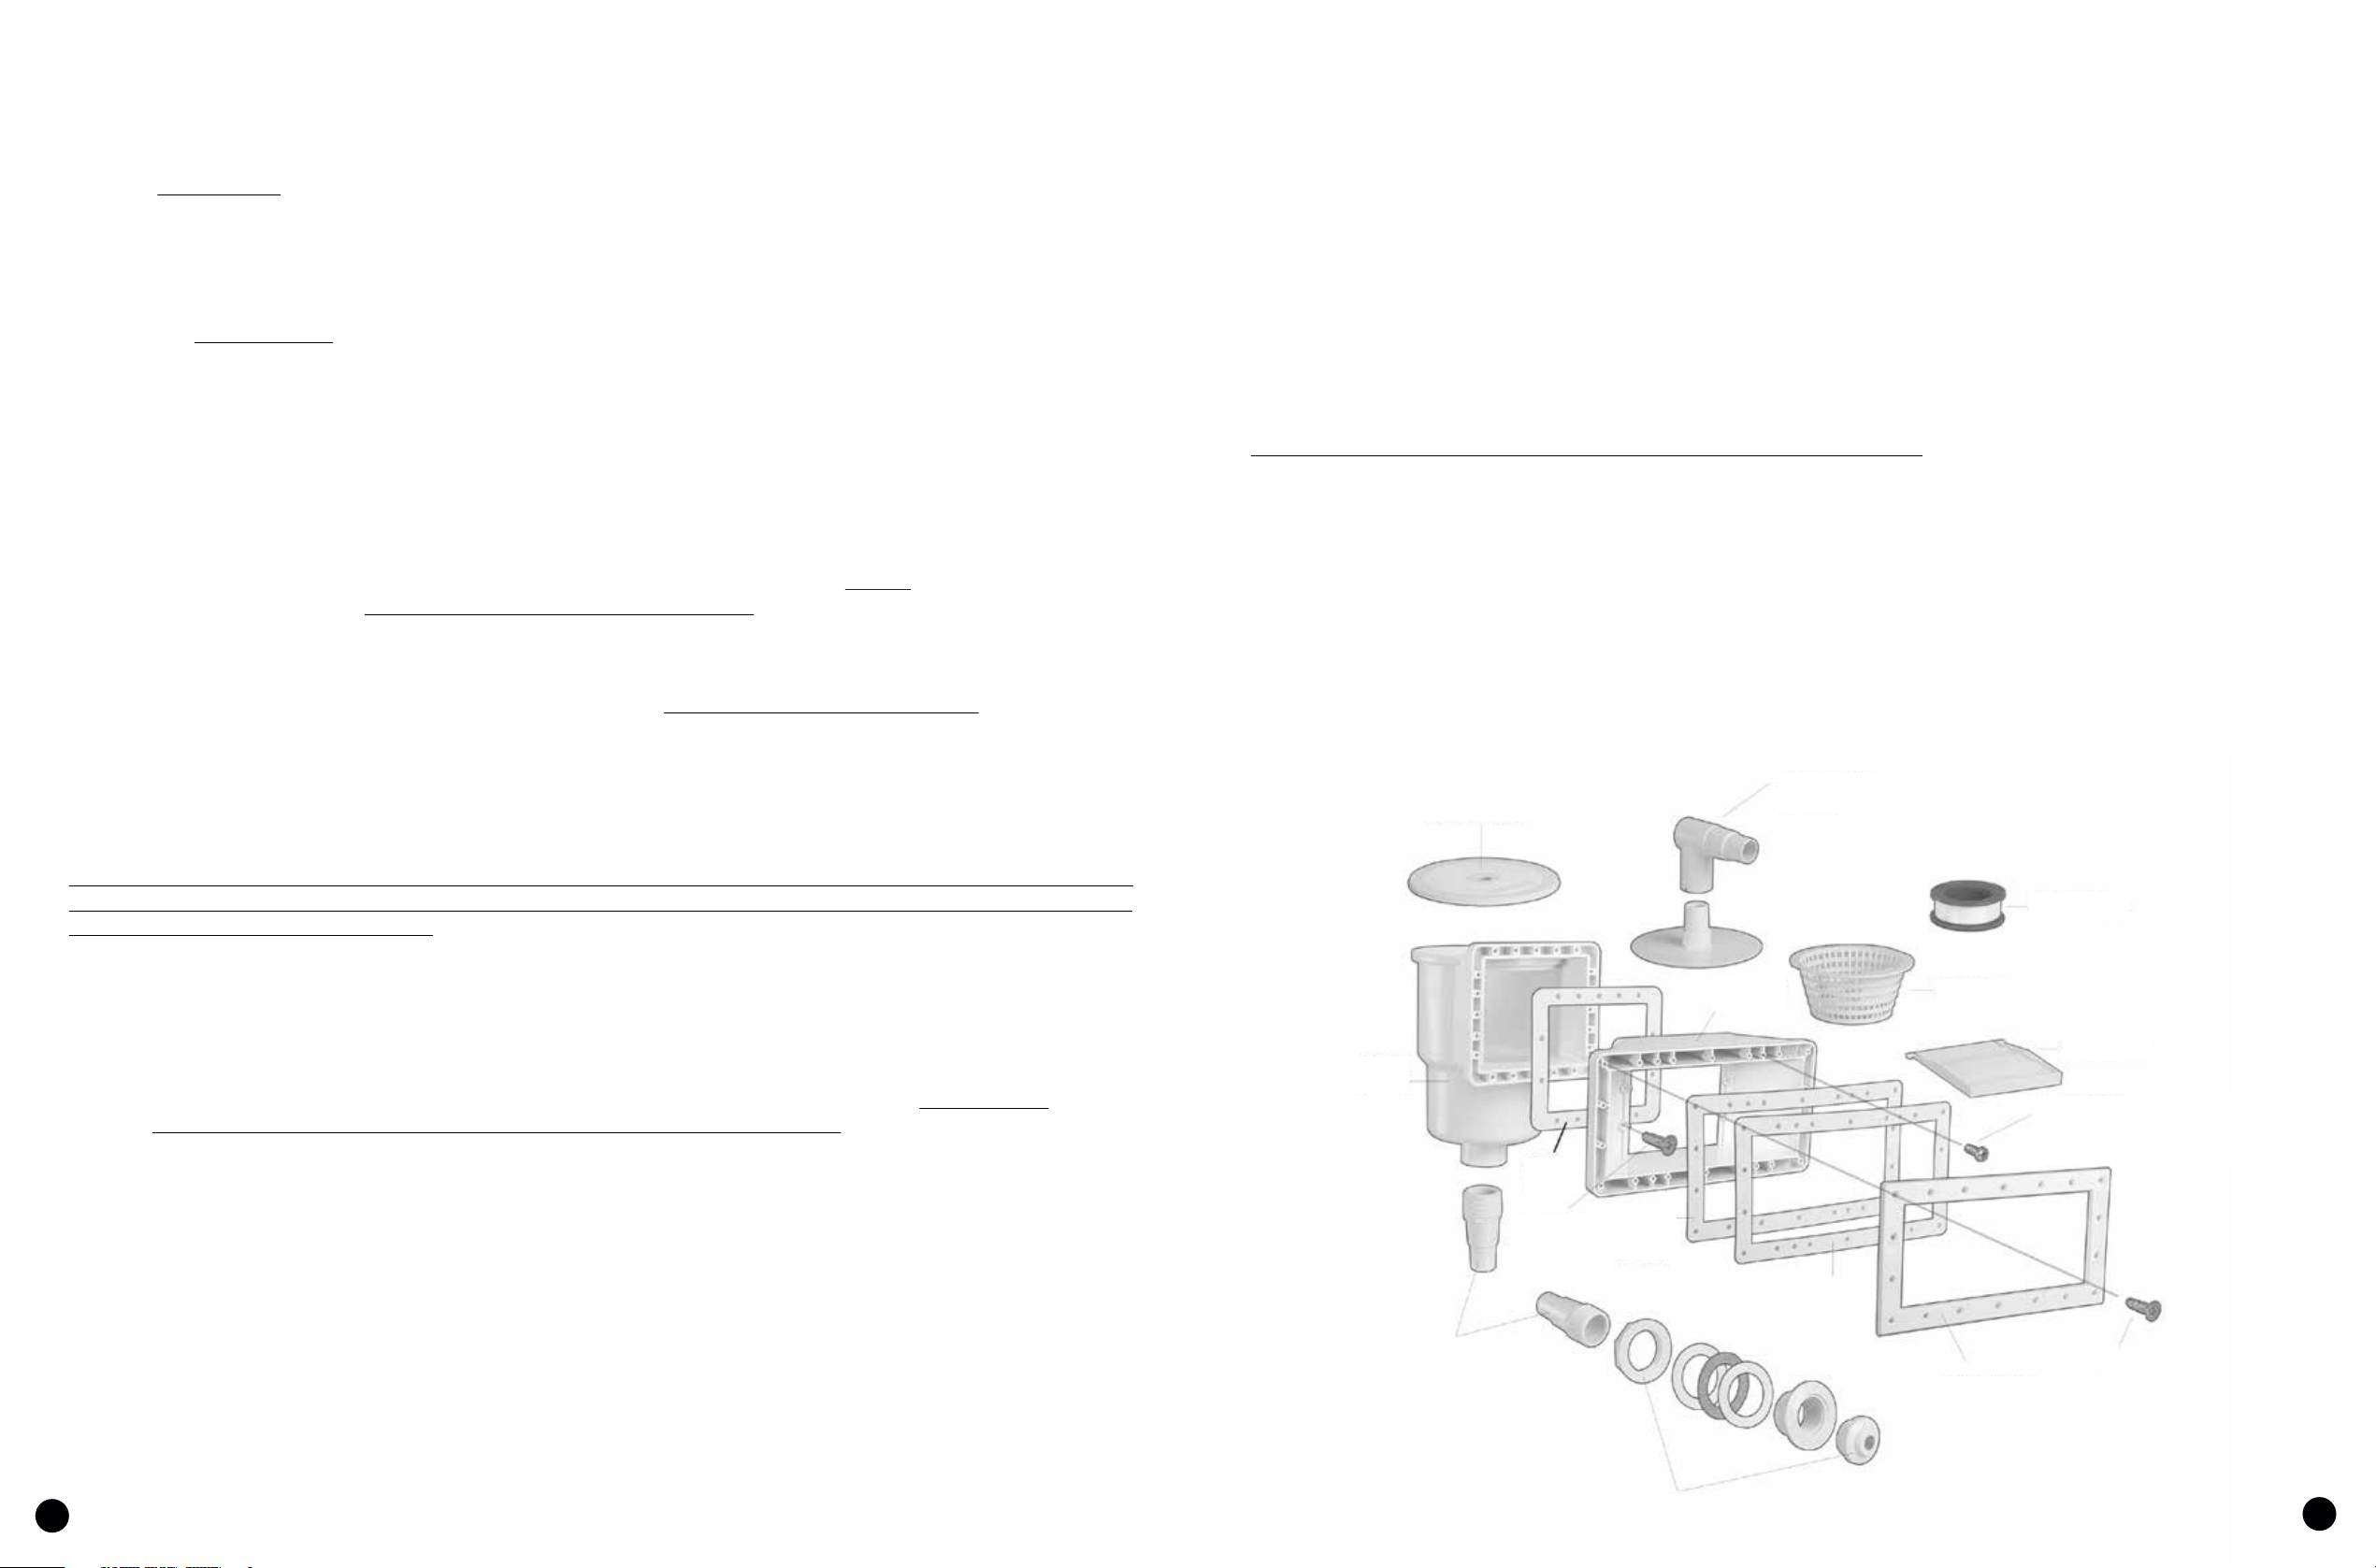
8917 Gasket
(Use Outside
of PoolWall)
(4) 5/8 Inch Pan Head Screws
(3rd hole from left & right, top & bottom)
Skimmer Housing
8946 Gasket
8905 Hose Coupler
2 Pieces Supplied
Use (8) 1 Inch
Flat Head
SS Screws
8949 Return Fitting,“Eyeball”& Gaskets
EXPLODED VIEW:
Use (18) 1 Inch
Flat Head Phillips
SS Screws
8918 Face Plate
8917 Gasket
(Use Inside of
PoolWall)
8927 LockingTop
8929Vac Adapter &Top Plate
Wide Mouth
Extension
8948Teon Tape
8928 Basket
8926 FlapWeir
PARTS LIST:
Model 8939 / 8939GWide MouthThru-Wall Skimmer System includes:
• 8929Vac Adapter Plate & Elbow
• 8949 Return Fitting including "Eyeball" and Gaskets
• (2) 8905 Hose Adapters 1-1 /4" and 1-1 /2"
• 8917Wide Mouth Skimmer Gasket Set (2 Pcs.)
• Stainless Steel Philips Screw Set (30) Pcs.- (26) #10 x 1" at Philips heads and (4) #10 x 5/8" short pan heads)
• 8948 RollTeonTape
• Skimmer Housing
•Wide Mouth Extension
• 8918Wide Mouth Face Plate
• 8927 LockingTop Cover
• 8926 FlapWeir
• 8928 Basket
3