Swisscom Fixnet Classic S128 User manual

Gigaset C340 / SWZ-de / A31008-M1621-F151-1-2X19 / cover.fm / 27.04.2005
Classic S128 mit SMS-Funktion
Bedienungsanleitung
Classic S128 avec fonction SMS
Mode d’emploi
Classic S128 con funzione SMS
Istruzioni per l’uso

1
Handset at a glance
Gigaset C340 / SWZ-engl NUR für INTERNET / xxxxxxxxxxx / overview.fm / 17.5.05
Handset at a glance 1Display in idle status
2Battery charge condition
=eVU(empty to full)
= flashes: battery nearly empty
eVUflashes: battery charging
3Control key (page 8)
4Message key
Opens calls and messages lists.
Flashes: New message or new call.
(only with CLIP)
5End call key, On/Off key
End call, cancel function, go back one menu
level (short press), back to idle status
(long press), activate/deactivate handset
(long press in idle status)
6Hash key
Keypad lock on/off (long press, page 7)
7Microphone
8Recall key
Enter recall (long press)
9Star key
Ringers on/off (long press in idle status),
Enter dial pause (long press when dialling),
Switch between upper/lower case letters
and digits for text entry (page 40)
10 Talk key
Answer a call, open last number redial list
(short press), start dialling (long press)
11 Handsfree key
Switch between earpiece and handsfree
mode;
Lights up: handsfree activated;
Flashes: incoming call
12 VIP directory
V
INT 1
§§§§INT§§§ §§Menu
12
2
3
5
4
6
7
10
9
1
8
11
V
INT 1
§§§§INT§§§ §§Menu

2
Contents
Gigaset C340 / SWZ-engl NUR für INTERNET / xxxxxxxxxxx / C340_laender_IVZ.fm / 17.5.05
Contents
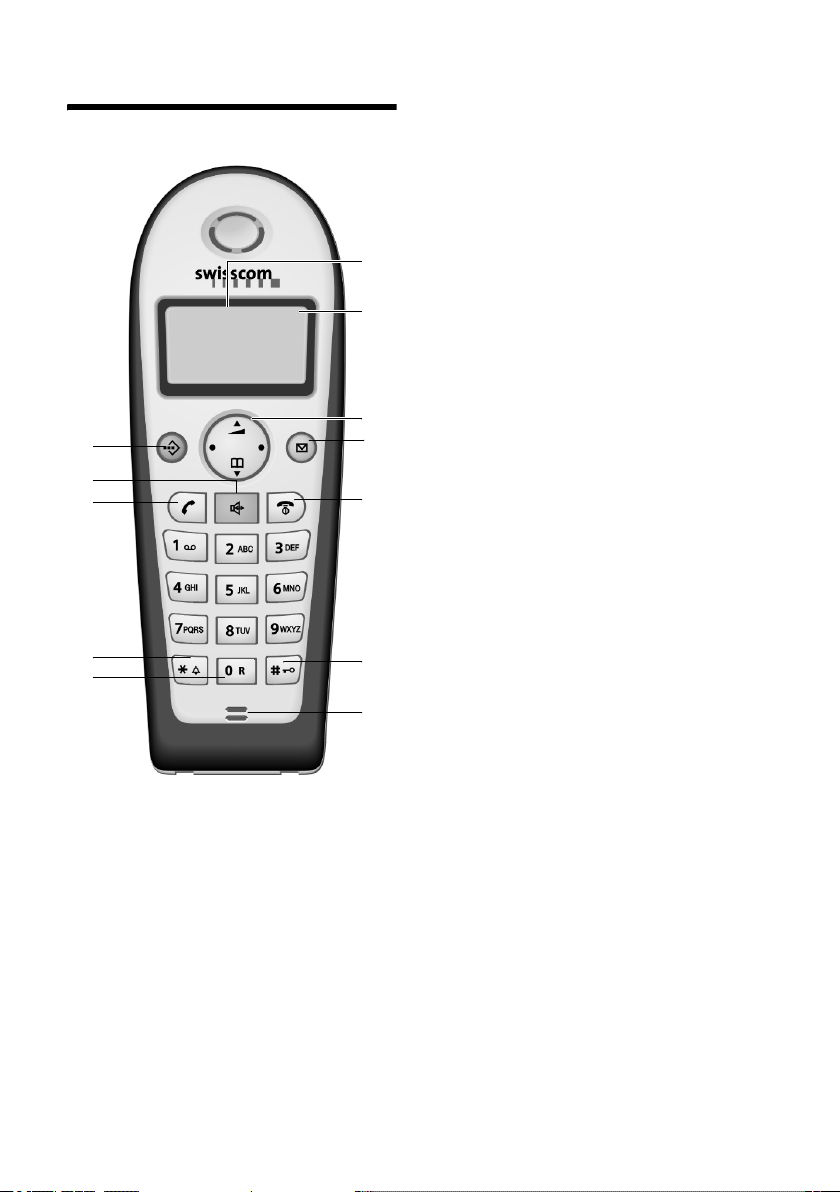
Handset at a glance . . . . . . . . . . . 1
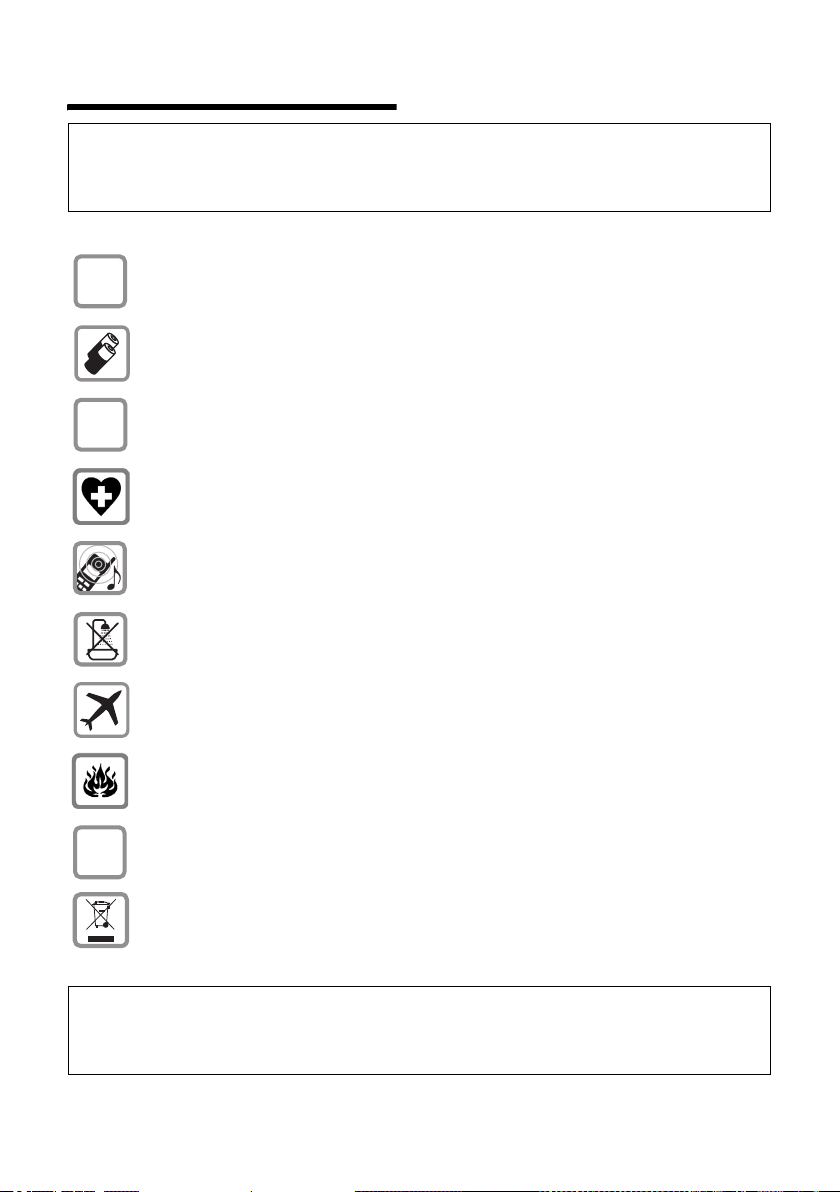
Safety precautions . . . . . . . . . . . . 4
Classic S128 –
More than just a telephone . . . . . 5
Preparing to use the phone . . . . . 5
Installing the base . . . . . . . . . . . . . . . . 5
Range . . . . . . . . . . . . . . . . . . . . . . . . . . 5
Connecting the base station . . . . . . . . 5
Setting up the handset for use . . . . . . . 6
Activating/deactivating the handset . . 7
Activating/deactivating
the keypad lock . . . . . . . . . . . . . . . . . . 7
Setting the date and time . . . . . . . . . . 7
Handset operation . . . . . . . . . . . . 8
Control key on the handset . . . . . . . . . 8
Return to idle status . . . . . . . . . . . . . . . 8
Menu management . . . . . . . . . . . . . . . 8
Correcting wrong inputs . . . . . . . . . . . 9
Operating information . . . . . . . . . 9
Symbols . . . . . . . . . . . . . . . . . . . . . . . . 9
Step-by-step instructions . . . . . . . . . . . 9
Making calls . . . . . . . . . . . . . . . . 10
Making an external call . . . . . . . . . . . 10
End call . . . . . . . . . . . . . . . . . . . . . . . . 10
Answering a call . . . . . . . . . . . . . . . . . 10
Caller ID . . . . . . . . . . . . . . . . . . . . . . . 10
Handsfree talking . . . . . . . . . . . . . . . . 11
Muting . . . . . . . . . . . . . . . . . . . . . . . . 11
Network services . . . . . . . . . . . . 12
Setting functions for the next call . . . 12
Setting functions for all
further calls . . . . . . . . . . . . . . . . . . . . 12
Functions during one call . . . . . . . . . . 12
Functions after one call . . . . . . . . . . . 13
Using the directory/
VIP directory and lists . . . . . . . . 14
Directory/VIP directory . . . . . . . . . . . . 14
Last number redial list . . . . . . . . . . . . 16
Opening lists with
the message key . . . . . . . . . . . . . . . . . 16
Making cost-effective calls . . . . 18
Displaying call duration
and charges . . . . . . . . . . . . . . . . . . . . . 18
SMS (Text Messages) . . . . . . . . . 19
Writing/sending text messages . . . . . . 19
Receiving text messages . . . . . . . . . . . 21
Using data in message
attachments . . . . . . . . . . . . . . . . . . . . 22
Setting up an SMS centre . . . . . . . . . . 23
SMS Info services . . . . . . . . . . . . . . . . 23
SMS and PABX's . . . . . . . . . . . . . . . . . . 24
Activating/deactivating the
SMS function . . . . . . . . . . . . . . . . . . . . 24
SMS Troubleshooting . . . . . . . . . . . . . 24
Using the network mailbox
(Combox) . . . . . . . . . . . . . . . . . . . 26
Specifying the network mailbox
(Combox) for fast access . . . . . . . . . . 26
Using several handsets . . . . . . . 27
Registering handsets . . . . . . . . . . . . . . 27
De-registering handsets . . . . . . . . . . . 27
Looking for a handset ("paging") . . . . 28
Making internal calls . . . . . . . . . . . . . . 28
Barging-in to an external call . . . . . . . 29
Changing the name of a handset . . . . 29
Changing a handset's
internal number . . . . . . . . . . . . . . . . . 29
Using a handset as a room monitor . . 30
Handset settings . . . . . . . . . . . . . 32
Changing the display language . . . . . 32
Activating/deactivating Auto talk . . . . 32
Adjusting the loudspeaker volume . . . 32
Changing ringer tones . . . . . . . . . . . . 32
Activating/deactivating
suppression of the first ring tone . . . . 33
Activating/deactivating
advisory tones . . . . . . . . . . . . . . . . . . . 33
Restoring the handset
default settings . . . . . . . . . . . . . . . . . . 34
Base station settings . . . . . . . . . 34
Access control . . . . . . . . . . . . . . . . . . . 34
Repeater support . . . . . . . . . . . . . . . . 34
Restoring the base default settings . . 34

3
Contents
Gigaset C340 / SWZ-engl NUR für INTERNET / xxxxxxxxxxx / C340_laender_IVZ.fm / 17.5.05
Connecting the base unit
to a PABX . . . . . . . . . . . . . . . . . . . 35
Dialling mode and recall (flash) . . . . . 35
Setting pauses . . . . . . . . . . . . . . . . . . 35
Appendix . . . . . . . . . . . . . . . . . . . 36
Care . . . . . . . . . . . . . . . . . . . . . . . . . . 36
Contact with liquid . . . . . . . . . . . . . . 36
Faults and Self-help with
Troubleshooting . . . . . . . . . . . . . . . . . 36
Warranty/Maintenance/Repair/
Authorisation . . . . . . . . . . . . . . . . . . . 37
Repair/Maintenance . . . . . . . . . . . . . . 37
Specifications . . . . . . . . . . . . . . . . . . . 38
Default settings . . . . . . . . . . . . . . . . . 39
Writing and editing text . . . . . . . . . . . 40
Menu tree . . . . . . . . . . . . . . . . . . 42
Accessories . . . . . . . . . . . . . . . . . 44
Index . . . . . . . . . . . . . . . . . . . . . . 45

4
Safety precautions
Gigaset C340 / SWZ-engl NUR für INTERNET / xxxxxxxxxxx / starting.fm / 17.5.05
Safety precautions
Caution:
Read the safety precautions and the operating instructions before use.
Explain their contents to your children, and the potential hazards associated with using the tele-
phone.
Only use the mains adapter supplied, as indicated on the underside of the base.
Fit only the recommended rechargeable batteries (page 38) of the same
type! Do not use any other battery type or non-rechargeable batteries as this
could result in significant health risks and personal injury.
Insert rechargeable batteries as indicated by their polarity symbols, and use
them according to these instructions (polarity symbols can be seen in the hand-
set's battery compartments).
The operation of medical appliances may be affected. Be aware of the technical
conditions in your particular environment, e.g. doctor's surgery.
The handset may cause an unpleasant humming noise in hearing aids.
Do not install the base station in bathrooms or showers. The handset and base
are not waterproof (page 36).
Switch off your phone when onboard aircraft. Ensure that it cannot be switched
on again accidentally.
Do not use your phone in environments with a potential explosion hazard,
e.g. auto paint shops.
If you give your telephone to someone else, make sure you also give them the
operating manual.
Dispose of the batteries and phone in accordance with environmental regula-
tions.
$
‹
Œ
ƒ
Note:
Not all of the functions described in this manual are available in all countries.
CLIP (calling line identification) and SMS (short message services) functions depend on the network
provider.

5
Classic S128 – More than just a telephone
Gigaset C340 / SWZ-engl NUR für INTERNET / xxxxxxxxxxx / starting.fm / 17.5.05
Classic S128 –
More than just a telephone
Your phone lets you store up to 100 phone
numbers (page 14) – it can do much,
much more:
uYou can programme the keys of your
phone with important numbers so you
can dial at the touch of a button
(page 15).
uYou can designate important people as
VIPs so you can tell important calls from
the ring tone (page 15) – (only with
CLIP).
uYou can store birthdays (page 15) in
your phone and it will remind you of
them in advance.
Have fun using your new phone!
Preparing to use the phone
The pack contains:
uone Classic S128 base station,
uone handset,
uone power supply unit,
uone telephone cord,
utwo batteries
uone battery cover
uone set of operating instructions.
Installing the base
The base is designed to be operated in
enclosed, dry areas at temperatures rang-
ing from +5 °C to +45 °C.
¤Set up the base at a central position
within the home.
Please note:
uNever expose the phone to the follow-
ing: heat sources, direct sunlight, other
electrical appliances.
uProtect your telephone from moisture,
dust, corrosive liquids and vapours.
Range
Range:
uOutdoors: up to 250 m
uIndoors: up to 40 m
Connecting the base station
¤Please connect the mains unit first and
then connect the phone jack as shown
below, placing the cords in the cord
recesses.
1 Underside of the base unit (partial view)
2 230 V mains unit
3 Phone jack with phone cord
Please note:
uThe mains unit must be left plugged
in at all times because the phone will
not operate without a mains power
supply.
Note:
All functions involving CLIP and SMS depend
on your network provider.
1
3
2
1
1
1

6
Preparing to use the phone
Gigaset C340 / SWZ-engl NUR für INTERNET / xxxxxxxxxxx / starting.fm / 17.5.05
uIf you buy a replacement phone cord in
the shops make sure that the phone
jack has the correct type of wiring.
Setting up the handset for use
Inserting the batteries
¤Fit the batteries with the correct
polarity.
¤Position the battery cover against the
edge 1and push down until it clicks
home.
Opening the battery cover
¤Push the catch 2towards the loud-
speaker 1and lift the cover up.
Placing the handset in the base and
registering it
¤Place the handset in the charging cra-
dle of the base unit with its display
facing forward.
The handset registers automatically. Reg-
istration takes around 1 minute. While this
is happening, Registering appears in the
display and the name of the base, Base 1,
flashes. The handset is given the lowest
available internal number (1–6). When
the handset has registered, this number
appears in the display, e.g. INT 1. This
means that the handset has been allo-
cated the first internal number. If all inter-
nal numbers 1–6 have been assigned (six
handsets are registered on a base), the
number 6 is overwritten if that handset is
in idle status.
¤Leave the handset in the charging cra-
dle in the base to charge up the
batteries.
Correct phone jack wiring
1unused
2unused
3a
4b
5unused
6unused
Caution:
Use only the rechargeable batteries recom-
mended on page 38! Under no circumstances
should you use a conventional (non recharge-
able) battery or other battery types as this
could cause significant damage to health and
property, e.g. the outer casing of the batteries
could be destroyed or the batteries could
explode. The phone could also malfunction or
be damaged as a result of using batteries that
are not of the recommended type.
3
2
1
4
5
6
1
Notes:
– Automatic registration is not possible when
the base on which you wish to register the
handset is being used to make a call.
– A key press cancels automatic registration.
– If automatic registration does not work the
handset will have to be registered manually
(page 27).
– The name of the handset can be changed
(page 29).
2
1

7
Preparing to use the phone
Gigaset C340 / SWZ-engl NUR für INTERNET / xxxxxxxxxxx / starting.fm / 17.5.05
¤
If you have any questions or problems see
page 36.
First battery charge and discharge
Battery charging is indicated in the top
right of the display by a flashing battery
icon e, Vor U. During handset oper-
ation, the battery icon indicates the
charge status of the batteries (page 1).
The correct charge status can only be dis-
played when the batteries are first fully
charged and discharged through use.
¤To do this, leave the handset in the
base without interruption until the
battery icon stops flashing in the dis-
play (approx. 6h). Your handset need
not be switched on for it to charge.
¤Once the batteries are fully charged,
remove the handset from the base and
do not put it back again until the batter-
ies are fully discharged.
Please note:
uAlways repeat the charging and dis-
charging procedure if you remove the
batteries from the handset and insert
them in again.
uThe batteries may warm up as they are
charging. This is not dangerous.
uAfter a while the charge capacity of the
batteries will decrease for technical rea-
sons.
Your telephone is now ready for use.
¤Set the date and time (page 7) to
ensure that incoming calls are logged
with the correct time.
Activating/deactivating
the handset
aPress the end call key and
hold. You hear the confirma-
tion beep.
Activating/deactivating
the keypad lock
#Press the hash key long.
You hear the confirmation beep. The icon
Øappears in the display when the keypad
lock is activated.
The keypad lock deactivates automatically
when you receive a call and activates
again after the call.
Setting the date and time
§Menu§ ¢Settings ¢Date/Time
~Enter the day, month and year
with 6 digits and press §OK§. Use
qto move between the
fields.
~Enter hours and minutes with
4 digits (e.g. Q M 1 5
for 07:15) and press §OK§. Use
qto move between the
fields.
Notes:
– The handset may only be placed in the base
provided for it.
– When the handset is in the base, it charges
even if it is switched off. You will see the
charge status in the display.
– If the handset has switched itself off
because the batteries are flat and if it is
then placed in the base, it will switch itself
on automatically.
Note:
After the first battery charge and discharge
you may replace your handset in its base after
every call.
Note:
The handset displays an advisory message if
you press a key by accident while the keypad
lock is on. To deactivate the keypad lock, press
the hash key #long.

8
Handset operation
Gigaset C340 / SWZ-engl NUR für INTERNET / xxxxxxxxxxx / starting.fm / 17.5.05
Handset operation
Control key on the handset
1Displayfunctions
2Controlkey
In these instructions, the side of the con-
trol key that you must press in the given
operating situation is shown in black (top,
bottom, right, left). Example: tfor "press
the top of the control key".
The control key has a number of different
functions:
When the handset is in the idle state
sOpen the directory.
tAdjust the ringer melody vol-
ume of the handset (page 32).
In lists
t/ sScroll up/down line by line.
In menus
t/ sScroll up/down line by line.
In an input field
t/ sMove the cursor left or right.
During an external call
sOpen the directory.
tAdjust loudspeaker volume for
earpiece and handsfree mode.
Using display functions
The current display functions are shown
reverse highlighted in the bottom display
line.
u/ vLaunch left / right display func-
tion.
You can use the display icon — to
delete text in input fields one character at
a time, moving from right to left.
Return to idle status
You wish to return to idle status from any-
where in the menu:
¤Press the end call key along.
Or:
¤Press no key: After 2 minutes the dis-
play will return automatically to its idle
status.
Changes which you have not confirmed/
stored by pressing §OK§ will be rejected.
For an example of the display in idle sta-
tus, see page 1.
Menu management
Your telephone's functions are accessed in
a menu that has a number of levels.
Main menu (first menu level)
¤To open the main menu, press §Menu§
with the handset in idle status.
Accessing a function
¤Scroll to the required function with the
control key and press §OK§.
Or:
¤Enter the number that is in front of the
function in the menu tree (page 42).
The corresponding submenu (the next
menu level) is opened.
Submenus
The functions in the submenus are dis-
played as lists.
Accessing a function:
¤Scroll to the function with the control
key qand press §OK§.
§§§§INT§§§ §§Menu 1
2

9
Operating information
Gigaset C340 / SWZ-engl NUR für INTERNET / xxxxxxxxxxx / starting.fm / 17.5.05
Or:
¤Enter the number combination that is
in front of the function in the menu
tree (page 42).
A short press on the end call key a
returns you to the previous menu level /
cancels the operation.
Correcting wrong inputs
uNavigate to the wrong input with the
control key if Tis displayed.
uPress —to delete the character to
the left of the cursor.
uInsert characters to the left of the cur-
sor
uWhen entering the time and date etc.,
overwrite the (flashing) character.
Operating information
This section explains the meaning of cer-
tain symbols and typographical conven-
tions that are used in these operating
instructions.
Symbols
~Enter digits or letters.
§Menu§ The display functions currently
in the bottom display line are
shown reverse highlighted.
Press the corresponding side
of the control key to launch
the function.
qPress the top or bottom of the
control key, e.g. when scroll-
ing.
c/ Q/ Petc.
Press the matching key on the
handset.
External Calls / Internal Calls (example)
Select one of the menu func-
tions (External Calls or Internal
Calls) from the list.
Step-by-step instructions
In these operating instructions, sequences
of symbols are used to show you which
steps you must carry out. This system is
explained below using the example of
"setting the ringer melody". The things
you have to do are explained in the boxes.
§Menu§ ¢Audio Settings ¢Ringer Melody
¤With the handset in idle status, press
on the right of the control key to open
the main menu.
¤With the control key, select qAudio
Settings and press on the right of the
control key to confirm your selection
with §OK§.
¤With the control key, select qRinger
Melody and press on the right of the
control key to confirm your selection
with §OK§.
Select External Calls / Internal
Calls and press §OK§.
¤Press the bottom of the control key
repeatedly until External Calls or Internal
Calls is selected.
¤Press OK§ (control key right) to confirm
your selection.
qSelect melody (‰=on)and
press §OK§.
¤Press the top or bottom of the control
key to select a melody.
¤Press OK§ (control key right) to confirm
your selection.
The selected melody is indicated by a ‰.
aLong press (idle status).
¤Press the end call key and hold until the
handset returns to idle status.

10
Making calls
Gigaset C340 / SWZ-engl NUR für INTERNET / xxxxxxxxxxx / telephony.fm / 17.5.05
Making calls
Making an external call
External calls are calls using the public tel-
ephone network.
~c Enter the number and press
the talk key.
Or:
c~ Press the talk key clong and
then enter the number.
You can cancel the dialling operation with
the end call key a.
End call
aPress the end call key.
Answering a call
The handset indicates an incoming call in
three ways: it rings, there is a display on
the screen and the handsfree key d
flashes.
To accept an incoming call:
¤Press the talk key c.
¤Press the handsfree key d.
If the handset is in the base and the Auto
Answer function is activated (page 32), the
handset will take a call automatically
when you lift it out of the base.
Caller ID
When you get a call, the caller's number is
shown in the display provided the follow-
ing conditions are met:
uYour network provider supports CLIP,
CLI.
– CLI (Calling Line Identity): The
caller's number is transmitted
– CLIP (Calling Line Identity Presenta-
tion): The caller's number is dis-
played
uYou have requested CLIP from your net-
work provider.
uThe caller has requested CLI from his
network provider.
Call display with CLIP/CLI
If the caller's number is stored in your
directory, you see his name.
1 Ringer icon
2 Caller's number or name
Instead of the number, you see:
uExternal Call, if no number is transmit-
ted.
uWithheld, if the caller withholds his ID
(page 12).
uUnavailable, if the caller has not
requested caller ID.
Notes:
– Dialling with the directory (page 14) or last
number redial list (page 16) saves repeated
keying of phone numbers.
– You can assign a number from the directory
to a key for speed dialling (page 15).
Notes:
– You can copy the number which is dis-
played into the directory (page 15).
®
1234567890
§Menu
1
2

11
Making calls
Gigaset C340 / SWZ-engl NUR für INTERNET / xxxxxxxxxxx / telephony.fm / 17.5.05
Handsfree talking
With handsfree talking, instead of holding
the handset to your ear you can put it
down, e.g. on the table in front of you, to
allow others to listen and speak to the
caller.
Activating/deactivating handsfree
Activating while dialling
~d Enter the number and press
the handsfree key.
¤You should inform your caller before
you use the handsfree function so that
they know someone else is listening.
Switching between earpiece and
handsfree mode
dPress the handsfree key.
Switch handsfree on and off during a call.
If you wish to place the handset in the
base during a call:
¤Press the handsfree key dand hold it
while placing the handset in the base.
If handsfree key ddoes not light up,
press the key again.
To find out how to adjust the volume, see
page 32.
Muting
You can deactivate the microphone in
your handset during an external call.
Muting the handset
§INT§ Press the control key.
Cancelling muting
aBriefly press the end call key.

12
Network services
Gigaset C340 / SWZ-engl NUR für INTERNET / xxxxxxxxxxx / TNet_Features_SAG.fm / 17.5.05
Network services
Network services are additional services
offered by your network provider. Please
contact your network provider to find out
which additional services are available.
¤Contact your network provider if you
have any problems.
Setting functions for the
next call
You have the following options:
Withhold Number
Withhold caller ID for the next call
(CLIR).
§Menu§ ¢Select Services ¢Withhold
Number
~Enter a number.
cPress the talk key.
Setting functions for all
further calls
When you have completed one of the fol-
lowing procedures, a code is sent.
¤When it has been acknowledged by the
phone network, press the end call key
a.
You can set the following select services:
Call diversion
§Menu§ ¢Select Services ¢For All Calls ¢
Call Divert ¢All Calls / No Answer /
When Busy
Select On / Off and press §OK§
to activate or deactivate call
diversion.
~Enter the number and
press §OK§.
Activating/deactivating call waiting
(external call only):
§Menu§ ¢Select Services ¢For All Calls
¢Call Waiting
Select On / Off and press §OK§
to activate or deactivate call
waiting.
Functions during one call
Initiate ringback
You hear the busy tone.
§Menu§ ¢Ringback
aPress the end call key.
Consultation
During a call:
§Menu§ ¢External Call
~Enter number and press §OK§.
You have the following options:
uToggling:
¤Use qto toggle between the par-
ties.
– End call with active party: §Menu§ End
Active Call.
uConference call:
– Talk to both parties: §Menu§ Conference
Call.
– End conference call (toggle):
§Menu§ End Conference.
uEnd call with both parties:
¤Press the end call key a.

13
Network services
Gigaset C340 / SWZ-engl NUR für INTERNET / xxxxxxxxxxx / TNet_Features_SAG.fm / 17.5.05
Accept call waiting
§Menu§ ¢Accept Call Waiting
You have a choice between toggling the
call or a conference call.
Reject the waiting call
§Menu§ ¢Reject Call Waiting
Call transfer
While consulting or toggling:
§Menu§ ¢Call Transfer
Functions after one call
Cancel ringback
§Menu§ ¢Select Services ¢Cancel
Ringback
Note:
With CLIP, a waiting call is only indicated by a
signal tone.

14
Using the directory/ VIP directory and lists
Gigaset C340 / SWZ-engl NUR für INTERNET / xxxxxxxxxxx / directories.fm / 17.5.05
Using the directory/
VIP directory and lists
The options are:
uDirectory,
uVIP directory (up to 10 entries),
uLast number redial list,
uSMS list (*),
uCalls list (*).
You can store up to 100 entries in the
directory (the actual number depends on
the size of the individual entries).
You create a personalised directory for
your own individual handset. However
you can send the list or individual entries
to other handsets (page 15).
Directory/VIP directory
In the directory/VIP directory you store
numbers and matching names.
¤With the handset in idle status, open
the directory by pressing sor the
VIP directory by pressing l.
Length of an entry
Number: max. 32 digits
Name: max. 16 characters
Storing a number in the directory/
VIP directory
sor l¢§Menu§ ¢New Entry
~Enter the number and
press §OK§.
~Enter the name and press §OK§.
If your phone is connected to a PABX, refer
to page 35.
(*CLIP and SMS depend on the network pro-
vider)
Selecting a directory/VIP directory
entry
s or lOpen the directory/VIP direc-
tory.
You have the following options:
uUse qto scroll to the entry until the
required name is selected.
uEnter the first character of the name, or
scroll to the entry with q.
Dialling with the directory/
VIP directory
sor l¢q(select entry; page 14)
cPress the talk key. The number
is dialled.
Managing directory/VIP directory
entries
You have selected an entry (page 14).
Editing an entry
§Menu§ ¢Edit Entry
~Edit the number if required,
and press §OK§.
~Edit the name if required, and
press §OK§.
Using other functions
sor l¢s(select entry; page 14)
¢§Menu§
The following functions can be selected
with q:
Use Number
Edit or add a stored number. Then dial
or use other functions with §Menu§.
Birthday
Add, view, edit or delete a birthday for
an existing entry.
Delete Entry
Delete a selected entry.
Note:
You can assign a number from the directory to
a key for speed dialling (page 15).

15
Using the directory/ VIP directory and lists
Gigaset C340 / SWZ-engl NUR für INTERNET / xxxxxxxxxxx / directories.fm / 17.5.05
VIP Entry
Mark a directory entry as VIP (Very
Important Person) and assign it a par-
ticular ringer melody. You will now be
able to tell VIP calls from the ringer mel-
ody*.
This feature requires caller display
(CLIP) (page 10).
Send Entry
Send a single entry to another handset
(page 15).
Delete List
Delete all the entries in the directory.
Send List
Send the complete list to another hand-
set (page 15).
Shortcut
Assign the current entry to a selected
key for speed dialling.
Using speed dial keys
¤Press the required speed dial key and
hold.
Sending the directory to another
handset
Requirements:
uThe sending and receiving handsets
must both be registered to the same
base unit.
uThe other handset and the base unit
can send and receive directory entries.
s¢q(select entry; page 14)
¢§Menu§ ¢Send Entry / Send List
~Enter the internal number of
the receiver handset and
press §OK§.
A successful transfer is confirmed by a
message and the confirmation tone at the
receiver handset.
*only with CLIP
Please note:
uEntries with identical numbers are not
overwritten in the receiver handset.
uThe transfer is cancelled if the phone
rings or if the memory of the receiving
handset is full.
Copying a displayed number to
the directory
You can copy numbers to the directory;
they will be displayed in a list, e.g. the
calls list or last number redial list or during
a call.
A number is displayed:
§Menu§ ¢Copy to Directory
¤Complete the entry (page 14).
Copying a number from the directory
In many operating situations you can
open the directory to copy a number, for
example. Your handset need not be in idle
status.
¤Depending on the operating situation,
open the directory with sor
§Menu§ Directory.
qSelect an entry (page 14).
Storing a birthday in the directory
You can store a birthday for every number
in the directory, and specify a time when
you will receive a reminder call on the
birthday.
s ¢q(select an entry; page 14)
¢§Menu§ ¢Birthday
~Enter the date and press §OK§.
~Enter the time and press §OK§.
qSelect Visual or the melody
that will be used for the
reminder on the birthday, and
press §OK§.
The entry will now have the icon ¶next
to it in the directory.

16
Using the directory/ VIP directory and lists
Gigaset C340 / SWZ-engl NUR für INTERNET / xxxxxxxxxxx / directories.fm / 17.5.05
Editing or deleting a birthday
s ¢q(select an entry; page 14)
¢§Menu§ ¢Birthday
If you have stored a birthday for the entry,
you can call the following functions with
§Menu§:
Edit Birthday
¤Edit settings (page 15).
Delete Birthday
Reminder call on a birthday
A birthday reminder call is signalled on the
handset with the selected ring tone.
§OK§ Press the control key to end
the reminder call or acknowl-
edge a missed birthday.
The corresponding directory entry is dis-
played.
Last number redial list
The last number redial list shows the last
ten numbers dialled on the handset
(max. 32 digits). If one of the numbers is
in the directory, then the corresponding
name will be displayed.
Manual last number redial
cPress the key briefly.
qSelect an entry.
cPress the talk key again. The
number is dialled.
Managing entries in the last number
redial list
cPress the key briefly.
qSelect an entry.
§Menu§ Press the control key.
The following functions can be selected
with q:
Use Number (as in the directory page 14)
Copy to Directory
Copy an entry to the directory
(page 15).
Delete Entry (as in the directory page 14)
Delete List (as in the directory page 15)
Opening lists with
the message key
You can use the message key fto open
the following lists:
uSMS list (depending on the network
provider),
uCaller list (only with CLIP)
An advisory tone sounds as soon as a new
message arrives on a list. The message
key fflashes. In idle status, an icon
appears in the display for the new mes-
sage:
The number of new entries is shown
beneath the corresponding icon.
When you press the flashing key f, you
will see all the lists that contain new mes-
sages. If only one list contains new mes-
sages, it opens immediately.
Key f goes out when a list opens and the
menu is closed. If there are other new
entries, you can set the message key flash-
ing again (page 16), e.g. to tell other
users about the new entries.
Setting the message key flashing
Requirement: There is still at least one
new entry in one of the lists.
fOpen the calls list.
Select Set MWI-LED and
press §OK§.
aLong press (idle status).
Key f goes out when a list opens and the
menu is closed.
Icon New message...
Á... in calls list

17
Using the directory/ VIP directory and lists
Gigaset C340 / SWZ-engl NUR für INTERNET / xxxxxxxxxxx / directories.fm / 17.5.05
Calls list
Requirement: CLIP (page 10)
The numbers of the last 30 incoming calls
are stored. Depending on the Calls List Set-
tings either All Calls or only Missed Calls are
stored (page 17).
Several calls from the same number are
stored depending on the type of list:
uAll Calls stored more than once.
uMissed Calls stored once (the last call).
The calls list is displayed as follows:
Number of new entries + number of old, read
entries
Setting the list type for the calls list
f¢Calls List: 01+02
¢q(select entry; page 14)
¢§Menu§ ¢Calls List Settings
Select Missed Calls / All Calls
and press §OK§ (‰=on).
aLong press (idle status).
The entries in the calls list are retained
when you change the list type.
Opening the calls list
f¢Calls List: 01+02
qSelect an entry.
The calls list shows the last received call.
List entry
Example of a list entry:
uStatus of the entry
In the calls list
New Call: new missed call.
Old Call: entry already read.
Call recv.: the call was taken (only with
list type All Calls).
uSequence number of the entry
01/02 means e.g.: First of a total of two
entries.
uCaller's number or name
You can copy the caller's number to the
directory (page 15).
uCall date and time (if set, page 7).
Pressing §Menu§ gives you a number of
options:
Delete Entry
The current entry is deleted.
Deleting the calls list
Caution! All old and new entries will be
deleted.
f¢Calls List: ¢§Menu§ ¢Delete List
aLong press (idle status).
Calls List: 01+02
New Call 01/02
1234567890
28/08/04 17:53
§Back§ U§Menu

18
Making cost-effective calls
Gigaset C340 / SWZ-engl NUR für INTERNET / xxxxxxxxxxx / charges.fm / 17.5.05
Making cost-effective calls
Displaying call duration
and charges
You can view the duration of calls
(in minutes), the number of call units,
the charges for the last call and the sum
of all calls.
The units of a call are displayed automati-
cally, if the charge per unit is set to 00.00.
The call charge is displayed if you have set
the charge per unit and the currency.
When the phone is supplied, the charge
per unit is set to CHF 0.10.
Setting the charge per unit and the
currency
§Menu§ ¢Additional Features Settings ¢Call
Charges ¢Settings
~Enter the charges per unit and
press OK§.
~Enter the currency key and
press OK§.
Your entries are stored.
Viewing/deleting call charges
§Menu§ ¢Additional Features ¢Call Charges
qSelect an entry and press §OK§.
You have the following options:
Last Call
View the charges for the last call.
All Calls
View the charges for calls on all hand-
sets.
¤Press the control key —to reset
the particular call charges to "0".
Note:
Previously stored call charges are deleted if the
cost per unit is changed.

19
SMS (Text Messages)
Gigaset C340 / SWZ-engl NUR für INTERNET / xxxxxxxxxxx / sms_BRD_neutral.fm / 17.5.05
SMS (Text Messages)
Your phone comes supplied ready for you
to start sending SMS (text messages)
straight away.
The access number for the Swisscom SMS
Center (062 210 00 0x) is already pre-pro-
grammed on the phone.
(The last digit in the nummer, i.e. the 10th
digit is automatically set to 0).
Requirements:
uCaller ID (CLI) must be activated for
your phone line.
uYour network provider must support
SMS in the fixed network (information
about this can be obtained from your
network provider).
The first time you send an SMS, you will
register.
uYou must be registered with your serv-
ice provider to send and receive mes-
sages.
Text messages are exchanged between
SMS centres that are operated by service
providers. The SMS centre through which
you wish to send and receive messages
must be entered in your device. You can
receive text messages from any of the
entered SMS centres provided you have
registered with your service provider.
Your text messages are sent through the
SMS centre that is entered as Service
(active send service centre). However you
can activate any other SMS centre as the
active send service centre to send a cur-
rent message (page 23).
If no service centre is entered, the SMS
menu has just one entry: Settings. Enter an
SMS service centre (page 23).
uEntering text, see page 40.
uWriting with EATONI predictive text, see
page 40.
Rules
uAn SMS can be up to 612 characters
long (depending on the provider). The
Swisscom network has space for 160
characters.
uIf there are more than 160 characters
or a lot of image data the SMS is sent as
a linked SMS (up to 4 messages with
153 characters each).
Please note:
uIf your phone is connected to a PABX,
read page 24.
uTo receive text messages you must be
registered with your service provider.
Writing/sending text messages
§Menu§ ¢SMS ¢Write Message
~Write your message.
§Menu§ Send Text
Select Send Text and press §OK§.
§Menu§ Message Type: Text Message
Select Message Type: Text Mes-
sage and press §OK§.
s/ ~Enter the number with prefix
(including your local area
code) from the directory or key
it in manually, and press §OK§.
When sending a message to
an SMS mailbox: Put the mail-
box ID at the end of the
number.
The message is sent.
Note:
If you are interrupted by an external call while
composing the message, it will be automati-
cally stored in the draft message list.
Table of contents