Synaps 11011324 Operation manual

10.2” Tru-Collage Digital Photo Frame
Item Number: 11011324
Installation & User’s Guide
All brand names and trademarks are the property of their respective owners

2
Contents
Overview.............................................................................................................................................3
Quick Start Guide...............................................................................................................................3
Attaching the Easel Stand to the Digital Photo Frame ..................................................................4
Package Contents..............................................................................................................................5
Digital Photo Frame Front View .......................................................................................................6
Digital Photo Frame Back View........................................................................................................6
Installation and Setup of Accessories.............................................................................................7
Connecting the Digital Photo Frame ...............................................................................................8
Menu Control Buttons.......................................................................................................................9
Remote Control Functions .............................................................................................................10
Using the Remote Control ..............................................................................................................10
Changing the battery in the remote control..................................................................................10
OSD Main Menu ...............................................................................................................................11
OSD Menu.........................................................................................................................................12
Setup Menu Instructions.................................................................................................................13
Additional Feature...........................................................................................................................14
Specifications ..................................................................................................................................15
Troubleshooting...............................................................................................................................16
Maintenance.....................................................................................................................................17
Precautions ......................................................................................................................................18
FCC Norm.........................................................................................................................................19
Service Procedure...........................................................................................................................20
Warranty ...........................................................................................................................................21

3
Overview
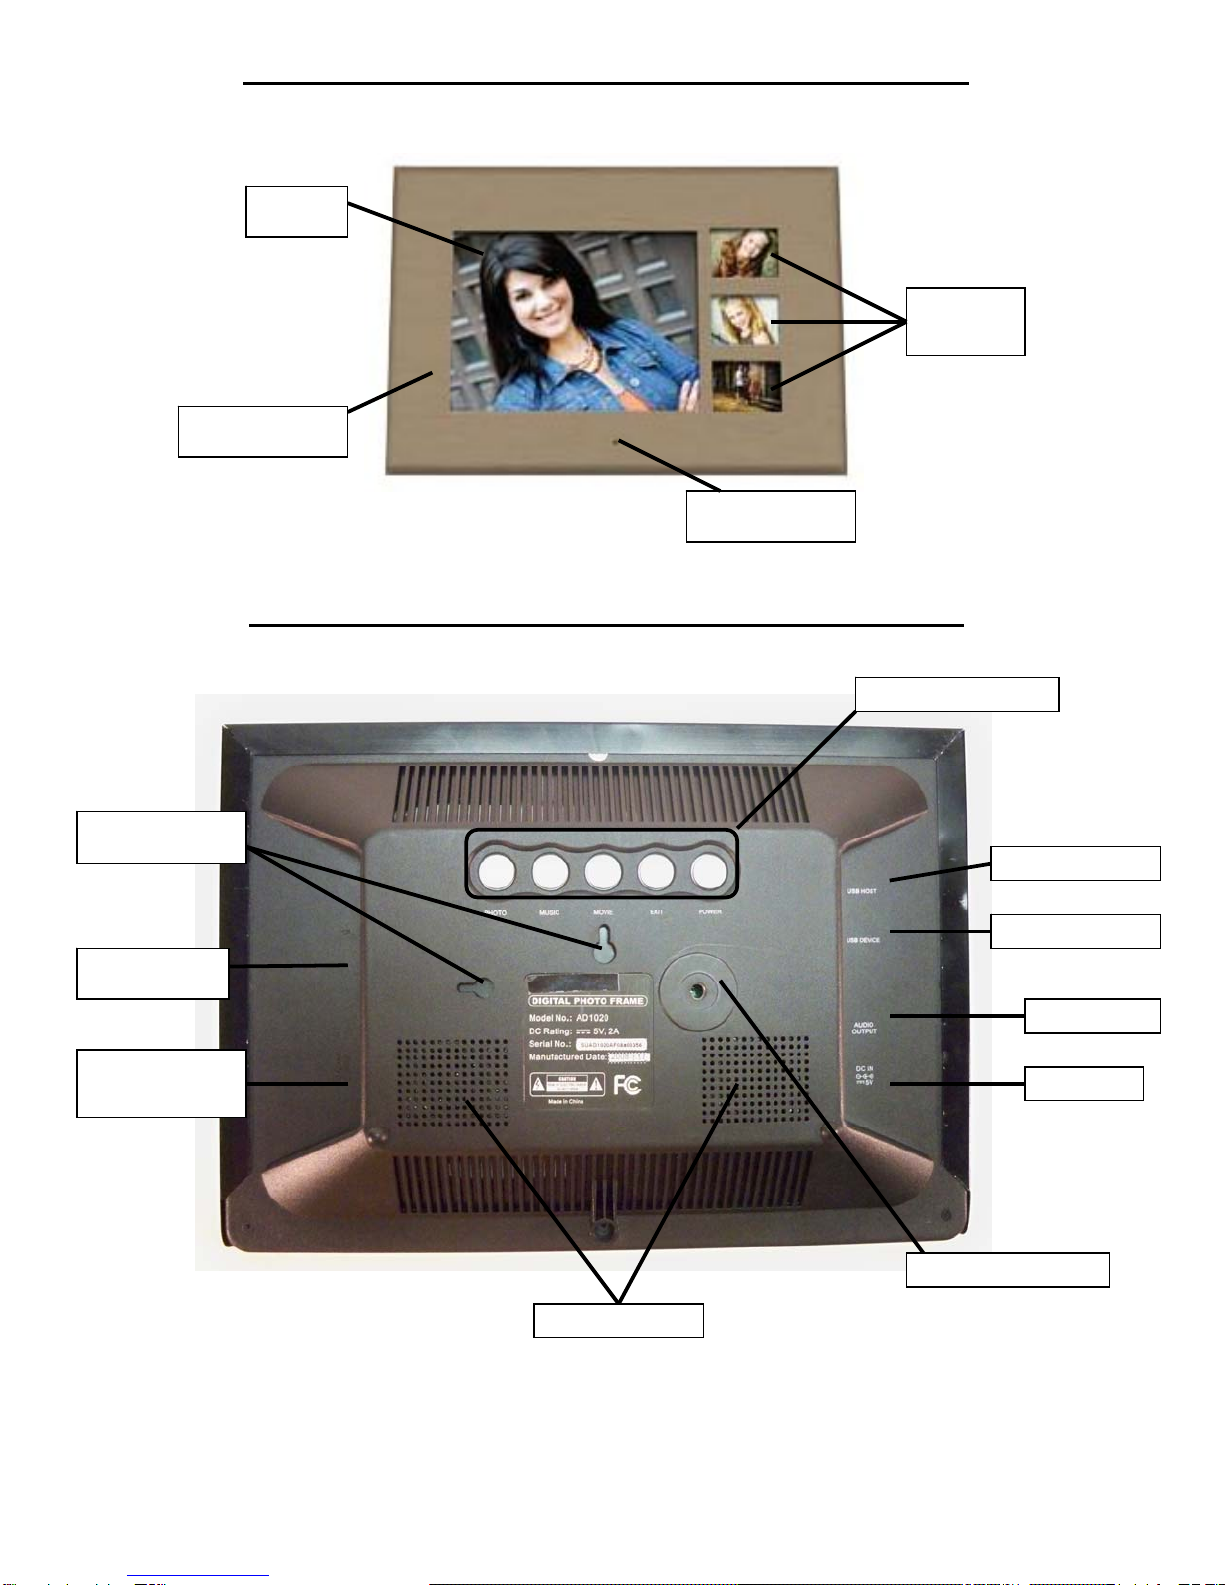
•The 10.2” Tru-Collage Digital Photo Frame enables you to view digital photos and play music
files from different types of memory cards simply and quickly.
•With its unique 4 frames in 1 design, with an 8” LCD and three 2.3” LCD, you can enjoy your
photos anytime and anywhere. It’s very convenient and quick.
•The Digital Photo Frame does not require a direct connection to a computer. The built-in
memory card reader can read a wide assortment of the most popular memory cards.
•The Digital Photo Frame supports SD™ Card, Memory Stick™ Card, MultiMediaCard, and
CompactFlash® Card memory cards via the built-in card reader. You should use your
computer to rotate your pictures into proper orientation and save onto the media card or USB
Thumb drive for the best possible viewing on your Digital Photo Frame.
•The SLIDESHOW mode has single transition effects and adjustable display time.
•You can play a picture SLIDESHOW with MP3 or WMAbackground music, provided you have
MP3 or WMAfiles saved on the media card, along with your picture files.
•The unit supports JPEG, MP3, and WMA file formats. In addition the unit has built-in memory
of 128 MB so you can store your favorite pictures and music.
•The Portrait Style frame is Wall Mountable and can be operated from a distance with the
remote control.
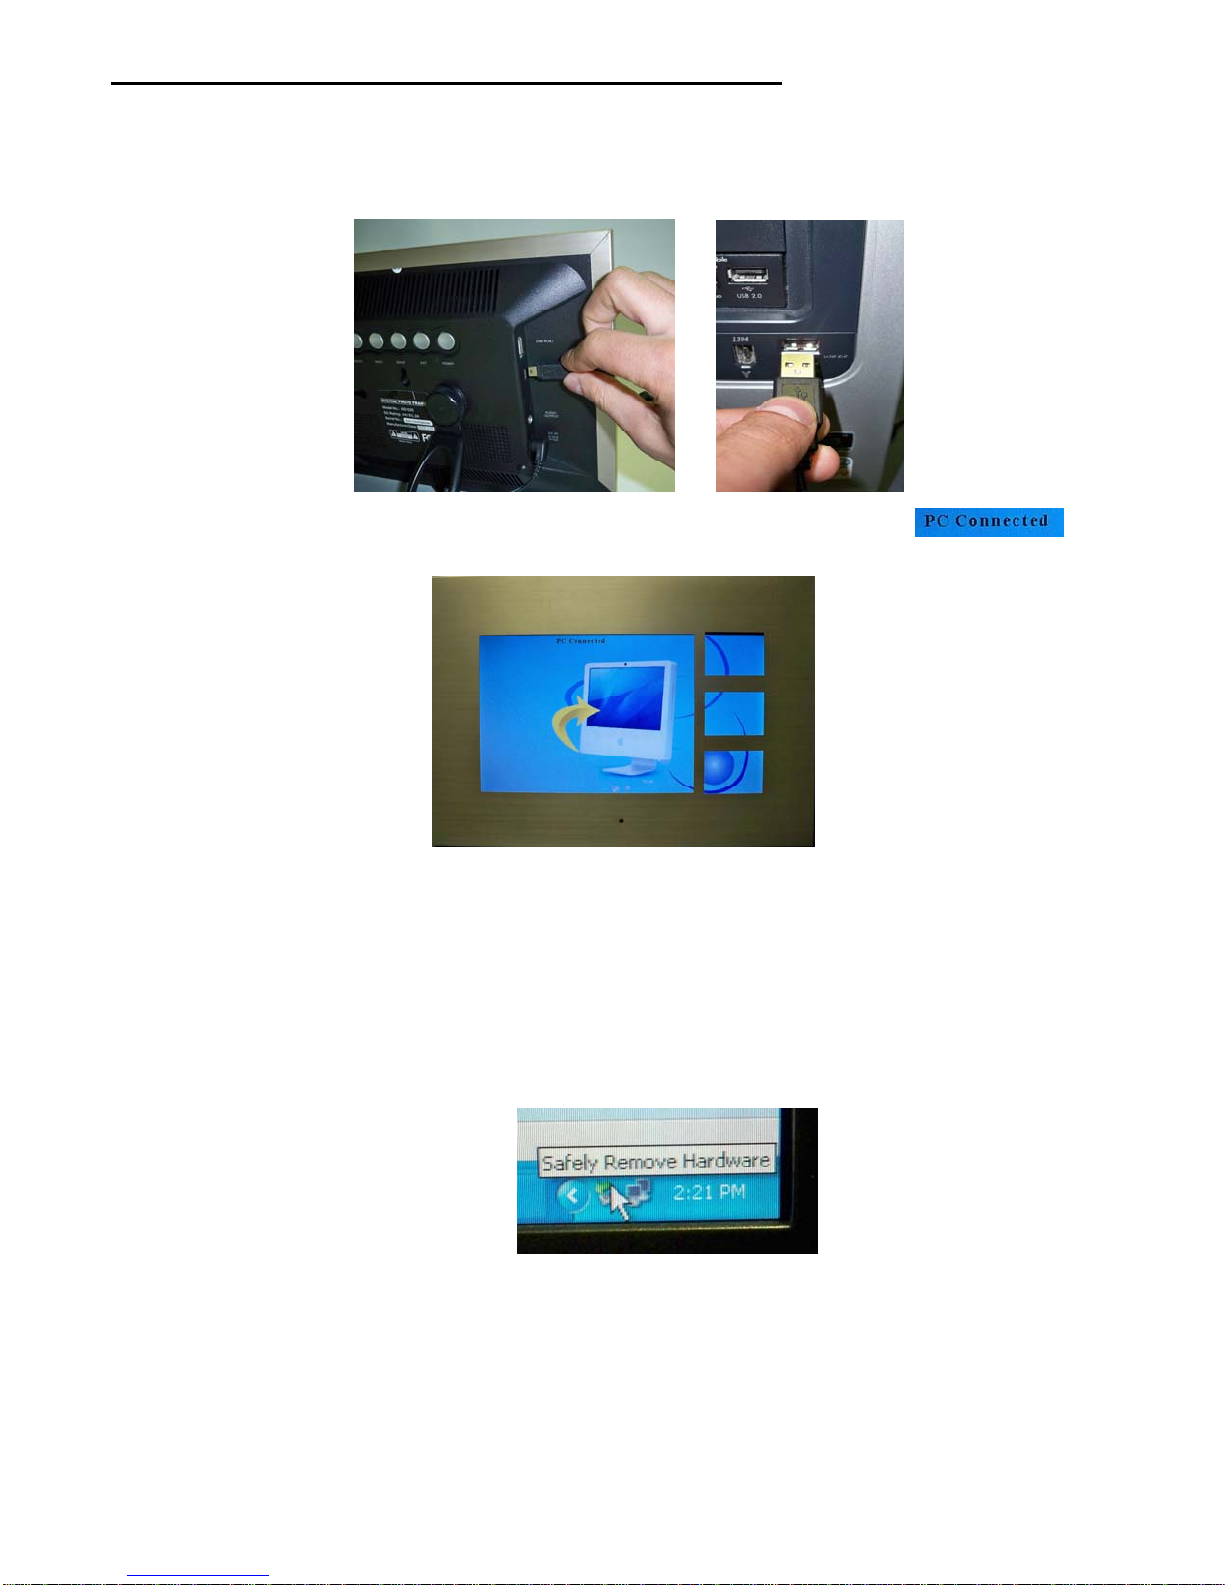
•USB 2.0 interface option allows for fast downloads from thumb drives and computers.
•Built-in Stereo speakers recreate quality sound from your music files.
Quick Start Guide
1. Plug the AC power adapter cord into the DC “In” input located on the side of the photo frame;
then plug the AC end of the power adapter into a standard electrical wall outlet.
2. Press the POWER button to turn “On” the Digital Photo Frame and a preprogrammed
SLIDESHOW of pictures will begin to play on the unit
3. Insert an SD, MMC, MS or CF memory card (up to 4GB), containing your desired formatted
pictures, into card slot on the Right side of the photo frame. The digital photo frame will
initialize the files and display those photos in a thumbnail format. You may also use a USB
flash drive (up to 4GB) to transfer your files.
4. If you have any questions, feel free to contact customer support at 1-508-435-4830 or
800-639-3803 or via email at [email protected], please reference item number:
11011324 and we will be happy to assist you.

4
Attaching the Easel Stand to the Digital Photo Frame
1. Clear a flat clean area to set your photo frame down upon in order to attach the easel stand to
the back of the frame. Make sure there are no sharp objects in the area that can make contact
with the LCD screen of the photo frame that may cause damage to the screen.
2. Align the easel stand to the back of the photo frame so that the mounting hole lines up correctly.
Locate the securing screw packed with the photo frame unit and insert it through the easel and
tighten the knob to securely hold the easel stand to the photo frame.
3. You may set the Digital Photo Frame in horizontal position as shown below.
Horizontal Position

5
Package Contents
10.2” Tru-Collage Digital Photo Frame
Easel Stand with Knob
Power Adapter
USB Cable
Remote Control
User’s Manual
1 Black & 1 Champagne
Aluminum frame

6
10.2” Tru-Collage Digital Photo Frame – Front View
10.2” Tru-Collage Digital Photo Frame - Back View
DC In
p
ut
Built-in S
p
eakers
Mini USB Port
3 in 1 Built-in
SD/MMC/MS
Ca
r
d
S
l
ot
Wall Mount
Holes
8” LCD
Dis
p
la
y
2.3” LCD
Display
Remote Control
Sensor
Removable
Frame
CF Built-in
Card Slot
Easel Stand Hole
USB Host In
p
ut
Audio out
p
ut
O
p
eration buttons

7
Installation and Setup of Accessories
1. Carefully position your Digital Photo Frame so that you can see all of the connection ports on
the side of the frame.
2. Plug the DC Power Adapter Cable into the DC input, and plug the AC end of the adapter into
a normal AC outlet.
3. The photo frame has built-in speakers but you may listen to the audio program by plugging
in the Earphone Cable to theAudio output (optional).
4. In order to view pictures and listen to music, insert your SD, MS, MMC or CF memory cards
(up to 2GB) into the correct slot on the left side panel of the photo frame.
5. You may also connect a USB flash drive (up to 2GB) or transfer files directly from your
computer using the USB cable included.
3 in 1 Built-in
SD/MMC/MS
Ca
r
d
S
l
ot
CF Built-in
Card Slot
Mini USB
Port
USB Host
In
p
ut

8
Connecting the Digital Photo Frame to your PC
1. Press the power button on the Digital Photo Frame or remote control to turn ON the unit.
2. Connect the Mini USB cable included on the right side of the Digital Photo Frame and connect
the other end of the cable to your computer.
3. When the photo frame is connected to a computer via the USB cable, the
message will appear on the screen of the Digital Photo Frame as illustrated.
4. Files from the computer can be transferred and saved to built-in memory of the Digital Photo
Frame. To access the Digital Photo Frame, click on the Start button (lower left corner) -> click
on “Computer”, double-click on the Removable (:) your system automatically assigns to this
unit.
5. After copying the pictures or music files, close the window then safely remove the Digital
Photo Frame by clicking the “Safely Remove Hardware” icon on the bottomright hand corner
of the screen as illustrated, and then disconnect the USB cable.
NOTE: The USB HOST and USB DEVICE can not take effect at the same time. Make sure to
disconnect the DPF with your PC before inserting the USB removable storage device.

9
Menu Control Buttons
cdefg
No. Button Function
cMoves the cursor upward when making a selection.
dMoves the cursor downward when making a selection.
eENTER Access the selected function.
fEXIT Exits the current menu or function.
gPOWER Turns the unit on or off.

10
Remote Control Functions
Using the Remote Control
Point the remote control directly at the remote control sensor on the front of the Digital Photo Frame.
Changing the Battery in the Remote Control
Hold the remote control, squeeze the button to the right, and pull the battery tray out. Then re-place
the battery (model CR2025) inside the tray with the “+” polarity facing up, and then push the tray back
to its place.
Remote
Control Sensor
POWER: Turns the unit on or off.
UP: Moves the cursor up when making a selection.
OSD: Press OSD to display the info of the playing file.
LEFT: Moves the cursor/highlight to the left when making a
selection.
ENTER: Access the selected function.
RIGHT: Moves the cursor/highlight to the right when making a
selection.
EXIT: Returns to the previous menu.
DOWN: Moves the cursor down when making a selection.
VOL+: Increases the volume.
BACK MUSIC: Plays slideshow with background music.
: Plays or Pauses the music.
V
OL - : Decreases the volume.

11
On Screen Display (OSD) Main Menu
Main Menu without a card Main Menu with a media storage device
Main Menu
1. Press the POWER button on the unit or on the remote control to turn ON the unit.
NOTE: The Digital Photo Frame will automatically display a slide show of the pictures
preprogrammed into the unit.
2. Press the EXIT button on the unit or on the remote control 2 times to exit the slide show and
return to the main menu.
INTERNAL
MEMORY Including two folders:PHOTO and FILE.
Provides two kinds of displaying mode of flies in the internal memory.
SETTINGS Set the player’s language, slide show time, slide show mode, brightness, contrast,
saturation, and default

12
OSD Menu
Functions Operation Screen
Press the POWER button to turn the
unit ON, it will displays photos in the
internal memory in 4 separate
screen.
Displaying photos
In the main menu, enter into the
internal memory or external device,
select PHOTO and press ENTER. It
will start a photo slide show in 4
separate screen.
Select File and press ENTER, then
select a desired photo and press
ENTER, it will start a slide show in
entire screen.
Playing music
Select the FILE menu and press
ENTER to enter into the file list. Use
the buttons to select the
desired music files and press ENTER
to confirm and begin to play a desired
music.
Background music
When displaying photos, press the
BACKMUSIC button to start a photo
slide show in background music.
Press BACK MUSIC again to stop
the back music. Press to pause a
song.
NOTE: To view images in 4 separate screens, there must be at least four photos on the internal
memory or memory card.

13
Settings Menu Instructions
The Setup Menu allows you to manage options in Photo and Music files. To access the Setup
menus, press the SETTING button on the key pad to enter the SETUP Mode.
Language Allows you to set the OSD language of the Digital Photo Frame.
For this product, only English can be chosen.
Slideshow Time
Allows you to adjust the pictures interval time during displaying
pictures, there are many values for choice: 3 sec., 5 sec., 15
sec., 1 min., 15 min., 1 hour or Off.
Contrast Allows you to adjust the contrast of the screen.
The contrast value can be 0~16.
Brightness Allows you to adjust the brightness of the screen.
The brightness value can be 0~16.
Saturation
Allows you to adjust the saturation of the screen.
The saturation value can be 0~16.
Default Allows you to resume the original settings in the factory.

14
Additional Features
You may copy files from an external memory card or USB thumb drive into the Digital Photo Frame
built-in memory, or deleting the pictures stored in the DPF.
1. Copy file
Select the desired device; press ENTER to enter into the device menu. Select FILE and press
ENTER to enter the file list.
In the file list, press to select the file you want to copy, press to confirm. Continue to select
files and confirm to copy more.
Then press the OSD button, select COPY and press ENTER to display card information, press to
confirm.
Press ENTER to start transferring the selected file.
2. Delete File
Select the desired device; press ENTER to enter into the device menu. Select FILE and press
ENTER to enter the file list.
In the file list, press to select the file you want to delete, press to confirm. Continue select
photos and confirm to delete more.
Then press the OSD button, select DELETE and press ENTER to select √ or X .
Select √to delete the selected file.
NOTE: Pictures deleted cannot be recovered. Make sure you want to delete the picture before you
confirm to delete.

15
Troubleshooting
No power
Ensure the power button is on
Ensure the power cord is not damaged
Ensure the power plug is connected firmly to the outlet
Could not read the card
1. Please copy the content in your card to your PC, then format
your card, then past your photos/music/movies in your card again,
then insert the card to DPF to read it.
2. Ensure the card is not damaged
3. Ensure the card is connected to the DPF correctly.
4. Ensure the card has photos, if no photos in card, the screen will
display "no playable file"
5. Do not insert your card and USB to gather at same time.
Otherwise one of device can not be recognized
Could not read the USB 1 .This unit is 2.0 version USB port; make sure your USB device
port is 2.0 versions
2. Do not insert your card and USB to gather at same time.
Otherwise one of device can not be recognized
Remote control not working
1 .Ensure the batteries are inserted
2. Ensure the batteries "protective plastic" is pulled out.

16
Specifications
LCD Panel Type
Viewing Angle
Contrast Ratio
Brightness
Response Time
Resolution
Aspect Ratio
10.2” (One 8” + Three 2.3”) TFT LCD Display
H: 120° , V: 100
250: 1
200 cd/m2
18ms
800 X 480
4 : 3
Built-in Card Reader Type SD, MMC, MS and CF memory card
Power Voltage
Consumption 100-240V AC 5V, 2A
Slideshow Standard JPEG with MP3 / WMABackground
music.
Image Standard JPEGFile Format
Audio MP3 and WMAfiles
Operating Condition Temperature
Air Humidity
10°C~40°C
20% ~ 80% R.H.
Dimensions Physical 12” (W) 8.5” (H) 1.5” (D)
Net Weight 0.92 lbs
Regulation (Certifications) FCC
Accessories DC Power Adaptor, Easel Stand with knob,
Remote Control, USB cable, 2 Plastic Frames
and User‘s Manual.

17
Maintenance
To clean your digital photo frame, please refer to the instructions below:
NOTE: To prevent electrical shock, do not open the Digital Photo Frame casing. Leave repair
of the frame to qualified personnel, please see the tech support information in the warranty.
1. Unplug the power
Unplug the Digital Photo Frame power adapter from the AC socket before cleaning the monitor.
2. Check the cover
Check to see if the frame and accessories are damaged, broken, or strained. If so, please consult
the warranty card for Tech Support information.
3. Clean
Never spray or pour any liquid directly onto the screen or frame. Avoid allowing any water or liquid
from entering the Digital Photo Frame or accessories.
4. Cleaner
Use water or non-ammonia/non-alcohol based glass cleaner. Do not use harsh or abrasive
cleaners such as ketene (such as acetone), ethanol, toluene, acetic acid, methane, chloride, or other
detergents to clean the digital photo frame, these chemicals can damage the LCD screen or the
frame.
5. Screen
To clean your LCD screen or case, use water or a mild cleaner, as listed above. Moisten a soft,
clean cloth or if possible, use a special screen cleaner sheet or a solution suitable for static electricity
application. Using any cleaner other than water or a mild cleaner may damage your digital photo
frame and will not be covered under the warranty.
6. Storage of Unit
If the Digital Photo Frame is not in use for a long time, please unplug it and store it in its original box
in order to avoid any damage.
7. Disclaimer
Any damage resulting from use of any cleaner that is not mentioned above is not covered under the
terms of the warranty on this product.

18
Precautions
1. Read all of these instructions and save this manual for later use.
2. Follow all warnings and instructions on the product.
3. Do not insert sharp objects or spill liquid into the digital photo frame through the cabinet slots;
this may cause accidental fire, electric shock or failure.
4. Unplug the unit when not in use for an extended period of time.
5. Unplug the unit from power outlet before cleaning.
6. Do not attempt to service this product yourself, as opening or removing the cover may expose
you to potential electric shock. Only a qualified technician should service this product.
7. Do not apply pressure to the screen, the LCD screen is very delicate.
8. Keep the digital photo frame away from extreme heat, cold or humid places.
9. Do not place directly under sunlight, dusty surroundings or near equipment which may
generate strong magnetic fields.
10.Do not place any object on the power cord.

19
FCC Norm
FCC
This equipment has been tested and complies with limits for Class B digital devices pursuant to Part
15 of Federal Communications Commission (FCC) rules.
FCC Compliance Statement
These limits are designed to provide reasonable protection against frequency interference in
residential installations. This equipment generates, and radiates radio frequency energy, and if not
installed properly or used in accordance with the instructions, may cause harmful interference to
radio communication. However, there is no guarantee that interference will not occur in television
reception, which can be determined by turning the equipment on and off. Interference may be
corrected by one or more of the following measures:
Reorient or relocate the receiving antenna
Increase the separation between the equipment and the receiver
Plug the equipment into an outlet on a circuit different from that to which the
receiver is connected.
CAUTION!
The Federal Communications Commission warns the user that changes or modifications to the unit
not expressly approved by the party responsible for compliance could void the user’s authority to
operate the equipment.
Fourstar Group (FSG) encourages consumers to recycle their used Digital Photo Frames.
Please visit www.fourstari.com/recycle for additional information on recycling.

12
Service Procedure
Beyond the retailer return policy, please call the toll free number below to obtain service.A
customer representative will give you a return authorization number (RA number) allowing you to
ship your product to the service center.
Please have the following information available when you call the service center:
Your Name and Address
Date of Purchase
Model Number
Serial Number
Store Name and Address
Store Location Number
Type of problem with the unit
After receipt of the RAnumber:
Send the complete unit, including power cord and adapter in the original carton to the address
below.
Include a copy of the original receipt for proof of purchase .
Write the RAnumber on the outside of the package. Packages without RAnumbers will not be
accepted.
The LCD monitor is fragile. Use extreme care when handling and packaging the unit.
The purchaser is responsible for any shipping charges to the repair facility and assumes all
risk.
The service center will repair or replace the unit and send it back to the purchaser within 10
working
days from receipt of the unit.
To contact the service facility, please call 508-435-4830 or (800) 639-3803. The address for this
facility is:
Four Star Group
26840 Fargo Ave. Suite C
Bedford Heights, OH 44146
Table of contents
Other Synaps Digital Photo Frame manuals