Synaps 11009987 User manual

15” Portrait Style
Digital Photo Frame
User’s Manual
Item Number: 11009987
All brand names and trademarks are the property of their respective owners

2
Contents
Overview / Quick Start Guide .........................................................................................................3
Package Contents ...........................................................................................................................4
Diagram of the Digital Picture Frame ............................................................................................5
Installation and Setup ....................................................................................................................6
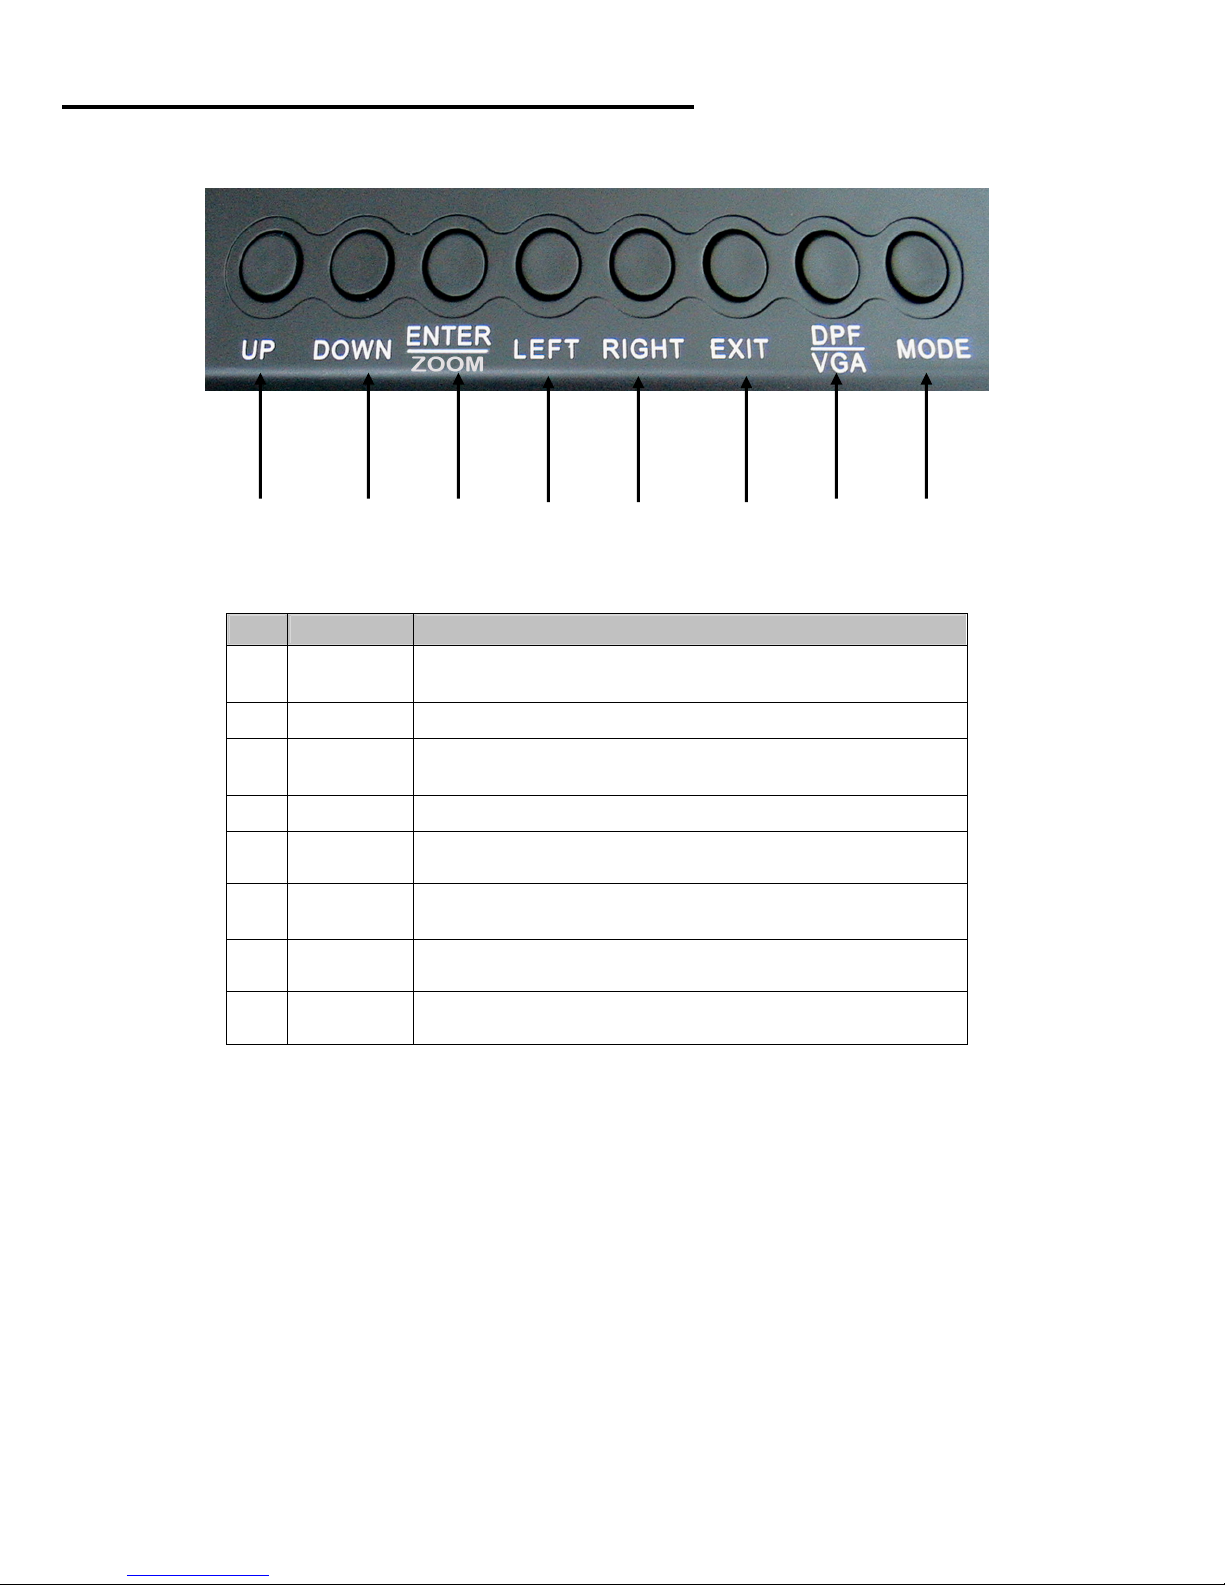
Digital Picture Frame Navigation Controls....................................................................................7
Remote Control Functions .............................................................................................................8
Operating Instructions ...................................................................................................................9
Setup Menu/ Photo Mode Operation.......................................................................................10-12
Music Mode Operation..................................................................................................................12
Video Mode Operation ..................................................................................................................13
Additional Features .................................................................................................................14-15
Frequently Asked Questions........................................................................................................16
Specifications................................................................................................................................17
Important Safety Instructions.......................................................................................................18
FCC Statement...............................................................................................................................19
Service Procedure.........................................................................................................................20
Warranty.........................................................................................................................................21
Spanish Section
Descripción / Guía de Inicio Rápido ............................................................................................23
Contenidos de Paquete.................................................................................................................24
Diagrama del Marco De Fotos Digital ....................................................................................24-25
Instalación .....................................................................................................................................26
Controles de Navegación del Marco de Foto Digital..................................................................27
Funciones del Control Remoto ....................................................................................................28
Instrucciones de Operación ........................................................................................................29
Menu de Configuración / Operación del Modo de Foto ........................................................30-32
Operación del Modo de Musica....................................................................................................32
Operación del Modo de Video ......................................................................................................33
Aspectos Adicionales .............................................................................................................34-35
Preguntas Más Frequentes ..........................................................................................................36
Especificaciones ...........................................................................................................................37
Instrucciones Importantes de Seguridad ....................................................................................38
Norma FCC.....................................................................................................................................39
Procedimiento de Reparación......................................................................................................40
Garantía..........................................................................................................................................41

3
Overview
•The 15” Portrait Style Digital Photo Frame enables you to view digital photos, videos and play
music files from different types of memory cards simply and quickly. You can enjoy your photos
anytime and anywhere.
•The Digital Photo Frame does not require a direct connection to a computer. The built-in
memory card reader can read a wide assortment of the most popular memory cards.
•The Digital Photo Frame supports SD™ Card, Memory Stick™ Card, MultiMediaCard, and
CompactFlash® Card memory cards via the built-in card reader.
•The SLIDESHOW mode has multiple transition effects and adjustable display time.
•You can play a picture SLIDESHOW with MP3 music in the background.
•The unit supports JPEG, BMP, MP3, WMA, MPEG-1, Motion- JPEG and MPEG-4 file formats.
In addition the unit has built-in memory of 256 MB so you can store your favorite pictures, music
and videos.
•The Portrait Style frame is Wall Mountable and can be operated from a distance with the
remote control.
•USB 2.0 interface option allows for fast downloads from thumb drives and computers.
•VGA input interface allows you to use the unit as a computer monitor.
•Built-in Stereo speakers recreate quality sound from your music files.
Quick Start Guide
1. Note: Please carefully remove the protective film from the LCD panel by grasping the tab in the
corner, and removing the film from the screen. You may discard the protective film.
2. Locate the power adapter and cord and plug the input jack into the DC In connector located on
the side of the photo frame and then plug the AC end of the adapter into a standard electrical
outlet. Turn the On/Off power switch to the On position and a preprogrammed SLIDESHOW of
pictures will begin to play on the unit .
3. Insert your SD, MS, MMC or CF memory card from your digital camera into the correct card slot
on the side of the photo frame. The digital photo frame will initialize the file and display your
media in a SLIDESHOW thumb nail format. You can also use a USB flash drive (up to 2GB) to
transfer your files.
4. Press the SLIDESHOW button on the remote control included with your digital photo frame and
enjoy your pictures.

4
Package Contents
15” Digital Photo Frame
Remote Control
AC Power Adapter /
Power Cord
User’s Manual
USB Cable
15” Digital Photo Frame – Front View
LCD Screen
Remote Control Receiver

5
15” Digital Photo Frame - Back View
The unit may be displayed on a table top using the built-in pedestal stand built into the back of the unit.
LED
Power
Light
VGA Input
Power
Adapter
Input
On/Off
Power
Switch
Audio
Out
USB
Computer
Interface
USB
Host
Input
input2
CF Card
Slot
3 in 1
SD/MMC/ MS
Card Slot
Wall Mount Positions

6
Installation and Setup
1. Carefully position your Digital Photo Frame so that you can see all of the connection ports on
the side of the frame.
2. Plug the Power Adapter Cable into the DC IN input on the side of the unit and plug the AC end
of the adapter into a normal AC outlet.
3. In order to view pictures, video and listen to music, insert your SD, MS, MMC or CF memory
cards into the correct slot on the side panel of the photo frame. You may also connect a USB
flash drive or transfer files directly from your computer using the USB cable included.
4. Now press the power on/off switch to the ON position.

7
Digital Picture Frame Navigation Controls
12 3 4 5 6 7 8
No Word Function
1 UP Moves the cursor up or to the previous selection
2 DOWN Moves the cursor down or to the next selection
3 ENTER /
ZOOM Confirms or Plays/Pauses the music or video ;
Zoom in Photos
4 LEFT Moves the cursor to the left or backward
5 RIGHT Moves the cursor to the right or forward
6 EXIT Return to last displayed menu,
Enter/Exit the display menu
7 DPF/VGA
May be used as monitor by switching to VGA
8 MODE Allows you to select Photo, Music or Video Modes

8
Remote Control Functions
1. POWER: Turns the unit on or off
2. UP: Moves the cursor up when making a
selection
3. SETUP: Goes to the main OSD Menu
4. LEFT: Moves the cursor to the left when making a
selection
5. ENTER / ZOOM: Access the function selected
and plays the picture show, music or video ; Zoom
in Photos
6. RIGHT: Moves the cursor to the right when
making a selection
7. CARD SELECT: Selects the memory card type
8. DOWN: Moves the cursor down when making a
selection
9. CALENDER: Displays the Calendar/Clock on
screen
10.PHOTO MODE: Goes to the Photo menu
11.SLIDESHOW: Activates the SLIDESHOW
12.ROTATE: Rotates the photo in 90°clockwise
intervals
13.MUSIC MODE: goes to the Music menu
14.EXIT: Exit to the previous menu
15.VOL+: Increases the volume
16.VIDEO MODE: goes to the Video menu
17.VGA/DPF: Switches between VGA and Digital
Photo Frame (DPF) viewing
18.VOL - : Decreases the volume

9
Operating Instructions
To Power the unit On/Off
Insert the DC power plug into the DC jack on the side of the photo frame and connect the other end of
the AC adapter to a standard electrical outlet. Press the power switch to the “On” position and after 5
seconds the photo frame will display the main page. Switch the power button off at the end of use.
Enter Memory Card File
Press the Card Select button on your remote control in order to choose the type of memory card you
have inserted and this will allow you to review the files on the memory card.
Card Select
Press the Card Select button on the remote control to choose between memory devices and to browse
the files on the card.
Select the file that you want to play
Photo file: press the Photo mode button to select the photo file.
Music file: press the Music mode button to select the music file.
Video file: press the Video mode button to select the video file.
Play
After choosing the file mode you will see its main menu. At this point, use the LEFT/RIGHT and
UP/DOWN keys to select a file. Then press “ENTER” to play your chosen file.
Adjusting the Volume
Use the VOL+ on the remote control to increase volume, VOL- to decrease the volume after entering
the Music or Video modes during play. Press “ENTER” to play or pause the music or video files.
Adjusting the screen Brightness / Contrast / Color / Tint
Under the Setup menu, select Brightness / Contrast / Color or Tint adjustments. Use the Left or Right
buttons on your remote to adjust until you are satisfied with the appearance of the screen.
Digital Photo Frame mode and VGA mode
The Digital photo frame can be used as a computer monitor. Use a computer monitor VGA cable (not
included) to connect to the computer host. Then press the VGA/ DPF button and the digital photo
frame will display the computer’s video signal on the screen.

10
Set Up Menu Instructions
The Setup Menu allows you to manage options in Photo/Music and Video files.
Photo
Options: Separate Windows /
SLIDESHOW Effect / SLIDESHOW
Speed / Copy File / Delete File / Reset
Settings / Language /
Brightness/Contrast / Color/Tint/Screen
Saver/Screen Saver Waiting Time
Music
Options: Music Repeat / Copy File /
Delete File / Reset Settings / Language /
Brightness/Contrast / Color/Tint/ Screen
Saver/Screen Saver Waiting Time
Video
Options: Video Repeat / Copy File /
Delete File / Reset Settings / Language /
Brightness/Contrast / Color/Tint/ Screen
Saver/Screen Saver Waiting Time
Under each submenu you can press SETUP on your remote to go into the desired setup menu.
The function of Setup Menus is primarily for you to be able to work with file management on your
memory cards. For example, you will be able to copy and delete files on your selection of memory
cards. Press “Exit” to exit from the setup menu.
Photo Mode Operation
Browsing Pictures
Under the Photo Mode, select the
desired photo to be viewed on the big
screen by using the RIGHT ( ) or
LEFT ( ) buttons on the remote,
then press ENTER to play, (the first
picture on the directory list will show
by default)
Press up or left to view previous and press down or right to view next or back.
When a picture is displayed, you may press “Rotate” in order to view the picture in it’s correct
horizontal or vertical position.
Note : For large size high resolution files, the unit may take more time to download and display these
files.

11
Photo Setup
Under the Photo Mode set up menu press “SETUP” and the following menu will appear:
Press Up or Down to select the submenu option you wish to adjust and then press “ENTER” to enter
into its submenu.
Separate Windows You can choose to browse through multi-pictures on the screen
when in the SLIDESHOW mode.
SLIDESHOW Effect You may choose different effects while the digital pictures
transition from one to another.
SLIDESHOW Speed Changes the time interval of picture transitions
Copy File You may copy the files to other inserted memory cards or to
the on-board built-in memory on the photo frame (256MB
Built-in flash memory)
Delete File Deletes the chosen file
Reset Settings Returns to the default settings as set in the factory.
Language Press “ENTER” to select a menu language (choose from
English, Italian, German, French, Spanish, Portuguese
and
Dutch)
Brightness/Contrast Press “ENTER” , then press “LEFT/RIGHT, UP/DOWN” to
adjust screen Brightness and Contrast
Color/Tint Press “ENTER” , then press “LEFT/RIGHT, UP/DOWN” to
adjust screen Color and Tint.
Screen Saver choose ON/OFF to enable or disable this function
Screen Saver Waiting
Time Select time (3 / 5 / 10minutes)
Note: The Copy and the Delete functions are not active when the selected file is in use.
Photo Slideshow
While in the Photo Mode, press the “SLIDESHOW” key to play your photos automatically with
background music as the selected effect. Music will play only if you have music files loaded onto the
memory card.
“Photo Mode”“Setup” Select “SLIDESHOW Effect” function to choose the effect you want.
Choose Photo Menu
Under the Photo Mode, Press the Card Select button on the remote control to view photo files from a
different memory card you may have inserted into the unit.

12
Music Mode Operation
Play music
Under the Music Mode, choose
the desired file using DOWN
() /LEFT ( ), or UP ()
/RIGHT ( ) keys, and then
press ENTER to play. (the first
music file of the directory will
play by default)
Volume/Pause control while music is playing
While playing, press ENTER once to pause the music and press again to continue. To adjust the
volume press VOL+ or VOL—on the remote control.
Music setup
The Music setup is similar to
Photo Setup except for “Music
Repeat”: if you choose “One”,
the single selected music file will
repeat but if you choose “all”, all
the music files will repeat. If you
choose “off”, no music will
repeat.
Note: The “Copy” and the “Delete” functions are not active when the selected file is in use.
Choose the Music Menu
Under the Music Mode, Press the Card Select button on the remote to choose music files from
different memory card you may have inserted into the unit.

13
Video Mode Operation
Play Video file
Note: The system may need more time to identify and download large video files.
The Copy and the Delete functions are not active when the selected file is in use.
Volume/pause control while Video is playing
While playing, press ENTER once to pause the video and press again to continue. To adjust the
volume press VOL+ or VOL- on the remote control.
Video setup
The operation is identical to the Music Setup except that we are using Video files incorporating sound
and motion.
Choose the Video Menu
Under the Video Mode, Press the Card Select button on the remote to choose video files from different
memory card you may have inserted into the unit.
Under the Video Mode,
choose desired file using
the DOWN () /LEFT
( ), or UP () /RIGHT
( ) keys, then press
ENTER to play. (The first
file from the directory list
will play by default)

14
Additional Features
Calendar Function
Press the Calendar key on the remote control and the calendar page will display. Press Setup to adjust
the date, time, press again to set up Sleep Time and again to set up the Wake Time. This will allow for
your SLIDESHOW to begin and end at your preset times.
Press calendar key Set up key The date and time will appear in the screen, use up/down/left/right
key to adjust time and calendar.
Monitor Function
The digital photo frame can be used as a computer monitor. Use a VGA monitor cable (not included) to
connect with the computer host and the VGA input connector located on the side of the digital photo
frame. Once the computer is up and running, press the VGA / DPF button to switch the display to the
computer screen.
USB Connection Host Function
You may connect an MP3 player or other USB mass storage devices or digital cameras with a USB
cable connector located on the side of the unit to USB input jacks. This will allow you to transfer files to
and from these devices. (USB Cable included).
NOTE: Not all digital cameras will support the USB input function, please refer to the owners manual of
your digital camera.
USB Computer Interface
When the photo frame is connected to a computer via the USB cable, , files from the
computer can be transferred and saved to and from the memory cards and USB devices attached to
the photo frame. (USB Cable included)
Audio Out
You may connect your digital photo frame to other audio devices via the Audio Out interface using a
stereo phono connector plug and cable (not included). You may listen to your music and audio files
from your digital photo frame on external stereo speakers.

15
Additional Features
Built-in Flash Memory
This digital photo frame comes with built-in onboard memory. With the built-in 256MB flash memory
the device will function without the use of memory cards.
Screen Saver
The digital photo frame will enter screen saver mode without any user intervention.
User can control this function: Set upScreen Saverchoose ON/OFF to enable or disable this
function
Screen Saver Waiting Time
Users can select 3 / 5 /10 minutes as the time interval before the photo frame goes into screen saver
mode. Set upScreen saver waiting timeSelect time (3 / 5 / 10minutes)
After the photo frame has been in screen saver mode for 5 minutes, it will then enter into the
Power-Save mode without any user intervention.
Power Saving Function
After operating for 5 minutes in the screen saver mode, the photo frame will automatically turn to
Power Saving mode. Press any key to wake up the photo frame.
Auto SLIDESHOW Function
You are able to change the Start-Up SLIDESHOW photos by deleting the photos from the 256MB built
in memory, and adding your favorite photos.

16
Frequently Asked Questions
Q: What types of file formats does the digital photo frame support?
A: The unit supports JPEG, BMP, MP3, WMA, MPEG-1, Motion- JPEG and MPEG-4 file formats. In
addition the unit has built-in memory of 256 MB so you can store your favorite pictures, music and
videos. Not all the MPEG-4 files can be supported due to the various file formats that exist.
Q: Why are some of my photos not able to be displayed on the viewer?
A: Most digital cameras take and save photos in a JPEG format which allows the digital photo frame to
display the photos. However, some images (for example web page images, scanned images,
Progressive JPEG image, Pixel Dimensions over 7Kx7K, or RAW format photos taken by special
cameras) may not be supported.
Q: There is no picture on the screen?
A: Make sure the flash card is installed properly in the flash card reader. You may have to flip it over.
B: Check that the power adapter is connected properly to the power outlet and DC input on the digital
picture frame.
C: Turn off the Digital Photo Frame and reinsert the memory card properly.
D: Please check to see if you are in the VGA Mode
Q: Can I adjust the colors of the picture?
A: No, all color settings are preset at the factory. But you can adjust the appearance of the pictures by
going into the Setup Menu where you can adjust the Brightness, Contrast, Tint and Color saturation of
the screen which will effect the appearance of the picture.
Q: What is the highest resolution that can be displayed on the screen?
A: The highest resolution that the screen is capable of rendering is 1024 x 768 pixels.
Q: How do I create music files to play on my digital frame?
A: Use a personal computer and a popular audio editing software such as MusicMatch to first convert
your music into MP3 format files. Then you can transfer these MP3 files to a memory card using a
memory card reader. Finally once you have the music files on the memory card simply insert the card
into the card slot of the digital frame and then select your music using the on screen display menu.
Q: Why do some picture files load faster than others?
A: Higher Resolution pictures take more time to load than pictures taken in lower resolutions.
To speed up the loading process, take pictures using a lower resolution setting on your camera.
Q: There is no sound being produced while I am playing my music or video files?
A: The volume setting may be set at zero. Adjust the volume up by using the remote control. The file
format may not be recognized by the unit. Please check to see that the file type is supported. The USB
cable may not be connected properly or the cable may be damaged. Please check the USB
connection and make sure the USB cable is not damaged.

17
Specifications
LCD Panel
Type
Contrast Ratio
Response Time
Resolution
Aspect Ratio
15” TFT LCD Display
300: 1
16ms
1024 X 768
4 : 3
Supported File Formats Type JPEG, BMP, MP3, WMA, MPEG-1, Motion-
JPEG and MPEG4
Built-in Card Reader Memory Types SD, MS, MMC and CF memory cards supported
up to 2GB of memory.
Media
Audio
Photo
Video
Functions
File Format
File Format
File Format
Video Play and Audio Out
MP3(Bit Rate: 32k 320kpbs-CBR,VBR)-L3
WMA(Bit Rate: support 48k
320kpbs-CBR,VBR) (P.S:CBR= Constant
Bitrate ,VBR= Variable Bitrate)
JPEG (Baseline format), BMP
MPEG-1(352*288 @30FPS), Motion-JPEG
(AVI, MOV (640*480 @30FPS)),
MPEG-4(Mp4(720*480 @30FPS);
AVI(@30FPS); Div/4.x/5.x/6.x(720*480
@30FPS); XviD(@30FPS)) (Ps: FPS=Frame
per second)
Built-In Speakers 2x speakers 2Watt
Power
Voltage
Current
Consumption
Input:AC100 - 240V, 50/60Hz
Output:12V _ _ _ 3A
Interface Type USB 2.0 480Mbps, Stereo Audio Output,
VGA input from computer to monitor.
Dimensions Physical 16.2” (W) 13.5” (H) 2.6” (D)
Net Weight 7.8 Lbs
Regulation (Certifications) FCC
Accessories UL Adaptor, Remote Control, USB Cable,User ‘s
Manual.

18
Important Safety Instructions
To reduce the risk of electric shock or product damage, do not attempt to remove screws (of
product cover).
Do not use this unit near the presence of water. Do not expose this unit to rain, moisture, water
drip or splash. Also ensure that no container with liquids, such as vases, be placed near or on the
unit.
Do not operate or install near any heat sources such as radiators, heat registers, stoves, or
similar unit.
Do not open product cover and do not attempt to repair this product by yourself. Please refer to
qualified service personnel.
Avoid sandy places such as beaches.
Please insert the AC plug and secure it firmly to avoid any electrostatic discharge.
Ensure all cords and wires are connected, safely and correctly.
Avoid applying pressure on the LCD screen or exposing it to direct sunlight. Clean with a dry, soft
cloth only.
Please note the machine will only play files with compatible formats.
Music/Videos/Pictures may be subjected to copyright. Playing such files without permission may
be in violation of copyright law.
Do not allow metallic objects to come into contact with the AC/DC plug when the machine is in
operation.
Avoid placement near hot equipment such as amplifiers, to prevent the product from overheating.
Do not remove inserted memory cards when the machine is reading them to prevent possible
files being lost or system failure.
Do not unplug the power cord when playing music, pictures.
Do not rest the unit on your lap for prolong periods of time to prevent overheating.
Please avoid excessive earphone usage especially at high volumes to prevent potential damage
to the ears.
Please do not play (speakers) at excessive volumes in order to prevent permanent damage to
speakers.
Please note excessive visual contact with screen (excessive play) may cause spatial
disorientation or discomfort.
The Digital Photo Frame is not intended to be run for 24 hours continuously. The recommended
time usage is less than 8 hours at a time each day.
The contents of this operation manual may be updated from time to time to incorporate updated
functionalities.

19
FCC Norm
FCC
This equipment has been tested and complies with limits for Class B digital devices pursuant to Part 15
of Federal Communications Commission (FCC) rules.
FCC Compliance Statement
These limits are designed to provide reasonable protection against frequency interference in
residential installations. This equipment generates, and radiates radio frequency energy, and if not
installed properly or used in accordance with the instructions, may cause harmful interference to radio
communication. However, there is no guarantee that interference will not occur in television reception,
which can be determined by turning the equipment on and off. Interference may be corrected by one or
more of the following measures:
Reorient or relocate the receiving antenna
Increase the separation between the equipment and the receiver
Plug the equipment into an outlet on a circuit different from that to which the receiver
is connected.
CAUTION!
The Federal Communications Commission warns the user that changes or modifications to the unit not
expressly approved by the party responsible for compliance could void the user’s authority to operate
the equipment.

20
Service Procedure
For technical support, please call the toll free number below. A customer service representative will
assist you and provide a return authorization number (RA number) if required allowing you to ship your
product to the service center.
DO NOT RETURN THIS PRODUCT TO THE STORE. PLEASE CONTACT THE TOLL FREE
NUMBER LISTED BELOW
Please have the following information available when you call the service center:
Your Name and Address
Date of Purchase
Model Number
Serial Number
Name of Retailer purchased from
Description of the problem
After receipt of the RA (return authorization) number:
Send the complete unit, including power cord and adapter in the original carton to the address
below.
Include a copy of the original receipt for proof of purchase (within 1 year).
Write the RA number on the outside of the package. Packages without RA numbers will not be
accepted.
The Digital Photo Frame is fragile. Use extreme care when handling and packaging the unit.
The purchaser is responsible for any shipping charges to the repair facility and assumes all risk.
The service center will repair or replace the unit and send it back to the purchaser within 10
business days from receipt of the unit.
To contact customer support, please call 508-435-4830 or 800-639-3803. The address for this facility
is:
Fourstar Group
26840 Fargo Ave. Unit C
Bedford Heights, OH 44146
Table of contents
Languages:
Other Synaps Digital Photo Frame manuals