Thank you for choosing SYNCO product.
Please read this manual carefully before use and follow all instructions mentioned
herein.
Vlogger Kit 1 User Manual
Caring For Your SYNCO Product
Please keep the product in a dry, clean, dust-free environment.
Keep corrosive chemicals, liquids and heat source away from the product to
prevent mechanics damage.
Use only a soft and dry cloth for cleaning the product.
Malfunction may be caused by dropping, impact of external force.
Do not attempt to disassemble the product. Doing so voids warranty.
Please have the product checked or repaired by authorized technicians if any
malfunctions happened.
Failure to follow all the instructions may result in mechanics damage.
Warranty does not apply to human errors.
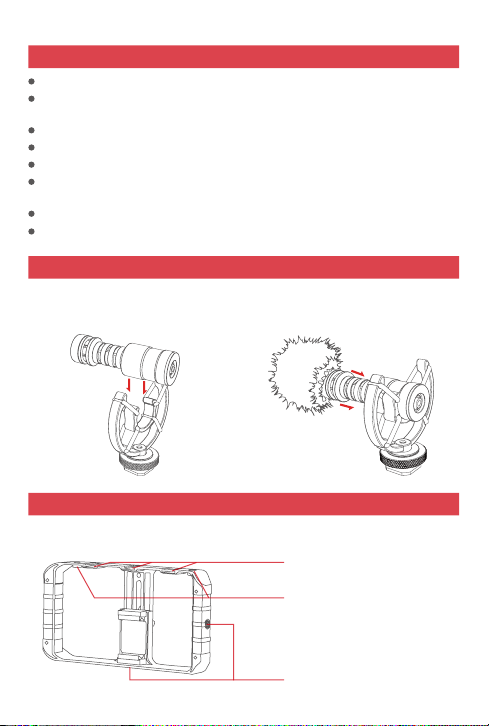
1. Insert the microphone body into
the shock mount. Make sure it is
secure and well-balanced.
The video rig provides three cold shoe mounts and four 1/4” threads for
attaching microphones, video lights and tripod.
Cold Shoe Mounts
1/4” Threads
1/4” Threads
Microphone Usage
Kit Installation
2. Install the windshield to the front of
the microphone body.
1. Attach the tripod to the 1/4” thread on the
bottom for horizon lming or to that on the
right side for vertical lming.
2. Unscrew the knob on the back of the rig
to expand the phone clamp.
3. Place the smartphone into the clamp and
adjust it.
4. Screw the knob tightly to x the
smartphone.
① Power & Mode Switch Button
Long press this button to turn on/o the
product.
When the product is on, short press this
button to switch between 2 light modes,
CCT Mode and EFF Mode.
② Display Screen
③ Dial
Press down the dial to choose the option
to be adjusted.
Roll the dial upwards to increase the
value, and downwards to decrease the
value.
Video Light Instructions
5. Install the microphone and the video light on the cold shoe mounts.
6. Connect the microphone with your phone via the 3.5mm TRRS phone cable.
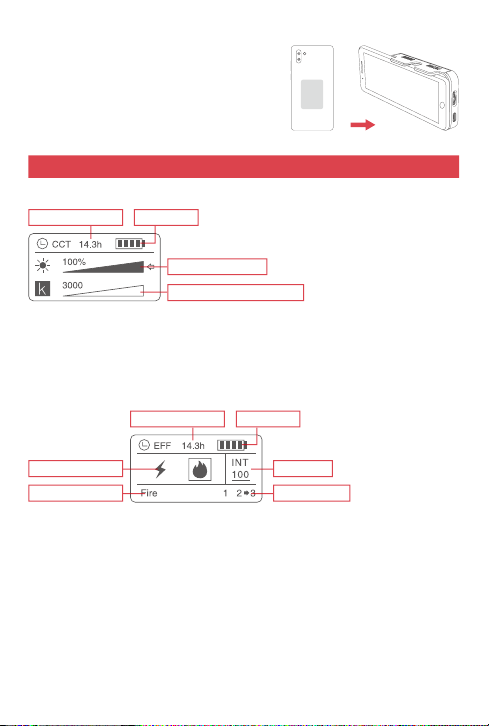
In CCT Mode, you can choose to adjust brightness or color temperature by
pressing down the dial.
Increase or decrease the brightness and color temperature by rolling the dial
upwards or downwards.
In CCT Mode, press the mode switch button once to enter EFF Mode.
Press down the dial to switch among subordinate mode, brightness and
special eect, and roll the dial to adjust.
Subordinate Mode: Lightning and Fire
Each mode contains 3 special eects, amount to 6 special eects.
Video Light Interface
④ Type-C Charging Port
⑤ 1/4” Screw Hole
⑥ Magnetic Back
Used for attaching the light to smartphones
with the metal plate.
CCT Mode
Remaining Runtime Battery Life
Current Brightness
Current Color Temperature
EFF Mode
Subordinate Mode Brightness
Special Eect Current Option
Remaining Runtime Battery Life