Synectics e1600 User manual

e1600 User Manual
Issue 1

Contact Information
For Product and Software support please contact your corresponding office below and ask for the
support department.
Visit us on line at www.synx.com
Contact us by post at any of the following addresses:
Synectic Network Systems Synectics Industrial Systems
Synectics House The Flarepath
3 –4 Broadfield Close Elsham Wold
Sheffield Brigg
South Yorkshire North Lincolnshire
S8 0XN DN20 OSP
UK UK
Tel: +44 (0) 114 255 2509
+44 (0) 114 280 2829 Tel: +44 (0)1652 688908
Fax: +44 (0) 114 258 2050 Fax: +44 (0)1652 688928
Synectics Middle East Synectics USA
Jafza Views, Building 18, Floor 12, Office 5 4180 Via Real, Suite A
Jebel Ali Free Zone (South) Carpinteria
Postal Address: PO Box 262814 CA 93013
Dubai, UAE USA
Tel: +971 (0) 48857595 Tel: +1 805 745 1920
Fax: +971 (0) 48855028 Fax: +1 805 745 1980

e1600 User Manual, Issue 1 © Synectic Systems Group Ltd 2012. All Rights Reserved
Specifications subject to change. E&OE Page 3
E1600 User Manual
1Introduction ......................................................................................................................................5
1.1 System Approvals ...................................................................................................................5
1.2 Scope and Conventions..........................................................................................................6
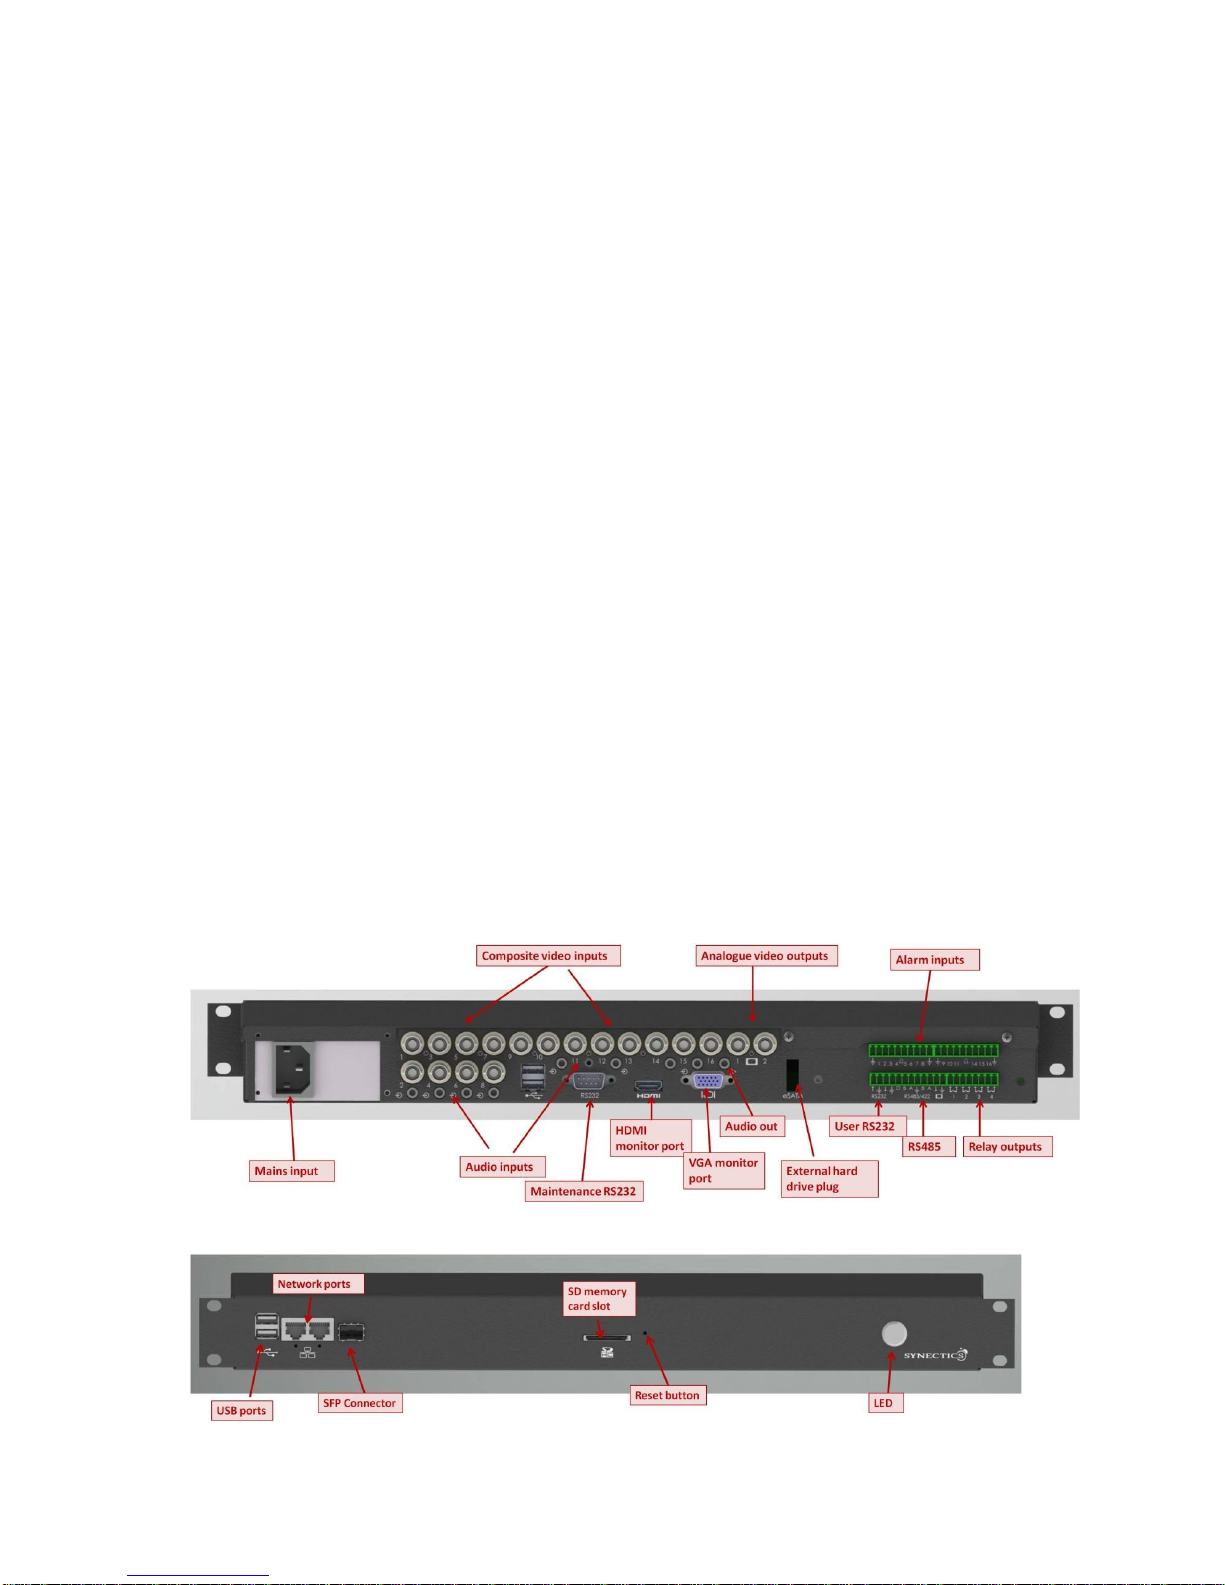
2e1600 Hardware Description ...........................................................................................................7
2.1 Main Components...................................................................................................................7
2.1.1 Installation Requirements....................................................................................................8
2.1.2 Mains Power........................................................................................................................8
2.1.3 Video Inputs ........................................................................................................................8
2.1.4 Audio Inputs ........................................................................................................................8
2.1.5 Video Outputs......................................................................................................................8
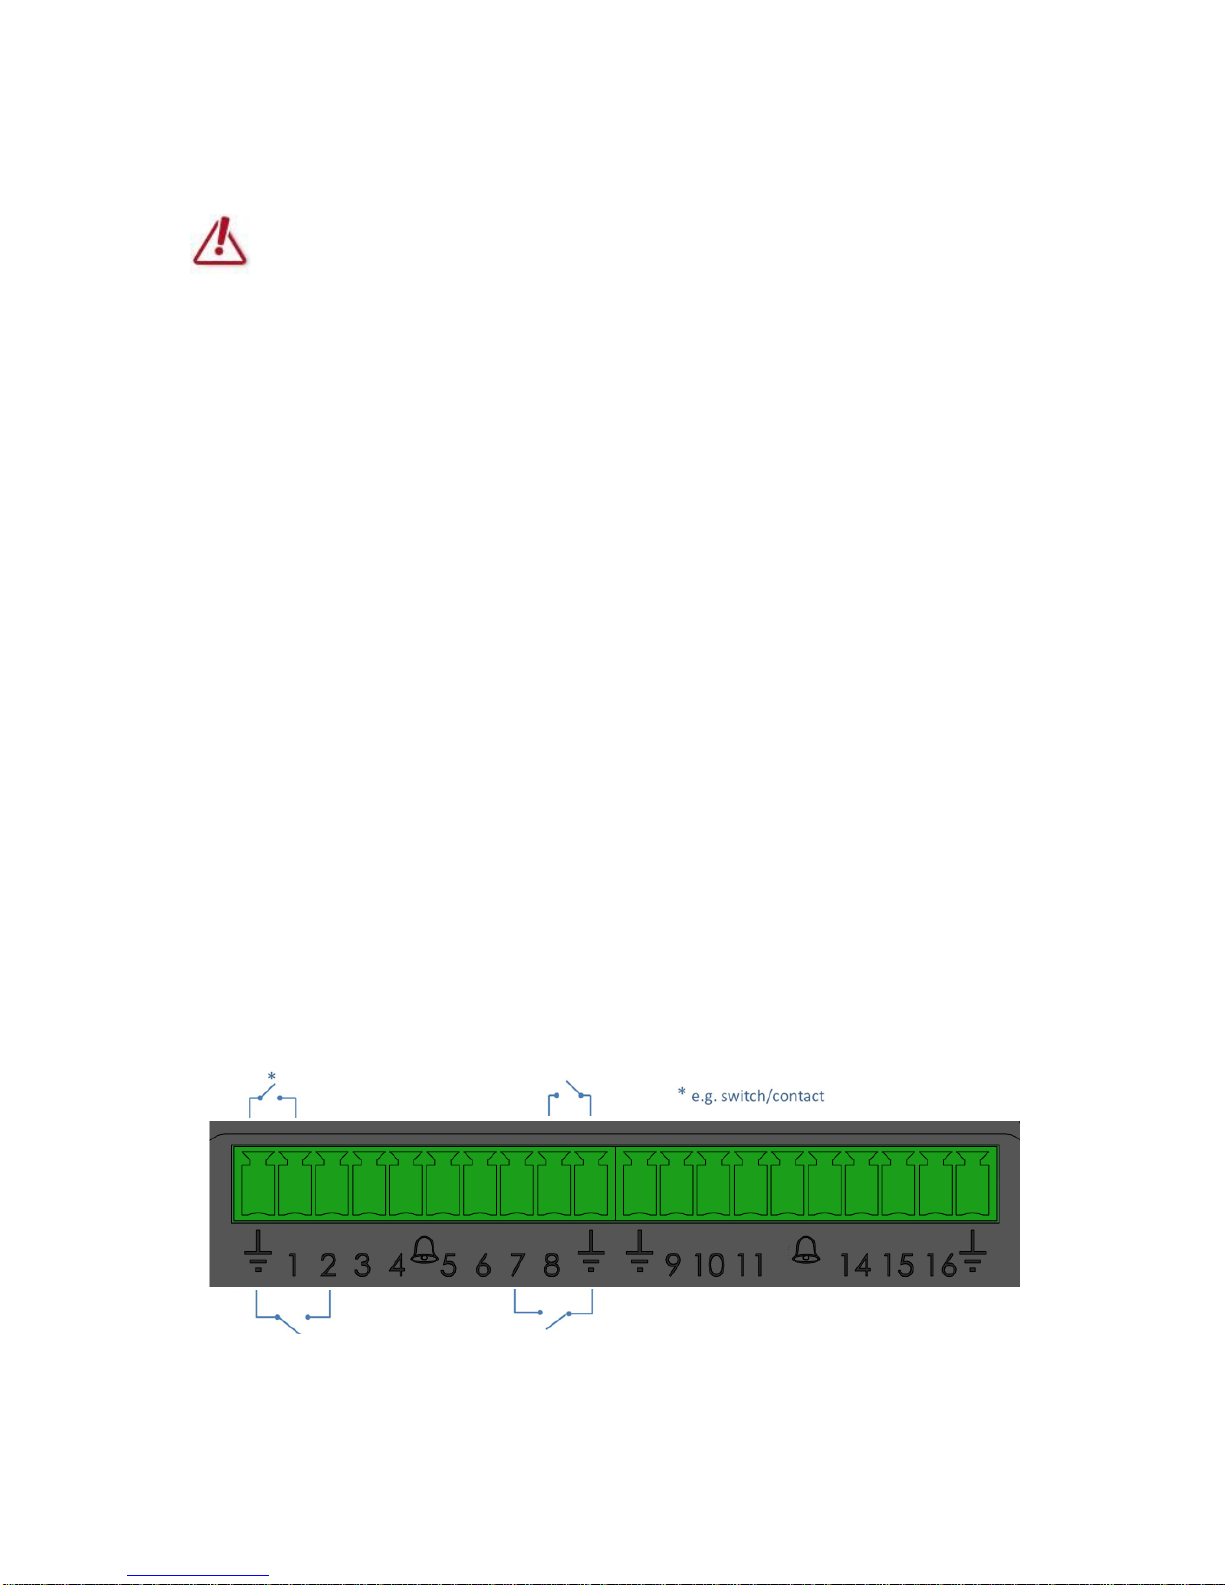
2.1.6 Alarm Inputs........................................................................................................................8
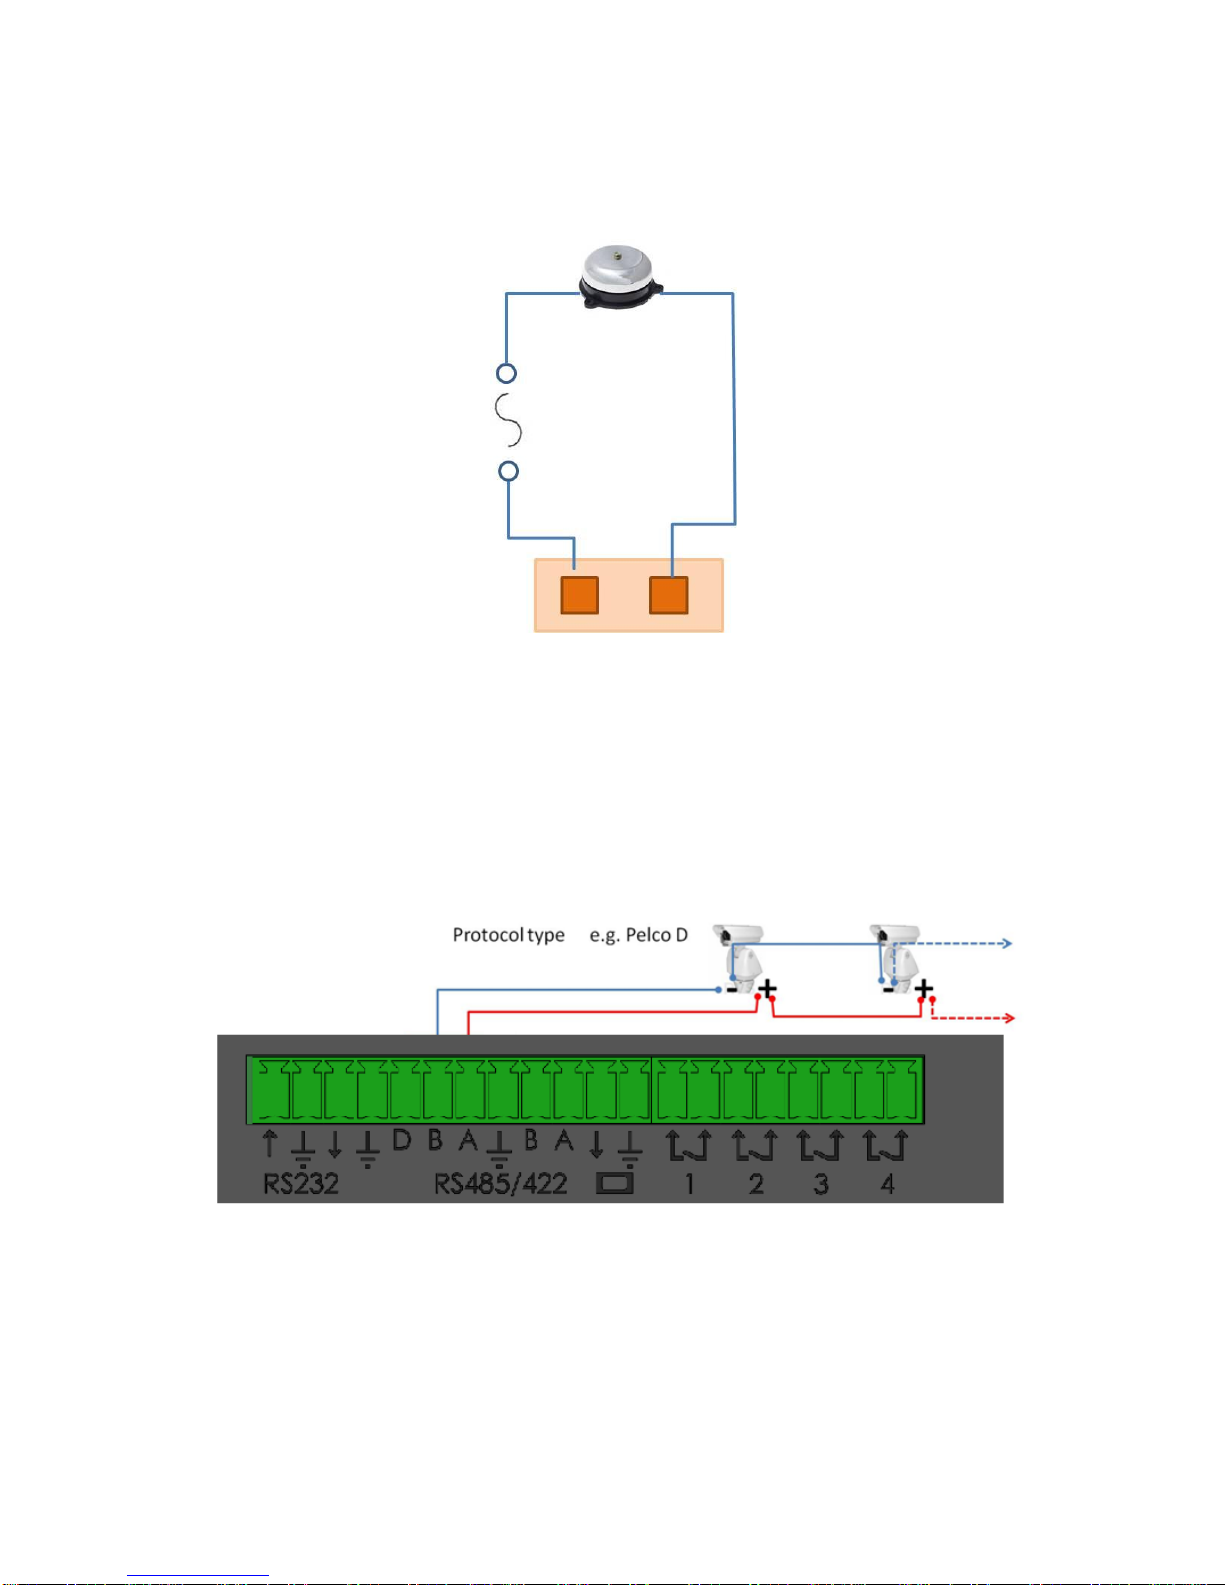
2.1.7 Relay Output .....................................................................................................................10
2.1.8 RS485 and RS422 Port.....................................................................................................10
2.1.9 RS232 Ports......................................................................................................................11
2.1.10 External hard drive plug ................................................................................................12
2.1.11 Audio output..................................................................................................................12
2.1.12 USB ports......................................................................................................................12
2.1.13 Ethernet Ports ...............................................................................................................12
2.1.14 SFP network port...........................................................................................................12
2.1.15 Reset button..................................................................................................................12
2.1.16 SD memory card slot.....................................................................................................12
2.1.17 LED ...............................................................................................................................12
3e1600 Configuration.......................................................................................................................13
3.1 Initial Configuration ...............................................................................................................13
3.1.1 Configure with DHCP server present................................................................................13
3.1.2 Configure without DHCP server present...........................................................................13
3.2 Accessing the e1600 Configuration ......................................................................................17
3.2.1 Login..................................................................................................................................17
3.2.2 Applying and Saving Changes..........................................................................................18
3.3 General Settings ...................................................................................................................19
3.3.1 Unit Configuration..............................................................................................................20
3.3.2 Time/Date Configuration ...................................................................................................21
3.3.3 Network Configuration.......................................................................................................22
3.3.4Users.................................................................................................................................23
3.3.5 Change Password.............................................................................................................24

e1600 User Manual, Issue 1 © Synectic Systems Group Ltd 2012. All Rights Reserved
Specifications subject to change. E&OE Page 4
3.4 Streaming..............................................................................................................................25
3.4.1 Video Configuration...........................................................................................................25
3.4.2 Video Profiles....................................................................................................................26
3.4.3 Audio Configuration...........................................................................................................27
3.5 Events ...................................................................................................................................28
3.5.1 Inputs.................................................................................................................................29
3.5.2 Outputs..............................................................................................................................30
3.5.3 VMD Configuration............................................................................................................31
3.5.4 Capture Change Actions...................................................................................................31
3.5.5Output Alarm Actions ........................................................................................................32
3.5.6 Rules .................................................................................................................................33
3.6 System Maintenance.............................................................................................................34
3.7 Upgrading the Unit ................................................................................................................37
3.8 Live Video Viewing................................................................................................................39
3.9 Discovery and Remote Control Using Synxplorer.................................................................40
4PSN and Synergy Setup for e1600................................................................................................43
4.1 RMS Configuration................................................................................................................43
4.1.1 Add e1600 Encoder to RMS .............................................................................................43
4.1.2 Configure Streams ............................................................................................................45
4.2 e1600 Setup in Synergy........................................................................................................48
4.2.1 Configure DVR Type.........................................................................................................50
4.2.2 Configure Camera Types and Add Cameras....................................................................52
4.2.3 Setup DVR ........................................................................................................................55
4.2.4 Configure Alarms...............................................................................................................57
5e1600 Advanced Features.............................................................................................................62
5.1 RTSP Streaming ...................................................................................................................62
5.1.1 Example Using VLC Media Player to view video from the e1600.....................................62
Appendix A –Technical Specifications.................................................................................................66
Appendix B –Part Codes......................................................................................................................66
Index......................................................................................................................................................67

e1600 User Manual, Issue 1 © Synectic Systems Group Ltd 2012. All Rights Reserved
Specifications subject to change. E&OE Page 5
1 Introduction
The e1600 16-channel video and audio encoder is ideal for centralized video and audio collection
from legacy analogue systems, or as a distributed collection node encoder. The e1600 provides full
resolution (D1) full frame rate (25fps PAL/30 fps NTSC) on all channels. All channels support dual
streaming
1
and each stream can be configured independently for frame rate, resolution and image
quality to enable a high degree of flexibility across all input channels.
Fully compatible with Synectics MDRS and Synergy™ solutions, the e1600 can be used to present
legacy analogue feeds to an existing or new IP deployment. It may also be displayed on any Synergy
Client workstation, display wall or web client, and maybe recorded and managed via the Synectics
PSN with complete TLL (Time Lapse Later) support.
For systems requiring Video Content Analysis support, the unit is fully compatible with the Synectics
iSYNX VCA server. Third Party VMS support is also provided for through the e1600’s support for RTP
/ RTSP streaming.
1.1 System Approvals
EMC
Immunity
EN50130-4:1995+A1:1998 +A2:2003 Electromagnetic compatibility (EMC)
Product Family Standard: Immunity requirements for components of fire,
intruder and social alarm systems
Emissions
EN61000-6-3: 2007 Electromagnetic compatibility (EMC) Part 6-3: Generic
standards - Emissions for residential, commercial and light-industrial
environments
USA emissions
Title 47 of the Code of Federal Regulations (CFR) Part 15 (47CFR15)
Subpart B –Unintentional Radiators
Safety
Low voltage Safety testing
Safety Testing to EN 60950-1:2006 + A1:2010 “Information Technology equipment –Safety –Part 1
General Requirements”
Complies with EN61000-4-2:2009, EN61000-4-3:2006+A1+A2, EN61000-4-4:1995, EN61000-4-
5:1995, EN61000-4-6:1996+A1, EN61000-4-11:1994, EN50130-4:1995+A1:1998.
1
dual streaming capability is data rate/frame rate dependent

e1600 User Manual, Issue 1 © Synectic Systems Group Ltd 2012. All Rights Reserved
Specifications subject to change. E&OE Page 6
1.2 Scope and Conventions
In this user manual you will find instructions for the following:
e1600 description
e1600 configuration –web based initial configuration and consequent configuration changes
configuring of an e1600 on a PSN and on Synergy
The following symbols are used to indicate important points and information:
Alert
Performing this action may affect system operation.
Note
Details useful information you should bear in mind.
Terms that you can find in the user interface are written in bold.

e1600 User Manual, Issue 1 © Synectic Systems Group Ltd 2012. All Rights Reserved
Specifications subject to change. E&OE Page 7
2 e1600 Hardware Description
2.1 Main Components
The e1600 encoder comprises of the following hardware components:
16 75ΩBNC PAL/NTSC standard definition analogue video inputs
16 mono audio inputs via 3.5mm stereo jacks
2 analogue video outputs
16 alarm inputs (normally closed or normally open contacts)
4 relay outputs (1A, 24V)
1 x RS485 or 1 x RS422 serial communications interface
1 user RS232 port
1 external eSATA hard drive plug*
1 audio output
1 VGA monitor port*
1 HDMI monitor port*
1 maintenance RS232 port
1 x IEC mains input (100 –240VAC)
4 USB ports
2 x RJ45 1000-BaseT Ethernet connectors
1 SFP type network port
Reset button
SD memory card slot*
Status LED
* For features to be supported in future product releases

e1600 User Manual, Issue 1 © Synectic Systems Group Ltd 2012. All Rights Reserved
Specifications subject to change. E&OE Page 8
2.1.1 Installation Requirements
When installing the e1600 unit you must ensure that the screens of the co-axial cables are
connected to the earth of the building installation and that the unit is connected to a power socket-
outlet with a protective earthing connection.
2.1.2 Mains Power
The mains power can be between 100 VAC and 240 VAC; AC 50 / 60 Hz.
2.1.3 Video Inputs
The e1600 unit has 16 Composite Video Inputs. The Video Inputs are used to connect PAL or NTSC
video cameras. The unit will auto-detect the connected video sources.
2.1.4 Audio Inputs
The e1600 has 16 mono audio inputs these are arranged as 8 ‘stereo’ type 3.5mm connectors.
2.1.5 Video Outputs
The video outputs are currently not enabled on the e1600 encoder
2.1.6 Alarm Inputs
Up to 16 alarm inputs can be configured on the e1600.
Two common / GND signals per connector block are provided for your convenience. Wire Alarm
inputs in accordance with the below diagram:

e1600 User Manual, Issue 1 © Synectic Systems Group Ltd 2012. All Rights Reserved
Specifications subject to change. E&OE Page 9
For Analogue end of line (EoL) the alarm is in the Closed condition when the system reads 1KΩand
in the Open condition when the system reads 2KΩ. The transition from 1KΩ to 2KΩ triggers an alarm
condition. Refer to the table below for details of the zone resistance and resulting conditions.
Zone Resistance Ω
Condition
0-720
Tamper Short Circuit
721-1300
Normal (Closed)
1301-12500
Alarm (Open)
12501 - ∞
Tamper Open Circuit
The maximum number of detectors that can be connected to a single alarm input is 10.
The standard wiring of a detector is:

e1600 User Manual, Issue 1 © Synectic Systems Group Ltd 2012. All Rights Reserved
Specifications subject to change. E&OE Page 10
2.1.7 Relay Output
There are four relay outputs that can be used to trigger other equipment.
The limit for the each output is 1A, 24V.
2.1.8 RS485 and RS422 Port
The connection point labeled RS485/422 can be used to connect to an RS485 or RS422 PTZ camera.
For RS485 connection please wire in accordance with the below diagram:

e1600 User Manual, Issue 1 © Synectic Systems Group Ltd 2012. All Rights Reserved
Specifications subject to change. E&OE Page 11
And for RS422 please wire in accordance with the below diagram:
2.1.9 RS232 Ports
The connection points labelled RS232 can be used to connect to a RS232 based controlling keyboard
or similar device. Please wire in accordance with the below diagram:

e1600 User Manual, Issue 1 © Synectic Systems Group Ltd 2012. All Rights Reserved
Specifications subject to change. E&OE Page 12
2.1.10 External hard drive plug
Use to connect an external eSATA hard drive be utilised for local video recording
2
2.1.11 Audio output
To connect an external speaker
2.1.12 USB ports
Use to connect USB devices (e.g. memory stick) to update firmware or for exporting recordings (to be
implemented in future version)
2.1.13 Ethernet Ports
The unit has two 1000BaseT Ethernet ports to be used to connect to your Network LAN / WAN.
2.1.14 SFP network port
Can be used to connect a SFP fibre module.
2.1.15 Reset button
To press the recessed Reset button you need to use a suitable fine pointed tool.
Pressing the Reset buttons will reset the unit.
2.1.16 SD memory card slot
Use to insert an SD memory card to be utilised for local video recording
3
.
2.1.17 LED
The LED will light up dim blue when the unit is powered up and will become brighter once the unit is
operational.
2
To be implemented in a future version
3
To be implemented in a future version

e1600 User Manual, Issue 1 © Synectic Systems Group Ltd 2012. All Rights Reserved
Specifications subject to change. E&OE Page 13
3 e1600 Configuration
The configuration of the e1600 is done from a PC via a simple Web interface.
Currently we recommend using Google Chrome or Firefox as your web browser for
performing the configuration.
3.1 Initial Configuration
The initial configuration is different depending on whether a DHCP server is set up for your network.
3.1.1 Configure with DHCP server present
If there is a DHCP server on your network on start-up, the e1600 unit will acquire an IP address.
You can then use Synxplorer to discover the unit and find out its IP address.
3.1.2 Configure without DHCP server present
The e1600 comes with the default IP address 192.168.100.123 and sub-net mask 255.255.255.0.
To perform the initial configuration of the unit connect it to a PC using a cross over network cable.
You now need to configure the PC to use an IP address within the same range as that of the e1600.
To do this on Windows 7 and Windows Vista go to Control Panel->Network and Sharing Center,
select Change Adaptor Settings in the panel on the left; on Windows XP go to Control->Network
Connections. The Network Connections dialog opens. In it right click on Local Area Connection
and click Properties in the context menu:

e1600 User Manual, Issue 1 © Synectic Systems Group Ltd 2012. All Rights Reserved
Specifications subject to change. E&OE Page 14

e1600 User Manual, Issue 1 © Synectic Systems Group Ltd 2012. All Rights Reserved
Specifications subject to change. E&OE Page 15
The Local Area Connection Properties dialog will be launched.
Select Internet Protocol Version 4(TCP/IPv4) in the list and then click Properties. The Internet
Protocol Version 4(TCP/IPv4) Properties dialog is launched.
Make sure that the Use the following IP address option is selected (if not click on it to select it).
Then type in an address in the range of that of the unit. For example type in 192.168.100.1 and
255.255.255.0

e1600 User Manual, Issue 1 © Synectic Systems Group Ltd 2012. All Rights Reserved
Specifications subject to change. E&OE Page 16
Click OK to close the Internet Protocol Version 4(TCP/IPv4) Properties dialog. Then click Close to
close the Local Area Connection Properties dialog.
Now open your internet browser and in the address bar type in the IP address of the unit:
192.168.100.123. The PC will connect to the unit and display the Home configuration page.
You need to Login. The default username and password are: admin, admin. See section 3.2.1 for
more details,
From the menu on the left select Network under General Settings. The Network Configuration
page is displayed.
From the Use DHCP or static IP? drop down list select Static IP.
Change the IP address, Subnet and Gateway fields with values suitable for your network.
You can then connect the unit to your network and you will be able to access it from other PCs on the
same subnet of the network.

e1600 User Manual, Issue 1 © Synectic Systems Group Ltd 2012. All Rights Reserved
Specifications subject to change. E&OE Page 17
3.2 Accessing the e1600 Configuration
Open your internet browser and in the address bar type in the IP address of the unit. The PC will
connect to the unit and display the Welcome page:
3.2.1 Login
You have to login to view the configuration pages. Click the Login button (indicated on the screen
shot above). The following Login screen is displayed:
Type in your Username and Password and click Login. The default Username and Password are
admin
admin.
The following home page is displayed:

e1600 User Manual, Issue 1 © Synectic Systems Group Ltd 2012. All Rights Reserved
Specifications subject to change. E&OE Page 18
From here you can access all the configuration pages for the e1600 unit.
To logout click the Logout button.
The menu on the left provides access to the various configuration pages (described in the sections to
follow)
3.2.2 Applying and Saving Changes
On each page there is an Apply button:
Clicking it applies the changes you made to the page.
Your settings will not be saved to the e1600 until you click the Save to Unit button.
To save the changes to the e1600 unit you have to click the Save to e1600 option at the top of the
page.

e1600 User Manual, Issue 1 © Synectic Systems Group Ltd 2012. All Rights Reserved
Specifications subject to change. E&OE Page 19
You will be prompted to confirm that you wish to save the changes.
Click Save to commit the changes.
3.3 General Settings
Under General Settings there are links to pages for unit, date and time, network and users
configuration, as well as the option to change the password for the currently logged in user.

e1600 User Manual, Issue 1 © Synectic Systems Group Ltd 2012. All Rights Reserved
Specifications subject to change. E&OE Page 20
3.3.1 Unit Configuration
To access the Unit Configuration page select Unit under General Settings.
To change the Unit Name type the new name in the edit field and clicking Apply. The Unit Name
must be between 2 and 63 characters long, and may contain only alphanumeric characters as well as
. - and _. If you type it an invalid name an error message is displayed.
For Video Standard select PAL or NTSC, depending on what is the video colour standard used in
your region. Click Apply to apply the changes.
Check the Enable access to Video View without logon tick box if you wish to allow video to be
viewed without having to log in to the system.
Click Apply to apply changes to the page and then click Save to e1600 option at the top of the page
to save your changes to the unit.
Table of contents