Synergy LCD1U-15-04 User manual

Toll Free : 1-888-865-6888
Tel : 510-226-8368
Fax : 510-226-8968

User
Manual
LCD1U-15-04/17-01/19-01
1U15 /17 /19 Rackmount
LCDKeyboardDrawerwith
USBKVMSwitch

Rev. : 1.0
P.1
1.TableOfContent
1.TableofContent P.1
2.ReadBeforeInstallation P.2
3.Introduction P.3
4.Features P.3
5.PackageContents P.4
6.Optional Accessories P.5
7.PeripheralProducts P.5
8.ImportantSafeguards P.6
9.StructureDiagram P.7
10.DimensionDiagram
LCD1U15-04-8/-16-KVM-n-u P.8
LCD1U17-01-8/-16-KVM-n-u P.9
LCD1U19-01-8/-16-KVM-n-u P.10
11.LCD Session
LCD MembraneDiagramP.12
LCD OSDControl
MainMenuP.12
Sub Menu P.13-14
ResolutionSettings
ForWindowsP.15
12.KVMSession
Front ViewP.17
RearViewP.18
Installation StepsP.19
Cascading P.20
13.StartUp P.21
HotKeyCommand P.21
HotKeyCommand OperationP.22-23
KVMOSDOperation
MainControlsP.24
Sub Controls P.25-30
14.FAQ P.31
15.TechnicalSpecification P.32-33
UserManual

Technical Notes
ForWindows98/98SE systems
HID(Human InterfaceDevice)drivermustbeinstalled prior tousing
the USB KVMswitch.Toinstallthe HIDdriver,firstconnectaUSB
keyboardandmicedirectlytocomputer(beforeinstalling KVMswitch)
then followthe Windowsinstallation instructions,thiswillinstallthe HID
devicedriverand allowthe useof theKVMswitch.
If amouserecognition errorisdisplayedduringsystemboot:
Windowsdidnotdetectamouseattached tothe computer.You can
safelyattachaserialmousenow.ToattachamousetoaPS/2mouse
port, youmust first turnthecomputeroff”
a)Press the Tab keyoncetoselect thecheck box.
b)Press the Space bar oncewhichwillplaceacheck inthebox
Donot showthismessage again”
c)Press the Enter keyonceand Windowswillcontinue tobootand
willthen recognizethe mouse.
OperatingSystem Compatibility
AnyUSB-
enabledoperatingsystemsuchasWindows®98,
Windows®98SE,Windows®2000,Windows®XP orhigher.
Windows®95arenotrecommendedbecauseofimmatureUSB
support.
Introduction
Note: Failuretodo somayresultinWindowsnot being abletodetect
keyboardand mouse.
Rev. : 1.0
P.2
2.ReadBeforeInstallation
UserManual

Rev. : 1.0
P.3
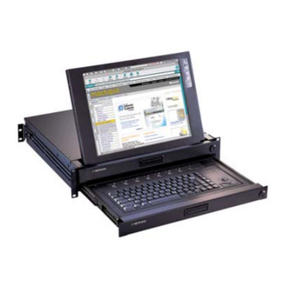
The unit isacombination ofkeyboard,mouseand monitorintoadrawer,
withfeaturessuchasflip-updesign, adjustablebrackets,builtinLCD OSDto
provide effectiveassistant foran administratortocontrolPCsystem.
The unit providescosteffectiveforyourlimited ITbudgetoverusingCRT
and rack mounting. Also, it willbe spacesavingforyourcompact environment
rack and effectiveassistant foran administratortocontrolPCsystem.
3.Introduction
4.Features
UserManual
Uniquemechanicaldesigntomaximizerack mountablespace
Adjustablemountingbracketsfrom390to790mm(fronttorear19”
mounts
Twokeyboardselectionssupportingmultiplelanguages
Threemodelstochoosefrom15”, 17”or19”LCD panel
DirectlycompatiblewithSUN Microsystemsresolution1152x900
Built-inSUN MicrosystemsHot Keywithout anyconverter
Slide railshavetwofixed positionstoprevent movement of thekeyboard
Suppliedwith12V5Aremotepoweradapter(singlepowersource)
Bulit-inKVMswitchfunction foreasy controlling and monitoring upto16
residing servers/platforms
SupporteightcharacterspasswordprotectionandsearchPCserver
name
Autoscan mode formonitoringPCsand flexiblescan timefrom5~99
seconds
HotPluggable—Add orremovecomputerswithoutpowering downthe
switch
EasilyswitchIndividualbutton toselectthe PCchannelusing the push-
button channelselectorswitches,HotKeys,orviathe On-Screen Display
(OSD)Menu
Disclaimer
Thisinformation issubjecttochange withoutnotice.Theproducerofthismanual acceptsno
responsibilityfordamage orclaims,resulting frommisuseormisinterpretation

Rev. : 1.0
P.4
5.PackageContents
Before Unpacking
It isvery importanttolocatetheLCD KeyboardDrawerinasuitableenvironment.
The surfaceforplacingand fixing the LCDKeyboardDrawershouldbe stableandlevel
ormounted intoasuitablecabinet.
Makesurethe placehasgood ventilation,isout ofdirect sunlight, awayfromsourcesof
excessivedust, dirt,heat, water,moistureand vibration.
Convenienceforconnecting the LCD KeyboardDrawertothe related facilitiesshouldbe
well considerstoo.
Unpacking
The LCD KeyboardDrawercomeswiththe standardpartsshownasabove. Checkand make
suretheyareincluded and ingood condition.Ifanything ismissing,ordamage,contactthe
supplierimmediately.
LCDMonitorDrawerwithUSB KVMSwitch1Piece
UserManual1Piece
DCPowerAdapter1Piece
PowerCord1Piece
Mounting Bracket1Pair
Fasteners4Pieces
6ft 2-in-1KVMcable8 Pieces
UserManual

Rev. : 1.0
P.5
6.OptionalAccessories
7.PeripheralProducts
ModelDescription
8-PortUSB KVMswitch
16-Port USB KVMswitch
CAT.5USB KVMextender
6ft/ 10ft / 15ftUSB 2-in-1cable
6ftUSB Cascadecable
VideoInput
24V / 48V DC Power Supply
KVM Cable
CascadeCable
Others
UserManual

Rev. : 1.0
P.6
Pleaseread allof theseinstructionscarefullybeforeyou usethe device.
Savethismanualforfuturereference.
UnplugtheLCD KeyboardDrawerfromthepoweroutletbeforecleaning.
Donotsprayliquidcleanersoraerosoldirectlyonthe device. Wetaclothwitha
neutraldetergent(e.g.cleanwater) andsqueezeittight,thencleanthescreen
slightlywithit.
DonotexposetheLCDKeyboardDrawerdirectlytorain,water,moistureor
sunlight.
Avoidpressureonthe LCD screentopreventpermanentdamagetothedisplay.
Donotattempttoservicethe deviceyourself. Improperoperationmayvoidyour
warranty. Referall servicingtoqualifiedservicepersonnel.
Safestorageenvironment oftheLCD KeyboardDrawerisrangingbetween –20oC
and60oC.Permanent damagecouldoccuriftheLCD KeyboardDrawerisstored
outside thesaferange.
UnplugtheLCDKeyboardDrawerimmediatelyandcallqualifiedservice
personnelunderthefollowingconditions:
1.Ifthe monitorhasbeen exposed torain,liquidorwater.
2.Ifthe monitorhasbeen dropped orthe casing hasbeendamaged.
Whatthewarrantydoes notcover
1.Anyproduct,onwhichtheserialnumberhasbeendefaced,modifiedor
removed.
2.Damage,deteriorationormalfunction resulting from:
a)Accident,misuse,neglect,fire,water,lightning,orotheractsofnature,
unauthorized productmodification,orfailuretofollowinstructionssupplied
withthe product.
b)Repairorattemptedrepairbyanyonenotauthorized byus.
c)Anydamageof theproductduetoshipment.
d)Removalorinstallationof the product.
e)Causesexternaltotheproduct, suchaselectricpowerfluctuation orfailure.
f)Useof suppliesorpartsnot meetingourspecifications.
g)Normalwearand tear.
h)Anyothercauseswhichdoesnotrelatetoaproduct defect.
3. Removal, installation, andset-upservicecharges.
8.Important Safeguards
UserManual

Rev. : 1.0P.7
9.StructureDiagram
1.Keyboard
2.Aluminiumfrontpanel
3.Class AactivematrixTFT LCD panel
4.Rearmetalcase
5.LCD inverter
6.LCD membrane
7.Ball bearing telescopicslideswithstopper
8.Adjustablemountingbracket
9.USB KVMswitch
•‚ƒ„…
‡ˆ†‰
‰
UserManual

Rev. : 1.0
P.8
LCD1U15-04-8/16-KVM-n-u 1U15”LCD KBDrawerwithUSB KVM
10.Dimension Diagram
UserManual
15”LCD

Rev. : 1.0
P.9
LCD1U17-01-8/16-KVM-n-u 1U17”LCD KeyboardDrawerw/USB KVM
10.Dimension Diagram
UserManual
17”LCD

Rev. : 1.0
P.10
LCD1U19-01-8/16-KVM-n-u 1U19”LCD KBDrawerw/USB KVM
10.Dimension Diagram
UserManual
19”LCD

Rev. : 1.0
P.11
LCD
Session
UserManual

Rev. : 1.0
P.12
LCD MembraneDiagram
Left Right Exit
Menu/SelectionPower
MAINMENU
BRIGHT/CONTRAST
AUTOADJUST
PHASE/CLOCK
H/VPOSITION
MISC
RESET
MainMenu
Bright/ Contrast
Toenterintothe Bright, Blacklevel&Contrast sub-menu
AutoAdjust
Toperformautomaticoptimisationsof allfunctions
An Adjusting”message isdisplayed duringthe process
Phase / Clock
Toenterintothe phase&clock sub menu
H/VPosition
Toenterintothe H/VPosition sub-menu
MISC
Toenterintothe MISCsub-menu
Reset
Reset tothedefaultfactorysettings
11.LCD Session
UserManual

Rev. : 1.0
P.13
Bright/ Contrast
1.Brightness
Toperformbrightness adjustment of the inputRGBsignal
UsetheLeft&Rightbuttontoadjust andbuttonto Brightness”
2.Contrast
Toadjust the contrastlevelof theinput signal
Usethe Left&Right button toadjust and button to Contrast”
Phase/ Clock
1. Phase
Toadjust input videosampling clock’sphase
Usethe Left&Right button toadjust and button to Phase”
2. Clock
Toadjust input videosampling clock
Usethe Left&Right button toadjust and button to Clock”
H/VPosition
1. H.Position
Toadjust the horizontalsizeof theframe
Usethe Left &Right button toadjustand buttonto H.position”.
2.V.Position
Toadjust the verticalpositionof theframe
Usethe Left&Right button toadjust and button to V.position”.
11.LCD Session
UserManual

Rev. : 1.0
P.14
MISC
1.Information
The firstheaderrowshowsthe current resolution setup
The second headerrowshowsthe horizontalfrequency ofthecurrent
input signal
The thirdheaderrowshowsthe verticalfrequency ofthecurrentinput
signal
2.OSDTimer
Tomodifythe durationof theOSDtime-out
3.Color
a) 5500K
Select ColourTempat 5500K
b)6500K
Select ColourTempat 6500K
c) 9500K
Select ColourTempat 9500K
d)User
Change ColourTempbymanual
4.Language
Toselectthelanguageof OSDmenu 7Languages:
(1)English
(2)Japanese(日本語)
(3)Chinese(中文)
(4)German
(5)Francais
(6)Espanol
(7)Italiano
11.LCD Session
UserManual

Rev. : 1.0
P.15
ResolutionSettings
ForMicrosoftWindows
Step1 –Pressrightclickon the desktop
Step2 –Choose Properties”
Step3 –Change the Screen Resolution”
Step4 –Change the Screen refreshrate”
11.LCD Session
UserManual

Rev. : 1.0
P.16
KVM
Session
UserManual

Rev. : 1.0
P.17
FrontView
ChannelSelect Button
Selected Channel BankButton
BankNo.
Shift ButtonOnlineChannel
LEDIndication
Selected Channel-Displayedchannelonmonitor &redinLED.
Channelselect button-Press toselect channelfrom1 –8.
Shiftbutton-Press &Holdfollowwithachannelbutton
toselect channelfrom9 –16.
OnlineChannel-GreenLEDstatethePChasconnected
andpoweron.
Bankno.-Displaythe Bankno. from1 –8.
Bankbutton -Select the bankfrom1 –8(forcascade only).
12. KVMSession
UserManual

Rev. : 1.0
P.18
12. KVMSession
RearView
Cascade
Port
Channel
Port
DC
Power
LCD1U-15-04/17-01/19-01-8-KVM-n-u
LCD1U-15-04/17-01/19-01-16-KVM-n-u
DC Power -connect toexternal12VDC poweradapter.
CascadePort -connecttoadditionalKVMswitchforchannel
expansion.
ConsolePort-connecttomonitor, PS/2keyboard&mouse.
Channel Port -connecttoPCcomputerwith6-ft 2-in-1USB KVMcable.
UserManual
This manual suits for next models
2
Table of contents
Other Synergy LCD Drawer manuals