Synesthesia Mandala Synapse User manual

User Manual
Synesthesia Corp. ©2013

!
2!
CONTENTS
!
!
Overview……………………………………………………………. 3
Synapse Hardware Diagram ………….………………………….. 4
!
Synapse Software Parameters ………..……………….………….. 5
Input 1 & 2: Kick 1 & Kick 2 ……....………….…..……....... 6
Input 3: Hat………………..…………….…………..……….. 6
or Expression ………………….…………….……… 7
Input 4: Expression…………………………………….…...... 8
!
Setup……………………………………………….…………….…. 8
!
Calibrating Synapse to your Pedals …………………………..….. 9
Input 1 & 2: Calibrating for eKick Pedals………….….……... 9
Input 3: Calibrating for eHat Pedal…………………….…...… 10
or Calibrating for 2nd Expression Pedal ……………... 12
Input 4: Calibrating for Expression Pedal………………..….... 12
Synapse Tools ………..………………………………………......… 13
Raw Mode………….….……................................................... 13
Enter Bootload …………………………………….…………. 13
Factory Reset ……………………………………….………... 14
!
!

!
3!
OVERVIEW
Synapse has one primary function: To convert analog electronic drum and
expression pedals to USB MIDI. The Synapse as a pedal instrument is
recognized by your computer as a device named "Mandala Synapse".
Setting your audio software to receive from MIDI device "Mandala
Synapse" will result in pedal signals being available to trigger and control
many aspects of your sound and music.
The main additional function of the Synapse is to be a hub for USB devices.
USB devices connected to Synapse's USB inputs are recognized by your
computer by their normal device names just as if you had connected them
through a standard powered USB hub.
This short User Manual focuses on the pedal aspect of the Synapse because
the hub aspect simply connects devices you are already familiar with directly
to your computer, but the pedal aspect is new territory.
Synapse Settings software allows you to customize the settings for the feel,
response and output of the pedals you connect to the Synapse hardware. All
software settings are transmitted instantly into the Synapse box and saved to
internal memory as you change them. Once you configure your Synapse for
your pedals you might not ever run the Settings software again. The
hardware will be set from then on and ready to perform consistently just as
you've configured it.
* SYNAPSE REQUIRES TRS (Stereo) ¼” CABLES FOR ALL PEDALS *
Note: Every parameter in the Mandala Synapse Settings software has
rollover help if you hover the cursor over the names of the settings.

!
4!
SYNAPSE HARDWARE DIAGRAM
Fig. 1) Typical Synapse Setup
*SYNAPSE REQUIRES TRS (Stereo) ¼” CABLES FOR ALL PEDALS*

!
5!
SYNAPSE SOFTWARE PARAMETERS
This section is for the purpose of understanding the parameters of the
Synapse software and hardware before connecting your equipment and
getting it all running.
Fig. 2) Synapse Settings main (and only!) window

!
6!
Input 1 & 2: KICK 1 & KICK 2
MIDI NOTE - Which MIDI note will be transmitted when you trigger the
kick pedal
NOTE LEN - How long the MIDI note will stay on once it is triggered.
This setting is approximately 60 ticks per second, with a special setting of 0
= infinity
MIDI CHAN - The MIDI channel that the triggered MIDI note will be
transmitted on
STRENGTH – A parameter to alter how much your foot power is amplified
toward the maximum velocity level
SENSITIVITY - How softly the pedal needs to be tapped in order for a
trigger to occur. 1 means a hard kick is required, 9 means a light touch
should do it. Beware of unwanted triggers at high sensitivity settings!
VELOCITY - This is a graphic table showing the response curve for your
kick trigger velocities as determined by the following settings:
Curve - Adjust the velocity curve to anywhere from 0 (Linear)to
various degrees of – (Exponential)or + (Logarithmic)
Max - The maximum velocity of a kick trigger
Min - The minimum velocity of a kick trigger
Input 3: HAT
CTRLR # - The MIDI controller number the hat pedal will transmit
controller values on as it moves between open and closed
MIDI CHAN - The MIDI channel that the MIDI controller values and
triggered MIDI note will be transmitted on
MIDI NOTE - Which MIDI note will be transmitted when you trigger the
hat pedal by closing it completely

!
7!
NOTE LEN -How long the MIDI note will stay on once it is triggered.
This setting is approximately 60 ticks per second, with a special setting of 0
=infinity
STRENGTH - A parameter to alter how much your foot power is amplified
toward the maximum velocity level when the pedal is stomped
FEEL – Some hat pedals need a bit of ‘feel’ dialed into them in order to get
the desired trigger response. Most pedals can have this set to 0.
VELOCITY - This is a graphic table showing the response curve for your
hat trigger velocities as determined by the following settings:
Curve - Adjust the velocity curve to anywhere from 0 (Linear)to
various degrees of –(Exponential)or + (Logarithmic)
Max - Set the maximum velocity of a hat trigger
Min - Set the minimum velocity of a hat trigger
Cal Open - Using your foot, position the pedal fully open (heel down) and
click here to calibrate
Cal Closed - Using your foot, position the pedal fully closed (toe down) and
click here to calibrate
Input 3: EXP
If you would like to use two expression pedals with the Synapse (Input 3 and
Input 4 instead of only Input 4) there is an option to assign Input 3 as an
EXP input instead of a HAT input. Click “EXP” at the top of the column to
switch Input 3 to EXP from HAT.
CTRLR # - The MIDI controller number the expression pedal will transmit
controller values on as it moves between open and closed
MIDI CHAN - The MIDI channel that the MIDI controller values will be
transmitted on
CURVE - Choose an output curve for the controller value output

!
8!
Cal Open - Using your foot, position the pedal fully open (heel down) and
click here to calibrate
Cal Closed - Using your foot, position the pedal fully closed (toe down) and
click here to calibrate
Input 4: EXP
CTRLR # - The MIDI controller number the expression pedal will transmit
controller values on as it moves between open and closed
MIDI CHAN - The MIDI channel that the MIDI controller values will be
transmitted on
CURVE - Choose an output curve for the controller value output
SETUP
Please carry out the following steps in the order they are presented to get
your Synapse up and running:
-Download the Synapse Settings software (PC or Mac) from
http://synesthesiacorp.com/downloads
-Connect the included power adaptor to the Synapse “DC In”jack and plug
the adapter into a standard electrical outlet
-Connect the Synapse to your computer using the included USB cable
-Check Device Manager/Devices and Printers (PC) or the MIDI Window of
Audio MIDI Setup (Mac) to verify that your computer recognizes "Mandala
Synapse". If your Mac recognizes it as “USB MIDI Device”please
disconnect then highlight and delete the “USB MIDI Device”icon and
reconnect so you see the “Mandala Synapse”icon.

!
9!
-Open the Synapse Settings software that you just downloaded
-The software will automatically search for your Synapse, connect with it,
and poll it for all of its current internal settings and display them on the
screen
-Connect your eKick, eHat and Expression pedals to the Synapse. Please
use TRS (stereo) ¼” cables for all Synapse pedal inputs
-At any time you can connect up to 6 USB devices (such as Mandala
Drums) to the USB inputs of the Synapse as well
-Now you can customize the operational parameters of each of the Synapse
pedal inputs [See Below: “Calibrating Synapse to your Pedals”]
-Open your favorite audio software and set it to receive MIDI input from
‘Mandala Synapse’ and play away
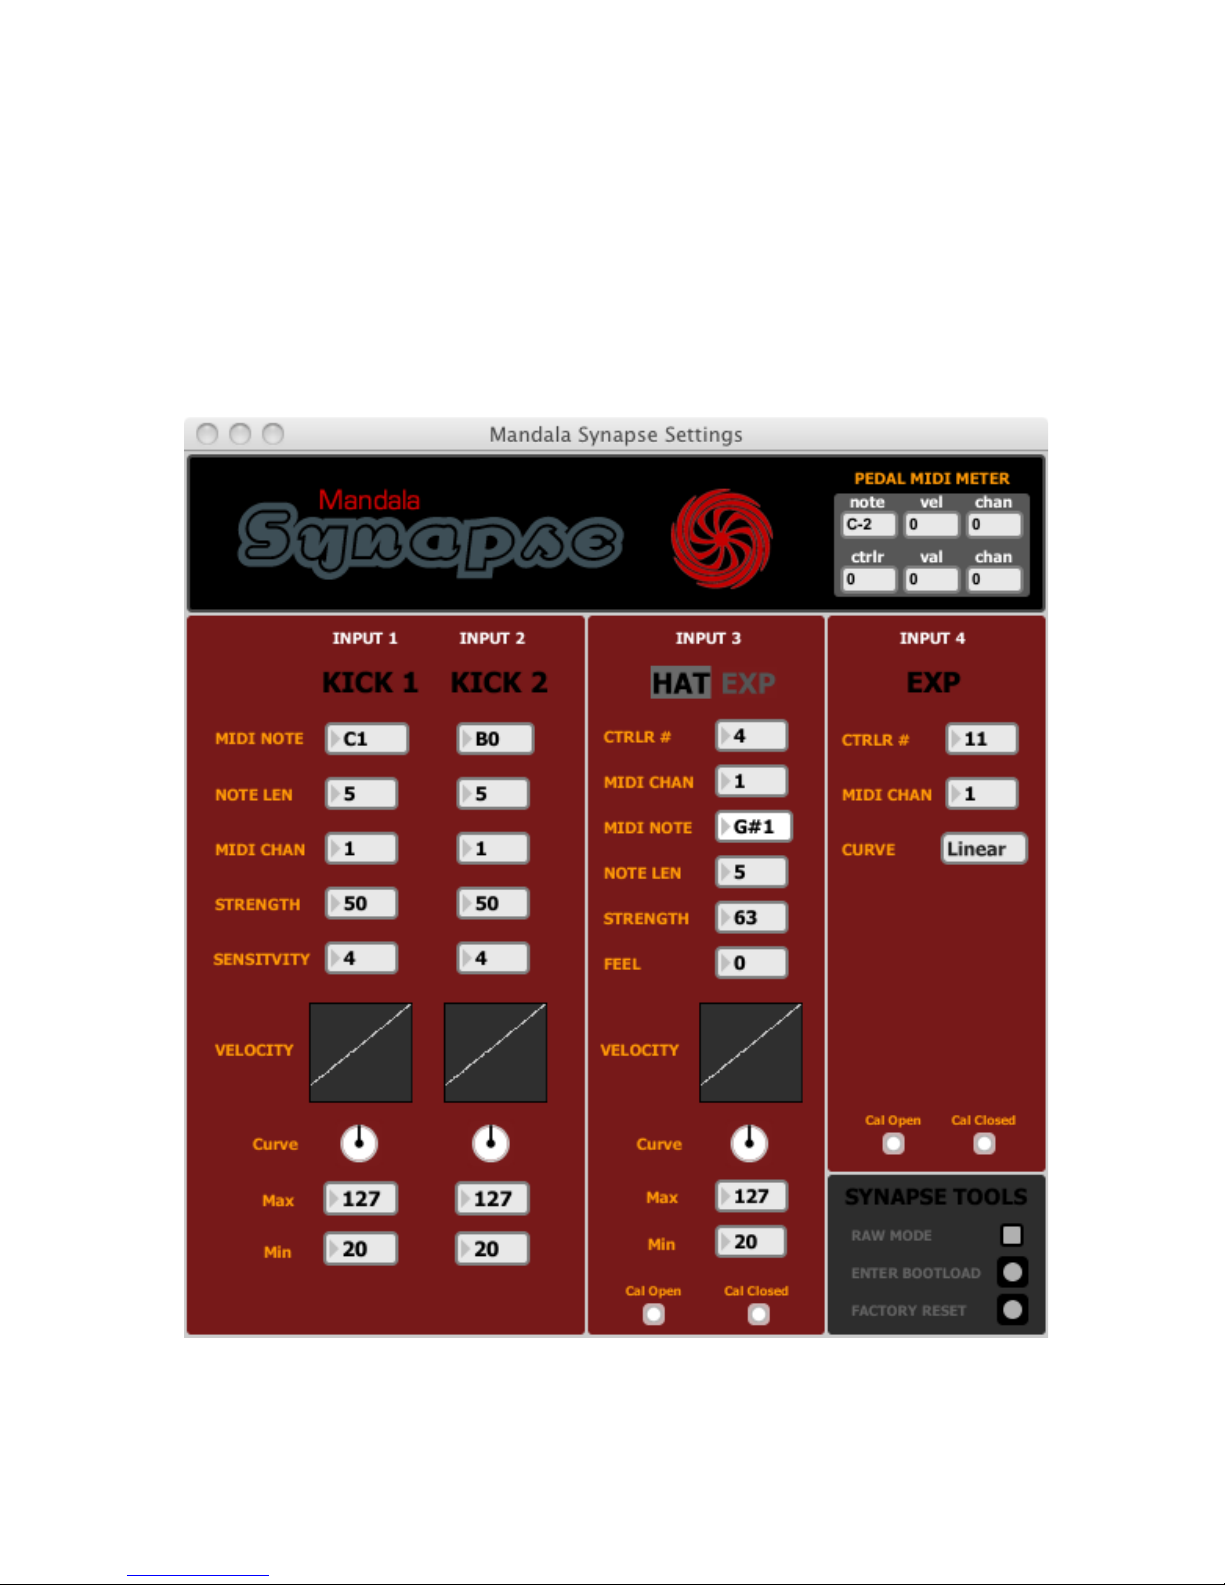
CALIBRATING SYNAPSE TO YOUR PEDALS
Synapse can be configured to work with a wide variety of electronic pedals.
Out-of-the-box, Synapse is factory calibrated for basically any eKick pedals
(Inputs 1 & 2), a Roland FD-8 Hat pedal (Input 3), and a Roland FV50L
Expression pedal (Input 4).
Input 1 & Input 2: KICK 1 and KICK 2
Calibrating Synapse to your eKick pedals
-Most eKicks will work on Synapse Inputs 1 & 2 by just going with the
Synapse out-of-the-box factory settings.
You might want to adjust the “Strength”parameter for each kick to set how
easily it reaches full velocity on your hardest kicks. You might also want to
adjust the “Sensitivity”parameter to set how easy it is to trigger the kick on

!
10!
your softest kicks. Beware that too high of a Sensitivity setting can result in
unwanted triggers. All other parameters in the Kick columns of the software
are related to MIDI output.
For additional thinning or fattening of the input signals from your eKicks
you can adjust the trimmers for Input 1 and Input 2 on the bottom of the
Synapse. These trimmers were set before shipping and will generally
remain quite far in the clockwise direction.
Pedal Input 3: HAT
Calibrating Synapse to your eHat pedal
There is definitely more than one way within the Synapse parameters to get
the response you desire from your eHat. Below are approximate Synapse
Input 3 software settings and Input 3 trimmer (located on bottom of Synapse
unit) settings for a number of eHat pedals [factory preset is for a Roland FD-
8]. Also, some pedals are more worn out than others but Synapse software
allows you to correct for that lack of pedal performance. These are just
suggested settings. If your pedal is not in this list then please follow the
instructions below for “Other Pedals”.
Yamaha HH65
Dial trimmer to full clockwise
Strength =87
Feel = 0
Curve = +5(Log)
Set pedal open and click Cal Open
Press pedal down and click Cal Closed
Alesis RealHat
Enter Raw Mode
Dial trimmer until Raw Mode output = ~50 with pedal open and click Cal Open
Press pedal until Raw Mode output = ~900 and click Cal Closed
Exit Raw Mode
Strength = 43
Feel = 0
Curve = -10 (Exp)

!
11!
Simmons Hi-Hat Controller
Dial trimmer to full clockwise
Strength = 80
Feel = 0
Curve = +5 (Log)
Set pedal open and click Cal Open
Press pedal down and click Cal Closed
Roland FD-7 and FD-8
Enter Raw Mode
Dial trimmer so Raw Mode output = ~166 with pedal open
Exit Raw Mode
Strength = 53
Feel = 0
Curve = 0 (Linear)
Set pedal open and click Cal Open
Press pedal down and click Cal Closed
HAT Kat
Enter Raw Mode
Dial trimmer so Raw Mode output = ~200 with pedal open
Exit Raw Mode
Strength = 90
Feel = 25
Curve = -7
Set pedal open and click Cal Open
Press pedal down and click Cal Closed
Other Pedals
Here are the 6steps you should take to calibrate Synapse for your eHat:
1. Enter Raw Mode
2. Adjust Input 3 trimmer on bottom of unit until Raw Mode output is at
least 40 and you get the widest possible Raw Mode output range when pedal
moves from fully open to fully closed
3. Click Cal Open with pedal fully open
4. Click Cal Closed with pedal fully closed
5. Exit Raw Mode
6. Set Strength/Feel/Curve to your taste (most pedals only need Feel = 0)

!
12!
Pedal Input 3: EXP
(use this for a 2nd Expression pedal if desired)
Calibrating Synapse to your Expression pedal when connected
to Input 3
-Position the blue trimmer on the bottom of the Synapse under Input 3
"Hat/EXP" to fully counterclockwise
-Enter Raw Mode and move your expression pedal from fullyopen (heel
down) to fullyclosed (toe down) and notice the number changing in the
indicator box next to "Input 3" in the program
-Turn the trimmer slowly clockwise as you rock the pedal back and forth
from fullyopen to fullyclosed until you find the trimmer position where you
are getting the largest range of numbers in the indicator box as the pedal
swings its full range
-Exit Raw Mode
-Position your pedal fully open (heel down) and click the "Cal Open" button
at the bottom of the Input 3: EXP column
-Position your pedal fully closed (toe down) and click the "Cal Closed"
button at the bottom of the Input 3: EXP column
-Look at the MIDI Meter (in the upper right of the program) to see your
MIDI controller output successfully cover the full MIDI range from 0 to 127
as you rock your pedal from open to closed
- Finish by configuring the other parameters in the Input 3: EXP column to
your liking
Pedal Input 4: EXP
Calibrating Synapse to your Expression pedal
-Position the blue trimmer on the bottom of the Synapse under Input 4
"EXP" to fully counterclockwise

!
13!
-Enter Raw Mode and move your expression pedal from fullyopen (heel
down) to fullyclosed (toe down) and notice the number changing in the
indicator box next to "Input 4" in the Settings program
-Turn the trimmer slowly clockwise as you rock the pedal back and forth
from fullyopen to fullyclosed until you find the trimmer position where you
are getting the largest range of numbers in the indicator box as the pedal
swings its full range
-Exit Raw Mode
-Position your pedal fully open (heel down) and click the "Cal Open" button
at the bottom of the Input 4: EXP column
-Position your pedal fully closed (toe down) and click the "Cal Closed"
button at the bottom of the Input 4: EXP column
-Look at the MIDI Meter (in the upper right of the program) to see your
MIDI controller output successfully cover the full MIDI range from 0 to 127
as you rock your pedal from open to closed
-Finish by configuring the other parameters in the Input 4: EXP column to
your liking
SYNAPSE TOOLS
RAW MODE - This makes two indicator boxes appear (next to Input 3 and
Input 4) which show raw data values streaming from your Input 3 and Input
4 pedals. Raw Mode can help while setting the trimmers on the bottom of
the Synapse to get maximum dynamic range from your particular pedals.
[See above “Calibrating Synapse to Your Pedals”]
ENTER BOOTLOAD - Only press here if Synesthesia Corp. has contacted
you regarding a firmware update. Pressing here will drop communication
with your Synapse and enter it into ready mode to receive a firmware
update. If you press here accidentally you will need to quit the program and

!
14!
reconnect your Synapse and open the program again to continue.
FACTORY RESET - Pressing here will erase all settings in your Synapse
and return it to factory calibration. Factory calibration is roughly set to most
any eKick, a Roland FD-8 Hat pedal, and a Roland FV50L Expression
pedal.
Table of contents