Systium Technologies Ready 113 User manual

SySTIUM®TECHNOLOGIES MotherBoard ReadySM System • MODEL 133
Copyright © 2013, SySTIUM® Technologies, LLC
PN: 91456-01 Rev 03
USER QUICK START GUIDE
Product Safety Warnings
WARNINGS
Ensure that the computer is disconnected from its power
source and from all telecommunications links, networks, or
modem lines whenever the chassis cover is removed. Do not
operate the computer with the cover removed.
AVERTISSEMENT
Assurez vous que le système soit débranché de son
alimentation ainsi que de toutes les liaisons de
télécomunication, des réseaux,et des lignes de modem avant
d’enlever le capot. Ne pas utiliser le système quand le capot
est enlevé.
WARNUNG
Das System darf weder an eine Stromquelle angeschlossen
sein noch eine Verbindung mit einer
Telekommunikationseinrichtung, einem Netzwerk oder einer
Modem-Leitung haben, wenn die Gehäuseabdeckung entfernt
wird. Nehmen Sie das System nicht ohne die Abdeckung in
Betrieb.
AVVERTENZA
Prima di rimuovere il coperchio del telaio, assicurarsi che il
sistema sia scollegato dall’alimentazione, da tutti i
collegamenti di comunicazione, reti o linee di modem. Non
avviare il sistema senza aver prima messo a posto il
coperchio.
ADVERTENCIAS
Asegúrese de que cada vez que se quite la cubierta del chasis,
el sistema haya sido desconectado de la red de alimentación y
de todos lo enlaces de telecomunicaciones, de red y de líneas
de módem. No ponga en funcionamiento el sistema mientras
la cubierta esté quitada
Wireless Antenna Safety Warnings
WARNING
The Model 133 is NOT to be connected to an outdoor
antenna or any type of cable distribution system. A built-in
(Integral) indoor antenna such as the ones used in wireless
routers or hubs is acceptable.
Connect the Peripheral & Power Cables
Connect the peripherals (Keyboard, Mouse, Video, etc.) required
for correct operation of the computer system. Refer to the
enclosed diagram of the specific Model 133 and motherboard
combination for the location and function of the various peripheral
connectors on the system. If you are unsure what model of
motherboard is installed, then locate the diagram that matches
the system. The function of the connectors is standard for
different motherboards.
NOTE
All of the external peripheral cables are designed such that the
connector can only be inserted in one orientation. Check the
orientation of the connector if the cable will not connect easily. Do
not use excessive force to connect a cable.
Check that the power cord supplied is designed and approved for
power connections. If you are unsure of the power cords
suitability, check with the safety approval agency in your region
of the world. If the power cable supplied is not suitable please
review the instructions in the section “Power Cord Replacement”.
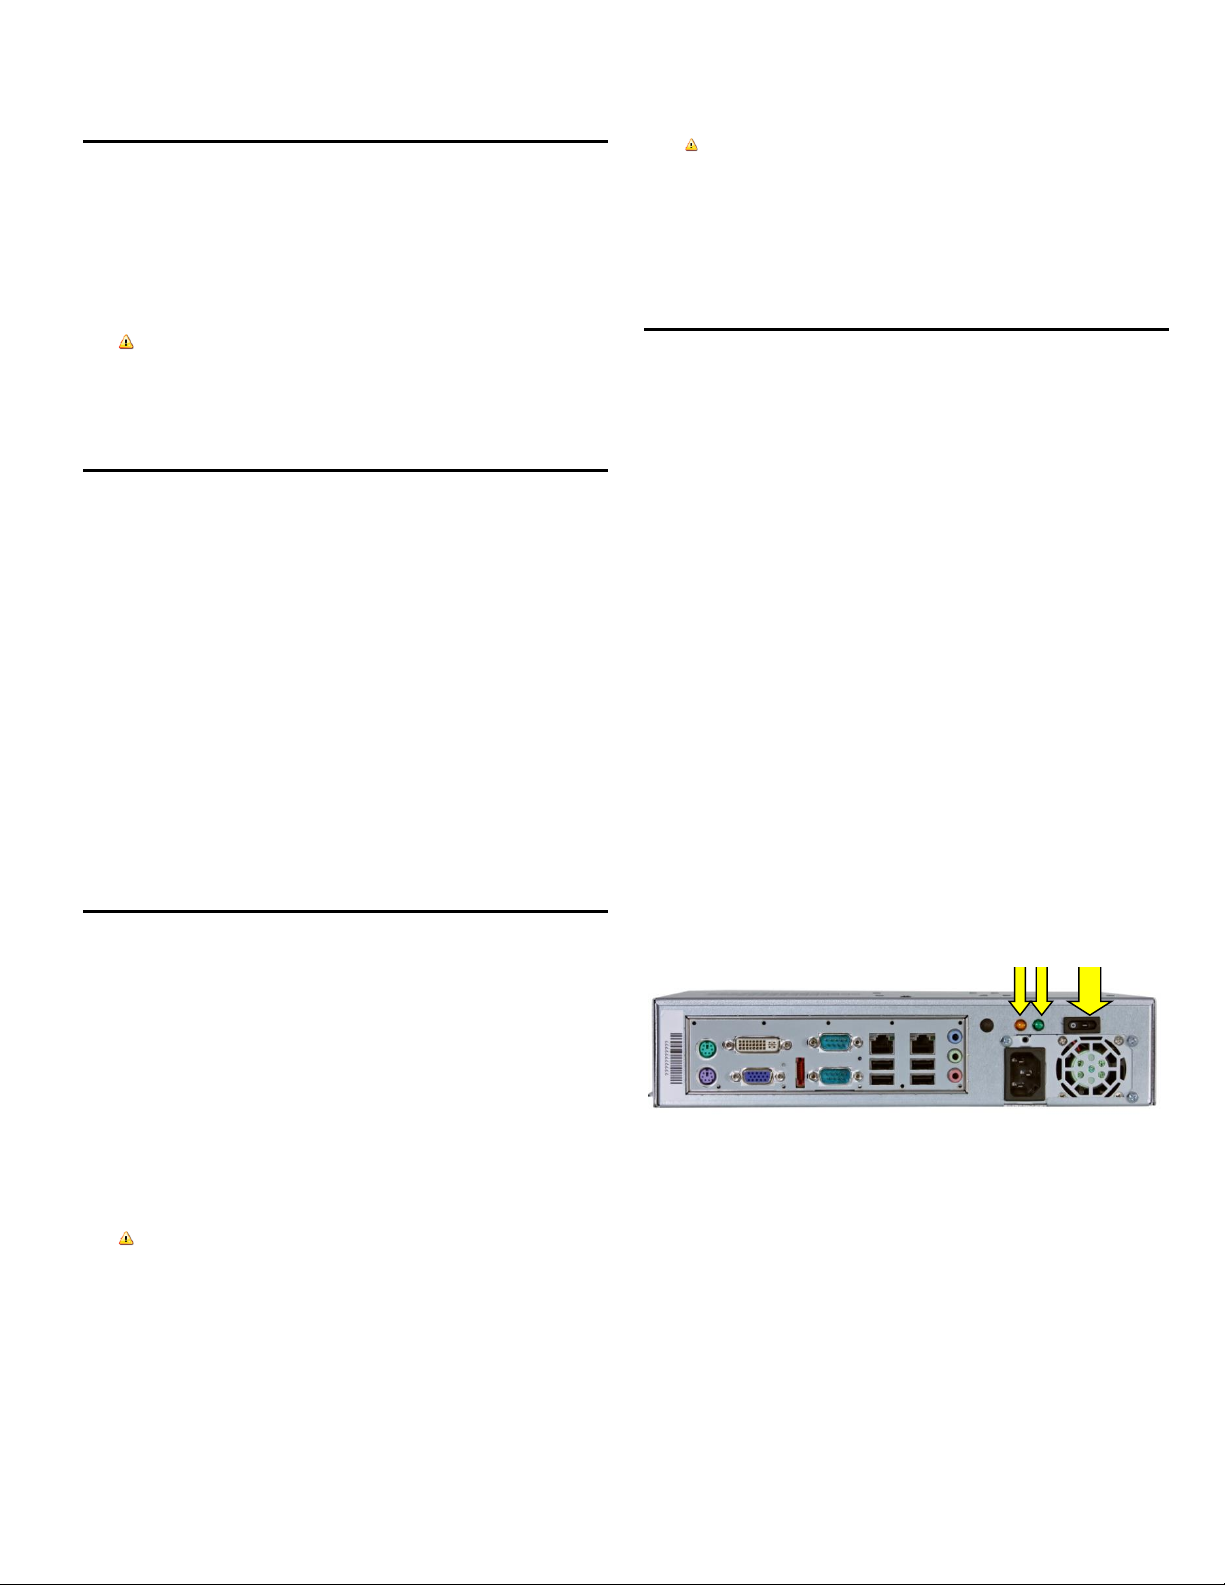
Before connecting the power cord to the system make sure the
power supply is set for the correct voltage operating range for
your region. Refer to the enclosed diagram of the specific Model
133 and motherboard combination for the location and
instructions for setting the computer system’s operating voltage
setting.
Warning
The power supply voltage standby circuit is active when the
computer is turned off. Ensure that the computer is
disconnected from its power source and from all
telecommunications links, networks, or modem lines whenever
the chassis cover is removed. Do not operate the computer
with the cover removed.
Power Cord Replacement
WARNING
Do not attempt to modify or use the supplied AC power cord if
it is not the exact type required.
In some cases, the power cord supplied with this system may not be
compatible with the AC wall outlet in your region. If this is true, you must
obtain a suitable power cord that meets the following criteria:
The cord must be rated for use at the AC voltage available,
with a current rating that is at least 125% of the current rating
of the product.
The AC plug end must be terminated in a grounding-type male
plug designed for use in your region. The plug ends must be
labeled or marked to indicate they have been certified by an
agency acceptable in your region.
The connector at the product end must be an IEC 320, sheet
C13, female connector (or the equivalent EN 60 320
connector).
The cord must be less than 14.8 feet (4.5 meters) long and, for
use in Europe, be created with <HAR> (harmonized) or VDE
certified cordage.

SySTIUM®TECHNOLOGIES MotherBoard ReadySM System • MODEL 133
Copyright © 2013, SySTIUM® Technologies, LLC
PN: 91456-01 Rev 03
Turning on the Computer
Your computer is supplied with an advanced power supply that
allows the operating system to control the power supplies
operation. The power switch on the power supply is used to
initially enable power to the system. (See the enclosed
Installation Diagram) The front power switch is then used to turn
the system on or to put the system into a sleep mode. (See
Figure 1) The power switch can also be used to turn off the
computer before the operating system is completely loaded.
WARNING
TO PREVENT ACESS TO HIGH ELECTRICAL ENERGY PARTS.
DO NOT REMOVE THE COVERS WHILE THE SYSTEM IS
POWERED ON!
Power-on Self-Test
Each time you turn on the Computer, the power-on self-test
(POST) runs automatically and checks the system motherboard,
CPU module, memory, keyboard, and most installed peripheral
devices.
NOTE:
If the system halts before POST completes running and emits a beep
code indicating a fatal system error or displays a POST failure
message on the monitor, contact your service representative or
supplier for assistance.
The POST will also display the message “Press <F2> key if you
want to run SETUP.” You have about five seconds to press <F2>
to enter setup before the boot process will continue.
The computer will then start the operating system. Please refer to
the documentation supplied with the operating system for further
information on operating the computer.
Shutting off Your Computer
Your computer is equipped with a power supply that supports the
“Soft-OFF” feature of operating systems that support the ACPI
1.0 or APM standard 1.1 or higher. The “Soft-OFF” feature allows
the operating system to turn off the power supply automatically
once it is ready to shutdown the system.
Please refer to the manual supplied with your operating system
to determine how to shut down your computer.
NOTE
It is possible to turn the computer off using the front panel switch
while the computer has the operating system loaded and is
operational. Pushing in the power switch and holding the switch in
until the computer shuts off. Release the switch.
Caution
Doing this may result in a loss of data and corruption of the
computer operating system or application. The computer
should only be shut off using the front power switch when the
operating system becomes unavailable for shutting off the
computer.
WARNING
Your computer is never totally powered off unless the
computer is disconnected from the ac outlet. Never open the
computer without removing the AC power cord from the AC
inlet.
Rear Panel Controls
The rear panel of your computer has the power control switch
and the activity indicators used for daily operation. Refer to
Figure 1 below for the rear panel layout.
A. Power control switch. Press and release to turn on the
computer. Once the operating system is completely
loaded and the computer is operational the computer
should only be turned off using the operating system.
1. It is possible to turn the computer off using the front
panel switch while the computer has the operating
system loaded and is operational. Push in the
power switch and hold the switch in until the
computer shuts off. Release the switch.
B. Power on/off. LED is green when the computer is on.
When the computer is in a powered off state the LED is
not on.
C. Hard disk light. Turns on when the computer reads or
writes data to a hard disk. The LED is orange when on.
FIGURE 1
A
C B

SySTIUM®TECHNOLOGIES MotherBoard ReadySM System • MODEL 133
Copyright © 2013, SySTIUM® Technologies, LLC
PN: 91456-01 Rev 03
BATTERY REPLACEMENT INSTRUCTIONS
HOW TO REPLACE THE BATTERY
When your computer is turned off, a lithium battery keeps the
time of- day clock and the values in CMOS RAM current. Figure
B.1 shows the location of the battery.
The battery should last about seven years. When the battery
begins to die, it loses voltage; when the voltage drops below a
certain level, the Setup program settings stored in CMOS RAM
(for example, the date and time) might not be accurate. Replace
the battery with an equivalent one.
TO REPLACE THE BATTERY, FOLLOW THESE STEPS:
1. Turn off all peripheral devices connected to the
computer. Turn off the computer. Disconnect the power
cord.
2. Remove the computer cover. Locate the battery on the
motherboard (see Figure B.1).
3. With a medium flat-bladed screwdriver, gently pry the
battery free from its socket.
Note the orientation of the “+” and “-” on the battery.
4. Install the new battery in the socket, orienting the “+”
and “-”correctly.
5. Replace the computer cover.
FIGURE B.1
NOTE
Do not expose batteries to excessive heat or fire. Keep all batteries
away from children. Spent batteries must be disposed of at an
approved recycling or disposal facility or in accordance with federal,
state, provincial, municipal or local environmental control
requirements. The customer agrees to abide by such disposal
requirements as may exist in their jurisdiction and to indemnify
SySTIUM® Technologies for any failure to do so.
WARNING
Danger of explosion if the battery is incorrectly replaced.
Replace only with the same or equivalent type recommended
by the equipment manufacturer. Discard used batteries
according to manufacturer’s instructions.
ATTENTION
Il y a danger d’explosion s’il y a remplacement incorrect
de la batterie. Remplacer uniquement avec une batterie du
méme type ou d’un type recommandé par le constructeur.
Mettre au rebut les batteries usagées conformément aux
instructions du fabricant.
ADVARSEL!
Lithiumbatteri - Eksplosionsfare ved fejlagtig håndtering.
Udskiftning må kun ske med batteri af samme fabrikat og
type. Levér det brugte batteri tilbage til leverandøren.
ADVARSEL
Lithiumbatteri - Eksplosjonsfare. Ved utskifting benyttes kun
batteri som anbefalt av apparatfabrikanten. Brukt batteri
returneres apparatleverandøren.
VARNING
Explosionsfara vid felaktigt batteribyte. Använd samma
batterityp eller en ekvivalent typ som rekommenderas av
apparattillverkaren. Kassera använt batteri enligt
fabrikantens instruktion.
VAROITUS
Paristo voi räjähtää, jos se on virheellisesti asennettu. Vaihda
paristo ainoastaan laitevalmistajan suosittelemaan tyyppiin.
Hävitä käjtetty paristo valmistajan ohjeiden mukaisesti.

SySTIUM®TECHNOLOGIES MotherBoard ReadySM System • MODEL 133
Copyright © 2013, SySTIUM® Technologies, LLC
PN: 91456-01 Rev 03
PRODUCT REGULATORY COMPLIANCE
Radio Frequency Interference Notice
(USA)
This equipment has been tested and found to comply with the
limits for a Class B digital device, pursuant to Part 15 of the FCC
Rules. These limits are designed to provide reasonable
protection against harmful interference in a residential
installation. This equipment generates, uses, and can radiate
radio frequency energy and, if not installed and used in
accordance with the instructions, may cause harmful interference
to radio communications. However, there is no guarantee that
interference will not occur in a particular installation. If this
equipment does cause harmful interference to radio or television
reception, which can be determined by turning the equipment off
and on, the user is encouraged to try to correct the interference
by one or more of the following measures:
Reorient or relocate the receiving antenna.
Increase the separation between the equipment and the
receiver.
Connect the equipment into an outlet on a circuit different
from that to which the receiver is connected.
Consult the dealer or an experienced radio/TV technician for
help.
Any changes or modifications not expressly approved by the
grantee of this device could void the user's authority to operate
the equipment. The customer is responsible for ensuring
compliance of the modified product.
Only peripherals (computer input/output devices, terminals,
printers, etc.) that comply with FCC class B limits may be
attached to this computer product. Operation with noncompliant
peripherals is likely to result in interference to radio and TV
reception.
All cables used to connect to peripherals must be shielded and
grounded. Operation with cables, connected to peripherals that
are not shielded and grounded may result in interference to radio
and TV reception.
Manufacturer: SySTIUM® Technologies, LLC
New Hope, MN
763-537-3600
Contact: Customer Support
Radio Frequency Interference
Notice (CDN)
This Class B digital apparatus complies with Canadian ICES-003.
Cet appareil numérique de la classe B est conforme à la norme
NMB-003 du Canada.
Declaration of the Manufacturer or
Importer
This system is compliant with Low Voltage Directive 2006/95/EC
using the standard IEC 60950-1:2005 (2nd Edition); Am 1:2009
according to EN 60950- 1:2006/A11:2009/A1:2010/A12:2011.
This system is compliant with EU directive 2004/108/EC using
the standards EN 55022 and EN 55024.
SAFETY COMPLIANCE
UL 60950-1 Second Edition; CSA60950-1-07 Second Ed., AM 1:2009
Information Technology Equipment - Safety - Part 1: General
Requirements
EN 60950- 1:2006/A11:2009/A1:2010/A12:2011;
The Standard for Safety of Information Technology Equipment
including Electrical Business Equipment. (European Union)
“EN 60950 compliance”
IEC 60950-1:2005 (2nd Edition); Am 1:2009
The Standard for Safety of Information Technology Equipment
including Electrical Business Equipment. (International)
EMC COMPLIANCE
FCC Class B
Title 47 of the Code of Federal Regulations, Parts 2 & 15, Subpart B,
pertaining to unintentional radiators. (USA) “EMI
regulations” “FCC compliance”
CISPR 22; 2003
Limits and methods of measurement of Radio Interference
Characteristics of Information Technology Equipment.
(International) “CISPR 22compliance”
EN 55022
Limits and methods of measurement of Radio Interference
Characteristics of Information Technology Equipment. (Europe)
“EN 55022 compliance”
EN 55024-1 2003
ITE Immunity Standard;
ICES-003, Issue 3
Interference-Causing Equipment Standard, Digital Apparatus.
(Canada)
Disclaimer Statement
SystiumTechnologies makes no warranty of any kind with regard to this
material, including, but not limited to, the implied warranties of
merchantability and fitness for a particular purpose. SystiumTechnologies
assumes no responsibility for any errors that may appear in this
document. SystiumTechnologies makes no commitment to update nor to
keep current the information contained in this document. No part of this
document may be copied or reproduced in any form or by any means
without prior written consent of SystiumTechnologies.
† Third-party brands and trademarks are the property of their respective
owners.
This manual suits for next models
1
Other Systium Technologies Motherboard manuals