T.O.M TPC-13AL User manual

PERCEUSE D’ETABLI - 5 vitesses
BENCH DRILLING MACHINE - 5 speed
BOHRMASCHINE FÜR
DIE WERKBANK - 5 geshwindigten
TPC-13AL
Manuel d’utilisation
Operating instructions
Bedienungsanleitung
LASER
PRECISION


3
SOMMAIRE
français ---------------------------------------------------------------------------------------------------------------------------
CONSIGNES GENERALES DE SECURITE -----------------------------------------------------------------------------
4
PROTECTION POUR L’ENVIRONNEMENT -----------------------------------------------------------------
5
CONSIGNES SPECIFIQUES AUX PERCEUSES A COLONNES ------------------------------------
6
INSTALLATION -----------------------------------------------------------------------------------------------------
7
CARACTERISTIQUES TECHNIQUES ------------------------------------------------------------------------ 7
MONTAGE ------------------------------------------------------------------------------------------------------------- 8
FONCTIONNEMENT DE LA MACHINE ----------------------------------------------------------------------
9
GUIDAGE LASER ------------------------------------------------------------------------------------------------
10
VUE ECLATEE ----------------------------------------------------------------------------------------------------
11
DECLARATION DE CONFORMITE ------------------------------------------------------------------------
12
ENGLISH ----------------------------------------------------------------------------------------------------------------------------------
GENERAL SAFETY RULES -----------------------------------------------------------------------------------------------------
14
ADDITIONAL SAFETY RULES FOR TABLE SAW -----------------------------------------------------------------
14
SYMBOLS --------------------------------------------------------------------------------------------------------------------------------
15
INSTALLATION -------------------------------------------------------------------------------------------------------------------------
15
PRODUCT SPECIFICATIONS -------------------------------------------------------------------------------------------------
15
ASSEMBLY AND ADJUSTMENTS ------------------------------------------------------------------------------------------
16
SETTING THE TOOL ----------------------------------------------------------------------------------------------------------------
18
CONNECTING TO THE POWER SUPPLY -----------------------------------------------------------------------------
19
OPERATION THE TOOL ----------------------------------------------------------------------------------------------------------
20
CHANGING BLADES ----------------------------------------------------------------------------------------------------------------
21
RECYCLABLE MATERIALS ANALYSIS LIST -------------------------------------------------------------------------
33
TSR-210 PARTS LIST --------------------------------------------------------------------------------------------------------------
33
TSR-210 MOTOR PARTS LIST -----------------------------------------------------------------------------------------------
36
TSR-210 STAND PARTS LIST --------------------------------------------------------------------------------------------------
38
CONFORMITY AND WARRANTY -------------------------------------------------------------------------------------------
43
deutsch -------------------------------------------------------------------------------------------------------------------------------
allgemeine sicherheitsregeln -----------------------------------------------------------------------------------------
23
zusätzliche sicherheitsregeln für tischkreissägen ----------------------------------------------------
24
symbole ------------------------------------------------------------------------------------------------------------------------------
25
installation -----------------------------------------------------------------------------------------------------------------------
25
spezifikationen ------------------------------------------------------------------------------------------------------------------
25
montage -----------------------------------------------------------------------------------------------------------------------------
26
einrichten des werkzeugs -----------------------------------------------------------------------------------------------
28
anschluß an die stromquelle -----------------------------------------------------------------------------------------
29
inbetriebnahme des geräte ----------------------------------------------------------------------------------------------
30
sägeblattwechsel -------------------------------------------------------------------------------------------------------------
31
liste für recyclebare materialien -----------------------------------------------------------------------------------
32
teileliste tsr-210 -----------------------------------------------------------------------------------------------------------------
33
motorteile liste tsr-210 ----------------------------------------------------------------------------------------------------
36
stückliste der basis tsr-210 ----------------------------------------------------------------------------------------------
38
konformitätserklärung and garantiekarte ----------------------------------------------------------------
43
ATTENTION
Une utilisation incorrecte et dangereuse de cet outil motorisé peut entraîner la mort ou
des blessures graves.
Lisez l’intégralité du manuel d’utilisation avant de faire fonctionner votre outil.
CONSERVEZ CES INSTRUCTIONS POUR UNE CONSULTATION ULTÉRIEURE.
Y
ManUEL D’UTiLisaTiOn

AVERTISSEMENT : lire le manuel dans son intégralité. Le non
respect des instructions énumérées ci-après peut résulter en un
choc électrique, un incendie ou de graves blessures. Le terme « outil
électrique » gurant dans tous les avertissements énumérés ci-après
renvoie aussi bien à l’outil électrique lorsqu’il est raccordé au secteur
(via le cordon d’alimentation) que lorsqu’il fonctionne sur batterie
(sans câble). CONSERVEZ CES INSTRUCTIONS.
1) Zone de travail
a) La zone de travail doit être propre et bien éclairée. Les zones
encombrées et sombres peuvent favoriser les accidents. b) Il ne faut
pas utiliser les outils électriques dans des atmosphères explosives,
en présence de liquides inammables, de gaz ou de poussière. Les
outils électriques génèrent des étincelles qui peuvent enammer la
poussière ou les fumées.
c) Éloignez spectateurs et enfants de la zone de travail lors de l’utili-
sation d’un outil électrique. Toute distraction peut vous faire perdre le
contrôle de l’outil.
2) Sécurité électrique
a) La che de l’outil électrique doit correspondre à la prise murale. Il
ne faut en aucun cas modier la che. N’utilisez pas de che d’adap-
tation avec des outils électriques devant être reliés à la terre (masse).
Les ches d’origine et les prises murales adaptées réduisent les
risques de choc électrique.
b) Évitez les contacts corporels avec les surfaces reliées à la terre
telles que tuyauteries, radiateurs, réfrigérateurs et autres. Le risque
de choc électrique est accru dès lors que votre propre corps est relié
à la terre ou à une masse.
c) Il ne faut pas exposer les outils électriques à la pluie ou à l’humi-
dité. La pénétration d’eau dans un outil électrique augmente le risque
de choc électrique.
d) Ne malmenez pas le cordon électrique. Ne transportez, tirez ou dé-
branchez jamais l’outil électrique en tirant sur le cordon. Éloignez ce
dernier des sources de chaleur, des matières graisseuses, des arêtes
tranchantes et des pièces en mouvement. Les cordons endommagés
ou enchevêtrés augmentent le risque de choc électrique.
e) Prévoyez un prolongateur spécique pour usage extérieur pour
utiliser l’outil électrique à l’extérieur.
L’utilisation d’un cordon pour usage extérieur réduit les risques de
choc électrique.
3) Sécurité des personnes
a) Restez vigilant, soyez attentif à ce que vous faites et utilisez votre
bon sens lorsque vous utilisez un outil électrique. N’utilisez pas d’outil
électrique lorsque vous êtes fatigué ou sous l’inuence de drogues,
de l’alcool ou de médicaments. Un moment d’inattention peut résulter
en de graves blessures corporelles.
b) Utilisez les équipements de sécurité. Portez systématiquement des
lunettes de protection. Lorsque cela est nécessaire, utilisez des équi-
pements de sécurité tels qu’un masque anti-poussière, des chaus-
sures à semelles antidérapantes, un casque de protection et des
bouchons d’oreilles pour réduire les risques de blessures corporelles.
c) Évitez tout démarrage accidentel. Assurez-vous que l’interrupteur
est en position d’arrêt avant de brancher l’outil. Le fait de transporter
les outils électriques avec un doigt sur l’interrupteur ou de les bran-
cher lorsque l’interrupteur est en position marche peut engendrer des
accidents.
d) Enlevez les clés de réglage avant de mettre l’outil électrique en
marche. Si une clé reste xée à une pièce en mouvement, le risque
de blessures corporelles est important.
e) Ne vous penchez pas trop sur l’outil. Gardez bien votre équilibre
et en permanence un bon appui sur le sol. Cela permet en effet de
mieux contrôler l’outil électrique dans des situations inattendues.
f) Portez la tenue qui convient. Ne portez pas de vêtements amples
ni de bijoux. Maintenez cheveux, vêtements et gants éloignés des
pièces en mouvement.
Les vêtements amples, les bijoux ou les cheveux sont susceptibles
d’être happés par les pièces en mouvement.
g) Si l’outil est équipé d’un raccordement destiné aux équipements
d’évacuation et de ramassage des poussières, assurez-vous qu’ils
sont raccordés et utilisés correctement. L’usage de ces dispositifs
peut réduire les risques liés aux poussières.
4) Utilisation et entretien de l’outil électrique
a) Ne forcez pas l’outil électrique. Utilisez l’outil électrique adapté à
votre application. Le résultat sera meilleur et le travail effectué en
toute sécurité si la vitesse pour laquelle l’outil électrique a été conçu
est respectée.
b) Il ne faut pas utiliser l’outil électrique si l’interrupteur ne permet pas
de le mettre en marche et de l’arrêter. Tout outil électrique ne pouvant
pas être contrôlé grâce à l’interrupteur est dangereux et doit être
réparé.
c) Débranchez l’outil électrique du secteur ou retirez la batterie avant
de procéder aux réglages, de changer les accessoires ou de le
stocker. Ces mesures de sécurité préventives réduisent le risque de
démarrage accidentel.
d) Stockez les outils électriques à l’arrêt hors de portée des enfants.
Ne les conez pas à des novices non rompus à leur utilisation et
n’ayant pas connaissance du présent manuel. Dans les mains de ces
personnes, les outils électriques peuvent s’avérer dangereux.
e) Entretenez vos outils électriques. Vériez le mauvais alignement
ou le grippage des pièces en mouvement, la rupture de certaines
pièces ainsi que toute autre condition qui pourrait entraver le fonc-
tionnement de l’outil électrique. Si celui-ci est endommagé, il faut im-
médiatement le faire réparer. De nombreux accidents sont provoqués
par des outils électriques mal entretenus.
f) Maintenez les outils de coupe propres et affûtés. Les outils de
coupe bien entretenus et dont les arêtes de coupe sont aiguisées
sont moins susceptibles de se gripper et sont plus faciles à contrôler.
g) Utilisez l’outil électrique, les accessoires, grains, etc. confor-
mément aux présentes instructions et en adéquation avec leurs
spécicités, en fonction de la tâche à effectuer et des conditions de
travail. L’utilisation d’un outil électrique à d’autres ns que celles pour
lesquelles il a été conçu peut s’avérer dangereuse.
5) Réparation
Conez la réparation de votre outil électrique à un technicien qualié
qui n’utilisera que des pièces de rechange rigoureusement iden-
tiques. Ceci est indispensable pour que l’outil électrique puisse être
utilisé en toute sécurité.
COnsiGnEs GEnEraLEs DE sECUriTE
4

5
Le symbole de la poubelle sur roues barrée d’une croix signifie que ce produit doit faire l’objet d’une collecte sélective en fin
de vie au sein de l’Union européenne. Cette mesure s’applique non seulement à votre appareil mais également à toute autre
accessoire marqué de ce symbole. Ne pas jeter ces produits dans les ordures ménagères non sujettes au tri sélectif.
En application de la directive DEEE concernant l’environnement, il est interdit d’éliminer des appareils électriques ou électro-
niques usagés dans la nature ou dans une simple décharge publique.
L’appareil doit être remis à un point de collecte approprié pour le traitement, la valorisation, le recyclage des déchets EEE ou
rapporté chez son distributeur sur le principe du 1 pour 1 (soit un appareil acheté contre un appareil repris).
L’utilisateur fait ainsi un geste pour l’environnement, et contribue à la préservation des ressources naturelles et à la protection
de la santé humaine.
COrDOns PrOLOnGaTEUrs
N’utilisez que des cordons prolongateurs à trois conducteurs possédant une che à deux broches et des prises à deux cavités et une terre cor-
respondant à la che de l’outil. Lorsque vous utilisez un outil électrique à une distance importante de l’alimentation, assurez-vous d’utiliser un
cordon prolongateur qui a une dimension sufsante pour transporter le courant dont l’outil a besoin. Un cordon prolongateur sous dimensionné
provoquera une chute de tension dans la ligne conduisant à une surchauffe et à une perte de puissance. Utilisez le tableau pour déterminer la
dimension minimale des ls requise dans un cordon prolongateur. Seuls des cordons prolongateurs ronds comportant un revêtement gurant
sur la liste établie par les laboratoires peuvent être utilisés.
Longueur du cordon prolongateur : jusqu’à 15 m
Dimension du l : 3 x 2,5 mm2
Avant d’utiliser tout cordon prolongateur, vériez qu’il ne comporte pas de ls qui dépassent ou sont nus et que l’isolant n’est pas coupé ou
usé. Réparez ou remplacez immédiatement un cordon endommagé ou usé.
raCCOrDEMEnT ELECTriQUE
Votre machine comporte un moteur électrique fabriqué avec précision. Elle doit être branchée sur une alimentation de 230 V, 50 Hz. Si votre
appareil ne fonctionne pas lorsqu’il est branché dans une prise, vériez bien les caractéristiques de l’alimentation.
Le niveau de bruit de la machine est mesuré selon la norme DIN EN ISO 3744 : 1995-11 ; DIN EN ISO 11203 : 1996-07.
Les valeurs citées sont des valeurs d’émission calculées selon les normes en vigueur et non des valeurs liées à l’utilisation sur le lieu de tra-
vail. Bien qu’il y ait une corrélation entre ces différents niveaux d’émission, il est impossible de tirer une
quelconque conclusion sur des précautions supplémentaires à apporter. Des facteurs ayant une inuence potentielle sur le niveau d’émission
sonore sur le lieu de travail incluent la durée de travail, la taille de la pièce ainsi que les autres sources de bruit (ex : le nombre de machines
en fonctionnement, autres opérations bruyantes effectuées en même temps). Les seuils de niveau sonore varient d’un pays à l’autre. Pour ces
différentes raisons, nous recommandons aux utilisateurs de porter un casque de protection auditif lors de l’utilisation de cette machine.
Le niveau de pression acoustique d'émission pondérée A au poste est inférieur à 70db.
La mise à la terre consiste à relier à une prise de terre, par un l conducteur, les
masses métalliques qui risquent d’être mises accidentellement en contact avec le
courant par suite d’un défaut d’isolement dans un appareil électrique. Cette mise à
la terre, associée à un disjoncteur différentiel, évite tout incident. Le courant passe
directement dans la terre et l’alimentation est automatiquement coupée.
Ne modiez pas la che fournie. Si elle ne rentre pas dans la prise, faites installer
une prise appropriée par un électricien qualié.
Un raccordement mal fait du conducteur de mise à la terre de l’équipement peut
entraîner un risque de décharge électrique. Le conducteur dont la gaine isolante
est verte avec un let jaune est le conducteur de mise à la terre. Si la réparation
ou le remplacement du cordon d’alimentation est nécessaire, ne raccordez pas le
conducteur de terre à une borne sous tension.
Renseignez-vous auprès d’un électricien qualié ou d’une personne responsable de l’entretien si les instructions de mise à la terre ne sont pas
complètement comprises ou s’il y a un doute quant à la mise à la terre correcte de l’outil.
Si le câble d’alimentation est endommagé, il doit être remplacé par le fabricant, son service après-vente, ou des personnes de qualication
similaire an d’éviter un danger. Ne pas faire fonctionner l’outil avec un câble d’alimentation endommagé.
Cet outil est prévu pour être utilisé sur un circuit comportant une prise murale. Il est aussi doté d’une broche de mise à la terre.
PrOTECTiOn DE L’EnVirOnnEMEnT
BranCHEMEnT DE La MaCHinE - raCCOrDEMEnTs ELECTriQUEs
infOrMaTiOn sUr LE BrUiT
insTrUCTiOns DE MisE a La TErrE

6
COnsiGnEs DE séCUriTé sPéCifiQUEs aUx PErCEUsEs a COLOnnE
1. Cette perceuse à colonne est destinée à être utilisée à l’inté-
rieur et dans un environnement sec.
2. Ne percez pas de pièces trop petites, qui ne pourront pas
être maintenues correctement.
3. Gardez vos mains hors de portée de la trajectoire des
mèches. Évitez de mettre vos mains dans des positions qui
pourraient, à la suite d’un glissement, les entraîner vers la
mèche.
4. N’installez ou n’utilisez pas une mèche dont la longueur est
supérieure à 175 mm ou qui dépasse les mors du mandrin de
150 mm. Elles peuvent à tout moment se tordre ou se casser.
aVErTissEMEnT !
Veillez à respecter les consignes de sécurité fondamentales lorsque vous
utilisez des outils électriques an de réduire les risques d’incendie, de
décharge électrique et de blessures corporelles.
5. Choisissez les mèches recommandées pour les matériaux
des pièces à travailler. N’utilisez pas de roues métalliques, de
mèches à mortaiser, de couteaux limeurs, de couteaux circu-
laires ou de rabots rotatifs sur cette perceuse à colonne.
6. Quand vous percez une grosse pièce, assurez-vous qu’elle
soit parfaitement soutenue, à hauteur de la table.
7. N’entreprenez pas un travail sans les mains. Utilisez des
accessoires, brides, gabarits ou autres outils pour les pièces
instables.
8. Ne percez pas le matériau trop rapidement pour éviter une
surcharge du foret.
9. Assurez-vous qu’il n’y ait pas de clous ou de corps étrangers
dans la pièce à percer.
10. Si la pièce à travailler dépasse de la table et menace de
tomber ou de basculer si elle n’est pas maintenue, xez-la à la
table ou prévoyez un support auxiliaire.
11. Si vous utilisez un étau pour perceuse à colonne, xez-le
toujours à la table.
12. Assurez-vous que toutes les xations et systèmes de blo-
cage sont correctement bloqués avant de percer.
13. Ne procédez pas à l’assemblage ou à la préparation du tra-
vail sur la table pendant que la perceuse à colonne fonctionne.
14. Porter un équipement de protection personnel approprié si
nécessaire, incluant :
- casque de protection auditive pour réduire le risque de
perte d’audition ;
- lunettes de sécurité ;
- masque de protection pour réduire le risque d’inhalation de
particules de poussières, nuisibles à la santé ;
- gants de protection lors de la manipulation des trépans et des
matériaux bruts coupants.
AVERTISSEMENT !
• S’assurer que le bras est correctement bloqué lors de
coupes en biseau.
• Garder l’aire de travail propre et exempte de débris ou
chutes de coupes autour de la machine.
• Utiliser des foret correctement aiguisées. Vérier la vitesse
maximale indiquée sur la trépans.
• Lors du remplacement du laser, ne pas installer un autre
type de laser. Les réparations doivent seulement être
effectuées par le fabricant de laser ou toute autre personne
autorisée.
• Ne pas enlever de débris ou chutes de la zone de coupe
lorsque la machine est en marche et que la tête de trépans
n’est pas en position basse.
• S’assurer que la machine est toujours xée à un établi ou à
une surface portante chaque fois que possible.
SYMBOLES
V ………....Volt A ……..….....................Ampères
Hz… ….….Hertz W........................................Watts
min …........Minutes ~.....................Courant alternatif
h …............Heures I ………...................... MARCHE
O …...........ARRÊT min-1 …............Tours par minute
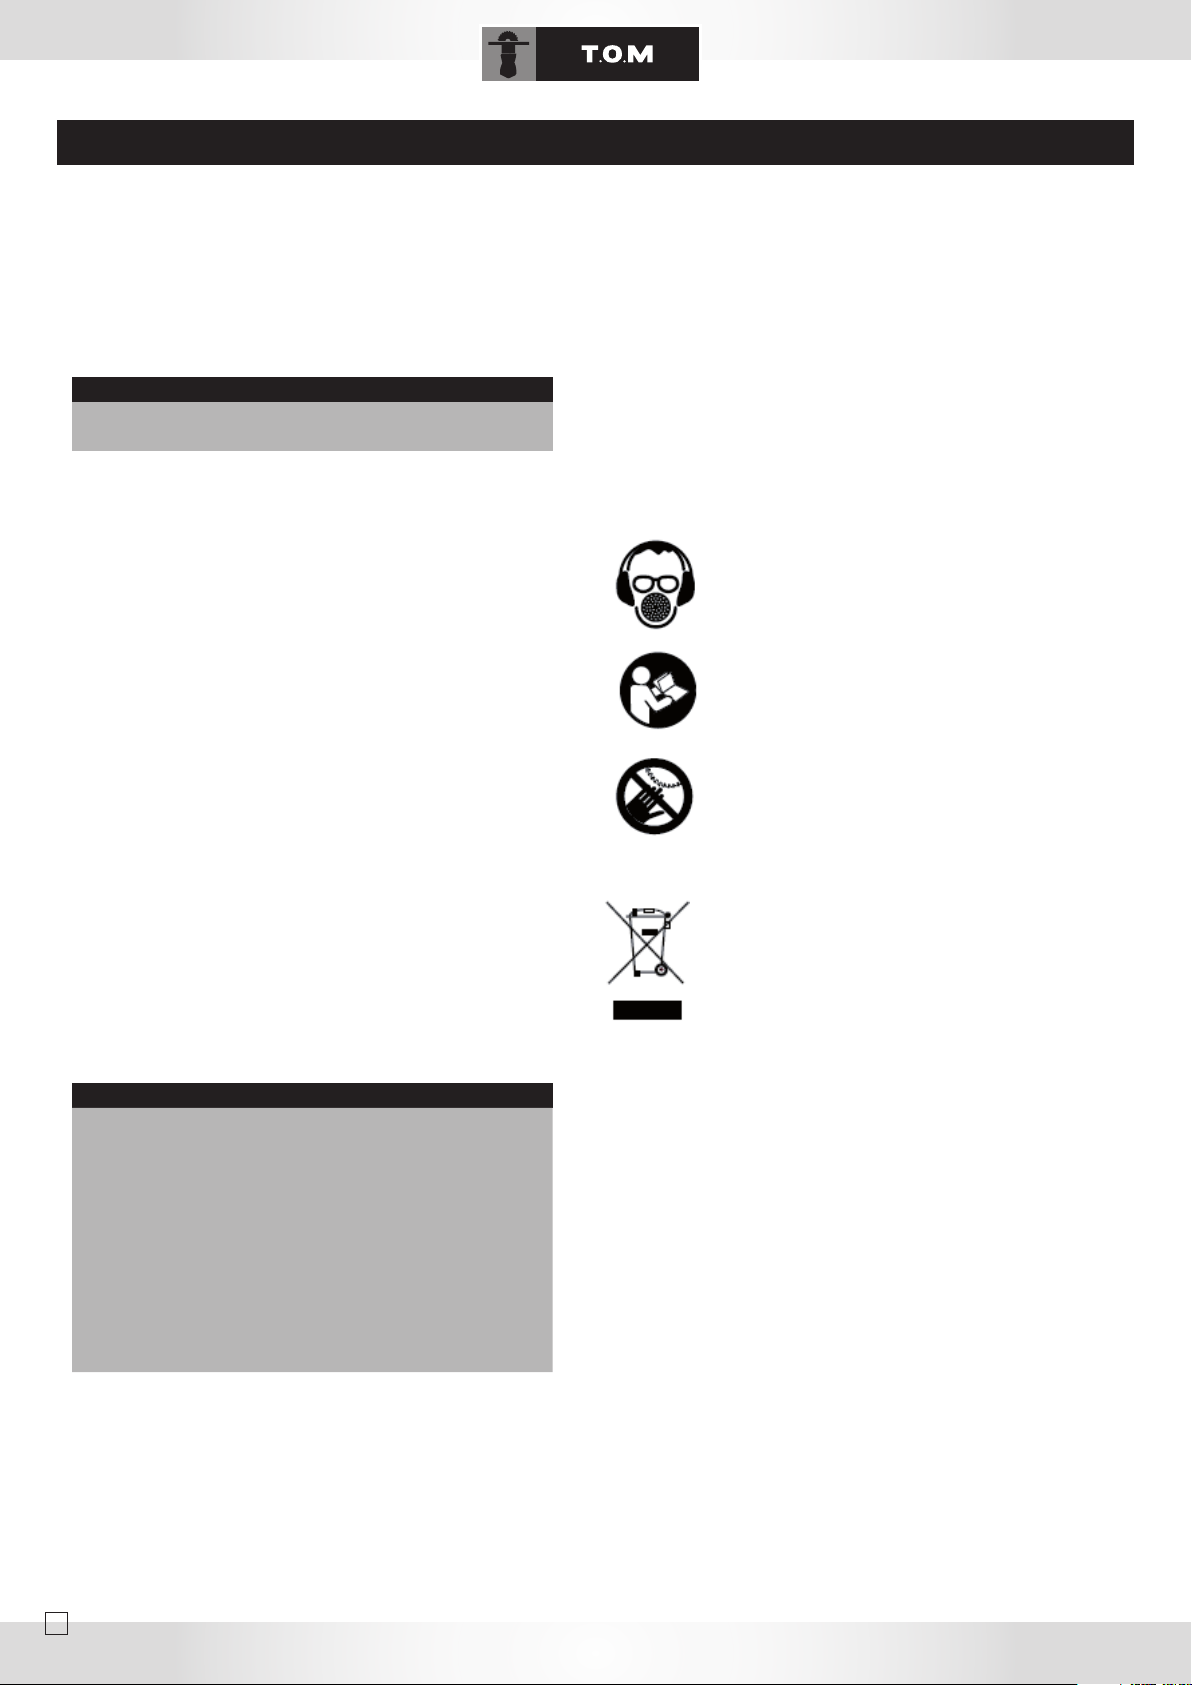
Portez des lunettes de protection
Portez un équipement de protection des oreilles
Portez un masque anti-poussière
LIRE ET S’ASSURER DE BIEN COMPRENDRE
LE MANUEL DE L’UTILISATEUR: Pour réduire le
risque de blessures, les utilisateurs et les spectateurs
doivent lire et comprendre le manuel d’instruction
avant d’utiliser le produit.
GARDER LES MAINS LOIN DE LA LAME: Ne pas
garder vos mains loin de la lame causera des bles-
sures à votre personne.
PROTECTION DE L’ENVIRONNEMENT
Ne jetez pas les matériaux inutilisés à la poubelle,
recyclez-les. Tous les outils, exibles et emballages
doivent être triés, puis envoyés au point de retraite-
ment des déchets le plus proche, de manière à être
recyclés en respectant l’environnement. Il est interdit
d’éliminer les appareils électriques ou électroniques
usagés dans la nature ou dans une simple décharge
publique, il est demandé de les porter dans un dépôt
prévu à cet effet pour le recyclage. Contacter votre
collectivité locale quant aux systèmes de collectes mis
à votre disposition. Si des appareils électriques sont
déposés dans des décharges ou dans la nature, des
substances dangereuses peuvent s’inltrer dans l’eau
souterraine et entrer dans la chaîne alimentaire, et
ainsi, nuire à votre santé et bien-être. Si vous rempla-
cez un ancien appareil électrique par un neuf, votre
revendeur a pour obligation de reprendre votre ancien
appareil gratuitement et sera responsable de son
élimination.

7
A : carter poulie
B : volant de descente du mandrin
C : interrupteur du laser
D : interrupteur arrêt coup de poing
E : butée de profondeur
F : protection du mandrin
G : table
H : socle
J : tiroir rangement forets et clés Allen
K : tige de blocage pour la tension de la courroie
L : poignée de blocage de la table
M : extension de la table
N : laser
O : étau
CaraCTErisTiQUEs TECHniQUEsinsTaLLaTiOn
Puissance moteur : 350 W
Alimentation moteur : 230 V 50Hz
Gamme de vitesse : 580 à 2600 tr/min
Capacité de perçage : 13 mm
Cône morse : B16
Mandrin auto serrant : B16 13 mm
Course de broche : 50 mm
Distance broche / colonne : 105 mm
Distance broche / plateau : 330 mm
Distance broche / socle : 400 mm
Dimensions plateau sans rallonge : 198 x 173 mm
Dimensions plateau avec rallonge : 280 x 173 mm
Dimensions du socle : 315 x 180 mm
Diamètre de la colonne : 48 mm
Hauteur totale : 730 mm
E
8
MOnTaGE
aTTEnTiOn !
déballer la perceuse, vérier si aucune des pièces n’a été endommagée.
Si vous constatez une pièce endommagée rapportez la machine à votre point de vente mais surtout ne pas la monter.
Montage de la colonne
Fixer la colonne par l’intermédiaire des trois vis ( rondelles plates + rondelles frein ) et serrer fortement.
Monter la table D de la perceuse sur la colonne tout rn positionant la crémaillère dans le collier.
Placer le collier crémaillère
Monter la tête de perçage sur la colonne.
Positionner la tête de perçage parallèlement au socle.
Serrer les vis sans tête situées sur le côté droit de la tête de perçage à l’aide de la clé Allen fournie.
Visser les trois boules sur le volant de descente du mandrin.
A
C
B
D
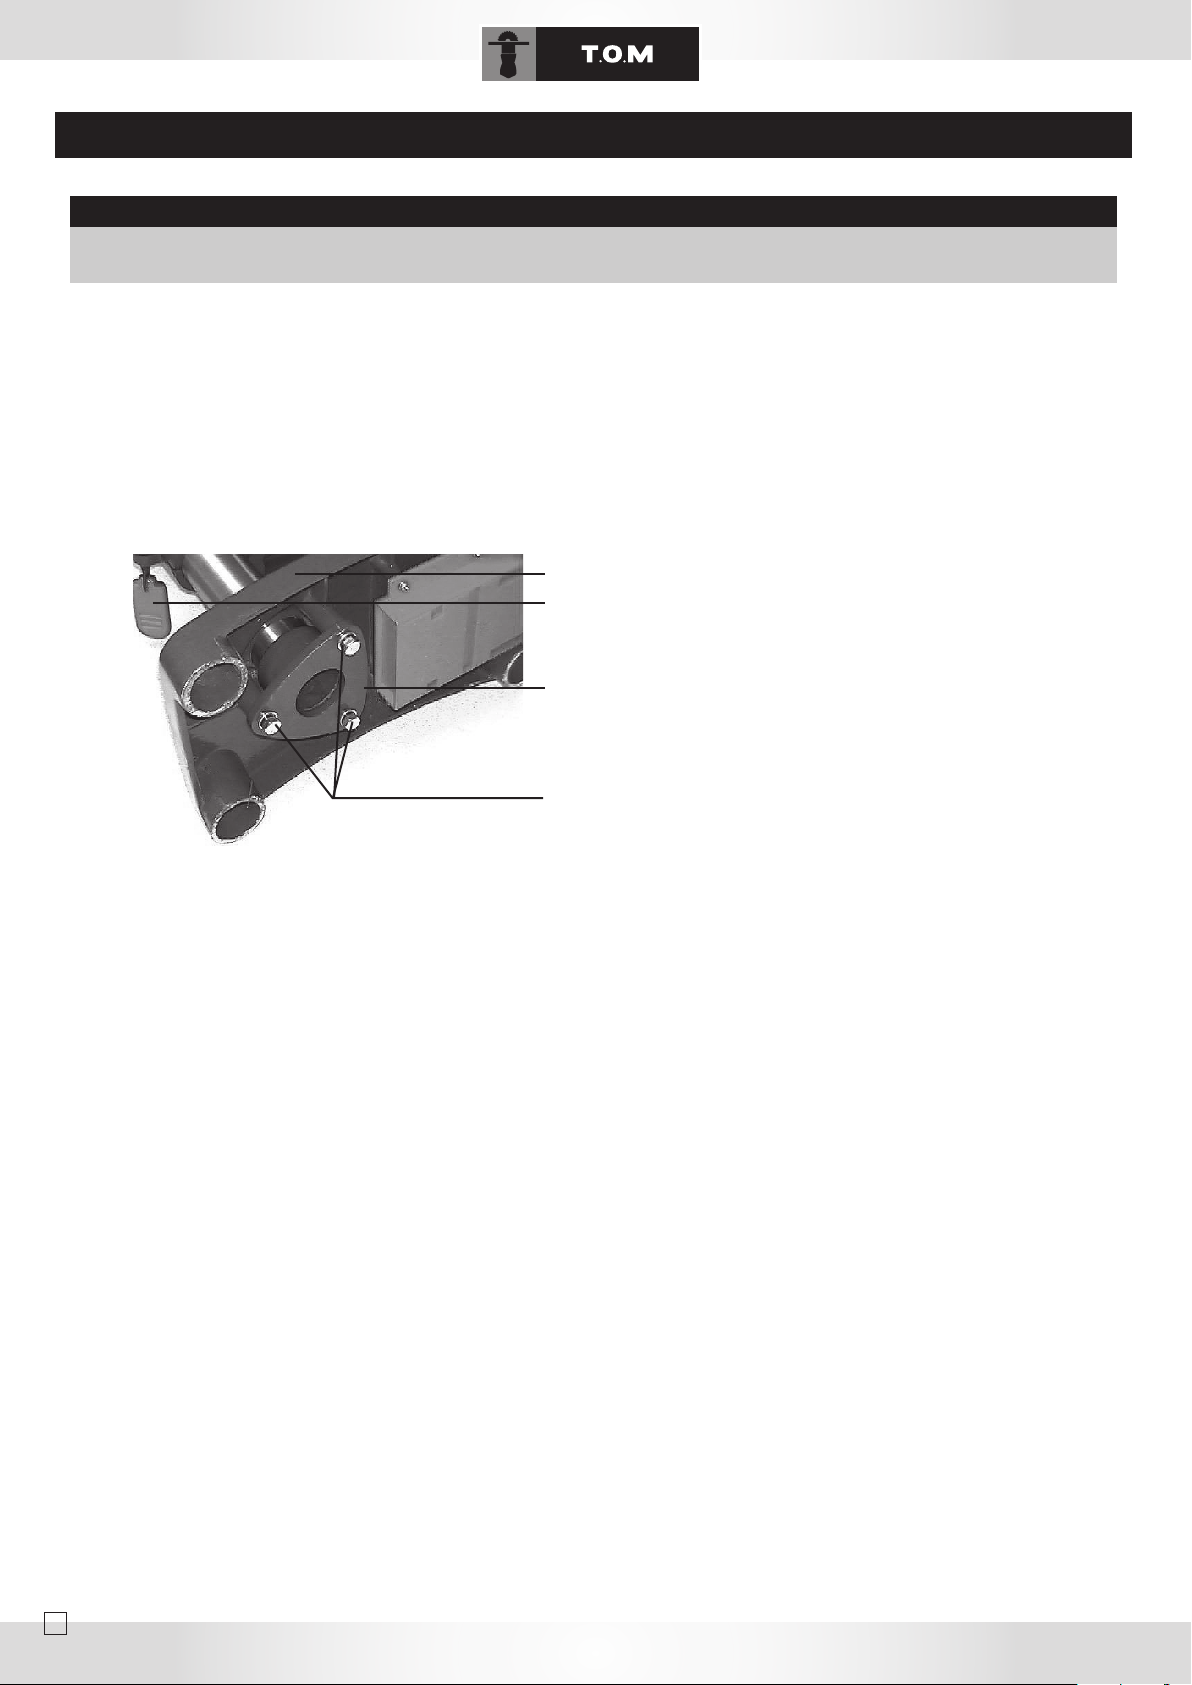
Montage de la visière du protecteur du mandrin :
Dévisser et enlever la vis centrale de la protection
Monter la visière du protecteur.
Remonter la vis centrale avec son écrou et la serrer.
Serrer les deux vis à droite et à gauche de la visière. Ces deux vis sont positionnées sur la bague.
Montage du mandrin :
Nettoyer correctement le cône morse de la perceuse ainsi que le cône femelle du mandrin.
Positionner le mandrin dans le cône d’un coup sec.
Prendre un morceau de bois, le positionner sur la table, rentrer les mors du mandrin, puis, d’un coup sec, tourner le volant de façon à
faire frapper le mandrin sur le morceau de bois.
Raccordement au réseau électrique :
Le raccordement ainsi que les rallonges électriques utilisées doivent correspondre aux instructions. Le voltage et la fréquence doivent
être conformes aux données inscrites sur la machine.
Le fusible du secteur doit être calibré à 10A.
Utiliser pour le raccordement des câbles de type H07 RN-F.
Tous les travaux de branchement et de réparation sur l’installation électrique doivent être exécutes uniquement par un électricien
qualié.
Mise en marche :
Cette machine doit être impérativement branchée à la terre.
La mise en marche du moteur de la perceuse s’effectue par l ‘intermédiaire de l’interrupteur situé sur le côté gauche de la perceuse.
9
Prendre toujours en considération les instructions de sécurité et se tenir aux règlements en vigueur.
Ajuster la hauteur de la table et la profondeur du perçage de manière à ne pas percer la table.
Insérer un morceau de bois pour protéger la table ainsi que le forêt.
S’assurer que le forêt ne fera pas bouger la pièce
Serrer la pièce à la table ou se servir de l’étau fourni.
Choisir la vitesse de manière à ce que le forêt puisse travailler rapidement et sans interruption.
Une avance de perçage trop rapide risque de faire des traces de brûlures, une vitesse de perçage trop lente peut stopper le moteur ou
briser le forêt.
fOnCTiOnnEMEnT DE La MaCHinE
aTTEnTiOn !
Gardez les doigts à une distance sufsante du forêt en rotation, prendre en considération que la pièce ou vos mains peuvent glisser.
Ne pas enlever les copeaux et les pièces usinées avant que la machine ne soit à l’arrêt
Ne jamais travailler en laissant le protecteur du mandrin ou le cache courroie ouvert.
Toujours serrer l ‘étau à la table
Ne jamais travailler une pièce tenue en l’air sans la poser sur la table.
Poser des pièces longues sur des servantes.
rEGLaGEs
Avant tout réglage, débrancher la machine du réseau électrique.
Changement de vitesse
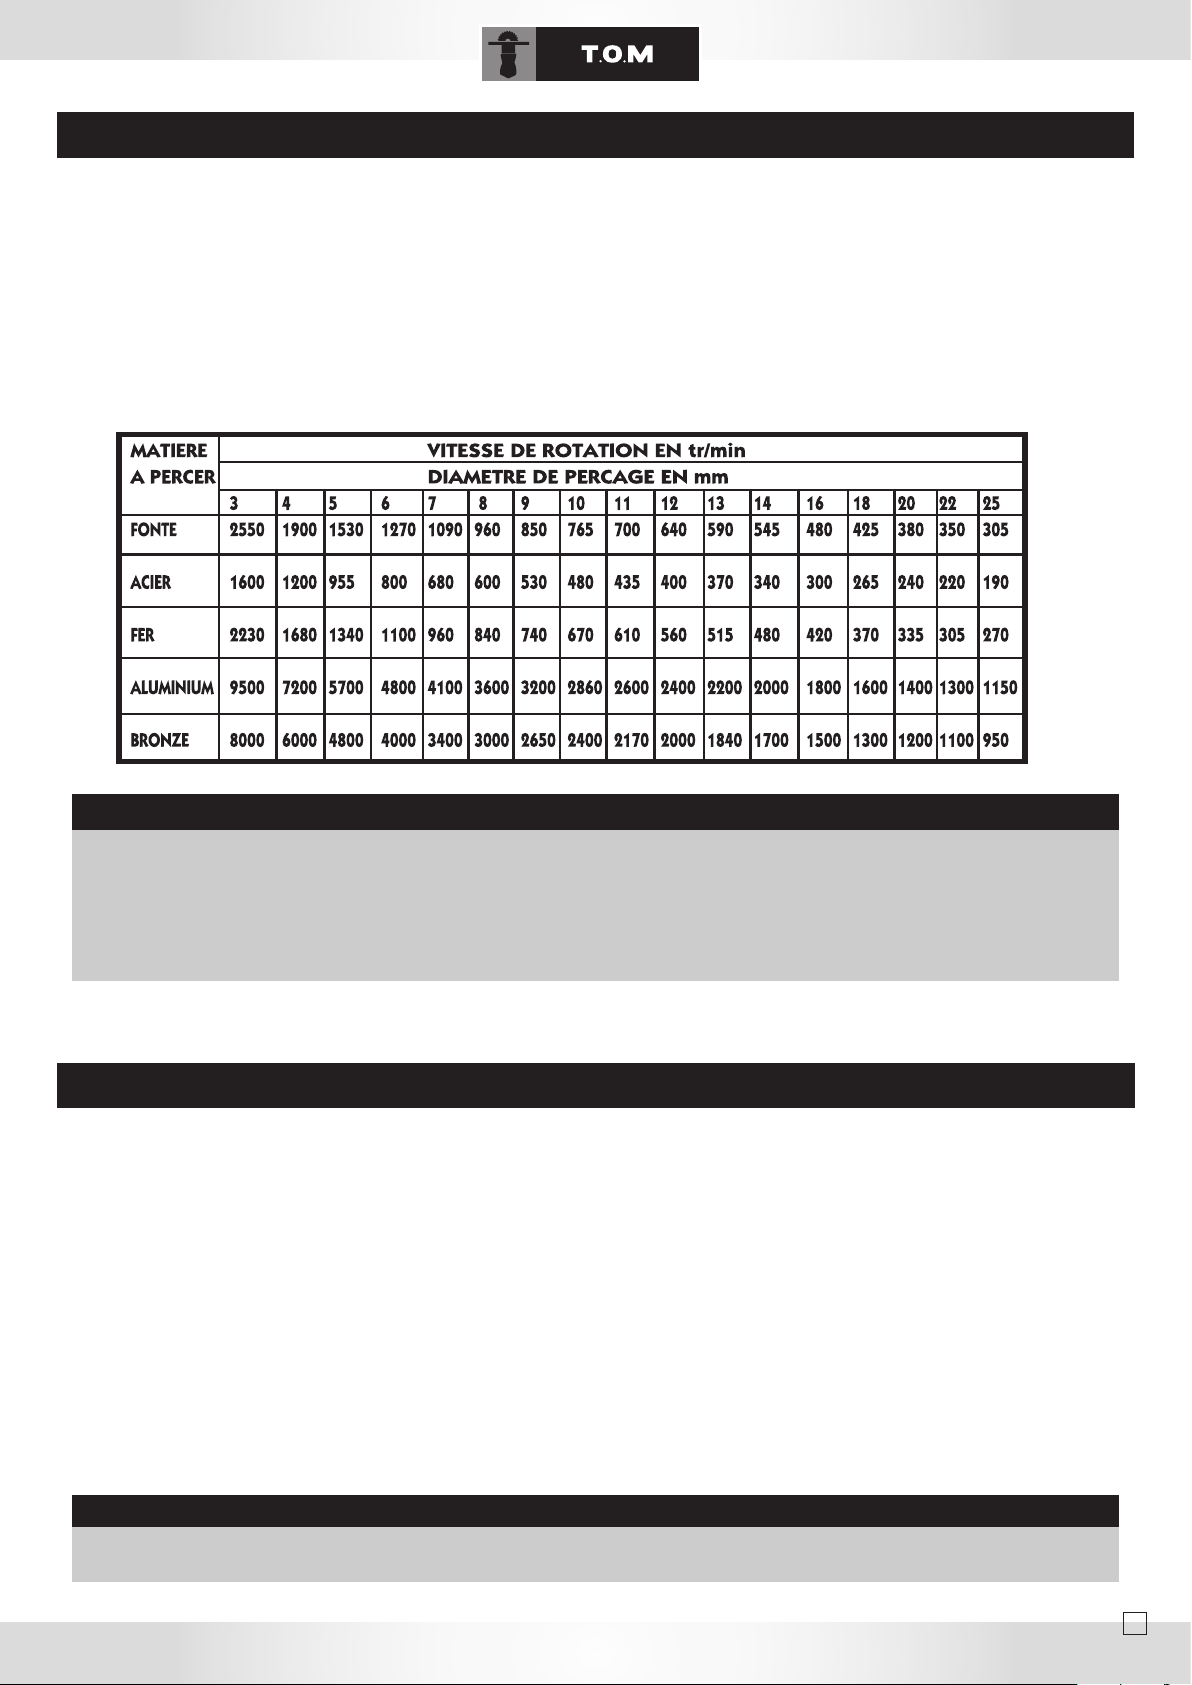
Desserrer la vis de sécurité et ouvrir le carter courroie.
Un graphique vitesse-position de courroie se trouve à l’intérieur du capot.
S ‘orienter sur ce graphique pour chaque changement de vitesse.
Effectuer le changement de vitesse.
Desserrer sur les deux côtés les tiges de blocage de la tension de la courroie.
Relâcher les courroies.
Changer la position de la courroie selon le graphique vitesse-position de la courroie.
Tendre les courroies et bloquer les deux tiges de la tension de la courroie.
Refermer le cache et resserrer la vis de sécurité.
aTTEnTiOn !
Vous ne pouvez pas mettre en marche la perceuse si le carter courroie reste ouvert. Un contact de sécurité coupe
l’alimentation.
10
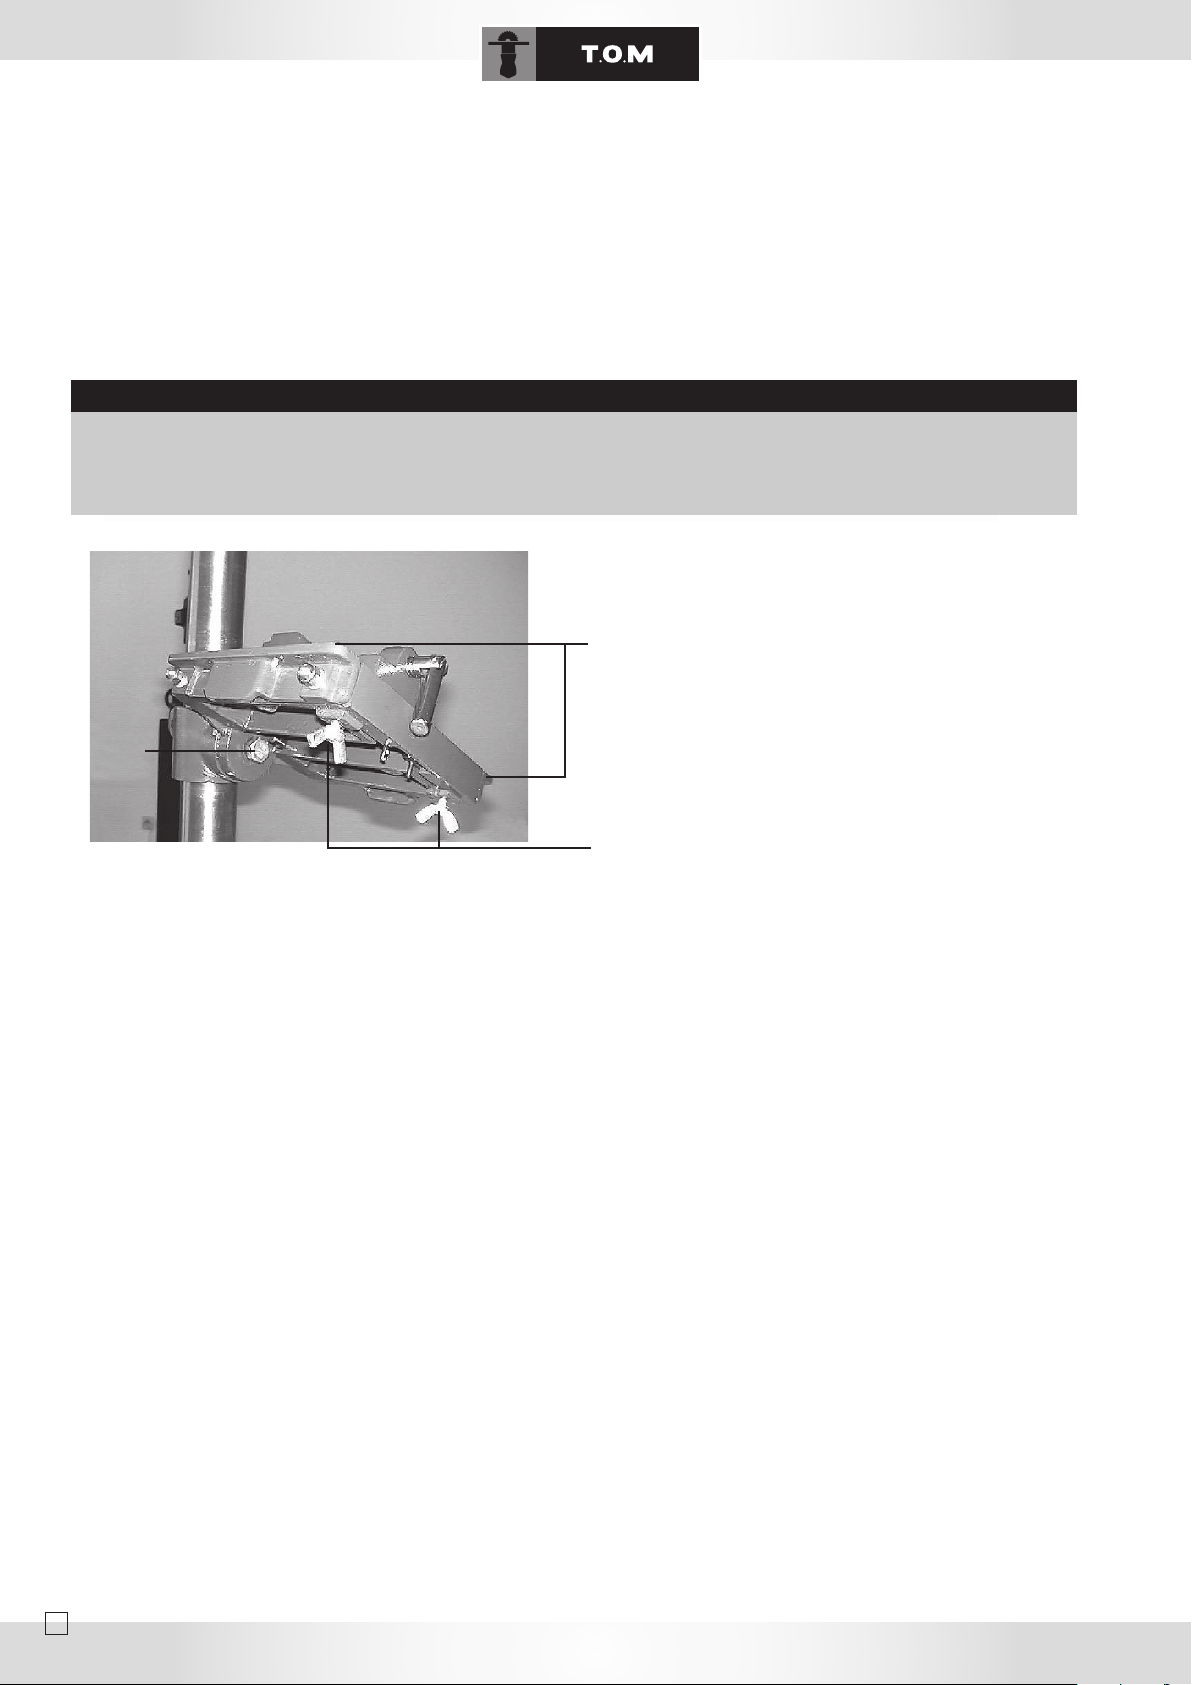
Réglage de la butée de profondeur :
Pour un perçage de plusieurs trous de la même profondeur, utiliser la butée de profondeur.
Abaisser l’arbre avec le foret à la profondeur souhaitée.
Régler l’écrou de réglage de la butée de profondeur E g. 1 sur la mâchoire de blocage.
Lorsque vous tournerez le volant, le forêt ne pourra pas descendre au-delà de cette profondeur.
Inclinaison de la table :
Ne jamais procéder à ce réglage sur la machine en marche.
Desserrer la vis C pour incliner la table.
aTTEnTiOn !
Ne desserrer que légèrement la vis C, sinon la table et ses rallonges peuvent tomber.
Incliner la table à l’angle désiré.
Resserrer la vis.
Au besoin pour sortir les rallonges latérales A desserrer les vis papillon B.
A
C
B
Faire tous les travaux de maintenance, réglage ou
nettoyage après avoir débranché la machine du
réseau !
Tous travaux de branchement et de réparation sur
l’installation électrique doivent être exécutés uniquement
par un électricien qualié.
Remplacer immédiatement les dispositifs de protection
endommagés ou usés.
Nettoyage : nettoyer la machine régulièrement.
Graissage : graisser régulièrement avec un peu de
graisse :
• L’arbre d ‘entraînement.
• L’engrenage de la broche de perçage.
Guidage Laser :
La mise en marche du laser s’effectue par l’intermédiaire de l’interrupteur situé sur le devant de la machine.
Le laser A est utile pour centrer la pièce sur la table. Il est impératif de le régler pour une meilleure utilisation en l’inclinant en avant ou
en arrière de façon à ce que la croix projetée par le faisceau indique le centre du plateau.
Le guidage laser émet des radiations nocives lorsqu’il est en marche. Évitez toute exposition directe avec les yeux.
Mise en garde : puissance maxi < 1 mW, longueur d’onde : 630 - 670 mm, DINEN6085-1 : 1997, radiations laser : ne pas xer le
faisceau, laser de classe II.

CONTENT
EnGLisH -------------------------------------------------------------------------------------------------------------------------------
ENVIRONNEMENT PROTECTION -----------------------------------------------------------------------------------------
11
GENERAL SAFETY INSTRUCTION --------------------------------------------------------------------------12
SAFETY INSTRUCTIONS SPECIFIC TO SCROLL SAWS -------------------------------------------
13
SPECIFICATIONS ------------------------------------------------------------------------------------------------ 14
MACHINE USE ----------------------------------------------------------------------------------------------------- 16
LISTE DES PIÈCES ---------------------------------------------------------------------------------------------
30
VUE ÉCLATÉE ----------------------------------------------------------------------------------------------------
31
CONFORMITÉ ET GARANTIE -------------------------------------------------------------------------------
32
ENGLISH ----------------------------------------------------------------------------------------------------------------------------------
GENERAL SAFETY RULES -----------------------------------------------------------------------------------------------------
14
ADDITIONAL SAFETY RULES FOR TABLE SAW -----------------------------------------------------------------
14
SYMBOLS --------------------------------------------------------------------------------------------------------------------------------
15
INSTALLATION -------------------------------------------------------------------------------------------------------------------------
15
PRODUCT SPECIFICATIONS -------------------------------------------------------------------------------------------------
15
ASSEMBLY AND ADJUSTMENTS ------------------------------------------------------------------------------------------
16
SETTING THE TOOL ----------------------------------------------------------------------------------------------------------------
18
CONNECTING TO THE POWER SUPPLY -----------------------------------------------------------------------------
19
OPERATION THE TOOL ----------------------------------------------------------------------------------------------------------
20
CHANGING BLADES ----------------------------------------------------------------------------------------------------------------
21
RECYCLABLE MATERIALS ANALYSIS LIST -------------------------------------------------------------------------
33
TSR-210 PARTS LIST --------------------------------------------------------------------------------------------------------------
33
TSR-210 MOTOR PARTS LIST -----------------------------------------------------------------------------------------------
36
TSR-210 STAND PARTS LIST --------------------------------------------------------------------------------------------------
38
CONFORMITY AND WARRANTY -------------------------------------------------------------------------------------------
43
deutsch -------------------------------------------------------------------------------------------------------------------------------
allgemeine sicherheitsregeln -----------------------------------------------------------------------------------------
23
zusätzliche sicherheitsregeln für tischkreissägen ----------------------------------------------------
24
symbole ------------------------------------------------------------------------------------------------------------------------------
25
installation -----------------------------------------------------------------------------------------------------------------------
25
spezifikationen ------------------------------------------------------------------------------------------------------------------
25
montage -----------------------------------------------------------------------------------------------------------------------------
26
einrichten des werkzeugs -----------------------------------------------------------------------------------------------
28
anschluß an die stromquelle -----------------------------------------------------------------------------------------
29
inbetriebnahme des geräte ----------------------------------------------------------------------------------------------
30
sägeblattwechsel -------------------------------------------------------------------------------------------------------------
31
liste für recyclebare materialien -----------------------------------------------------------------------------------
32
teileliste tsr-210 -----------------------------------------------------------------------------------------------------------------
33
motorteile liste tsr-210 ----------------------------------------------------------------------------------------------------
36
stückliste der basis tsr-210 ----------------------------------------------------------------------------------------------
38
WARNING
Improper and unsafe use of this power tool can result in death or serious bodily
injury.
Please read and understand this manual before operating the
power tool.
please keep this manual available for others before they use the
power tool.
Y
OPEraTinG insTrUCTiOns
11

WARNING !
Read the instructions in full. Any failure to comply with the instruc-
tions listed in this document may lead to electric shock, re ha-
zards or serious injury. The term “power tool” mentioned in all of
the warnings listed below refers both to the power tool when it is
connected to the mains (by the power cord) and when it operates
on its battery (without cables).
PLEASE KEEP THESE INSTRUCTIONS FOR FUTURE USE.
1) Work area
a) Keep the work area clean and well lit. Cluttered or dark areas
invite accidents.
b) Do not operate power tools in explosive atmospheres or in the
presence of ammable liquids, gases or dust. Power tools gene-
rate sparks which may ignite the dust or fumes.
c) Keep onlookers and children away from the work area while
operating a power tool. Distractions can cause you to lose control
of the tool.
2) Electrical safety
a) The power tool plug must correspond to the wall socket. Do
not modify the plug in any event. Do not use an adapter plug with
power tools that must be connected to the earth. The original
plugs and suitable wall sockets reduce the risk of electric shock.
b) Avoid body contact with earthed surfaces such as piping, ra-
diators, refrigerators, etc. The risk of electric shock is increased if
your body is connected to the earth.
c) Do not expose power tools to rain or humidity. Water entering a
power tool increases the risk of electric shock.
d) Take care of the electrical cord. Never transport, pull or dis-
connect the power tool by pulling on the cord. Keep the cord
away from heat, greasy material, sharp edges and moving parts.
Damaged or tangled cords increase the risk of electric shock.
e) Only use an extension cord that has been designed for outdoor
use when operating the power tool outdoors. Using a cord for
outdoor use reduces the risks of electric shock.
3) Personal safety
a) Stay alert and watch what you are doing. Use common sense
when operating a power tool. Do not use the power tool when
tired or under the inuence of drugs, alcohol or medication. A
moment of inattention can lead to serious injury.
b) Use personal protective equipment. Always wear protective
goggles. When required, use safety equipment such as a dust
mask, non-skid safety shoes, a hard hat and hearing protection to
reduce the risk of injury.
c) Avoid unintentional starting up. Ensure the switch is in the off-
position before you connect the tool.
Carrying power tools with a nger on the switch or connecting
them with the switch set to on can lead to injuries.
d) Remove any adjustment keys or wrenches before starting up
the power.
If a key or wrench remains attached to a moving part, there is a
high risk of injury.
e) Do not bend too far over the tool. Keep your balance and a
proper footing at all times to keep closer control of the power tool
in unexpected situations.
f) Wear appropriate clothing. Do not wear loose clothing or jewel-
lery. Keep your hair, clothing and gloves away from moving parts.
Loose clothes, jewellery or hair are likely to be caught by moving
parts.
g) If the tool is equipped with a connection for sawdust exhaust or
dust recovery systems, ensure that they are connected and used
correctly. Using this equipment can reduce the risks connected to
dust.
4) Tool use and care
a) Do not force the power tool. Use the correct power tool for your
application. This will provide better results and will be safer if the
power tool is used at the speed for which it is designed.
b) Do not use the power tool if it cannot be started up and stop-
ped using the switch. A power tool that cannot be controlled by
means of the switch is hazardous and must be repaired.
c) Disconnect the power tool from the mains or remove the bat-
tery before making adjustments, changing accessories or storing
it. These preventive safety measures reduce the risk of starting
the tool accidentally.
d) Store power tools switched off and out of the reach of children.
Do not give them to untrained individuals who have never used
them before and have not read and understood these instructions.
Power tools can be dangerous in the hands of these individuals.
e) Take care of you power tools. Check the misalignment or
binding
of moving parts, breakage of any parts and any other condition
that could hinder the working of the power tool. If the tool is da-
maged, have it repaired immediately. Many accidents are caused
by poorly maintained power tools.
f) Keep cutting tools clean and sharpened. Well maintained cut-
ting tools with sharp cutting edges are less like to bind and easier
to control.
g) Use the power tool, accessories, disc pads, etc. in accordance
with these instructions and according to their characteristics, de-
pending on the task to be carried out and the working conditions.
Using a power tool for reasons other than those for which it was
designed can be dangerous.
5) Repairs
Have your power tool repaired by a qualied technician who only
uses identical spare parts. This is vital in order to ensure that the
power tool can be used safely.
GENERAL SAFETY INSTRUCTIONS
12
The crossed-out wheeled bin means that within the European Union the product must be taken to separate collection at
the product end-of-life. This applies to your device but also to any accessories marked with this symbol. do not dispose of
these products as unsorted municipal waste.
In accordance with the WEEE directive concerning the environment, it is forbidden to abandon used electric or electronic
equipment or leave them at a standard public dump. The equipment must be taken to a collection point for treatment, re-
covery and recycling of EEE waste, or returned to its dealer on a 1 for 1 basis (one item of equipment bought for one item
of equipment taken back). The user is therefore taking an environmentally-friendly step and helping to preserve natural
resources and protect human health.
EXTENSION CORDS
Only use extension cords with three conductors ending in two-pin plugs and sockets with two holes and an earth pin that are suited to
the plug of the tool. When using a power tool at a considerable distance from the power source, use an extension cord heavy enough
to carry the current that the tool will draw. An undersized extension cord will cause a drop in line voltage, resulting in a loss of power
and causing the motor to overheat. Use the chart provided below to determine the minimum wire size required in an extension cord.
Only round jacketed extension listed by laboratories should be used.
Length of extension cord: up to 15 m
Wire size: 3 x 2.5 mm2
Before using an extension cord, inspect it for loose or exposed wires and cut or worn insulation. Repair or replace any damaged or
worn cord immediately.
ELECTRICAL CONNECTIONS
Your machine has a precision built electric motor. It should be connected to a power supply that is 230 V, 50 Hz. If your tool does not
operate when plugged into a socket, double-check the power supply characteristics.
The noise level of the machine is measured according to standards DIN EN ISO 3744: 1995-11 and DIN EN ISO 11203: 1996-07.
The values given are emission values calculated according to applicable standards and not values relating to use in the workplace.
Although correlation between those different emission levels does exist, this cannot be reliably used to determine whether additional
precautions are necessary. Factors with potential inuence on the sound emission level in the workplace include the length of the
period of work, the size of the room and any other sources of noise (e.g. number of machines operating, other noisy work being carried
out at the same time). Acceptable exposure levels may vary from one country to another. For all these reasons, we would advise users
to wear equipment to protect their ears while using this machine.
The A-weighted emission sound pressure levels at the workstattion are lower than 70dB.
Earthing consists in connecting metal masses, that are liable to come acciden-
tally in contact with the current due to faulty insulation in an electrical device, to
an earth connection by means of a conductive wire. That earth connection, when
used with a differential circuit breaker, prevents electrical incidents. The current
ows directly into the earth and the power supply is automatically cut off. Do not
modify the supplied plug. If it cannot be put into the socket, have an appropriate
socket installed by a qualied electrician. If the earth conductor of a machine is
incorrectly connected, this can lead to a risk of electric shock. The earth conduc-
tor is contained in green insulation with a yellow line. If the power cord needs to
be repaired or replaced, do not connect the earth conductor to a live terminal.
Call in a qualied electrician or maintenance personnel if the earthing instructions
are not fully understood or if in any doubt about the correct earthing of the tool. If
the power supply cable is damaged, it should be replaced by the manufacturer,
the manufacturer’s after-sales department or similarly qualied person in order
to avoid any danger. Do not use a tool if its power cord is damaged. This tool is designed to be used with a circuit containing a power
socket. It is also equipped with an earthing pin.
ENVIRONMENT PROTECTION
CONNECTING THE MACHINE – ELECTRICAL CONNECTIONS
NOISE INFORMATION
EARTHING INSTRUCTIONS
13
safETY insTrUCTiOns sPECifiC TO DriLL PrEssEs
1.This drill press is designed for indoor use, in a dry environment.
2.Do not drill excessively small pieces as they may not be held correctly.
3.Keep your hands out of the path of drill bits. Avoid awkward hand positions.
A sudden slip could cause a hand to move into the drill bit.
4.Do not install or use drill bits longer than 175mm or bits that exceed the
jaws of the chuck by more than 150mm. They could twist or break at any time.
WarninG!
Make sure to follow the basic safety instructions while using power tools in
order to reduce the risk of re, electric shock or other injury
5.Use the drill bits recommended for the material of the work-
piece. Do not use wire brushes, rotary les or hole saws with
this drill press.
6.While drilling a large workpiece, make sure it is fully suppor-
ted, at the table height.
7.Do not work without using your hands. Use accessories,
clamps, templates or other tools for unstable workpieces.
8.Do not drill the material too rapidly, in order not to overload
the drill bit.
9.Make sure that there are no nails or foreign bodies in the
workpiece.
10.If the workpiece is larger than the table and is liable to fall or
tip over if it is not held in place, secure it to the table or use an
additional support.
11.While using a drill press vice, always secure it to the table.
12.Make sure that all the fastenings and clamping systems are
correctly locked before drilling.
13.Never perform assembly or set-up work on the table when
the drill press is running.
14.Wear appropriate personal protective equipment if needed,
including:
- safety gloves while handling drill bits and sharp unworked
materials.
- ear protection to reduce the risk of damaging your hearing;
- breathing mask to reduce the risk of inhaling dust particles,
which are harmful to health;
- safety goggles.
WARNING!
Keep the working area clean and free of debris or cutting
scrap around the machine.
Use bits that are properly sharpened. Check the maximum
speed stated on the drill bits.
Do not replace the laser with another type of laser. Repairs
may only be made by the laser manufacturer or another
authorised party.
Do not remove debris or scrap from the cutting area while the
machine is operating and when the drill press head is down.
Make sure that the machine is always secured to a bench or
a supporting surface whenever possible.
SYMBOLES
V Volt
A Amperes
Hz Hertz
W Watts
min Minutes
~ Alternating current
h Hours
I ON
O OFF
rpm Revolutions per minute
Wear protective goggles
Wear ear protection
Wear a dust mask
MAKE SURE YOU READ AND FULLY UNDERSTAND
THE OPERATING INSTRUCTIONS:
To reduce the risk of injury, users and bystanders
should read and understand the instructions for use
before the product is used.
KEEP YOUR HANDS AWAY FROM THE BLADE:
Failure to keep your hands away from the blade could
cause serious injury.
ENVIRONMENT PROTECTION
Do not dispose of unused material as waste; recycle
it. All tools, hoses and packaging must be sorted,
then sent to the nearest waste reprocessing facility
to be recycled in an environmentally friendly manner.
It is forbidden to abandon used electrical or electro-
nic equipment or leave it at a standard public tip; it
should be taken to a centre designed for recycling
such material. Please contact your local authority for
information about your nearest facilities. Abandoning
electrical equipment or leaving it at public tips can
cause hazardous substances to enter the water table
and the food chain, and can thus be harmful to your
health and well-being. If you replace an old electrical
device with a new one, your reseller is legally required
to take back your old device free of charge and take
responsibility for its disposal.
14
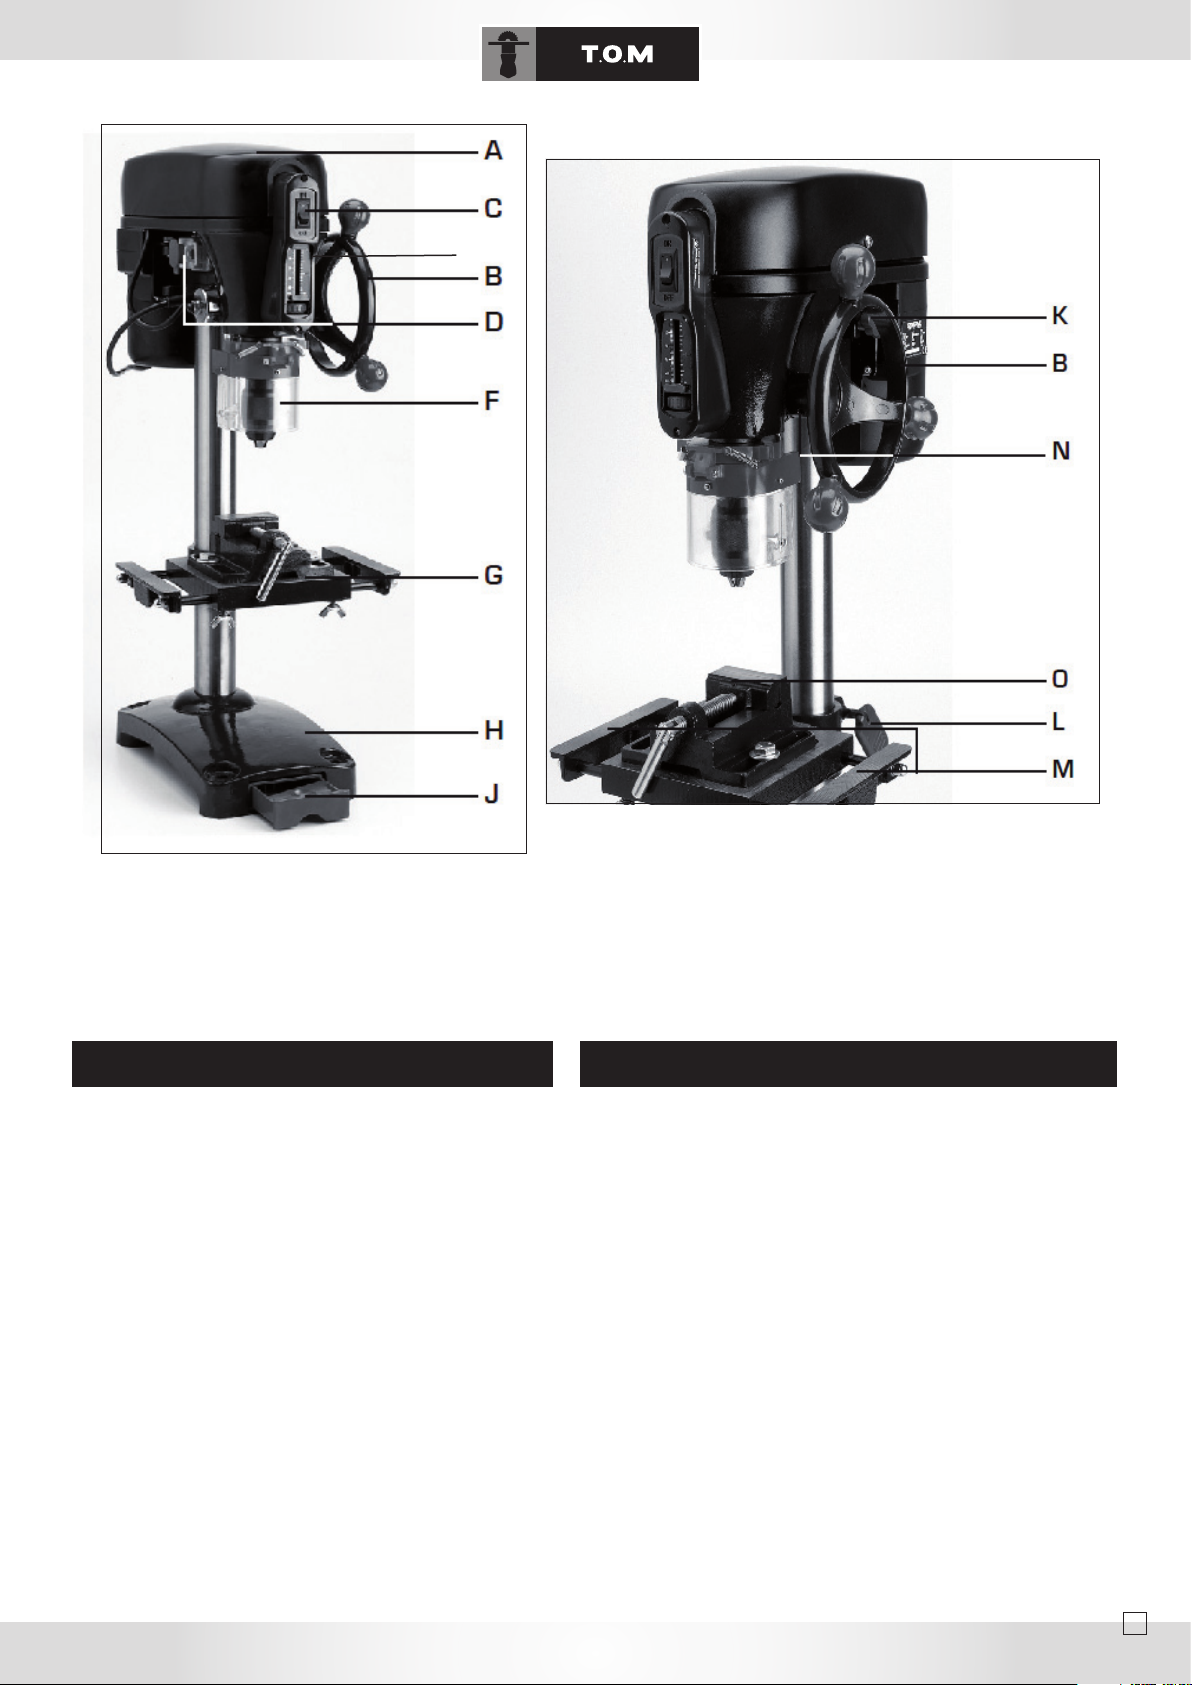
A: pulley casing
B: chuck lowering wheel
C: laser switch
D: push-button stop switch
E: depth stop
F: chuck guard
G: table
H: base
J: Allen key and drill bit storage drawer
K: belt tension locking rod
L: table locking handle
M: table extension
N: laser
O: vice
sPECifiCaTiOnsinsTaLLaTiOn
Motor power rating: 350 W
Motor power supply: 230 V 50Hz
Speed range 580 to 2600 rpm
Drilling capacity: 13 mm
Morse taper: B16
Keyless chuck: B16 13 mm
Spindle travel: 50 mm
Spindle/column distance: 105 mm
Spindle/table distance: 330 mm
Spindle/base distance: 400 mm
Table size without extension: 198 x 173 mm
Table size with extension: 280 x 173 mm
Base dimensions: 315 x 180 mm
Column diameter: 48 mm
Total height: 730 mm
E
15

assEMBLY
iMPOrTanT!
Unpack the drill press and make sure that it is not damaged.
If any part appears damaged, take the machine back to your point of sale, and do not attempt to assemble it.
Column assembly
Secure the column using three screws (plain washers + lock washers) and tighten rmly. Assemble the table D of the drill press on the
column, while positioning the rack in the collar.
Position the rack collar
Assemble the drill press head on the column.
Position the drill press head parallel to the base.
Fasten the headless screws on the right-hand side of the drill press head using the Allen key supplied. Screw the three balls on the
chuck lowering wheel.
A
C
B
D
Assembling the chuck guard visor
Unscrew and remove the central screw of the guard
Fit the guard visor.
Put back the central screw with its nut and tighten it.
Fasten the two screws to the right and left of the visor. These two screws are placed on the ring.
Assembling the chuck
Thoroughly clean the morse taper of the drill press and the female taper of the chuck.
Snap the chuck into the taper.
Take a block of wood, place it on the table, move in the chuck jaws and then turn the wheel rmly so as to strike the chuck on the
wooden block.
Electrical connections
The connections and the extension cords used must comply with the instructions. The voltage and frequency must be as stated on the
machine.
The rating of the mains fuse must be 10A.
Use H07 RN-F type cables for the connections.
All the connections and repairs of the electrical system must only be carried out by a qualied electrician .
Starting up
This machine must be connected to the earth.
The drill press motor is started up by means of a switch located on the left-hand side of the drill press.
16

Always follow the safety instructions and comply with applicable regulations.
Adjust the table height and drilling depth so as to not drill the table.
Insert a wooden block to protect the table and the drill.
Make sure that the drill bit does not move the workpiece.
Clamp the workpiece to the table or use the vice supplied.
Select the speed so that the drill bit can operate fast and without interruption.
If the drill speed is too high, this could lead to burn marks; if it is too slow, this could make the motor stall or break the drill bit.
OPEraTinG THE MaCHinE
iMPOrTanT!
Keep your ngers at a safe distance from the rotating drill bit and keep in mind the fact that the workpiece or your hands might slip.
Never remove chips and machined workpieces before the machine has come to a halt.
Never work with the chuck guard or belt cover open.
Always x the vice to the table.
Never work on a workpiece held in the air with no support from the table.
Place long workpieces on support stands.
sETTinGs
Before setting the machine, disconnect it from the mains.
Changing the speed
Loosen the safety screw and open the belt cover.
A speed/belt position chart is provided on the inside of the cover. Use the chart every time you change the speed.
Change the speed.
Loosen the belt tension locking rods on both sides. Release the belts.
Change the belt position as indicated on the speed/belt position chart. Tighten the belts and lock the two belt tension rods.
Close the cover and tighten the safety screw.
The drill press cannot be started up if the belt cover is open. A safety contact will keep the power switched off.
Setting the depth stop:
Use the depth stop to drill several holes of the same depth. Lower the shaft with the drill to the required depth.
Set the depth stop setting nut (E, g. 1) on the locking jaws. When you turn the wheel, the bit cannot be lowered below that depth.
Table tilt:
Never carry out this setting when the machine is operating. Loosen screw C to tilt the table
iMPOrTanT!
The drill press cannot be started up if the belt cover is open. A safety contact will keep the power switched off.
17
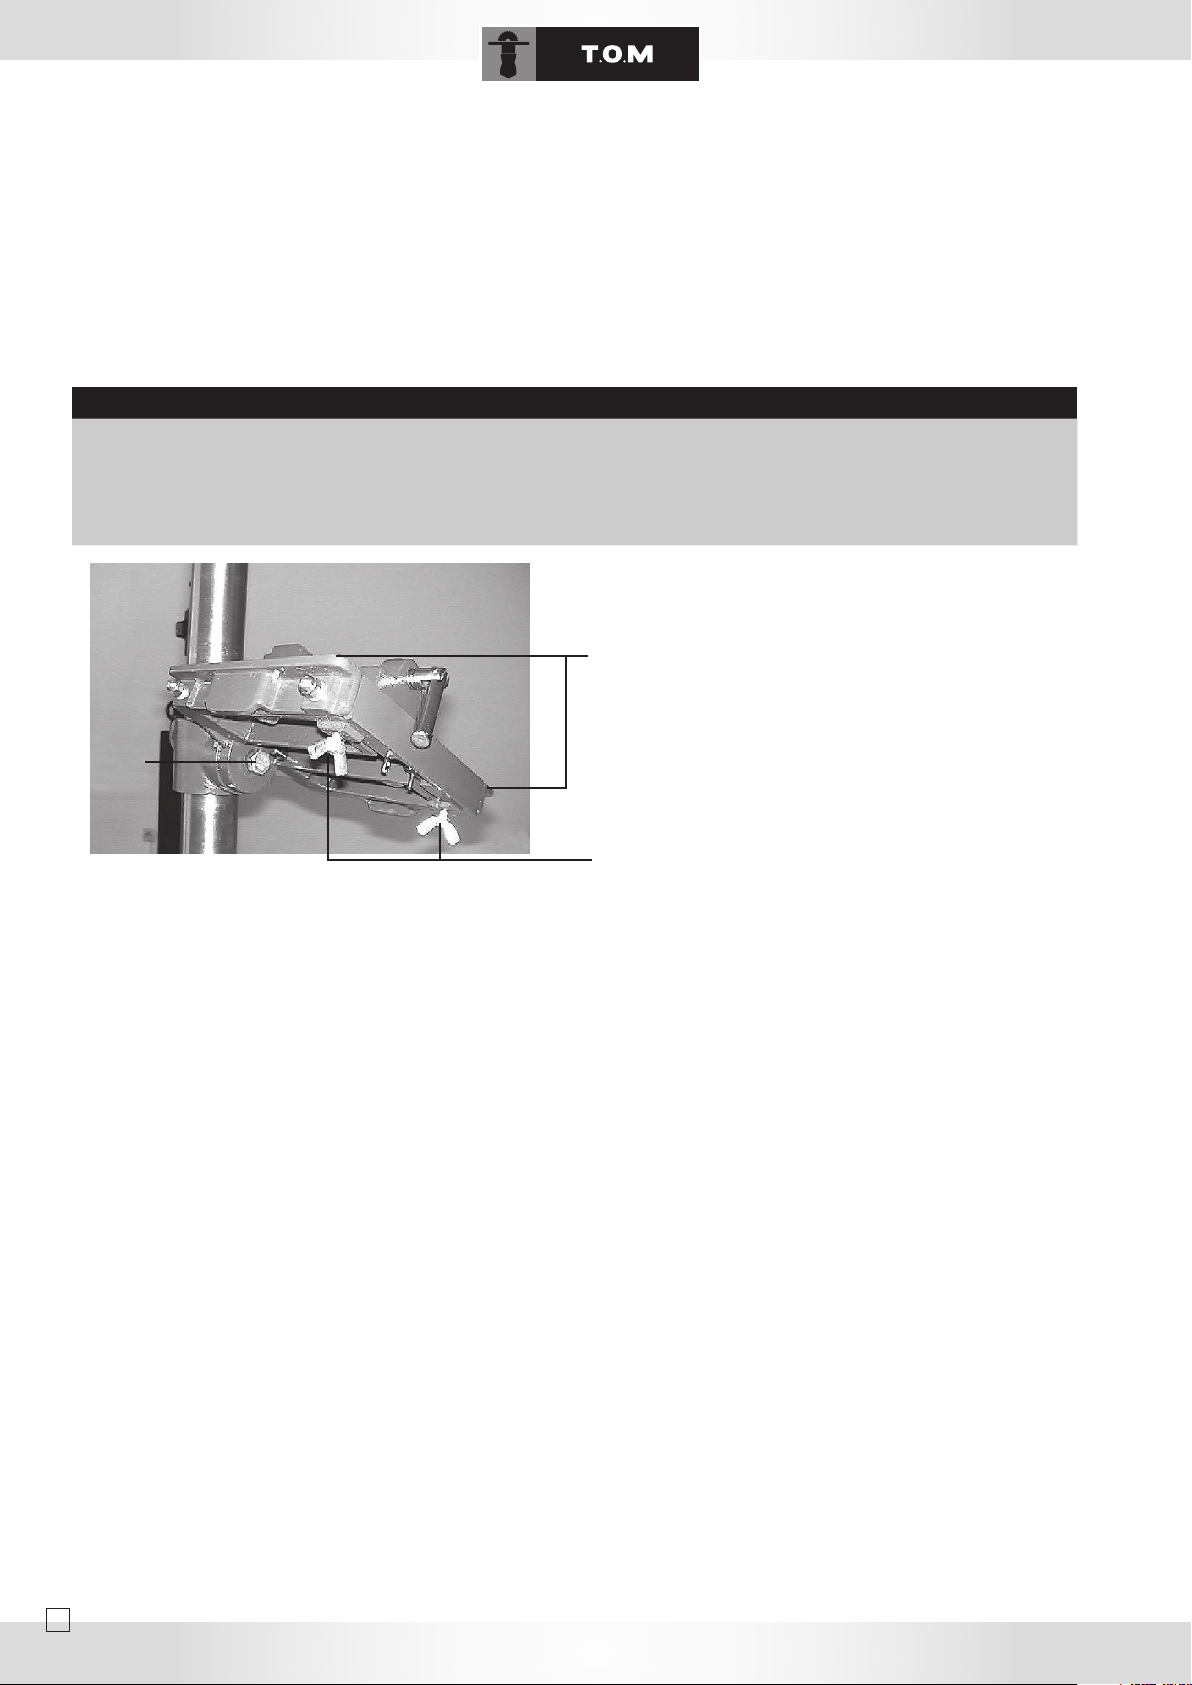
Setting the depth stop:
Use the depth stop to drill several holes of the same depth. Lower the shaft with the drill to the required depth.
Set the depth stop setting nut (E, g. 1) on the locking jaws. When you turn the wheel, the bit cannot be lowered below that
depth.
Table tilt:
Never carry out this setting when the machine is operating. Loosen screw C to tilt the table.
iMPOrTanT!
Loosen screw C only slightly; otherwise, the table and the extensions may fall off.
Set the required table angle.
Tighten the screw.
If needed, loosen wing screws B to pull out the side extensions A.
A
C
B
Disconnect the machine from the mains before starting
any maintenance, setting or cleaning work!
All the connections and repairs of the electrical system
may be carried out by a qualied electrician only.
Immediately replace damaged or worn safety devices.
Cleaning: clean the machine regularly.
Lubrication: regularly apply a bit of grease to:
•The drive shaft.
•The gears of the drilling spindle.
Laser guide:
The laser is started up by means of a switch located on the front of the machine.
The laser A is used for centring the workpiece on the table. For best results, the laser must be adjusted by tilting it forwards or
backwards so that the cross formed by the beam indicates the centre of the table.
The laser guide emits harmful radiation when it is operating. Keep your eyes safe from direct exposure.
Warning: max. power < 1 mW, wavelength: 630 - 670 mm, DINEN6085-1: 1997, laser radiation: do not stare at the beam, class II
laser.
18

INHALTSVERZEICHNIS
DEUTsCH -----------------------------------------------------------------------------------------------------------------------------
ALLGEMEINE SICHERHEITSHINWEISE ---------------------------------------------------------------------------------
4
UMWELTSCHUTZMASSNAHMEN------------------------------------------------------------------------------
5
ZUSÄTZLICHE SICHERHEITSHINWEISE FÜR STÄNDERBOHRMASCHINEN ----------------
6
GERÄTE-ELEMENTE ---------------------------------------------------------------------------------------------
7
TECHNISCHE DATEN -------------------------------------------------------------------------------------------- 7
MONTAGE ------------------------------------------------------------------------------------------------------------- 8
GEBRAUCH DER MASCHINE-----------------------------------------------------------------------------------
9
LASERFÜHRUNGSSYSTEM ---------------------------------------------------------------------------------
10
EXPLOSIONSZEICHNUNG ---------------------------------------------------------------------------------
11
KONFORMITÄTSERKLÄRUNG ------------------------------------------------------------------------------
12
ENGLISH ----------------------------------------------------------------------------------------------------------------------------------
GENERAL SAFETY RULES -----------------------------------------------------------------------------------------------------
14
ADDITIONAL SAFETY RULES FOR TABLE SAW -----------------------------------------------------------------
14
SYMBOLS --------------------------------------------------------------------------------------------------------------------------------
15
INSTALLATION -------------------------------------------------------------------------------------------------------------------------
15
PRODUCT SPECIFICATIONS -------------------------------------------------------------------------------------------------
15
ASSEMBLY AND ADJUSTMENTS ------------------------------------------------------------------------------------------
16
SETTING THE TOOL ----------------------------------------------------------------------------------------------------------------
18
CONNECTING TO THE POWER SUPPLY -----------------------------------------------------------------------------
19
OPERATION THE TOOL ----------------------------------------------------------------------------------------------------------
20
CHANGING BLADES ----------------------------------------------------------------------------------------------------------------
21
RECYCLABLE MATERIALS ANALYSIS LIST -------------------------------------------------------------------------
33
TSR-210 PARTS LIST --------------------------------------------------------------------------------------------------------------
33
TSR-210 MOTOR PARTS LIST -----------------------------------------------------------------------------------------------
36
TSR-210 STAND PARTS LIST --------------------------------------------------------------------------------------------------
38
CONFORMITY AND WARRANTY -------------------------------------------------------------------------------------------
43
deutsch -------------------------------------------------------------------------------------------------------------------------------
allgemeine sicherheitsregeln -----------------------------------------------------------------------------------------
23
zusätzliche sicherheitsregeln für tischkreissägen ----------------------------------------------------
24
symbole ------------------------------------------------------------------------------------------------------------------------------
25
installation -----------------------------------------------------------------------------------------------------------------------
25
spezifikationen ------------------------------------------------------------------------------------------------------------------
25
montage -----------------------------------------------------------------------------------------------------------------------------
26
einrichten des werkzeugs -----------------------------------------------------------------------------------------------
28
anschluß an die stromquelle -----------------------------------------------------------------------------------------
29
inbetriebnahme des geräte ----------------------------------------------------------------------------------------------
30
sägeblattwechsel -------------------------------------------------------------------------------------------------------------
31
liste für recyclebare materialien -----------------------------------------------------------------------------------
32
teileliste tsr-210 -----------------------------------------------------------------------------------------------------------------
33
motorteile liste tsr-210 ----------------------------------------------------------------------------------------------------
36
stückliste der basis tsr-210 ----------------------------------------------------------------------------------------------
38
ACHTUNG
Ein fEhlErhaftEr und riskantEr GEbrauch diEsEs ElEktrowErkzEuGs kann
schwErE odEr tödlichE körpErvErlEtzunGEn zur folGE habEn.
vor dEr inbEtriEbnahmE dEr maschinE diE bEdiEnunGsanwEisunG vollstän-
diG durchlEsEn.
bedienungsanweisung aufbewahren.
Y
BEDiEnUnGsanWEisUnG
19

aCHTUnG : Bedienungsanweisung vollständig durchlesen. Eine
Missachtung der nachstehend aufgelisteten Vorschriften kann einen
Stromschlag, einen Brand oder schwere Verletzungen zur Folge ha-
ben. Der in den unten aufgeführten Sicherheitshinweisen verwendete
Begriff «Elektrowerkzeug» bezieht sich sowohl auf die Verwendung des
Elektrowerkzeugs bei Netzbetrieb (über das Netzkabel) als auch bei
Batteriebetrieb (ohne Kabel).
BEDIENUNGSANWEISUNG AUFBEWAHREN.
1) Arbeitsbereich
a) Den Arbeitsbereich sauber halten und für gute Beleuchtung sorgen.
Unaufgeräumte und schlecht beleuchtete Arbeitsbereiche erhöhen das
Unfallrisiko.
b) Elektrowerkzeuge nicht in Umgebungen mit erhöhter Explosionsge-
fahr, in denen sich leicht entammbare Flüssigkeiten, Gase oder Staub
benden, betreiben. Elektrowerkzeuge erzeugen während des Betriebs
Funken, durch die sich Staub oder Dämpfe leicht entzünden können.
c) Während des Betriebs von Elektrowerkzeugen dafür sorgen, dass sich
keine Kinder oder sonstige Unbeteiligte in der Nähe benden. Bei Unacht-
samkeit kann die Kontrolle über das Werkzeug verloren gehen.
2) Elektrische Sicherheit
a) Der Stecker des Elektrowerkzeugs muss zur Wandsteckdose
passen. Keinesfalls Manipulationen am Stecker vornehmen. Für
Elektrowerkzeuge, die eine Erd- oder Masseverbindung benötigen, keine
Adapterstecker verwenden. Die Verwendung der passenden Originalstec-
ker und -wandsteckdosen verringert die Stromschlaggefahr.
b) Körperkontakt mit geerdeten Oberächen wie Rohren, Heizungen,
Kühlschränken usw. vermeiden. Es besteht erhöhte Stromschlaggefahr,
wenn der Körper des Bedieners mit der Erde oder einer Masse verbun-
den ist.
c) Elektrowerkzeuge von Regen und Nässe fernhalten. Das Eindringen
von Wasser in das Elektrowerkzeug erhöht die Stromschlaggefahr.
d) Das Netzkabel nicht zweckentfremden. Keinesfalls das Netzkabel zum
Tragen oder Ziehen des Werkzeugs oder zum Herausziehen des Stec-
kers aus der Steckdose verwenden. Das Kabel von Hitze, Öl, scharfkanti-
gen Objekten und beweglichen Geräteteilen fernhalten. Beschädigte oder
verknotete Netzkabel erhöhen die Stromschlaggefahr.
e) Für die Verwendung des Elektrowerkzeugs im Freien eine speziell
für den Außenbereich ausgelegte Verlängerungsleitung vorsehen. Dies
erhöht die
Stromschlaggefahr.
3) Persönliche Sicherheit
a) Beim Betrieb eines Elektrowerkzeugs immer aufmerksam sein und
verantwortungsbewusst handeln. Das Elektrowerkzeug keinesfalls bei
Ermüdungszuständen oder unter Einuss von Drogen, Alkohol oder Me-
dikamenten verwenden. Ein kurzer Moment der Unaufmerksamkeit kann
schwere Körperverletzungen nach sich ziehen.
b) Sicherheitsausrüstungen verwenden. Stets eine Schutzbrille tragen.
Sofern erforderlich Sicherheitsausrüstungen wie eine Staubmaske,
Schuhe mit rutschfesten Sohlen, einen Schutzhelm und Gehörschutz
tragen, um das Risiko einer Körperverletzung zu mindern.
c) Jegliches unbeabsichtigte Anlaufen vermeiden! Vor dem Anschließen
sicherstellen, dass der Schalter in der Position OFF steht. Das Tragen
von Elektrowerkzeugen mit einem Finger auf dem Schalter oder das
Anschließen bei eingeschaltetem Gerät kann Unfälle verursachen.
d) Vor dem Einschalten des Elektrowerkzeugs Einstellschlüssel abziehen.
Falls ein Schlüssel an einem beweglichen Geräteteil hängenbleibt, bes-
teht erhebliche Verletzungsgefahr.
e) Nie zu weit nach vorn beugen. Stets auf einen festen Stand achten und
das Gleichgewicht halten, dadurch wird eine bessere Kontrolle über das
Elektrowerkzeug in unerwarteten Situationen gewährleistet.
f) Angemessene Arbeitskleidung tragen. Keine weite Kleidung oder
Schmuck tragen. Haare, Kleidung und Handschuhe von beweglichen
Geräteteilen fernhalten. Weite Kleidung, Schmuck oder Haare könnten
sich in sich bewegenden Geräteteilen verfangen.
g) Sofern eine Staubabsaug- und auffangvorrichtung vorgesehen ist,
sicherstellen, dass diese korrekt angeschlossen ist und ordnungsgemäß
arbeitet. Die Verwendung solcher Vorrichtungen verringert die mit der
Staubentwicklung in Zusammenhang stehenden Gefahren.
4) Gebrauch und Wartung des Elektrowerkzeugs
a) Das Elektrowerkzeug nicht überlasten. Ein für den vorgesehenen
Zweck geeignetes Elektrowerkzeug verwenden. Mit dem passenden
Elektrowerkzeug kann besser und sicherer im angegebenen Leistungsbe-
reich gearbeitet werden.
b) Elektrowerkzeuge, die sich nicht mehr ein- oder ausschalten lassen,
dürfen nicht mehr verwendet werden. Sie stellen eine Gefahrenquelle dar
und müssen repariert werden.
c) Den Stecker vom Netz trennen bzw. die Batterie herausnehmen, bevor
Einstellungen vorgenommen werden, Zubehör gewechselt oder das
Elektrowerkzeug verstaut wird. Diese Vorsichtsmaßnahmen mindern die
Gefahr eines unbeabsichtigten Anlaufens des Geräts.
d) Unbenutzte Elektrowerkzeuge außerhalb der Reichweite von Kin-
dern aufbewahren. Elektrowerkzeuge nicht an unerfahrene Personen
weitergeben, die nicht mit dem Gebrauch des Geräts vertraut sind und die
vorliegende Bedienungsanweisung nicht kennen. Eine Benutzung durch
unerfahrene Personen birgt Gefahren.
e) Elektrowerkzeuge regelmäßig warten. Kontrollieren, ob bewegliche
Teile falsch ausgerichtet sind oder klemmen und ob Teile gebrochen
oder so beschädigt sind, dass die Funktion des Elektrowerkzeugs
beeinträchtigt wird. Beschädigte Elektrowerkzeuge vor dem Gebrauch
reparieren lassen. Viele Unfälle haben ihre Ursache in schlecht gewarte-
ten Elektrowerkzeugen.
f) Schneidwerkzeuge scharf und sauber halten. Sorgfältig gepegte
Schneidwerkzeuge mit scharfen Schneidkanten verklemmen sich weniger
und sind leichter zu führen.
g) Das Elektrowerkzeug, sein Zubehör, die benötigten Körnungen usw.
stets unter Einhaltung der Vorschriften der vorliegenden Bedienung-
sanweisung und Beachtung ihrer technischen Eigenschaften, des Ve-
rwendungszwecks und der spezischen Arbeitsbedingungen verwenden.
Die Verwendung eines Elektrowerkzeugs zu Zwecken, für die es nicht
ausgelegt ist, kann Gefahren bergen.
5) Reparaturen
Reparaturen des Elektrowerkzeugs sind unter der ausschließlichen
Verwendung von Original-Ersatzteilen von einem qualizierten Tech-
niker ausführen zu lassen. Dies ist für ein sicheres Arbeiten mit dem
Elektrowerkzeug unerlässlich.
aLLGEMEinE siCHErHEiTsHinWEisE
20
Table of contents
Languages:
Popular Drill manuals by other brands


Hitachi
Hitachi FDV 16VB2 Handling instructions

Ingersoll-Rand
Ingersoll-Rand P33 Series Product information

Bosch
Bosch GSR Professional Original instructions

Fein
Fein ABOP 6 Repair instructions

Cleveland Steel Tool
Cleveland Steel Tool Handy-Mag II user manual

Black & Decker
Black & Decker DR260 instruction manual


