Supporting the extraction function:
♦
Sawdust blowing function
Switching the sawdust blowing function on:
♦
Fitting the splinter guard
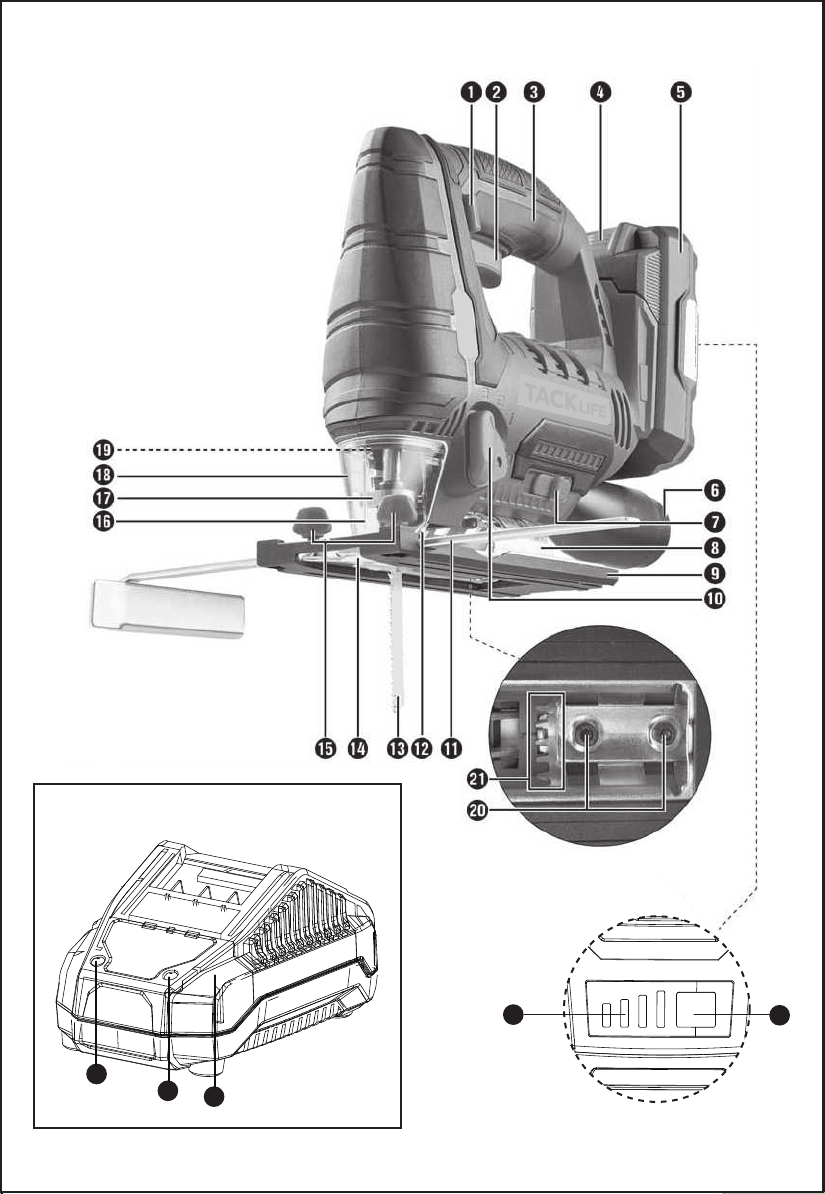
The splinter guard 14 can prevent the tearing up of the surface when sawing wood. The splinter guard
14 can only be used with certain sawblade types without the sliding shoe 9and only at a cutting angle
of 0°.
♦
Fitting the sliding shoe
When working on sensitive surfaces, you can fit the sliding shoe 9on the baseplate 8to prevent
scratching the surface.
♦
♦
Use
Setting the cutting angle
♦
♦
♦
NOTE
►
Setting the stroke rate
The ON/OFF switch 2 has a variable speed control. Press the ON/OFF switch 2lightly for a low
speed. Increasing the pressure increases the speed.
NOTE
►
Adjusting the pendulum stroke
♦
CORDLESS JIGSAW DJS20A
Introduction
Congratulations on the purchase of your new appli�ance. You have chosen a high-quality product.
The operating instructions are part of this product. They contain important information about safety,
usage and disposal. Before using the product, please familiarise yourself with all operating and safety
instructions. Use the product only as described and for the range of applications specified.
Intended use
This appliance is suitable for making straight and curved cuts as well as mitre cuts of up fo 45° in
angular workpieces made of plastic, wood or light metal. This appliance is exclusively intended for
private use in dry indoor spaces. Any other usage of or modification to the appliance is deemed to be
improper and carries a significant risk of accidents. The manufacturer accepts no responsibility for
damage(s) attributable to misuse.
Features
Package contents
Technical data
Use only the following battery to operate the cordless tool:
Use only the following high-speed battery charger to charge the cordless tool:
Noise emission value:
Noise measurement value determined in accordance with EN 60745. The A-rated noise level of the
power tool is typically as follows:
Sound pressure level: lPA = 80 dB (A) Uncertainty K:
KPA = 3 dB
Sound power level: l^A= 91 dB (A)
Uncertainty K: KWA = 3 dB
Wear hearing protection!
Total vibration value:
(vector total of three directions) determined in accordance with EN 60745:
Cutting boards: ahB = 5.9 m/s2
Uncertainty K = 1.5 m/s2
Cutting sheet metal: ahM = 7.2 m/s2
Uncertainty K = 1.5 m/s2
NOTE
►
WARNING!
►
The vibration level specified in these instructions has been measured in accordance with the
standardised measuring procedure specified in EN 60745 and can be used to make equipment
comparisons. The specified vibration emission value can also be used to make an initial exposure
estimate.
The vibration level will vary according to the use of the power tool and may sometimes be higher
than the value specified in these instructions. Regular use of the power tool in this way may cause
the user to underestimate the vibration. Try to keep the vibration loads as low as possible.
Measures to reduce the vibration load are, e.g. wearing gloves and limiting the working time.
Wherein all states of operation must be included (e.g. times when the power tool is switched off
and times where the power tool is switched on but running without load).
General Power Tool Safety Warnings
WARNING!
►
Save all warnings and instructions for future reference.
The term "power tool" in the warnings refers to your mains-operated (corded) power tool or battery-
operated (cordless) power tool.
safety
1.
a)
b)
c)
2.
a)
b)
c)
d)
e)
f)
3.
a)
b)
c)
d)
e)
f)
g)
Read all safety warnings and all instructions. Failure to follow the warnings and instructions may
result in electric shock, fire and/or serious injury.
Work area safety
Keep work area clean and well lit. Cluttered or dark areas invite accidents.
Do not operate power tools in explosive atmospheres, such as in the presence of flammable
liquids, gases or dust. Power tools create sparks which may ignite the dust or fumes.
Keep children and bystanders away while operating a power tool. Distractions can cause you to
lose control.
Electrical safety
Power tool plugs must match the outlet.
Never modify the plug in any way.
Do nof use any adapter plugs with earthed (grounded) power tools. Unmodified plugs and match-
ing outlets will reduce risk of electric shock.
Avoid body contact with earthed or grounded surfaces, such as pipes, radiators, ranges and
refrigerators. There is an increased risk of elec�tric shock if your body is earthed or grounded.
Do not expose power tools to rain or wet conditions. Water entering a power tool will increase the
risk of electric shock.
Do not abuse the cord. Never use the cord for carrying, pulling or unplugging the power tool. Keep
cord away from heat, oil, sharp edges or moving parts. Damaged or entangled cords increase the
risk of electric shock.
When operating a power tool outdoors, use an extension cord suitable for outdoor use. Use of a
cord suitable for outdoor use reduces the risk of electric shock.
If operating a power tool in a damp location is unavoidable, use a residual current device (RCD)
protected supply. Use of an RCD reduces the risk of electric shock.
Personal safety
Stay alert, watch what you are doing and use common sense when operating a power tool. Do not
use a power tool while you are tired or under the influence of drugs, alcohol or medication. A
moment of inattention while operating power tools may result in serious personal injury.
Use personal protective equipment. Always wear eye protection. Protective equipment such as
dust mask, non-skid safety shoes, hard hat, or hearing protection used for appropriate conditions
will reduce personal injuries.
Prevent unintentional starting. Ensure fhe switch is in the off-position before connecting to power
source and/or battery pack, picking up or carrying the tool. Carrying power tools with your finger
on the switch or energising power tools that have the switch on invites accidents.
Remove any adjusting key or wrench before turning the power tool on. A wrench or a key left
attached to a rotating part of the power tool may result in personal injury.
Do not overreach. Keep proper footing and balance at all times. This enables better control of the
power tool in unexpected situations.
Dress properly. Do not wear loose clothing or jewellery. Keep your hair, clothing and gloves away
from moving parts. Loose clothes, jewellery or long hair can be caught in moving parts.
If devices are provided for the connection of dust extraction and collection facilities, ensure these
are connected and properly used. Use of dust collection can reduce dust-related hazards.
4.
a)
b)
c)
d)
e)
f)
g)
5.
a)
b)
c)
d)
6.
a)
Appliance-specific safety instructions for jigsaws
■
Power tool use and care
Do not force the power tool. Use the correct power tool for your application. The correct power tool
will do the job better and safer at the rate for which it was designed.
Do not use the power tool if the switch does not turn it on and off. Any power tool that can�not be
controlled with the switch is dangerous and must be repaired.
Disconnect the plug from the power source and/or the battery pack from the power tool before
making any adjustments, changing accessories or storing power tools. Such preventive safety
measures reduce the risk of starting the power tool accidentally.
Store idle power tools out of the reach of children and do nof allow persons unfamiliar operate the
power tool. Power tools are dangerous in the hands of untrained users.
Maintain power tools. Check for misalignment or binding of moving parts, breakage of parts and
any other condition that may affect the power tool's operation. If damaged, have the power tool
repaired before use. Many accidents are caused by poorly maintained power tools.
Keep cutting tools sharp and clean. Properly maintained cutting tools with sharp cutting edges are
less likely to bind and are easier to control.
Use the power tool, accessories and tool bits, etc. in accordance with these instructions, taking
into account the working conditions and the work to be performed. Use of fhe power tool for opera-
tions different from those intended could result in a hazardous situation.
Use and handling of the cordless electrical power tool
Charge a rechargeable battery unit using only the charger recommended by the manufacturer.
Chargers are often designed for a particular type of rechargeable battery unit. There is the danger
of fire if other types of rechargeable battery units are used.
Only the rechargeable battery units supplied are to be used with an electrical power tool. The use
of other rechargeable battery units may lead to the danger of injury or fire.
When they are not being used, store rechargeable battery units away from paper- clips, coins,
keys, nails, screws or other small metal objects that could cause the contacts to be bridged.
Short-circuiting the contacts of a rechargeable battery unit may result in heat damage or fire.
Fluids may leak out of rechargeable battery units if they are misused. If this happens, avoid
contact with the fluid. If contact occurs, flush the affected area with water. Seek additional medical
help if any of the fluid gets into your eyes. Escaping balfery fluid may cause skin irritation or burns.
Service
Have your power tool serviced by a qualified repair person using only identical replace� ment
parts. This will ensure that the safety of the power tool is maintained.
Hold the power tool by the insulated gripping surfaces when carrying out work during which the
power tool may contact hidden power cables.Contact with a live wire may electrify exposed metal
parts of the power tool and could give the operator an electric shock.
CAUTION! RISK OF EXPLOSION! Never charge non-rechargeable batteries!
Protect the rechargeable battery from heat, for example from continuous exposure
to sunlight fire, water and moisture. There is a risk of explosion.
Safety guidelines for battery chargers
■
■
The charger is suitable for indoor use only.
WARNING!
■
Original accessories/auxiliary equipment
■
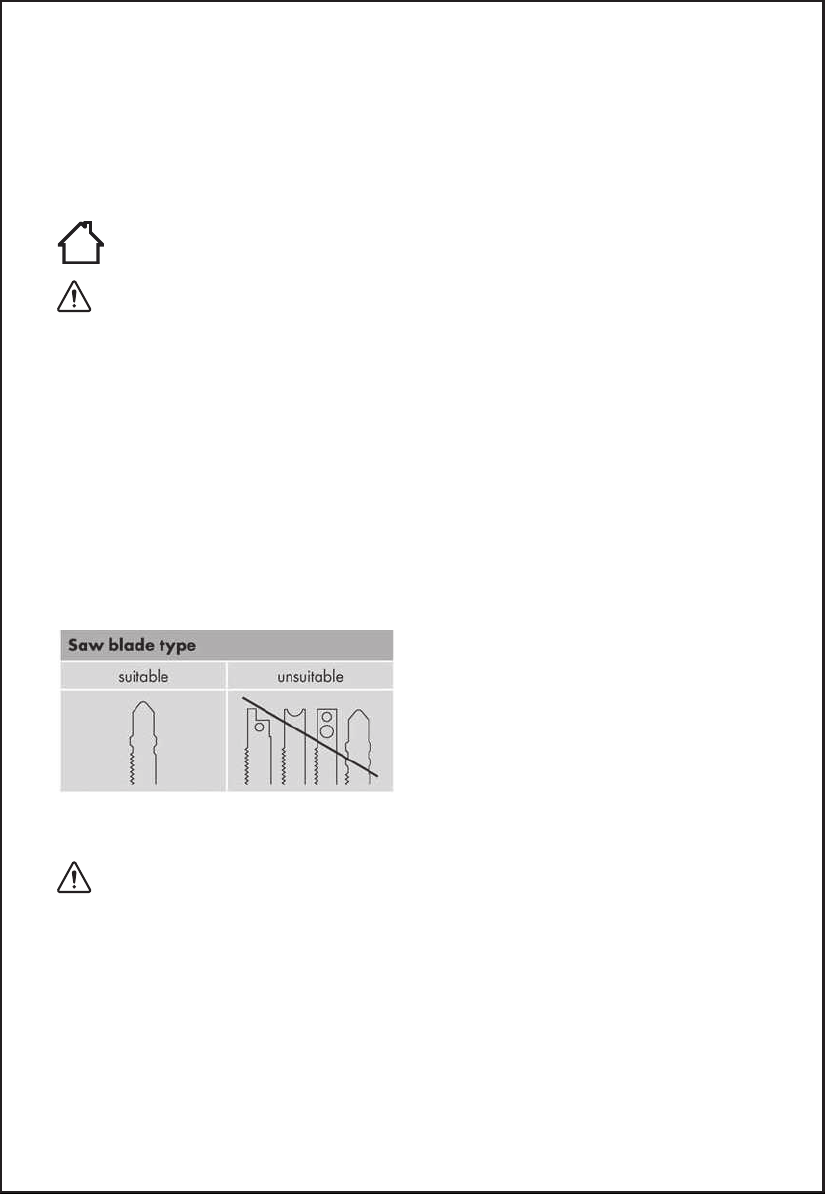
Information on saw blades
The Parkside basic equipment includes saw blades for use with wood and metal.
■
■
■
NOTE
a.
Before use
Charging the battery pack (see fig. A)
CAUTION!
►
NOTE
►
♦
♦
♦
This appliance may be used by children aged 8 years and above and by persons with limited
physical, sensory or mental capabilities or lack of experience and knowledge, provided that they
are under supervision or have been told how to use the appliance safely and are aware of the
potential risks. Do not allow children to use the appliance as a toy. Cleaning and user maintenance
tasks may not be carried out by children unless they are supervised.
To avoid potential risks, damaged mains cables should be replaced by the manufacturer, their
customer service department or a similarly qualified person.
If the power cord requires replacement, this should be carried out by the manufacturer or an
approved representative to avoid safety hazards.
Use only the accessories and additional equipment that are specified in the operating instructions
and are compatible with the appliance.
2 saw blades for general wood cutting
2 saw blades for general plastic cutting
2 saw blade for light metals up to 5 mm
You can use any saw blade, provided it is fitted with a suitable mounting (single-lug shank).
Always unplug the appliance before you remove the battery pack from or connect the battery pack
to the charger.
Never charge the battery pack if the ambient temperature is below 10°C or above 40°C. If a
lithium-ion battery is to be stored for an extended period, the charge level should be checked
regularly. The optimum charge level is between 50% and 80%. The storage climate should be cool
and dry and the ambient temperature should be between 0°C and 50°C.
Connect the battery pack 5to the high-speed battery charger 24 see fig. A).
Insert the power plug into the socket. The control LED 25 lights up red.
The green LED 26 indicates that the charging process is complete and the battery pack 5is ready.
A CAUTION!
♦
♦
♦
■
♦
Attaching/disconnecting the battery pack to/from the appliance
Inserting the battery pack:
♦
Removing the battery pack:
♦
Checking the battery charge level
♦
♦
Initial operation
Fitting/changing the saw blade
Remove the battery before carrying out any work on the power tool (e.g. maintenance, changing
tools, etc.) as well as during the transport and storage of the power tool.
Unintentional activation of the ON/OFF switch can result in injury.
♦
♦
♦
♦
■
Fitting the blade guard
Fit the blade guard 18 before you connect the appliance to a dust extractor.
♦
♦
Fitting the rip fence
The rip fence 11 can be fitted on the left or right of the appliance.
♦
♦
♦
Connecting the sawdust extractor
♦
♦
■
If the red control LED 25 flashes, this means that the battery pack 5has overheated and cannot
be charged.
If the red and green control LEDs 25 26 both flash, this means that the battery pack 5is broken.
Push the battery pack 5back into the appliance.
Never recharge a battery pack again immediately after rapid charging. There is a risk that the
battery pack will overheat and this will reduce the lifespan of the battery.
Switch off the charger for at least 15 minutes between successive charging sessions.
To do this, disconnect the power plug.
Allow the battery pack 5 to click into place in the appliance.
Press the release button④and remove the battery pack.
Press the battery charge level button 22 to check the status of the battery (see also main diagram).
The status will be shown on the battery display LED 23 as follows:
RED/ORANGE/GREEN = maximum charge RED/ORANGE = medium charge
RED = low charge - charge the battery
Press the blade guard together 18 at the height of the outer catches and pull it off to the front.
Turn the quick-release chuck 17 and hold if in this position.
Push the required saw blade into the quick release chuck 17 as far as the stop.
Release the quick-release chuck 17 so that it returns to its initial position. The saw blade is now
locked.
CAUTION! The saw blade teeth must face the front (see fold-out page)!
Fit the blade guard 18 onto the appliance so that the two outer catches engage in the recesses in
the housing.
Remove the blade guard 18 for working without a dust extractor or when making mike cuts.
To do this, press the blade guard together 18 at the height of the outer catches and pull it off to the
front.
Undo both the clamping screws on the insertion openings 15.
Push the rip fence 11 into the insertion openings15
Retighten the two locking screws.
Push the extraction nozzle 6into the vacuum extraction duct until it is secured in place. Optional,
depending on the diameter of the dust and sawdust extractor.
Attach an approved dust and sawdust extractor to the extraction nozzle 6
Wear a dust mask.
Press the sawdust blower switch 7to the "O" position.
Press the sawdust blower switch 7to the position.
Press the splinter guard 14 into the footplate 8from below (notch facing upwards).
Mount the sliding shoe 9 onto the front of the baseplate 8and press it up at the back until it clicks
into place on the baseplate 8.
To remove the sliding shoe 9,unfasten it at the rear of the baseplate 8and slide it off the front.
Undo the clamping screws 20 with the supplied hex key and pull the baseplate 8 to the rear.
Adjust the cutting angle to 0°/15o/30o/45° with the aid of the markings on the baseplate 8Push the
baseplate 8forwards so that the locking pin engages in the toothing 21 .
Retighten the clamping screws 20 with the hex key.
When using a cutting angle of 15°/30°/ 45°, the blade guard 18 and the splinter guard 14 must be
detached beforehand.
The integrated motor brake ensures rapid stoppage.
You can use the pendulum stroke switch 10 to adjust the pendulum movement of the saw blade
13 You can achieve fine, clean-cut edges without pendulum movement (setting "0"). Deactivate
pendulum movement when working on thin workpieces. You can achieve an increasingly fast work
Switching on/off
Switching the appliance on:
♦
♦
Switching the appliance off:
Release the ON/OFF switch 2.
Maintenance and cleaning
WARNING! RISK OF INJURY! Always switch the appliance off and remove the battery before
carrying out any work on the appliance.
■
■
■
■
■
Disposal
European Directive 2012/19/EU requires that worn-out power tools be collected separately and
recycled in an environmentally compatible manner.
Defective or worn-out rechargeable batteries must be recycled according to Directive 2006/66/EC.
Take the battery pack and/or appliance to a nearby collection facility.
Please consult your local authorities regarding suitable disposal of worn out power tools/battery
packs
rate if the pendulum stroke is activated (settings 1 -3).
Push the safety lock-out 1to the left or right and keep it pressed.
Press the ON/OFF switch 2.
Once the saw is running, you can release the safety lock-out 1.The working light 19 illuminates
when the ON/OFF switch 2is depressed lightly or completely. This provides illumination of the
work area in poor lighting conditions.
The appliance must always be kept clean, dry and free from oil or grease.
Use a soft, dry cloth to clean the housing.
If a lithium-ion battery is to be stored for an extended period, the charge level should be checked
regularly. The optimum charge level is between 50% and 80%. The optimum storage environment
is cool and dry.
Clean the appliance after completing your sawing work.
Remove any dirt (e.g. sawdust). If necessary, clean the saw blade mount with a brush or
compressed air.
- 06 -