Tagwood BBQ BBQ01SS User manual

Visit us
Freestanding charcoal grill / Parrilla a carbón de pie
Model / Modelo
BBQ01SS
STYLED TO PERFECTION, CREATED TO LAST, BORN TO GRILL

3
AN EXCELLENT CHOICE
Thank you for choosing TAGWOOD BBQ charcoal grill, a product made of high-quality materials and with high attention to details. We pre-
pared this manual thinking about you and your family. Here are some very simple instructions so that you and your family can enjoy all the
advantages that our product offers, in addition to its safety.
Please read all instructions and safety warnings on this manual thoroughly as you will find useful product information, warnings, and cautions.
IMPORTANT: We have done our best to give you detailed and accurate instructions on how to assemble this product. If in doubt, consult
qualified personnel to assemble this product or contact us directly.
The company is not responsible for any difficulty and / or problem arising from the interpretation of the instructions contained in this manual.
The grill and all its parts must be used only for the purposes in this manual. Both the Company and distributors and / or representatives are
not responsible for any type of damage, either to people and/or property, directly or indirectly, due to the inability to use this product safely
and for which it was designed and manufactured.
If you have any questions that are not indicated in these instructions, or for service, assembly or operation information, you can contact us
Before doing so, remember to locate the serial number on the interior part of the side table.
Before returning your purchased product, please contact us for assistance.
PLEASE carefully read all safety instructions and warnings in detail BEFORE assembling and operating your grill and check if it is properly
assembled and maintained. Failure to follow these instructions may result in serious body injury and/or property damage.
IMPORTANT SAFETY WARNINGS
IN CASE OF AN EMERGENCY, ALWAYS CALL 911 FIRST. Please keep in mind that major causes of grill fires are
a result of poor maintenance and failure to maintain a required distance from the grill and combustible and non-combustible materials and
products. If uncontrolled fire occurs, always call 911 or Fire Department first.
• Use caution when moving the grill to prevent injuries.
• Ensure the grill is completely cool to the touch before moving.
•
Do not place anything flammable on the under shelf or products
that can melt.
• This product is not recommended for people with reduced phys-
ical, sensory, or mental capabilities, or lack of experience and
knowledge, unless they are under direct supervision or instruc-
tion by a person responsible for their safety.
HOT SURFACES.
HEAT RESISTANT SAFETY GLOVES REQUIRED.
WARNING: This grill is for outdoor use ONLY. Do not use on unventilated areas.
WARNIMG: While all care has been taken to remove sharp edges, care must be taken when cleaning, assembling, or handling the grill to
prevent risk of injury from exposed metal edges.

4 5
•
To ease assembling and avoid injury, use 3 people when assem-
bling when it is in its original box.
• If missing any parts or damaged, do not attempt to assemble.
• Do not store children’s items of interest in the grill.
•
Combustion by-products produced when using this product con-
tain chemicals known to the State of California to cause cancer,
birth defects or other reproductive harm. For more information
please visit www.p65Warnings.ca.gov
•
We recommend, in case you need to move or relocate the prod-
uct, hire suitable personnel for the transfer. Avoid disassembling
the product, and once relocated, it is necessary to readjust all
the parts and screws again.
•
These warnings apply to all our products and accessories sold
under our brand.
GRILL LOCATION WARNINGS
•
Do not place the grill on any surface that is unable to safely
support the weight of the grill or it may cause it to be unstable.
•
This grill should be used and placed on a non-combustible surface.
•
Keep the grill at least 18ft from any combustible and non-com-
bustible material (decks, buildings, fences, trees, bushes, etc)
from all sides and above. Keep in mind the wind conditions to
add clearance/distance accordingly.
•
Do not place the grill near flammable liquids, gases, or where
flammable vapors may be present.
• Place this grill on an area protected from the wind.
OPERATION WARNINGS
•
Do not use gasoline, kerosene, or alcohol for lighting charcoal.
Use of any of these or similar products could cause an explosion
possibly leading to severe body injury.
•
Do not leave a grill lit unattended. It must be supervised by a
responsible adult at any time. Keep children and pets away from
the grill as many parts can be hot and can cause severe burns.
•
When adding charcoal and/or wood, use extreme caution. Never
add charcoal lighting fluid to hot or even warm coals as flash-
back and explosion may occur.
•
Never move the grill when it is in use or when it contains hot
coals or ashes.
• Be cautious as flames and sparks may flare-up.
•
Keep hands, face, and body safe from hot steam and flame flare ups.
•
To avoid injuries and protect hands use heat resistant globes or
oven mitts while cooking or touching any part of the grill.
•
Always open or close the top lid holding from its handle as the
door can get extremely hot.
•
Never leave coals and ashes unattended. Before leaving the grill,
coals and ashes must be removed or not burning any longer.
•
Handle secondary grate, griddle, shovel, and coal rake with ex-
treme caution and with heat resistant gloves or oven mitts since
they can get hot and cause injuries.
•
You should clean and maintain your grill after and before every use.
•
Do not place the coal rake and shovel on the grill while using
the grill, as they heat up, and could cause severe burns. Always
place them on another surface that does not heat up to be able
to use on grill.
•
Always place charcoal on top of the refractory bricks. Do not
place charcoal directly on the bottom of the grill.
•
Do not place coals on the front door. Always put them on the firebricks.
• Do not grill in high winds.
•
Do not wear clothing with loose flowing sleeves or allow hair to
hang freely while lighting or using the grill.
• Never allow children to operate the grill.
•
Do not burn manufactured logs, driftwood, trash, leaves, paper,
cardboard, plywood, painted or stained or pressure treated wood.
Avoid using softwoods such as pine or cedar that can throw sparks.
• Be cautious because winds can cause unexpected flare-ups and blow
hot embers from the fire resulting in body injury or property damage.
• When using, never lean on any part of the grill.
•
The use of alcohol, prescription drugs, non-prescription drugs, or
illegal drugs, may impair the consumer’s ability to properly and
safely assemble, move, store, or operate the grill.
•
Dump ashes or charcoal only when they are completely extin-
guished and out.
•
Do not store the grill before ashes and coals are completely out.
•
Do not heat unopened food containers on any part of the grill.
The buildup of pressure resulting from the heat may cause the
container to burst.
•
Always wear closed shoes as hot coals or sparks may fall from
the grill and cause burns or injuries.
LIST OF PARTS:
Accesory kit:
1- Main body
1 pcs
6- Side table
1 pcs
5- Right and left
support rail
2 pcs
2- Bottom shelf
1 pcs
3- Left leg set
1 pcs
4- Right leg set
1 pcs
7- Main grate
3 pcs
15- Height adjustable
system handle
1 pcs
14- Top lid
handle
1 pcs
16- Water
drain system
1 pcs
13- Firebricks
22 pcs
9- Secondary grate
1 pcs
10- Upright column
1 pcs
11- Caster
without brake
2 pcs
12- Caster
with brake
2 pcs
17- Shovel and
coal rake
2 pcs
19- Cover
1 pcs
18- Oil
1 pcs
F- 4#
Allen key
1 pcs
E- Ring fixing
screw
1 pcs
A3- Hexagon screws
M6*60mm
12 pcs
8- Griddle
1 pcs
A1- Hexagon screws
M6*10mm
27 pcs
A2- Hexagon screws
M6*16mm
2 pcs
C- Washer
36 pcs
B- Spring washer
36 pcs
D- Hexagon
tighten screw
1 pcs
Do not use any power tool
Use Allen key

6 7
Assembly: Before you begin to assemble, carefully remove all protective films while avoiding any scratches to the surface or any
parts and whilst protecting the working/assembly area.
Step 1
Screw the two casters with brakes (12) into lower end of left and right leg sets (3,4). Make sure you do it in the front view as marked.
Screw the two casters without brakes (11) into lower end of left and right leg sets (3,4). Make sure you do it in the front view as marked.
Step 2
Assemble the two sets of legs with the bottom shelf (2) using eight M6*10mm hexagon screws(A1), spring washers(B) and washers(C).
Step 3
Assemble right and left support rail (5) with top of leg sets by using eight M6*10mm hexagon screws(A1), spring washers(B) and
washers(C) inside and using six M6*60mm hexagon screws(A3), spring washers(B) and washers(C) outside (using two screws at the
side with bottle opener, and using four screws at the other side).
Step 4
Carefully place the main body (1) on the lower structure. Assemble them together by using four M6*60mm hexagon screws(A3), spring
washers(B) and washers(C).
Step 5
Assemble the top lid handle (14) with top cover using two M6*16mm hexagon screws(A2), spring washers(B) and spring washers(C).
Step 6
Slide the water drain system (16) under the drain hole on main body (1).
Step 8
Assemble the height adjustable system handle (15) with main body (1), using hexagon tighten screw(D) on the handle.
Step 7
Place the firebricks (13) into the body (1).
rear

8 9
Step 9
Put the upright column support (10) upon the right side edge of the firebox, fix them together using four M6*10mm hexagon screws(A1).
Step 10
Insert the secondary grate (9) into the assembled upright column support (10), and fix it with the ring fixing screw(E).
Step 11
Place the main grate (7) or the griddle (8) into the main grate frame.
Step 12
Hang the coal rake and shovel at the right side of the grill.
Step 14
Extra 1: Use the cover (19) on the BBQ when it’s not in use.
Step 15
Extra 2: Apply provided oil to both sides threaded rods periodically for maintenance.
Step 13
Assemble the right bracket for side table with the leg by using one hexagon screw M6*60mm(A3), spring washer(B) and washer(C) at the
top and using one hexagon screw M6*10mm(A1), spring washer(B) and washer(C). Hang the side table into the hole of the assembled side
bracket, and then assemble the left bracket with the leg by using one hexagon screw M6*60mm(A3), spring washer(B) and washer(C) at the
top and using one hexagon screw M6*10mm(A1), spring washer(B) and washer(C).

10 11
Congratulations! We hope you enjoy your purchase. We worked hard so you can have a great and safe experience. We are always available
if you have any questions or concerns about our products.
BEFORE USING FOR THE FIRST TIME
All stickers and films must be removed from the grill before use. We recommend to clean the table, small grate, main grate and griddle
thoroughly with a suitable cleaning agent. Remove all cleaning residues and dry.
HOW TO CLEAN THE GRILL GRATES
Two hours after cooking: First, make sure all surfaces are cool. While still on the grill, scrub grate with a stainless-steel brush to remove
all excess of food.
When grates are completely cool: Remove each section of grates from grill and place them on the side. Add 1 gallon of warm water in a
container big enough to fit one piece at a time. Add a couple of drops of degreaser or detergent in the water.
Insert one piece at a time in the container, soak it and scrub excess food with a nylon cleaning brush. Remove each grate from container
and rinse with fresh water. Dry it with microfiber cloth. Repeat the process for each piece of grate.
LIMITED WARRANTY CERTIFICATE
Tagwood bbq warrants this product for a period of (5) years against deficiencies in material and/or manufacture defect, from the date of issuance of the purchase
invoice. This LIMITED WARRANTY does not cover products that are improperly used, abused, altered or repaired. This warranty excludes all incidental or conse-
quential damages and any condition resulting from other than ordinary residential wear or any use for which the product was not intended, such as use in rental
or contract trade or commercial. This warranty does not include also normal wear and tear or dissatisfaction due to buyer’s remorse. The LIMITED WARRANTY
covers manufacturing, material and parts defects after proper verification by authorized technicians. The warranty will be void if the product suffers damages
resulting from accidents, improper assembly, improper use, carelessness, action of corrosive agents, excessive load, ignorance of the instructions contained in
the instruction manual or for presenting signs of having been repaired by non-authorized personnel. Deficient products or parts that are covered by this policy will
be replaced or repaired. This warranty is non-transferable and valid only with the presentation of the purchase invoice. This product may undergo technical design
modifications without prior notice from manufacturer. The importer assumes no responsibility for personal or property damage that could be caused by improper
installation or use of the product, including lack of maintenance in the latter.
Tagwood bbq reserves the right to inspect and assess the product before honoring the warranty and to invalidate the warranty if it is concluded that the claim was
not valid. If you believe that your product meets the criteria for warranty replacement, please follow this procedure:
1. Take a picture of the damaged part
2. Take a picture of the invoice
3. Locate the serial number under the table
4.
Send both pictures (damaged part & invoice) and serial number to
5. Please include a phone number we can contact you
6. We will contact you 48 hrs after receiving the email to explain how to proceed
OPERATING INSTRUCTIONS
WARNING: We recommend moving food aside from the grill if flare-ups occur, to avoid getting the food too burned, or not at the desired
cooking level. The best way to manage this is to create two zones of fire, and always leave some portion of the grilling surface without coals
under, so that when the flare-up occurs, you can move the food to the other side and then move back when the flames reduce.
WARNING: We recommend cooking on the secondary grate or griddle without direct flame. Always do it only with the heat of the coals. Use
extreme care while cooking on the secondary grate or griddle or when adding any type of liquid such as oil as it may generate a flame or
hot drops causing serious injury.
Step 1:
We recommend not to use lighter fluid
because it may transmit a chemical taste
to your food. Instead you can use a natural
Firestarter.
Step 2:
When coals start falling under the firebox
it means they are ready. Use the coal rake
to start spreading out the fallen coals to
create an even layer under the main grate.
Step 3:
Place the food on the grill only when the
charcoals have reached the desired tem-
perature for cooking.
You can follow the same procedure for other parts in contact with food like secondary grate, griddle.
HOW TO CLEAN THE OUTSIDE OF THE GRILL
First make sure all surfaces are completely cool. Use a microfiber cleaning cloth mix with a soapy solution. Rub it over the exterior of the
grill. If there is persistent dirt or grease, you can use a soft sponge to scrub them out. Rinse with fresh water but avoid any excess of wa-
ter from getting inside the grill as this can cause damage to the interior. Dry it with microfiber cloth. Never use any sharp items that could
scratch the surface of the grill. Never use an acidic, chlorine based or abrasive cleanser on stainless steel. They will damage the finish.
WARNING: Some discoloration will occur on some parts of the grill due to the extreme heat. The company consider this a normal wear
and tear and will not be responsible for its cleaning.

12 13
1) Height adjustment system. This feature gives you the possibility
to adjust the height of the grates to regulate cooking temperature.
Use the wheel to move the main grates up or down depending on
what you need (closer to the coals = more heat to sear | away from
coal = less heat for slow cooking).
2) The firebox allows you to light up the charcoal quicker and with
less effort. It maintains fire lit and away from food. You can use
wood charcoal, briquettes or wood based on your preference. We
recommend using lump charcoal and firewood.
3) Firebricks help transmit less heat to the outside panels but also
spreads the heat evenly under the grates. Last, but not least, it
extends the life of the grill.
4) 3 different cooking areas to inspire your imagination. A main
grate, one secondary grate and interchangeable griddle. The top
lid when closed captures more heat and helps to create a roasting
environment. Ideal for slow cooking or food smoking.
GET TO KNOW YOUR GRILL BETTER

14 15
UNA EXCELENTE ELECCIÓN
Gracias por elegir la parrilla de carbón TAGWOOD BBQ. Usted adquirió un producto hecho con materiales de alta calidad, confiable y máxima
atención al detalle. Aquí encontrará algunas instrucciones muy simples para que usted y su familia puedan disfrutar todas las ventajas que
ofrece nuestro producto, además de su seguridad.
Si no tiene el hábito de leer manuales de instrucciones, no deje de leer, porque en él encontrará toda la información de seguridad del producto.
IMPORTANTE: hemos hecho todo lo posible para darle instrucciones detalladas y precisas sobre cómo ensamblar este producto. En caso de
duda, consulte a personal calificado o contáctenos directamente.
La compañía no es responsable de ninguna dificultad y/o problema que surja de la interpretación de las instrucciones detalladas en este
manual. La parrilla y todas sus partes deben usarse solo para los fines establecidos en este manual. Tanto la compañía como los distribuidores
y/o representantes no son responsables de ningún tipo de daño, ya sea a personas y/o propiedad, directa o indirectamente, debido a la
incapacidad de usar este producto de manera segura y para el cual fue diseñado y fabricado.
Si tiene alguna pregunta que no se indique en estas instrucciones, o para información de servicio, montaje u operación, puede comunicarse
con nosotros al +54 0230-444-0734 (Arg), +1 (786) 999 2568 (USA) o bien vía e-mail escribiendo a: [email protected].
Antes de hacerlo, recuerde ubicar el número de serie de su parrilla ubicado en la parte interior de la mesa.
Antes de devolver su producto comprado, contáctenos para recibir asistencia.
POR FAVOR, lea todas las instrucciones y advertencias de seguridad en detalle ANTES de ensamblar y operar su parrilla. Verifique que esté correctamente
ensamblada y bien mantenida. El incumplimiento de estas instrucciones puede ocasionar lesiones corporales graves y/o daños a la propiedad.
ADVERTENCIAS DE SEGURIDAD IMPORTANTES
EN CASO DE EMERGENCIA, SIEMPRE LLAME AL 911 PRIMERO.
Tenga en cuenta que la mayor causa de
incendios de parrillas son el resultado de un mantenimiento deficiente y la ausencia de distancia requerida entre la parrila y productos
inflamables y no inflamables. Si ocurre un incendio, siempre llame primero al 911 o al departamento de bomberos.
• Tenga cuidado al mover la parrilla para evitar lesiones.
• Asegúrese que la parrilla esté completamente fría antes de moverla.
•
No recomendable para personas con capacidades físicas, senso-
riales o mentales reducidas, falta de experiencia y/o conocimien-
to, a menos que estén bajo supervisión o instrucción directa de
una persona responsable de su seguridad.
•
No coloque nada inflamable o que pueda derretirse y/o dañarse
en el estante inferior.
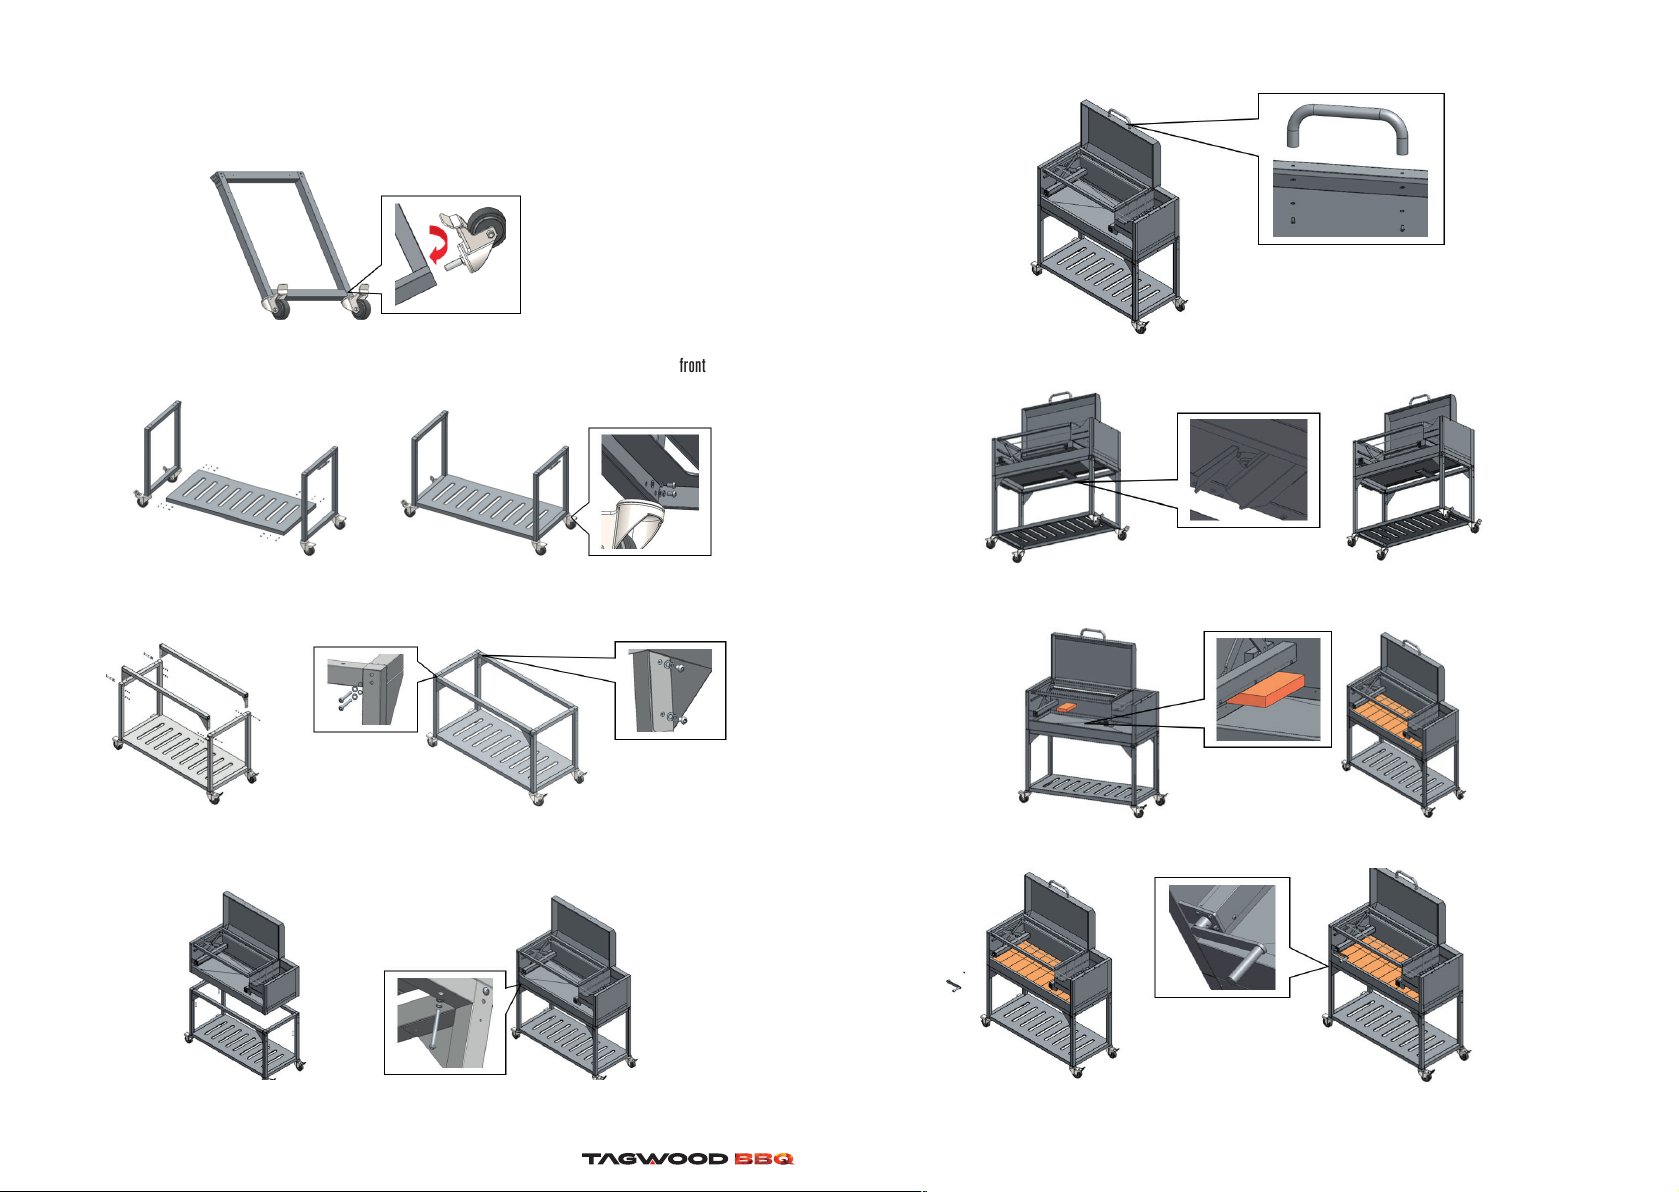
• Para facilitar el ensamblado utilice 3 personas.
• Si falta alguna pieza o está dañada, no intente ensamblar.
SUPERFICIES CALIENTES.
SE REQUIEREN GUANTES DE SEGURIDAD RESISTENTES AL CALOR.
ADVERTENCIA: Esta parrilla es SOLO para uso en exteriores. No utilizar en zonas sin ventilación.
ADVERTENICIA: Si bien se han tomado todas las precauciones para eliminar los bordes afilados, tenga cuidado al limpiar o manipular para
evitar el riesgo de lesiones por los bordes metálicos expuestos. Antes de devolver su producto comprado, contáctenos para recibir asistencia.
• No guarde ni almacene dentro de la parrilla objetos de interés de niños.
•
Este producto y los subproductos de combustión producidos al
usar este articulo contienen químicos que pueden causar cáncer,
defectos de nacimiento. Para obtener más información visite
https://www.p65warnings.ca.gov
•
Recomendamos, en caso de necesitar mudar o trasladar el pro-
ducto, contratar personal idóneo para el traslado. Evitar desarmar
el producto, y una vez relocalizado, es necesario reajustar todos
las partes y los tornillos nuevamente.
•
Éstas advertencias aplican a todos nuestros productos y acceso-
rios vendidos bajo nuestra marca.
ADVERTENCIAS DE UBICACIÓN DE LA PARRILLA
•
No coloque la parrilla en superficies que no soporten el peso de
la misma en forma segura o que causen inestabilidad.
•
Mantenga la parrilla al menos a 5,4mts de cualquier material com-
bustible o no combustible (cubiertas, cercas, árboles, arbustos, etc.)
por todos los lados y hacia arriba. Tenga en cuenta las condiciones del
viento para agregar una distancia adecuada desde todos sus ángulos.
• Coloque la parrilla en un área protegida del viento.
•
No coloque la parrilla cerca de líquidos inflamables, gases o
donde puedan estar presentes vapores inflamables.
ADVERTENCIAS DE OPERACIÓN DE LA PARRILL A
•
No use gasolina, kerosene o alcohol para encender el carbón. El
uso de cualquiera de estos productos o similares podría causar una
explosión que posiblemente ocasione lesiones corporales graves.
•
No deje la parrilla en uso sin vigilancia. Mantenga a los niños
y mascotas alejados en todo momento, ya que muchas partes
pueden calentarse y causar quemaduras graves.
•
Tenga mucho cuidado al agregar carbón y/o leña. No agregue
ningún tipo de fluido inflamable sobre las brasas calientes o
tibias ya que pueden causar una explosión o una llamara.
•
Nunca mueva la parrilla cuando esté en uso o cuando contenga
brasas o cenizas calientes.
•
Mantenga las manos, la cara y el cuerpo lejos del aire caliente
y llamaradas.
•
Siempre abra o cierre la tapa agarrando la manija ya que la puerta
puede calentarse y provocar lesiones o quemaduras.
•
Nunca deje las brasas y las cenizas sin vigilancia. Antes de dejar la
parrilla, el carbón y las cenizas deben apagarse. Tome precaución
para protegerse y proteger su propiedad.
•
Manipule con extremo cuidado y con guantes aislantes resis-
tentes al calor la parrilla secundaria o plancha ya que pueden
levantar altas temperaturas y provocar lesiones o quemaduras.
•
No recomendable para personas con capacidades físicas, senso-
riales o mentales reducidas, falta de experiencia y/o conocimien
-
to, a menos que estén bajo supervisión o instrucción directa de
una persona responsable de su seguridad.
• No permita que niños operen la parrilla.
• Mantenga limpia su parrilla antes y después de cada uso.
•
No coloque el atizador y/o pala en la parrilla mientras esté en
uso, ya que se calientan y podrían causar quemaduras graves.
Siempre colóquelas en una superficie que no reciba calor.
•
Asegúrese de usar guantes resistentes al calor con aislamiento
cuando utilice la pala y el atizador.
•
No queme troncos manufacturados, madera flotante, basura,
hojas, papel, cartón, madera contrachapada, madera pintada o
teñida o tratada a presión. Evite el uso de maderas blandas
como por ejemplo el pino o el cedro que pueden generar chispas.
•
Tenga mucho cuidado ya que el viento puede avivar las llamas
y generar brasas que provoquen un daño físico a personas, a su
propiedad y/o de terceros.
•
El uso de alcohol, medicamentos recetados, medicamentos sin receta
o drogas puede afectar la capacidad del consumidor para ensamblar,
mover, almacenar u operar la parrilla de manera adecuada y segura.
• Remover las cenizas, carbón o brasas de la parrilla solo cuando
estén completamente apagadas.
•
No almacene la parrilla antes que las cenizas, carbón y brasas
estén completamente apagadas.
•
No caliente recipientes de comida sin abrir en cualquier parte de
la parrilla. La acumulación de presión resultante del calor puede
hacer que el recipiente explote.
•
No coloque brasas sobre la puerta frontal de la parrilla siempre hágalo
sobre los ladrillos refractarios, los mismos no deben ser retirados.
• No utilice este producto con vientos fuertes.
•
No use ropa con mangas o el pelo suelto mientras enciende el
fuego o durante el uso de la parrilla.
•
Use zapatos cerrados ya que brasas calientes, carbones o chis-
pas pueden caer de la parrilla y causar quemaduras o lesiones.

16 17
LISTA DE PARTES:
Kit de accesorios:
F- Llave Allen 4#
1/1 pcs
E- Tuerca
anillada
1 pcs
A3- Tornillo hexagonal
M6*60mm
12 pcs
A1- Tornillo hexagonal
M6*10mm
27 pcs
A2- Tornillo hexagonal
M6*16mm
2 pcs
C- Arandela
36 pcs
B- Arandela
de resorte
36 pcs
D- Tornillo de
apriete hexagonal
1pcs
1- Cuerpo principal
1 pcs
14- Manija de
tapa
1 pcs
16- Sistema de
drenaje
1 pcs
13- Ladrillos
refractarios
22 pcs
9- Parrilla
secundaria
1 pcs
6- Mesa lateral
1 pcs
11- Ruedas sin freno
2 pcs
12- Ruedas
con freno
2 pcs
5- Soporte izquierdo
y derecho
2 pcs
2- Estante inferior
1 pcs
3- Patas izquierdas
1 pcs
4- Patas derechas
1 pcs
17- Pala y atizador
2 pcs
7- Parrilla principal
3 pcs
15- Manivela de sistema
de ajuste de altura
1 pcs
10- Riel lateral para
parrilla secundaria
1 pcs
19- Cobertor
1 pcs
18- Aceite
1 pcs
8- Plancha
1 pcs
No utilizar herramientas eléctricas
Utilizar Allen key
Montaje:
Antes de comenzar a ensamblar, retire con cuidado todas las películas protectoras evitando rayaduras en la superficie o
en cualquier pieza y protegiendo el área de trabajo / ensamblaje.
Paso 1
Atornille las ruedas con freno (12) en el extremos inferior del set de patas izquierdo y derecho (3,4). Asegurese de hacerlo en la
parte frotal marcada. Atornille las ruedas sin freno (11) en el extremos inferior del set de patas izquierdo y derecho (3,4). Asegurese
de hacerlo en la parte posterior marcada.
Paso 2
Ensamble los dos juegos de patas al estante inferior (2) usando ocho tornillos hexagonales M6*10 mm (A1), arandelas de resorte (B)
y arandelas (C).
Paso 3
Ensamble el riel de soporte derecho e izquierdo (5) con la parte superior de los juegos de patas usando ocho tornillos hexagonales M6 *
10 mm (A1), arandelas de resorte(B) y arandelas(C) en el interior y usando seis tornillos hexagonales M6 * 60 mm (A3), arandelas de
resorte(B) y arandelas(C) en el exterior (usando dos tornillos en el lado con el abridor y usando cuatro tornillos en el otro lado).
Paso 4
Coloque con cuidado el cuerpo principal (1) en la estructura inferior. Móntelos con cuatro tornillos hexagonales M6 * 60 mm (A3),
arandelas de resorte(B) y arandelas(C).

18 19
Paso 5
Ensamble la manija de la tapa superior (14) con la tapa superior utilizando dos tornillos hexagonales M6 * 16 mm (A2), arandelas de
resorte(B) y arandelas(C).
Paso 6
Deslice el sistema de drenaje (16) debajo del cuerpo principal (1).
Paso 8
Ensamble la manivela del sistema de ajuste de altura (15) con el cuerpo principal (1) usando el tornillo de apriete hexagonal(D) en la
manivela.
Paso 7
Coloque los ladrillos refractarios (13) en el cuerpo principal (1).
Paso 9
Coloque riel lateral para parrilla secundaria (10) en el lateral derecho del brasero usando cuatro tornillos hexagonales M6*10mm(A1) en
la parte inferior y con uno en el medio.
Paso 10
Inserte la parrilla secundaria (9) en el riel lateral ya ensamblado (10) y ajustelo con la tuerca anillada (E).
Paso 11
Coloque la parrilla principal (7) y/o la plancha (8) sobre el marco de parrilla principal (1).
Paso 12
Cuelgue la pala y el atizador (17) en el extremo derecho de la parrilla.

20 21
Paso 14
Extra 1: Utilice el cobertor (19) incluído para cubrir la parrilla cuando no esté en uso.
Paso 15
Extra 2: Para su mantenimiento, aplique un poco de aceite (20) en la varilla roscada del sistema de ajuste de altura.
Paso 13
Ensamble el soporte derecho para la mesa lateral con la pata utilizando una pieza de tornillo hexagonal M6 * 60 mm(A3), arandela de
resorte(B) y arandela(C) en la parte superior y utilizando una pieza de tornillo hexagonal M6 * 10 mm (A1), arandela de resorte(B) y
arandela(C). Cuelgue la mesa lateral en el orificio del soporte lateral ensamblado y luego ensamble el soporte izquierdo con la pata usando
una pieza de tornillo hexagonal M6 * 60 mm(A3), arandela de resorte(B) y arandela(C) en la parte superior y usando una pieza de tornillo
hexagonal M6 * 10 mm(A1), arandela de resorte(B) y arandela(C).
¡Felicidades! Deseamos que disfrute de su producto. Trabajamos para maximizar su bienestar y lograr el mayor beneficio del producto
adquirido. Quedamos a su disposición para cualquier duda o consulta que pueda tener.
ANTES DE USAR POR PRIMERA VEZ
Debe sacar todos los calcos o films adheridos. Recomendamos que limpie la parrilla principal, mesa, la plancha y parrilla secundaria.
CÓMO LIMPIAR SU PARRILLA
Dos horas después de cocinar: Primero asegúrese que las parrillas están frías. Con las parrillas seccionadas puestas, pase un cepillo
de alambre de acero inoxidable para remover excesos de comida.
Cuando la parrilla está completamente fría: Remueva cada sección de parrilla y póngala a un costado. Agregue 3 litros de agua tibia en un
recipiente lo suficientemente grande para que entre una sección de parrilla a la vez. Agregue un par de gotas de detergente o desengrasador.
Inserte las parrillas individuales dentro del recipiente, enjabónela y limpie el exceso de comida con un cepillo de nylon. Saque la parrilla del
recipiente y enjuáguela con agua dulce. Séquela con un paño de microfibra. Repita el proceso para cada sección de parrilla.
Recomendamos el mismo procedimiento para cualquier parte que toque comida como la plancha o parrilla secundaria.
CÓMO LIMPIAR EL EXTERIOR DE LA PARRILLA
Primero asegúrese que todas las superficies estén completamente frías. Use un paño de microfibra mezclado con una solución jabonosa
y frótelo sobre el exterior de la parrilla. Si hay suciedad o grasa persistentes, puede usar una esponja suave para restregarlas. Enjuague
con agua dulce evitando que entre exceso en la parrilla ya que esto puede dañar el interior. Séquela con un paño de microfibra. Nunca
use elementos afilados o abrasivos que puedan rayar la superficie y/o exterior de la parrilla. Nunca use un limpiador ácido, a base de
cloro o abrasivo sobre el acero inoxidable. Dañarán el acabado.
ADVERTENCIA: Algunas partes de la parrilla pueden sufrir una decoloración. Esto es debido al calor intenso del fuego. La empresa lo
considera un desgaste normal del producto y no se hace responsable de su limpieza.

22 23
CERTIFICADO DE GARANTÍA LIMITADA
Tagwood bbq garantiza este producto por un período de (5) años contra deficiencias en el material y / o defectos de fabricación, a partir de la fecha
de emisión de la factura de compra. Esta garantía excluye todos los daños incidentales o consecuentes y cualquier condición que resulte de un uso
residencial que no sea ordinario o cualquier uso para el cual el producto no fue diseñado, como el uso en alquiler o contrato comercial. Además, ésta
garantía no incluye el desgaste normal o la insatisfacción debido al arrepentimiento del comprador. La GARANTÍA LIMITADA cubre defectos de fabricación,
materiales y piezas después de una verificación adecuada por parte de técnicos autorizados. La garantía será nula si el producto sufre daños resultantes
de accidentes, montaje incorrecto, uso inadecuado, descuido, acción de agentes corrosivos, carga excesiva, ignorancia de las instrucciones contenidas
en el manual de instrucciones o por presentar signos de haber sido reparado por personal no autorizado. Los productos o piezas deficientes que están
cubiertos por esta garantía serán reemplazados o reparados. Esta garantía no es transferible y solo es válida con la presentación de la factura de compra.
Este producto puede sufrir modificaciones de diseño técnico sin previo aviso del fabricante. El importador no asume ninguna responsabilidad por daños
personales o materiales que puedan ser causados por una instalación o uso incorrectos del producto, incluida la falta de mantenimiento en este último.
Tagwood bbq se reserva el derecho de inspeccionar y evaluar el producto antes de cumplir con la garantía e invalidar la garantía si se concluye que el
reclamo no era válido. Si cree que su producto cumple con los requisitos para hacer efectiva esta garantía siga el siguiente procedimiento:
1. Tome una fotografía de la parte dañada.
2. Tome una foto de la factura.
3. Encuentre en número de serie bajo la mesa
4.
Envíe ambas imágenes (parte dañada y factura) y número de serie
a info@tagwoodbbq.com con el encabezado que diga Garantía.
5.
Por favor incluya un número de teléfono con el que podamos contactarlo.
6.
Nos pondremos en contacto con usted 48 horas después de
recibir el correo electrónico para explicarle cómo proceder.
INSTRUCCIONES DE OPERACIÓN
ADVERTENCIA: Recomendamos mover los alimentos a un lado de la parrilla si se produce fuego directo a los mismos, para evitar que los
alimentos se quemen demasiado o no al nivel de cocción deseado. La mejor manera de manejar esto es crear dos zonas bajo la parrilla
principal: una con brasas y otra siempre libre de brasas. De este modo, cuando ocurra el brote de fuego, usted puede mover la comida
a la zona libre de brasas y luego volverla a poner sobre la zona de brasas cuando ya no haya llamas.
ADVERTENCIA: Recomendamos cocinar en la parrilla secundaria o plancha sin llama directa. Siempre hágalo solo con el calor de las
brasas. Tenga extremo cuidado mientras cocine en la parrilla secundaria o plancha o al agregar algún tipo liquido como aceite ya que
puede generar una llama o gotas calientes que provoquen lesiones graves.
Paso 1:
Recomendamos no usar ningún tipo de
fluido para encender el fuego ya que pue-
de trasmitir un sabor a químico a los ali-
mentos. Nuestra sugerencia es que utilice
un iniciador de fuego natural.
Paso 2:
Cuando los carbones se convierten en
brasas, use las mismas que caigan bajo el
brasero y comience a extender una capa
uniforme bajo la parrilla principal, donde
luego colocara los alimentos.
Paso 3:
Coloque la comida en la parrilla solo
cuando las brasas hayan alcanzado la
temperatura deseada para cocinar.
1) Sistema de regulación de altura. Esta característica le da la
posibilidad de ajustar la altura de la parrilla para regular la tem-
peratura de cocción. Use la manivela para mover la parrilla hacia
arriba o abajo dependiendo de lo que necesite (más cerca de las
brasas para sellar los alimentos | más lejos para una cocción lenta).
2) El brasero le da la posibilidad de encender el fuego más rápido
y con menos esfuerzo. Además, lo mantiene encendido y alejado de
la comida. Puede usar carbón, briquetas o leña dependiendo de su
preferencia. Recomendamos el uso de carbón vegetal y leña.
3) Ladrillos refractarios ayudan a minimizar el traspaso del calor
hacia la parte exterior de la parrilla, así como también a expandir
el calor de forma consistente bajo la parrilla principal. Por último,
ayuda a extender la vida útil del producto.
4) 3 áreas diferentes de cocción para inspirar su imaginación. Una
parrilla principal, una parrilla secundaria y una plancha. La tapa
cuando se cierra captura más calor y crea un ambiente tipo horno
para cocinar de forma lenta o ahumar (saborizar).
CONOZCA MEJOR SU PARRILLA:

CUSTOMER SERVICE | SERVICIO AL CLIENTE
+1 (786) 999 - 2568 - Argentina: 0230-444-0734
Questions / Consultas
www.tagwoodbbq.com | email: info@tagwoodbbq.com
Table of contents
Languages:
Other Tagwood BBQ Grill manuals