CONTENTS
INTRODUCTION
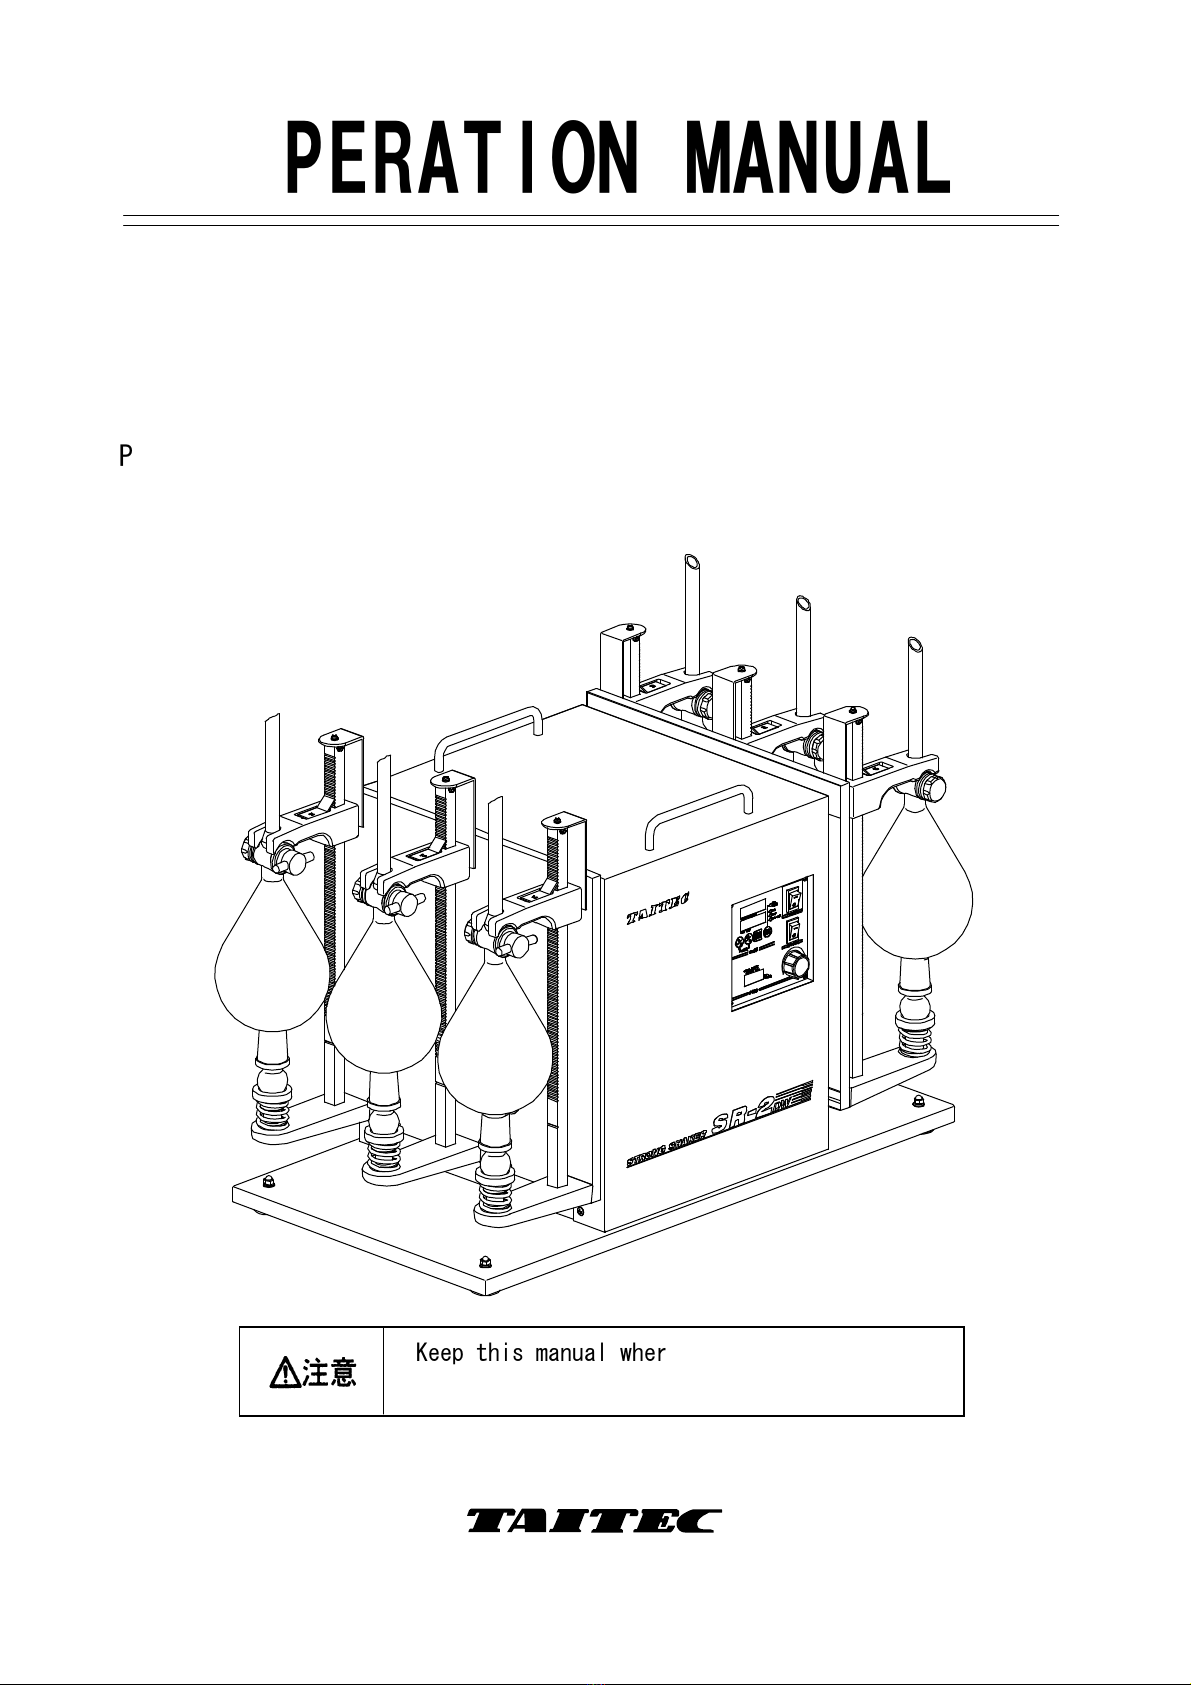
INTRODUCTIONINTRODUCTION
INTRODUCTION・・・・・・・・・・・・・・・・・・・・・・・・・・・・・・・・
・・・・・・・・・・・・・・・・・・・・・・・・・・・・・・・・・・・・・・・・・・・・・・・・・・・・・・・・・・・・・・・・
・・・・・・・・・・・・・・・・・・・・・・・・・・・・・・・・
1
11
1
CONTENTS
CONTENTSCONTENTS
CONTENTS・・・・・・・・・・・・・・・・・・・・・・・・・・・・・・・・・・・
・・・・・・・・・・・・・・・・・・・・・・・・・・・・・・・・・・・・・・・・・・・・・・・・・・・・・・・・・・・・・・・・・・・・・・
・・・・・・・・・・・・・・・・・・・・・・・・・・・・・・・・・・・
2
22
2
Before op
Before opBefore op
Before operating
eratingerating
erating・・・・・・・・・・・・・・・・・・・・・・・・・・・・・・・・
・・・・・・・・・・・・・・・・・・・・・・・・・・・・・・・・・・・・・・・・・・・・・・・・・・・・・・・・・・・・・・・・
・・・・・・・・・・・・・・・・・・・・・・・・・・・・・・・・
3
33
3
Warning
WarningWarning
Warning・・・・・・・・・・・・・・・・・・・・・・・・・・・・・
・・・・・・・・・・・・・・・・・・・・・・・・・・・・・・・・・・・・・・・・・・・・・・・・・・・・・・・・・・
・・・・・・・・・・・・・・・・・・・・・・・・・・・・・・・・
・・・・・・
・・・
3
33
3
About operation manua
About operation manuaAbout operation manua
About operation manua ・・・・・・・・・・・・・・・・・・・・・・・・・・・
・・・・・・・・・・・・・・・・・・・・・・・・・・・・・・・・・・・・・・・・・・・・・・・・・・・・・・
・・・・・・・・・・・・・・・・・・・・・・・・・・・
3
33
3
Warranty and guarantee
Warranty and guaranteeWarranty and guarantee
Warranty and guarantee・・・・・・・・・・・・・・・・・・・・・・・・・・・・・・・・
・・・・・・・・・・・・・・・・・・・・・・・・・・・・・・・・・・・・・・・・・・・・・・・・・・・・・・・・・・・・・・・・
・・・・・・・・・・・・・・・・・・・・・・・・・・・・・・・・
4
44
4
For your safe and proper operation
For your safe and proper operationFor your safe and proper operation
For your safe and proper operation・・・・・・・・・・・・・・・・・・・・・・
・・・・・・・・・・・・・・・・・・・・・・・・・・・・・・・・・・・・・・・・・・・・
・・・・・・・・・・・・・・・・・・・・・・・・
・・・・
・・
5
55
5
About pictgram
About pictgramAbout pictgram
About pictgram・・・・・・・・・・・・・・・・・・・・・・・・・・・・・
・・・・・・・・・・・・・・・・・・・・・・・・・・・・・・・・・・・・・・・・・・・・・・・・・・・・・・・・・・
・・・・・・・・・・・・・・・・・・・・・・・・・・・・・
5
55
5
Warning
WarningWarning
Warning・
・・
・Caution
CautionCaution
Caution・
・・
・Instruction
InstructionInstruction
Instruction・・・・・・・・・・・・・・・・・・・・・・・・・・
・・・・・・・・・・・・・・・・・・・・・・・・・・・・・・・・・・・・・・・・・・・・・・・・・・・・
・・・・・・・・・・・・・・・・・・・・・・・・・・
5
55
5
Specifications
SpecificationsSpecifications
Specifications・・・・・・・・・・・・・・・・・・・・・・・・・・・・・・・・・・
・・・・・・・・・・・・・・・・・・・・・・・・・・・・・・・・・・・・・・・・・・・・・・・・・・・・・・・・・・・・・・・・・・・・
・・・・・・・・・・・・・・・・・・・・・・・・・・・・・・・・・・
7
77
7
Part names and function
Part names and functionPart names and function
Part names and function・・・・・・・・・・・・・・・・・・・・・・・・・・・・・・
・・・・・・・・・・・・・・・・・・・・・・・・・・・・・・・・・・・・・・・・・・・・・・・・・・・・・・・・・・・・
・・・・・・・・・・・・・・・・・・・・・・・・・・・・・・
8
88
8
【
【【
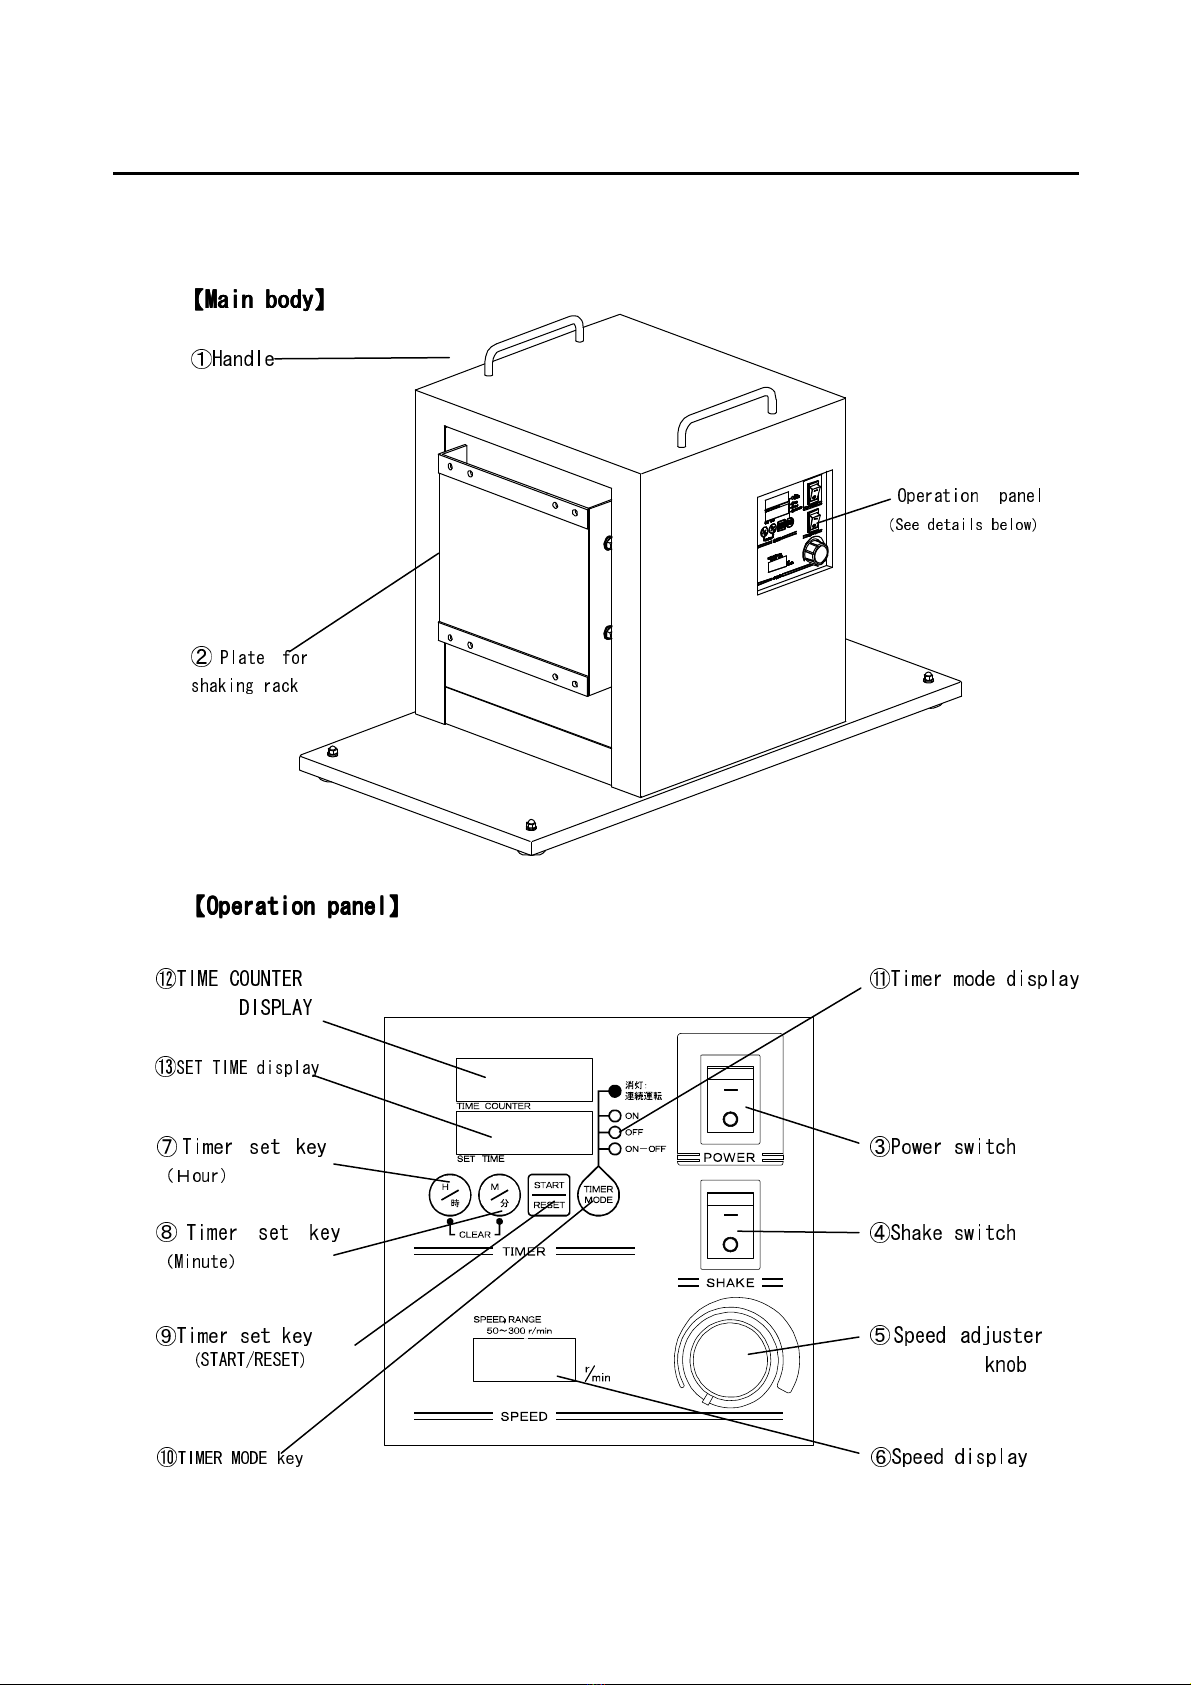
【Main body
Main bodyMain body
Main body】
】】
】・・・・・・・・・・・・・・・・・・・・・・・
・・・・・・・・・・・・・・・・・・・・・・・・・・・・・・・・・・・・・・・・・・・・・・
・・・・・・・・・・・・・・・・・・・・・・・・・・・・・・・・
・・・・・・・・・・・・・・・・・・
・・・・・・・・・
8
88
8
【
【【
【Operation pane
Operation paneOperation pane
Operation pane 】
】】
】・・・・・・・・・・・・・・・・・・・・・・・・・・・・・
・・・・・・・・・・・・・・・・・・・・・・・・・・・・・・・・・・・・・・・・・・・・・・・・・・・・・・・・・・
・・・・・・・・・・・・・・・・・・・・・・・・・・・・・
8
88
8
Insta ation and preparation
Insta ation and preparationInsta ation and preparation
Insta ation and preparation・・・・・・・・・・・・・・・・・・・・・・・・・・・
・・・・・・・・・・・・・・・・・・・・・・・・・・・・・・・・・・・・・・・・・・・・・・・・・・・・・・
・・・・・・・・・・・・・・・・・・・・・・・・・・・
10
1010
10
1
11
1.
..
.Insta ation
Insta ationInsta ation
Insta ation・・・・・・・・・・・・・・・・・・・・・・・・・・・・・・・
・・・・・・・・・・・・・・・・・・・・・・・・・・・・・・・・・・・・・・・・・・・・・・・・・・・・・・・・・・・・・・
・・・・・・・・・・・・・・・・・・・・・・・・・・・・・・・
1
11
10
00
0
2
22
2.
..
.How to attach and hand e
How to attach and hand e How to attach and hand e
How to attach and hand e each
eacheach
each
shaking rack
shaking rackshaking rack
shaking rack・
・・
・・・・・・・・・・・・・・
・・・・・・・・・・・・・・・・・・・・・・・・・・
・・・・・・・・・・・・・
1
11
10
00
0
3
33
3.
..
.Before operati
Before operatiBefore operati
Before operation
onon
on・・・・・・・・・・・・・・・・・
・・・・・・・・・・・・・・・・・・・・・・・・・・・・・・・・・・
・・・・・・・・・・・・・・・・・・・・・・・・・・・・・・
・・・・・・・・・・・・・・・・・・・・・・・・・・
・・・・・・・・・・・・・
1
11
14
44
4
【
【【
【Connect to wa out et
Connect to wa out etConnect to wa out et
Connect to wa out et】
】】
】・・・・・・・・・・・・・・・・・・・・・・・・・・・
・・・・・・・・・・・・・・・・・・・・・・・・・・・・・・・・・・・・・・・・・・・・・・・・・・・・・・
・・・・・・・・・・・・・・・・・・・・・・・・・・・
1
11
14
44
4
OPERATION
OPERATIONOPERATION
OPERATION(
((
(SUMMARY
SUMMARYSUMMARY
SUMMARY)
))
)・・・・・・・・・・・・・・・・・・・・・・・・・・・・・・・・・・・・
・・・・・・・・・・・・・・・・・・・・・・・・・・・・・・・・・・・・・・・・・・・・・・・・・・・・・・・・・・・・・・・・・・・・・・・・
・・・・・・・・・・・・・・・・・・・・・・・・・・・・・・・・・・・・
1
11
18
88
8
1
11
1.
..
.Continuous operation
Continuous operationContinuous operation
Continuous operation・・・・・・・・・・・・・・・・・・・・・・・・・・
・・・・・・・・・・・・・・・・・・・・・・・・・・・・・・・・・・・・・・・・・・・・・・・・・・・・
・・・・・・・・・・・・・・・・・・・・・・・・・・
1
11
18
88
8
2
22
2.
..
.ON or OFF timer operation
ON or OFF timer operationON or OFF timer operation
ON or OFF timer operation・・・・
・・・・・・・・
・・・・・・・・・・
・・・・・・・・・・・・
・・・・・・・・・・・・・・・・・
・・・・・・・・・・・・・・・・・・・・・・
・・・・・・・・・・・・
・・
・
1
11
18
88
8
3
33
3.
..
.ON
ONON
ON-
--
-OFF timer operation
OFF timer operationOFF timer operation
OFF timer operation・・・・・・
・・・・・・・・・・・・
・・・・・・・・・・・・・・・・・・・・・・・・
・・・・・・・・・・・・・・・・・・・・・・・・・・・・・・・・・・・・
・・・・・・・・・・・・・・・・・・
1
11
19
99
9
OPERATION
OPERATIONOPERATION
OPERATION(
((
(DETAIL
DETAILDETAIL
DETAIL)
))
)・・・・・・・・・・・・・・・・・・・・・・・・・・・・・・・・
・・・・・・・・・・・・・・・・・・・・・・・・・・・・・・・・・・・・・・・・・・・・・・・・・・・・・・・・・・・・・・・・
・・・・・・・・・・・・・・・・・・・・・・・・・・・・・・・・
20
2020
20
1
11
1.
..
.Basic operation
Basic operationBasic operation
Basic operation・・・・・・・・・・・・・・・・・・・・・・・・・・・・・・
・・・・・・・・・・・・・・・・・・・・・・・・・・・・・・・・・・・・・・・・・・・・・・・・・・・・・・・・・・・・
・・・・・・・・・・・・・・・・・・・・・・・・・・・・・・
20
2020
20
2
22
2.
..
.Continuous operation
Continuous operationContinuous operation
Continuous operation・・・・・・・・・・・・・・・・・・・・・・・・
・・・・・・・・・・・・・・・・・・・・・・・・・・・・・・・・・・・・・・・・・・・・・・・・
・・・・・・・・・・・・・・・・・・・・・・・・
21
2121
21
3
33
3.
..
.ON timer operation
ON timer operationON timer operation
ON timer operation・・・・・・・・・・・・・・・・
・・・・・・・・・・・・・・・・・・・・・・・・・・・・・・・・
・・・・・・・・・・・・・・・・・・・・
・・・・・・・・
・・・・・・・・・
・・・・・・・・・・
・・・・・
22
2222
22
4
44
4.
..
.OFF timer operation
OFF timer operationOFF timer operation
OFF timer operation・・・・・・・・・・・・・・・・・・・
・・・・・・・・・・・・・・・・・・・・・・・・・・・・・・・・・・・・・・
・・・・・・・・・・・・・・・・・・・・・・・・・
・・・・・・・・・・・・
・・・・・・
2
22
25
55
5
5
55
5.
..
.ON
ONON
ON-
--
-OFF timer operation
OFF timer operationOFF timer operation
OFF timer operation・・・・・・・・・・・・・・・・
・・・・・・・・・・・・・・・・・・・・・・・・・・・・・・・・
・・・・・・・・・・・・・・・・・・・・・・・
・・・・・・・・・・・・・・
・・・・・・・
2
22
28
88
8
6
66
6.
..
.How to check set time whi e in timer operation
How to check set time whi e in timer operationHow to check set time whi e in timer operation
How to check set time whi e in timer operation・・・・・・・・・・
・・・・・・・・・・・・・・・・・・・・
・・・・・・・・・・・
・・
・
32
3232
32
7
77
7.
..
.Pause timer operation
Pause timer operationPause timer operation
Pause timer operation・・・・・・・・・・・・・・・・・・・・・
・・・・・・・・・・・・・・・・・・・・・・・・・・・・・・・・・・・・・・・・・・
・・・・・・・・・・・・・・・・・・・・・・・・
・・・・・・
・・・
32
3232
32
8
88
8.
..
.Power fai ure wh
Power fai ure whPower fai ure wh
Power fai ure whi e operation
i e operationi e operation
i e operation・・・・・・・・・・・・・・・・・・・・・・・・・・
・・・・・・・・・・・・・・・・・・・・・・・・・・・・・・・・・・・・・・・・・・・・・・・・・・・・
・・・・・・・・・・・・・・・・・・・・・・・・・・
32
3232
32
About safety device
About safety deviceAbout safety device
About safety device・・・・・・・・・・・・・・・・・・・・・・・・・・・・・・・・
・・・・・・・・・・・・・・・・・・・・・・・・・・・・・・・・・・・・・・・・・・・・・・・・・・・・・・・・・・・・・・・・
・・・・・・・・・・・・・・・・・・・・・・・・・・・・・・・・
3
33
33
33
3
Maintenance
MaintenanceMaintenance
Maintenance・
・・
・Inspection
InspectionInspection
Inspection・・・・・・・・・・・・・・・・・・・・・・・・・・・・・・・・・・・
・・・・・・・・・・・・・・・・・・・・・・・・・・・・・・・・・・・・・・・・・・・・・・・・・・・・・・・・・・・・・・・・・・・・・・
・・・・・・・・・・・・・・・・・・・・・・・・・・・・・・・・・・・
3
33
33
33
3
1
11
1.
..
.Inspection of main body
Inspection of main bodyInspection of main body
Inspection of main body・・・・・・
・・・・・・・・・・・・
・・・・・・・・・・・・・・・・・・・・・・・・・・・・・
・・・・・・・・・・・・・・・・・・・・・・・・・・・・・・・・・・・・・・・・・・・・・・
・・・・・・・・・・・・・・・・・・・・・・・
3
33
33
33
3
2
22
2.
..
.C eaning of main body
C eaning of main bodyC eaning of main body
C eaning of main body・・・・・・・・・・
・・・・・・・・・・・・・・・・・・・・
・・・・・・・・・・・・・・・・・・・・・・・・・・・・・
・・・・・・・・・・・・・・・・・・・・・・・・・・・・・・・・・・・・・・
・・・・・・・・・・・・・・・・・・・
3
33
34
44
4
3
33
3.
..
.Not in use for a ong period of time
Not in use for a ong period of timeNot in use for a ong period of time
Not in use for a ong period of time・・・・・・・・・・・・・・・・・・・・・・・
・・・・・・・・・・・・・・・・・・・・・・・・・・・・・・・・・・・・・・・・・・・・・・
・・・・・・・・・・・・・・・・・・・・・・・
3
33
34
44
4
4
44
4.
..
.Maintenance
MaintenanceMaintenance
Maintenance・・・・・・・・・・・・・・・・・・・・・・・・
・・・・・・・・・・・・・・・・・・・・・・・・・・・・・・・・・・・・・・・・・・・・・・・・
・・・・・・・・・・・・・・・・・・・・・・・・・・・・・
・・・・・・・・・・
・・・・・
3
33
34
44
4
Troub e shooting
Troub e shootingTroub e shooting
Troub e shooting・・・・・・・・・・・・・・・・・・・・・・・・・・・・・・・・
・・・・・・・・・・・・・・・・・・・・・・・・・・・・・・・・・・・・・・・・・・・・・・・・・・・・・・・・・・・・・・・・
・・・・・・・・・・・・・・・・・・・・・・・・・・・・・・・・
3
33
35
55
5
Optiona accessories
Optiona accessoriesOptiona accessories
Optiona accessories・・・・・・・・・・・・・・・・・・・・・・・・・・
・・・・・・・・・・・・・・・・・・・・・・・・・・・・・・・・・・・・・・・・・・・・・・・・・・・・
・・・・・・・・・・・・・・・・・・・・・・・・・・・・・・
・・・・・・・・
・・・・
3
33
36
66
6