As the figure shows, store
Anti-slip Pad between Quick
Release Knob and Mounting
Platform.
Takeway®R2 Ranger Clampod Professional Edition is Takeway®’s
another revolutionary breakthrough after R1 Ranger. The
ultra-lightweight R2 Ranger Clampod is developed for the “outdoor
enthusiast”. The R2 Ranger weighs only 120 g and is convenient to use.
It is suitable for consumer electronic devices such as action cams,
smartphones, and tablets. Not only can it be clamped onto tubes, but
it can also be fixed on flat surfaces. The R2 Ranger can be easily
disassembled without tools and has a maximum load capacity of 3 kg
(Static). The R2 Ranger will not get loose when it is used on the move;
even dynamic moves in extreme sports will not affect its function. It can
be enhanced by adding various matching accessories. This provides
versatility based on the user’s requirements. The R2 Ranger is portable
and can be easily carried in the pocket. So enjoy every moment and
explore new experience with Takeway®R2 Ranger Clampod
Professional Edition!
1
2
4Operating Instructions
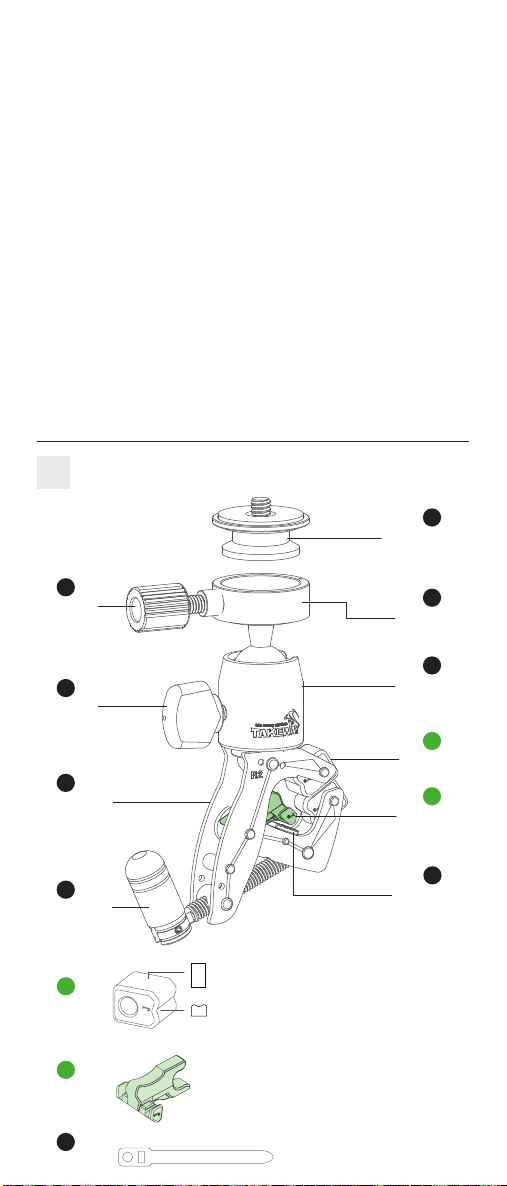
3List of Components
5
3
10
11
6
9
1
5
7
8
6-1-2
T-RC01
T-IJ02
Ball Head
Knob
Labor-saving
Handle
Jaws
7
Inner jaw
Anti-slip pad
8
4
Clamp Body
T-BK02
T-IJ02
2
11
7
6-2-1
Before using this product on your consumer electronic devices,
please check Takeway®R2 Ranger Clampod Profession Edition and
its accessories for damage or deformation. If there are any defects,
please contact the salesperson to exchange your product. A properly
functioning product prevents damage to your consumer electronic
devices or personal injury caused by the faulty product. Takeway®
takes no responsibility and assumes no liability for the loss or
inconvenience caused by the user’s own negligence.
Please test the relevant components and
read the user guide before using this product
4-3: Do not use or store the product near heat or an open flame, which
will damage the plastic components. If the product has not been used
for a long time, please check the components and make sure they
function properly, before mounting any devices. This might prevent
the device from getting loose and falling during mounting.
4-4: After the product is assembled, please first place it on a flat
surface and check for its stability. When using this product in a
standing position and mounting the device on the clampod, do not
remove your hands from your electronic device until you are sure that
both the device and the clampod are securely fixed. Make sure that
the clampod stands firmly on the surface before shooting so that your
electronic device will not be damaged due to the fall of the clampod.
4-5: Please follow the installation instructions below when using this
product. First, clamp and fix the R2 Ranger on a chosen object. Then
use the attached quick release clip to mount your electronic device.
During the process, Make sure that your electronic device is securely
mounted and the clampod grips tightly on the clamped object to
prevent your device from falling and getting damaged.
4-6: When attaching the quick release clip to an electronic device or
accessory, make sure that the quick release clip is screwed in tightly
to prevent it from getting loose and falling.
4-7: When using or storing the clampod, make sure that the jaws do
not clasp something sharp as doing so may damage the jaws.
4-1: When clamping the R2 Ranger on a smooth cylindrical surface,
place the anti-slip pad between the surface and the clampod to
increase grip.
4-2: The body of the clamp is made of aluminum alloys and in general
free from rust. However, to avoid the product being damaged, do not
keep the product in a humid environment over a long period of time.
List of Components
Quick
Release
Knob
Quick Release
Clip
Mounting
Platform
Ball Head
Jaws
Inner jaw
Pad
Smooth side : used on a flat surface
Anti-slip Pad should be used on
a slippery and cylindrical surface
The inner jaw can be easily deployed and
stored; it allows the clampod to have a
firm grip on a thinner cylindrical object or
a pole. The clamping range is between
ø10mm and ø16mm.
Groove side : used on a cylindrical surface
T-RK01
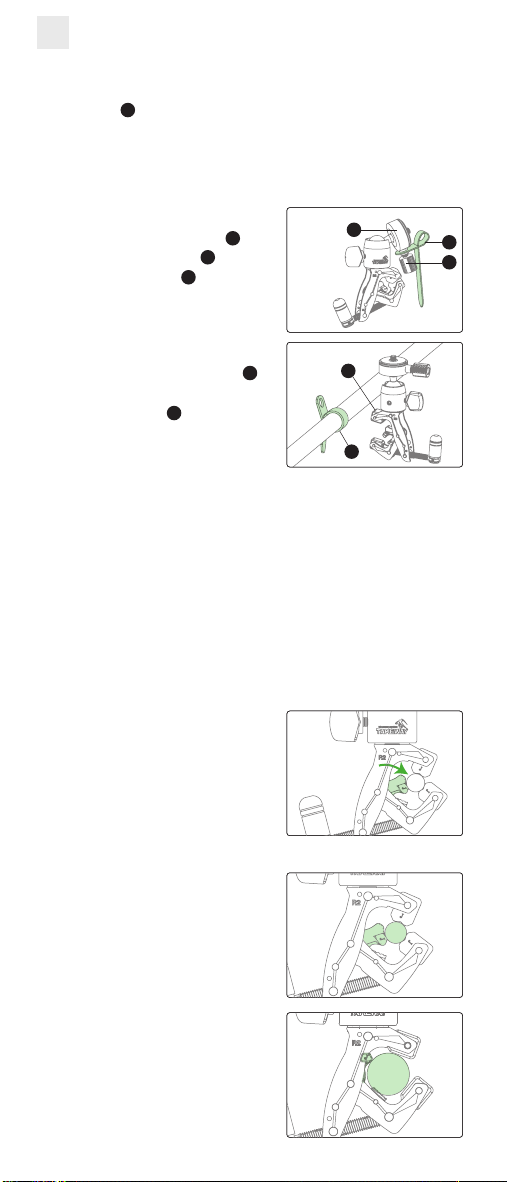
6-1: Anti-slip pad assembly, disassembly, and storage
Assembly and Use
6-1-1: Storing the anti-slip pad
As Figure 6-1-2 shows, wrap
Anti-slip Pad around the cylindrical
object. Then use Jaws to clamp
the R2 Ranger onto the anti-slip
pad surface to increase grip.
6-1-2: Using the anti-slip pad
11
7
Move the inner jaw downward from its stationed position. It
becomes the third point between the clamping jaw tips and can
further strengthen the stability of clamping on cylindrical
objects. After clamping the R2
Ranger on an object, gently shake
the clampod to make sure that the
clampod firmly grips the clamped
object; this check could prevent the
clampod from getting loose and
falling.
6-2-1: Using the inner jaw
6
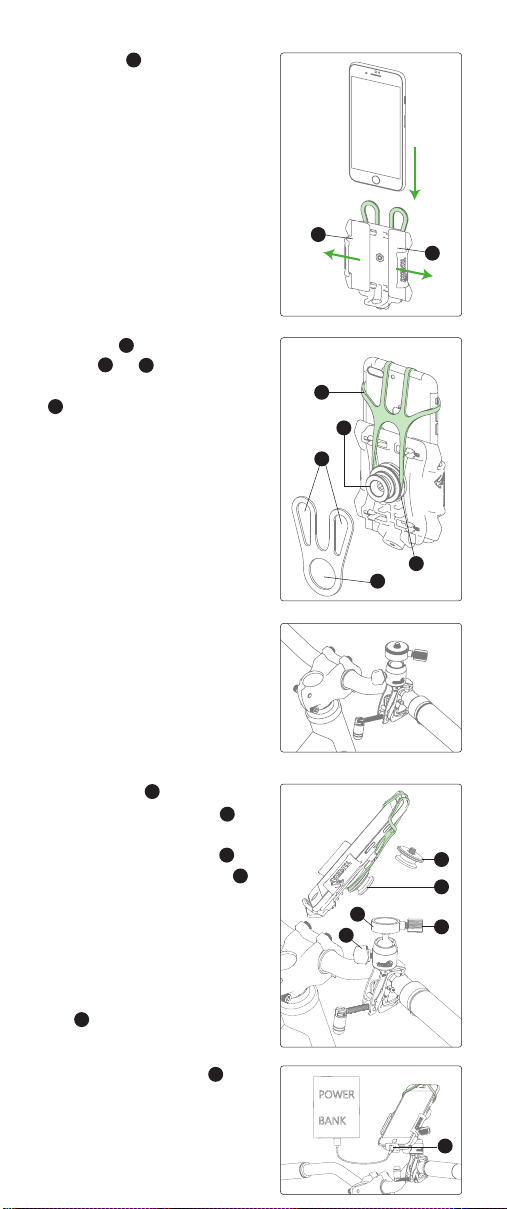
6-4: Mounting and Using A Digital Camera
6-4-1: Release Quick Release
Knob and remove Quick Release
Clip. Screw in the quick release clip
on your digital camera with a coin
or a flathead screwdriver. Please
make sure that the quick release
clip is screwed in tightly so that the
camera does not get loose.
6-4-2: Clamp the R2 Ranger
Clamp the R2 Ranger onto a
desired object and location and
then shake the clampod gently
to make sure that it is securely
fixed to prevent the clampod
from getting loose and falling.
6-4-3: Mount the camera with
Quick Release Clip ready in 6-4-1
on Mounting platform, and
screw in Quick Release Knob.
Adjust the camera to a desired
position and then start your photo
shooting.When shooting, please
use the Ball Head Knob to pan
the camera.
6-4-1
6-4-2
2
1
3
4
6-4-3
RANGER
coin
3
1
1
2
3
4
Our Sincere Gratitude
Wrap the Anti-slip Pad around a smooth cylindrical object and
then clamp the R2 Ranger to increase stability and to avoid sliding
of the clampod. The pad can be stored between the quick release
knob and the mounting platform to prevent loss.
6-2: Function of the inner jaw
Using an inner jaw can make clamping on small tubes more
convenient and secure. The inner jaw is made of glass-fiber
reinforced nylon and of high strength. All R2 are installed with an
inner jaw during the manufacturing process; please do not
remove the inner jaw from the clampod unless necessary.
6-3-1
10
6-3-2
10
To clamp properly onto a thin cylindrical object, please refer to
6-2-1 ‘Using the inner jaw’. To clamp properly onto a smooth
cylindrical surface, please refer to 6-1-2 ‘Using the anti-slip pad’.
6-3: Instructions for Clamping
6-3-1: Clamp and secure the
clampod onto a chosen object. As
shown in the figure, Labor-saving
Handle is bendable and provides
versatile application, even in a
limited space. Clamping is faster
and more convenient and at the
same time needs less effort thanks
to the design of the handle.
10
6-3-2: Clamp the R2 Ranger onto
a chosen surface. Shake gently
to make sure that it is securely
fixed on the clamped object to
prevent the set from getting
loose and falling.
Before using the product for the first time, please carefully read through the user guide.
Please also make sure that you fully understand the content of the user guide and correctly use this product following the instructions.
USER GUIDE
6-1-1
11
3
2
Clamping range: Ø 10-16mm
For cylindrical objects Ø10 – Ø16
mm, the inner jaw should be
pushed out. Then use the jaws
and the inner jaw to make a "3
J-point clamp".
6-2-2: Clamping instruction
Clamp onto a small cylindrical object
Clamping range: 1-32mm
Use only the jaws for clamping
Clamp onto a board/plate
For cylindrical objects
Ø17~Ø32mm, the inner jaw
should be in its stationed
position. Use only the clamp body
and make sure that the clamped
object is completely wrapped
inside the clamp body.
Clamp onto a large cylindrical object
11
Clampod with
T-IJ02 inner jaw
Phone holder for sport
(T-PH03)*
Anti-slip Pad
(T-AP01)
V belt
(T-AP02)*
Pouch (Random)
(T-P01)
Action Cam
Mount*
T-IJ02
*Note: Optional accessory
11
3
2