TALARIA STING R L1E User manual

TALARIA POWER TECH
STING R L1E OWNER’S MANUAL

TALARIA POWER TECH
Content
Introduction .................................................................................................................... 1
An Important Message from Talaria ............................................................... 1
About This Manual ............................................................................................... 1
Useful Information for Safe Riding .................................................................. 2
Identification Numbers .................................................................................... 3
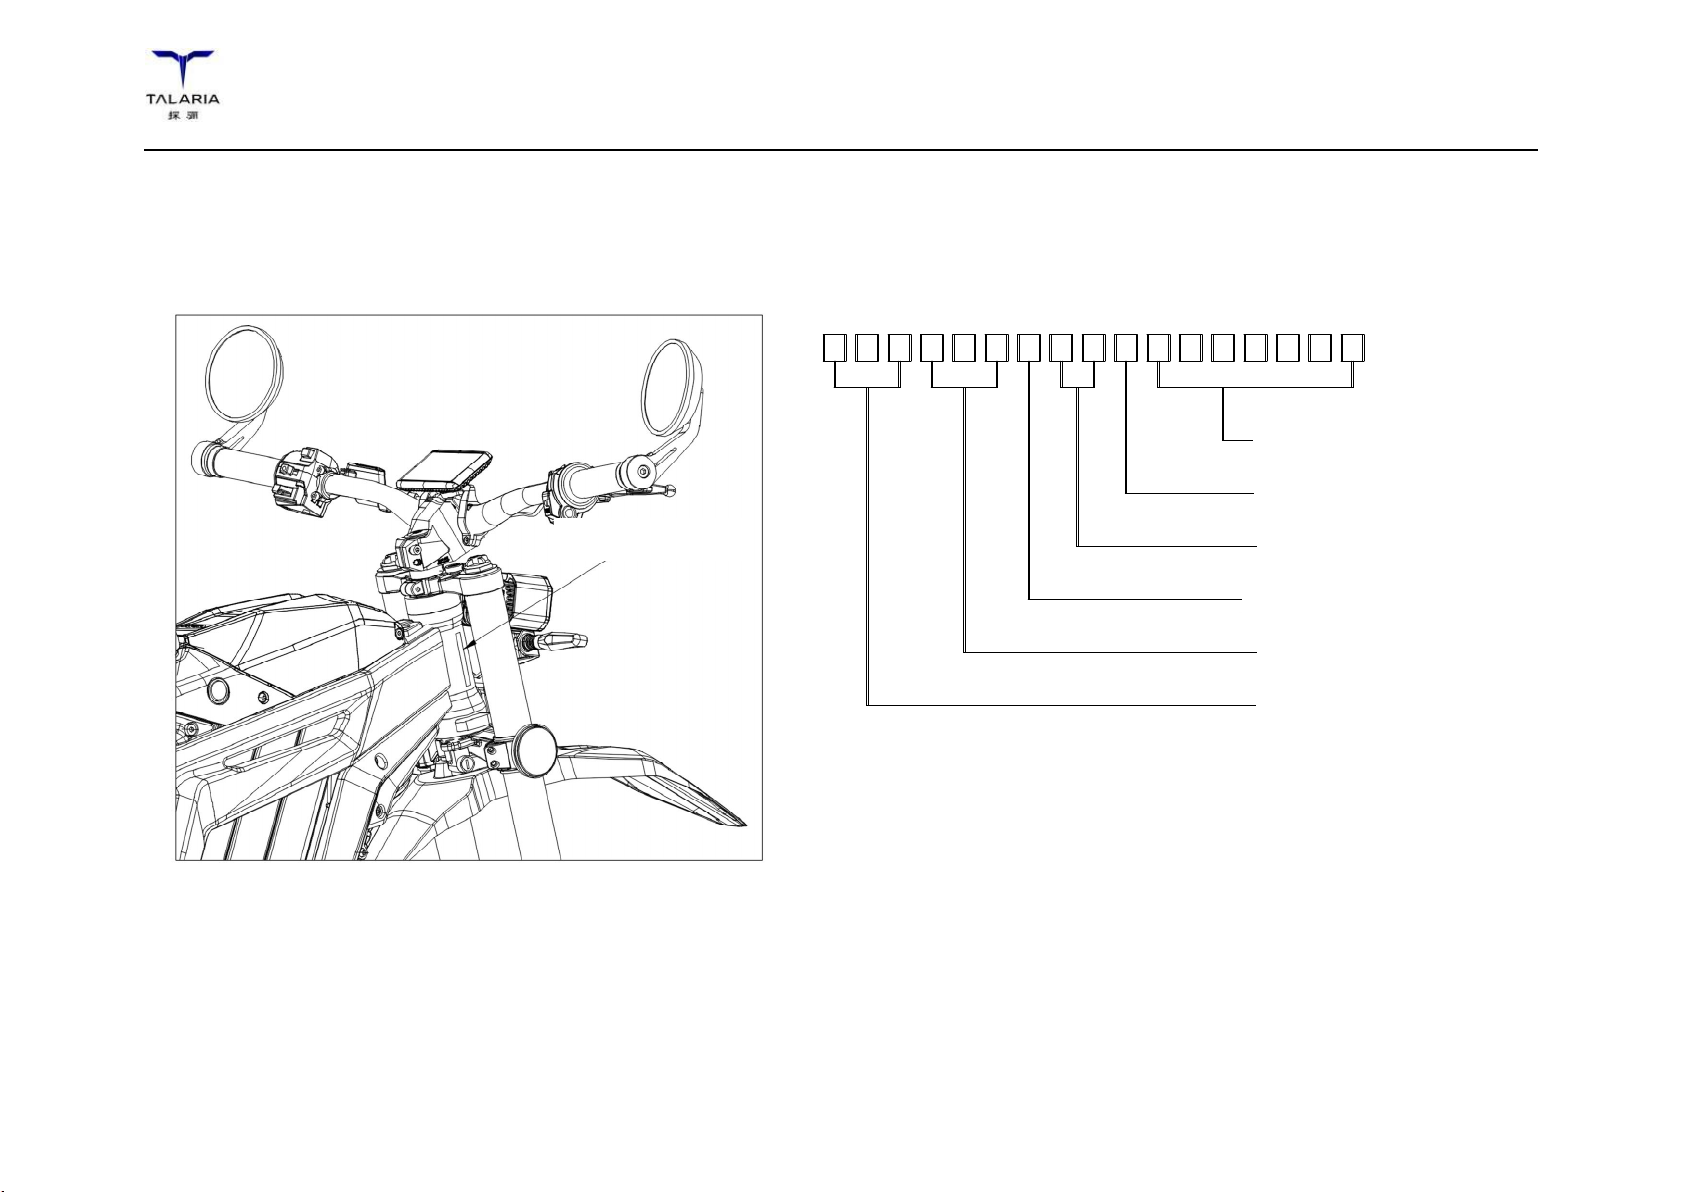
Vehicle Identification Number (VIN) ............................................................... 3
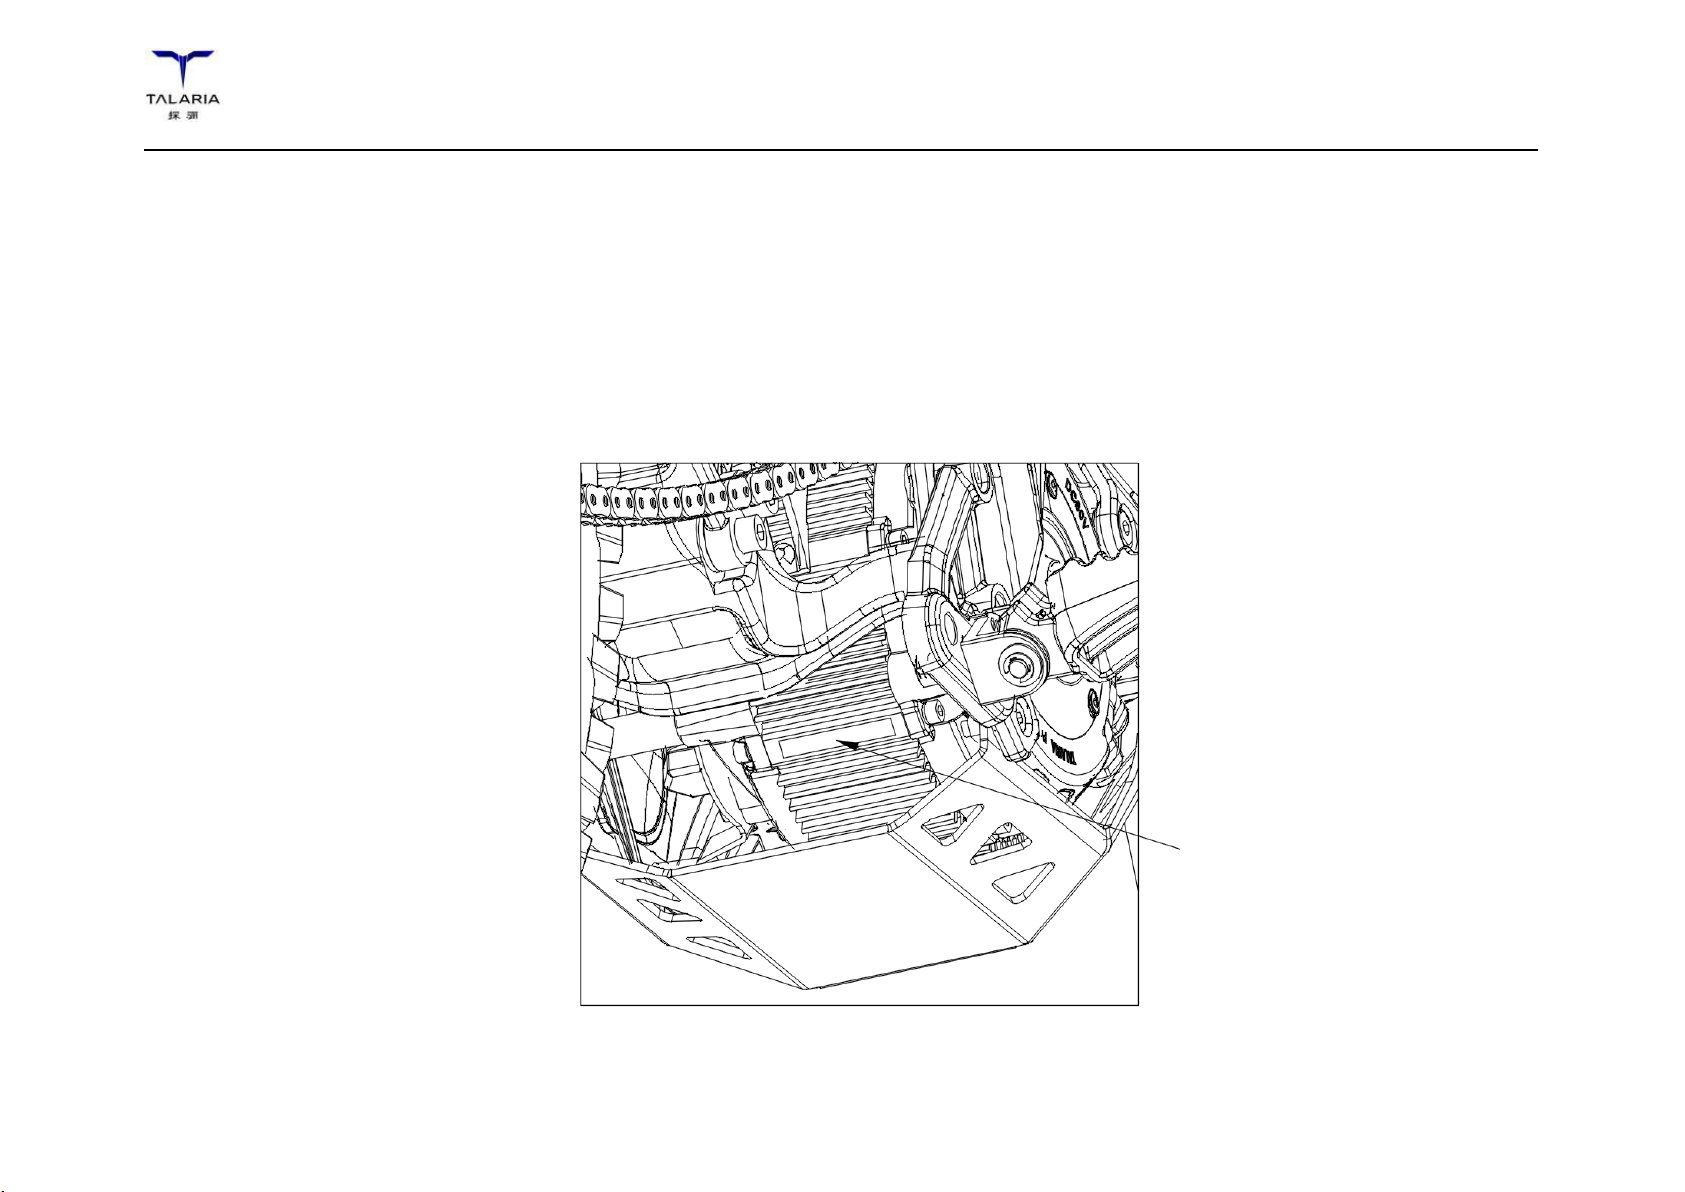
Motor Serial Number ........................................................................................... 4
General Information .......................................................................................... 5
Technical Specification ........................................................................................ 5
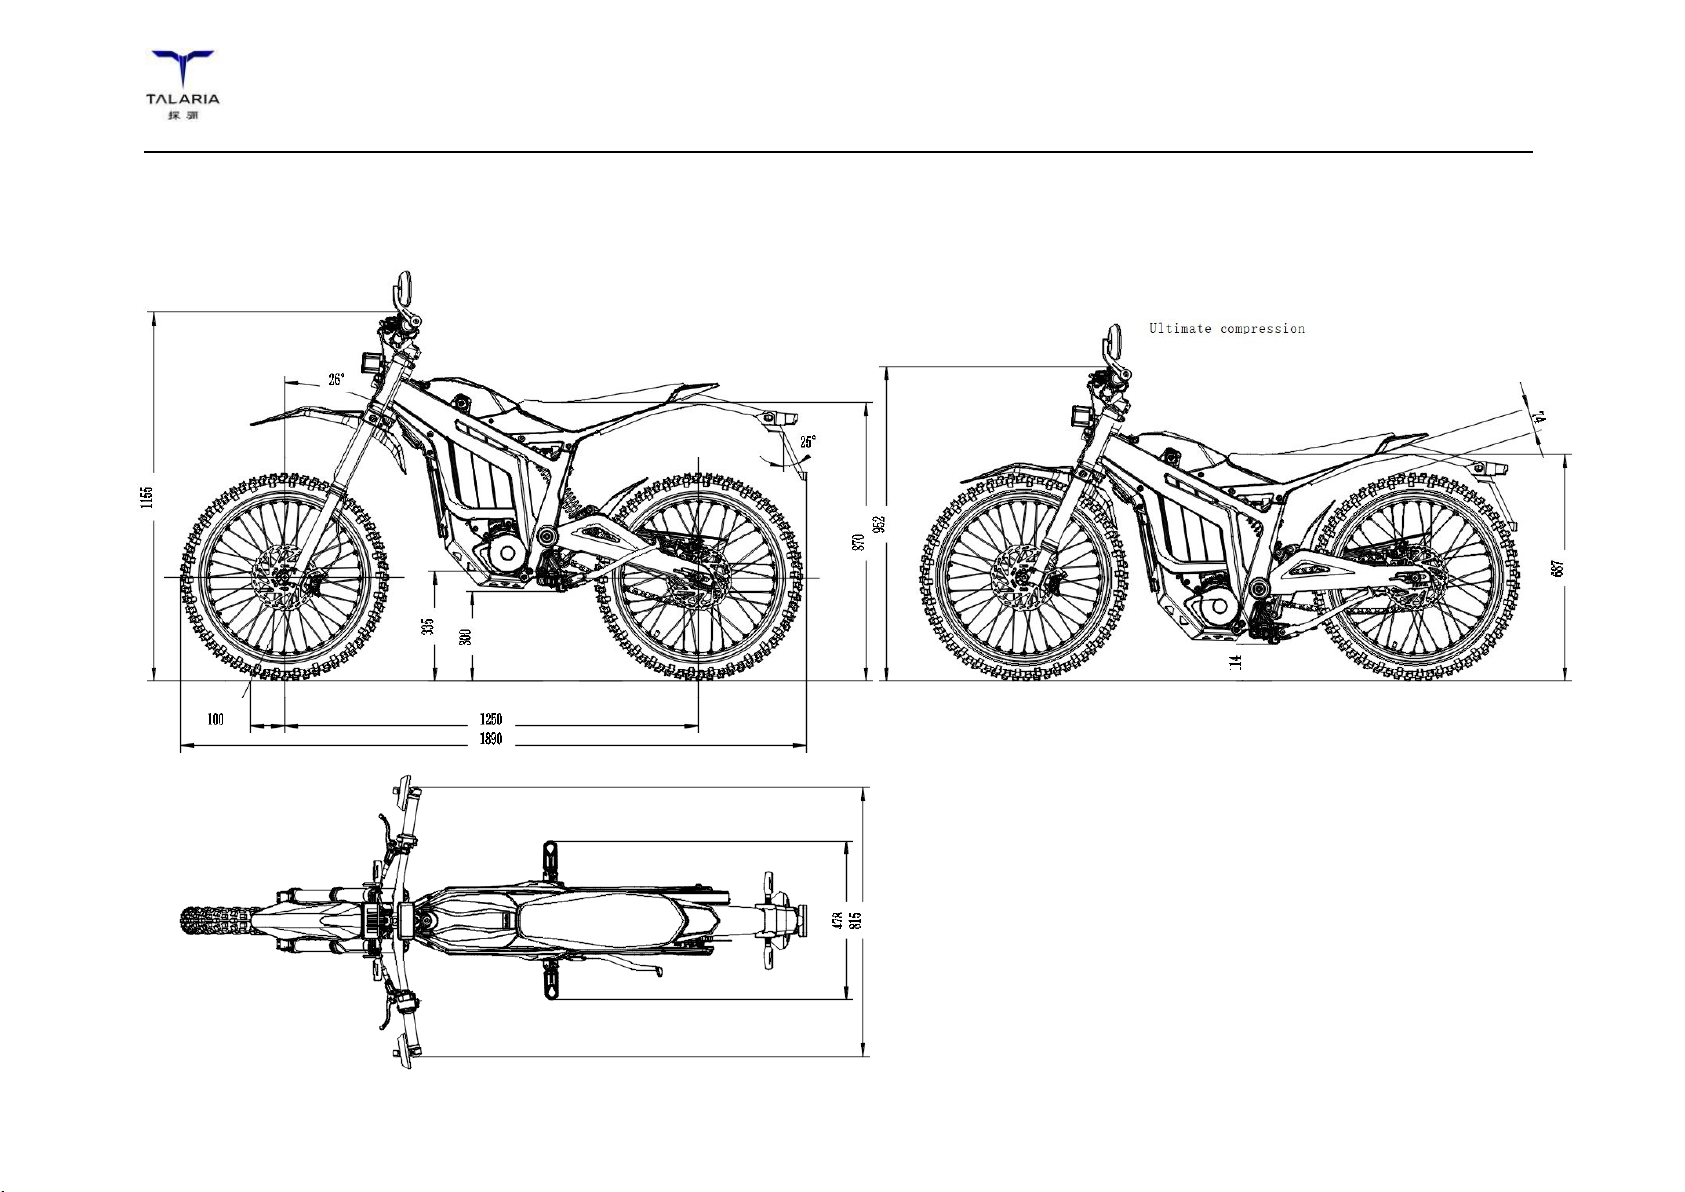
Vehicle Overall Dimension ................................................................................. 6
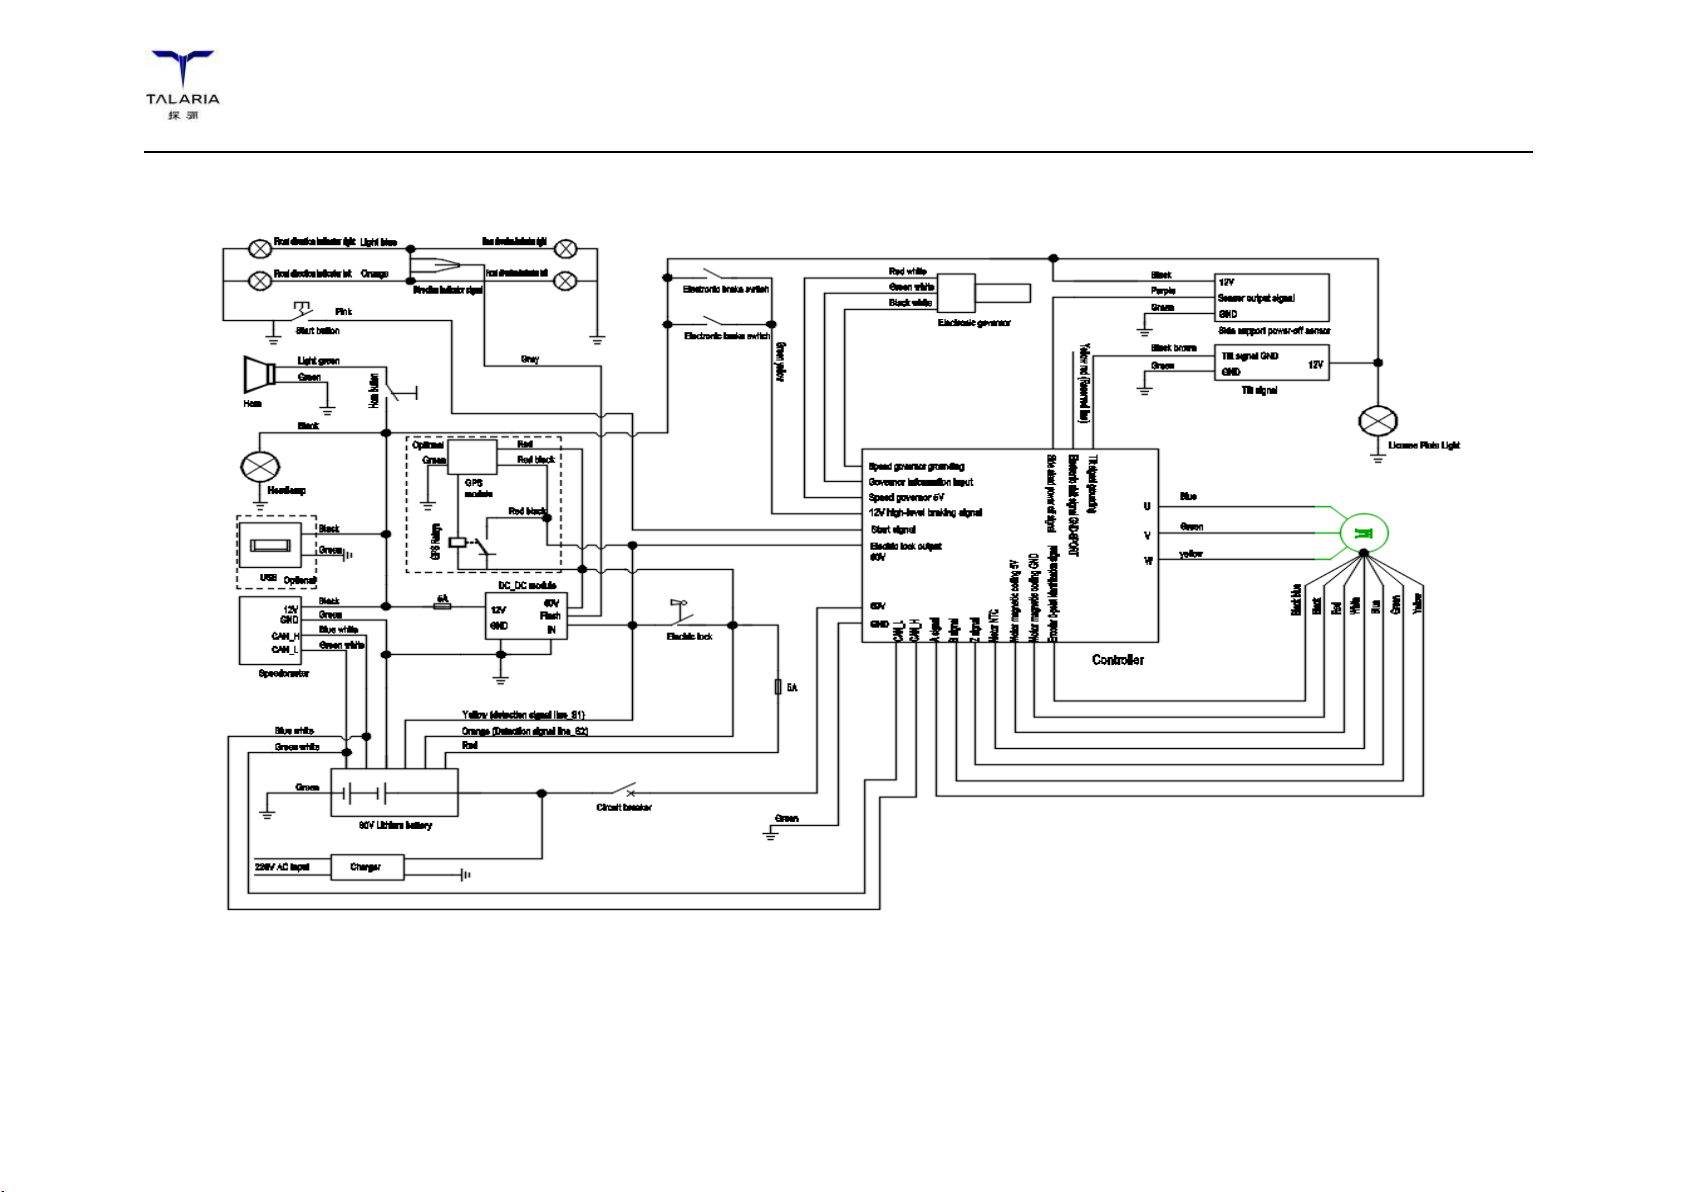
Circuit Schematic Diagram ................................................................................. 7
Safety Information ............................................................................................. 8
Anti-Theft Alarm Information ........................................................................... 8
General Safety Precautions ................................................................................ 9
Location of Important Labels ......................................................................... 10
Controls and Components ............................................................................ 11
Motorcycle Controls .......................................................................................... 11
Dash Overview .................................................................................................... 12
Top View ............................................................................................................... 20
Left Side View ...................................................................................................... 21
Right Side View ................................................................................................... 22
Starting and Operating .................................................................................. 23
Pre-Ride Inspection ........................................................................................... 23
Riding Operating ................................................................................................ 24
Charging and Battery Information .............................................................. 27
Battery Basic Information ................................................................................ 27
Battery Charging and Charger Usage ......................................................... 28
Charging Precautions ....................................................................................... 29
Remove the Battery ........................................................................................... 30
Install the Battery ................................................................................................ 31
Malfunction Inspection and Troubleshooting ......................................... 32
Precautions for High Voltage Electrical Components ............................ 32
General Troubleshooting ................................................................................. 33
Dash Error Codes, Failures and Troubleshooting .................................... 33
Warranty ............................................................................................................ 38
Warranty Description ........................................................................................ 38
Maintaining Your Motorcycle ...................................................................... 39
Owner’s Responsibilities .................................................................................. 39
Scheduled Inspection ........................................................................................ 39
Parts/Maintenance Items ................................................................................. 40
Scheduled Maintenance Notice .................................................................... 47
Scheduled Maintenance Table ...................................................................... 47
Maintenance Record ...................................................................................... 50
Maintenance Record Card .............................................................................. 50
Customer Information Card ............................................................................ 50

TALARIA POWER TECH
Introduction
An Important Message from Talaria
Congratulations and thank you for purchasing the 2023 Talaria Sing R L1e
electric motorcycle; we welcome you to the community of Talaria
Motorcycle riders. This manual is designed to provide you with a better
understanding of the operation, inspection, and basic maintenance
requirements of this motorcycle.
Talaria continually seeks advancements in product design and quality.
Therefore, this manual contains the most current product information
available at the time of printing. Because of this, your motorcycle may
differ from the information supplied in this Owner’s Manual. No legal
claims can be made on the basis of data in this manual. When it comes
time to sell your Talaria Sting R L1e electric motorcycle, please ensure
that this manual stays with the motorcycle. It is an important part of the
vehicle. If you have any questions concerning the operation or
maintenance of your motorcycle, please contact Talaria at
For 24-hour updates and additional information about your motorcycle,
visit the Talaria Motorcycle website:
http://www.talaria.cn
About This Manual
This manual covers the standard features, operations, malfunction
inspections and warranty for Talaria STING R L1e electric motorcycles.
Talaria Sting R L1e: Road Legal (For EU Countries)
Speed Limitation: 45KM/H
Wire Wheels
19-inch Diameter Front Wheel
19-inch Diameter Rear Wheel
Knobby Tires
Locating and Referencing Information
A good place to locate information about the motorcycle is in the index in
the back of the manual.
The terms “right” or “left” refer to the rider’s right or left when sitting on the
motorcycle.

TALARIA POWER TECH
Introduction
Useful Information for Safe Riding
This manual contains the word WARNING to indicate something that
could hurt you or others. It also contains the word CAUTION to indicate
things that could damage your motorcycle.
WARNING! Please read this manual carefully and completely before
operating this motorcycle. Do not attempt to operate this motorcycle until
you have attained adequate knowledge of its controls and operating
features, and until you have been trained in safe and proper riding
techniques. Regular inspections and proper maintenance, along with
good riding skills, help you safely enjoy the capabilities and the reliability
of this motorcycle. Disregarding the aforementioned, however, may
render the warranty invalid.
This symbol is located in various locations on the motorcycle to inform you
that exposure to high voltage can cause shock, burns and even death.
The high voltage components on the motorcycle should be serviced only
by technicians with special training. High voltage cable or wiring has an
orange covering. Do not probe, tamper with, cut, or modify high voltage
cable or wiring.
Unplug the Battery
CAUTION: Proper care of the motorcycle’s battery is essential! Once
your motorcycle is charged, disconnect the battery from AC power.
Leaving your motorcycle unplugged will maximize long-term battery
health.
See “Battery Information”, from page 27 to page 31 for other important
information regarding the battery.

TALARIA POWER TECH
Identification Numbers
Vehicle Identification Number (VIN)
The VIN is a 17-digit number stamped on the right side of the frame’s head tube. Do not alter or remove this number as it is the unique identifier for
your motorcycle.
流水号Running number
生产年份production year
代码版本versin code
变形码variant code
车辆类别vehiche type
世界制造商标识WMI
********R 7 3 L 3T A 0 0
☆ ☆
车 架 VIN 码
流水号Running number
生产年份production year
代码版本versin code
变形码variant code
车辆类别vehiche type
世界制造商标识WMI
********R 7 3 L 3T A 0 0
☆ ☆
VIN
Production serial number
Production year
Version code
Variant code
Electric motorcycle type
WMI
4

TALARIA POWER TECH
Identification Numbers
Motor Serial Number
The motor serial number is stamped on the left-hand side of the motor housing. ☆159ZW6030413NA☆
And the Second row is the Talaria internal control number:Internal 6-Digit Model Number + Manufacturing Date(YY/MM) + 1-Digit Factory Identify
Number +4-Digit Running Number:
Example: ☆TL4000-22122030001☆
Motor Serial Number

TALARIA POWER TECH
General Information
Technical Specification
Item Specs
Vehicle Dimension 1890mm × 815mm × 1155mm
Wheelbase 1250mm
Vehicle Weight/45Ah Battery Included 55kg/68kg
Max. Loading Ability 100kg
Min. Ground Clearance 300mm
Seat Height 840mm
Max. Gradeability 45°
Top Speed 45km/h (Limited)
Nominal Power 4KW
Peak Power 3.5KW (Limited)
Battery Pack 60V 43.2Ah for Nominal, and 60V 45Ah for maximum
Range ≥100Km@25Km/h
Charging Time 4h
Charger Input Voltage AC110/230V-50/60Hz
Riding Modes ECO/SPORT
Wire Wheel Size Fr.: 1.9×14; Rr.:1.9×16
Tire Size Fr.: 70/100-19; Rr.: 80/100-19
Front Fork Adjustable Hi-Performance Dual Crown Fork with 200mm Travel
Rear Suspension Adjustable 85mm Travel Shock absorber with Linkage
Brake Hydraulic Front and Rear Disc Brakes
Primary Transmission Gearbox
Secondary Transmission Chain (420-106)
Dash Type TFT

TALARIA POWER TECH
General Information
Vehicle Overall Dimension

TALARIA POWER TECH
General Information
Circuit Schematic Diagram

TALARIA POWER TECH
Safety Information
Anti-Theft Alarm Information
1. Key Switch: Turn the key switch clockwise to the ON
position, the electric motorcycle is powered on; turn the key
switch counter-clockwise to the OFF position, the electric
motorcycle is powered off, and then remove the key.
2. Steering Lock: Turn the handlebar all the way to the left,
insert the key and turn it counter-clockwise to lock the
steering, and then remove the key; insert the key and turn it
clockwise to unlock the steering, and then remove the key.
3. Battery Case Lock: Insert the key and turn it counter-
Key Switch
Steering Lock

TALARIA POWER TECH
Safety Information
clockwise to unlock the Battery Case Lock.
General Safety Precautions
This is a performance motorcycle and should be treated with extreme caution.
Please obey the local traffic rules, and ride the motorcycle with a proper speed. (Top speed for Sting R L1e version is limited to be 45km/h)
Proper safety gear, including a regionally approved helmet, eye protection, riding boots, gloves, and protective clothing should be worn while riding to
reduce the risk of potential injury. We highly recommend the use of full height riding boots since the vast majority of motorcycle injuries are leg and foot
injuries. It is not recommended to ride without the correct protective clothing; this applies to even short journeys and to every season of the year.
Read all additional warnings and product instructions in this owner’s manual, as well as safety labels, before operating your electric motorcycle.
Never permit a guest to ride your electric motorcycle without proper instruction.
Never use alcohol or mind-altering drugs before operating your electric motorcycle.
Persons unwilling or unable to take responsibility for their actions should not use this motorcycle. You assume all responsibility while operating your
motorcycle. The seller assumes no liability for misuse or operator negligence
Your safety depends in part on the good mechanical condition of the motorcycle. Be sure to do maintenance regularly. Be sure you understand the
importance of checking all items thoroughly before riding.
Modifications to the motorcycle may render the vehicle unsafe and may cause severe personal injury. Talaria cannot be held liable for non-approved
modifications.
Be very careful when loading or adding accessories to your motorcycle. Large, bulky, or heavy items may adversely affect the handling and performance
of your motorcycle.

TALARIA POWER TECH
Safety Information
Location of Important Labels

TALARIA POWER TECH
Controls and Components
Motorcycle Controls
1. Horn button
2. Dash (For description and operation, see “Dash Overview” from page 12 to page 18.)
3. Starting button (After the electric motorcycle is turned on, and the side kick stand is swung back, then, press the start button to allow the bike to go
when the dash shows READY).
4. Brake Fluid Reservoir.
Attention:
a. ECO mode is with a slow acceleration setting, which is good for the fresh riders and the need of longer battery life.
b. SPORT mode is with a fast acceleration setting, which is good for the skilled riders and off-road riding.
c. To avoid overcharge and protect the battery, Re-Gen function will only work when battery’s SOC is below 90%.

TALARIA POWER TECH
Controls and Components
Dash Overview
Left Indicator Turn Signal Left Indicator Turn Signal
Fault Indicator USB
Error Code
Speedometer
Performance Modes
Tripmeter
Clock
High/Low Beam Indicator
Energy Consumption
Odometer
Armed Indicator
Regen Level Indicator
SOC Indicator
Battery Status Indicator

TALARIA POWER TECH
Controls and Components
1
1
2
3

TALARIA POWER TECH
Controls and Components
SEL UP
SEL DOWN
SAVE
In the main interface,press SEL UP one time,Regen +1 level; holding SEL UP
to clear the trip to ZERO.
In the main interface,press SEL UP one time,Regen -1

TALARIA POWER TECH
Controls and Components
My Vehicle:Press SAVE to enter into the set interface, then, the riding data will
show on the display (Such as the information about the speed, battery, runtime,
range, and so on).
Screen Display:Press SEL DOWN to enter into “Screen display” setting interface.
Then, press SAVE to start selecting the screen display modes by pressing SEL UP
or SEL DOW, and finally, press SAVE to save the setting. There are 3 modes to
select. Auto Mode, the screen will automatically adjust the display brightness
accord to the environment luminance. Day Mode, the screen display will keep the
high brightness. Night Mod, the screen display will keep a clear and comfortable
brightness. Auto Mode is the default setting.

TALARIA POWER TECH
Controls and Components
Brightness:Press SEL DOWN to enter into “Brightness” setting interface. Then,
press SAVE to start selecting the brightness modes by pressing SEL UP or SEL
DOWN, and finally, press SAVE to save the setting. There are 4 brightness modes
to select. Auto Mode will automatically adjust the brightness accord to the
environment luminance. Level 1 is with the highest brightness. Level 1 is with the
medium brightness. Level 3 is with the low brightness. Auto Mode is the default
setting.
Time:Press SEL DOWN to enter into “Time” setting interface. Then, press SAVE
to start setting the time by pressing SEL UP or SEL DOWN, and finally, press SAVE
to save the setting.

TALARIA POWER TECH
Controls and Components
Unit Settings:Press SEL DOWN to enter into “Unit Setting” setting interface. Then,
press SAVE to start selecting Metric or Imperial unit display by pressing SEL UP or
SEL DOWN, and finally, press SAVE to save the setting.
Language: Press SEL DOWN to enter into “Language” setting interface. Then, press
SAVE to start selecting Chinese or English by pressing SEL UP or SEL DOWN, and
finally, press SAVE to save the setting.

TALARIA POWER TECH
Controls and Components
Wheel: Press SEL DOWN to enter into “Wheel” setting interface. Then, press SAVE
to start selecting wheel diameter by pressing SEL UP or SEL DOWN, and finally,
press SAVE to save the setting. The incorrect diameter setting will cause the
incorrect speed indication. The default wheel diameter setting is 17inch.
Notice: The wheel diameter refers to the rear driving wheel. If you choose the
wrong wheel diameter, your motorcycle will still run with no problems. But the
Speedometer will display the incorrect real-time speed.
Gr: Press SEL DOWN to enter into “Gr” setting interface. Then, press SAVE to start
selecting gear ratio by pressing SEL UP or SEL DOWN, and finally, press SAVE to
save the setting.
Notice: 1:4.7 for 25T, 1:6.9 for 36T, 1:7.5 for 40T, 1:8.4 for 44T, 1:9.1 for 48T, 1:9.5
for 50T, 1:11 for 58T. If the gear ratio you chosen does not match the sprocket on
your motorcycle. Your motorcycle will still run with no problems. But the
Speedometer will display the incorrect real-time speed.
Table of contents
Other TALARIA Motorcycle manuals