TALARIA STING User manual


OWNER MANUAL
Model: STING
An Important Message From Talaria
Dear customers:
Congratulations and thank you for purchasing the Talaria STING electric motorcycle; we welcome you to the
community of Talaria Electric Motorcycles riders. This manual is designed to provide you with a better
understanding of the operation, inspection, and basic maintenance requirements of this electric motorcycle.
Talaria continually seeks advancements in product design and quality. Therefore, this manual contains the most
current product information available at the time of printing. Because of this, your motorcycle may differ from the
information supplied in this Owner’s Manual. No legal claims can be made on the basis of data in this manual.
When it comes time to sell your Talaria STING, please ensure that this manual stays with the electric motorcycle;
it is, by law, an important part of the vehicle. If you have any questions concerning the operation or maintenance
of your electric motorcycle, please contact the local Talaria dealers.
CAUTION: Please use only Talaria approved parts and accessories for your Talaria Electric Motorcycle. Parts and
accessories for your Talaria Electric Motorcycle have been checked and tested for safety and suitability. Talaria is
unable to accept any liability whatsoever for parts and accessories which have not been approved.
Vehicle Range
The range of an electric vehicle is defined as the distance the vehicle travels on a single full charge of the
battery pack. Your range results are a direct reflection of your riding habits. The more conservatively you ride,
the better range you can expect from your Talaria STING electric motorcycle.
Some of the factors which affect range include: speed, acceleration, number of starts and stops, ambient air
temperature, as well as changes in elevation. The combination of these factors, as you travel from one point to
another, defines your trip profile. In addition, tire pressure and payload are important considerations.
We suggest that you ride conservatively when you first get your Talaria STING electric motorcycle, and get to
know your motorcycle and your riding environment. Once you become familiar with the range versus
performance of your electric motorcycle, then you can adjust your riding characteristics if you so desire. This
applies mainly to riders which are at the edge of the performance envelope.

Table of Contents
001 Safety Information
002 Components
007 Components Functions
009 Starting and Operating
011 Charging and Battery Pack Information
013 Pre-Riding Inspection
015 Regular Inspection and Maintenance
017 Technical Specifications
018 Errors and Solutions
019 Circuit Diagram

Safety Information General Safety Precautions
• This is a performance electric motorcycle and should be treated with extreme caution.
• Proper safety gear, including a regionally approved helmet, eye protection, riding boots, gloves, and
protective clothing should be worn while riding to reduce the risk of potential injury. We highly recommend
the use of full height riding boots. It is not recommended to ride without the correct protective clothing.
• Read all additional warnings and product instructions in this owner’s manual, as well as safety labels, before
operating your electric motorcycle.
• Never permit a guest to ride your electric motorcycle without proper instruction.
• Never use alcohol or mind-altering drugs before operating your electric motorcycle.
• Persons unwilling or unable to take responsibility for their actions should not use this electric motorcycle. You
assume all responsibility while operating your motorcycle. The seller assumes no liability for misuse or
operator negligence.
• Prior to each use the rider must check everything carefully, and the charge level of the battery pack as
indicated on the battery pack display or dash display charge indicator.
• Your safety depends in part on the good mechanical condition of the motorcycle. Be sure to follow the
maintenance schedule and adjustment requirements contained in this manual. Be sure you understand the
importance of checking all items thoroughly before riding.
• Modifications to this electric motorcycle may render the vehicle unsafe and may cause severe personal injury.
Talaria cannot be held liable for non-approved modifications.
• Be very careful when loading or adding accessories to your motorcycle. Large, bulky, or heavy items may
adversely affect the handling and performance of your electric motorcycle. Overloading may even cause the
safety hazards and vehicle damages.
Important Operating Information
Several operating considerations are listed below:
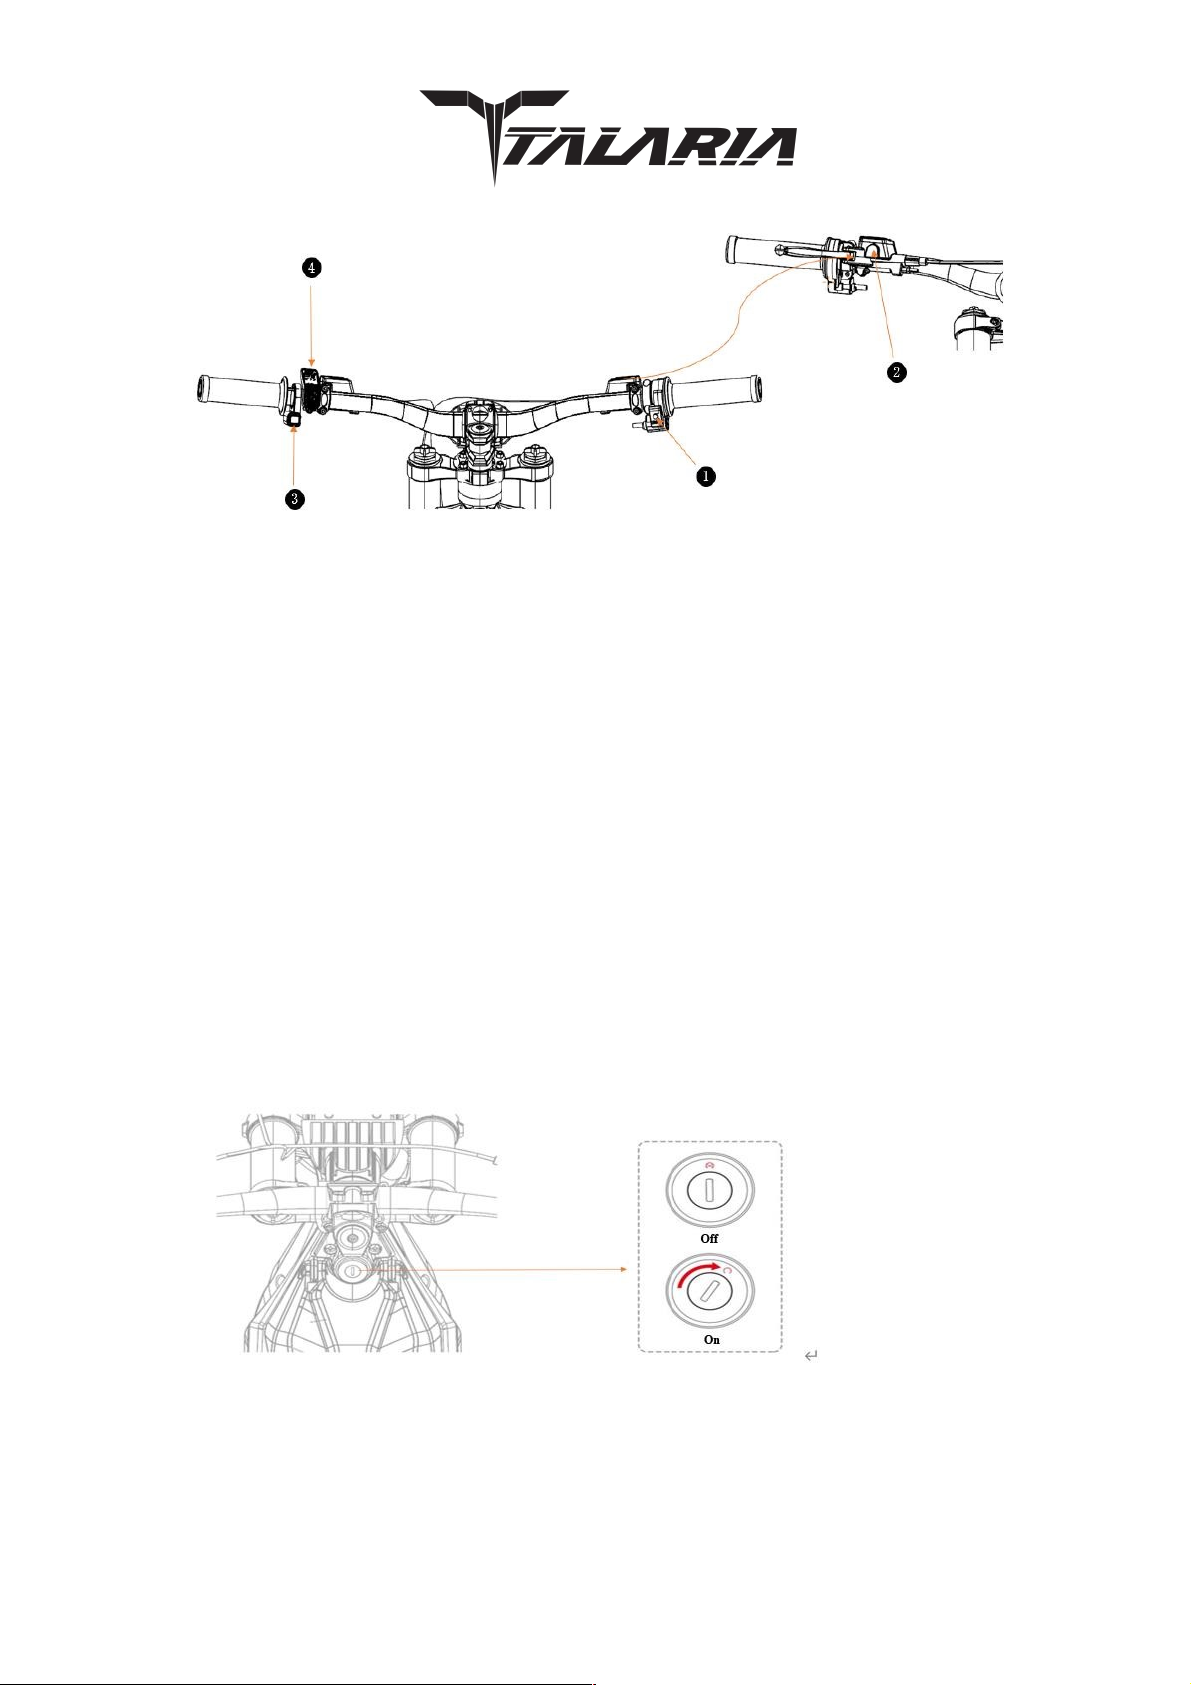
• Always turn the key switch to the OFF position when not actively riding. It is very easy to forget that the
electric motorcycle is powered up because it is silent. An accident can occur if the electric motorcycle is left
powered up while getting on or off the electric motorcycle.
• Use the rear brake when you are stopped on an incline. Do not hold the motorcycle using partial throttle or
damage to the motor may occur.
• If you plan on riding again the next day or the battery pack’s state of charge is less than 30%, plug the battery
pack or your electric motorcycle into an AC power source to recharge it. Always use the supplied charging
cable as it has been designed for use with your electric motorcycle’s electrical components.
• While unplugged with the key in the OFF position, the electric motorcycle’s electronics will consume a very
small amount of power and the battery pack will drain extremely slowly. If the electric motorcycle has been
unused for more than 30 days, turn the circuit switch off, as well as unplug the battery cable. For every
3month, charge the battery one time to about 60% power, and store the battery pack in a dry and ventilated
place.

CAUTION: Only charge the Talaria battery pack with the approved Talaria accessory charger.
Vehicle Identification Number (VIN) & Motor Number
• The VIN is a 17-digit number stamped on the head tube of the frame. Do not alter or remove this number as
it is the legal identifier for your electric motorcycle.
• The motor number is stamped on the motor enclosure.
Components
Please refer to the illustrations to identify the components and be familiar with the electric motorcycle.
Illustration 1
1-1 Front Brake Lever 1-3 Throttle Control
1-2 Rear Brake Lever 1-4 Handle Grips
1-5 Handlebar 1-5 Key Switch
1-7 Battery Pack Holder Cover 1-8 Footpeg
1-9 Seat 1-10 Side Kickstand

Illustration 2
2-1 Headlight
2-3 Front Fender
2-5 Front Brake Disc
2-7 Controller
2-9 Motor Protector
2-11 Chassis
2-13 Rear-Wheel
2-15 Rear Brake Disc
2-2 Front Fork
2-4 Front Wheel
2-6 Front Brake Pump
2-8 Battery Pack Charging Interface
2-10 Gearbox Cover
2-12 Rear Fenders
2-14 Rear Brake Pump
2-16 Rear Fork

Illustration 3
3-1 Battery Pack
3-3 Tail Light
3-5 Motor Assy.
3-7 O-Ring Chain
3-2 Battery Pack Holder Lock
3-4 Rear Shock Absorber
3-6 Horn
3-8 Chain Guide
3-9 Sprocket

Components Functions
Illustration 4
4-1 Setting Button (not available while riding)
4-2 Status Display (including WAIT/READY/ECO/SPORT/ERROR)
4-3 Real-Time Speed 4-4 Battery Display
4-5 Single Range
4-6 Re-Gen Levels Indicator (1, 2, 3, 4 re-gen levels can be set)
4-7 Button M (When the electric motorcycle is switched on and stationary, hold down the setting button for a
while to enter into the dash setting. And after the dash setting finished, press button M to confirm and save the dash
settings. Beside this, regularly, the button M is also used to switch the riding modes between ECO and SPORT)
4-8 & 4-9 Selection Buttons (up/down) (When the electric motorcycle is switched on and stationary, hold
down the setting button for a while to enter into the dash setting. Then, you can use the selection buttons to select
the settings by up and down. Beside this, regularly, the selection buttons are also used to select the re-gen levels.)
4-10 EXIT (exit any settings)
4-11 Riding DATA (Including average energy consumption, maximum speed, average speed, startup running
time, mileage).
4-12 Switch for KM/H and MPH.
4-13 Wheel Diameter Setting (17” or 19”).
4-14 Gear Ratio Setting
4-15 Battery pack information (Battery voltage, capacity, cycle index)

Illustration5
5-1 Start button, for the consideration of safety, after the electric motorcycle was switched on, it will not move
when you throttle the electric motorcycle. And on the dash, it displayed WAIT. Once you are ready to ride, press
this start button, it will display READY on the dash, and then, you can throttle the electric motorcycle to ride. 5-2
Brake fluid level indicator
5-3 horn button 5-4 dash
Special Notice:
• When you select the "ECO " mode, the power output and speed acceleration are not so active, it’s suitable
for fresh riders, as well as the riders who want a longer range.
• When you select the "SPORT" mode, the power output and speed acceleration is active, it’s suitable for motor
cross riding. In this case, for your safety, please make sure you are skilled, and well geared up.
• To avoid battery pack overcharge, the re-gen function will work only after the battery SOC (State of Charge)
is less than 90%.
Key Switch Illustration
Illustration 6

Starting and Operating
Starting
Pre-starting inspection is required.
• Before starting, firstly, please make sure the circuit breaker, which is inside of the battery pack holder, is
switched on. Secondly, well lock the battery pack holder cover, and unplug the key to turn the key switch on.
And then, check whether all other switches, dash and horn well work. Finally, hold down the front and rear
brake levers to check whether the brakes work correctly.
• Motor Starting: After the checking, fold up the side kickstand (WAIT is displayed on the dash). And when the
rider is ready, press the start button to start the motor. Then, READY will be displayed on the dash, it means
the electric motorcycle is ready to go, and the rider can throttle to ride the electric motorcycle to ride. This
electric motorcycle has the power-off protection device on the side kickstand, unless the side kickstand is
folded up, the motor will not start.
Throttle Control
When the throttle is in the closed position, there’s no power to energize the motor. Twist the throttle in a
counterclockwise rotation to energize the motor and accelerate the electric motorcycle. Twist the throttle in a
clockwise rotation to decelerate the electric motorcycle. Release the throttle and it snaps back to the closed position
to deenergize the motor.
Warning: Please twist the throttle properly, progressive twist of the throttle could cause damages to the throttle
and lose control of the electric motorcycle. In this case, may lead to serious injury or even death.
Braking
• On the right handlebar is the hand operated brake lever. The brake lever controls the front brake when the
lever is squeezed. On the left handlebar is the hand operated brake lever. The brake lever controls the rear
brake when the lever is squeezed.
• When braking, the throttle should be in the closed position. And if you only apply front brake or rear brake,
will possibly cause sideslips, and lead to serious injury or even death. Therefore, we strongly recommend
you to apply both front and rear brakes together.
Warning: If you apply the front or rear brake hard enough, it is possible to lock the wheels. This could cause you
to lose control of the electric motorcycle and could lead to serious injury or even death. Progressive use of the
brakes should bring the electric motorcycle to a complete stop without locking the wheels. Your Talaria STING
electric motorcycle is a light- weight performance product and therefore practice is strongly recommended to
perfect safe emergency stops.
Riding Cautions
• When you ride the electric motorcycle, if there’re no emergency circumstances, don’t do quick accelerations
and decelerations is strongly suggested. With less quick accelerations and decelerations, it will protect your

electric motorcycle in a good condition, keep you away from the hazards, reduce the power consumption,
increase the range and life time of the electric motorcycle.
• When you ride the electric motorcycle on rainy and snowy days, the ground is wet and slippery. In this case,
we strongly suggest you pay more attention to the riding environment around you, and keep a clear mind for
fast reactions in case of any emergency circumstances. After your electric motorcycle is washed or the
wading riding, the braking effect may be temporarily reduced. For your safety, in this case, we suggest you
slow down the speed, and gently squeeze the brake levers to apply the brake for some times until the brakes
work normally.
• We suggest you to ride the electric motorcycle carefully and slowly in light rain and snow. But we strongly
suggest you do not ride the electric motorcycle in heavy rain and snow.
• We suggest you to ride the electric motorcycle carefully and slowly on the ground with the puddles. If any
puddles can submerge the hub of the wheel, may cause the motor and brake to work incorrectly. We don’t
suggest you to ride this electric motorcycle in the puddles for a long time. Once the electronic parts
submerged for a long time, may cause the damages for the electronic parts and lead to serious hazards.
Caution
• The side kickstand is only designed to support the electric motorcycle. We suggest you do not sit on the
electric motorcycle with the side kickstand unfolded. Otherwise, the side kickstand may be damaged.
• We suggest you don’t park the electric motorcycle on the soft ground or any slopes, otherwise, your electric
motorcycle may get tip-over easily.
• We strongly suggest you don’t expose your electric motorcycle in the rain for a long time, or use the
highpressure washer to flush your electric motorcycle for the positions may have electronic parts. Otherwise,
it’s possible to cause the failures for the electronic parts.
Parking
• For your safety, please ride slowly to the parking place, observe carefully before parking, and choose the
right place to park your electric motorcycle.
• Squeeze the brake levers to apply the brakes to stop your electric motorcycle, and release the throttle to
snap back to the closed position. Then, switch off the key switch and unplugged the key.
• After you get off your electric motorcycle, please stand at the left side of the electric motorcycle, and unfolded
the side kickstand to support the electric motorcycle. Before you leave, please make sure all the locks are
well locked, and unplugged the key to take together with you.
Warning
Before you well sit on the electric motorcycle and are ready to ride, please don’t twist the throttle. After you stopped
the electric motorcycle, and before you release the brake levers, please switch off the key switch. Otherwise, may
cause any unexpected hazards.

Charging and Battery Pack Information
The Talaria battery pack leverages proven battery cell chemistry, configuration, and enhanced reliability. With the
high-performance lithium-ion battery cells inside of the battery pack, it’s well designed to operate under normal
temperatures and environmental conditions based on 60V voltage. The battery pack should not be used outside
of the range of -20°C to 50°C; the Battery Management System (BMS) turns off the power controller outside of this
range. And the battery pack will have the best working efficiency at the range of 10°C to 30°C. The performance
and lifetime of the battery pack will have a reduction if the battery pack is used outside of the range of -20°C to
50°C. The battery pack should not be charged below 0°C.
Caution
• The battery pack should not be charged below 0°C, users should wait the temperature to be equal or above
0°C, and then, can charge the battery pack. Otherwise, the battery pack may be damaged.
• When the temperature is low, it’s normal that the performance of the battery pack will have a reduction, and
lead to a relatively shorter range. After the temperature got to be normal, the performance of the battery pack
and the range will be recovered automatically.
• The battery pack has self-protection function, it will work to protect the battery pack from any damages by
over charge and discharge. Frequently over discharge will cause the performance of the battery pack to have
a reduction. When the battery power is low, please charge the battery pack as soon as possible.
• The battery pack has no memory function, it could be charged frequently. And to charge the battery pack
frequently can keep it being in a good condition.
• If the battery pack will not use for a long time, please charge the battery pack once for every 3-month to about
60% power, switch off the circuit breaker and unplug the discharge connector. And then, and store the battery
pack in a dry and ventilated place. Otherwise, if the battery pack is not charged for a long time. The low
voltage self-protection function will be activated automatically, then, you need to re-activate the battery pack
to use again.
• After the battery pack is fully charged, the voltage should be in the range of 66.5V to 67.2V. If the voltage is
out of the range of 66.5V to 67.2V, then, the battery pack is not fully charged or may got problem. Please
contact the local dealer for solution.
Caution
If the motor and controller got overheating, or the battery pack got low power, the self-protection function will act
to reduce the output power or even shut down the electric motorcycle. It’s not a failure or error. After the overheating
cool down, or the battery pack is charged, the performance of the electric motorcycle will recover to be as usual.

Charging and Charger Information
Illustration7
7-1 Battery Pack Discharging Interface 7-2 Ventilative Valve
7-3 Battery Power Indicator 7-4 Activation Button
• Only charge the Talaria battery pack with the approved Talaria accessory charger. Any other unapproved
chargers may cause damages to the battery pack, and lead to serious hazards.
• Check the charger to make sure the input voltage marked on the charger is correct for the local power supply
voltage (AC 110V / AC 220V).
• The battery pack could be charged when it’s mounted on the electric motorcycle, or plug out the battery pack
to charge directly.
• Caution: When you charge the battery pack, firstly, please connect the DC input connector with the battery
pack charging interface. Then, connect the AC power cord with the power supply socket. Once the battery
pack is fully charged, firstly, please disconnect the AC power cord. After the indicator extinguished, then,
disconnect the DC input connector.
• When the battery pack is charging, the red indicator will twinkle. And after the battery pack is fully charged,
the green indicator will be constantly on. Usually, it will take about 4 hours to fully charge the battery pack.
• After the battery pack is fully charged, the charging will be shut down automatically. But in consideration of
safety, we suggest you disconnect the AC power cord from the power supply socket within 6 hours after the
battery pack is fully charged.
• Any unqualified and unskilled people will not be allowed to disassemble the battery pack. Otherwise,
damaged will be caused to the battery pack, and lead to serious hazards.
• When the battery pack is inactive, you can activate it by the activation button on the battery pack or connecting
the charger.

Caution:
• When you charge the battery pack, please make sure the charging place cannot be reached by any kids.
• The battery pack, which just finished the discharge, will have a high internal temperature. Please don’t charge
the battery pack immediately. Before charging, we suggest to cool down the battery pack in a ventilated place
for 30 minutes.
• After the battery pack is fully charged, before use, we suggest to rest the battery pack for 10 minutes.
• When you charge the battery pack, please make sure nothing covers on the charger. And the charger is
designed to use in door, please use or store the charger in a dry and ventilated place.
• During the charging, if there’s the strange smell or found the temperature is too high or the battery pack
cannot be fully charged for a long time, please stop charging immediately and send it to the qualified
maintenance store to check.
Illustration 8
8-1 Oil Rule Cap & Oil Filling Hole 8-2 Oil Drain Bolt
8-3 Gas Vent
Usage and maintenance of gearbox and controller
• Regularly check whether the gearbox fixing screws are loose, and the lubricating oil level is between the
upper and lower tick marks. Please don’t ride the electric motorcycle, if the gearbox got short of or without
lubricating oil. Otherwise, damages will happen to the gearbox. After the running-in period, replace the
lubricating oil every 1000KM (Lubricating oil grade: CL-5 85W/90). To replace the lubricating oil, firstly, loosen
the oil rule cap screw on the gearbox. And then, loosen the oil drain bolt to drain out the used lubricating oil.
If there’s no used lubricating oil drain out, please clean the dirt on the magnetic core of oil drain bolt, and
then, fix it back on the gearbox, and fill 120-150ml lubricating oil into the gearbox through the oil filling hole.
• Regularly check whether the connection wires between motor and controller are loose, and whether the
insulation of the wires has a good condition.
• Regularly check whether the fuse is loose or melted.
• It’s not recommended to ride your electric motorcycle in the deep puddles. Otherwise, the motor may work
incorrectly.
• It’s not recommended to use high-pressure washer to flush the motor and controller.
Pre-riding inspection

Tire inspection
1. Before riding, please check whether the tire pressure is correctly as recommended.
Cautions:
• Abnormal tire pressure, tire damages, and tire wear will cause serious potential safety hazards.
• When the tire pressure is low, the tires will be easily worn, and cause the steering to be inflexible, as well as
lead to low speed and less range.
• When the tire pressure is high, the riding will be uncomfortable, the tires will be easily worn, even cause the
blowout and lead to serious hazards. According to the tire depression when tires contact the ground, you can
identify whether the pressure is proper. And the suggested front tire pressure is 225 kpa and the rear tire is
225 kpa, (low tire pressure will lead to slow speed and less range).
Note: The suggested tire pressure is just based on the manufacturer’s test result. It’s just for your reference.
When you ride the electric motorcycle, you can adjust the tire pressure accord to your weight, the ground condition,
the local weather condition, etc.
2. We suggest you to check whether the tires have cracks and abnormal wear before riding.
3. We suggest you to check whether there are nails, sharp-edged pebbles, and broken glass stabbed in to the
tires before riding.
4. We suggest you to replace the tires, when the tire tread is worn out for equal or more than 2/3.
5. We suggest you to check with the spokes of the wheels are loose before riding.
Caution:
• The run-in period for the electric motorcycle is 300KM. First maintenance needs to be done after the run-in
period. And then, maintenance needs to be done for every 1000KM.
Inspection of dash, horn, brakes, and replace the gearbox lubricating oil.
• Switch on the key switch to inspect whether all the indicators are well displayed on the dash.
• Press the horn button to inspect whether the horn work properly.
• Squeeze the left and right brake levers to inspect whether the front and rear brakes work well.
• 4. Replace the gearbox lubricating oil after the run-in period (Lubricating oil grade: CL-5 85W/90).
Inspection of handlebar and seat
• Please check whether the handle bar and seat are in the proper position and well fixed.
• If you find any problems during the inspection, please read the related content of this manual or contact the
local dealer for solutions.

Battery Pack Pull Out
• Switch off the key switch, and take the key to unlock the battery pack holder cover, and then, you will have
the battery pack in sight.
• Switch off the circuit breaker, unplug the battery pack discharge connector, then pull out the battery pack by
lifting upward.
Battery pack installation
• Use the key to unlock the battery pack holder cover.
• Install the battery pack by putting downward, but please pay attention to the direction (the battery pack
charging interface should be on the left side). After the battery pack installed properly, please well plug the
battery pack discharging connector, switch on the circuit breaker. Finally, lock the battery pack holder cover,
and take off the key.
Warning
• Before you pull out or install the battery pack, please switch off the circuit breaker.
• The battery pack discharge connector should be well plugged, otherwise, the battery will not be identified,
and cause the electric motorcycle to fail to run.
Regular inspection and maintenance
• For your safety, as well as to increase the lifetime of the electric motorcycle, and enjoy a safe and comfortable
riding, it’s strongly recommended to do inspection and maintenance for your electric motorcycle regularly. If
your electric motorcycle will have long time no use, regular inspections and maintenances are still required.
• The first inspection and maintenance need to be done after the 300KM run-in period.
• Take full care of safety and follow this manual when you do inspection and maintenance.
• When your do inspection and maintenance, it’s recommended to park your electric motorcycle on the flat
ground.
• If the emergent inspection and maintenance is required to do during the riding, you need to pay attention to
the surrounding environment and situation, and find a safe place to finish the inspection and maintenance.

• If any problems are found by the inspection, please ride your electric motorcycle after solving the problems.
If any problems you cannot find the solution by yourself, please contact the local dealer to do the maintenance.
Caution:
• Both front and rear brakes are disc brakes, once the brake pads got severe wear and tear, then, you should
replace the brake pads.
• For daily use, please keep the disc brake being clean. To make sure the silt and oil contamination will not
adhere on the disc brakes, we suggest you to clean the disc brakes after every off-road riding, and regularly
clean the disc brakes after non-off-road riding.
Inspection of Operating Components
• Before riding, please inspect whether the front fork got any faults, such as bend, deformation, damages,
loose, oil leaking, and so on. Hold the handlebar to compress the front fork to see whether any noise caused
by the faults of front fork. If any faults are found by the inspection, please contact the local dealer for
maintenance.
• Inspection of the rear shock absorber
• Inspection of the brake levers. Inspect when the free travel of brake lever is in the range of 15mm to 30mm.
If the free travel is out of the range of 15mm to 30mm, then, need to be adjusted.
• Inspect the brake performance. Ride the electric motorcycle slowly on a safety ground, squeeze the front and
rear brake levers to check whether the brakes perform properly. For abnormal brake performance, please
check whether the brake pads need to clean or be replaced, or need to add the brake oil. If still have problems,
please contact the local dealer for solution.
Inspection of Tires, Wheels System, Transmission, etc
• Before riding, please inspect the tire pressure by the tire pressure meter.
• Before riding, inspect whether the tires got cracks, damages, abnormal wears, and sharp objects on the tires.
• Before riding, please check whether have any spokes are loose.
• Before riding, please inspect the tension of the chain, and make sure the chain be tensioned properly.
• During the riding, the tires will keep contacting on the ground for a long time. The nails, sharp-edged pebbles,
and broken glass can easily stab into the tires to cause damages, and lead to serious hazards. Therefore,
when you ride the electric motorcycle, we suggest you to pay attention the to ground situation, and avoid to
ride the electric motorcycle on the ground where have nails, sharp-edged pebbles, and broken glass. For
your safety, before every riding, we suggest you to inspect the whether the tires got cracks, damages,
abnormal wears, or are stabbed by the nails, sharp-edged pebbles, and broken glass. If any one of the
mentioned cases happened to the tires, please repair or replace the tire(s) to ride.
• Before riding, please check the tire tread. If the tire tread is worn out equal or more than 2/3, then, the tire(s)
need to be replaced by the new tire(s).

Inspection of Battery Pack
The electric motorcycle is equipped with 3-Element Lithium-ion battery pack, once the battery pack is fully charged,
please measure the voltage of the positive and negative poles by a multimeter. The proper voltage for a fully
charged battery pack should be in the range of 66.5V to 67.2V. Otherwise, the battery pack may be not fully
charged or got damages, please contact the local dealer to do professional inspection and maintenance.
Caution:
• Before you pull out the battery pack, please switch off the circuit breaker first.
• When you install the battery pack, if you found it’s hard to push the battery pack downward, please pull out
the battery pack to check whether it’s stuck by something.
Fuse Replacement
• If the dash, horn, lights of the electric motorcycle will not work after the circuit breaker and key switch were
switched on, it’s possibly that the fuse is melt. Then, please switch off the circuit breaker, and replace the
fuse.
• Unlock the battery pack holder cover, and pull out the battery pack. Then, you will find the fuse box in the
front of the circuit breaker, and open it.
• Remove the melt fuse, and replace it with the spare fuse. Then, well close the fuse box, install the battery
pack, and lock the battery pack holder cover.
Caution:
• Please make sure the spare fuse is properly fixed. If the spare fuse is loose, may cause serious fault or
hazards.
• The spare fuse should be the correct recommended type and spec, otherwise, the fuse will not be melted to
work out the protection when it’s necessary.
• If the spare fuse is melted in a short time after it’s replaced, please contact the local dealer to check for any
other possible reasons and fix the problem.
• The fuse box should not be flushed by water.

Main Specs of STING

Notice: Talaria continually seeks advancements in product design and quality. Therefore, above specs are based
on current product information available at the time of printing. Because of this, your motorcycle may differ from
the above specs. Please well noted about this.
Errors and Solutions
• Switch on the key switch, motor does not work
Possible Reasons
Solutions
1. Discharge wire loose.
Properly fix the discharge wire connection.
2. Throttle control connector falls off.
Properly plug the connector.
3. Motor wires loose or fall off.
Reconnect the motor wires properly.
4. The brake lever does not return or the brake sensor
fails.
Inspect the brake lever and brake sensor, solve the
problem by repair or replace the relative parts.
• Failure of throttle control or reach to the top speed
Possible Reasons
Solutions
Low battery voltage.
Fully charge the battery.
Failure of throttle control.
Contact the local dealer to replace the throttle control.
• About short range
Possible Reasons
Solutions
Low tire pressure.
Inflate the tire to the proper pressure.
Battery pack is not fully charged.
Fully charge the battery pack.
Charger failure.
Repair or replace the charger.
Battery pack got ageing by long time use or damaged.
Replace a new battery pack.
The ground with many slopes, and ride against the
wind.
It’s normal that the range will reduce in such a riding
environment.
Frequently twist the throttle for quick acceleration and
deceleration, or overloading.
A good riding habit can help you to get a longer range
for one charge.
• Charger does not charge the battery pack
Possible Reasons
Solutions
The plug of the charger is loose or falls off.
Please properly connect the charger plug with the
battery pack charging interface.
Other manuals for STING
1
Table of contents
Other TALARIA Motorcycle manuals