T&T Industries Co TM889 B Type User manual

T
T
TM
M
M8
8
88
8
89
9
9
U
U
US
S
SE
E
ER
R
R’
’
’S
S
S
M
M
MA
A
AN
N
NU
U
UA
A
AL
L
L
B
B
B
t
t
ty
y
yp
p
pe
e
e
T
T
T&
&
&T
T
T
I
I
In
n
nd
d
du
u
us
s
st
t
tr
r
ri
i
ie
e
es
s
s
C
C
Co
o
o.
.
.,
,
,
L
L
Lt
t
td
d
d.
.
.

2
This manual provides detailed operation instructions and features to enhance your
product enjoyment. Please read this manual carefully before using this product for the
first time.
C
C
CA
A
AU
U
UT
T
TI
IIO
O
ON
N
NS
S
S
This player is a highly precise electronic product and is serviceable only by authorized
technicians. Please do not attempt to open the unit at your own discretion.
Do not subject the unit to severe impact
Keep the unit from extreme high/low temperatures, high humidity, dust or exposure to
direct sunlight
Use damp cloth to clean the unit. Do not use any chemical solution
Please Slide the HOLD switch on the side of TM-889 to the opposite direction of the
arrow before operating. Hold function prevents accidental operation or changes to
settings while carrying the device in the pocket or briefcase
I
IIM
M
MP
P
PO
O
OR
R
RT
T
TA
A
AN
N
NT
T
T
Our Company assumes no responsibility for any damaged or lost data caused by
accident resulting from malfunction, repairs or battery replacement. Backing up of all
important data on other media to protect against data loss is strongly recommended.

3
T
T
TA
A
AB
B
BL
L
LE
E
E
O
O
OF
F
F
C
C
CO
O
ON
N
NT
T
TE
E
EN
N
NT
T
TS
S
S
1. Introduction
Description / Package contents
2. Getting to know your TM889
Name of Parts / LCD Display
3. Connecting to PC
Operating system
Setup Program installation guide
Connecting to PC
Disconnecting form PC
File download/Upload
4. How to use your TM889
Power on/off
Playing Music files
+/- Volume Control
A-B Play Back
EQ mode
Entering Menu
Voice Recording
Voice Play
Line-In
FM Tuner / FM recording
Settings
How to change the power – on Picture
How to display the lyric synchronously
How to protect and use battery
5. To manage your TM889
6. Safety Precaution
7. Troubleshooting
8. Limited warranty
9. Appendix Specification / Features

4
1
1
1.
.
.
I
I
In
n
nt
t
tr
r
ro
o
od
d
du
u
uc
c
ct
t
ti
i
io
o
on
n
n
1
1
1)
)
)
D
D
De
e
es
s
sc
c
cr
r
ri
iip
p
pt
t
ti
iio
o
on
n
n
This MP3 player is multi-functional with high sound quality and low power consumption.
It also features EL backlight display, and doubles as removable storage medium.
This player plays back MP3 music with mpeg 1 layer 3compression format. You may
download authorized MP3 music from the internet or convert your favorite music from
CD to MP3 format using conversion software which you can download from the
optimum sound quality. This player also plays back authorized WMAmusic.
2
2
2)
)
)
P
P
Pa
a
ac
c
ck
k
ka
a
ag
g
ge
e
e
c
c
co
o
on
n
nt
t
te
e
en
n
nt
t
ts
s
s
The package should include the following accessories. Please contact the dealer if any
of the listed items is missing from the package.
◇TM889
◇User’s manual
◇Installation CD
◇Neck strap type Earphones
◇AAA battery / Line in Cable
◇Remote controller / USB cable

5
2
2
2.
.
.
G
G
Ge
e
et
t
tt
t
ti
i
in
n
ng
g
g
t
t
to
o
o
k
k
kn
n
no
o
ow
w
w
y
y
yo
o
ou
u
ur
r
r
T
T
TM
M
M8
8
88
8
89
9
9
<
<
<N
N
Na
a
am
m
me
e
e
o
o
of
f
f
p
p
pa
a
ar
r
rt
t
ts
s
s>
>
>
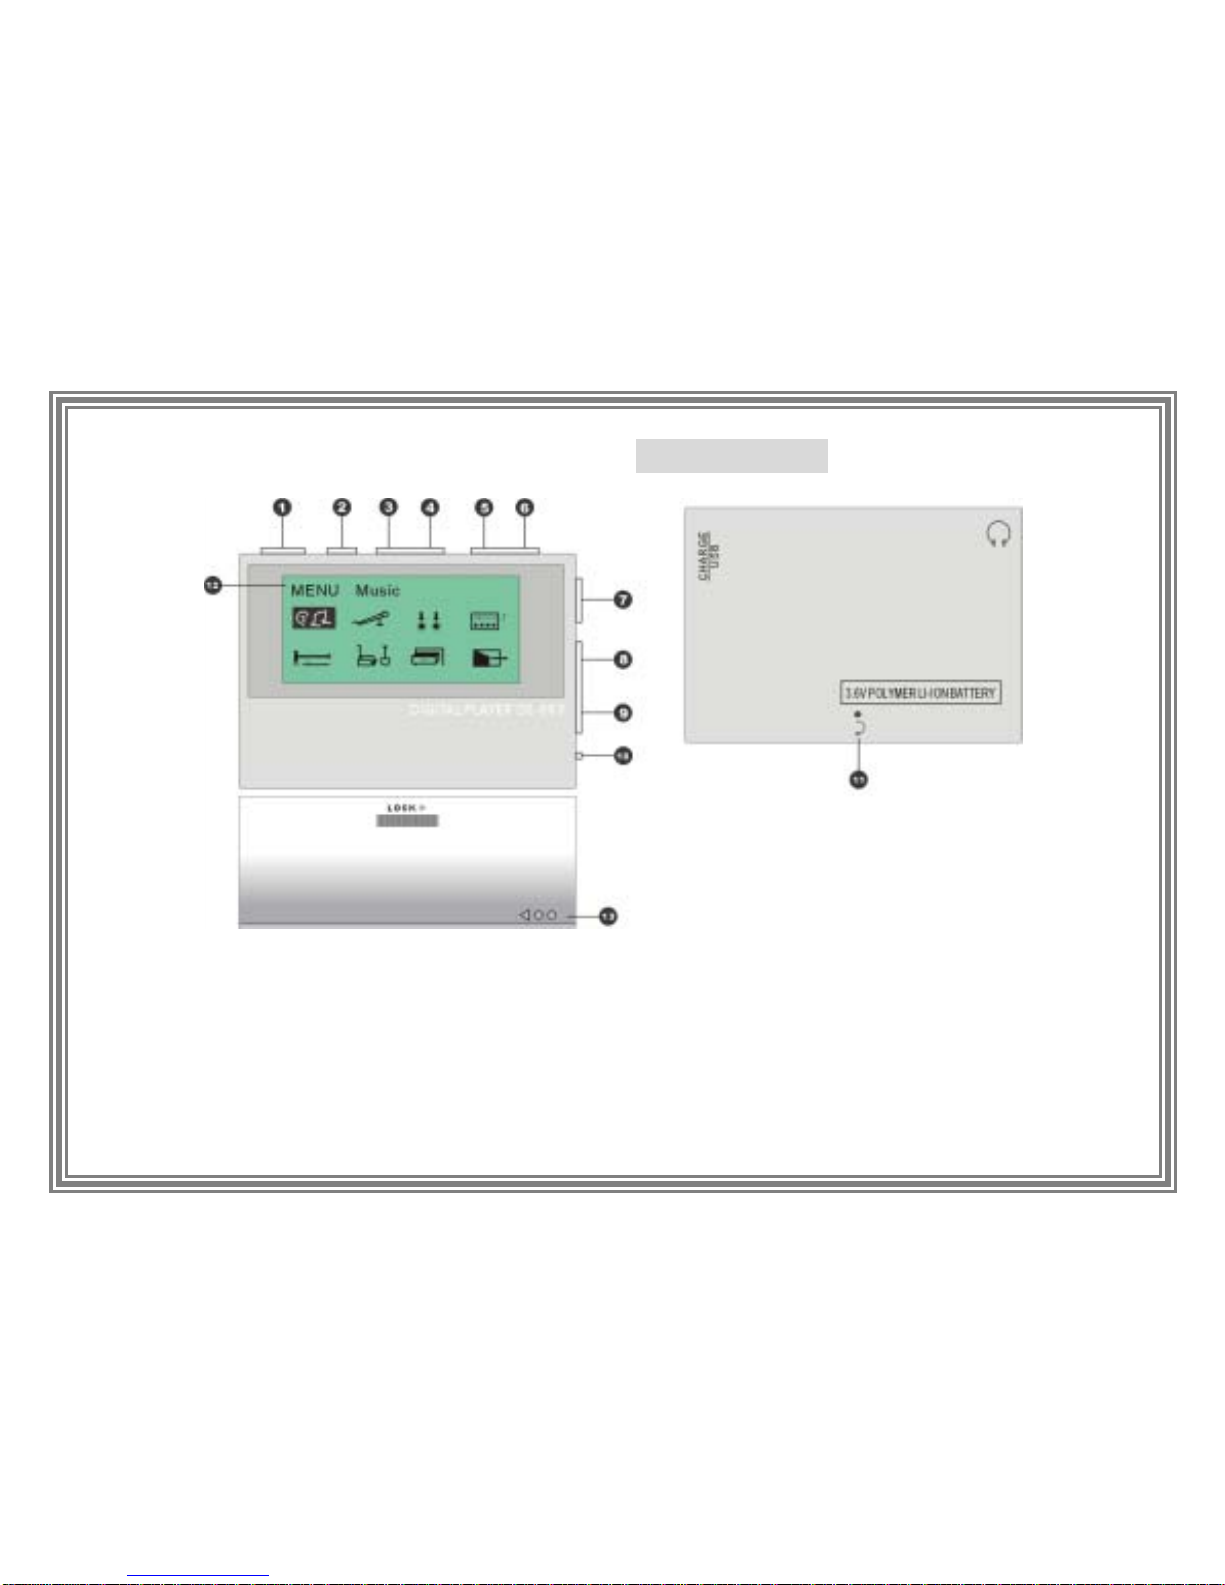
(1) Earphone Jack (6) Power on/play/Pause/Stop/power off (11) RESET
(2) Line - in (7) USB connecting line (12) LCD
(3) EQ / REC (8) PREV
(4) MENU (9) NEXT (13) Circumscribe
the Battery box
(5) REC / A-B / EQ (10) MIC

6
(1) Play / Pause / Stop (3) PREV (5) REC / A-B / EQ (7) Volume + (VOL +)
(2) MENU (Stop) (4) NEXT (6) Volume – (VOL -) (8) HOLD

7
<
<
<L
L
LC
C
CD
D
D
D
D
Di
iis
s
sp
p
pl
lla
a
ay
y
y>
>
>
1 open/pause/stop/close ico 6 Played time display
2 Repeat ico 7 Current track number
3 Equalizer ico 8 Total number of Music Files
4 Battery ico 9 Music titld/file name
5 Music type ico

8
3
3
3.
.
.
C
C
Co
o
on
n
nn
n
ne
e
ec
c
ct
t
ti
i
in
n
ng
g
g
t
t
to
o
o
P
P
PC
C
C
<
<
<C
C
Ch
h
he
e
ec
c
ck
k
k
P
P
Po
o
oi
iin
n
nt
t
ts
s
s>
>
>
Microsoft Windows98 does not provide a USB mass storage feature. Therefore you
should install this functionality using the “TM889 Installation CD”.
You have to connect the player after installing the program. After installing Setup
program, you can use the Firmware Downloads program as well.
If you use Microsoft windows 2000, and it has been patched with Service Pack 3 or
Windows ME/XP User you do not need to install the Setup program. However, in order
to use the format or upgrade, you need to install the Setup Program in your PC.
PC system◆requirements (minimum)
1) Microsoft®windows 98/me/2000/xp
2) CD-Rom Drive
3) Pentium II 700MHz or above
4) RAM 64MB(windows ME,2000)or 128MB(Windows XP)
5) 20GB HDD Space (more HDD for storing music file)
6) USB port

9
O
O
Op
p
pe
e
er
r
ra
a
at
t
ti
iin
n
ng
g
g
s
s
sy
y
ys
s
st
t
te
e
em
m
m:
:
:
Windows98: you should install the driver by using the TM889 Installation CD.
Windows 2000 or above:
In windows 2000, you have to install the patch with Service Pack 3.
In Windows ME/XP/2003, you do not need to install the Driver.
But if you want to upgrade or format the player, you need to install the Setup Program.
S
S
Se
e
et
t
tu
u
up
p
p
P
P
Pr
r
ro
o
og
g
gr
r
ra
a
am
m
m
i
iin
n
ns
s
st
t
ta
a
al
lll
lla
a
at
t
ti
iio
o
on
n
n
g
g
gu
u
ui
iid
d
de
e
e
1. Insert the TM889 Install CD in the CD-ROM of your computer. See the window below.
If it does not run automatically, find and run the ‘SETUP.EXE’ file form your CD.

10
2. The installation wizard will guide you through the setup.

11
W
W
Wa
a
ar
r
rn
n
ni
iin
n
ng
g
g:Windows 98 users must install the program (driver) before connecting the
player to the PC. Please reboot your computer when prompted.
C
C
Co
o
on
n
nn
n
ne
e
ec
c
ct
t
ti
iin
n
ng
g
g
t
t
to
o
o
P
P
PC
C
C
Open the cap of your TM889 and connect the USB port to the USB port on your
Computer. If the USB port of your computer is positioned in an uncomfortable area. You
may use the optional USB extension cord.
W
W
Wa
a
ar
r
rn
n
ni
iin
n
ng
g
g:Mp3 player should have the battery when connecting to the PC.
After connecting the player to your PC, backlight will start blinking for a while, then the
LCD display shows the player is ready to use. You may start downloading/uploading a
file, the backlight will be blinking when the data is transferring until it completes.
D
D
Di
iis
s
sc
c
co
o
on
n
nn
n
ne
e
ec
c
ct
t
ti
iin
n
ng
g
g
f
f
fo
o
or
r
rm
m
m
P
P
PC
C
C
Windows 2000 / ME / XP / users click ‘Stop USB Mass Storage Device Driver’, where
your PC screen’s button taskbar before disconnecting TM889 from your computer.

12
F
F
Fi
iil
lle
e
e
d
d
do
o
ow
w
wn
n
nl
llo
o
oa
a
ad
d
d
/
//
u
u
up
p
pl
llo
o
oa
a
ad
d
d
When your TM889 is connected to your computer, it works as a removable hard disk
drive in your computer.
You can transfer, copy, paste and delete the data (audio files, voice recorded files, other
files) stored in your TM889 simply from your computer.
W
W
Wa
a
ar
r
rn
n
ni
iin
n
ng
g
g:
:
:
During uploading/downloading files into your PC, please disconnect the player from
computer after blinking is finished. If you unplugged during blinking, data may be lost!
4
4
4.
.
.
H
H
HO
O
OW
W
W
T
T
TO
O
O
U
U
US
S
SE
E
E
Y
Y
YO
O
OU
U
UR
R
R
T
T
TM
M
M8
8
88
8
89
9
9
The player operates differently according to the length of the button pressing.
P
P
Po
o
ow
w
we
e
er
r
r
o
o
on
n
n/
//o
o
of
f
ff
f
f
Press “Power on/Play/pause/Stop/Power off” button over 1-2sec to turn on
Press “Power on/Play/pause/Stop/Power off” button over 2-3sec to turn off
P
P
Pl
lla
a
ay
y
yi
iin
n
ng
g
g
M
M
Mu
u
us
s
si
iic
c
c
f
f
fi
iil
lle
e
es
s
s
When you turn on TM889, you can see the music play mode directly. Press “ /” to
play the music or pause. Press “ /” button for 2 seconds to stop.

13
+
+
+/
//-
-
-
V
V
Vo
o
ol
llu
u
um
m
me
e
e
C
C
Co
o
on
n
nt
t
tr
r
ro
o
ol
ll
When the player is waiting or playing, press “MENU" button shortly and slide “ /”
button up and down to control the volume
A
A
A-
-
-B
B
B
p
p
pl
lla
a
ay
y
yb
b
ba
a
ac
c
ck
k
k
The player plays the desired segment (A-B) repeatedly. This feature is available only
when the player is in Playback mode or Playback mode for voice recording file.
Press the “A-B” button briefly to set the starting point (‘A-‘ appears on LCD display).
Press the “A-B” button briefly again to set the ending point. Press “A-B” button one more
or slide “ /” button to cancel.
!) This feature does not work in pause or stop status.
E
E
EQ
Q
Q
M
M
Mo
o
od
d
de
e
e
Press “EQ/REC” button to select the optimum sound of music while playing the music or
when in stop.
EQ: Normal, Rock, Jazz, Classic, Pop, Bass
E
E
En
n
nt
t
te
e
er
r
ri
iin
n
ng
g
g
M
M
Me
e
en
n
nu
u
u
Press “Menu” button for 3 seconds. The main Menu includes 8 functions (Music, Voice,
Line-In, FM Tuner, Setting, Delete, Info, Exit). Slide “ /” button to move the cursor
and press “Menu” button to go to Sub-menus of selected menu.

14
V
V
Vo
o
oi
iic
c
ce
e
e
R
R
Re
e
ec
c
co
o
or
r
rd
d
di
iin
n
ng
g
g
1) In the Main Menu, select “Voice” and press “Menu” button. Press “EQ/REC” button for
3 seconds to start recording. Press “EQ/REC” shortly to stop recording.
2) In the “Stop” mode, press “EQ/REC” button for 3 seconds to start recording. Press
“EQ/REC” button shortly to stop recording.
V
V
Vo
o
oi
iic
c
ce
e
e
P
P
Pl
lla
a
ay
y
y
Select Voice Play Mode in the main menu. Press “ /” button to play back the voice
recorded. Press “ /” button to pause or press “ /” button for 2 seconds to stop
playing.
L
L
Li
iin
n
ne
e
e
–
–
–
I
IIn
n
n
1) Use Line-In cable to connect the source equipment of sound (Max: Source of sound,
Min: MP3 player line-in port)
2) In Main Menu, select Line-in and press “Menu” button to select and start. Press
“EQ/REC” for 2 seconds to cancel.
Note: files is LXXX.wav
F
F
FM
M
M
T
T
Tu
u
un
n
ne
e
er
r
r
1) In the Main Menu” mode, slide “ /” button to select “FM Tuner”.
2) Press “MENU” button to enter the “FM Tuner” mode,then slide “ /” button to

15
select preset stations.
[
[
[1
1
1]
]
]
A
A
Au
u
ut
t
to
o
o
S
S
Sc
c
ca
a
an
n
n
s
s
st
t
ta
a
at
t
ti
iio
o
on
n
n
In FM radio mode,press “Menu” button for 3 seconds to go to sub-menu. Slide
“/” button to select “Auto Scan station”, then press “Menu” button to start auto
scanning stations.
[
[
[2
2
2]
]
]
S
S
Sa
a
av
v
ve
e
e
S
S
Sc
c
ca
a
an
n
n
S
S
St
t
ta
a
at
t
ti
iio
o
on
n
n
In FM radio mode,press “Menu” button for 3 seconds to go to sub-menu. Slide
“/” button to select “Save Scan Station”, then press “ /” button to save the
station.
[
[
[3
3
3]
]
]
D
D
De
e
el
lle
e
et
t
te
e
e
S
S
Sc
c
ca
a
an
n
n
s
s
st
t
ta
a
at
t
ti
iio
o
on
n
n
In FM radio mode,press “Menu” button for 3 seconds to go to sub-menu. Slide
“/” button to select “Delete Scan station”, then press “ /” button to confirm.
[
[
[4
4
4]
]
]
S
S
Sc
c
ca
a
an
n
n
s
s
st
t
ta
a
at
t
ti
iio
o
on
n
ns
s
s
m
m
ma
a
an
n
nu
u
ua
a
al
lll
lly
y
y
Press In FM radio mode, slide “ /” button to select the preset stations.
In FM radio mode, press “ /” to go to manual scanning mode. Slide “ /” button
to scan the stations manually.
[
[
[5
5
5]
]
]
R
R
Re
e
et
t
tu
u
ur
r
rn
n
n
m
m
mu
u
us
s
si
iic
c
c
m
m
mo
o
od
d
de
e
e
In FM radio mode, press “Menu” button for 3 seconds and select “Music” to return to
“Music” mode.

16
F
F
FM
M
M
R
R
Re
e
ec
c
co
o
or
r
rd
d
di
iin
n
ng
g
g
In FM radio stations,press “EQ/REC” button for 2 seconds to start recording FM radio.
Press “EQ/REC” button briefly to stop recording and return FM radio stations.
NOTE: files is FXXX.wav
S
S
Se
e
et
t
tt
t
ti
iin
n
ng
g
gs
s
s
Press “Menu” button for 3 seconds to go to main menu. In “Main Menu”, slide “ /”
button to select “Settings”, then press “Menu” button to go to sub-menu. “Settings” has 8
sub-menus (Equalizer, Repeat, Backlight control, Power Off , REC Bit rate, Screen
Save, Language, Exit).
*
*
*
E
E
Eq
q
qu
u
ua
a
al
lli
iiz
z
ze
e
er
r
r
S
S
Se
e
et
t
tu
u
up
p
p:
:
:Equalizer has 6 EQ modes (Normal,Rock,Jazz,Classic,Pop, Bass ).
*
*
*
R
R
Re
e
ep
p
pe
e
ea
a
at
t
t
S
S
Se
e
et
t
tu
u
up
p
p:Repeat setup has five repeat options. (Normal, Repeat one, Repeat All,
Shuffle, Shuffle Repeat)
*
*
*
B
B
Ba
a
ac
c
ck
k
kl
lli
iig
g
gh
h
ht
t
t
S
S
Se
e
et
t
tu
u
up
p
p:Backlight Control has five modes (Disable, 5, 10, 15, 20 seconds). It is
recommended to set 5 seconds to save power.
*
*
*
P
P
Po
o
ow
w
we
e
er
r
r
O
O
Of
f
ff
f
f
S
S
Se
e
et
t
tu
u
up
p
p:When the player is not in use, the player turns off its power after 1, 2, 5,
10 minutes automatically to save battery. It does not turn off its power if
“Disable” is selected.
*
*
*
R
R
RE
E
EC
C
C
B
B
Bi
iit
t
t
R
R
Ra
a
at
t
te
e
e
S
S
Se
e
et
t
tu
u
up
p
p: (Recording Quality) (16 KHz, 32 KHz, 48 KHz).
Voice recording quality may be controlled in 3 different levels.

17
*
*
*
S
S
Sc
c
cr
r
re
e
ee
e
en
n
n
s
s
sa
a
av
v
ve
e
e
s
s
se
e
et
t
tu
u
up
p
p:“Screen Save” setup has 2 different kinds of screen savers.
(Man Dancer, Woman Dancer)
*
*
*
L
L
La
a
an
n
ng
g
gu
u
ua
a
ag
g
ge
e
e
S
S
Se
e
et
t
tu
u
up
p
p: Language Setup has 2 Modes (EN: ENGLISH, CN: CHINESE)
*
*
*
F
F
Fi
iil
lle
e
e
D
D
De
e
el
lle
e
et
t
te
e
e:
:
:Press “Menu” button for 3 seconds to go to “Main Menu”. Slide “ /”
button to select “Delete” mode, then press “Menu” button to enter
“Delete” mode. In “Delete” mode, slide “ /” button to select the file
to delete. Press “ /” button to delete the file. mode, press “ / ” to
delete the selected file.
N
N
NO
O
OT
T
TE
E
E:
:
:
The player deletes “Music” file if it is in “Music” playing mode and deletes
“Voice” recorded if it is in “Voice” playing mode)
*
*
*
I
IIn
n
nf
f
fo
o
or
r
rm
m
ma
a
at
t
ti
iio
o
on
n
n:
:
:Press “Menu” button for 3 seconds to go to “Main Menu”. Slide “ /”
button to select “Info” mode, then press “Menu” button to see the
memory information as follows.
INT: 128MB
FREE: 108MB

18
H
H
Ho
o
ow
w
w
t
t
to
o
o
c
c
ch
h
ha
a
an
n
ng
g
ge
e
e
t
t
th
h
he
e
e
p
p
po
o
ow
w
we
e
er
r
r-
-
-o
o
on
n
n
p
p
pi
iic
c
ct
t
tu
u
ur
r
re
e
e
User can use drawing tools (such as Photo Shop or Paint Brush) to make MP3 power on
picture you like to see when you turn on the player. Connect the player to your computer and
save or copy your own “POWERON” picture or drawing to “POWERON” folder in your player.
Disconnect the player from your PC, the “POWERON” picture you made or drew will appear
on LCD display. Please note that the file name has to be “poweron”.
Picture file name: poweron.bmp
Picture format: 128X64pixels.
Color: Black-and-white,
BMP format file (Bitmap)
H
H
Ho
o
ow
w
w
t
t
to
o
o
d
d
di
iis
s
sp
p
pl
lla
a
ay
y
y
t
t
th
h
he
e
e
l
lly
y
yr
r
ri
iic
c
c
s
s
sy
y
yn
n
nc
c
ch
h
hr
r
ro
o
on
n
no
o
ou
u
us
s
sl
lly
y
y
1) How to make lyric file:
There are two ways to make it:
(1) Use Word Pad to edit lyric.
(2) Use professional lyric software to edit.
The importance is that the lyric must be edited according to the playing time.
Format ”[mm:ss]” or ”[mm:ss.fff]”(minute : sec)
mm:minute
ss: seconds

19
For example : Angel’s Tale
[00:00.00]Angel's Tale
[00:12.72]Here in my heart,
[00:17.55]Memories linger,
[00:22.23]I hold them sacred,
[00:28.61]Safe from all others,
[00:32.99]Angel's tale.
[00:42.56]A love such a this,
[00:47.54]Once in a lifetime,
[00:53.17]Lost in your beauty,
[00:58.99]Still dreaming of you,
[01:05.32]Angel's tale.
[01:12.58]You drove the sinner from me,
[01:19.57]And shone with such glary,
…………………………………
[04:49.74]make : xxy 2004.2.6
NOTE : Use Word Pad tool to edit, then save the file after finishing editing, choose ALL
FILES in file type, the file extension name must be *.lrc in the saving dialog box.
File Name: XXX.lrc (please make sure to put .lrc as an extension)
File Type: All Files (please make sure to select All Files, not Text File)
2) In mp3 player, the name of song must be the same as the name of lyric files, and also

20
they must be in the same folder. The extension of song files maybe *.mp3 or *.wma, while
the extension of lyric files must be *.lrc.
For example: yesterday once more.mp3 and yesterday once more. Lrc
H
H
Ho
o
ow
w
w
t
t
to
o
o
p
p
pr
r
ro
o
ot
t
te
e
ec
c
ct
t
t
a
a
an
n
nd
d
d
u
u
us
s
se
e
e
b
b
ba
a
at
t
tt
t
te
e
er
r
ry
y
y
A
A
A. Internal battery
The internal battery is made of Li polymer.
Recharging:
(1) Turn off the MP3 player.
(2) Take off the external battery.
(3) Connect the mp3 player to PC with USB cable. The recharging begins.
Note:The player recharges faster when the mp3 player is turned off.
B
B
B.External battery: AAA battery
C
C
C. When you connect external battery to the mp3 player, you do not have turn off the mp3
player. The external battery should be used before the internal battery.
Note:
(1) Recharging current:
Constance current—60mA, this can extend the live of internal battery.
(2) During the recharging status, the voltage of internal battery must be below 4.2V,
otherwise the mp3 player will stop recharging to protect the battery
This manual suits for next models
1
Other T&T Industries Co MP3 Player manuals