Targa TSR 5200 HDD Instruction sheet

Front Panel Adjustments
1 Stand-by (On/Off)
2 Menu (display main menu)
3 OK (enter a selection)
4 EXIT (quit a menu)
5 Arrow buttons
to select menu items
6 Display window
7 Add-on card slots (Pay TV)
For open the flap please push on the marking below the display
Rear Panel Connections
8 USB port
9 Optical digital output (audio)
10 Coaxial digital output (audio)
11 S-Video output (video)
12 CVBS output (video)
13 YPbPr output (video)
14 Input for terrestrial antenna signal
15 Scart output (TV)
16 IF 1 output
17 IF 1 input
18 Power switch
19 Audio output (left + right)
20 Antenna signal output
21 Scart in/output (VCR/AUX)
22 RS 232 interface
23 IF 2 output
24 IF 2 input
8
1
9 10 11 12 13 14 15 16 17 18
19 20 21 22 23 24
2 3 4 5 76
Targa TSR 5200 HDD
User's Manual and Service Information
TARGA GmbH
Lange Wende 41
D-59494 Soest
www.targa-online.com
Ready for you:
www.targa.co.uk
tsr5200_manualcover_uk_0611.qxd:Layout 1 09.11.2006 11:07 Uhr Seite 1

Important warranty
information
Dear Customer,
Thank you for purchasing a TARGA product.
Please carefully read through the enclosed documentation or online help before putting your
Targa product into service.
If you have a problem, which can’t be solved in this way, please contact our hotline. If the
problem cannot be solved over the phone, you will be given a reference number (RMA),
which you should enclose together with a copy of the proof of purchase. After you have
packaged the unit safe for transport and in plain packaging, please send it for warranty
processing, with the RMA noted on the outside of the package, to the address given to you
by our hotline employee. After receiving the unit we will correct the manufacturing and
material defect free of charge.
Up-to-date information and answers to the most frequently asked questions are available on
the internet from:
www.targa-online.com
This guarantee is valid in Ireland.
Your statutory guarantees from the seller are in addition to this warranty and are not limited
by it.
Hotline number:
0207-3650744
(Please have your serial number to hand!)
36 month warranty from
date of purchase
Manufacturer: TARGA GmbH, Postfach 22 44,
D-59482 Soest
Important warranty
information
Dear Customer,
Thank you for purchasing a TARGA product.
Please carefully read through the enclosed documentation or online help before putting your
Targa product into service.
If you have a problem, which can’t be solved in this way, please contact our hotline. If the
problem cannot be solved over the phone, you will be given a reference number (RMA),
which you should enclose together with a copy of the proof of purchase. After you have
packaged the unit safe for transport and in plain packaging, please send it for warranty
processing, with the RMA noted on the outside of the package, to the address given to you
by our hotline employee. After receiving the unit we will correct the manufacturing and
material defect free of charge.
Up-to-date information and answers to the most frequently asked questions are available on
the internet from:
www.targa-online.com
This guarantee is valid in the UK.
Your statutory guarantees from the seller are in addition to this warranty and are not limited
by it.
Hotline number:
0207-3650744
(Please have your serial number to hand!)
36 month warranty from
date of purchase
Manufacturer: TARGA GmbH, Postfach 22 44,
D-59482 Soest
Remote control 1 Standby (On/Off)
2 Mute
3 Toggle to TV control
4 Toggle to VCR control
5 Toggle to Set Top Box control
6 Toggle to DVD control
7 Numeric keys (0 to 9)
8 TV/Radio switching
9 TV/Sat switching
10 Channel up
11 Channel down
12 Reduce audio volume
13 Increase audio volume
14 Menu (display main menu)
15 Exit (quit a menu)
16 OK
17 Left arrow
18 Up arrow
19 Right arrow
20 Down arrow
21 Fast down
22 Fast up
23 TTX (Videotext)
24 SIG (show signal quality)
25 TIME (Date/Time setting menu)
26 Multi Picture
27 Pause live TV
28 EPG (Electronic Program Guide)
29 HDD (hard disk)
30 Satellite selection
31 One-touch recording
32 Stop
33 Fast Rewind
34 Fast Forward
35 Slow-motion backward
36 Slow-motion forward
37 LAST (last programme)
38 FAV (display Favorite menu)
39 Info button
40 Audio mode
41 Pause for HDD playback
42 Playback
43 Step forward
44 Step backward
45 Toggle between PIP pictures
46 PIP (Picture-in-Picture)
37 38
39 40
41 42
43 44
45 46
27
28 29
30 31
32 33
34 35
36
26
25
22
20
19
18
15
13
12
9
7
6
53
4
8
10
11
14
16
17
21
23
24
1 2
www.targa-online.com
www.targa-online.com
tsr5200_manualcover_uk_0611.qxd:Layout 1 09.11.2006 9:53 Uhr Seite 2

TSR 5200 HDD Table of Contents
i
Table of Contents
INTRODUCTION............................................................................................................................................1
SAFETY INSTRUCTIONS ....................................................................................................................................1
POSITIONING .....................................................................................................................................................2
INTENDED USE...................................................................................................................................................3
PACKAGE CONTENTS ........................................................................................................................................3
NOTICE ON USE OF THIS MANUAL...................................................................................................................3
CONNECTION TYPES ..................................................................................................................................4
CONNECTING TO A SATELLITE ANTENNA.......................................................................................................4
SINGLE-USER SATELLITE SYSTEM 4
MULTIPLE-USER SATELLITE ANTENNA SYSTEM 5
TWO SATELLITE ANTENNAS 5
CONNECTING TO TV.........................................................................................................................................6
SCART (EURO AV) CONNECTOR 6
COAXIAL (TV ANTENNA CONNECTOR) 7
VIDEO CONNECTOR 7
S-VHS CONNECTOR 7
COMPONENT CONNECTOR 8
CONNECTING TO A VIDEO RECORDER............................................................................................................9
CONNECTING TO A VIDEO RECORDER USING A SCART CABLE 9
CONNECTING TO A VIDEO RECORDER USING A COAXIAL CABLE 9
GETTING STARTED ...................................................................................................................................10
INSERTING THE BATTERIES ...........................................................................................................................10
POWERING THE DEVICE ON/OFF...................................................................................................................11
POWERING ON11
POWERING OFF 11
INSTALLATION ................................................................................................................................................11
SELECTING SCREEN LANGUAGE 11
SETTING THE TIME 12
USER SETTINGS..........................................................................................................................................14
ASPECT RATIO ................................................................................................................................................14
DISPLAY MODE ...............................................................................................................................................15
TV TYPE ..........................................................................................................................................................15

TSR 5200 HDD Table of Contents
ii
VIDEO OUTPUT............................................................................................................................................... 16
TIMER ............................................................................................................................................................. 17
MODULATOR TYPE ........................................................................................................................................ 18
MODULATOR CHANNEL................................................................................................................................. 18
OSD TRANSPARENCY .................................................................................................................................... 19
OSD TIMEOUT................................................................................................................................................ 19
PLAYBACK................................................................................................................................................... 20
WATCHING TV CHANNELS............................................................................................................................ 20
SWITCHING TV CHANNELS 20
ADJUSTING THE VOLUME 20
MUTE 20
FAVORITES...................................................................................................................................................... 21
DISPLAYING FAVORITES 21
RENAMING FAVOURITES 22
PROGRAMMING FAVORITES 23
PLAYING BACK RECORDINGS FROM HARD DISK ........................................................................................ 25
PLAYBACK 25
FAST FORWARD AND REWIND 25
SLOW-MOTION FORWARD AND REWIND 25
STEP-BY-STEP PLAYBACK FORWARD/BACKWARD 25
PAUSE 25
STOPPING PLAYBACK 25
BOOKMARKS................................................................................................................................................... 26
INSERTING BOOKMARKS 26
GOING TO A BOOKMARK 26
DELETING BOOKMARKS 26
VIEWING TWO TV SHOWS SIMULTANEOUSLY (PIP) .................................................................................. 26
DISPLAYING MULTIPLE CHANNELS SIMULTANEOUSLY (MULTI-PICTURE).............................................. 27
TIME-SHIFT FUNCTION.................................................................................................................................. 27
RECORDING AND EDITING .................................................................................................................... 28
RECORDING .................................................................................................................................................... 28
ONE-TOUCH RECORDING 28
STOPPING RECORDING 28
VIEWING A TV PROGRAMME WHILE RECORDING ANOTHER PROGRAMME 28
PROGRAMMED RECORDING.......................................................................................................................... 29
EPG RECORDING 29
ERASING PROGRAMMED RECORDINGS 30

TSR 5200 HDD Table of Contents
iii
PROGRAMMING A RECORDING MANUALLY 31
EDITING RECORDINGS....................................................................................................................................33
CUTTING A RECORDING 35
AUDIO FUNCTIONS....................................................................................................................................37
LISTENING TO THE RADIO..............................................................................................................................37
RADIO STATION SETTINGS 37
RECORDING RADIO BROADCASTS 38
SWITCHING BACK TO TV MODE 38
PLAYING MP3 MUSIC.....................................................................................................................................39
ADVANCED SETTINGS..............................................................................................................................40
EDITING TV CHANNELS .................................................................................................................................40
SYSTEM SETUP ................................................................................................................................................41
PARENTAL CONTROL 42
FACTORY SETTING 43
SYSTEM INFORMATION 43
MENU LOCK 43
FINDING THE SATELLITE................................................................................................................................44
THE HARD DISK..............................................................................................................................................45
FORMATTING THE HARD DISK 45
SAVING THE CHANNEL LIST ON THE HARD DISK 46
UPDATING THE CHANNEL LIST ON THE HARD DISK 46
UPDATING THE SOFTWARE FROM HARD DISK 47
TIME SHIFT 48
VIDEOTEXT......................................................................................................................................................48
COMMON INTERFACE CARDS ........................................................................................................................49
SELECTING THE TUNER..................................................................................................................................49
LNB TYPE .......................................................................................................................................................51
ENABLING/DISABLING THE 22KHZ SIGNAL..................................................................................................52
DISEQC...........................................................................................................................................................52
LNB POWER....................................................................................................................................................53
TRANSPONDER ................................................................................................................................................54
POSITIONER SETTING.....................................................................................................................................54
POSITIONER CONTROL VIA DISEQC1.2 55
POSITIONER CONTROL VIA USALS 56
SATELLITE SCAN (CHANNEL SEARCH)..........................................................................................................56
TP SCAN (TRANSPONDER SCAN)....................................................................................................................58

TSR 5200 HDD Table of Contents
iv
NETWORK SCAN............................................................................................................................................. 58
ADVANCED SCAN............................................................................................................................................ 58
SMART SEARCH.............................................................................................................................................. 59
EDITING TRANSPONDERS/SATELLITES......................................................................................................... 60
EDITING TRANSPONDERS 61
TRANSFERRING SOFTWARE........................................................................................................................... 62
SYSTEM UPGRADE.......................................................................................................................................... 62
EXCHANGING DATA WITH THE PC............................................................................................................... 64
USING THE REMOTE CONTROL WITH OTHER DEVICES.............................................................................. 65
APPENDIX .................................................................................................................................................... 66
CLEANING AND TROUBLESHOOTING............................................................................................................ 66
CLEANING 66
TROUBLESHOOTING 66
TECHNICAL SPECIFICATIONS........................................................................................................................ 68
DEVICE CODES................................................................................................................................................ 70
TV SETS 70
VIDEO RECORDERS 82
DVD PLAYERS 86

TSR 5200 HDD Introduction
1
Introduction
Safety Instructions
•Please read the following instructions carefully.
•Please keep this User's Guide for later use.
•If you sell or pass this device on to another person, it is imperative that you also
hand over this manual.
•Follow all warnings.
•Proceed exactly as described in the instructions.
•Never use the device near water.
•Only use a dry and soft cloth for cleaning.
•Never block the ventilation holes.
•Do not place the device near heat sources such as radiators, ovens or other
appliances emitting heat (including amplifiers).
•Only connect the device to a power outlet with a grounding pin. If the provided plug
does not fit into your outlet, consult an electrician for replacement of the obsolete
outlet.
•Install the power cord in such a way that nobody can trip over it. Take special care
that the cable does not become pinched, particularly at the plug and ports.
•The power switch of this device does not fully disconnect the device from the mains.
Furthermore, the device consumes electricity in the Standby mode. In order to
completely disconnect the device from the mains, the power plug must be pulled out
from the wall outlet. For this reason, the device should be positioned in a way that
assures unobstructed access to the wall outlet so that the power plug can be
immediately pulled out in an emergency situation. To avoid the danger of fire if the
device is not going to be used for a long while (e.g. during holidays), it should
always be disconnected from the power socket.
•Do not use any extension cords.
•Only use accessories recommended by the manufacturer.
•Use only suitable carts, stands, brackets or tables for the device, that make it
impossible for it to fall or tip over. When a cart is used, operate carefully to prevent
the device from tipping over.
•Separate the device from the mains during storms or when not using it for a long
period of time, and also pull out the antenna plug.
•Always hold all cables by the plug and never pull on the cable itself. Never hold the
power cord with wet hands as this may cause a short circuit or electric shock.
•Contact qualified personnel when servicing is needed. Servicing is required when
this device has been damaged in any way, for example, when the power cord or
plug is damaged, when liquid has been spilled on the product, when objects have
fallen into the product, when the product has been exposed to rain or moisture,
when the product does not work normally or if the product has been dropped.
•Battery Safety Instructions - To prevent battery leakage which may result in bodily
injury or property damage:

TSR 5200 HDD Introduction
2
-Install all batteries correctly, with + and - signs matching the marks indicated.
Do not mix batteries (old and new or carbon and alkaline, etc.).
-Remove batteries when the device is not used for a long time.
-Respect the environment. Old batteries do not belong in with the domestic
waste. They must be handed in to a collection point for old batteries.
•To avoid electric shock or fire, prevent this product from being exposed to any rain,
dripping or splashing.
•Do not place it under dripping or flowing liquids. Do not place any receptacles
containing liquids (beverages, vases, etc.) on the device.
•Do not place any fire sources (such as candles) onto the device.
•Outdoor Antenna Grounding - If an outside antenna is connected to the product, be
sure that the antenna system is grounded so as to provide sufficient protection
against voltage surges and built-up static charges.
•If you are not using the device within the Republic of Germany, you must observe
the regulations and laws in the country of use.
Positioning
•Do not place the device in direct sunlight.
•Avoid damp or dusty places.
•Place the device only on flat, vibration-free surfaces.
•Avoid positioning it in the vicinity of air-conditioning and heating units.
•Always make sure there is sufficient ventilation. The ventilation slots on the lid of
the device should never be covered (e.g. by laying a cloth on the device).
•Never place the device in the immediate vicinity of magnetic fields (e.g.
loudspeakers).
•The device should be easy to access from all sides.
•Make sure that no liquid gets into the device.
•Avoid severe temperature changes as this may cause moisture in the device
through condensation.

TSR 5200 HDD Introduction
3
Intended Use
This device is a consumer electronics device. It may only be used for private use, not
industrial. Furthermore, the device should only be used indoors, never in tropical regions
and never for commercial purposes. Only connection cables and external devices may be
used that comply with safety standards and the electromagnetic compatibility and shielding
quality of the TSR 5200 HDD.
If the product is labelled with a struck-out waste bin, it is subject to the European
Guideline 2002/96/EC. All electric and electronic devices must be disposed of
separately from household waste at established bodies. Avoid damaging the
environment and danger to your personal health by disposing of the device
properly.
This device fulfils all that relates to CE Conformity, relevant norms and
standards. Any changes to the equipment other than the recommended changes
by the manufacturer may lead to the result that these directives are not met any
more. Only use accessories recommended by the manufacturer.
Package contents
First check that the package contents are complete.
1. TSR 5200 HDD
2. Remote control
3. Batteries
4. Stereo Audio/Video adapter cable
5. Scart (Euro AV) cable
6. Loop cable
7. User manual with service information
Notice on Use of this Manual
This symbol signifies further information on the topic.
This symbol signifies important notes.
i
!

TSR 5200 HDD Connection Types
4
Connection types
The TSR 5200 HDD offers many connection possibilities. This ensures that the device is
usable in any environment.
Connecting to a Satellite Antenna
The device has two tuners. With these you can use it with a satellite antenna that has one
or two ports, or two different satellite antennas.
Make sure that the satellite antenna has been professionally installed and is
grounded. It the satellite antenna is not grounded, power surges may occur
which can damage the device and can cause a build-up of static electricity.
Single-user satellite system
To use this system with a single-user satellite system, connect the coaxial of the satellite
antenna's LNB to the IF 1 INPUT [17], as shown in the following figure.
Alternatively, you can use the supplied loop cable (6) to connect the output of
the first connector to the input of the second connector. This enables limited use
of the second tuner although you are only using a single-user satellite antenna
system.
IF 1 INPUT
F-type connector of
satellite antenna system
!
i
TSR 5200 HDD Connection Types
5
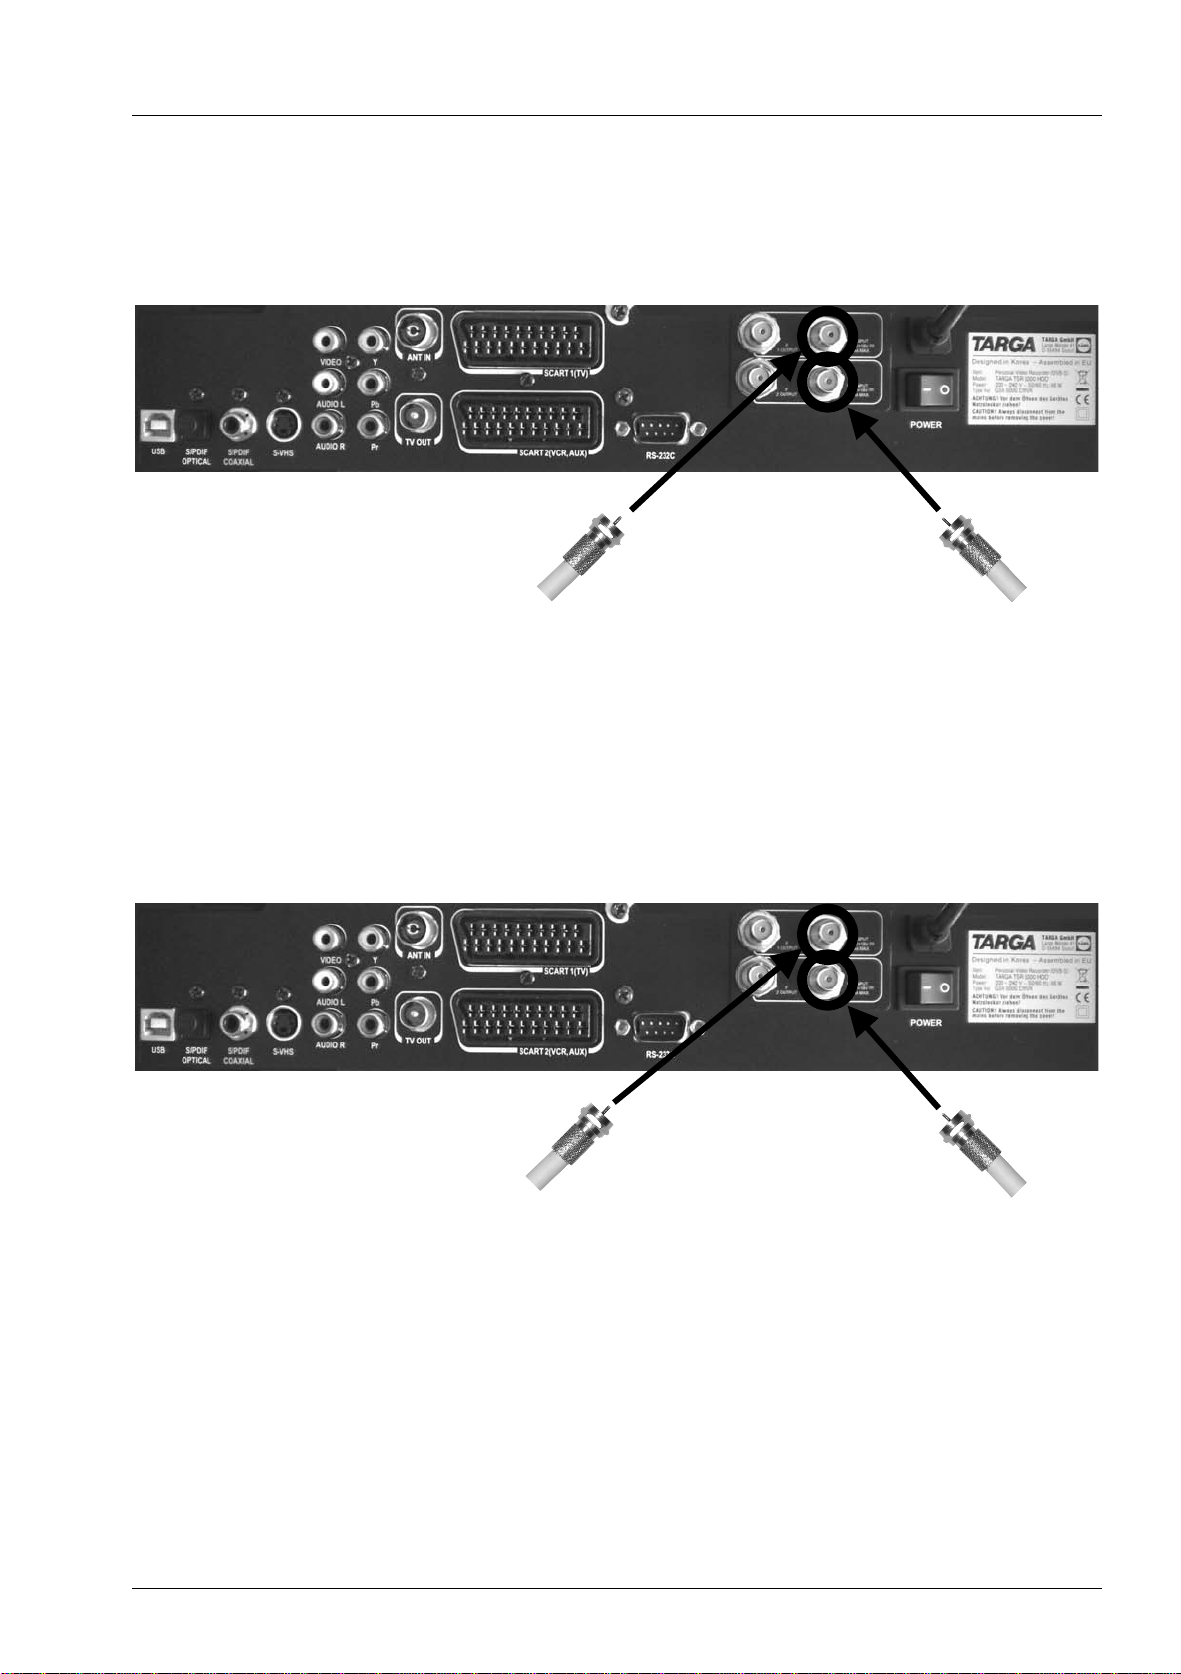
Multiple-User Satellite Antenna System
Independently of whether you are using a satellite antenna with a multi-switch, or whether
your satellite equipment is equipped with a multiple LNB, connect both the coaxial cables
with the connectors IF 1 INPUT [17] and IF 2 INPUT [24], as shown in the following figure.
Two Satellite Antennas
If you are using two different satellite antennas, connect the coaxial cable of the first
satellite antenna to the connector labelled IF 1 INPUT [17]. Connect the coaxial cable of
the second satellite unit to the IF 2 INPUT [24] connector.
2. F-type connector
of satellite antenna
system
1. F-type connector of
satellite antenna system
IF 2 INPUT
IF 1 INPUT
F-type connector of
second satellite
F-type connector of
first satellite antenna
IF 1 INPUT IF 2 INPUT

TSR 5200 HDD Connection Types
6
Connecting to TV
The TSR 5200 HDD offers many possibilities for connecting to a TV or projector. These
are:
1. Scart (Euro AV) connector
2. Coaxial (TV antenna connector)
3. Video connector
4. S-VHS connector
5. Component connector
These connector types are explained in more detail in the following pages.
Scart (Euro AV) connector
Plug the Scart cable into the upper Scart jack of the TSR 5200 HDD (labelled
SCART 1 (TV) [15]). Insert the other end of the Scart cable into the Scart jack of the TV.
The picture of the TSR 5200 HDD will be transmitted on the AV channel of your TV. If you
are not sure how to switch to the AV channel on your TV, please refer to the TV manual.
The lower Scart jack on the TSR 5200 HDD SCART 2 (VCR, AUX) [21] is
reserved for a video recorder, decoder or similar devices.
Scart (Euro AV) connector
(SCART 1 TV)
i

TSR 5200 HDD Connection Types
7
Coaxial (TV antenna connector)
If your TV does not offer any Scart connector, you can connect the TSR 5200 HDD to your
TV using a coaxial cable. To do so, connect the coaxial jack TV OUT [20] of the TSR 5200
HDD to the antenna input of your TV.
The default output frequency of the TSR 5200 HDD is tuned to channel 38. You must set a
program preset on your TV on channel 38 to be able to reproduce the image and sound of
the TSR 5200 HDD. If you are not sure how to tune to channel 38 on your TV, please refer
to the TV manual.
If you are additionally using a video recorder via the antenna cable, make sure
that its output frequency is not tuned to channel 38. If this is the case, select
another output frequency for the video recorder or the TSR 5200 HDD. To find
out how to change the output frequency of the TSR 5200 HDD, see page 18 –
Channel Modulator.
Video connector
If required, use a cinch cable to connect the video jack VIDEO [12] of the TSR 5200 HDD
to the corresponding video jack on your TV.
Please note that only the picture signal will be transferred via a video connector.
To transfer sound to the TV also you must connect the additional audio
connectors AUDIO L and AUDIO R [19] of the TSR 5200 HDD to the TV.
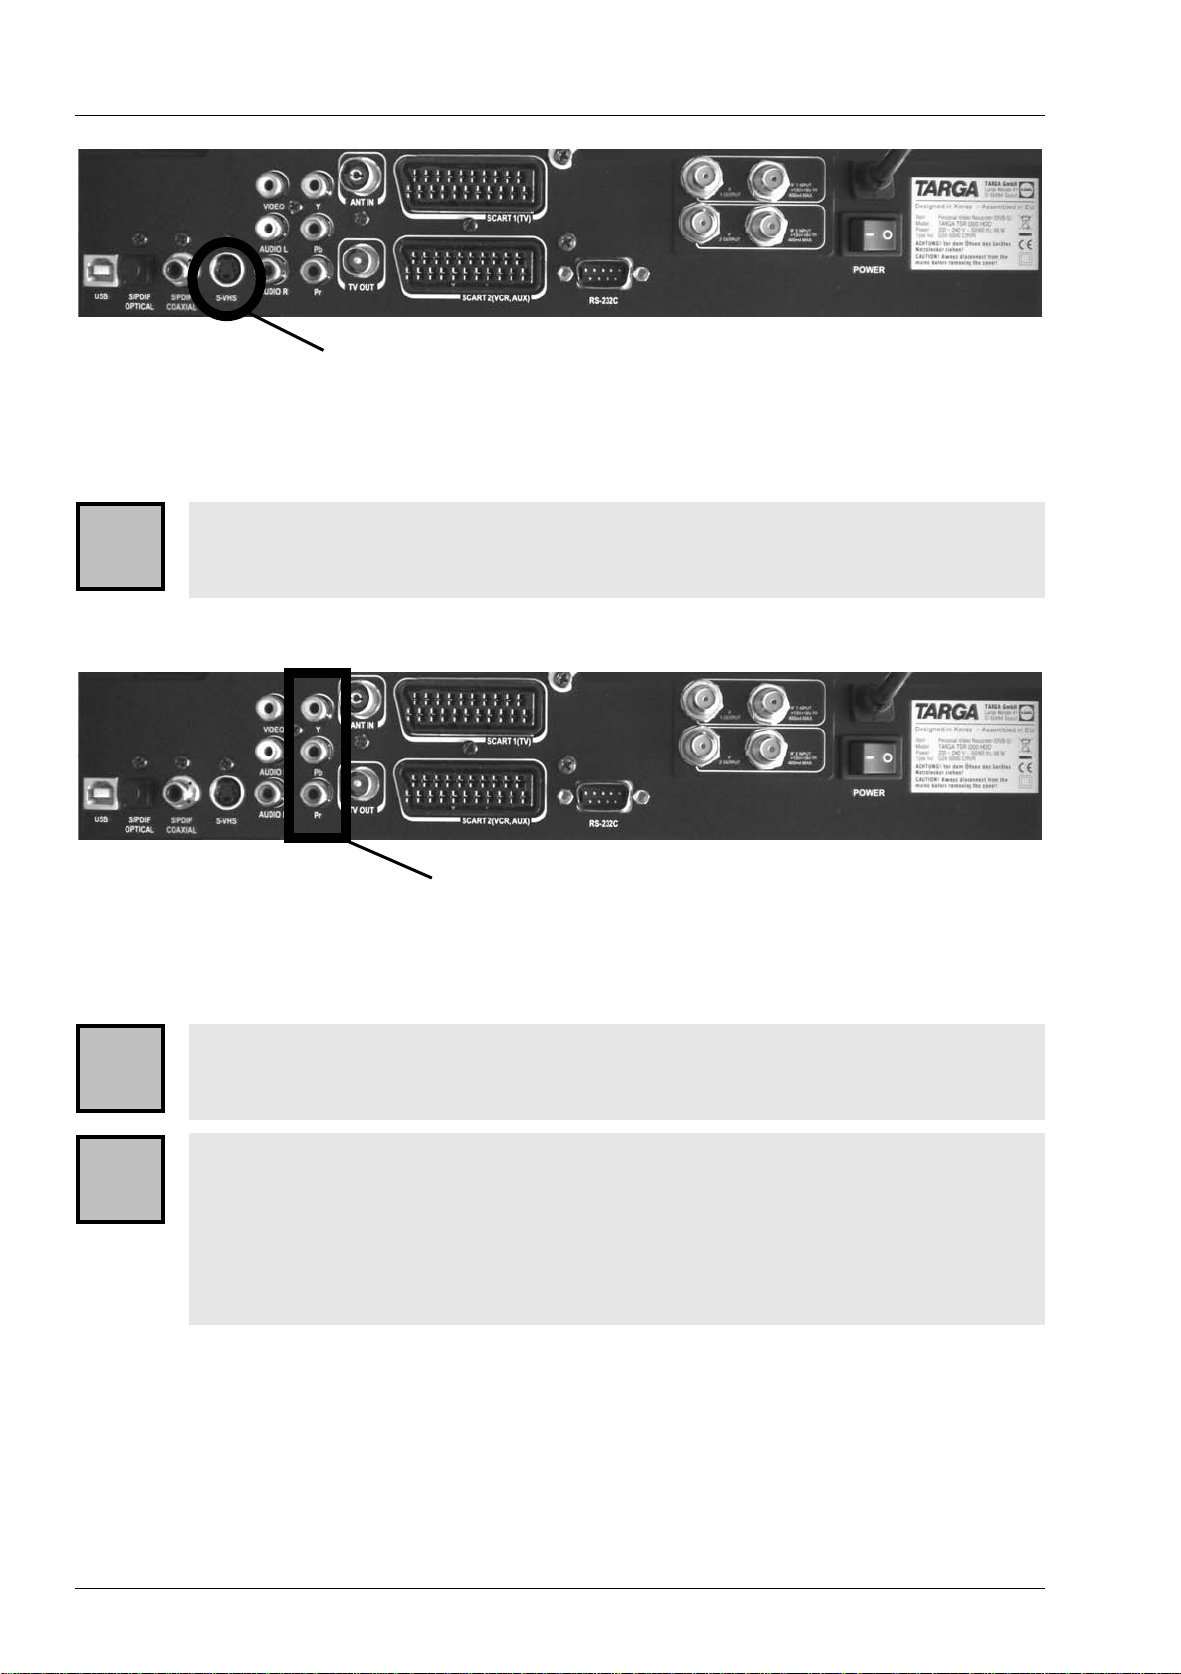
S-VHS connector
Coaxial connector
Video connector (with audio connector)
!
!
TSR 5200 HDD Connection Types
8
If your TV offers an S-VHS connector, you can connect the TSR 5200 HDD to your TV
using an S-VHS cable. This enhances the playback quality compared to the regular
antenna or Scart connection.
Please note, that only the picture signal will be transferred via an S-VHS
connector. To transfer sound to the TV also you must connect the additional
audio connectors AUDIO L and AUDIO R [19] of the TSR 5200 HDD to the TV.
Component connector
The component connector (YPbPr) offers the best playback quality. Many modern TVs and
projectors have this means of connection. If required, connect the component connector
[13] to the connector jack of your TV or projector using a triple cinch cable.
Please note that only the picture signal will be transferred via a component
connector. To transfer sound to the TV also you must connect the additional
audio connectors [19] of the TSR 5200 HDD to the TV.
The component connector transfers the picture signal with three different pieces
of information:
Y - transfers the brightness
Pb - transfers the colour variation from grey on the blue-yellow scale
Pr - transfers the colour variation from grey on the red-cyan scale
(See also page 16 – Video Playback)
S-VHS connector jack
Component connector (Y Pb Pr)
!
!
i

TSR 5200 HDD Connection Types
9
Connecting to a Video Recorder
You can use the TSR 5200 HDD in combination with a video recorder. Either connect the
TSR 5200 HDD and your video recorder with a Scart cable or with a coaxial cable. The
Scart cable offers better playback quality.
Connecting to a Video Recorder using a Scart Cable
If your video recorder has a Scart jack, plug the Scart cable into the Scart jack
SCART 2 (VCR, AUX) [21] on the TSR 5200 HDD. Insert the other end of the Scart cable
into the Scart jack of the video recorder.
Connecting to a Video Recorder using a Coaxial Cable
If your video recorder has no Scart jack, you can also connect the TSR 5200 HDD to the
video recorder using a coaxial cable. To do so, plug the coaxial cable into the jack TV OUT
[20] and the other end of the cable into the video recorder.
The default output frequency of the TSR 5200 HDD is tuned to channel 38. To avoid
picture interference, take care that the connected video recorder is not tuned into channel
38. If this is the case, select another output frequency for the video recorder or the TSR
5200 HDD. To find out how to change the output frequency of the TSR 5200 HDD, see
page 18 – Channel Modulator.
Scart 2 (VCR, AUX)
Coaxial connector
TSR 5200 HDD Getting Started
10
Getting Started
When you have connected all required cables, plug the TSR 5200 HDD power plug into a
wall outlet and switch on the power switch on the back of the device.
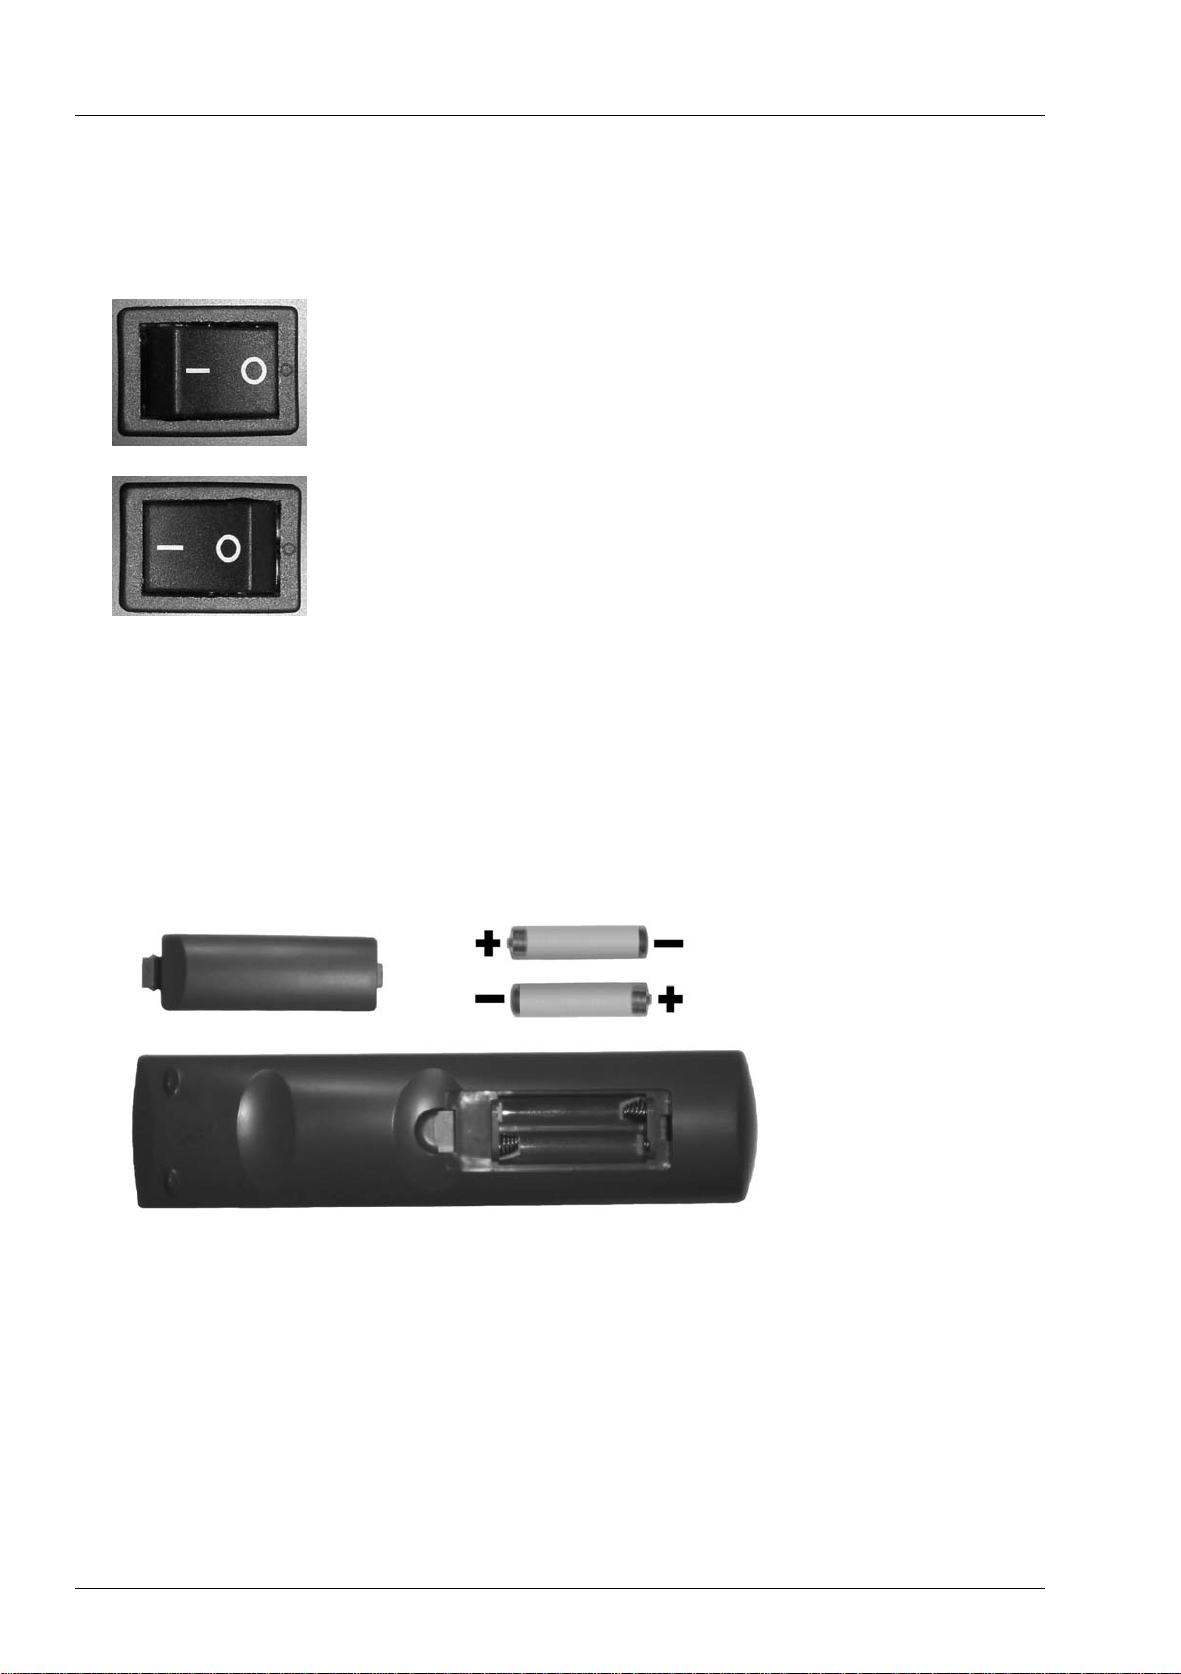
Inserting the Batteries
Insert the supplied batteries type LR03, size AAA, into the remote control. Be sure to
respect the polarity. The polarity is indicated with the symbols + and – on the batteries and
in the battery compartment on the remote control.
Power switch in "Off" position
Power switch in "On" position

TSR 5200 HDD Getting Started
11
Powering the Device On/Off
Powering On
Make sure that the power switch on the back of the TSR 5200 HDD is switched on. Press
key [1] on the remote control or key [1] on the front of the device to power on the TSR
5200 HDD.
Powering Off
Press key [1] on the remote control or key [1] on the front of the device to power off the
device. The TSR 5200 HDD is now in Stand-by mode.
In Stand-by mode, the TSR 5200 HDD is not fully switched off and still
consumes a little power. This allows you to power the device back on at any
time using the remote control.
If you wish to fully turn off the TSR 5200 HDD, toggle the power switch [18] on
the back of the device to "0" (see figure on page 10 – Getting Started).
Please note that when you next switch on the device using the power switch
[18] on the back of the TSR 5200 HDD, it will take a few minutes before it is
ready for use.
Installation
The channels that can be received via satellite are already preset in the TSR 5200 HDD.
As soon as new channels are available via satellite, the settings will be updated.
Furthermore, it is possible to tune the channels manually and also adjust the channel order
to suit your wishes.
It is essential that the satellite antenna is correctly orientated for reception.
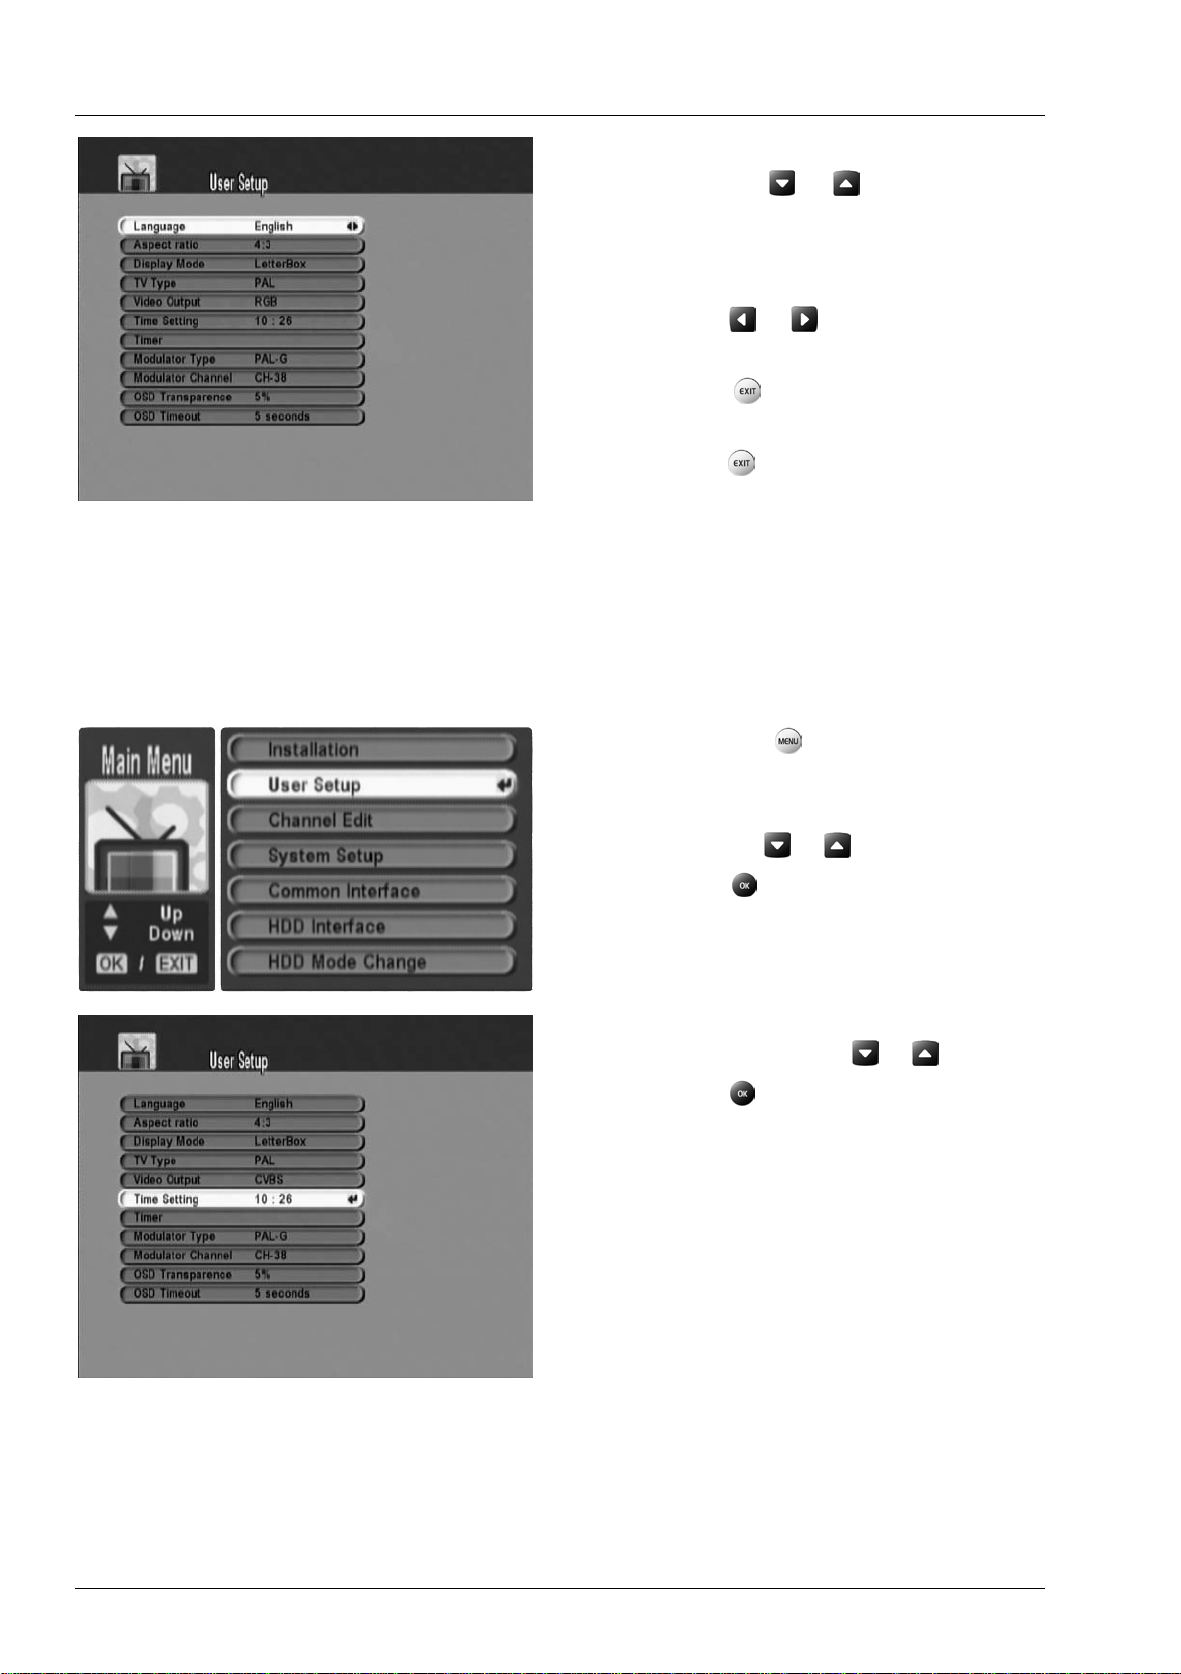
Selecting Screen Language
The screen display is available in the following languages:
-Press the button on the remote
control to go to the Main Menu.
-Select the menu option User Setup
using the or buttons.
-Press to go to the User Setup
menu.
!
i
TSR 5200 HDD Getting Started
12
-Select the menu option Language
using the or buttons. On first
use, the language is set to English.
To change, go to the menu option
Language.
-Press or to select the desired
language.
-Press to exit User Setup: the
changes will be saved.
-Press to exit the Main Menu.
Setting the Time
In order to be able to enter the correct time for recording, you must set the clock in your
satellite receiver. The TSR 5200 HDD receives the current time from the respective
programmes, but you can also set the clock manually.
-Press the button on the remote
control to go to the Main Menu.
-Select the menu option User Setup
using the or buttons.
-Press to go to the User Setup
menu.
-Select the menu option Time
Setting using the or buttons.
-Press to go to the Time Setting
menu.

TSR 5200 HDD Getting Started
13
- Select the desired setting with the
and buttons.
- Press the and buttons to alter the
respective settings or enter the data
using the numeric keypad.
-Press to exit Time Setting: the
changes will be saved.
-Press to exit the Main Menu.

TSR 5200 HDD User Settings
14
User Settings
You can make various settings to the TSR 5200 HDD to adjust to your requirements. You
have already met the Language and Time Setting functions in the previous chapter,
"Getting Started". Further functions in User Setup will be described on the following pages.
The User Setup Menu is as follows:
- Press the button on the remote
control to go to the Main Menu.
-Select the menu option User Setup
using the or buttons.
-Press to go to the User Setup menu.
Aspect Ratio
In this menu you can adjust the picture format of the TSR 5200 HDD to your TV or
projector. To do so, first go to the User Setup menu as described in previous pages.
- Select the Aspect Ratio menu option
with or .
- Press or to change between the
standard format (4:3) and widescreen
(16:9).
-Press to exit User Setup: the
changes will be saved.
Table of contents


