Tascam CD-200 User manual

CD-200
Compact Disc Player
D01064220F
OWNER’S MANUAL

IMPORTANT SAFETY PRECAUTIONS
2 TASCAM CD-200
The exclamation point within an equilateral triangle is intended to alert the user to the
presence of important operating and maintenance (servicing) instructions in the litera-
ture accompanying the appliance.
The lightning flash with arrowhead symbol, within equilateral triangle, is intended to alert
the user to the presence of uninsulated “dangerous voltage” within the product’s enclo-
sure that may be of sufficient magnitude to constitute a risk of electric shock to persons.
CAUTION: TO REDUCE THE RISK OF ELECTRIC SHOCK, DO NOT REMOVE COVER (OR
BACK). NO USER-SERVICEABLE PARTS INSIDE. REFER SERVICING TO QUALIFIED SERVICE
PERSONNEL.
This appliance has a serial number located on the rear panel.
Please record the model number and serial number and
retain them for your records.
Model number
Serial number
INFORMATION TO THE USER
This equipment has been tested and found to comply
with the limits for a Class A digital device, pursuant to Part
15 of the FCC Rules. These limits are designed to provide
reasonable protection against harmful interference when
the equipment is operated in a commercial environment.
This equipment generates, uses, and can radiate radio
frequency energy and, if not installed and used in accor-
dance with the instruction manual, may cause harmful
interference to radio communications.
Operation of this equipment in a residential area is likely
to cause harmful interference in which case the user
will be required to correct the interference at his own
expense.
CAUTION
Changes or modifications to this equipment not expressly
approved by TEAC CORPORATION for compliance could
void the user's authority to operate this equipment.
For U.S.A.
In North America use only on 120V supply.
WARNING: TO PREVENT FIRE OR
SHOCK HAZARD, DO NOT EXPOSE THIS
APPLIANCE TO RAIN OR MOISTURE.
CE Marking Information
a) Applicable electromagnetic environment: E4
b) The average half-cycle r.m.s. inrush current
1. On initial switch-on : 0.4Arms
2. After a supply interruption of 5s : 0.14Arms
For Canada
THIS CLASS A DIGITAL APPARATUS COMPLIES WITH CANADIAN
ICES-003.CET
APPAREIL NUMERIQUE DE LA CLASSE A EST CONFORME A LA
NORME NMB-003 DU CANADA.
For the customers in Europe
WARNING
This is a Class A product. In a domestic environment, this
product may cause radio interference in which case the
user may be required to take adequate measures.
Supplier’s Declaration of Conformity
Model Number: CD-200
Responsible party: TEAC AMERICA, INC.
Address: 10410 Pioneer Blvd., Unit #1, Santa Fe
Springs, California 90670, U.S.A
Telephone number: 1-323-726-0303
This device complies with Part 15 of the FCC Rules. Operation
is subject to the following two conditions: (1) this device may
not cause harmful interference, and (2) this device must accept
any interference received, including interference that may
cause undesired operation.
This product complies with applicable UK
regulations.
This product complies with the European
Directives request and the other Commission
Regulations.

IMPORTANT SAFETY INSTRUCTIONS
TASCAM CD-200 3
• The apparatus draws nominal non-operating power
from the AC outlet with its POWER or STANDBY/ON
switch not in the ON position.
• The mains plug is used as the disconnect device, the
disconnect device shall remain readily operable.
• Caution should be taken when using earphones or
headphones with the product because excessive
sound pressure (volume) from earphones or
headphones can cause hearing loss.
• If you are experiencing problems with this product,
contact TEAC for a service referral. Do not use the
product until it has been repaired.
CAUTION
• Do not expose this apparatus to drips or splashes.
• Do not place any objects filled with liquids, such as
vases, on the apparatus.
• Do not install this apparatus in a confined space
such as a book case or similar unit.
• The apparatus should be located close enough to
the AC outlet so that you can easily grasp the power
cord plug at any time.
• If the product uses batteries (including a battery
pack or installed batteries), they should not be
exposed to sunshine, fire or excessive heat.
• CAUTION for products that use replaceable lithium
batteries: there is danger of explosion if a battery is
replaced with an incorrect type of battery. Replace
only with the same or equivalent type.
WARNING
• Products with Class I construction are equipped
with a power supply cord that has a grounding
plug. The cord of such a product must be plugged
into an AC outlet that has a protective grounding
connection.
8RACK-MOUNTING THE UNIT
Use the supplied rack-mounting kit to mount the unit in a
standard 19-inch rack, as shown below.
Remove the feet of the unit before mounting.
CAUTION
• Leave 1U of space above the unit for ventilation.
• Allow at least 10 cm (4 in) at the rear of the unit for
ventilation.
1 Read these instructions.
2 Keep these instructions.
3 Heed all warnings.
4 Follow all instructions.
5 Do not use this apparatus near water.
6 Clean only with dry cloth.
7 Do not block any ventilation openings. Install in
accordance with the manufacturer's instructions.
8 Do not install near any heat sources such as radiators,
heat registers, stoves, or other apparatus (including
ampliers) that produce heat.
9 Do not defeat the safety purpose of the polarized
or grounding-type plug. A polarized plug has two
blades with one wider than the other. A ground-
ing type plug has two blades and a third grounding
prong. The wide blade or the third prong are pro-
vided for your safety. If the provided plug does not
t into your outlet, consult an electrician for replace-
ment of the obsolete outlet.
10 Protect the power cord from being walked on or
pinched particularly at plugs, convenience recep-
tacles, and the point where they exit from the appa-
ratus.
11 Only use attachments/accessories specified by the
manufacturer.
12 Use only with the cart, stand, tripod, bracket, or table
specied by the manufacturer, or sold with the appa-
ratus. When a cart is used, use caution when moving
the cart/apparatus combination to avoid injury from
tip-over.
13 Unplug this apparatus during lightning storms or
when unused for long periods of time.
14 Refer all servicing to qualified service personnel.
Servicing is required when the apparatus has been
damaged in any way, such as power-supply cord or
plug is damaged, liquid has been spilled or objects
have fallen into the apparatus, the apparatus has
been exposed to rain or moisture, does not operate
normally, or has been dropped.

4 TASCAM CD-200
Safety Information
8CAUTIONS ABOUT BATTERIES
This product uses batteries. Misuse of batteries could
cause a leak, rupture or other trouble. Always abide by
the following precautions when using batteries.
• Never recharge non-rechargeable batteries. The
batteries could rupture or leak, causing fire or injury.
• When installing batteries, pay attention to the polarity
indications (plus/minus (+/–) orientation), and install
them correctly in the battery compartment as indicat-
ed. Putting them in backward could make the batteries
rupture or leak, causing fire, injury or stains around
them.
• When you store or dispose batteries, isolate their termi-
nals with insulation tape or something like that to prevent
them from contacting other batteries or metallic objects.
• When throwing used batteries away, follow the dispos-
al instructions indicated on the batteries and the local
disposal laws.
• Do not use batteries other than those specified. Do not
mix and use new and old batteries or different types of
batteries together. The batteries could rupture or leak,
causing fire, injury or stains around them.
• Do not carry or store batteries together with small
metal objects. The batteries could short, causing leak,
rupture or other trouble.
• Do not heat or disassemble batteries. Do not put them
in fire or water. Batteries could rupture or leak, causing
fire, injury or stains around them.
• If the battery fluid leaks, wipe away any fluid on the
battery case before inserting new batteries. If the
battery fluid gets in an eye, it could cause loss of
eyesight. If fluid does enter an eye, wash it out thor-
oughly with clean water without rubbing the eye and
then consult a doctor immediately. If the fluid gets on
a person’s body or clothing, it could cause skin injuries
or burns. If this should happen, wash it off with clean
water and then consult a doctor immediately.
• The unit power should be off when you install and
replace batteries.
• Remove the batteries if you do not plan to use the unit
for a long time. Batteries could rupture or leak, causing
fire, injury or stains around them. If the battery fluid
leaks, wipe away any fluid on the battery compartment
before inserting new batteries.
• Do not disassemble a battery. The acid inside the
battery could harm skin or clothing.
8LASER INFORMATION
This laser product is a consumer laser product according
to EN 50689:2021 and complies with all consumer laser
product requirements except child appealing products.
This product contains a laser system and is classified as a
CLASS1 LASER PRODUCT according to IEC 60825-1:2014.
This class does not require special attention in normal use. Do
not take apart to prevent being exposed to the laser beam.
8CAUTIONS ABOUT LASER RADIATION
This product has been designed and manufactured
according to FDA regulations“title 21, CFR, chapter 1,
subchapter J, based on the Radiation Control for Health
and Safety Act of 1968,”and is classified as a class 1 laser
product. There is no hazardous invisible laser radiation
during operation because invisible laser radiation emitted
inside of this product is completely confined in the
protective housings.
The label required in this regulation is shown at 1.
Cautions:
• DO NOT REMOVE THE PROTECTIVE HOUSING USING A
SCREWDRIVER.
• USE OF CONTROLS OR ADJUSTMENTS OR PERFORMANCE OF
PROCEDURES OTHER THAN THOSE SPECIFIED HEREIN MAY
RESULT IN HAZARDOUS RADIATION EXPOSURE.
• IF THIS PRODUCT DEVELOPS TROUBLE, CONTACT YOUR
NEAREST QUALIFIED SERVICE PERSONNEL, AND DO NOT USE
THE PRODUCT IN ITS DAMAGED STATE.
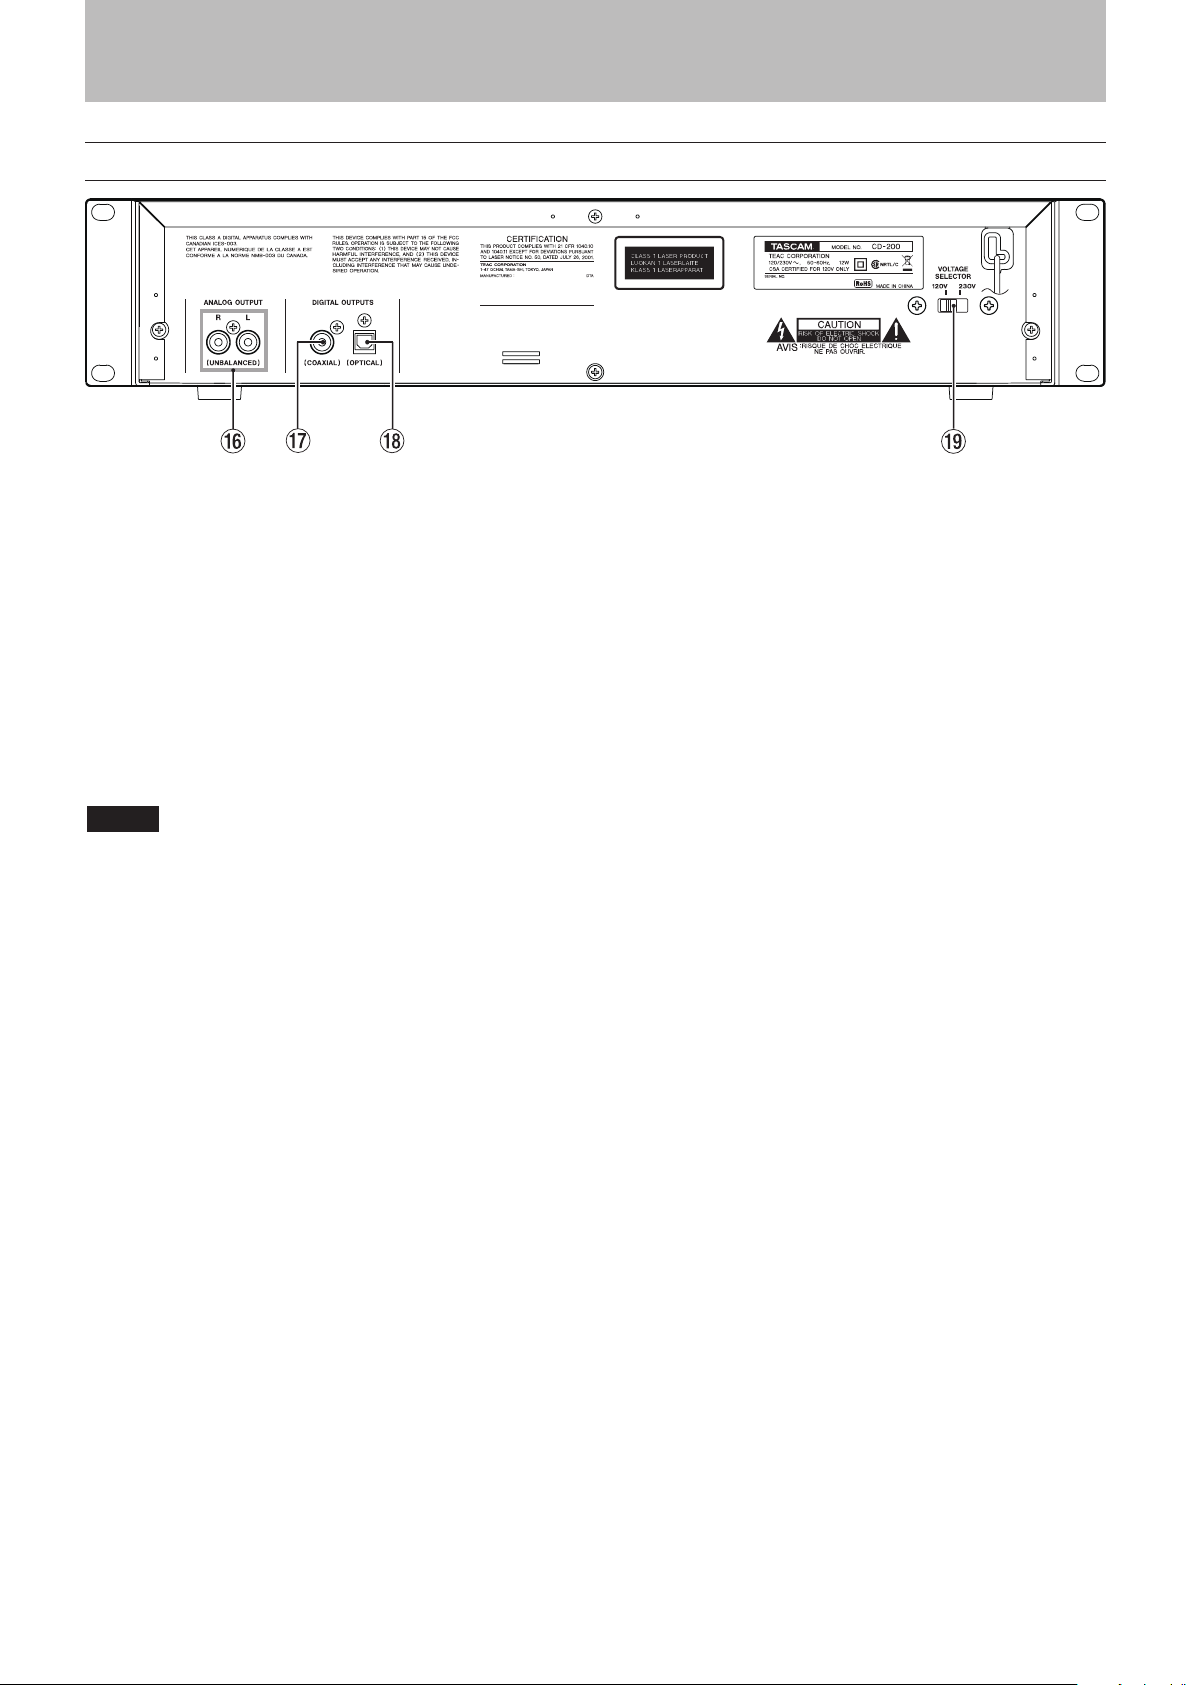
Optical pickup
Type : EP-C101
Manufacturer : Ever Bright Teachnology and Science
Electronical Co.,LTD
Laser output : Less than 0.3 mW
Wavelength : 790±25nm
WARNING
To prevent possible hearing damage, do not listen
at high volume levels for long periods.

TASCAM CD-200 5
Safety Information
8For European Customers
Disposal of electrical and electronic equipment and batteries
and/or accumulators
(a) All electrical/electronic equipment and waste
batteries/accumulators should be disposed of
separately from the municipal waste stream via
collection facilities designated by the government or
local authorities.
(b) By disposing of electrical/electronic equipment
and waste batteries/accumulators correctly, you
will help save valuable resources and prevent any
potential negative effects on human health and the
environment.
(c) Improper disposal of waste electrical/electronic
equipment and batteries/accumulators can have
serious effects on the environment and human health
because of the presence of hazardous substances in
the equipment.
(d) The Waste Electrical and Electronic
Equipment (WEEE) symbols, which show
wheeled bins that have been crossed out,
indicate that electrical/electronic equipment
and batteries/accumulators must be
collected and disposed of separately from
household waste.
If a battery or accumulator contains more
than the specified values of lead (Pb),
mercury (Hg), and/or cadmium (Cd) as
defined in the Battery Directive (2006/66/
EC, 2013/56/EU), then the chemical symbols
for those elements will be indicated beneath
the WEEE symbol.
Pb, Hg, Cd
(e) Return and collection systems are available to end
users. For more detailed information about the
disposal of old electrical/electronic equipment and
waste batteries/ accumulators, please contact your
city office, waste disposal service or the shop where
you purchased the equipment.

IMPORTANT SAFETY PRECAUTIONS
6 TASCAM CD-200
Contents
1 − Introduction..............................................7
Main features........................................................................7
Included items .....................................................................7
About this manual..............................................................7
Trademarks............................................................................7
Using the TEAC Global Site.............................................. 7
About TASCAM customer support service................7
Precautions and notes for placement and use.........8
Beware of condensation...................................................8
Cleaning the unit.................................................................8
About discs............................................................................8
Handling of compact discs.......................................8
2 − Names and Functions of Parts .................9
Front panel............................................................................9
Rear panel............................................................................10
Remote control unit (RC-CD200) .................................11
Display...................................................................................12
3 − Preparation for Use ................................13
Connections........................................................................13
Connecting headphones ........................................13
Connecting other audio equipment...................13
Preparing the remote control.......................................14
Inserting batteries......................................................14
Replacing the batteries............................................14
Cautions about the use of batteries....................14
Cautions about using the remote control.........14
4 − Playing back CDs.....................................15
Discs that can be played.................................................15
Folders and tracks on data CDs ...................................15
Loading a CD ......................................................................16
Playback................................................................................16
Selecting a track................................................................17
Skipping to the next or previous track...............17
Selecting by track number .....................................17
Search forward and backward.....................................17
Folder playback (with data CDs only) ........................18
Playback modes.................................................................18
Select the playback mode ......................................18
Programmed playback....................................................19
Setting the program .................................................19
Checking the program.............................................20
Replacing a program track .....................................21
Adding more program tracks................................21
Clearing the program ...............................................21
Time and text information display .............................21
Repeat playback................................................................22
Pitch control........................................................................23
Intro Check ..........................................................................23
5 − Message Lists ..........................................24
Operation messages........................................................24
Warning messages ...........................................................24
Error messages...................................................................24
6 − Troubleshooting .....................................25
7 − Specifications..........................................26
Ratings ..................................................................................26
General .................................................................................26
Dimensions .........................................................................27

TASCAM CD-200 7
1 − Introduction
Thank you for your purchase of the TASCAM CD-200 Compact
Disc Player.
Before connecting and using the unit, please take time to read
this manual thoroughly to ensure you understand how to
properly set up and connect the unit, as well as the operation
of its many useful and convenient functions. After you have
finished reading this manual, please keep it in a safe place for
future reference.
You can also download the Owner's Manual from the TASCAM
web site (https://tascam.com/us/).
Main features
• In addition to audio CDs (CD-DA), plays data CDs (CD-ROM)
on which WAV and MP3 format files are recorded.
• CD-R/RW playback
• 2U EIA rack mount size
• Analog output (RCA) and digital outputs (coaxial and
optical)
• Headphone output with level control
• 10-key wireless remote control
• Displays textual information (artist name, album name,
track name, etc.) including CD text and ID3 tags.
• Three types of play mode (continuous, shuffle, and
programed)
• Repeat playback (single repeat, all repeat)
• ±12.5% pitch control
• Intro check
• Folder repeat for data CDs
• Various time display (track elapsed time, track remaining
time and total remaining time for audio CDs, total elapsed
time for data CDs).
• 10-second shockproof memory built-in (protection against
skipping).
Included items
The included items are listed below.
Take care when opening the package not to damage the items.
Keep the package materials for transportation in the future.
Please contact the store where you purchased this unit if any of
these items are missing or have been damaged during transpor-
tation.
• Main unit ................................................................................................. 1
• Wireless remote control unit (RC-CD200).................................... 1
• AA batteries for the remote control unit..................................... 2
• A rack-mounting screw kit................................................................ 1
• A warranty card..................................................................................... 1
• Owner's manual (this manual).................................................. 1
• TASCAM ID registration guide................................................... 1
NOTE
The batteries are not supplied for Taiwan.
About this manual
In this manual, we use the following conventions:
• The names of keys and controls are given in the following
typeface: DISPLAY.
1 − Introduction
• When the alphanumeric portion of the display shows a
message, this is shown in the following typeface:
OPEN
.
• If a preset indicator in the display (i.e. one which cannot
change) is shown, this is shown as follows: INTRO.
• The CD-DA format may also be mentioned as“audio CD”
format.
• CDs on which MP3 or WAV audio files are recorded may be
mentioned as“data CDs”.
• Additional information is introduced in the styles below
when needed:
TIP
Useful hints when using the unit.
NOTE
Explanation of actions in special situation and supplement.
CAUTION
Instructions that should be followed to avoid injury,
damage to the unit or other equipment, and loss of data.
Trademarks
• TASCAM is a registered trademark of TEAC Corporation.
• MPEG Layer-3 audio coding technology licensed from
Fraunhofer IIS and Thomson.
• Other company names, product names and logos in this
document are the trademarks or registered trademarks of
their respective owners.
Using the TEAC Global Site
You can download updates for this unit from the TEAC Global
Site:https://teac-global.com/
In the TASCAM Downloads section, select the desired language
to open the Downloads website page for that language.
About TASCAM customer support
service
TASCAM products are supported and warrantied only in their
country/region of purchase.
To receive support after purchase, on the TASCAM Distributors
list page of the TEAC Global Site (https:// teac-global.com/),
search for the local company or representative for the region
where you purchased the product and contact that organi-
zation.
When making inquiries, the address (URL) of the shop or
web shop where it was purchased and the purchase date are
required. Moreover, the warranty card and proof of purchase
might also be necessary.

8 TASCAM CD-200
1 − Introduction
Precautions and notes for placement
and use
• The operating temperature should be between 5°C and
35°C (41°F and 95°F).
• Make sure that the unit is mounted in a level position for
correct operation.
• Do not place any object on the unit for heat dissipation.
• Avoid installing this unit on top of any heat-generating
electrical device such as a power amplifier.
Beware of condensation
If the unit (or a compact disc) is moved from a cold to a warm
place, or used after a sudden temperature change, there is a
danger of condensation; vapor in the air could condense on
the internal mechanism, making correct operation impossible.
To prevent this, or if this occurs, let the player sit for one or two
hours at the new room temperature before using.
Cleaning the unit
To clean the unit, wipe gently with a soft dry cloth. Do not use
any benzene, paint thinner, ethyl alcohol or other chemical
agents to clean the unit as they could damage the surface.
About discs
In addition to audio CDs (CD-DA), the CD-200 can play CD-R and
CD-RW discs on which audio CD, MP3, or WAV format files are
recorded. The CD player can also play 3-inch CDs
Handling of compact discs
• Always place the compact discs in the trays with their label
facing upward.
• To remove a disc from its case, press down on the center of
the disc holder, then lift the disc out, holding it carefully by
the edges.
• Avoid getting fingerprints on the signal side (the non-label
side). Grime and dust may cause skipping or malfunction.
• To clean the signal side of a disc, wipe gently with a soft dry
cloth from the center towards the outside edge.
Dirt on discs can lower the sound quality, so clean them and
always store them in a clean state.
• Do not use any record spray, anti-static solutions, benzene,
paint thinner or other chemical agents to clean CDs as they
could damage the delicate playing surface. It may cause
CDs to become unplayable.
• Do not affix any labels or stickers to the label side of the
disc and do not use any protective coating spray. Do not
insert discs that have adhesive remaining from tape or
stickers that have been removed. If they are inserted into
the player, they could stick to the internal mechanism,
requiring removal by a technician.
• Never use a commercially available CD stabilizer. Using
stabilizers with this player will damage the mechanism and
cause it to malfunction.
• Do not use cracked discs.
• Only use circular compact discs. Avoid using non-circular
promotional, etc. discs.
• When labeling CD-R and CD-RW discs, always use a soft
oil-based felt-tipped pen to write the information. Never
use a ball-point or hard-tipped pen, as this may cause
damage to the recorded side.
• Music discs with copy control, a copy-protection system,
have been released form several record companies in an
attempt to protect the copyright. Since some of these discs
do not comply with the CD specifications, they may not be
playable on the CD-200.

TASCAM CD-200 9
2 − Names and Functions of Parts
Front panel
wDISPLAY
Press this key to show for two seconds the type of infor-
mation (playback time or text information) that currently
appears in the main area of the display.
Press this key again while this is being shown to change the
type of information displayed. The type of information that
can be shown depends on the type of disc loaded and the
operation status. (See“Time and text information display”
on page 21.)
ePLAY MODE/INTRO CHECK
Press briefly to change the playback mode. The three
playback modes are continuous, shuffle and programmed.
(See “Playback modes”on page 18.) Press and hold this key
to use the Intro Check function. (See “Intro Check” on page
23.)
r REPEAT
Press this key to select single repeat or all repeat playback.
Press this key again to stop repeat playback. (See “Repeat
playback” on page 22.)
tFOLDER (˙/¥)
Use these keys when a data CD is in the player to change
the playback folder. By selecting “ALL,”every folder on the
disc is made subject to playback. (See “Folder playback (with
data CDs only)”on page 18.)
1POWER
Press this switch to turn the unit on or off.
2Disc tray
3OPEN/CLOSE
Use this key to open and close the disc tray.
4PLAY/READY (¥/π)
Use this key to start or pause playback.
5STOP (ª)
Use this key to stop playback.
6SEARCH Ô [Â]
Press this key briefly to skip to the previous track. Hold down
this key to search for a part of a track in the reverse direction.
7SEARCH [¯]
Press this key briefly to skip to the next track. Hold down this
key to search for a part of a track in the forward direction.
8PHONES jack and knob
For private listening, insert the headphones plug into this
standard 1/4”stereo phone jack, and adjust the volume by
turning the level knob.
9PITCH CONTROL switch, indicator and knob
Use this switch to turn the pitch control function on or off.
When the function is on, the indicator will light. Adjust the
amount (±12.5%) by turning the knob. (See“Pitch control”
on page 23.)
0Remote Sensor
When operating the remote control unit, point it towards
here.
qDisplay
Displays various information.
2 − Names and Functions of Parts

10 TASCAM CD-200
2 − Names and Functions of Parts
Rear panel
yANALOG OUTPUT (UNBALANCED) jacks
The CD playback signal is output here as stereo analog
signals (–10 dBV).
uDIGITAL OUTPUT (COAXIAL) jack
The CD playback signal is output here as a digital signal in S/
PDIF format.
iDIGITAL OUTPUT (OPTICAL) jack
The CD playback signal is output here as a digital signal in S/
PDIF format.
o VOLTAGE SELECTOR
Switches the voltage to either 230 V or 120 V.
NOTE
• The voltage selector is only available on units for specific
markets.
• In North America, use only on 120V supply.

TASCAM CD-200 11
2 − Names and Functions of Parts
Remote control unit (RC-CD200)
1
Numeric keys
Use these keys to select tracks.
2
DISPLAY
Press this key to show for two seconds the type of infor-
mation (playback time or text information) that currently
appears in the main area of the display.
Press this key again while this is being shown to change the
type of information displayed. The type of information that
can be shown depends on the type of disc loaded and the
operation status. (See“Time and text information display”on
page 21.)
3
PLAY MODE/INTRO CHECK
Press briefly to change the playback mode. The three
playback modes are continuous, shuffle and programmed.
(See “Playback modes”on page 18.) Press and hold this key
to use the Intro Check function. (See “Intro Check” on page
23.)
4
FOLDER ˙/¥
Use these keys when a data CD is in the player to change the
playback folder. By selecting “ALL,”every folder on the disc is
made subject to playback. (See “Folder playback (with data
CDs only)”on page 18.)
5
Ô/Â
Press this key briefly to skip to the previous track. Hold down
this key to search for a part of a track in the reverse direction.
6
¯/
Press this key briefly to skip to the next track. Hold down this
key to search for a part of a track in the forward direction.
7
OPEN/CLOSE
Use this key to open and close the disc tray.
8
PROGRAM EDIT
Use this to set, confirm and edit programs. (See
“Programmed playback” on page 19.)
9
REPEAT
Press this key to select single repeat or all repeat playback.
Press this key again to stop repeat playback. (See “Repeat
playback” on page 22.)
0
STOP
Use this key to stop playback.
q
PLAY/READY
Use this key to start or pause playback.

12 TASCAM CD-200
2 − Names and Functions of Parts
1SHUFFLE
SHUFFLE lights when this function is on.
2REPEAT
REPEAT ALL appears when it is set and REPEAT appears
when single repeat is set.
3INTRO
INTRO lights when this function is on.
4 MEMORY
MEMORY lights when programmed playback is on and
blinks while you are setting the program.
5Folder number
When a data CD is in the unit, the folder number is shown
when set to folder playback, and
ALL
is shown when set to
disc playback (all folders). When an audio CD is in the unit,
cd
is shown.
6Main display
The track number and time or text information is shown.
The status of the unit (
OPEN
,
CLOSE
,
TOC
*
READ
, etc.) and
messages (
NO DISC
, etc.) are also shown. Items with more
than eight characters are scrolled when shown.
* TOC means “Table Of Contents,” which is track information
written on the disc
Display

TASCAM CD-200 13
3 − Preparation for Use
Connections
Amplifier
3 − Preparation for Use
Connecting headphones
Connect stereo headphones to the PHONES jack on the
front panel. Use the knob to adjust the level.
Connecting other audio equipment
Sound from this unit can be output as an analog or digital
signal to, for example, an external amplifier or mixer. Unbal-
anced analog signals are output from the ANALOG OUTPUT
jacks (RCA pin jacks), and digital signals are output from the
DIGITAL OUTPUT jacks in S/PDIF format. The unit has two types
of DIGITAL OUTPUT jacks—coaxial and optical—allowing
connection to equipment with both types of inputs.
CAUTION
• When making a digital connection, use either the coaxial or
optical connector.
• To dub a recording digitally, prepare the disc for playback in
this unit before starting recording with the recording device.

14 TASCAM CD-200
3 − Preparation for Use
Preparing the remote control
Inserting batteries
1. Open the lid.
2. Confirm +/- polarity, and insert two AA batteries.
3. Close the lid.
NOTE
The batteries are not supplied for Taiwan.
Replacing the batteries
Replace both batteries with new ones when the range of the
remote control becomes short or if the function keys become
unresponsive.
Cautions about the use of batteries
Misuse of batteries could cause them to leak, rupture or
otherwise be damaged. Please read and abide by the precau-
tions on them when using batteries. Also see“CAUTIONS ABOUT
BATTERIES”on page 4.
Cautions about using the remote control
• When using other devices controlled by infrared rays, use of
this remote control might operate these devices by mistake.
• Use the remote control within the following range.
Remote sensor
15° 15°
Operation distance
Directly in front: Within 7 meters
15° left or right: Within 7 meters

TASCAM CD-200 15
4 − Playing back CDs
Discs that can be played
This unit can play the following types of files and discs.
8CD-DA (audio CD) format discs
Music CDs that are commercially available and CD-R and
CD-RW discs that have been recorded as audio CD format
can be played. In this manual, these types of discs are called
“audio CDs.”
8CD-ROM (data CD) format discs
Discs with MP3 and WAV files recorded on them can be
played. In this manual, these types of discs are called“data
CDs.”
NOTE
MP3 files that have a sampling frequency of 32, 44.1 or 48
kHz and a bit-rate of 32–320 kbps or a variable bit-rate
(VBR) can be played back. WAV files that have a sampling
frequency of 8–48 kHz and are 8-bit or 16-bit can be played
back.
Limitations of MP3 files that use VBR compression
Due to format limitations, positions cannot be accurately
detected in VBR files. For this reason, the point where playback
actually starts might differ slightly from the point set in advance
for functions of this player when points must be set in the
middle of a track.
Folders and tracks on data CDs
This unit treats all the audio files (WAV and MP3) on data CDs as
“tracks.” Some data CDs store files inside folders in the same way
that ordinary computers do. In addition, multiple folders can be
stored inside another folder creating a multilevel structure.
This unit assigns a folder number to each folder to manage
them. Folder numbers and are assigned sequentially starting
with the first folder at the highest level followed by the folders
(subfolders) inside it. Folders inside a higher-level folder are
numbered in order before the next folder in the higher-level is
numbered as shown in the illustration below.
If the root folder of a data CD contains one or more audio files, it
will be numbered as the first folder.
Each audio file is also assigned a track number. Track numbers
are assigned in order starting from those in the lowest
numbered folder.
During ordinary playback of data CDs, tracks are played back
just like an audio CD in the order of their assigned numbers.
Folders that do not directly contain audio files are not given
numbers. For example, in the illustration below the folder that
contains folder 5 is not given a number.
<An Example of Data CD Structure>
4 − Playing back CDs

16 TASCAM CD-200
4 − Playing back CDs
Loading a CD
To load a CD, press the OPEN/CLOSE key on the main unit or on
the remote control to open the disc tray, and put the CD into the
tray with the label facing up.
Press the OPEN/CLOSE key again to close the disc tray. After
loading the disc, the unit reads the disc’s information and shows
on the display the total number of tracks and total playback
time if it is an audio CD and the total number of tracks in the
current folder if it is a data CD.
NOTE
Instead of pressing the OPEN/CLOSE key to close the disc
tray, you can press the PLAY/READY key to close the disc tray
and begin playback immediately.
CAUTION
If you open the disc tray while this unit is in use, the
following settings are lost.
• Program
• Current folder (for data CDs)
Playback
The following procedures assume that the necessary connec-
tions have been completed, the unit’s power has been turned
on and a CD (audio or data) has been loaded.
Press the PLAY/READY key on the main unit or remote control
to begin playback of a CD.
PLAY/READY key
PLAY/READY key
8Stopping playback:
Press the STOP key on the main unit or the remote control.
8Pausing playback:
Press the PLAY/READY key on the main unit or the remote
control.
In this manual, unless stated otherwise, explanations are given
assuming that continuous playback mode is set. (See“Playback
modes”on page 18.)

TASCAM CD-200 17
4 − Playing back CDs
Selecting a track
There are two ways to select a track. You can move (skip) to the
previous or next track, or you can select a track directly by its
track number.
Skipping to the next or previous track
Press a SEARCH Ô/(Â/¯) key on the main unit or
a search (Ô/Â, ¯/) key on the remote control.
After selecting the track, press the PLAY/READY key on the
main unit or the remote control to start track playback.
SEARCH Ô/keys
Sear
ch Ô/ keys
Selecting by track number
Use the numeric keys (0–9) on the remote control to directly set
a track for playback by number.
Track numbers can have up to two digits for audio CDs and up
to three digits for data CDs.
1. Use the remote control numeric keys (0–9) to input the track
number. Input the track number starting with the first digit
as in the example below.
Numeric
keys
(0 - 9)
8To select track 1:
Press the“1”key one time.
8To select track 12:
Press the“1”key followed by the“2”key.
2. Press the PLAY/READY key on the main unit or the remote
control.
The selected track begins to play.
If you press the STOP key on the main unit or the remote
control, the display stops showing the track number input
and the display returns to its previous state.
NOTE
The numeric keys cannot be used to select a track when in
program or shuffle mode.
Search forward and backward
You can search forward and backward in a track while listening
to it.
1. Play or pause the desired track.
2. Press and hold a SEARCH Ô/(Â/¯) key on
the main unit or a search (Ô/Â, ¯/) key on the
remote control to start searching forward or backward.
3. Release the key that you are holding to stop searching
and return the unit to the state it was in before searching
(playback or pause).

18 TASCAM CD-200
4 − Playing back CDs
Folder playback (with data CDs only)
When playing a data CD, you can set a designated folder (the
current folder) as the playback area. Follow the procedures
below to set the playback folder. You can also set the playback
area to be the entire disc by selecting “ALL.”
FOLDER ˙/¥ keys
FOLDER
˙/¥ keys
When using a data CD, by pressing the FOLDER ˙/¥ keys on
the main unit or the remote control, you can skip to the previous
or next folder. This will skip to the beginning of the first track in
the previous or next folder. If you hold down one of these keys,
you can skip through folders continually.
NOTE
When you skip to a different folder, it becomes the current
folder.
Playback modes
This unit can play tracks using three types of playback modes.
Continuous playback (default setting)
The tracks on a disc are played back in numerical order.
NOTE
In folder playback mode, the tracks in the current playback
folder on a data CD are played back in numerical order. See
“Folder playback (with data CDs only)” on page 18 for
details.
Shuffle playback
The tracks on the disc are played back in random order
regardless of their track numbers. Playback stops after all tracks
have been played once.
NOTE
In folder playback mode, the tracks in the playback folder
on a data CD are played back in random order. See “Folder
playback (with data CDs only)” on page 18 for details.
Programmed playback
Tracks are played back in the programmed order. See
“Programmed playback” on page 19 for details.
Select the playback mode
Press the PLAY MODE/INTRO CHECK key on the main unit or
the remote control to cycle through the playback modes.
During playback, however, only continuous playback and shuffle
playback modes can be set.
To select programmed playback, press the PLAY MODE/INTRO
CHECK key when playback is stopped or no CD is loaded.
PLAY MODE
INTRO CHECK key
PLA
Y MODE
INTRO CHECK key

TASCAM CD-200 19
4 − Playing back CDs
An indicator for the current mode will appear on the display as
shown below.
Display Playback mode
No indication Continuous playback
SHUFFLE Shuffle playback
MEMORY Programmed playback
The selected playback mode is retained even when the power is
turned off.
NOTE
• Immediately after pressing the PLAY MODE/INTRO CHECK
key, the selected mode is shown on the main display area as
follows.
Continuous playback mode set: CONTINUE
Shuffle playback mode set: SHUFFLE
Programmed playback mode set: PROGRAM
• In this manual, unless stated otherwise, explanations are
given assuming that continuous playback mode is set.
Programmed playback
To use programmed playback, you must set a program either
before or after setting the playback mode to programmed
playback mode. (See“Select the playback mode”on page 18.)
When in programmed playback mode, press the PLAY/READY
key on the main unit or the remote control to start playback of
the set program in order from the first track (program step 01).
Press a SEARCH Ô/(Â/¯) key on the main unit or a
search (Ô/Â, ¯/) key on the remote control to skip
to the previous or next program step.
In programmed playback mode, when playback is stopped the
total number of tracks in the program and the total program
time are shown (total program time is not shown when using a
data CD).
Setting the program
When no program is set, follow the procedures below to set a
program using the remote control.
NOTE
• The program cannot be set from the main unit.
• You can set a program at any time regardless of the current
playback mode.
• The program is cleared when the disc tray is opened.
1. Press the PROGRAM EDIT key while playback is stopped.
PROGRAM
EDIT key
The unit enters program setting mode, and if no program
has been set, it will be possible to set a track to program step
01 (MEMORY indicator blinks).
[Audio CD]

20 TASCAM CD-200
4 − Playing back CDs
[Data CD]
NOTE
If the program is already set, the track number and
playback time of the track set as program step 01 is shown.
(See “Checking the program” on page 20.)
2. Use the numeric keys or search (Ô/Â, ¯/) keys
to select a track to set as program step 01. (The MEMORY
indicator and the track number blink.) When using the
numeric keys, input the number starting with the leftmost
digit.
Program step
Playback time
Track number
[Audio CD]
[Data CD]
NOTE
• When using a data CD, the screen switches to file name
display if more than a second passes after pressing a
numeric key or search (Ô/Â, ¯/) key, but it is
still possible to add the track to the program.
• If you press the STOP key while a track is selected, selection
of that track is canceled, and the screen returns to the state
where you can select a track.
3. Press the PROGRAM EDIT key.
The selected track is added to program step 01. The unit is
now ready for you to add another track for the next program
step.
4. By repeating steps two and three above, you can add more
tracks sequentially as desired.
5. If you are finished adding tracks to the program, press the
PROGRAM EDIT key when the empty program step where
it is possible to add a track appears. The unit exits program
setting mode.
NOTE
• The same track can be added to the program multiple times.
• If you press the STOP key when the empty program step
where it is possible to add a track appears, all steps in the
program are cleared.
• If you try to add more than 99 tracks, a “PGM FULL” error
message appears. Only 99 tracks can be added.
Checking the program
You can check the contents of the program.
1. Press the PROGRAM EDIT key on the remote control to put
the unit into program setting mode.
The track number and playback time of the track set as
program step 01 is shown on the screen (playback time is
not displayed if the loaded disc is a data CD) and MEMORY
blinks.
Program step
Playback time
Track number
2. Press the PROGRAM EDIT key to show the track information
of the next program step.
3. If you press the PROGRAM EDIT key when the final program
step is shown, it becomes possible to add another program
step. (No track number is displayed and the MEMORY
indicator blinks.)
4. Press the PROGRAM EDIT key again to exit the program
setting mode.
Other manuals for CD-200
2
Table of contents
Other Tascam CD Player manuals

Tascam
Tascam CD-6010 How to use

Tascam
Tascam CD-355 User manual

Tascam
Tascam MD-CD1mkII User manual

Tascam
Tascam CD-VT1 User manual

Tascam
Tascam CD-6010 User manual

Tascam
Tascam CD-400U User manual

Tascam
Tascam CD-A700 User manual

Tascam
Tascam CD-500 How to use

Tascam
Tascam CD-A630 Guide

Tascam
Tascam CD-160 Guide

Tascam
Tascam CD-200i User manual

Tascam
Tascam CD-A700 User manual

Tascam
Tascam CD-A550 User manual

Tascam
Tascam CD-VT1MKII User manual

Tascam
Tascam CD-150 User manual

Tascam
Tascam CD-450 CD-450 User manual

Tascam
Tascam CD-601MKII User manual

Tascam
Tascam CD-355 User manual

Tascam
Tascam CD-200BT User manual

Tascam
Tascam CD-200iL System manual