manuals.online logo
Brands
  1. Home
  2. •
  3. Brands
  4. •
  5. Tascam
  6. •
  7. Voice Recorder
  8. •
  9. Tascam DA-38 User manual

Tascam DA-38 User manual

TASCAM
TEAC ProfessionalDivision
DA-38
DigitalMultitrackRecorder K--l
t OWNER’SMANUAL I DOOZ45OOB
SECTION1: INTRODUCTION
Thank youforchoosing theTASCAMDA-38 Digital
MultitrackRecorder. TheDA-38 is aproductin thedirect line of theworldwide successfulDA-88 andw&designed
to meet theneeds of video/filmproduction,broadcast production,recording studios, projectstudios, andthe
musician,
Among theimportant features of DA-38 arethe
following :
0Menu-selectable machineJD,pre-/postrolltime,and
others
l Syncingup to 16 unitsfor128tracks
l Syncingwith theDA-88
0Canbe slaved to external word clock
0Shuttling forreel rockingto identify specific points on tape .Z-pointautolocatorwith or withoutpreroll
0Trialpunch in andout
l Crossfade action to ensure seamless punch in andout
l Track delayfunction to correctthetimingdiscrepan-
ties betweentracks 0Digitalcopy betweentracks within one. DA-38 or
from tracks of oneDA-38 to tracks of another
0Canbe controlledfrom theTASCAMRC-848or
RC-SOSremote
SECTION 1 : INTRODUCTION
I Table of Contents I
Important Safety Precautions .......................................... 2
Safety Instructions ........................................................... 3
Secbon I : InWoduction ............................................ 1 * 1
1.1. Unpacking ....................................................... 1 * 3
1-2. Precautions and recommendations.. ................ 1*3
1-3. Compatible cassette tapes *............................... 1 3
1.4. Available recording/play time......................... 1*4
1.5. Backup facility.. 1*.............................................. 4
Hookup example ..................................................... 1. 5
Section 2 : General Guide.. 2 *...................................... 1
h Section 3 : Formatting a Tape.. -................................ 3 1
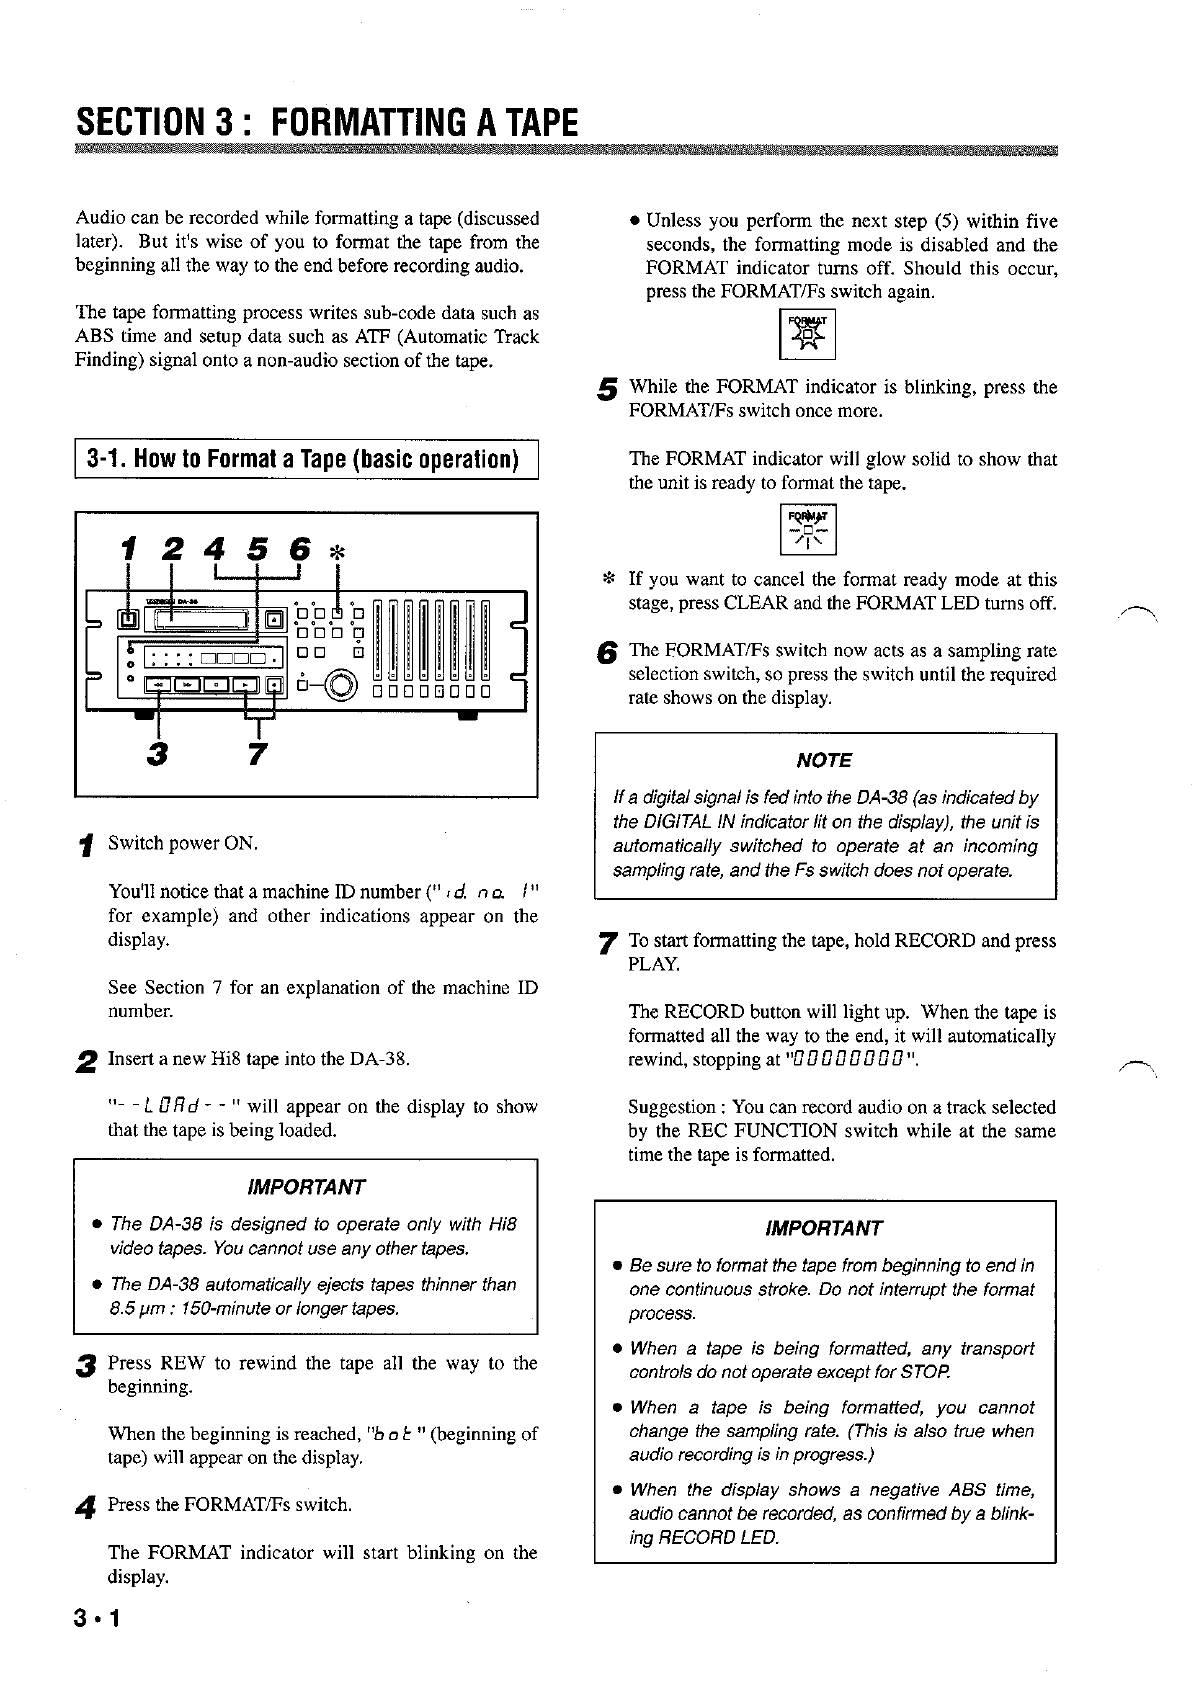
3.1. How to format a tape (basic operation)...........3 *1
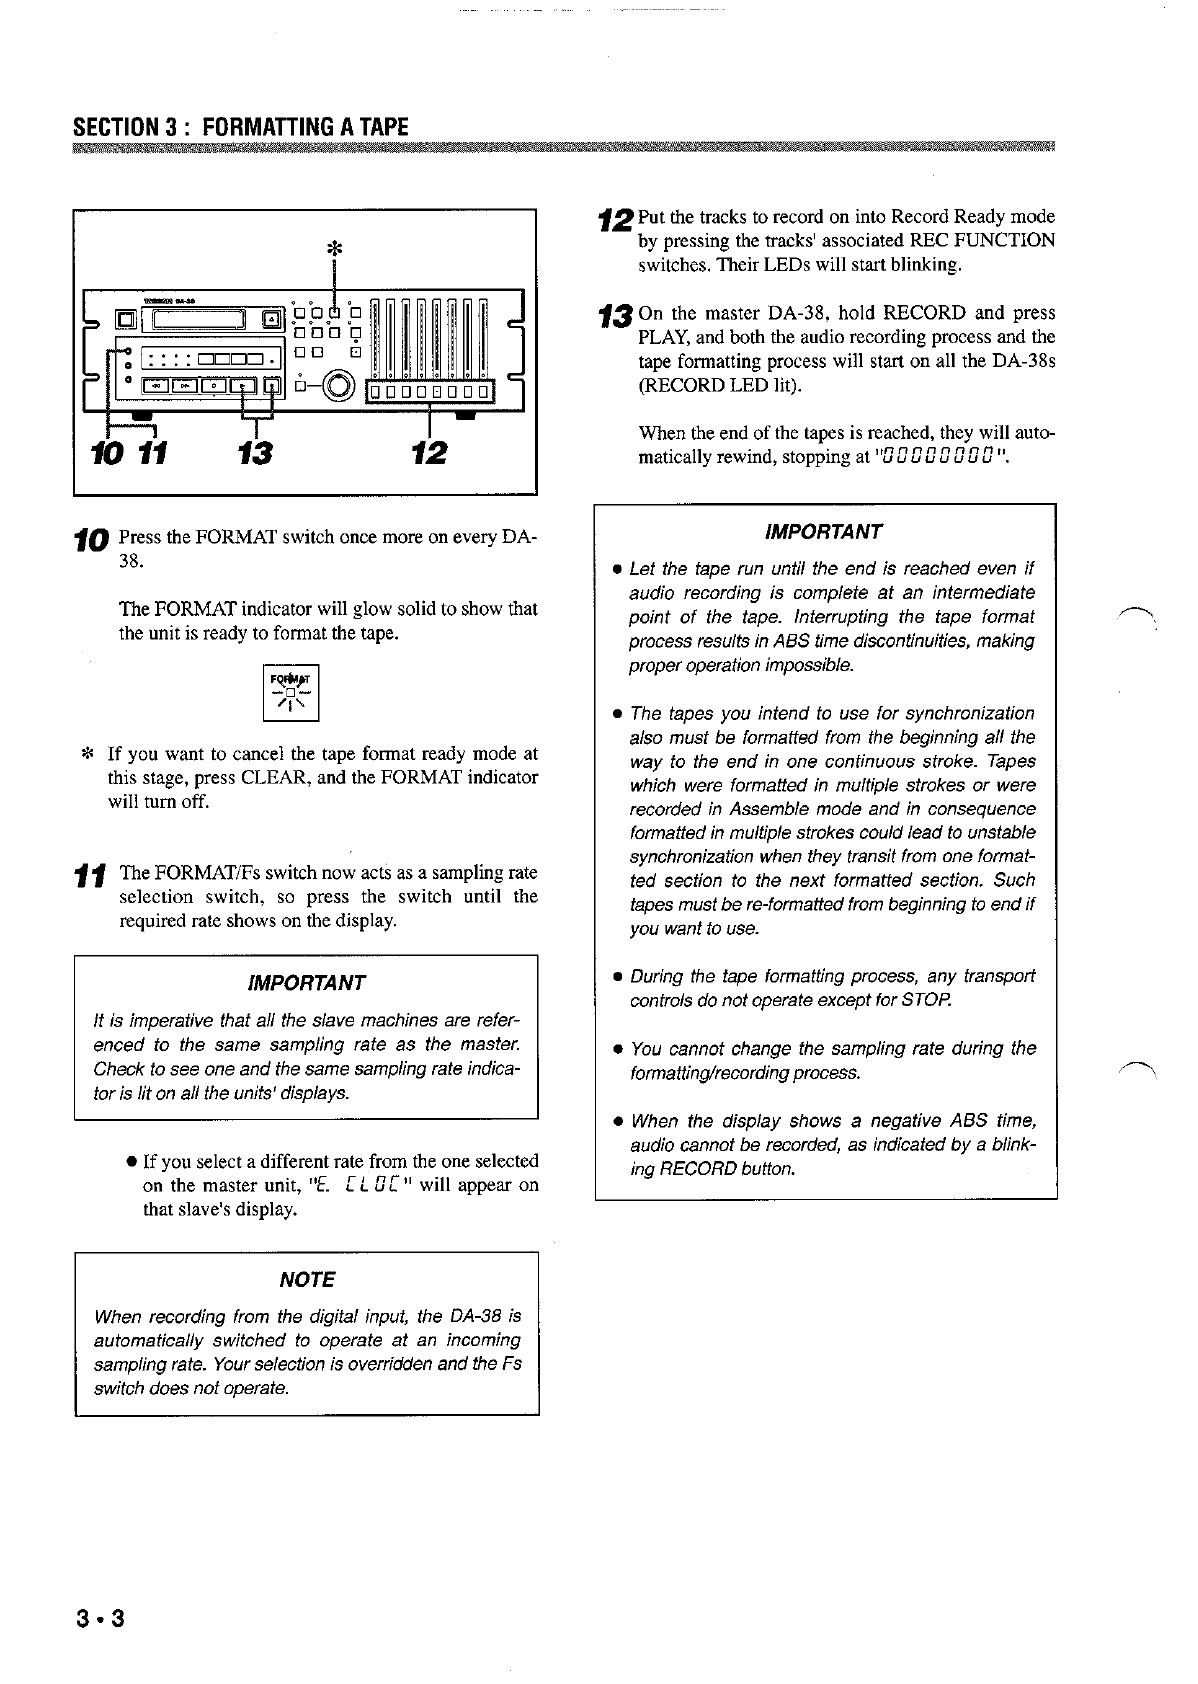
3.2. Real-time, simultaneous tape format ..............3 *2
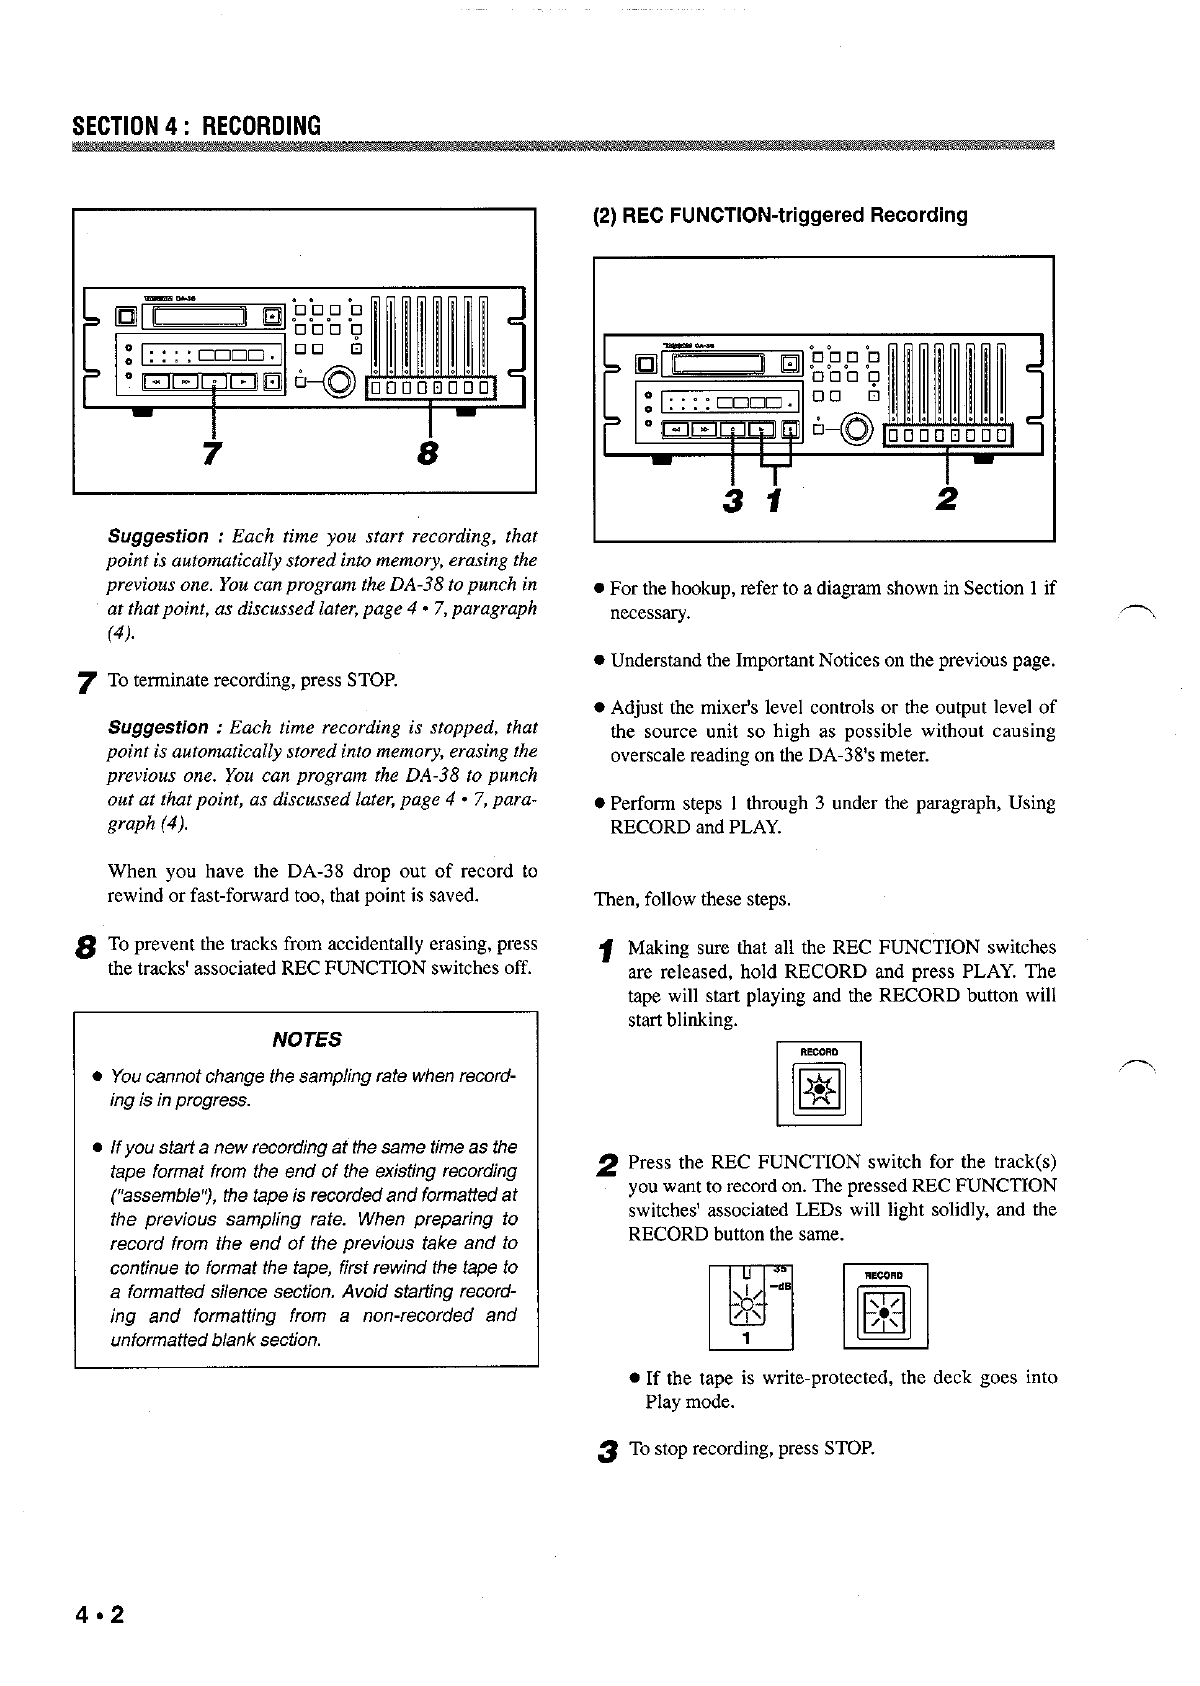
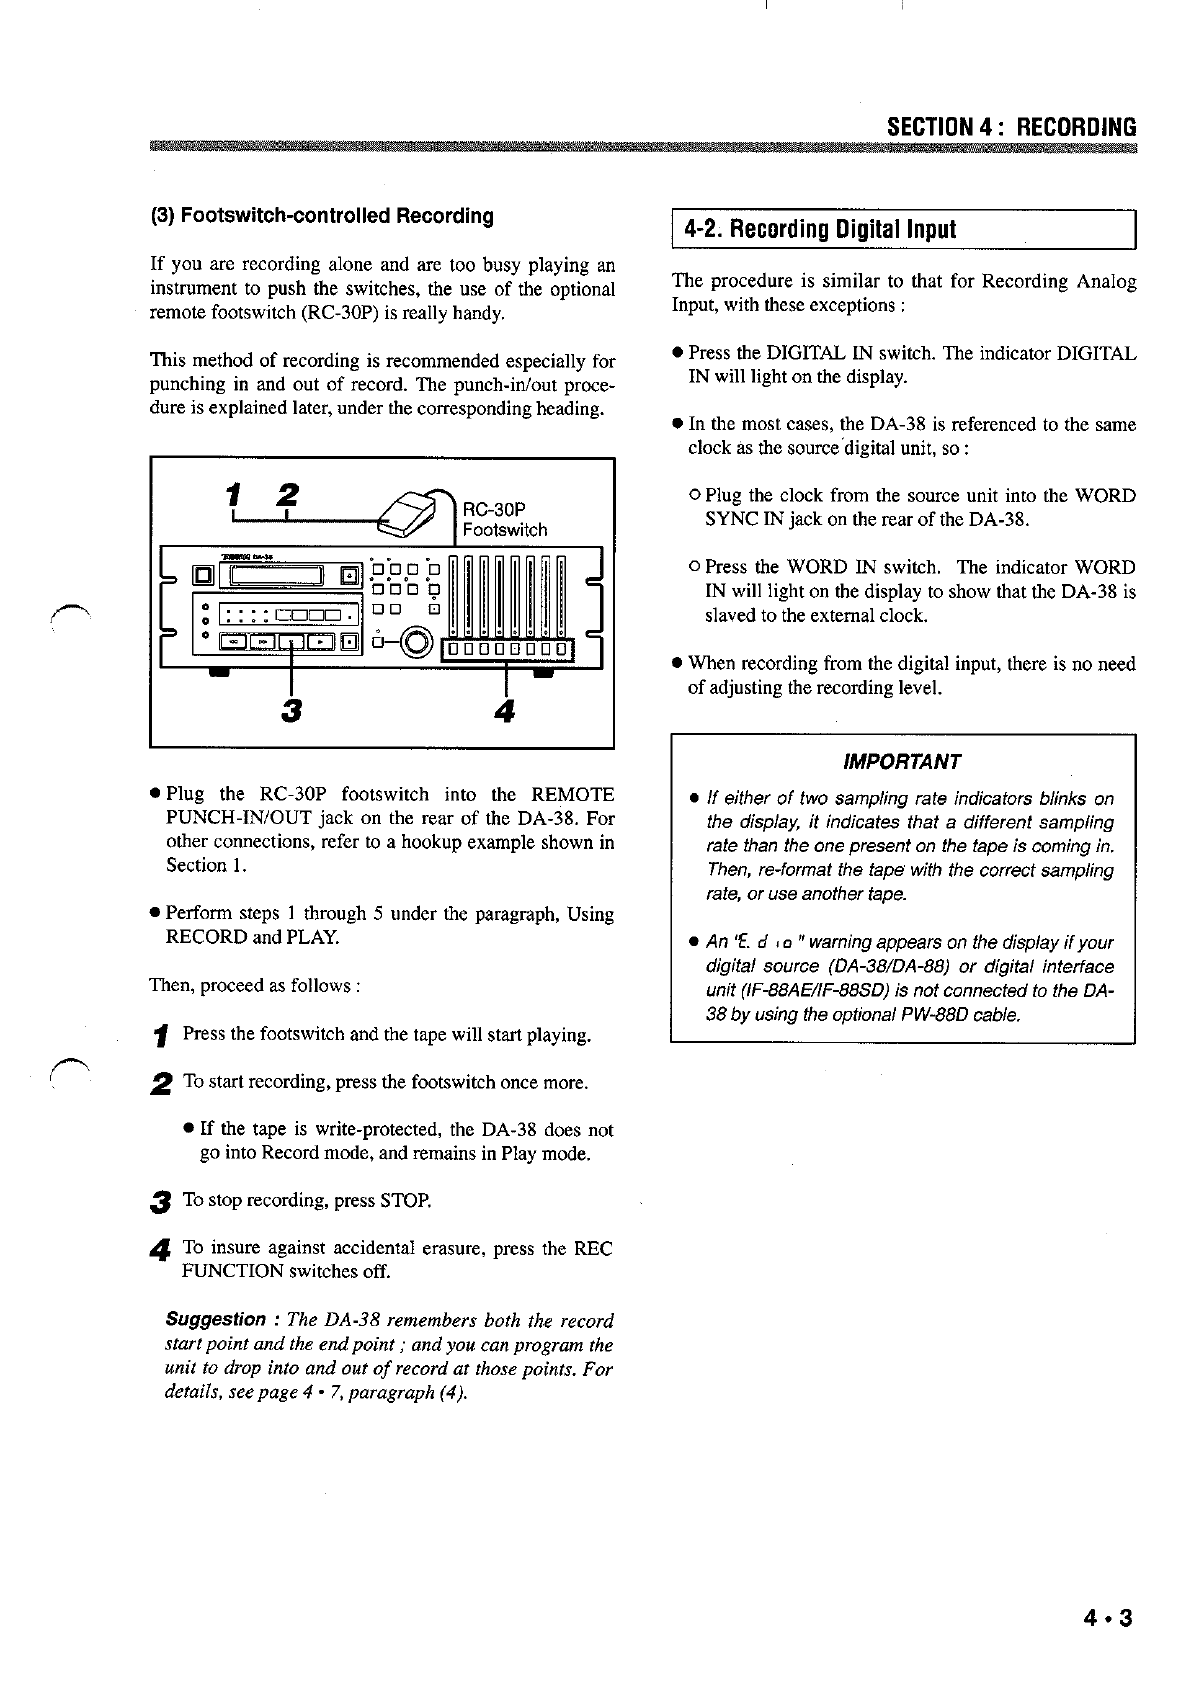
Section 4 : Recording.. ............................................. 4 *1
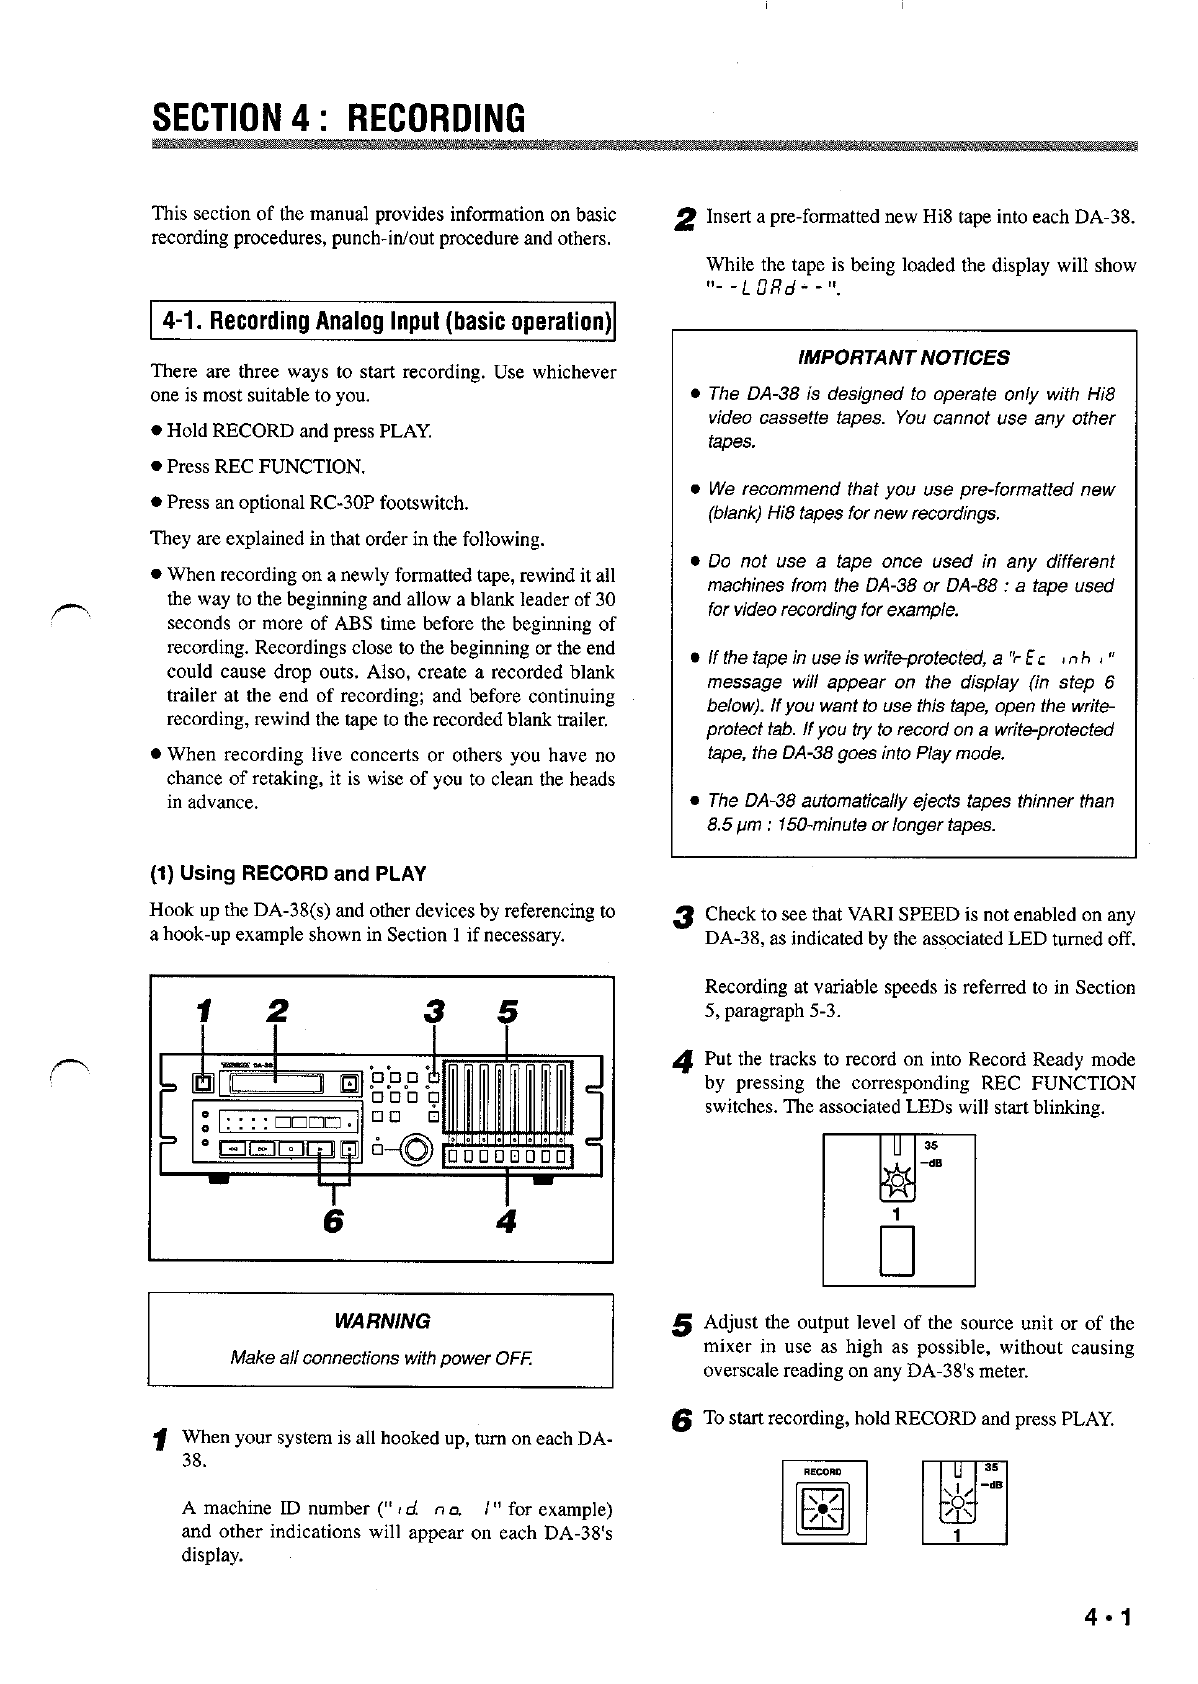
4-1. Recording analog input (basic operation). ...... 4 *1
4-2. Recording digital input.. .................................. 4 *3
4-3. Punch in/out editing.. ...................................... 4 *4
4-4. Crossfade time setting.. ................................... 4 *8
4-5. Preroll time setting.. ........................................ 4 - 8
4.6. Post1011time setting ........................................ 4 *9
4.7. Copying tracks *................................................ 4 9
4.8. Dithering the re-quantization noise.. ............. 4 - 14
Section 5 : Playback.. 5 *............................................... 1
5.1. Basic playback procedure *............................... 5 1
5.2. Shuttling the tape 5 *............................................ 1
5-3. Variable speed play 5 -......................................... 2
5.4. Setting locations.. 5 -
n ............................................ 3
5.5. Repeat play.. 5 ..................................................... 4
5.6. Delaying tracks ............................................... 5 *5
Section 6 : Autolocation.. .......................................... 6 *1
6-1. Autolocating to either of two location points,, 6 *1
6-2. Setting autolocation preroll time.. ................... 6 +1
6-3. The auto play function .................................... 6 *2
Section 7 : Syncing Multiple DA-3%. *...................... 7 1
7-1. Hooking up multiple DA-38s.. 7 *....................... 1
7.2. Selecting a machine ID number.. *....................7 2
7-3. How to sync the slave units to the master..-.. 7 *2
7.4. Offsetting slave units *...................................... 7 3
7-5. Digital dubbing between DA-38s ...................7 *4
Section 6 : Convolling the DA-36 from Menus.. .... 8 * 1
8.1. General.. .......................................................... 8 . 1
8.2. Using the built-in oscillator.. *........................... 8 2
8.3. Initializing the backup memory ...................... 8 *3
8.4. Selecting a TDIF input bit length.................... 8 - 4
Section 9 : Monitor and Other Capabilhies ............ 9 * 1
9-1. Monitor functions.. 9 *.......................................... 1
9.2. Capabilities to assist in saving your time........ 9 *3
9.3, To see the system version.. 9 -.............................. 3
Section 10 : Maintenance.. ..................................... 10*1
10.1. Errorratedisplay ........................................ 10*1
10-2. Cleaning the heads.. .................................... 10*2
10.3. Head drum utilized time display.. ............... 10*3
Section ii : Appendices ........................................ 11- 1
11.1. Specifications .............................................. 11*1
11.2. Optional accessories 11*................................... 2
11.3. Error messages explained ........................... 11*3
SECTlON3: FORMATTINGATAPE
Audio can be recorded while formatting a tape (discussed
later). But it’s wise of you to format the tape from the
beginning all the way to the end before recording audio.
The tape formatting process writes sub-code data such as
ABS time and satup data such as ATF (Automatic Track
Finding) signal onto a non-audio sectionof the tape.
13-1. How to Format a Tape (basic operation)
f Switch power ON
You’llnotice that a machine ID number (” td na /”
for example) and other indications appear on the
display.
See Section 7 for an explanation of the machine ID
number.
2 Insert a new Hi8 tape into the DA-38,
“- I !l!Rd - - ” will appear on the display to show
that the tape isbeing loaded.
IMPORTANT
l The DA-36 is designed to operate on/y with Hi&3
video tapes. You cannot use any other tapes.
l The DA-36 automatkx//y ejects tapes thinner than
8.5 pm : t50-minute or longer tapes.
3 Press REW to rewind the tape all the way to the
beginning.
When the beginning is reached, “b o k ” (beginningof
tape) will appear on the display.
4 Press the FORMATes witch.
The FORMAT indicator will start blinking cm the
display.
3.1
l Unless you perform the next step (5) within five
seconds, the formatting mode is disabled and the
FORMAT indicator turns off. Should this occur,
press the FORMAT/Fs witch again,
7
l0
5 While the FORMAT indicator is blinking, press the
FORMAT/Fs switch once more.
The FORMAT indicator will glow solid to show that
the unit is ready to format the tape.
* If you want to cancel the format ready mode at this
stage,press CLEAR and the FORMAT LED turns off.
6 The FORMATIFs switch now acts as a sampling rate
selectionwitch, so press the switch until the required
rate shows on the display.
.‘Y,
NOTE
ifa d@ita/ signa/ is fed into the DA-38 (as indicated by
the DIGITAL IN indicator /it on the disp/ay), the unit is
automatically switched to operate at an incoming
sampling rate, and the Fs switch does not operate.
7 To start formatting the tape, hold RECORD and press
PLAY,
The RECORD button will light up. When the tape is
formatted all the way to the end, it will automatically
rewind, stoppingat “fl!!flcfiflE”, fi
Suggestion : You can record audio on a track selected
by the REC FUNCTION switch while at the same
time the tape isformatted.
IMPORTANT
l Be we to format the tape from beginning to end in
one continuous stroke. Do not interrupt the format
process.
l When e tape is being formatted, any transpoti
controls do not operate except for STOP
l When a tape is being formatted, you cannot
change the sampling rate. (This fs also true when
audio recording is in progress.)
l When the display shows a negative ABS time,
audio cannot be recorded, es confirmed by a blink-
ing RECORD LED.
SECTION 3 : FORMATTING A TAPE
13-2. Real-time. Simultaneous Tane Format 1
In some cases, when recording a live concert using multi-
ple DA-38s for instance, you may want to format tapes
while at the same time you record audio on them, for later
master/slave sync play.
I 481
Follow these steps to perform the real-time, simultaneous
tape foxmat :
0 Hook up a mutiple DA-38 sync system a basic example
of which is shown in Section 7.
Speaking of Remembering :
l The DA-38 is designed to operate only with Hi8
video tapes. Youcannot use any other tapes.
g Switch power ON,
l The DA-38 automatically ejects tapes thinner than
8.5 pm : l5Ominute or longer tapes.
A machine ID number (” so! nCC \” for example) 7 Press REW to rewind the tape all the way to the
and other indications will appear on the display. beginning.
Assigning e machine ID number to each of the DA-38s
p (steps 2 through 5)
2 Press SHlFT and the associated LED will start blink-
ing to show that all the double function keys are
switched to offer their lower blue-labelled functions.
3 By repeatedly pressing MENU, access an ID selection
menu, which looks like this:
4 Enter the desired machine ID number by pressing the
A and V keys.
l Enter ” /” on the DA-38 you intend to use as the
master machine.
0 Enter other numbers (“2 ” to ” \6 “) on each of the
slave DA-38s.
IMPORTAA’T
Assign c different number to each of the DA-38s.
5 Press SHlFT and the display will be switched back to
show the ABS time,
6 Insert a new Hi8 tape into each of the DA-38s
The display will show “- -L ERd - “while the tape
is being loaded.
When the beginning is reached, “b o t ” will appear
on the display.
8 Press CHASE on each of the slave DA-38s to put
them into sync mode and the associated LED starts
blinking.
4%
OEL
L---l
cl
9 Press the FORMAT/Fs switch on all of the DA-3%.
The FORMAT indicator will start blinking on the
display of every DA-38.
0 If you don’tperform the next step within 5 seconds,
the tape format mode will be disabled and the
FORMAT indicator will turn off. Should this occur,
press the FORMAT key again.
3-2
SECTION 3 : FORMATTING A TAPE
f0 Press the FORMAT switch once more on every DA-
38.
The FORMAT indicator will glow solidto show that
the unit is ready to format the tape.
* If you want to cancel the tape format ready mode at
this stage, press CLEAR, and the FORMAT indicator
will turn off.
11 The FORMAT/Fs witch now acti as a samplingrate
selection switch, so press the switch until the
required rate shows on the display.
IMPORTANT
it is imperative that a/f the slave machines are refer-
enced to the same sampling rate a.s the master.
Check to .see one and the same sampling rate indica-
for is fit on all the units’ displays.
l If you select a different rate from the one selected
on the master unit, “E. Li Ec ” will appear on
that slave’sdisplay.
NOTE
When recording from the digital input, the DA-38 is
automatically switched to operate at an incoming
samp/ing rate. Your selection is overridden and the Fs
switch does not operate.
12 Put the tracks to record on into Record Ready mode
by pressing the tracks’associated REC FUNCTION
switches,Their LEDs will start blitiing.
13 On the master DA-38, hold RECORD and press
PLAY,and botb the audio recording process and the
tape formatting process will start on all the DA-38s
(RECORD LED lit).
When the end of the tapes isreached, they will auto-
matically rewind, stoppingat “~6!~~~ c:c “.
IMPORTANT
l Let the tape run until the end is reached wan if
audio recording is complete at an intermediate
point of the tape. Interrupting the tape format
process resu/ts in ABS time discontinuities, making
proper operation impossible.
l The tapes you intend to wa for synchronization
a/so must be formatted from the beginning a// the
way to the end in one continuous stroke. Tapes
which were formatted in multiple strokes or were
recorded in Assemble mode and in consequence
formatted in multiple strokes could lead to unstable
synchronization when they transit from ona format-
ted section to the next formatted section. Such
tapes must be re-formatted from beginning to end if
you want to use.
. During the tape formatting process, any transport
controls do not operate except for STOR
l You cannot change the sampling rate during the
formatting/recording process.
l When the disp/ay shows a negative ABS time,
audio cannot be recorded, as indicated by a blink-
ing RECORD button.
3.3
SECTlON4: RECORDING
This section of the manual provides information on basic
recording procedures, punch-in/out procedure and others.
4-1. Recording Analog Input (basic operation)
Therearethree ways to start recording. Use whichever
one is most suitable to you.
0 Hold RECORD and press PLAY.
. Press REC FUNCTION.
l Press an optional RC-30P footwitch.
They are explained in that order in the following.
0 When recording on a newly fomatted tape, rewind it all
the way to the beginning and allow a blank leader of 30
seconds or more of ABS time before the beginning of
recording. Recordings close to the beginning or the end
could cause drop outs. Also, create a recorded blank
trailer at the end of recording; and before continuing
recording, rewind the tape to the recorded blank trailer,
l When recording live concerts or others you have no
chance of retaking, it is wise of you to clean the heads
in advance.
(1) Using RECORD and PLAY
Hook up the DA-3S(s) and other devices by referencing to
a hook-up example shown in Section 1if necessary.
1 2 3 5
<p
WARNING
Make all connections with power OF,6
1 When your system is all hooked up, turn on each DA-
38.
A machine ID number (” 9d na 1” for example)
and other indications will appear on each DA-38%
display.
2 In%17a pre-fomatted new Hi8 tape intoeach DA-38.
While the tape is being loaded the display will show
f!..Lgflol__u,
IMPORTANT NOTICES
l The DA-36 is designed to operate on/y with Hi8
video cassette tapes You cannot use any other
tapes.
. We recommend that you uee preform&ted new
(blank) Hi8 tapes for new recordings.
l Do not use a tape once used in any different
machines from the DA-36 or DA-68 : a tape used
for video recording for example.
l /f the tape in we is writeprotected, a ‘+Ec ,nh , ”
message wi// appear on the disp/ay (in step 6
below). If you want to use this tape, open the write
protect tab. If you try to record on a write-protected
tape, the DA-38 goe.s into F/ay mode.
l The DA-38 automatics//y ejects tapes thinner than
8.5 pm : 150-minute or longer tapes.
3 Check to see that VARI SPEED is not enabled on any
DA-38, as indicatedby the associatedLED turned off.
Recording at variable speeds is referred to in Section
5, paragraph 5-3.
4 Put the tracks to record on into Record Readv mode
by pressing the corresponding REC FUNkTION
switches. The associated LEDs will start blinking.
5 Adjust the output level of the source unit or of the
mixer in we as high as possible, without causing
overscale reading on any DA-38’smeter.
6 To start recording, hold RECORD and press PLAY,
SECTlON4: RECOROING
Suggestion : Each time you start recording, that
point is automatically stored into nwnory, erasing the
previous one. Youcan prognzm theDA-38 topunch in
at that point, as discussed later,psgs 4 - 7,paragraph
(4).
7 To tenninate recording, press STOP.
Suggestion : Each time recording is stopped, that
point is automatically stored into nwnory, erasing the
previous one. You con px~gram the DA-38 to punch
out at that point, as discussed later, page 4 * 7,par-a-
wph (4).
When you have. the DA-38 drop out of record to
rewind or fast-forward too, that point is saved.
8 To prevent the tracks from accidentally erasing, press
the tracks’ associated REC FUNCTION switches off.
NOTES
l Youcannot change the samp/ing rate when record-
ing is inprogress.
. /fYoustart a new recording at the same timeas the
tape format from the end of the existing recording
(“assemble’?, the tape is recorded and formatted at
the previous sampling rate. When preparing to
record from the end of the previous take and to
continue to format the tape, first rewind the tape to
a formatted silence section. Avoid staffing record-
ing and formatting from a non-recorded and
unformatted blank section.
(2) REC FUNCTION-triggered Recording
l For the hookup, refer to a diagram shown in Section l if
necessary.
l Understand the Important Notices on the previous page.
-,
0 Adjust the mixer’s level controls or the output level of
the source unit so high as possible without causing
overscale reading on the DA-38’s meter.
0 Perfom steps I through 3 under the paragraph, Using
RECORD and PLAY.
Then, follow these steps.
1
2
3
Making sure that all the REC FUNCTION switches
are released, hold RECORD and press PLAY. The
tape will start playing and the RECORD button will
start blinking.
Press the REC FUNCTION switch for the track(s)
you want to record on. The pressed REC FUNCTION
switches’ associated LEDs will light solidly, and the
RECORD button the sane.
. If the ta.pe is write-protected, the deck goes into
Play mode.
To stop recording, press STOP.
4*2
SECTION 4:RECOROING
(3)Footswitch-controlledRecording
If youarerecordingaloneandaretoobusyplayingan
instrumentto pushtheswitches,theuseof theoptional remote footswitch(RC-30P) is really handy,
Thismethod of recordingis recommended especiallyfor
punching in andoutof record.Thepunch-in/out proce- dareis explainedlater, underthecorresponding heading.
l PlugtheRC-30P footswitchintotheREMOTE PUNCH-IN/OUT jackon therearof theDA-38. For
otherconnections, referto a hookup exampleshownin
Section1.
l PerformstepsI through5 undertheparagraph,Using
RECORD andPLAY.
Then,proceedas follows:
1 Pressthefootswitchandthetapewillstartplaying.
2 To startrecording,pressthefootswitchoncemore.
l If thetapeis write-protected,theDA-38doesnot
go intoRecord mode,andremainsin Playmode.
3 To stoprecording,pressSTOP.
4 To insure againstaccidentalerasure, presstheREC
FUNCTION switches off.
Suggestion: TheDA-38remembersbothtk record startpoint andtheendpoint ; andYOUCCVIpqq-amthe
unittodropintoandoutofrecordatthose points.For
&tails,set?page4 - 7, paragraph (4).
4-2. RecordingOigilal Input
Theprocedureis similarto thatforRecordingAnalog Input, withtheseexceptions:
l PresstheDIGITALIN switch.TheindicatorDIGITAL
IN willlighton thedisplay.
0 In themostcases, theDA-38is referencedto thesame
clockAs thesour&digital unit,so :
0 Plugtheclockfromthesource unitintotheWORD
SYNCIN jackon therearof theDA-38.
0 PresstheWORDIN switch,TheindicatorWORD
IN willlighton thedisplayto showthattheDA-38is
slaved to theexternal clock.
0 Whenrecordingfromthedigitalinput, thereis no need
of adjustingtherecordinglevel,
IMPORTANT
l Ifeitheroftwosamplingrateindicatorsblinkson
thedisplay,itindicates thata different sampling
ratethantheonepresentonthetapeiscomingin.
Then, w-formatthetapewiththecorrectsampling
rate* oruseanothertape.
l An‘?.d to” warningappearsonthedisplayifyour
digita/ source(DA-38/DA+?8) ordigita/ interface unit(/F-&?&?AE/fF-88SD)isnotcorrected totheDA-
38byusing theoptionalFWL38Dcable.
4-3
SECTION 4 : RECORDING
14-3. Punch In/Out Editing I
This section of the manual provides information on
rehearsal or trial punch in/out and actual punch in/out
procedures.
Quite often, it becomes apparent that the recorded mater-
ial contains a mistake or could be improved. One obvious
way to correct thisproblem is to x-record the entire track,
but, if the mistake is minor, this is not practical or neces-
sary. You can use the technique known as Punch-in or
Insert recording. This provides a way to re-record only a
small part of a track, thus covering the mistake, or to
record additional material on a blank section of a track,
augmenting the original material.
For smooth punch-ins (dropping into record) and punch-
outs (dropping out of record) we recommend you the use
of the optional RC-30P footswitch. This streamlines the
process and you can control the timing of punching in and
out with ease. Especially if you are recording alone and
are busy playing an instnnnent, it isreally handy.
The DA-38 has a Rehearsal function, allowing you to
make a trial punch in without actually recording on to
tape, And, when you are ready, you can “se an Auto
Punch-in/out function to have the deck actually drop into
record and drop out to play exactly at pre-selected points.
The DA-38 ensures seamless punch-ins and outs with a
built-in crossfade action. The crossfade time defaults to
IO milliseconds. If you want to change this time, refer to
paragraph 4-4.
Let’s say we’vediscovered a small error on track 2, here’s
how to fix it.
In Point Out Point
w Time
(I) Rehearsal
. Plug the mic or instrument as required intochannel 2.
1 Press the track 2’sREC FUNCTION switch.
The associated LED will start blinking to show that
track 2 isrecord-enabled.
,--X
2 Press the INSERT switch.
The associated LED will light to show that an Insert
Monitormode isenabled.
3 Press the RHSL switch. r-x
‘Ihe associated LED will start blinking to show that
the unit is inRehearsal Ready mode.
4 Press PLAY to start playing the tape.
5 When the point you want to punch in the retake is
reached, press RECORD.
That point is saved to memory ; the monitor is
switched from tape to input;and the RECORD button
is blinking.
4*4
SECTlON4: RECOROING
6 When the point where yo” want to punch out of
record is reached, press PLAY.
That point is saved to memory ; and the RHSL LED
that was blinking glows solid to show that the “nit is
now in Rehearsal mode,,
After about 3 seconds of play (this post-roll time is
adjustable, as discussed later), the tape will rewind,
automatically stopping at a point about 5 seconds
lower than the punch-in point (this pwmll time also
is adjustable, as discussed later).
n 7 To cycle over a seq”ence punching in and o”t, press
PLAY.
During Rehearsal mode, the monitor is automatically
switched from tape to input at the punch-in point and,
at the punch-out point, reverts to tape.
* If yo” decide to exit the Rehearsal mode, press
CLEAR. The RHSL LED will then turn off.
8 Repeat the rehearsal as many times as necessary. If
yo” are not satisfied with the c”rrent punch-in and o”t
point settings, first exit the rehearsal mode by press-
ing RHSL, then go back to step 3. Consider also the
possibilities explained under the next paragraph, (2)
Setting Punch I” and Out Points.
0 Auto Play Function : If yo” press PLAY during the
n autolocate process after p&roll, the PLAY button will
start brinking to show that the DA-38 will automatically
start playing when completing autolocation.
If yo” are “sing the optional RC-848 remote control
“nit and press its AUTO PLAY key, the trial punch-in
will automatically repeat over and over.
l If yo” are “sing the optional RC-30P footswitch, press
the footswitch in step 7, insteadof PLAY.
(2) Setting Punch In and Out Points
You cm set the punch in and o”t points in my of three
ways :
A. Perform a trialpunch-in recording in Reheaal mode,
as explained above.
B. Key in the desired points at men”s in Rehearsal
mode.
C. Perform a normal recording (as explained earlier, the
point yo” start recording from and the point yo” stop
recording are automatically stored into memory as
punch in and out points).
Punch in and out points yo” select by Method A or C can
be recalled from memory onto the display, and yo” can
trim them to frame acc”racy (Method B). Also, if the
necessary punch in and out points are known to yo” in
advance, yo” can directly enter them at men”s.
Follow these steps to control the punch in and out points
from nIe”“s :
f Check to see that the RHSL LED is lit. If it isn’t,press
the RHSL key two times and the LED will light.
2 Press SHIFT and the associated LED will stati blink-
ing to show that all the double function keys are
switched to offer their lower blue-labelled functions.
4-5
SECTiON4: RECORDING
3 Press MEMO I and the displaywill momentarily read
like thisbefore indicating the current punch in point.
4 You’ll notice that a period is blinking in the hours
column to show that you can key in the desired
number of hours using the A and V keys.
0 Each time you press MEMO 1, the blinking period
moves to the next cohmm (H, M, S, then F).
0 When no period in any column is blinking, the
hours, minutes, seconds and frame number change
all at once as you press the A or the V key.
l Tocleaxthedisplay to”fl0flflnflflfl”,hold the V
or the A key and press the other.
l You can enter any time from zero up to 23 hours,
59 minutes, 59 seconds, and 33 frames.
” u 0 F
5 Make sure that the entered punch in point is correct,
then press MEMO 2 and the display will momentarily
read like this before indicating the current punch out
point.
6 You’ll notice that a period is blinking in the hours
column, so enter the desiredhours usingthe A and V
keys.
l Each time you press MEMO 2, the blinking period
moves to the next column (H, M, S, then F).
l When no period in any column is blinking, the
hours, minutes, seconds and frame number change
all at once as you press the A or the V key.
l Toclearthedisplay to”~~~~~~~~“,hold~e V
or the A key and press the other.
. You can enter any time from zero up to 23 hours,
59 minutes, 59 seconds, 33 frames.
” u s F
7 To exit the punch in/out point setting mode, press
SHIFT. ‘I%edisplaywill be switched back to show the
ABS time. -
To audition the entered points :
l Pressing the LOC 1 key autolocates the tape to a
point 5 seconds (or user selected time) lower than
the entered punch in point,then press PLAY.
l Pressing the LOC 2 key autolocates the tape to a
point 5 seconds (or user selected time) lower than
the entered punch out point,then press PLAY.
PrePoint InPoint OutPhi
I I I I
I A
k.cl PWIJII I’
Time LO.22 ;;r&r;ll
Speaking of remembering :
The double function keys in the center of the unit
offer the upper black-lahelled functions when the
SHIFT LED isturned off.
When the SHIFT LED is blinking, they offer the
lower blwlabelled functions.
SECTlON4: RECOROING
(3) Auto Punch In and Out Autolocation
When you perform the following steps, the originaltake is
permanently lost..Repeat the rehearsal until yokeare sure
your performance and the in/out points are correct.
0 Pressing the LOC I key autolocates the tape to a point 5
seconds (or user selected time) lower than the punch in
point.
The DA-38 has an Auto punch in/out function and it drops
into and out of record exactly at the same points as during
rehearsal. Also, an Auto check function offers a prompt
audition of your retake.
0 Pressing the LOC 2 key autolocates the tape to a point 5
seconds (or user selected time) lower than the punch out
point.
I
1 Press the AUTO IN/OUT key and the associatedLED
will start blinking to show that the unit is in Auto
punch-in/out ready mode.
+%%
rl cl
* To exit the auto punch in/out mode, press CLEAR
and the AUTO IN/OUT LED will turn off.
2 Press PLAY to start the programed punch-in/out
Seq”.XlX.
After 3 seconds (or user selected time) of postroll, the
AUTO IN/OUT LED will glow solidand the tape will
rewind, stoppingat a point 5 seconds (or user selected
time) lower than the punch-in point.
3 Press PLAY to audition the result (“auto check”).
4
r-------Gizx----------;
If you are not satisfied with your performance and
want to try again, x-do from step 1.
(4) Punch In and Out at Points Captured on the
As mentioned earlier, when you start recording (with
RECORD + PLAY or with the optional footswitch), and
terminate recording, the start and the end points are auto-
matically saved to memory, so you can have retakes be
punched in and out at those rnexnorypoints (without pass-
ingthrough rehearsal).
32
1 Press AUTO IN/OUT and the associated LED will
start blinking to show that the unit is in Auto punch-
in/outmode.
2 Press LOC 1 and the tape will rewind, stopping at a
point 5 seconds (or user selected time) lower than the
point the original take started from,
* To exit the auto punch-in/out mode, press CLEAR
and the AUTO IN/OUT LED will turn off.
3 Press PLAY and, after preroll, the selected tracks will
automatically drop into and out of record at the sane
points 4s the previous take. After postroll, the AUTO
IN/OUT LED will glow solid and the tape will
rewind, stoppingat a point 5 seconds (or user selected
time) lower than the point where the unit dropped into
record.
SECTION 4 : RECOROING
14-4. Crossfade Time Setting I 14-5. Preroll Time Setting
Seamless punch in and out of record is ensured by a
crossfade action which is factory preset to 10 millisec-
onds. You can change this time up to 90 ms at a menu, in
10ins steps.
1 Press SHIFT and the associated LED will start blink-
ing to show that all the double function keys are
switched to offer their lower blue-labelled functions.
F!!!l
El
2 Press MENU to access a crossfade.menu, which looks
like this :
3 Enter the desired time using the A and V keys.
4 To exit the menu mode, press SHIFC The displaywill
be switched back to show the ABS time.
The DA-38 is factory preset to offer 5 seconds of preroll
up to punch in points. You can change the time up to S9
minutes 59 seconds, in 1 second steps, if you want to, as
Pm Point In Point
‘UPreroll Time
1 Press SHIFT and the associated LED will start blink-
ing to show that all the double function keys are
switched to offer their lower blue-labelled functions.
I ..A4 I
2 Press PRE ROLL. The time now appearing on the
display is an autolocation preroll time and not for
punch-in. (Autolocation preroll time is explained in
Section 6)
h
3 Press PRE ROLL once more and the display will now
show the current punch-in preroll time, like this :
4 Enter the desired preroll time using the A and V
keys.
If you hold the V key and press the A
key, the display is cleared to the factory preset
(“Pr.flflfl5.r h”).
5 Press SHIFT to exit the preroll time settingmode and
switch the displayback to show the ABS time.
SECTION 4 : RECOROING
14-6. Postroll Time Settino 4-7. Copyino Tracks
The DA-38 is factory preset to play for 3 seconds after
dropping out of record. Youcan change the time up to 59
minutes 59 seconds at a menu, in 1second steps.
Out Point
-
32
1 Press SHIFT and the associated LED will start blink-
ing to show that all the double function keys are
switched to offer their lower blue-labelled functions.
lEl
2 Press MENU to access a postroll menu, which looks
like this :
3 Enter the desired postroll time using the A and V
keys.
4 Press SHIFT to exit the menu mode and switch the
display back to show the ABS time.
The DA-38 hasa track matrix and you can assign any
sources (tracks or inputs as discussed below) to any loca-
tions, that is, to any tracks. So, for instance, you can
record input 1 on track 2 and copy track 8 to track 5,
simultaneously.
Here is an outline of the track copy procedure :
TRK COPY
+
Targettrack selection (REC FUNCTION)
+
Source selection (A / V)
+
RECORD + PLAY
PRECAUTIOA’S
l When the track copy function is disabled
(? r.c F oFF ” as the d&pay reads), you cannot
proceed to specify tracks or inputs,
l Even if a sowca and a target track are specified,
the track is not recorded unless the track’s REC
FUNCTION switch is pressed on.
. Simifarfy, even if a source and a target track are
specified, the source is not fed to the track when
the track copy function is disabled (‘f r.c F 0FF ,y.
4*9
SECTlON4: RECORDING
(1) Copying in Stereo Pairs
As an example, let’scopy tracks 3 and 4 to tracks 5 and 6
in stereo.
9 18 46
1 Press SHIFT and the associated LED will start blink-
ing to show that all the double function keys are
switched to offer their lower blue-labelled functions.
2 Press the TRK COPY key and the display will read
?r.cP OFP.
3 Press the A or V and the “t r.c F off ” will change
to “t r.c f on ”to show that the track copy function is
activated, the mK COPY LED being lit.
4 Youhave to specify target tracks before sourcetracks.
So press the REC FUNCTION switch of track 5 (one
of the target tracks in our example). The track’sLED
will start blinking and the display will change to look
like this :
5 Now, let’sproceed with source track selection.
Each time you press the A key, the rightmost display
will change in sequence, like this (” t” for input, and
“t ” for track) :
TheV key generates them inreverse order.
Since track 3 is one of the source tracks in our exam-
ple,have the display show “t 3”, like this :
6
7
8
9
. If you hold the A or the V key and press the
other, the display is switched back to show the
default source selection (” IS” in our example).
In a similar way, let’s specify another targetisource
pair.
To specify track 6 as a target track, press the track’s
REC FUNCTION witch, and the associated LED
will start blinking while the display will change to
looklike this :
T&get Track
Specify track 4 as a source track by means of the A
and V keys.
Toexit the track copy settingmode, press SHIFT. The
display will be switched back to show the ABS time.
The TRK COPY LED remains lit.
To start copying,holdRECORD and press PLAY.
Track 3 iscopied to track 5, and track 4 to track 6.
. If you are using two DA-38s, you can copy tracks
of one unit to tracks of another (discussed below)
while at the same time you can copy tracks within
one unit (as discussed above).
4.10
SECTION4:RECORDING
(2) Copying Tracks of One DA-38to Tracks of Another
AS EUI example,M’scopy track 2of first unit to track 1of second unit
9 8 275
.Hook up a&voDA-38 sync system.If necessary,refer to Section7.
l Be sure to connecttheunits by using theoptionalPW-
88Ddubbingcable.
WARNING
Each time youpress theAkey, therightmostdisplay
will change in sequence,like this (” I” forinput, and
“k ”fortrack) :
1Press theDIGITALIN switch on thesecond unit The
indicatorDIGITALIN will light on thedisplay.
@4w
l -iyc
2Press SHIPT on thesecond unit. TheassociatedLED
will start blinkingto show that allthedouble function
keys areswitchedto offer their lower blue-labelled
functions.
&
0
l
3Press theTRKCOPY keyon thesecond unit. The
displaywill read “b r.cF
ofF“.
4Press theAor the7keyon thesecond unit to change the. “off ” displayto “on“,
5Press theRECFJUNCTIONswitch fortrack 1on the
second unit. TheassociatedLEDwill start blinking
andthedisplaywill change to look like this :
6Select input 2by means of theAandVkeys. (Remember,tracks of thefirst unit are‘inputs’to the
second unit.)
The 7 keygenera&them in reverseorder.
l If youhold theAor theVkeyandpress theother, thedisplayis switchedback to show thedefault
source selectionc’ t /” in ourexample).
7Press SHIFT on thesecond onit to exit thetrack copy
seuing mode. TheSHIPT LEDwill mm offandthe
displaywill be switchedback to show theABStime.
8Hold RECORD andpress PLAY on thesecond unit
9Press PLAY on thefirst unit
Track 2of thefirst onit is copied to track 1of the
second unit.
l Youcanalso copy tracks of aDA-38 to other tracks of thesane unit (discussedin thepreviouspara- graph) while at thesame time making adigitalcopy
be&w, twoDA-38s.
T&getTrack
SECTlON4: RECOROING
(3) Using the Track Copy Capability as a Patch
Bay
Thetrack copy capability allows you to select sources and
tracks to record on, so you can record a specific input to
any tracks without going to the trouble of repatching the
input.
As an example, let’srecord analog input 2 to track 1,and
analog input 1to track 2.
9 j846
l Check to see that the DIGITAL IN indicator is notlit on
the display.If it is,press the DIGITAL IN switch to turn
off the indicator.
1 Press SHIFT and the associated LED will stat blink-
ing to show that all the double. function keys are
switched to offer their lower blue-labelled functions.
2 Press the TRK COPY key and the display will reads
?r,cP OFF,‘,
3 Press either the A or the V key to activate the track
copy function ; the “off ” display will change to
‘$0n I’,like this :
4 Press the REC FUNCTION switch for track 1 and
” ;” will show in the seconds column, like this :
5 Select input 2 (the source to record on track 1 in our
example) by means of the A and 7 keys.
Each time you press the A key, the rightmost display
will change in secluencelike this (” S” for input, and
“t ” for track) :
, ;-,2-(._)- ,T-<s-t \-t+(...)-t8
The V key generates those options in reverse oder.
0 If you hold either the A or the V key and press the
other, the dispslay will be switched back to show the.
default selection (’ 4[” in our example).
6
7
8
9
Press the REC FUNCTION switch for track 2. The
associated LED will stat blinking and “2” will show
inthe seconds column, like this :
Select input 1 (the source to record on track 2 in our
example) by means of the A and V keys.
Go on to the next step when the display looks like
this :
Press SHIFT and the associatedLED will turn off, the
display being switched back to show the ABS time.
Hold RECORD and press PLAY to start recording.
Input 1isrecorded on track 2 and input 2 on track 1.
l If, for example, you select input 2 in step 7, analog
input2 is recorded on tracks I and 2.
4.12
SECTlON4: RECORDING
(4) To Switch Off the Track Copy Mode
23
Press SHIFT and the associated LED will start blink-
ing to show that all the double function keys are
switched to offer their lower blwlabelled functions.
2 Press the TRK COPY key and the display will show
the last track copy setting (“kr.c P.? r :” for exam-
ple).
Depending on the last setting, the display will read
“kr.c F 0 n ” at this stage. If this is the case, skip to
step 4.
3 Press the TRK COPY key once more and the display
will read “kr.c P on Il.
4 Press either the A or the V key to change the “0n ”
display to “off “.
(5) Track Copy Settings Backed Up
Your settings for track copy are automatically saved to a
backup memory and are not erased when turning off
power : they become the default.
Also, if you press and hold the TRK COPY key (for 1
second or more), the display will show the current track
copy settingsas follows :
Display Settingfor
l T%etens of hours column Track I
l The units of hours column Track 2
l The tens of minutes column Track 3
l The units of minutes column Track 4
l The tens of seconds column Track 5
l The units of seconds column Track 6
l The tens of frames column Track I
l The units of frames column Track 8
A solidlylit period in any columns indicates a track of the
DA-38, and an extinguished period indicates an input.
For example :
In thiscase, track 1is selected by the user as the source of
track 2, and input 6 as the source of track 5, the remaining
tracks being left alone.
SECTION 4 : RECORDING
14-8. Ditherina the Re-wantization Noise 1
The DA-38 has a 18 bit A/D converter, a quantim for
changing analog data into itsdigital equivalent,
The DA-38 can also receive digital data of up to 24 bits,
but it records and plays using I6 bit patterns,which means
that it is necessary to further convert the 18or 24 bit data
into I6 bit data, a process called re-quantization.
The simplest solution may be rounding of the data, which
neglects data past the 16thbit.
This rounding ma.yproduce noise correlated to the origi-
nal input signal, because of the difference in resolution
between 18/24bit data and 16bit data.
The dithering process overcomes re-quantization noise by
masking it with a low-level random signal (a kind of
noise).
The DA-38 is designed to allow you to monitor the input
with as high a definition as possible, so the dithering
process takes place only when the input signal is actually
recorded onto tape. The effect of dithering is thus pwxp-
tible only on playback.
‘l%editheringfunction is enabled or disabledin a menu, as
follows :
2
3
4
Access the dither n~enuby pressing MENU as many
times as necessary,which looks like “d tk h. off “.
Press either the A or the V key and the “0f F ” will
change to “0n “.
Press SHIFT and the associated LED will turn off, the
display being switchedback to show the ABS time.
l To witch off the dither,change the “0n “display
to “0f f ”by means of either A or V.
32
1 Press SHIFT and the associated LED will start blink-
ing to show that all the double function keys are
switched to offer their lower blue-labelled functions.
4* 14

Other manuals for DA-38

3

Other Tascam Voice Recorder manuals

Tascam DR-05 User manual

Tascam

Tascam DR-05 User manual

Tascam DR-701D User manual

Tascam

Tascam DR-701D User manual

Tascam DR-07 Manual

Tascam

Tascam DR-07 Manual

Tascam DR-07MKII User manual

Tascam

Tascam DR-07MKII User manual

Tascam DA-78HR Guide

Tascam

Tascam DA-78HR Guide

Tascam DR-701D User manual

Tascam

Tascam DR-701D User manual

Tascam DR-05 User manual

Tascam

Tascam DR-05 User manual

Tascam AUDIO RECORDER User manual

Tascam

Tascam AUDIO RECORDER User manual

Tascam DR-08 User manual

Tascam

Tascam DR-08 User manual

Tascam DR-22WL User manual

Tascam

Tascam DR-22WL User manual

Tascam DR-05 User manual

Tascam

Tascam DR-05 User manual

Tascam DR-07 User manual

Tascam

Tascam DR-07 User manual

Tascam DR-1 User manual

Tascam

Tascam DR-1 User manual

Tascam DS-D98 User manual

Tascam

Tascam DS-D98 User manual

Tascam DR100 MkII User manual

Tascam

Tascam DR100 MkII User manual

Tascam DR-07 User manual

Tascam

Tascam DR-07 User manual

Tascam dr-44wl User manual

Tascam

Tascam dr-44wl User manual

Tascam DR100 Mk3 User manual

Tascam

Tascam DR100 Mk3 User manual

Tascam MMR-8 User manual

Tascam

Tascam MMR-8 User manual

Tascam DR-05 User manual

Tascam

Tascam DR-05 User manual

Tascam DA-98HR User manual

Tascam

Tascam DA-98HR User manual

Tascam DV-RA1000HD User manual

Tascam

Tascam DV-RA1000HD User manual

Tascam DR-100MKIII User manual

Tascam

Tascam DR-100MKIII User manual

Tascam DR-10L User manual

Tascam

Tascam DR-10L User manual

Popular Voice Recorder manuals by other brands

Sony ICD-35 - Ic Recorder Specifications

Sony

Sony ICD-35 - Ic Recorder Specifications

Ohkura VM7000A instruction manual

Ohkura

Ohkura VM7000A instruction manual

Philips DPM 9220 user manual

Philips

Philips DPM 9220 user manual

APAR AR236 user manual

APAR

APAR AR236 user manual

Panasonic RRQR400 - IC RECORDER operating instructions

Panasonic

Panasonic RRQR400 - IC RECORDER operating instructions

OpenEye E-Series quick start guide

OpenEye

OpenEye E-Series quick start guide

Inter-m PV-6232A Operation manual

Inter-m

Inter-m PV-6232A Operation manual

Aiwa IC-M60 Service manual

Aiwa

Aiwa IC-M60 Service manual

Sony ICD-UX512F quick start guide

Sony

Sony ICD-UX512F quick start guide

Philips VoiceTracer DVT6010 user manual

Philips

Philips VoiceTracer DVT6010 user manual

Olympus WS-520M manual

Olympus

Olympus WS-520M manual

Sony ICD-BX112 Specifications

Sony

Sony ICD-BX112 Specifications

Yamaha D24 Service manual

Yamaha

Yamaha D24 Service manual

Oregon Scientific VR399 user manual

Oregon Scientific

Oregon Scientific VR399 user manual

Sony ICD-B200 operating instructions

Sony

Sony ICD-B200 operating instructions

Olympus DS 30 instructions

Olympus

Olympus DS 30 instructions

Olympus DS-3300 quick start guide

Olympus

Olympus DS-3300 quick start guide

T&D RTR501B user manual

T&D

T&D RTR501B user manual

manuals.online logo
manuals.online logoBrands
  • About & Mission
  • Contact us
  • Privacy Policy
  • Terms and Conditions

Copyright 2025 Manuals.Online. All Rights Reserved.