Taymor 32-F218 User manual
INSTALLATION INSTRUCTIONS
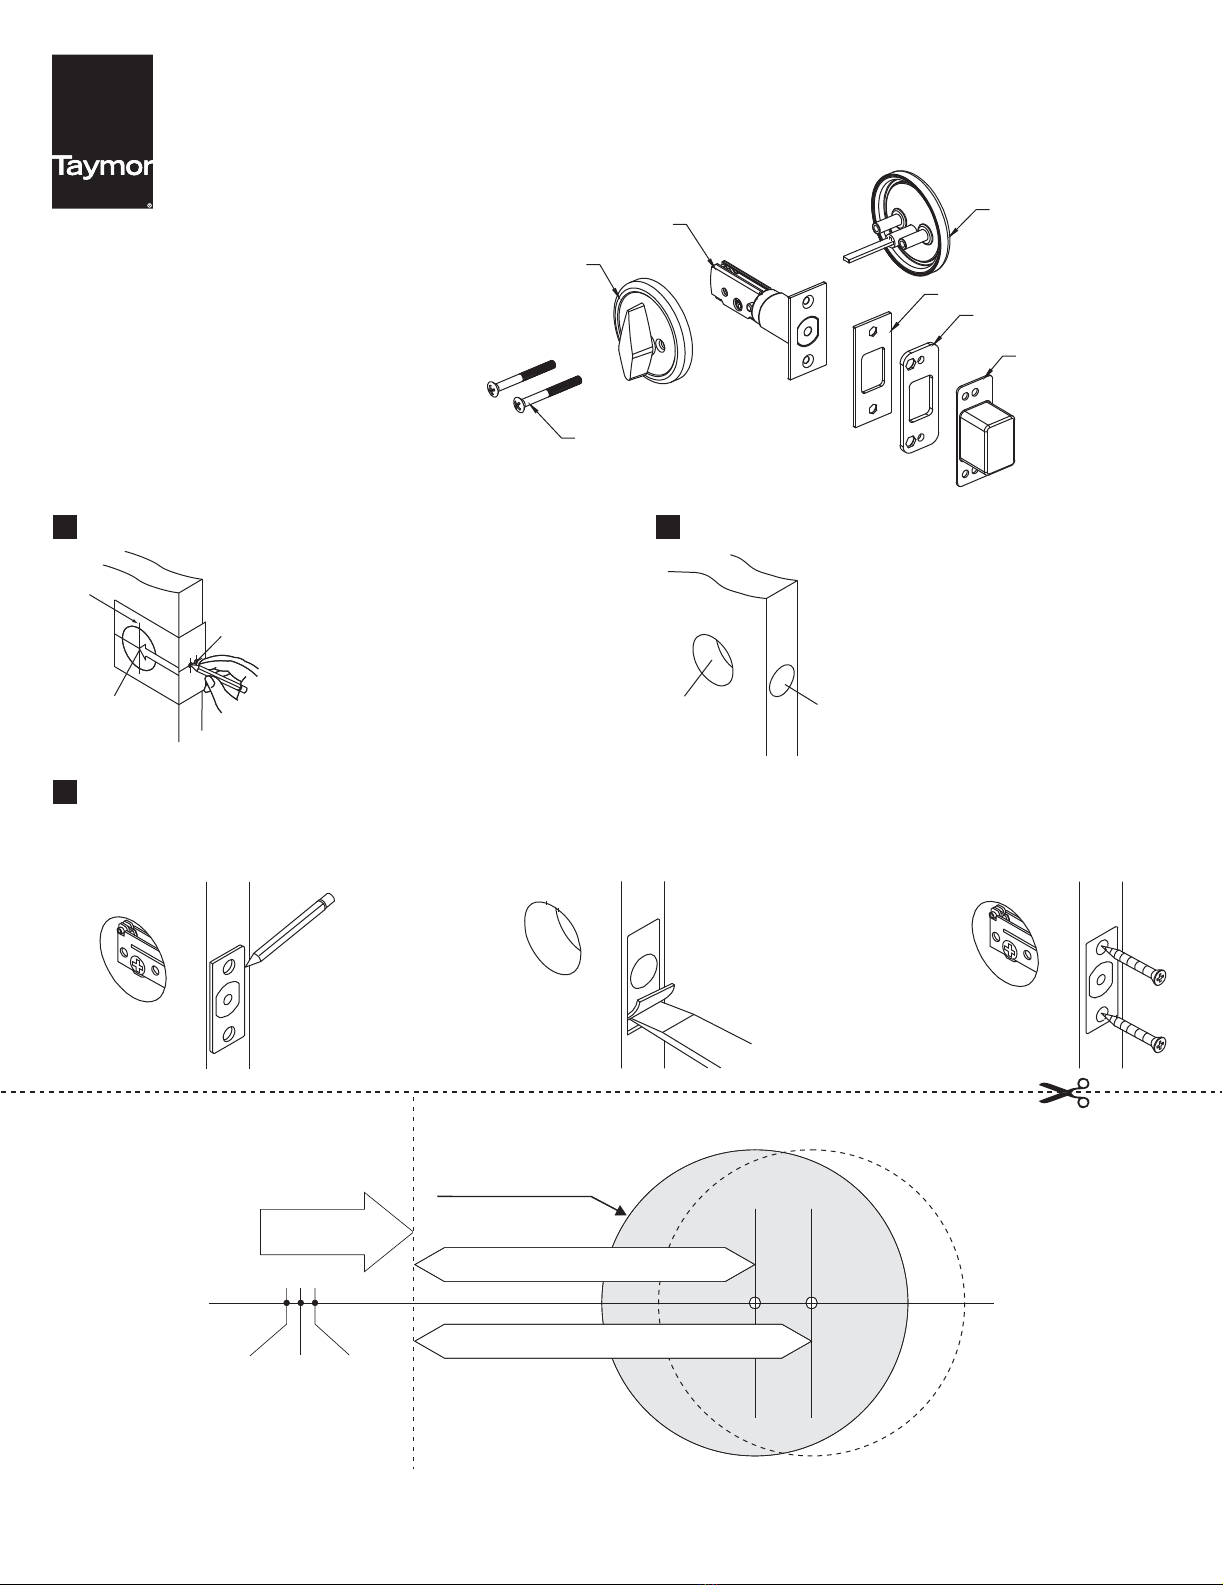
32-F218 / SINGLE SIDED COMMUNICATING DEADBOLT
For use on doors 1-3/8” to 1-3/4” (35-45 mm) thick
Tools required for new installation:
• Phillips head screwdriver
• 2-1/8” (54 mm) hole saw
• 1” (25.4 mm) drill bit
• Chisel
Tools required for replacement installation:
• Phillips head screw driver
THUMB TURN
ASSEMBLY
MOUNTING
SCREWS
DEADBOLT
BLANK PLATE
STRIKE
WOOD FRAME
REINFORCER
DUST BOX
1MARK DOOR
Measure center line of lock; height as
desired from finished floor. Select 2-3/4”
or optional 2-3/8” backset, fold and apply
template to interior side of door and mark
center of door as indicated on template.
Mark center hole on door face through
guide on template.
2DRILL HOLES
Drill 2-1/8” (54 mm) hole through door face as
marked for lockset. (It is recommended that
holes be drilled from both sides on wood doors
to prevent splitting.) Drill 1” (25.4 mm) hole in
center of door edge for latch.
CENTER LINE
MARK FOR 2-1/8”
(54 mm) HOLE
ON DOOR FACE
MARK FOR
1” (25.4 mm)
HOLE IN
DOOR EDGE
2-1/8” (54 mm)
HOLE 1” (25.4 mm)
HOLE
3INSTALL DEADBOLT
A. Insert latch in hole, keeping it parallel to face of door. Mark outline of latch face plate and remove latch.
B. Chisel 1/8” (3 mm) deep or until latch plate is flush with door edge.
C. Insert latch and tighten to the door using #8 screws.
DOOR EDGE DOOR SIDE
TEMPLATE
FOLD HERE
ON DOOR EDGE
Ø2-1/8” (54 mm) HOLE
2-3/8” (60 mm) BACKSET
2-3/4” (70 mm) BACKSET
Make 1” (25.4 mm) hole at center of door edge
45 mm
(1-3/4”) 40 mm
(1-9/16”) 35 mm
(1-3/8”)
A. B. C.
TEMP
LATE

INSTALLATION INSTRUCTIONS (continued)
32-F218 / SINGLE SIDED COMMUNICATING DEADBOLT
4INSTALL STRIKE
Close door. Locate strike in
jamb and center line of strike.
Open door and extend line to
door stop. Measure half of door
thickness plus 1/8” from door
stop. Vertically mark centerline
for strike.
CENTER LINE
5INSTALL THUMBTURN ASSEMBLY AND BLANK PLATE
Insert torque blade horizontally into deadbolt latch. Crank until indicator
assembly is flush with the door face. Mate the thumbturn assembly with the
torque blade on the indicator assembly. Insert the screws through the holes of
the thumbturn assembly and latch body. Tighten the screws to the threaded
posts of the blank mounting plate. Tighten the assembly so the complete
assembly is tight to the door.
JAMB
A.
Drill (2) 1” (25.4 mm) holes 1-1/4” (31.7 mm) deep
in door jamb, 5/16” (8 mm) above and 5/16” (8 mm)
below horizontal center line.
CAUTION:
Hole must be drilled a full 1-1/4” (31.7 mm) deep
to ensure proper functioning.
B.
Insert the strike and
tighten to the frame
with #8 screws.
C.
TORQUE BLADE
THUMB TURN
ASSEMBLY
BLANK
PLATE
Other Taymor Lock manuals


Popular Lock manuals by other brands


schmersal
schmersal AZM300Z-I2-ST1P2P-T-DU Instructions for assembly operation

COMPX
COMPX TL-37 Dimensional drawing

Schlage
Schlage LINK FE599 installation instructions

Gartner
Gartner GAT Smart.Lock 7001 quick start guide

Meccanica Fadini
Meccanica Fadini ZERO.K quick start guide

Sandleford
Sandleford PKSS70 operating instructions


