TBC DPI1K User manual

CONTENTS:
WARNING INFORMATION ................................................................................................... PAGE 2
OVERVIEW .............................................................................................................................. PAGE 3
OPERATION ..................................................................................................................... PAGES 4 -7
TROUBLESHOOTING ..................................................................................................PAGES 8 - 10
USER
GUIDE
DPI Rev.1.0
CONTENTS:

PAGE 2
Safe use of the system is possible only when the user manual is read completely and the
instructions contained are strictly observed.
Failure to comply with instructions marked with the ”NOTICE” symbol may result in serious
damage to the system or one of its components.
Read all instructions before using this product.
Important safety information on TBC®products can be found under the following headings:
DANGER - Failure to comply with these instructions will result in severe personal
injury.
WARNING - Failure to comply with these instructions may result in severe
personal injury.
CAUTION - Failure to comply with these instructions can result in minor personal
injury.
NOTICE - Failure to comply with these instructions can result in property damage.
WARNING
• This appliance can be used by children aged from 8 years and by persons with
reduced physical, sensory or mental capabilities or lack of experience and
knowledge if they have been given supervision or instruction concerning use of
the appliance in a safe way and understand the hazards involved.
• Children shall not play with the appliance. Cleaning and user maintenance shall
not be made by children without supervision.
Only for US and Canadian markets
• Persons who do not have the necessary experience or knowledge of the product/
products must not use the product/products. Besides, persons with reduced
physical, sensory or mental abilities must not use the product/products, unless they
are under surveillance or they have been thoroughly instructed in the use of the
apparatus by a person who is responsible for the safety of these persons.
• Moreover, children must be under surveillance to ensure that they do not play with
the product.
• It is the operator’s responsibility to ensure that there is free space for the
application to move without risk for the operator or bystanders before operating
the application.
CAUTION
Load on the table
Risk of injury to persons and of malfunction
• Do not overload the frame.
• Place heavy load centrally on the desk.
• Do not use the desk as a work bench.
• Do not use the frame for lifting persons.
• Do not stand on the desk while it is driving up or down.
IMPORTANT SAFETY INFORMATION - READ AND SAVE

PAGE 3
DPI1K DPI1C
• Up/down drive • Up/down drive
• Up to four favorite positions
• Bluetooth®
• Display
Desk Connect™ App
• Up/down drive
• Displays actual height
• Up to four favorite positions
• Automatic connection to desk
• Possibility to enable automatic drive
• Possibility to enable keylock
• Works via Bluetooth Low Energy Technology
• Available for iOS and Android smart phones
PRODUCTS
NOTE:
This user guide is only in reference
to operation of the DPI controllers.
For detailed assembly instructions,
including how to attach the controller
to your console, please consult the
respective assembly guide(s) or email

PAGE 4
Operate the DPI by tilting it.
1. Tilt and hold up DPI to drive desk up, press and hold down DPI to drive desk down.
2. Release DPI when you have reached your requested position.
Figure 1 Tilt and hold the DPI to drive the desk up
Figure 2 Press and hold the DPI to drive the desk down
If favorite positions have been saved and automatic drive is enabled:
Simply double-tap up or down to drive the desk to a favorite position.
Figure 3 Double-tap the DPI to drive the desk to a pre-set favorite position
DPI1C only:
OPERATION

PAGE 5
Settings mode (accessible via the DPI)
The settings mode of the DPI1C is primarily meant for installers when installing the system,
and for users who do not use the Desk Connect™ App.
End users should not mix the ways to set up/congure the DPI but use either the
Desk Connect™ App or the DPI settings mode.
If you set up the DPI1C via the settings mode and then connect to the Desk
Connect™ App, favorite positions and units set in the app will override the favorite
positions and units selected via the DPI settings mode.
Via the settings mode of the DPI1C you can access the following menus:
• HEIGHT
• UNITS
• FAV. POS.
• LIMITS
• RESTORE
• EXIT
The setup menu
1. To access the settings mode, press the connect button and, at the same time, tilt the
paddle down for 3 seconds.
2. Tilt the paddle up or down to scroll through the menus.
The settings mode is identied by the icon in the upper left corner of the display.
3. Press the connect button to select a menu/setting.
After 30 seconds of inactivity, the DPI automatically exits the setup menu.
Height
The rst menu is ‘HEIGHT’. If the height shown in the display is not correct, it can be
adjusted via this menu.
1. Measure the height from the oor to the tabletop.
2. Press the connect button to enter the menu.
3. Tilt the paddle up or down to adjust the displayed height.
4. Press the connect button to save the new height.
Units can be changed in the ‘UNITS’ menu.
Revisit your favorite positions if you change the desk height.

PAGE 6
Units
The second menu is ‘UNITS’. In this menu you can change the height unit.
1. Press the connect button to enter the menu.
2. Tilt the paddle up or down to scroll through the options ‘CM’, ‘MM’ and ‘INCH’.
3. Press the connect button to save the selected option.
If the desk is connected to the Desk Connect™ App, the units set in the app will
override the units selected via the DPI settings mode.
Favorite positions
The third menu is ‘FAV. POS’. In this menu you can set your favorite positions.
1. Press the connect button to enter the menu.
2. Tilt the paddle up or down to reach the desired favorite position, the option to clear
all set favorite positions, or ‘CANCEL’ to leave the menu and return to the settings
menu.
3. When the desired option is displayed, press the connect button.
4. Adjust the desk to the preferred height.
5. Press the connect button to select the height and then again to save the favorite
position.
In case you do not want to save this position as a favorite, tilt the paddle and then
press the connect button to cancel and return to the favorite positions menu.
If the desk is connected to the Desk Connect™ App, the favorite positions set in the
app will override the favorite positions set via the DPI settings mode.
Deleting favorite positions
In the favorite positions menu, tilt the paddle up or down to get to menu ‘CLR FAV.’
In this menu you delete all set favorite positions.
1. Tilt the paddle up or down to scroll to the ‘CLR FAV.’ menu.
2. Press the connect button to select this option and then again to conrm deletion of
all favorite positions.
In case you do not want to delete the favorite positions, tilt the paddle and then
press the connect button to cancel and return to the ‘CLR FAV.’ menu.
PAGE 7
Limits
The fourth menu is ‘LIMITS’. In this menu you can change the upper and lower desk height
limits to prevent collision with for example a shelf above the desk or a cabinet placed
under the desk.
1. Press the connect button to enter the menu.
2. Tilt the paddle up or down to reach either the ‘LOWER’ or the ‘UPPER’ limit menu,
the option ‘CLEAR LIM.’ to clear all set limits, or ‘CANCEL’ to leave the menu and
return to the settings menu.
3. When the desired option is displayed, press the connect button.
4. Adjust the desk to the preferred height.
5. Press the connect button to select the height and then again to set the limit.
In case you do not want to save this position as a favorite, tilt the paddle and then
press the connect button to cancel and return to the favorite positions menu.
Restore
The fth menu is ‘RESTORE’. In this menu you can restore the DPI to its factory default
settings.
1. Press the connect button to enter the menu.
2. Press the connect button again to conrm.
In case you do not want to restore the DPI, tilt the paddle and then press the connect
button to cancel and return to the restore menu.
Exit
The last menu is ‘EXIT’. From here you can exit the settings menu when all settings are done.
1. Press the connect button to exit the settings menu.
After 30 seconds of inactivity, the DPI automatically exits the setup menu.
Downloading the app
The app is connected to the desk via Bluetooth®Low Energy technology
integrated in the DPI1C.
The app is called ‘Desk Connect’ and it has the following app logo:
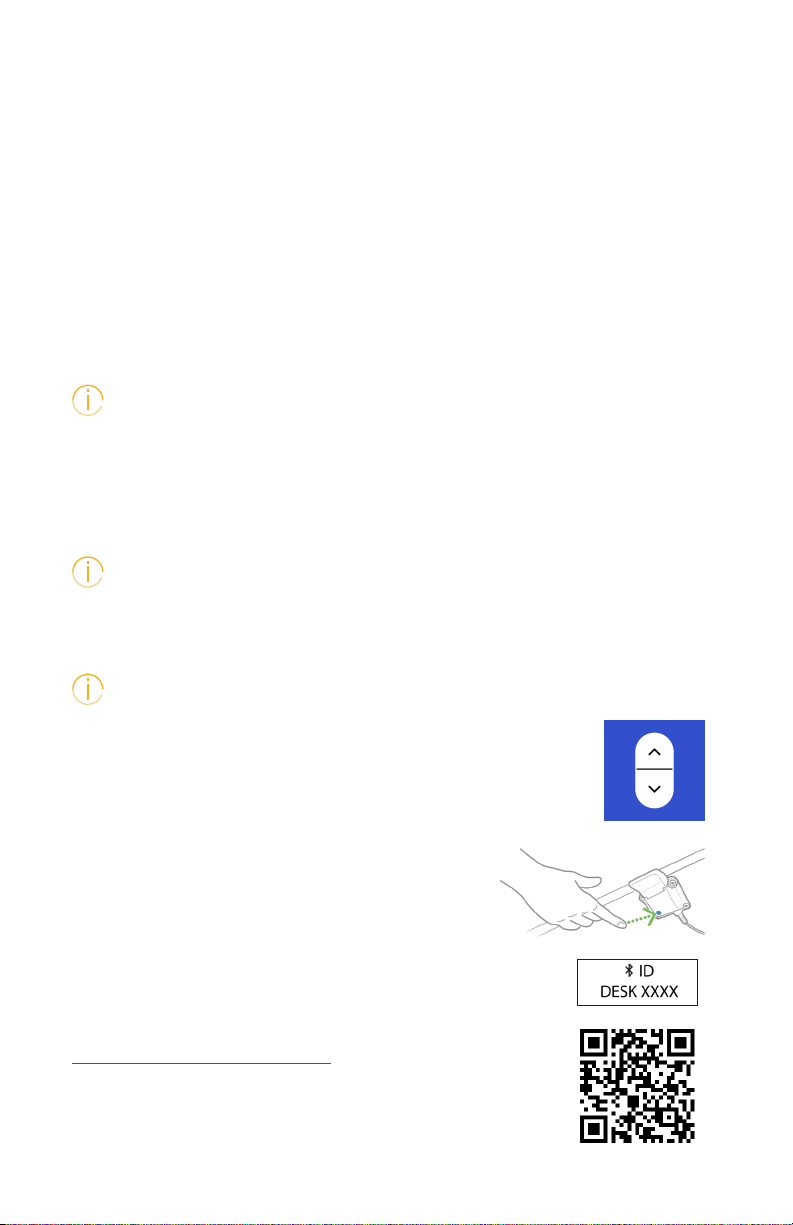
Onboarding ow
To connect the app and the desk, set the DPI in pairing
mode by pressing the connect button on the bottom of
the DPI for two seconds.
Need more help with the app?
Download the complete user guide here
Use the QR Code or follow this link:
To indicate that the DPI is in pairing mode, the display shows the ID:
All IDs are named ‘DESK’ followed by a four-digit number.
https://www.tbcconsoles.com/DPI-user-guide.pdf

PAGE 8
2
LINAK DESKLINE Troubleshooting
Glossary of Common Terms
• Components
» Desk leg (DL) – The lifting columns, typically with powder coated steel profiles, responsible for lifting the working load of
the application.
» Control box (CBD6S) – Both the computer and power supply of the system.
» Desk panel (DP) – The user interface. Depending on the model, it is used to activate the application, set memory
positions, display the height, display error codes, connect to mobile apps, and give reminders to the user.
» Motor cable – Transmits low voltage power (18-39 VDC) from the control box to the desk legs, and also transmits PIEZO
signals when available from the desk leg.
» Mains cable – Transmits high voltage power (120 VAC in US and Canada) to the control box.
• Other
» Initialize – Procedure to reset all desk legs to the fully retracted position so that the control box knows where they are.
» Reference – Any group of desk legs that run in parallel when an Up or Down command is sent to the control box. It is
possible to have a custom control box configuration that allows for more than one Reference. [Example: Two (2) desk
legs on Reference #1 (Channels #1 and #2) to lift a work surface, and one (1) LA31 on Reference #2 (Channel 3) to adjust
a monitor array.]
Standard Troubleshooting Procedures
P1 – Initialize the control box (“reset”)
Note: This is commonly the solution when a complaint is that a desk will move down but not up. When a control box requires
initialization, this is how the system is programmed to behave.
STEP 1. Hold Down button on desk panel to ensure the desk is retracted to its lower limit (whether it’s the fully retracted hard
stop, or a configured lower limit).
STEP 2. Briefly release Down
STEP 3. Press and hold Down for 5 seconds, wait until all desk movement has stopped, then release
a. If initialization is successful, you should see a slight up/down “handshake” movement of the desk legs
b. If you have a desk panel with display, you should also see E01 during this part of the procedure.
P2 – Check all cable connections
STEP 1. Mains cable, connected to both the control box and power outlet.
STEP 2. All motor cables, connected to both the control box and desk leg.
a. Assuming a standard control box configuration, these must be connected in channels 1 and 2, or channels 1, 2 and
3 for a 3-leg table. They can’t be connected in channels 1 and 3 or 2 and 3 unless there is a configuration on the
control box specifying this arrangement.
STEP 3. Desk panel cable, connected to the control box in either port A1 or A2 (doesn’t matter which)
Desk panel
Desk leg
Motor cable
Control box
Mains cable
Desk diagram:
TROUBLESHOOTING
3
Symptom Procedure
System will move down but not up 1. Initialize (P1)
System unresponsive (no power to
display with any button is pressed).
If any of these steps activates the
digital display, initialize the system
(P1).
1. Check mains cable connection
2. Test power outlet using another device (lamp, phone charger, etc.)
3. Plug in a new switch and test
4. Connect all existing cables to a new control box and test
System is powered, but will not
initialize
1. Try pressing and releasing the down button a few times before pressing and holding
for 5 seconds.
2. Also, be aware if the control box has a special configuration: If the desk is
programmed with a lower stroke limit, so as to avoid a collision with something like
a file cabinet, it is possible that it also has a custom, longer Forced Initialization
Time. This is the time required to hold Down before initialization begins. Sometimes
this is 10 seconds or longer.
3. If you have a standard control box without a special configuration (i.e. “Plug &
Play”), try to initialize each leg in Channel 1 by itself, with nothing else plugged into
the motor channels on the control box. Also, swap the motor cables so that a
different motor cable is used to initialize Channel 1 by itself. The problem could be a
faulty desk leg or a faulty motor cable.
Channel-specific error (Ex: E41 –
Channel 1 overload) – Everything
except PIEZO errors (E59-E63)
1. Swap the motor cable connections at the control box (Motor cable #1 from channel
1 to 2, motor cable #2 from channel 2 to 1). If It remains E41, there could be a
problem with the application (load or obstruction on one side) or a bad control box.
If the error changes to E42, go to step 2.
2. Swap the motor cable connections at the desk legs, so that the leg that was
originally connected to Channel 1 is back in Channel 1, but with the motor cable
that was originally connected to Channel 2. If it remains E42, it is most likely a bad
motor cable, now connected to Channel 2. If it goes back to E41, it is most likely a
bad desk leg, now connected to Channel 1.
P3 – Check for obstructions
STEP 1. Check under, above and on the sides of the desk for any obstructions that could prevent movement in either direction.
The next two procedures (P4 and P5) are for a two leg desk system. The same concepts can be used for a three leg system using
Channel 3 and so forth.
P4 – Check for faulty component(s) WITH error codes (digital display on Desk Panel, or on app via Bluetooth)
Notes: Check the error code list in the appendix of this troubleshooting guide for assistance. The code should read E##. Some
error codes are channel-specific which can help pinpoint the problem.
TROUBLESHOOTING

PAGE 9
3
Symptom Procedure
System will move down but not up 1. Initialize (P1)
System unresponsive (no power to
display with any button is pressed).
If any of these steps activates the
digital display, initialize the system
(P1).
1. Check mains cable connection
2. Test power outlet using another device (lamp, phone charger, etc.)
3. Plug in a new switch and test
4. Connect all existing cables to a new control box and test
System is powered, but will not
initialize
1. Try pressing and releasing the down button a few times before pressing and holding
for 5 seconds.
2. Also, be aware if the control box has a special configuration: If the desk is
programmed with a lower stroke limit, so as to avoid a collision with something like
a file cabinet, it is possible that it also has a custom, longer Forced Initialization
Time. This is the time required to hold Down before initialization begins. Sometimes
this is 10 seconds or longer.
3. If you have a standard control box without a special configuration (i.e. “Plug &
Play”), try to initialize each leg in Channel 1 by itself, with nothing else plugged into
the motor channels on the control box. Also, swap the motor cables so that a
different motor cable is used to initialize Channel 1 by itself. The problem could be a
faulty desk leg or a faulty motor cable.
Channel-specific error (Ex: E41 –
Channel 1 overload) – Everything
except PIEZO errors (E59-E63)
1. Swap the motor cable connections at the control box (Motor cable #1 from channel
1 to 2, motor cable #2 from channel 2 to 1). If It remains E41, there could be a
problem with the application (load or obstruction on one side) or a bad control box.
If the error changes to E42, go to step 2.
2. Swap the motor cable connections at the desk legs, so that the leg that was
originally connected to Channel 1 is back in Channel 1, but with the motor cable
that was originally connected to Channel 2. If it remains E42, it is most likely a bad
motor cable, now connected to Channel 2. If it goes back to E41, it is most likely a
bad desk leg, now connected to Channel 1.
P3 – Check for obstructions
STEP 1. Check under, above and on the sides of the desk for any obstructions that could prevent movement in either direction.
The next two procedures (P4 and P5) are for a two leg desk system. The same concepts can be used for a three leg system using
Channel 3 and so forth.
P4 – Check for faulty component(s) WITH error codes (digital display on Desk Panel, or on app via Bluetooth)
Notes: Check the error code list in the appendix of this troubleshooting guide for assistance. The code should read E##. Some
error codes are channel-specific which can help pinpoint the problem.
TROUBLESHOOTING

PAGE 10
4
P5 – Check for faulty component WITHOUT error codes (no digital display on Desk Panel, no Bluetooth)
Symptom Procedure
System will move down but
not up 1. Initialize (P1)
System will not initialize.
OR
System won’t complete the full
range of motion.
– After each of these steps,
attempt to initialize (P1).
1. Check mains cable connection. Test power outlet using another device (lamp,
phone charger, etc.)
2. Plug in a new switch.
3. Connect all existing cables to a new control box.
4. Try pressing and releasing the down button a few times before pressing and
holding for 5 seconds.
Symptom Procedure
Desk is uneven 1. Initialize the desk. If both legs begin to run down, complete the initialization. If only
one leg moves, stop and move to Step 2.
2. Check motor cable connections. Check to ensure motor cables are not pulled during
movement. With a standard, Plug & Play control box, it’s possible that only one leg
is connected, and connected to Channel 1. In this case, it will initialize and run
Channel 1 only. If there is only one leg but it’s connected to Channel 2, it will not
initialize.
3. If a motor cable was disconnected, try initializing again.
4. If unsuccessful, connect the desk leg from Channel 2 into Channel 1, with nothing in
Channel 2, and initialize.
5. Try initializing the same leg that’s in Channel 1, but with a different motor cable. If it
still won’t initialize, replace the desk leg.
5
5. Also, be aware if the control box has a special configuration: If the desk is programmed
with a lower stroke limit, so as to avoid a collision with something like a file cabinet, it is
possible that it also has a custom, longer Forced Initialization Time. This is the time
required to hold Down before initialization begins. Sometimes this is 10 seconds or longer.
6. If you have a standard control box without a special configuration (i.e. “Plug & Play”),
try to initialize each leg in Channel 1 by itself, with nothing else plugged into the motor
channels on the control box. Also, swap the motor cables so that a different motor cable
is used to initialize Channel 1 by itself. The problem could be a faulty desk leg or a faulty
motor cable.
Desk is uneven 1. Desk is uneven (P4)
Appendix
What is the Control Box Thinking?
There are many clever procedures, checks and measurements performed in the control box. Here is a brief description of
what the control box is trying to accomplish while it is activating an application:
• Safe activation of the application
o Parallel, even movement of all desk legs in the application is critical.
» The control box does not directly know the position of each desk leg. Instead, the position of each leg
is constantly calculated via Hall pulses from each motor. The legs on a single reference are not
allowed to be more than +/- 5 Hall pulses out of sync. For a standard DL, this amounts to +/- 0.55 mm.
» Motor cable disconnections are also detected as errors.
o If PIEZO technology is present in the desk leg, the control box monitors for PIEZO “collision” signals from
each channel. When a PIEZO signal is sensed, movement is immediately stopped and, if there is room, the
system is ran in the opposite direction a small distance.
o Anytime the control sees an incomplete signal, or more than one signal (multiple keys pressed, multiple
desk panels activated at the same time), an error is determined and no movement is allowed at that
moment. This is to prevent an action of movement that is not intended by the user.
• Protection from equipment damage
o Internal temperature of the control box is monitored.
o Maximum current draw for each motor channel, as well as the system as a whole, is measured. When the
current exceeds an allowable limit, an error is presented.
Troubleshooting and Error Code help
Download the Troubleshooting guide here
Use the QR Code or follow this link:
https://www.tbcconsoles.com/DPI-troubleshooting-guide.pdf
TROUBLESHOOTING


170 Rodeo Drive
Edgewood, NY 11717, USA
Phone 631.293.4068
Toll Free 888.CONSOLE
tbcconsoles.com
All specications and other information contained in this installation guide are based on the latest product in-
formation available at the time of printing. TBC Consoles is dedicated to product improvement and therefore
reserves the right to make changes to the specications of this and other products.
©TBC Consoles. Not to be reproduced wholly or in part without specic written permission from TBC Consoles.
Thank you for your business. We hope your experience using our product is excellent, and
we can’t wait to see you again soon. We welcome your input on this guide, our products or
TBC Consoles provides a robust warranty on all our products, however, incorrect installation
could void this warranty. Save time by engaging with our expert installation team, contact
All patterns, designs, and specications are the intellectual property of TBC Consoles and
may not be reproduced without prior written consent.
These assembly instructions are meant as a guide. As we provide custom consoles based
on a modular standard design, it is not possible to cover all possible customizations. In
the event that a customization applies for your project beyond this guide then a detailed
drawing or additional instructions will be provided.
This manual suits for next models
1
Table of contents
Other TBC Automobile Accessories manuals

Popular Automobile Accessories manuals by other brands

Sports Stop Lights
Sports Stop Lights Longhorn Third Brake Light installation instructions

Ironman4x4
Ironman4x4 BBCD115 installation instructions

OMNISTOR
OMNISTOR Omnibike Sport 2 Doors installation instructions

travall
travall TDG 1535 Fitting instructions

HaWeKo
HaWeKo HYM065 installation manual

Cruz
Cruz Evo Rack Pro P30-170 Assembly instructions


