TDC Netopia User manual

January 2010
User Guide

3
With this guide you can easily install your ADSL router with integrated modem
and congure your PC correctly to start using your ADSL broadband connection.
In the box, you will nd:
• A Netopia 3347 (PSTN) or Netopia 3357 (ISDN) router
• An Ethernet cable with a plastic connector of the RJ45 type for connection to
Ethernet HUB/switch or PC
• An RJ11 phone cable for connection to splitter
• A black power cable and transformer
In connection with new service establishments, the following has also been sent
to you:
• A splitter
• A phone plug
• An RJ11 telephone cable for connection to splitter
The instructions cover the TDC HomeDuo, TDC HomeTrio, TDC Business Broad-
band, TDC Broadband Professionel and Wireless (the wireless functionality)
products.
In the brochure, which is sent out together with the order conrmation, you will
nd a detailed router conguration description.
If a technician has already installed the router, you can skip section 1 ‘Installa-
tion’.
Please note that you only have to read the sections that are relevant for your
specic TDC broadband product.

4
1.1 If you have a landline/basic line and a telephone socket
without network connection ......................................................................................6
1.2 If you have an ISDN connection and a telephone socket
without network connection ......................................................................................7
1.3 If you have a telephone socket without network connection .............................8
2.1 Windows XP...................................................................................................................10
2.2 Windows Vista and Windows 7 ................................................................................11
4.1 How to set up the router ............................................................................................15
4.2 Quick Guide for PC setup for wireless .....................................................................16
Checking connection to the Internet, VPN MPLS, and IP telephony .......................... 22
8.1 Checking connection ................................................................................................. 23
8.2 Checking router........................................................................................................... 23
8.3 Checking Windows ..................................................................................................... 25
User guide for the router ..................................................................................................... 27
Requirements for your installations ................................................................................. 27

5
On the following pages, you can read how to install your ADSL router, depending
on the telephone socket and the type of connection you have.
If you have converted your connection from a landline connection/basic line
to ISDN or vice versa from TDC, you need to remove all equipment up to the
telephone/network socket and follow the directions given here.
If you have previously had a modem installed, this is no longer going to be
used, and you may discard it. If you are unsure about what it looks like, the TDC
modem is typically called SpeedStream (type 4100 or 5100) or Siemens, and it
could look like this:
Remove the cable from the modem’s DSL/ADSL port and connect it to the
router’s DSL port. The splitter is now the only equipment that should remain
between the ADSL router and the wall network socket.
pwr
dsl Ethernet

6
1 If you have a landline/basic line connection without Internet connection,
you must use the three-pin telephone plug. Connect the telephone cable to the
bottom of the loose telephone plug and the other end to the ‘LINE’ port in the
splitter.
2 Connect the loose telephone plug to the telephone wall socket.
3 The telephone can be plugged into the front of the loose plug.
4 Connect the telephone cable between the router’s DSL port and the splitter’s
ADSL port.
5 Connect the router’s power supply (12 V) to a power outlet (230 V) and switch
on the router.
The rst time the
ADSL router is switched on, it may take 10-15 minutes to program the router
from TDC’s central management system. This is, among other things, due to the
fact that the management system restarts the router several times along the
way, which may take up to four minutes each time. For more information, please
read Section 8 ‘Status check/troubleshooting’ in this guide.
The router is ready when the ‘Power’ LED lights green and the ‘DSL Sync’ LED
ashes and lights green.
How to connect your equipment to the router ports depends on your chosen
router prole for your Business Broadband solution. If you are unsure of your
router prole, it is specied on your order conrmation.
6 7 8 9 If you have ordered TDC Bredbånd Professionel or TDC BizBase,
connect the equipment to one of the four ports using the Ethernet cable.
Router
Splitter
Phone Computer
Computer
Hub/switch for LAN

7
6 Use the Ethernet cable to connect the equipment to port 1 if you only want
Internet access.
7 8 9 Use the Ethernet cable to connect the equipment to ports 2-4 if you
want simultaneous Internet and company MPLS network access.
6 8 Use the Ethernet cable to connect the equipment to port 1 and/or 3 if you
only want Internet access.
7 9 Use the Ethernet cable to connect the equipment to ports 2-4 if you want
access to the company MPLS network, but not the Internet.
1 If you have an ISDN connection and a telephone socket without network
connection, you must use the three-pin telephone plug. Connect the telephone
cable to the bottom of the loose telephone plug and connect the other end to
the ‘LINE’ port of the splitter.
2 Connect the loose telephone plug to the telephone wall socket.
3 The ISDN NT box can be connected to the front of the loose telephone plug.
4 The telephone can be connected to the ISDN NT box.
5 Connect the telephone cable between the DSL port of the router and the
ADSL port of the splitter.
6 Connect the router’s power supply (12 V) to a power outlet (230 V) and switch
on the router.
Router
Splitter
ISDN (NT)
box
Computer
Phone
Computer
Hub/switch for LAN

8
The rst time the
ADSL router is switched on, it may take 10-15 minutes to program the router
from TDC’s central management system. This is, among other things, due to the
fact that the management system restarts the router several times along the
way, which may take up to four minutes each time. For more information, please
read Section 8 ‘Status check/troubleshooting’ in this guide.
The router is ready when the ‘Power’ LED lights green and the ‘DSL Sync’ LED
ashes and lights green.
How to connect your equipment to the router ports depends on your chosen
router prole for your Business Bredbånd solution. If you are unsure of your
router prole, it is specied on your order conrmation.
7 8 9 10 If you have ordered TDC Bredbånd Professionel or TDC BizBase,
connect the equipment to one of the four ports using the Ethernet cable.
7 Use the Ethernet cable to connect the equipment to port 1 if you only want
Internet access.
8 9 10 Use the Ethernet cable to connect the equipment to ports 2-4 if you
want simultaneous Internet and company MPLS network access.
7 9 Use the Ethernet cable to connect the equipment to port 1 and/or 3 if you
only want Internet access.
8 10 Use the Ethernet cable to connect the equipment to ports 2-4 if you want
access to the company MPLS network, but not the Internet.
Router
Splitter
Computer
Computer
Hub/switch for LAN

9
If you have a network connection, you do not have to change the existing land-
line/basic line or ISDN installation.
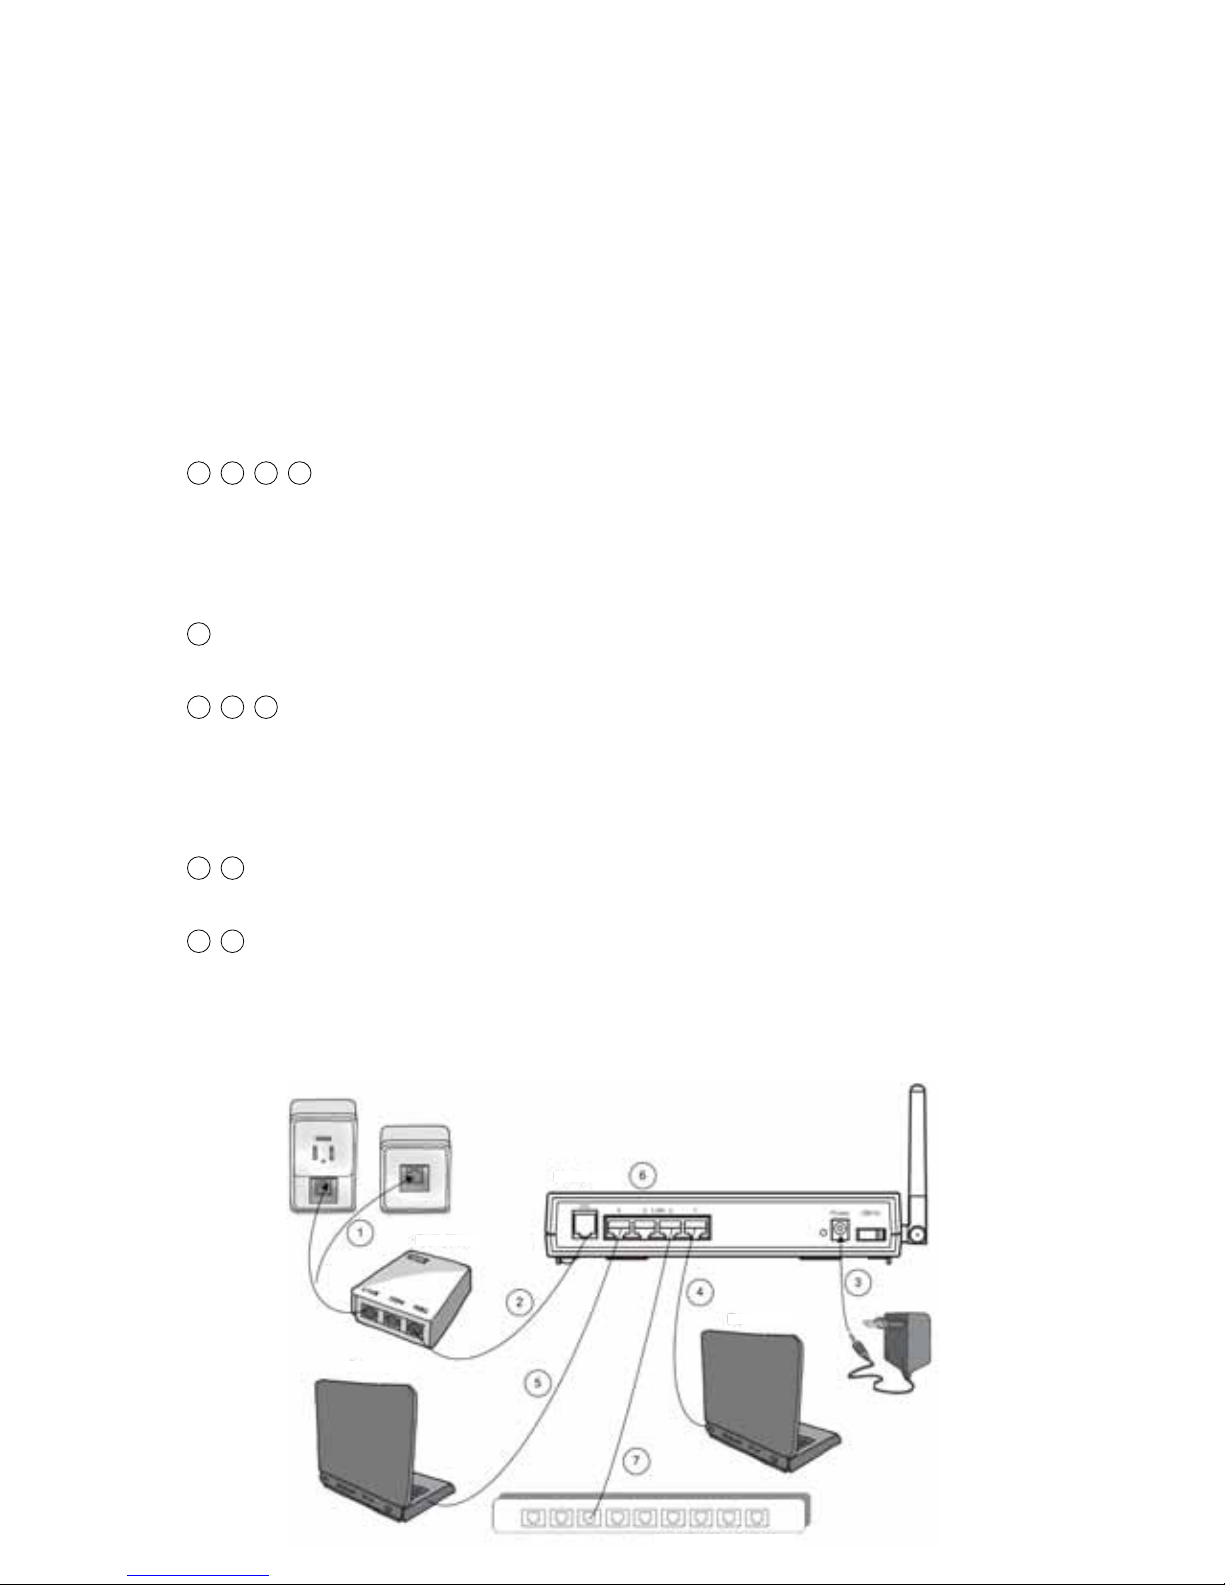
1 Connect one end of the cable to the ‘LINE’ port and the other end to the net-
work connection which can be with or without a telephone socket.
2 Connect the telephone cable between the DSL port of the router and the
ADSL port of the splitter.
3 Connect the router’s power supply (12 V) to a power outlet (230 V) and switch
on the router.
The rst time the
ADSL router is switched on, it may take 10-15 minutes to program the router
from TDC’s central management system. This is, among other things, due to the
fact that the management system restarts the router several times along the
way, which may take up to four minutes each time. For more information, please
read Section 8 ‘Status check/troubleshooting’ in this guide.
The router is ready when the ‘Power’ LED lights green and the ‘DSL Sync’ LED
ashes and lights green.
How to connect your equipment to the router ports depends on your chosen
router prole for your Business Bredbånd solution. If you are unsure of your
router prole, it is specied on your order conrmation.
4 5 6 7 If you have ordered TDC Bredbånd Professionel or TDC BizBase,
connect the equipment to one of the four ports using the Ethernet cable.
4 Use the Ethernet cable to connect the equipment to port 1 if you only want
Internet access.
5 6 7 Use the Ethernet cable to connect the equipment to ports 2-4 if you
want simultaneous Internet and company MPLS network access.
4 6 Use the Ethernet cable to connect the equipment to port 1 and/or 3 if you
only want Internet access.
5 7 Use the Ethernet cable to connect the equipment to port 2 and/or 4 if you
want access to the company MPLS network, but not the Internet.

10
Before you start, please note the following:
• Your PC must have an Ethernet card and the TCP/IP protocol installed. This is
normally carried out automatically when the network card is installed. But if
the connection does not work in spite of this, there may be a problem on your
computer and you need to contact your computer vendor.
• If changes have been ordered for the standard conguration, you may not be
able to follow this user guide.
• There must be a connection between the router and the network card. You can
check this by doing the following: Check whether the network card LED is lit. If
it is not lit, there is no connection. If the network card is connected directly to
the router, the LED where the cable is connected must also be lit. Please check
the setup again. If it still does not work, you can contact Business Support on
tel +45 80 80 80.
Click and choose . Next choose in the menu and choose
the item . Then follow the
directions.

11
Click and choose . Then enter in the
search form and click ‘Søg’. Click the and follow
the instructions for conguring your computer for DHCP.

12
Click and or choose , and then
. The window appears. Next, click .
The window opens. Choose the
tab. Check . Then click the
button in the bottom right-hand corner. The
window appears. Disable all options. Then click .

13
Then click the button, still on the tab.
appears.
Check .
Then click .

14
Check .
Then click .
Check
. Then click the button.
Click the button to end the wizard.

15
Your Netopia ADSL router has an integrated wireless access point which is
activated if this has been ordered or is standard with the product ordered. Oth-
erwise, the wireless functionality has not been ordered, and you may skip this
section.
Physical location of the router if used with wireless functionality:
• The wireless functionality may interfere with medical equipment. Please note
the technical conditions applying in the relevant environment.
• Avoid placing the router in the immediate vicinity of radio receivers, televi-
sions, and microwave ovens as this may result in disruptions in the wireless
signal.
• Please note that reinforced concrete can weaken the wireless signal.
• The antenna must point upward in order to get optimum coverage.
If the router was ordered with the wireless functionality activated, TDC’s man-
agement system handles the setup of the router in connection with the instal-
lation. You can see whether the wireless functionality has been activated by
checking whether the ‘Wireless’ LED is on.
If activation of the wireless functionality is ordered at a later point in time, you
will receive information on when it is ready on TDC’s management system.
Switch the router o and on in order for it to be updated by the management
system. The router will then automatically contact TDC’s management system
and download the correct conguration (this may take up to ve minutes).
Information on the wireless functionality (encryption key, SSID) is available on a
secure TDC website.
Access to this website must be established from a computer which is connected
to the router’s LAN port, which has Internet access, via the see
the ‘Installation’ section). The wireless functionality be set up via a VPN
connection. This is because the security in relation to online conguration is
based on a check of the router’s IP address.
Open a web browser, e.g. Internet Explorer, via the computer and use the follow-
ing self-service link: http://tts.tdc.dk/welcome.do. You will be asked to enter your
email address or your mobile phone number. Write the email address and/or the
mobile phone number on which you can receive emails or text messages at the
moment. Please note that you cannot use an email address from which you only
have access to reading emails via a VPN connection, e.g. your email address at
work. You will then receive an email or a text message with a password for the
website from which you can download information on your wireless congura-
tion. Follow the directions on the website.

16
With the information on SSID and encryption key from this website, you can
adapt the setup on your computer to the wireless equipment. If the wireless
functionality is managed by TDC, you can only download information for use in
connection with the setup of the computer. If the functionality is managed by
the user, the SSID broadcast/non-broadcast of SSID and encryption key, among
others, can be changed (the user rights in relation to the wireless functionality
were determined when the order was placed). Please contact your company’s
network administrator if you are in doubt as to which rights you have been as-
signed in connection with the ordering.
If you have used self-service to make changes in the router, you need to sub-
sequently switch the router o and on in order for the changes to take eect.
Please note that the wireless setup can only be changed when a computer is
connected to the router via a network cable.
On TDC’s web page for wireless setup you can nd detailed information on how
to set up your PC for wireless communication with the router. The instructions
cover both Windows XP and Windows Vista.
However, the quick guide below only covers Windows XP and set-up of wireless
access with WPA encryption:
From your PC, select the menu item, click
and then Under select the
tab:

17
Check that is
checked.To add the new network, click …
If you have ordered several wireless access solutions, e.g. Internet and VPN
MPLS access, you must follow this set-up procedure for each of the wireless
networks (SSIDs).
In the dialog which appears (see next page), the value which is dened for your
access point is specied in the . This value can be found
on TDC’s secure web page under the menu item.
This is the web page from where SSID and WPA PSK are downloaded.

18
Insert
Select
Select
Insert
(downloaded from TTS)
and
(downloaded from TTS)
Click .
Click . End by clicking .

19
If you have ordered broadband telephony, follow the installation guide which
comes with the ATA box.
If you have previously received a 4-port modem, you must use the Netopia
router instead. The ATA box is connected to port 4 on the router (as the router
has an integrated modem). The number can be found on the back of the router.
If you only have one telephone, the equipment must be connected in the follow-
ing way:
If you want to connect more telephones, the equipment must be connected
as shown in the Section ‘Bredbåndstelefoni med ere telefoner’ (multi-phone
broadband telephony) in the installation guide which accompanies the ATA box.
Phone plug
Network jack
Computer
ATA
Netopia
Switch

20
If you have ordered TDC HomeTrio and/or TDC TV, you must connect the digital
receiver to port 3 on the router. The port number can be found on the back of
the router.
When the digital receiver has been connected to the router, you just have to fol-
low the instructions which come with the digital receiver.
Connect the equipment in the following way:
Router
Splitter
Computer
Digital receiver
Digital receiver
Power socket
220 V

21
This section is only for customers who have ordered IP Scale or Ekstrakanal with
QoS.
The cables from your equipment must be connected to dierent LAN ports on
the router, depending on the prole that you have chosen for the router. The
router prole chosen appears from the ‘Specikation’ (specication) section on
your order conrmation.
The overview below shows you where the equipment is to be located in the
router.
1 Internet IP telephony IP telephony IP telephony
2 Internet VLAN 1) IP telephony IP telephony
3 Internet Own MPLS network IP telephony IP telephony
4 Internet Own MPLS network VLAN 1) IP telephony
5 IP telephony Own MPLS network IP telephony IP telephony
6 IP telephony Own MPLS network VLAN 1) IP telephony
7 Internet Internet/MPLS 2) VLAN 1) IP telephony
8 IP telephony IP telephony IP telephony IP telephony
9 IP telephony IP telephony IP telephony Transparent 3)
1) Equipment that is to have access to IP telephony is tagged with VLAN 10, whereas equipment with
Internet access must be tagged with VLAN 1.
If you have purchased a managed TDC IP Telephony Scale switch, this will be the port connected to
the switch.
2) All trac toward IP addresses apart from RFC1918 is routed via the Internet. Trac toward
RFC1918 addresses is routed via the MPLS network. The following IP addresses are RFC1918,
also called private IP addresses: 10.0.0.0 – 10.255.255.255, 172.16.0.0 – 172.31.255.255 and
192.168.0.0 – 192.168.255.255.
3) Own router or managed rewall can be connected directly to this port. Assumes an extra data
channel.
Table of contents