TDT DTR 3002CU PVR User manual

December 2009 1 of 54
DTR 3002CU PVR
User Manual

December 2009 2 of 54
Index
1. Installation .................................................................................................. 4
2. Remote Control ............................................................................................ 5
3. Installing the Batteries .................................................................................. 6
4. Setting Language ......................................................................................... 7
5. Setting Language ......................................................................................... 8
5.1 Setting Language ...................................................................................... 8
5.2 How to receive the programs?..................................................................... 9
5.2.1 Auto Scan ................................................................................. 9
5.2.2 Manual Scan.............................................................................10
6. STB Operation.............................................................................................11
6.1 Main Menu ...............................................................................................11
6.2 SETUP.....................................................................................................12
6.2.1 Installation...............................................................................12
6.2.1.1 Antenna Setting ................................................................12
6.2.1.2 Country Setting.................................................................12
6.2.1.3 OSD Language ..................................................................12
6.2.1.4 Audio Language.................................................................12
6.2.1.5 Subtitle Language..............................................................13
6.2.1.6 Time Zone ........................................................................13
6.2.1.7 Auto Scan.........................................................................13
6.2.1.8 Manual Scan .....................................................................13
6.2.2 TV Setup..................................................................................14
6.2.2.1 TV Format ........................................................................14
6.2.2.2 TV Mode ...........................................................................14
6.2.2.3 OSD Transparency .............................................................14
6.2.2.4 Banner Display Time ..........................................................14
6.2.2.5 Video Output.....................................................................15
6.2.2.6 Video Enhancement ...........................................................15
6.2.3 Password .................................................................................16
6.2.3.1 Channel Lock ....................................................................16
6.2.3.2 Censorship Lock ................................................................16
6.2.3.3 Change Password ..............................................................16
6.2.4 Advance Timer..........................................................................18
6.2.5 Data Transfer ...........................................................................19
6.2.5.1 System Software Update ....................................................19
6.2.6 Set Default...............................................................................20
6.3 TV/RADIO................................................................................................21
6.3.1 List .........................................................................................21
6.3.1.1 Delete ..............................................................................21
6.3.1.2 Skip.................................................................................22
6.3.1.3 Lock.................................................................................23

Rev 1.0 December 2009 3 of 54
6.3.1.4 Edit..................................................................................23
6.3.1.5 Favorites ..........................................................................25
6.3.1.6 Search .............................................................................25
6.3.2 Guide ......................................................................................27
6.3.2.1 Book ................................................................................27
6.4 MULTIMEDIA ............................................................................................30
6.4.1 My Album ................................................................................30
6.4.1.1 Thumbnail ........................................................................31
6.4.1.2 Folder ..............................................................................31
6.4.1.3 Zoom ...............................................................................32
6.4.1.4 Rotate..............................................................................33
6.4.1.5 Slide Show .......................................................................34
6.4.2 My Music..................................................................................37
6.4.3 My Movie .................................................................................39
6.4.4 My Recorder .............................................................................39
6.4.4.1 Recording List ...................................................................39
6.4.4.2 Recording Device...............................................................39
6.4.4.3 Recording Preference .........................................................40
6.5 GAME......................................................................................................40
6.5.1 Gomoku...................................................................................41
6.5.2 Calendar ..................................................................................41
6.5.3 Calculator ................................................................................42
6.6 Normal Play .............................................................................................43
6.6.1 Information..............................................................................43
6.6.2 Switch Program ........................................................................44
6.6.3 Program List.............................................................................44
6.6.4 Volume ....................................................................................45
6.6.5 Pause ......................................................................................45
6.6.6 Audio ......................................................................................46
6.6.7 Favorites..................................................................................46
6.6.8 Teletext ...................................................................................47
6.6.9 Subtitle....................................................................................48
6.6.10 Teletext Subtitle........................................................................48
6.6.11 Guide ......................................................................................49
6.6.12 List .........................................................................................49
6.6.13 Browse ....................................................................................49
6.6.14 Return .....................................................................................49
6.6.15 Message ..................................................................................49
6.6.15.1 No Signal..........................................................................49
6.6.15.2 No Service ........................................................................50
6.6.15.3 Service Scrambled .............................................................50
6.6.15.4 Antenna Overload..............................................................51
6.6.15.5 HDTV not support ..............................................................51
6.6.15.6 Locked .............................................................................52
7. Troubleshooting...........................................................................................53
8. Specifications..............................................................................................54

Rev 1.0 December 2009 4 of 54
1. Installation

Rev 1.0 December 2009 5 of 54
2. Remote Control

Rev 1.0 December 2009 6 of 54
3. Installing the Batteries
Remove the battery cover from the remote control and put 2XAAA size batteries inside the
compartment.The diagram inside the battery compartment shows the correct way to install the
batteries.
Using the Remote Control
To use the remote control,point it towards the front of the digital set top box.The remote control has
a range of up to 7 metres from the set top box at an angle of up to 60 degrees.
The remote control will not operate if its path is blocked.
Sunlight or very bright light will decrease the sensitivity of the remote control.

Rev 1.0 December 2009 7 of 54
4. Setting Language
Caution:Make sure to check the voltage specification of the wall outlet is the same rating with the
receiver.To prevent the risk of electric shock, do not open the cover or the back of the receiver
Note: When connecting the receiver to other equipment,e.g.,TV,VCR and amplifier,make sure to refer
to relevant user manual for instruction.Also,make sure you disconnect all the equipments from the
mains supply before the connection.

Rev 1.0 December 2009 8 of 54
5. Setting Language
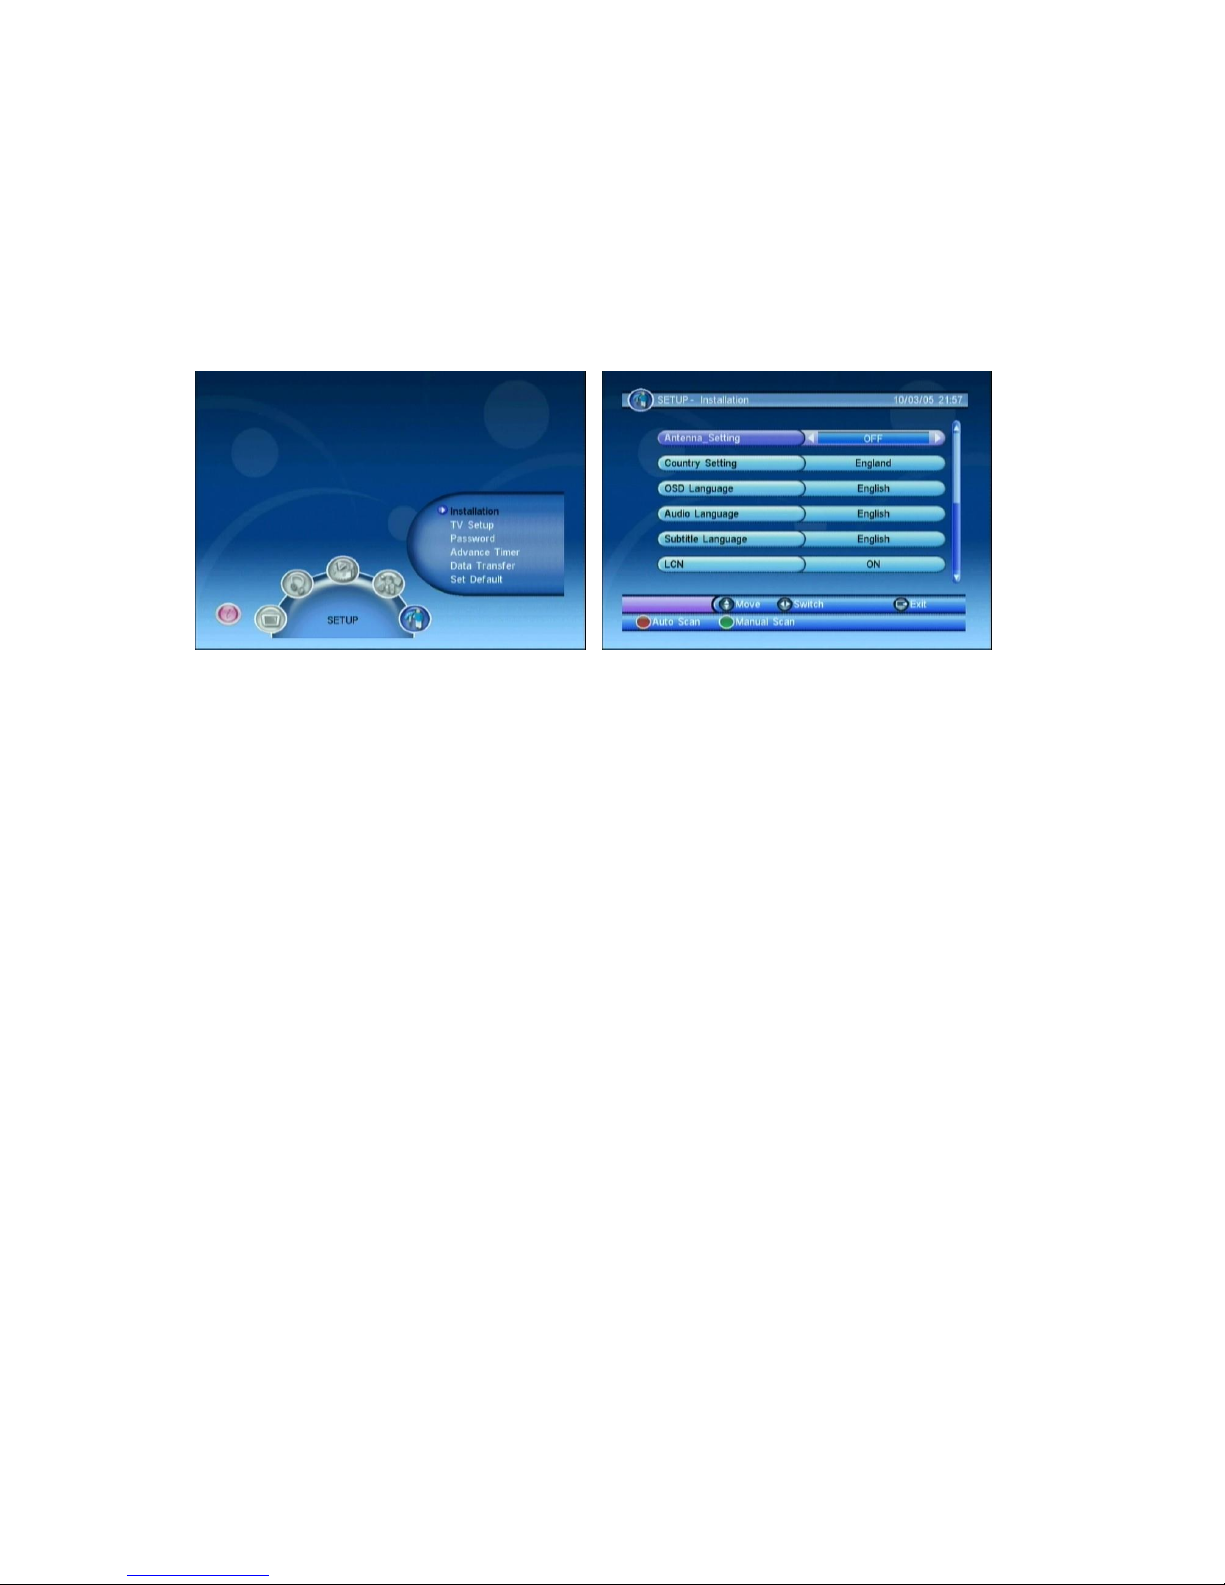
5.1 Setting Language
User can select a preferred language among various languages at Installation page.
(1) Press <menu> button to enter Main Menu.
(2) Press <Left/Right> button to select SETUP option.
(3) Press <Up/Down> button to select Installation option.
(4) Press <OK> button to enter Installation page.
(5) Press <Up/Down> button to select OSD Language option.
(6) Press <Left/Right> button to select a language.
See Figure 1, 2. If there is no database (scan result) in the STB, it will start at step (5) when booting.
Figure 1. Main Menu, SETUP
Figure 2. Installation Page

December 2009 9 of 54
5.2 How to receive the programs?
Scan the possible frequency and bandwidth to receive the programs.
(1) Press <menu> button to enter Main Menu.
(2) Press <Left/Right> button to select SETUP option.
(3) Press <Up/Down> button to select Installation option.
(4) Press <OK> button to enter Installation page.
(5) Press <Up/Down> button to select Country Setting option.
(6) Press <Left/Right> button to set Country Setting.
(7) Press <RED/GREEN> button to Auto Scan or Manual Scan.
See Figure 1, 2. If there is no database in the STB, it will start at step (5) when booting.
5.2.1 Auto Scan
Auto Scan will erase the database first, and scans default frequency and bandwidth by Country
Setting. Follow the steps (1) ~ (6) at section 1.2..
(7) Press <RED> button to be confirmed to clear the database.
(8) Press <OK> button to confirm the database will be cleared and start Auto Scan.
It costs time to do Auto Scan, user can press <exit> to exit at anytime. See Figure 3, 4.
Figure 3. Clear database message
Figure 4. Auto Scan Page

December 2009 10 of 54
5.2.2 Manual Scan
Manual Scan adds the scanning results into database, it doesn’t erase the database. But User has to
know the Frequency and Bandwidth for scanning. If user scans the same Frequency and
Bandwidth more then once, the programs will be duplicated. Follow the steps (1) ~ (6) at section
1.2..
(7) Press <GREEN> button to enter Manual Scan Page.
(8) Press <Up/Down> button to select Frequency option.
(9) Press <0~9> button to input the Frequency value.
(10) Press <Up/Down> button to select Bandwidth option.
(11) Press <Left/Right> button to set Bandwidth value.
(12) Press <OK/exit> button to start scan or exit.
See Figure 5, 6.
Figure 6. Manual Scan Result
Figure 5. Manual Scan Page

December 2009 11 of 54
6. STB Operation
Describe how to operate the STB.
6.1 Main Menu
Main Menu for operating a lot of functions.
(1) Press <menu> button to enter Main Menu.
(2) Press <info> button to display the version information of STB.
See Figure 7, 8.
Figure 7. Main Menu
Figure 8. Version Info
December 2009 12 of 54
6.2 SETUP
Set the system settings of STB. See Figure 9.
6.2.1 Installation
Set about receiving and playing program settings of STB. See Figure 10.
6.2.1.1 Antenna Setting
Set the antenna power on or off at Installation page.
(1) Press <Up/Down> button to select Antenna Setting option.
(2) Press <Left/Right> button to set “ON”or “OFF”for turning on or off the antenna power.
6.2.1.2 Country Setting
Set the country for Auto Scan, Manual Scan and Time Zone. Change the Country Setting will
automatically change the default Time Zone value. Country Setting also has default Frequency
and Bandwidth for Auto Scan.
(1) Press <Up/Down> button to select Country Setting option.
(2) Press <Left/Right> button to set the Country.
6.2.1.3 OSD Language
Set the On Screen Display Language, please reference section 1.1..
(1) Press <Up/Down> button to select OSD Language option.
(2) Press <Left/Right> button to set the language.
6.2.1.4 Audio Language
Set the audio language for watching program.
Figure 9. Main Menu, SETUP
Figure 10. Installation Page

Rev 1.0 December 2009 13 of 54
(1) Press <Up/Down> button to select Audio Language option.
(2) Press <Left/Right> button to set the language.
6.2.1.5 Subtitle Language
Set the language for displaying subtitle.
(1) Press <Up/Down> button to select Subtitle Language option.
(2) Press <Left/Right> button to set the language.
6.2.1.6 Time Zone
Set the Time Zone for adjusting the system time. Some Countries are covered with more than one
Time Zone.
(1) Press <Up/Down> button to select Time Zone option.
(2) Press <Left/Right> button to set the Time Zone value.
6.2.1.7 Auto Scan
Auto Scan erases the database first, and scans default frequency and bandwidth by Country
Setting. Please check the section 1.2. and 1.2.1. for more detail.
(1) Press <RED> button to start Auto Scan.
6.2.1.8 Manual Scan
Manual Scan adds the scanning results into database, it doesn’t erase any database. But user has
to know the Frequency and Bandwidth for scanning. If user scans the same Frequency and
Bandwidth more then once, the programs will be duplicated. Please check the section 1.2. and
1.2.2. for more detail.
(1) Press <GREEN> button to start Manual Scan.

December 2009 14 of 54
6.2.2 TV Setup
Setup the display mode for TV. See Figure 11.
6.2.2.1 TV Format
Set display format for watching program, such as 4:3LB, 4:3PS, 16:9LB, 16:9FIT.
(1) Press <Up/Down> button to select TV Format option.
(2) Press <Left/Right> button to set format.
6.2.2.2 TV Mode
Set PAL, NTSC or AUTO for display. AUTO will switch PAL or NTSC by program content. This setting
should be matched with user’s TV.
(1) Press <Up/Down> button to select TV Mode option.
(2) Press <Left/Right> button to set mode.
6.2.2.3 OSD Transparency
Set the On Screen Display transparency. 1 is the most diaphanous.
(1) Press <Up/Down> button to select OSD Transparency option.
(2) Press <Left/Right> button to set transparent value.
6.2.2.4 Banner Display Time
Set Banner displays time. Banner doesn’t disappear when setting “Always”. It displays at watching
program. See Figure 12.
(1) Press <Up/Down> button to select Banner Display Time option.
(2) Press <Left/Right> button to set the time.
Figure 11. TV Setup Page

Rev 1.0 December 2009 15 of 54
6.2.2.5 Video Output
Set the output method to TV.
(1) Press <Up/Down> button to select Video Output option.
(2) Press <Left/Right> button to set the method.
6.2.2.6 Video Enhancement
Set the Video Enhancement
(1) Press <Up/Down> button to select Video Enhancement option.
(2) Press <Left/Right> button to set Video Enhancement.
(3) Press <Up/Down> button to select Flesh Tone or Black/White Expansion.
(4) Press <Left/Right> button to set Flesh Tone and Black/White Expansion.
Figure 13. Video Enhancement
Figure 12. Banner

December 2009 16 of 54
6.2.3 Password
To setup password for channel lock or censorship lock. User can change password here. The default
PIN Code is 0000. See Figure 14.
6.2.3.1 Channel Lock
Lock the channel (program) which has been set lock status by password when turning on the
Channel Lock. About setting program lock status, please check the section 2.3.1.3. for more detail.
And lock many functions by password.
(1) Press <Up/Down> button to select Channel Lock option.
(2) Press <Left/Right> button to turn on or off the lock setting.
6.2.3.2 Censorship Lock
Lock the program by password and censorship threshold. The censorship info is in program content.
Under the censorship rating, user has to enter the password for watching program.
(1) Press <Up/Down> button to select Censorship Lock option.
(2) Press <Left/Right> button to set the rating.
6.2.3.3 Change Password
Change the PIN Code. If user forget the PIN Code, please contact the provider.
(1) Press <Up/Down> button to select Change Password option.
(2) Press <Left/Right> button to trigger changing password.
(3) Press <0~9> button to enter old password.
(4) Press <0~9> button to enter new password.
(5) Press <0~9> button to confirm new password.
If success, it will display PIN Code changed message. Or it will display PIN Code Error message. See
Figure 15 ~ 19.
Figure 14. Password Page

Rev 1.0 December 2009 17 of 54
Figure 15. Enter Old Password
Figure 16. Enter New Password
Figure 17. Confirm New Password
Figure 18. PIN Code Changed
Figure 19. PIN Code Error

December 2009 18 of 54
6.2.4 Advance Timer
User can set event(s) for watching the program(s) by date, time and frequency. When setting date
and start time is up, STB will automatically switch to program user sets. Setting here, the start time
and end time depend on current system time. Please check the section 2.3.2.1. for more detail. See
Figure 20
Figure 20. Advance Timer Page

December 2009 19 of 54
6.2.5 Data Transfer
Transfer code (application), database or both to PC or STB. Transfer data by RS232 to PC, or from
master STB to slave STB. See Figure 21.
(1) Press <RED> button to set Target value.
(2)Press <GREEN> button to set Mode value.
(3) Press <OK> button to start transfer.
6.2.5.1 System Software Update
Update application and tsbootl by build-in card reader or USB port. See Figure 21 ~ 24.
(1) Press <BLUE> button to enter file browser.
(2) Press <Left/Right/OK> button to change folder and focus *.crd file.
(3) Press <OK> button to start update.
Figure 21. Data Transfer Page
Figure 22. System Software Update
Figure 23. Confirm to Start Update
Figure 24. Updating

December 2009 20 of 54
6.2.6 Set Default
Reset STB to factory default. All settings by user has been operated will be reset default, and
database will be erased at same time. See Figure 25, 26.
Figure 25. Set Default
Figure 26. Saving
Table of contents


