Z
BU-VR24
Battery unit
Instructions for Use
Introduction
Thank you for purchasing the BU-VR24 battery unit. Please read this document
in its entirety before using the product to get the best performance and ensure
safe and proper operation.
oCompany names and product names in this document are the trademarks or registered
trademarks of their respective owners.
Included accessories
oConnecting panel (right) × 1 oConnection cable × 1
oConnecting panel (left) × 1 oInstructions for Use (this document) × 1
oConnecting panel screws (M3×6/binding/silver) × 4
Important safety instructions
Model for USA
Declaration of Conformity
Model number: BU-VR24
Trade name: TEAC
Responsible party: TEAC AMERICA,INC.
Address: 10410 Pioneer Blvd. Suite #1, Santa Fe Springs, California 90670, U.S.A.
Telephone number: +1-323-726-0303
This device complies with Part 15 of the FCC Rules. Operation is subject to the following
two conditions: (1) this device may not cause harmful interference, and (2) this device must
accept any interference received, including interference that may cause undesired operation.
Information
This equipment has been tested and found to comply with the limits for a Class A digital
device, pursuant to part 15 of the FCC Rules. These limits are designed to provide reasonable
protection against harmful interference when the equipment is operated in a commercial
environment. This equipment generates, uses, and can radiate radio frequency energy and,
if not installed and used in accordance with the instruction manual, may cause harmful
interference to radio communications. Operation of this equipment in a residential area is
likely to cause harmful interference in which case the user will be required to correct the
interference at his own expense.
CAUTION
Changes or modifications not expressly approved by the party responsible for compliance
could void the user’s authority to operate the equipment.
Model for Europe
This product complies with the European Directives request, and the other
Commission Regulations.
Disposal of electrical and electronic equipment
(a) All electrical/electronic equipment should be disposed of separately from the municipal
waste stream via collection facilities designated by the government or local authorities.
(b) By disposing of electrical/electronic equipment correctly, you will help save valuable
resources and prevent any potential negative effects on human health and the environment.
(c) Improper disposal of waste electrical/electronic equipment can have serious effects
on the environment and human health because of the presence of hazardous sub-
stances in the equipment.
(d) The Waste Electrical and Electronic Equipment (WEEE) symbols, which show
wheeled bins that have been crossed out, indicate that electrical/electronic
equipment must be collected and disposed of separately from household waste.
(e) Return and collection systems are available to end users. For more detailed infor-
mation about the disposal of old electrical/electronic equipment and waste
batteries/accumulators, please contact your city office, waste disposal service or the
shop where you purchased the equipment.
WARNING
This is a Class A product. In a domestic environment, this product may cause radio inter-
ference in which case the user may be required to take adequate measures.
ATENCIÓN
Este es un producto de clase A. En un entorno no profesional, este aparato puede producir
interferencias de radio, en cuyo caso el usuario será el responsable de tomar las medidas
necesarias para solucionarlo.
AVERTISSEMENT
Il s’agit d’un produit de Classe A. Dans un environnement domestique, cet appareil peut
provoquer des interférences radio, dans ce cas l’utilisateur peut être amené à prendre des
mesures appropriées.
Warnung
Dies ist eine Einrichtung, welche die Funk-Entstörung nach Klasse A besitzt. Diese Einrichtung
kann im Wohnbereich Funkstörungen versursachen; in diesem Fall kann vom Betrieber ver-
lang werden, angemessene Maßnahmen durchzuführen und dafür aufzukommen.
Model for Canada
Industry Canada’s Compliance Statement: This Class A digital apparatus complies with
Canadian ICES-003.
Cet appareil numérique de la classe A est conforme à la norme NMB-003 du Canada.
Precautions for use
oDo not use any battery other than the NP-L7S made by IDX Company, Ltd.
oIncorrect battery handling could cause rupture, fire, smoke, heat or fluid leak-
age and could lead to reduced performance or malfunction. Always abide by
the prohibitions in the battery owner’s manual.
oBatteries (including products that contain them) should not be exposed to
sunshine, fire or excessive heat.
oBefore changing the batteries, turn the VR-24 off. Furthermore, if a power
cord is connected to the DC IN connector, disconnect it.
oAlways use batteries in sets of two.
oCharge the batteries completely using the following battery charger before
use: IDX JL-2PLUS.
oIf you want to dispose of this product, always remove the batteries. For battery
disposal, follow the instructions in the battery owner’s manual.
oThe original side panels and stand feet attached to the VR-24 are not used
with the battery unit. However, you should save them because they will be
needed to use the VR-24 by itself when the battery unit is disconnected.
Assembly procedures
1 Remove the VR-24 side panels and stand feet.
The screws removed from the side panels will be used to attach the connect-
ing panels.
Media cover
Side panel (left)
Side panel (right)
Stand feet (front) Stand feet (back)
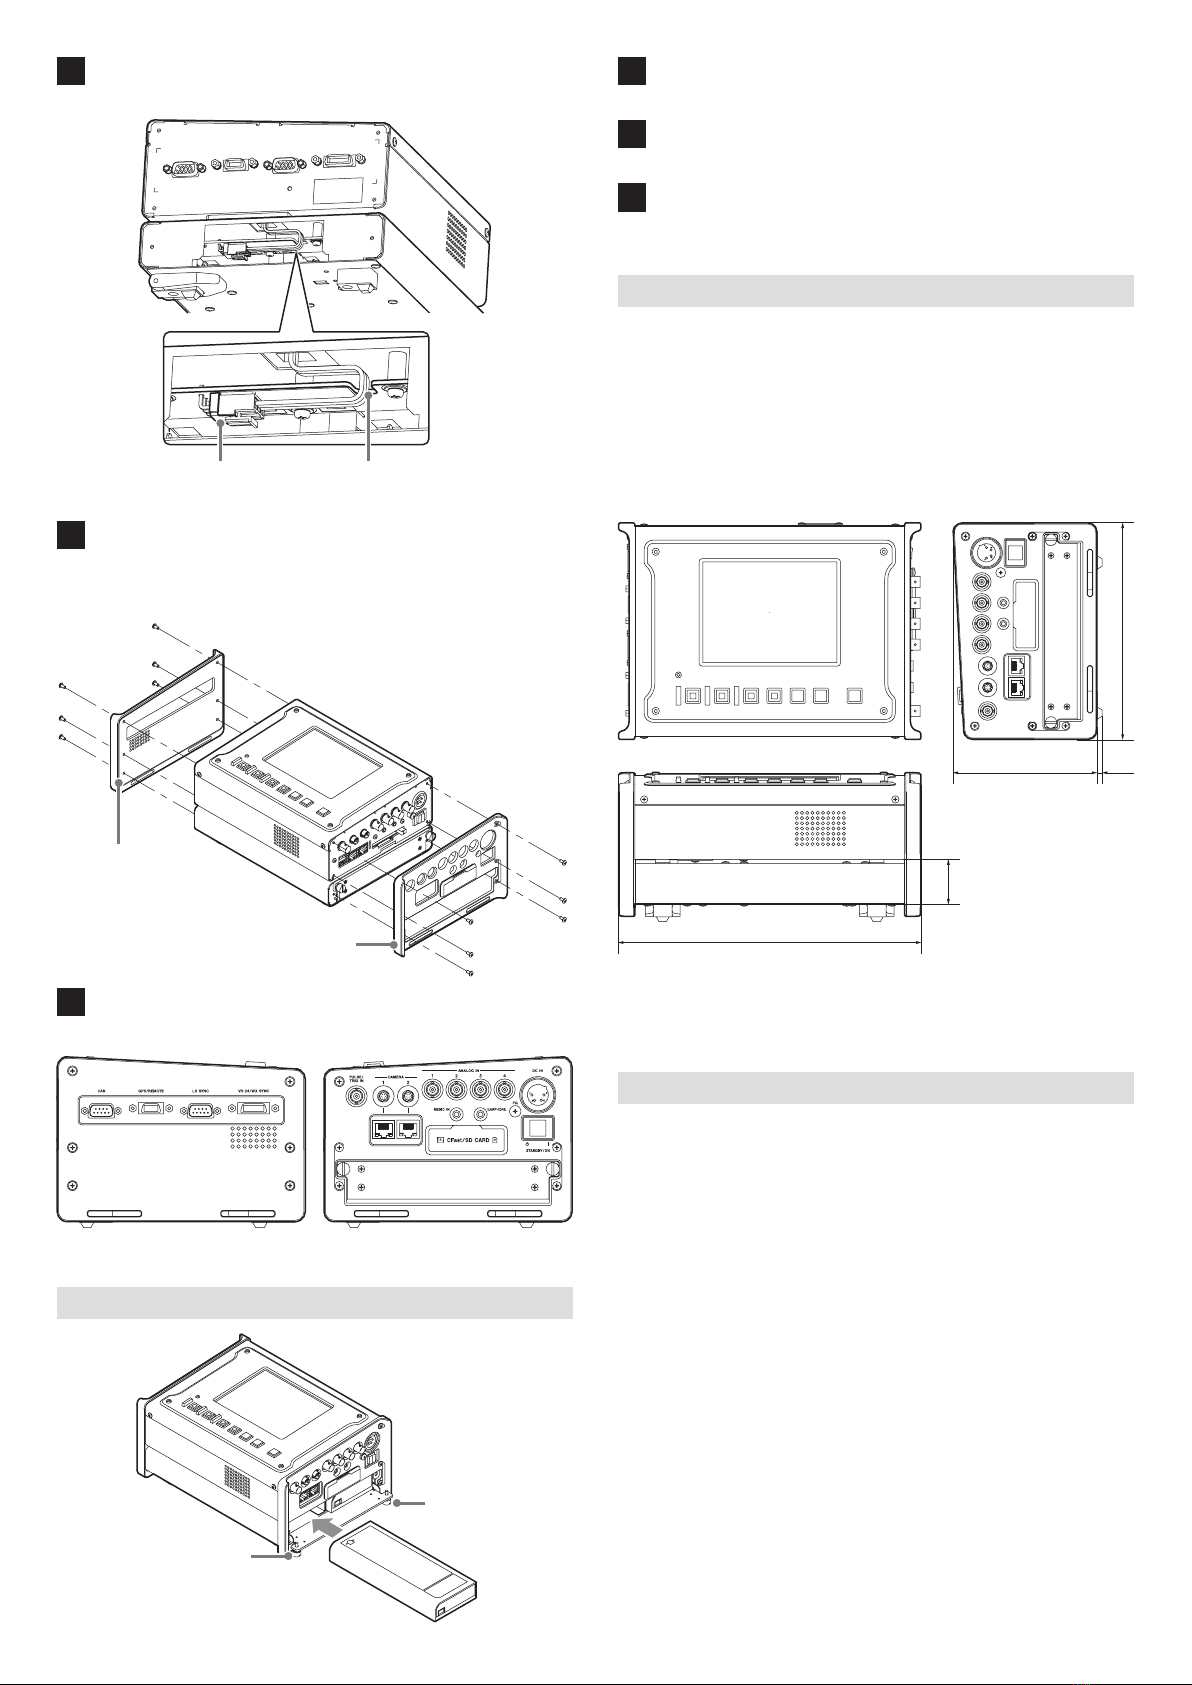
2 Remove the media cover from the right side panel and
attach it to the right side connecting panel.
Media cover
3 Remove the cover from the bottom of the unit and connect
the included connection cable.
Cover
Connection cable
oAttach the removed cover using the nearby screw threads. Tighten the
screws with a torque of 60 N·cm (6 kgf·cm).
D01254910B