Teac DV-TV5100 User manual

DV-TV5100
DV-TV5100
TV/DVD COMBO

WARRANTY REGISTRATION
Please read this warranty card.
Keep your purchase receipt to enable you to proceed quickly in the event of a Warranty Service.
Warranty Terms & Conditions
1. TEAC warrants to the original retail purchaser only, that this product is free from defects in material and
workmanship under normal domestic use and authorises free service during the warranty period at any
TEAC Authorised Centre only. TEAC warranty only applies to products purchased, used and serviced in
Australia.
2. Subject to the terms herein, this warranty effectively covers the equipment as specified in the Warranty
Periods Table from the date of purchase.
3. All parts, except the external cabinet, are warranted as specified in Warranty Periods Table, and will be
repaired or replaced at the sole judgement of TEAC.
4. Normal customer maintenance as described in the owner’s manual is not covered by this warranty (such as
cleaning VCR heads etc.)
5. This warranty does not apply to equipment showing abuse, damage or that it may have been tampered
with, altered or repaired outside any TEAC Authorised Service Centre. If so, the warranty will be void.
*Your nearest Authorised TEAC Service Centre is listed in your Owners Manual
6. In the event that this unit or any defective parts must be returned to TEAC Service Centres, a copy of this
warranty certificate and of your purchase receipt must be enclosed to be a valid warranty. Such
equipment or parts must be sent to the nearest authorised TEAC Service Centre. After the repair, the unit
will be available for collection by the owner or it will be returned to the owner. The warranty does not
cover freight or insurance. In all cases of in-transit damages or loss, a claim must be filed against the
carrier by the purchaser.
7. In home service will only be provided as part of this warranty if all the following conditions are met;
a) The product is a Colour Television of 51cm screen size or over.
b) The product is within the warranty period.
c) The product is located within the normal service area of the local TEAC Service Provider.
In any other situation or circumstance, where an in home service call is made, a service fee will be
charged by the Service Provider. TEAC Total Care in home service and installation is available at
competitive rates.
8. No one is authorised to assume any liability on behalf of TEAC or impose any obligation on it, in
connection with the sale of any equipment other than as stated in this warranty and outlined above.
9. In no event will TEAC be responsible or liable for indirect or consequential damages from interrupted
operations or other causes.
10. Warranty is not transferable to any subsequent purchaser if the product is sold during the warranty period,
TEAC PRODUCT
WARRANTY PERIOD
Plasma 1 Year (In-Home Service Included)
Televisions – 51cm and above 1 Year (In-Home Service Included)
Televisions 1 Year
Digital Set Top Boxes 1 Year
VCR 1 Year
DVD 1 Year
Audio Systems 1 Year
WARRANTY PROCEDURES
Please keep this information for your own records.
Please refer to the owner’s manual to ensure that you have followed the correct installation and
operating procedures.
1. Read owner’s manual carefully
2. If you require Warranty Service, please contact the TEAC Service Centre
3. Please have your purchase receipt as your proof of purchase and the following details
completed for a valid Warranty.
Owner’s Name
Owner’s Address
Postcode
Model Name/No. Serial No.
Dealer’s Name
Dealer’s Address
Postcode
4. Please ensure that your product is packed appropriately upon return to the service centre.
If you have any other queries regarding service or warranty please contact the TEAC Service below:
TEAC Total Care Ph: 1800 656 700
info@teac.com.au
www.teac.com.au

WARRANTY REGISTRATION
Please read this warranty card.
Keep your purchase receipt to enable you to proceed quickly in the event of a Warranty Service.
Warranty Terms & Conditions
1. TEAC warrants to the original retail purchaser only, that this product is free from defects in material and
workmanship under normal domestic use and authorises free service during the warranty period at any
TEAC Authorised Centre only. TEAC warranty only applies to products purchased, used and serviced in
Australia.
2. Subject to the terms herein, this warranty effectively covers the equipment as specified in the Warranty
Periods Table from the date of purchase.
3. All parts, except the external cabinet, are warranted as specified in Warranty Periods Table, and will be
repaired or replaced at the sole judgement of TEAC.
4. Normal customer maintenance as described in the owner’s manual is not covered by this warranty (such as
cleaning VCR heads etc.)
5. This warranty does not apply to equipment showing abuse, damage or that it may have been tampered
with, altered or repaired outside any TEAC Authorised Service Centre. If so, the warranty will be void.
*Your nearest Authorised TEAC Service Centre is listed in your Owners Manual
6. In the event that this unit or any defective parts must be returned to TEAC Service Centres, a copy of this
warranty certificate and of your purchase receipt must be enclosed to be a valid warranty. Such
equipment or parts must be sent to the nearest authorised TEAC Service Centre. After the repair, the unit
will be available for collection by the owner or it will be returned to the owner. The warranty does not
cover freight or insurance. In all cases of in-transit damages or loss, a claim must be filed against the
carrier by the purchaser.
7. In home service will only be provided as part of this warranty if all the following conditions are met;
a) The product is a Colour Television of 51cm screen size or over.
b) The product is within the warranty period.
c) The product is located within the normal service area of the local TEAC Service Provider.
In any other situation or circumstance, where an in home service call is made, a service fee will be
charged by the Service Provider. TEAC Total Care in home service and installation is available at
competitive rates.
8. No one is authorised to assume any liability on behalf of TEAC or impose any obligation on it, in
connection with the sale of any equipment other than as stated in this warranty and outlined above.
9. In no event will TEAC be responsible or liable for indirect or consequential damages from interrupted
operations or other causes.
10. Warranty is not transferable to any subsequent purchaser if the product is sold during the warranty period,
TEAC PRODUCT
WARRANTY PERIOD
Plasma 1 Year (In-Home Service Included)
Televisions – 51cm and above 1 Year (In-Home Service Included)
Televisions 1 Year
Digital Set Top Boxes 1 Year
VCR 1 Year
DVD 1 Year
Audio Systems 1 Year
WARRANTY PROCEDURES
Please keep this information for your own records.
Please refer to the owner’s manual to ensure that you have followed the correct installation and
operating procedures.
1. Read owner’s manual carefully
2. If you require Warranty Service, please contact the TEAC Service Centre
3. Please have your purchase receipt as your proof of purchase and the following details
completed for a valid Warranty.
Owner’s Name
Owner’s Address
Postcode
Model Name/No. Serial No.
Dealer’s Name
Dealer’s Address
Postcode
4. Please ensure that your product is packed appropriately upon return to the service centre.
If you have any other queries regarding service or warranty please contact the TEAC Service below:
TEAC Total Care Ph: 1800 656 700
www.teac.com.au

1
3
4
5
5
6
6
6
7
8
8
9
10
11
11
11
11
11
12
12
12
12
12
12
12
13
13
13
13
13
14
14
14
14
14
15
15
15
16
16
16
16
16
16
16
16
16
16
17
17
17
17
17
17
17
18
18
19
20
DVD Operations...................................
Play Discs ............................................
Pause Mode..........................................
OSD.................................... ................
DVD Menu Play.....................................
Select with Number Button.....................
Audio Mode.......................... ................
Fast......................................................
Slow Play..............................................
Repeat Mode.........................................
Repeat A-B...........................................
Subtitle.................................................
Angle ...................................................
Goto.....................................................
Display (Remain Time) ..........................
Resume Play.........................................
Zoom ...................................................
Program Mode.......................................
Picture CD............................................
Mp3 Operation ......................................
Specifications......................................
Safety Precautions..............................................
Installation............................................................
Location of control .............................................
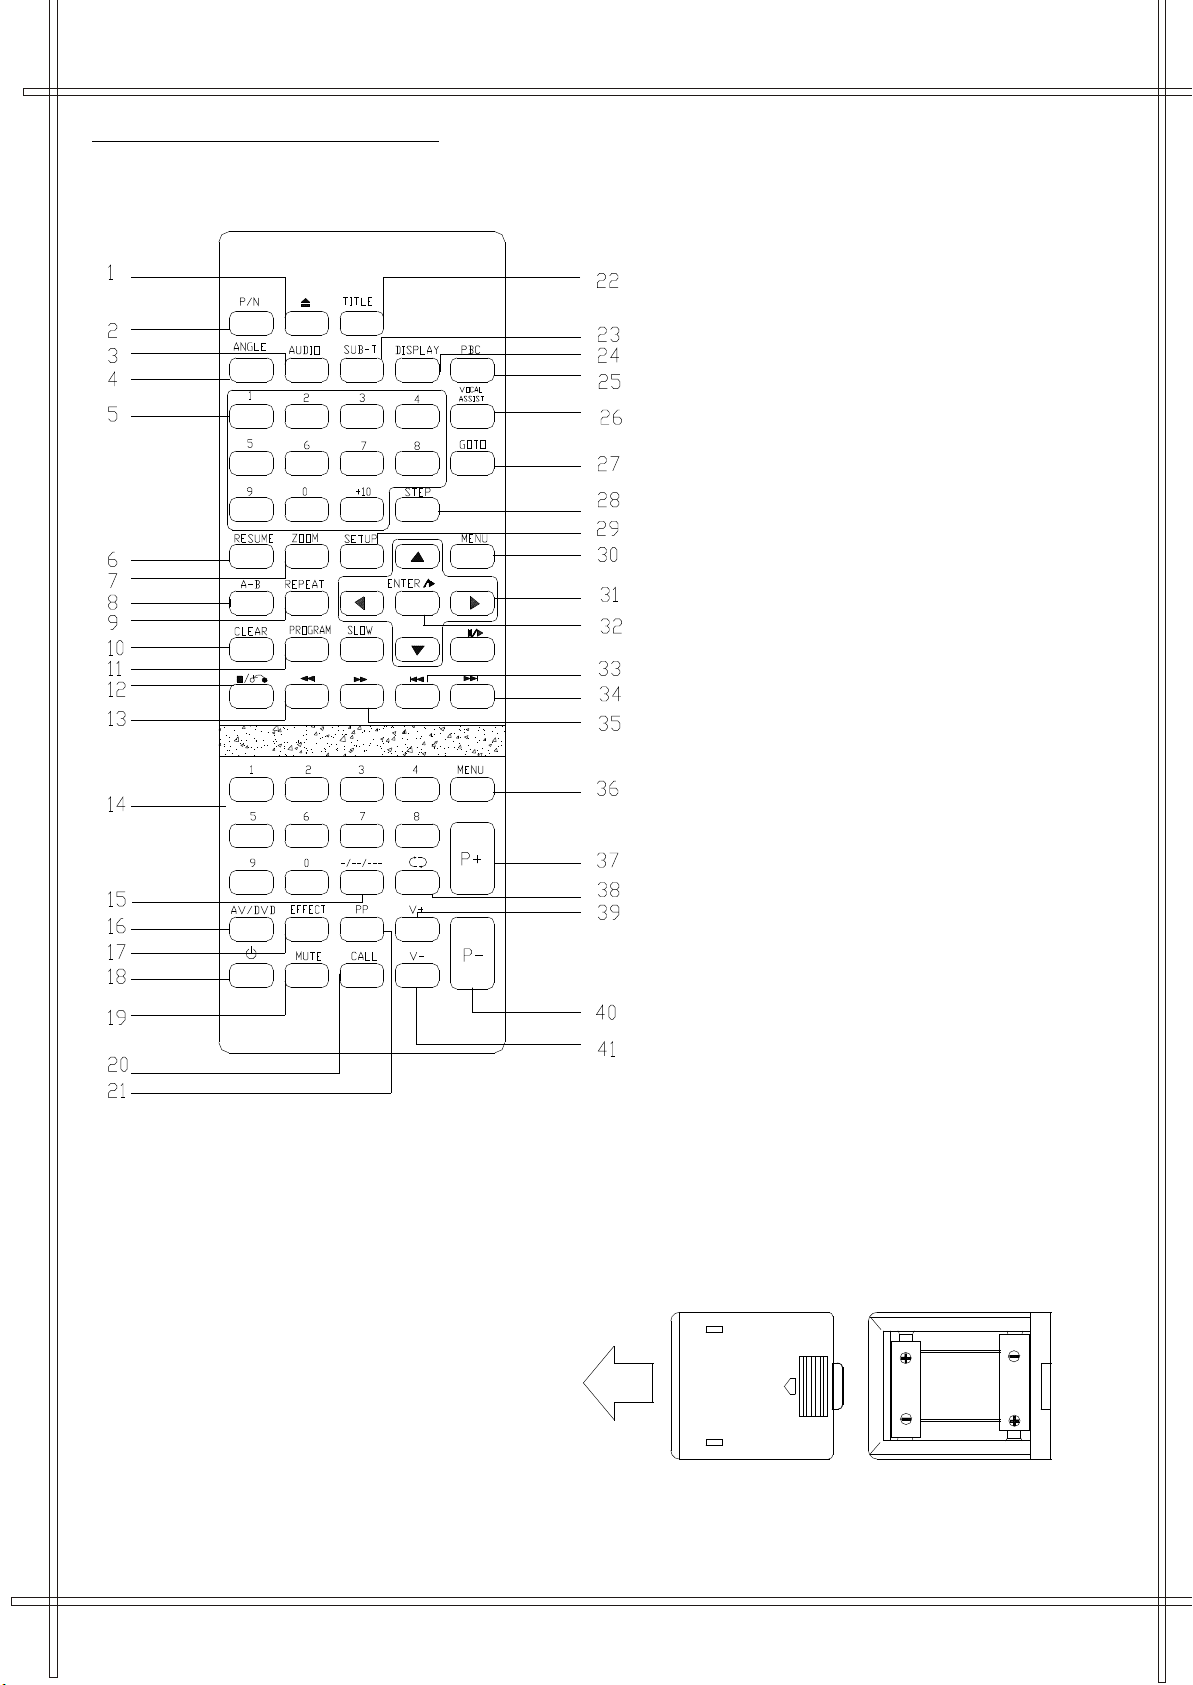
Name and function of remote control ..................
Battery installation..............................................
Operation of the whole machine...........................
Turn ON/OFF power supply....................................
Watching TVprograms...........................................
Search .......................... ......................................
Basic operations: Picture and sound control ...........
Time operation.....................................................
Intelligent volume, blue background ................... ...
Technical operation: swap.....................................
DVD Player Operation .................... ....................
General Setup .....................................................
TV Display............................................................
Angle Mark...................................... ....................
OSD Language.....................................................
Closed Captions.............................. ....................
Screen Saver........................................................
Analog Audio Setup............................................
Downmix......................................... ....................
Dolby Digital Setup .............................................
Dual Mono............................................................
Dynamic......................................... .....................
Video Setup.........................................................
Video Output.......................................................
Sharpness............................................................
Brightness...................................... .....................
Contrast..............................................................
Preference Setup.................................................
TV Type.......................................... .....................
Audio...................................................................
Subtitle.......................................... .....................
Disc Menu...................................... .....................
Parental...............................................................
Password.............................................................
Default.................................................................
Contents

Safety and Precautions
To avoid electrical shock, never subject the TV set
to rain or moisture.
It is OKto wipe itwith a cleanpiece of cloth dipped with water
or detergent. Donot use benzene,gasoline or other chemicals
to wipe it.Turn off the TV set beforewiping.
To prevent fault with electronic elements, the TV set should be
placed at a ventilated location, and dust, foreign matter shall
be prevented fromentering the DVDdisk tray.
Do not place the TV set at locations subject to direct sunshine
or close to a heat source, otherwise its normal operation may
be affected.
There is highvoltage inside theTV set. Do not removethe back
cover, asit may bedangerous to human safety.
Please turn off the power supply when no one watches TV.
Please remove theplug from powersocket.
1

Safety and Precautions
To ensure safe and reliable operation of the TV set, the following precautions must be observed in installation, operation and
maintenance.
Precautions
1. Pay attention to the power cord before installing the TV set. Do not attach anything on the power cord, and avoid treading on the
power cord. The power supply on socket must not overload. The power cord must not be extended without permission, and increased
care shall betaken for integratedsockets, as these may cause electrical shock or fire.
2. The vent on thehousing back andthe DVD trayon front mustnot be blockedor covered. The TV set must not be placed close to a heat
source, or itwill damage the TV set.
3. This TV set can only use the supply voltage and frequency indicated on the back of housing. If your house power supply does not
conform to theindication, please consult your service personnel.
4. It isstrictly forbidden todrop any metal article into the housing vents or the DVD door on front. It is strictly forbidden to have any liquid
flow into themachine, as itwill cause short-circuitin the TV set.
5. It is strictly forbidden to subject the TV set to rain or use it in a damp environment. When cleaning the TV set, be sure to remove the
plug from thepower supply socket.Do not directlyclean the housingwith liquid detergent,but it canbe wiped witha damp pieceof cloth.
Be sure to remove the plug from the power supply socket during a thunderstorm or when it is not used for long time, and the antenna
plug should alsobe removed, toavoid damaging theparts by lightning.
6. When an indoor antenna is used, do not allow the antenna to contact other electrical appliances, to avoid interfering receiving TV
program.
7. Never use accessories not recommended by manufacturers, as it may cause danger. It is better to use original carton and packaging
materials when handlingthe TV set.
8. When the DVD function is not used fora long time, the parts operation may not be ideal, so please use the DVDfunction occasionally
to prevent abnormality.
9. To prevent picture quality deterioration and sound distortion, keep your TV set away from radio sets or other articles with magnetic
fields.
10. If thereis condensation on the DVD laser head, do not use the DVD play function, or it may damage the internal parts of DVD.
(Insert the power cord plug into the power supply socket and switchto DVD statusand place it for 2-3 hours. This will pre-warm the DVD
2
Safety
1. Do not remove the back cover without permission, as the high voltage inside the TV set may cause danger. If it is necessary to
remove the backcover, it should be done by a specialized service person.
2. In caseof the following, please remove the power supply plug of the TV set from the socket, and contact the service personnel.
(1) There is damage orbreak in thepower cord andplug.
(2) Foreign matteror liquid has entered the TV set orDVD cassette.
(3) The TV set performance has obvious deterioration or thereis damage onhousing.
3. Please removethe plug from the power supply socket when the TV set is not used for a longtime.
4. Heavy object must not be placed on the machine, or the machine be treaded. Otherwise, it may cause serious personal damage or
damage to themachine.
5. Keep yourfinger away from the tray when closing the DVD tray, or it may cause personal injury.
6. The outdoor antenna must not be erected close to HVlines or other power lines, and great care shall be taken in erecting antenna. It
is strictly forbiddento contact the power line, or it may lead to fatal injury.

To ensure optimum receiving effect, please use outdoor antenna or common antenna (CATV). The antenna types and locations
will vary atdifferent places.
When an outdoor antenna is used, please make the connection as shown above, and lightning protection devices should be
installed and itshould be repairedat fixed intervals.
It is recommendedto use a75 coaxial cable, toeliminate interference ornoise caused bymismatching of impedance.
Antenna, audio and video connections
3
Instructions on installation
Before installation, pleasefirst read carefullythe relevant contentsin Safety and Precautions .
Please place the TV set inside a room where sunlight will not directly cast on the screen. Reflection on TV screen will cause eye
fatigue.
To enjoy TV programs comfortably, use softindirect lighting. The optimum watching distance is 5-7 times the screen height.
There shall be a clearanceof 10cm orover between theTV set and wall for good ventilation.
The TV set cannot be placed at a location with excessive high temperature or humidity, to avoid damageor invalidate components.
Automatic demagnetizing
A color TV set is likely to be affected by a magnetic field, to result in color stain on the screen, causing color distortion. If the TV
set is moved, turned or influenced by a magnetic object nearby when it is ON, please turn off its power and wait for at least one hour
before turning it ON again, to ensure that theautomatic demagnetizing circuit in the machine can work normallyagain, to eliminate the
effect of magnetizing on colorand restore normalcolor screen.
Installation

4
LOCATION OF CONTROLS
1. Speaker
2. Remote control receivingwindow
3. Indicator
4. Menu Button
5. AV/ DVD Button
6. DVD Play Button
7. Open/Close Button
8. Channel Button(P-)
9. Channel Button(P+)
10. Volume Button(V )
11. Volume Button(V )
12. Main power switch
13. 75 ohmAntenna Socket
14. AVin
15. AVout
16. Audio digitalOut Sockets (For DVD only)
17. SideAV
interface description:
1 Side AV:AV1 mode signal input in TV mode.
2 Rear AV interface: AV2 mode signal input and AV
signal output in TV mode.
3 Optical fiber: in DVD mode, optical fiber signal (digital
and AUDIO) output.
4 Coaxial: in DVD mode, coaxial signal (digital and audio)
output.
Note: If you want to use the DVD mode and AV input
mode of the TV set at the same time, please input the
audio and video signals from side AV (AV1), instead of
from rear AV (Av2).

o
p
e
n
REMOTE CONTROL UNIT
1. Open/Close Button
2. Pal/NTSC Button
3. Audio Button
4. Angle Button
5. DVD Numeric Buttons
6. Resume Button
7. Zoom Button
8. A-B Button
9. Repeat Button
10. Clear Button
11. Program Button
12. Stop Button
13. Fast Backward Button
14. TV Numeric Buttons
15. Three Digital Program Button
16. AV/DVD Button
17. Effect Button (Thebutton is non-functional.)
18. Standby Button
19. Mute Button
20. Call Button
21. PP Button
22. Title Button
23. Sub-t Button
24. Display Button
25. Pbc Button
26. VocalAssist Button
27. Go To Button
28. Step Button
29. Set Up Button
30. Menu Button
31. Direction Up Button
Direction Down Button
Direction Left Button
Direction Right Button
32. Enter/Play (ENTER)Button
33. Play/Pause Button
34. Music Change Buttons
35. Fast Forward Button
36. TV Menu Button
37. Channel Button (P+)
38. Previous program Button
39. Volume Button(V+)
40. Channel Button (P-)
41. Volume Button(V-)
BATTERY INSTALLATION
Insert two "AAA" batteries as illustrated
and replace the battery cover.
5

1.Press the powerswitch, the powerindicator will turnon, and after several seconds, theTV set will start normaloperation.
2.When the TV is operating,press the buttonon the remotecontroller to enterin standby mode. The power indicator will be
on but therewill be nosound or picture.
3.When the TV is instandby mode, press , the numberbuttons (0-9) orthe Program Up/Down(P+/P-) to resumethe operation
of your television.
Note: To ensure normaloperation at all times, wait for at least 5 seconds before turning the TV on again after switchingoff.
4.Press the powerswitch on thefront panel tocompletely turn off your TV.
Note: Please donot leave thetelevision in standbymode for longperiods of time.
Use the power switch located in the front panel instead.
6
Operation
Turning the power ON/OFF
1. Select aprogram
Use the directprogram number selectionbuttons
Youcan press thenumber buttons 0-9of the remotecontroller to selectone-digit programs.
Press the -/-- button once on the remote controller to enter two-digit program numbers. The symbol - - will display on the screen to
indicate that youcan press two number buttons 0-9 consecutively to select any program number between 10 and 99.
Press -/-- twice to enter three digit numbers between 100 and 227. The on-screen indication - - - will show that the TV is waiting for
your input ofa 3 digitsprogram number.
Or use theprogram Up/Down buttonsP+ and P- buttons
Pressing P+ will select aprogram number inan increasing sequence;
Pressing P- will select aprogram number ina decreasing sequence.
2. Adjustthe volume usingthe V+ and V- buttons.
3. Set correct color and sound systems
If the coloror sound ofa channel isnot normal, the problem may be wrong
settings for coloror sound systems.In this situationproceed as described below:
Press the MENU button 3 times, so that thescreen will displaythe following menu.
If the colorof the pictureis not normal
Press P+ or P- to select the COLOR menu option(it turns fromwhite to green),
then press V+ or V- to select the correct color system. The following selection
squence will bedisplayed:
AUTO PAL NTSC 4.43 NTSC 3.58
If the soundis not normal
Press the SOUND SYSTEM button repeatedly on the remote controller to select thecorrect sound system.Alternatively highlight
the SOUND option under the FEATURE menu usingP+ or P-. Then use V+ or V- to change to BG system within the following
selection sequence:
DK BG I
Note: If you are using the television for the first time, please first follow the automatic search procedure to store the programs
as described belowin Program presetting .
Watching television programs

Automatic search
When you turnon the TV set forthe first time,you must pressthe MENU
button repeatedly in the front panel or in the remote controller, until the
TUNING menu isdisplayed on thescreen:
Use P+ or P- buttons to selectthe AUTO STORE option (it turnsfrom
white to green).Press V+ button to start the automatic search. The following
menu is displayedon the screenand you canpress any buttonto stop searching.
Auto search features:
During automatic searching,all programs foundwill be automatically
stored starting fromthe current ProgramNumber.
If the numberof programs foundexceeds the maximumnumber of memory locations
the auto searchwill stop automatically.
All vacantprogram locations (program numbers with no actual TV channel stored)
will be setas SKIP ON.
At the endof automatic searchthe first Program found will be displayed.
1
7
Manual search
The use ofmanual search isrecommended when:
The automatic searchfunction cannot findthe desired channel.
To store TV Channels underparticular Program numbers,one by one.
Follow these stepsto manually findand store televisionchannels.
1. Press MENU. Alternatively press MENU 5 times
2. Select the option PROG using P+ and P- keys and set the
program number usingV+ and V-.
3. Highlight SEARCH and press V+ for ascending frequency
search, or V- to search for lower frequency TV channels. Repeat
this step untilthe desired channelis found.
4. The TV will store automatically thechannel found underthe
selected program number.
5. Press MENU or wait afew seconds toexit the tuningmenu.
Fine tuning
Under poor receptionconditions it issometimes possible toimprove the qualityof the pictureand sound usingthe fine tuningcontrol.
Enter the TUNING menu andhighlight the FREQ.FINE option. PressV+ or V- to
produce small tuningfrequency changes up or down from the central position.
A finetuning on-screen bar will be visible. Adjust for the best possible picture
and sound results.Finally press MENU to exit the menu and store your last settings
for the finetuning function.
Skip over undesiredProgram numbers
After program presetting,you can use this function to skip over the undesired program numbers,
leaving only thoseprograms that you intend to use. When you change channels using P+ or P- all
the skipped channelswill be ignored.
1.Press MENU. Alternatively press MENU 5 times
2.Select the optionPROG using P+ and P- keys. Find the
program number thatyou want to skip by using V+ and V-.
3.Highlight SKIP and press V+ or V- to change thestatus to ON.
4.The TV will store automaticallythe new setting.
5.Repeat steps 2to 4 forall the programsthat you wantto skip.
Press MENU or wait afew seconds toexit the tuningmenu.
Skipped programs canstill be accessedby using thenumeric
buttons (0 to227).
Following a similarprocedure you canrestore skipped program
s by changingthe SKIP setting to OFF.
..............
..............
..............
..............

Mute
The Mute function may be used when you want to eliminate any sound from the set. Press the MUTE button on the remote controller,
and the screenwill display thered characters MUTE.If you want to restore the sound, press the MUTE button once more.
Automatic mute isON during programswitchover, duringblue screen in TV and AV modes andduring search mode.
8
Screen display
Press the CALL button and the screen will show: the current program number, color system, sound system and mono/stereo status.
When in the screen display mode, pressing the CALL button will cancel the existing on-screen display.
Pressing the CALL button inAV mode will showcurrent video inputin use
When the channelis changed, theprogram number isdisplayed at the left top of the screen for about 5 seconds.
Selecting the picturemode
Press the PP button to select your desired picture settings from the following: NATURAL, RICH, SOFT and USER.
NATURAL Normal picture
RICH Clear and bright,with strong gradation
SOFT Light picture
USER Your personal preference
Basic Operation:Picture and sound control
Adjusting the picture
Follow these simplesteps.
1.Press MENU once or PICTURE to display the picture menu on the screen.
2.Select the itemthat you wantto adjust usingP+ or P-. That is brightness,
contrast, saturation, sharpnessor hue.
3.Adjust the pictureusing V+ orV-.
4.Press MENU to exit thismenu.
The HUE adjustment is only available for NTSC colorsystem. The adjusting range isfrom -50 to +50.
Brightness, contrast, saturationand sharpness canbe adjusted between0 and 100.
Setting the sound mode
Proceed as follows:
1.Press the MENU button twice or SOUND once, to displaythe sound menu on the screen
2.Select the itemthat you wantto adjust usingP+ or P-. That is volume orbalance.
3.Adjust the soundusing V+ or V-.
4.Press SOUND to store settingsand exit thismenu.
Programming timing functions
Using the timing function will allow you to watcha certain program at a particular
time automatically, you canalso place the TV set in stand-by at a specific time.
Read this exampleto learn howto operate timingfunctions. For example, it is now 18:28 and
you want towatch Program 6at 19: 00and turn theTV off at 22:30 (standby). The timer can be
programmed as follows:
1.In TV mode press MENU four times toenter the TIMING menu.
Select the CLOCKoption and enterthe current time. Use P+, P- and V+, V- to navigate the
menu options andto change values.The selected options will changecolor from white to green.

9
1.Select the TIMER ON optionand enter the starting time as 19:00
2.Select the PROGRAMoption and enterthe program number 6
3.Select the TIMER OFF optionand enter the ending time 22:30
Press MENU to store valuesand leave thismenu.
for example.
for example.
for example.
Setting the Sleeptime
You can program your TV to switch automatically to standby mode after a fixed period of time.
1.In TV mode press MENU button four timesor press TIMING once to enterthe TIMING menu.
2.Select the SLEEPTIMER option and enter thetime period beforeturning the TV into standbymode. Use P+, P- and V+, V- to
navigate the menuoptions and to change values. The selected optionswill change color from white to green.
Press MENU to store thevalue and leave this menu.
Setting the Sleep timer to 0 will disable this function. The TV will remain on until physically
switched to Stand-By.
Using the Automatic Volume Level function AVL
Use this functionto minimize volume differences between different programs.
1.In TV mode press MENU button three timesor press FEATURE once to enter the
FEATURE menu.
2.Select theAVLoption and change its status to ON. Use P+, P- select options and V+, V-
Press MENU to store the new value andleave this menu
Blue background screen
Setting the BlueScreen on willdisplay an uniform blue color instead of the typical black and
white dots or snow when thereis no reception.
1.In TV mode press MENU button three times to enter the FEATURE menu.
2.Select the BLUESCREEN option andchange its status to ON. Use P+, P- select options
and V+, V- to change values. The selected options will change color from white to green.
3.Press MENU to store thenew value andleave this menu.
The blue backgroundis disabled duringsearch mode.
The time periodcan be setbetween 0 and120 minutes in15 minutes increments.
to change values.The selected options will changecolor from white to green.

10
ADVANCED OPERATION
Previous program
Use the previousprogram button to recall the program being displayed immediately before the current one. Press twice to return to the
same current program.
Program order arrangement
You can use the PROG. SWAP function button to rearrange the position of channels in memory, for example after performing an
automatic search fortuning in programs.
1.Press PROG. SWAPto display the swap menu on the screen.
2.Select PROG1 and enter the number of the program that you want to move. That program will be displayed on the screen. Use P+ or
P- for selection andV+ or V- to change values.
3.Select PROG 2and enter thedestination for theprogram selected in step 2.
4.Select SWAPand press V+ to make the change.
5.Press PROG. SWAPto exit thismenu.
Playing a game
Press the GAMEbutton and followthe instructions on the screen to play this game with numbers.
GAME
TIMES 8
START ADJUST

DVD PLAYER OPERATION
Basic Operation
1. Press "DVD" button on the front panel of the TV orthe "AV" button on the remote controller to switchover to DVD play mode.
2. Press OPEN/ CLOSE buttonto load disc in disc tray.
3. Press OPEN/ CLOSE buttonto close the tray.
Hold the discwithout touching eitherof its surfaces,position it withthe printed title side
facing up, alignit with theguides, and placeit in itsproper position.
DVD Setup Mode
Setup Mode provides the menu for the configuration of GENERAL SETUP PAGE, ANALOG AUDIO SETUP PAGE,
DOLBY DIGITAL SETUP , VIDEO SETUP PAGE and PREFERENCE PAGE .
Item selection inthe Setup Menu is done by using the Navigation Arrows, SETUP button and the ENTER / 4button.
Firstly press the SETUP button, enter into SETUP menu, then press the DIRECTION RIGHT button, you can enter into the next
Sub-menu.
Press the DIRECTION LEFT button step by step to go back the last menu, until exit the Setup Menu,
1.GENERAL SETUP
ANGLE MARK
This only works when there is an
angle mark onthe disc. Select
ON, the screenshows the mark
when playing DVD.
ON
OFF
OSD LANGUAGE (ON SCREEN DISPLAY)
This is usedto select theOSD language.
ENGLISH
11
TV DISPLAY
4:3 PANSCAN
This is selectedwhen the DVD
player is connectedto a normal4:3
TV. Wide-screen images are shown
on the screen,but with someparts
cut automatically.
4:3 LETTERBOX
This is selectedwhen the player is
connected to anormal 4:3 TV.
Wide-screen images are shown on
the screen, withblack belt onthe top
and bottom.
16:9
This is selectedwhen the player
is connected toa wide-screen TV.
GENERAL SETUP PAGE
4:3 PANSCAN
SET TV DISPLAY MODE
4:3 LETTERBOX
CLOSED CAOTIONS
SCREEN SAVER
DIGITAL OUTPUT
TV DISPLAY
ANGLE MARK
OSD LANGUAGE 16:9
DOBLY
SCREEN SAVER
ANGLE MARK
CLOSED CAOTIONS
DIGITAL OUTPUT
OSD LANGUAGE
TV DISPLAY
SET ANGLE MARK
OFF
GENERAL SETUP PAGE
ON
DOBLY
SCREEN SAVER
ANGLE MARK
CLOSED CAOTIONS
DIGITAL OUTPUT
OSD LANGUAGE
TV DISPLAY
SET ANGLE MARK
OFF
GENERAL SETUP PAGE
ON
DOBLY
ENGLISH
SET OSD LANGUAGE

DOBLY
DUAL MONO (1+1) SETUP
DOLBY DIGITAL SETUP
DYNAMIC
DUAL MONO
MIX-MONO
R-MONO
L-MONO
STEREO
SET DOWNMIX MODE
ANALOG AUDIO SETUP PAGE
DOWNMIX
STEREO
LT/RT
DOBLY
12
DOBLY
SCREEN SAVER
CLOSED CAPTION OFF
ANGLE MARK
CLOSED CAOTIONS
DIGITAL OUTPUT
OSD LANGUAGE
TV DISPLAY
GENERAL SETUP PAGE
OFF
ON
SCREEN SAVER
GENERAL SETUP PAGE
ANGLE MARK
CLOSED CAOTIONS
DIGITAL OUTPUT
OSD LANGUAGE
TV DISPLAY
ON
OFF
SCREEN SAVER
DOBLY
DIGITAL OUTPUT
This is usedto set theaudio output.
SPDIF OFF
Set SPDIF to OFF to disable the digital
audio output. Then sorround soundwill
be available.
RAW
This surround soundformat is output
to a Dolbydigital decoder through
the optical andcoaxial connectors.
PCM only
This surround soundformat is output
to a DTSdecoder through the optical
and coaxial connectors.
SCREEN SAVER
The screen saver image appears when
the player stopsor the imageis frozen
for a fewminutes. This saver can
prevent the screen from being damaged.
ON (Start thescreen saver)
OFF (Remove thescreen saver).
2. ANALOG AUDIO SETUP PAGE
DOWNMIX
LT/RT
.
STER
3. DOLBY DIGITAL SETUP
DUAL MONO
This is used to select the stereo,L-MONO
R-MONO and MIX-MONO.
This option is recommended whenaudio output
is connected toan external DolbyProloigic.
EO
Select this optionto produce astereo sound image
from the multichannel system availablefrom many
DVD discs, whenconnecting to astereo sound system.
CLOSED CAPTIONS
This option canshow or hidethe captions.
ON (Show captions)
OFF (Hide captions)
SCREEN SAVER PCM only
SET SPDIF
ANGLE MARK
TV DISPLAY
DIGITAL OUTPUT
OSD LANGUAGE
CLOSED CAOTIONS
GENERAL SETUP PAGE
DOBLY
SPDIF OFF
RAW

4.VIDEO SETUP
SHARPNESS
This option isused to adjust the sharpness
of the image.
The sharpness levelof the videooutput
can be setto:
High
Medium
Low
BRIGHTNESS
User can setthe level ofbrightness for the image displayed.
It is rangedfrom -20 to 20.
BRIGHTNESS +4
CONTRAST
User can setthe level ofcontrast for the image displayed.
It is rangedfrom -16 to 16.
CONTRAST +4
DYNAMIC
This option isused to setthe compression
ratio in orderto control thesound (volume) contrast.
13
DOLBY DIGITAL SETUP
DOBLY
DUAL MONO
DYNAMIC
3/4
FULL
1/4
1/2
OFF
SET DRC TO FULL
BRIGHTNESS
00
BRIGHTNESS
CONTRAST
SHARPNESS
DOBLY
VIDEO SETUP PAGE
CONTRAST
CONTRAST 00
BRIGHTNESS
SHARPNESS
DOBLY
VIDEO SETUP PAGE
SHARPNESS
SHARPNESS
BRIGHTNESS
CONTRAST
VIDEO SETUP PAGE
DOBLY
MEDIUM
LOW
HIGH

PASSWORD
SET TV TYPE
DEFAULT
PAL
NTSC
PREFERENCE PAGE
DISC MENU
PARENTAL
SUBTITLE
AUDIO
TV TYPE
DOBLY
MULTI
DEFAULT
THAI
RUSSIAN
PASSWORD
PARENTAL
DISC MENU
SUBTITLE
AUDIO
SPANISH
JAPANESE
KOREAN
CHINESE
FRENCH
ENGLISH
PREFERENCE PAGE
DOBLY
SET AUDIO MODE
DOBLY
PREFERENCE PAGE
DEFAULT
PARENTAL
PASSWORD
DISC MENU
AUDIO
SUBTITLE
KOREAN
THAI
RUSSIAN
JAPANESE
CHINESE
SPANISH
ENGLISH
FRENCH
SUBTITLE
JAPANESE
KOREAN
CHINESE
PARENTAL
PASSWORD
DISC MENU
ENGLISH
FRENCH
SPANISH
AUDIO
DOBLY
PREFERENCE PAGE
SET SUBTITLE
RUSSIAN
THAI
DEFAULT
14
AUDIO
If a languagelisted below isrecorded
on the disc,you can playthe sound insuch
language. If not,the original language
recorded will be used.
ENGLISH
FRENCH
SPANISH
CHINESE
JAPANESE
KOREAN
RUSSIAN
THAI
SUBTITLE
If a language listed below is recorded
on the disc,you can setthe subtitle tobe
displayed in suchlanguage. If not,the original
language recorded willbe used.
ENGLISH
FRENCH
SPANISH
CHINESE
JAPANESE
KOREAN
RUSSIAN
THAI
OFF
DISC MENU
If a languagelisted be
the disc, youcan set theMenu to be
displayed in suchlanguage. If not,the
original language recorded will be used.
ENGLISH
FRENCH
SPANISH
CHINESE
JAPANESE
KOREAN
RUSSIAN
THAI
low is recordedon
TV TYPE
PAL
This is selectedwhen the playeris
connected to anPALTV.
MULTI
The player willset the TV standard
according to thedisc in thetray.
NTSC
This is selectedwhen the playeris
connected to aNTSC TV.
5.PREFERENCE SETUP

DOBLY
PREFERENCE PAGE
SET AGE CONTROL
DEFAULT
DISC MENU
PARENTAL
PASSWORD
SUBTITLE
NC17
ADULT
R
PGR
PG13
PG
TV TYPE
AUDIO
KID SAF
G
PASSWORD
LOAD FACTORY SETTING
DEFAULT RESET
DISC MENU
PARENTAL
PREFERENCE PAGE
AUDIO
SUBTITLE
TV TYPE
DOBLY
PREFERENCE PAGE
CHANGE
SUBTITLE
PARENTAL
PASSWORD
DISC MENU
AUDIO
DOBLY
SET PASSWORD
DEFAULT
PARENTAL
When playing adisc with parental lock function, you may select an age
Control grade accordingto grade ofdisc and yourown preference.
For example, if PG is selected, DVD Video disc rated higherthan the
PG grade cannotbe played.
KID SAF
G
PG
PG 13
P GR
R
NC 17
ADULT
-
OLD PASSWORD
NEW PASSWORD
CONFIRM PWD
OK
DEFAULT
User can loadthe original factory
setti and
press ENTER /4.
ng by choosing RESET
PASSWORD
User can changethe password that is
required when theuser wants to
change theAge Control Gradein the
Parental Lock function.
NOTE: (The factorysetting is 1369)
15

DVD Operations
Play Discs
1. Press theOPEN/CLOSE button ( )on the frontpanel and loadthe Disc onthe tray.
The label sideshould be facingupwards. For aDouble-sided DVD Disc,put the discwith labelA/1 up.
2. Press theOPEN/CLOSE ( ) buttonagain to closethe tray andthe disc will be loaded.
3. The Disc will beplayed automatically.
. If itis a DVDdisc, it willshow the Menu/Title Page on the screen.
. If itis a CD,it will playthe first track immediately.
4. Press theSTOP Button ( )if you wantto stop theDisc playback. You can resume playbackby pressing the ENTER / 4
button (on thefront panel)or theENTER / 4button (on theremote controller) andit will start at location where you have
pressed stopped (ResumePlay).
5. Press theSTOP Button twice to have the Disc fully stopped.
PAUSE Mode
This function isapplicable for DVDand CD audio.
For DVD ,the picture willbecome static.
For CD audio,it will becomesilent.
1.By pressing the Button will cause the player to enter Pause mode.
2. Press the ENTER / 4Button or PAUS to Play State.
OSD.
There are 5OSD languages embedded in the DVD Player : English, Spanish, German, French and Italian.
1. Press theSETUP button on the remotecontroller to enter the setup menu main page.
2. Choose GeneralSetup through the Navigation Arrows (3546) and press
3. Go tothe OSD LANG option and use the Navigation Arrows to do the selection.
4. Press ENTER / 4to confirm.
5. Press SETUP again to quit the Setup menu.
DVD Menu Play
The DVD MenuPlay function isonly applicable forDVD movie. Usercan access theCasting information, ProductionHistory, Movie
Introduction etc. directly through this function.
1. Press theDVD MENU Button on the remote controller to enter the Root Menu.
2. Use theNavigation Arrows(3546) or input the item index through the Number keys (0-9)
to do theselection.
3. Press ENTER / 4to confirm the selection.
E button again to resume
Select with Number Button (0 - 9)
During a DVDmovie playback, by inputting through the Number Buttons you are able to select the Chapter in the current file.
When playing audioCD, Number Key press will command the player to access the trackindicated.
Audio Mode
This function isapplicable for DVDand CD audio but with different effects.
For a DVDdisc, pressing the AUDIO Button will change the language of playback.
For CD, pressingthe AUDIO MENU Button will change the audio mode in round-robbin fashion.
Fast
This function isapplicable for DVDand CD audiobut with different effects. The
FAST FORWARD ( 8) key and FAST BACKWARD (7) key are used to achieve fast
play function.
For DVD ,there are 4different levels of speed (2x, 4x, 8x, 16x). Every successivekey press willincrement the speedof quick play.
Note : Press PLAY Button at any stage will resume to normal speed.
For CD audio,the FF/FR willperform quick rollingon the musicoutput. However,once the FF/FRkey press isreleased, the
playback will Resume to normal speed.
Slow Play
The Slow Forwardis applicable forDVD, There are 4 steps of slow motionspeed, 1/2,1/4, 1/8, 1/16. Successive key presses will
Decrement the playbackspeed.
Note : Press Play Key to switch back to normal playback speed.
Repeat Mod
D audio butwith different effects.
For DVD disc playback, user can choose to repeat the current chapter or the current title.
Subsequent key pressof the REPEAT key can change between these two options.
For CD, user can choose to repeat the current track or the whole disc (Repeat All).
Subsequent key press of the REPEAT key can change between these two options.
When using theNumber Buttons as input, user can directly input two numbers, if two digits are used.
For example, toinput the number '13' , user has to press' '1 ' and ' 3' .
e
This function is applicable to DVD and C
16
Table of contents
Other Teac TV manuals