TEAM CUISINE SKA-OVN-201-SMT User manual
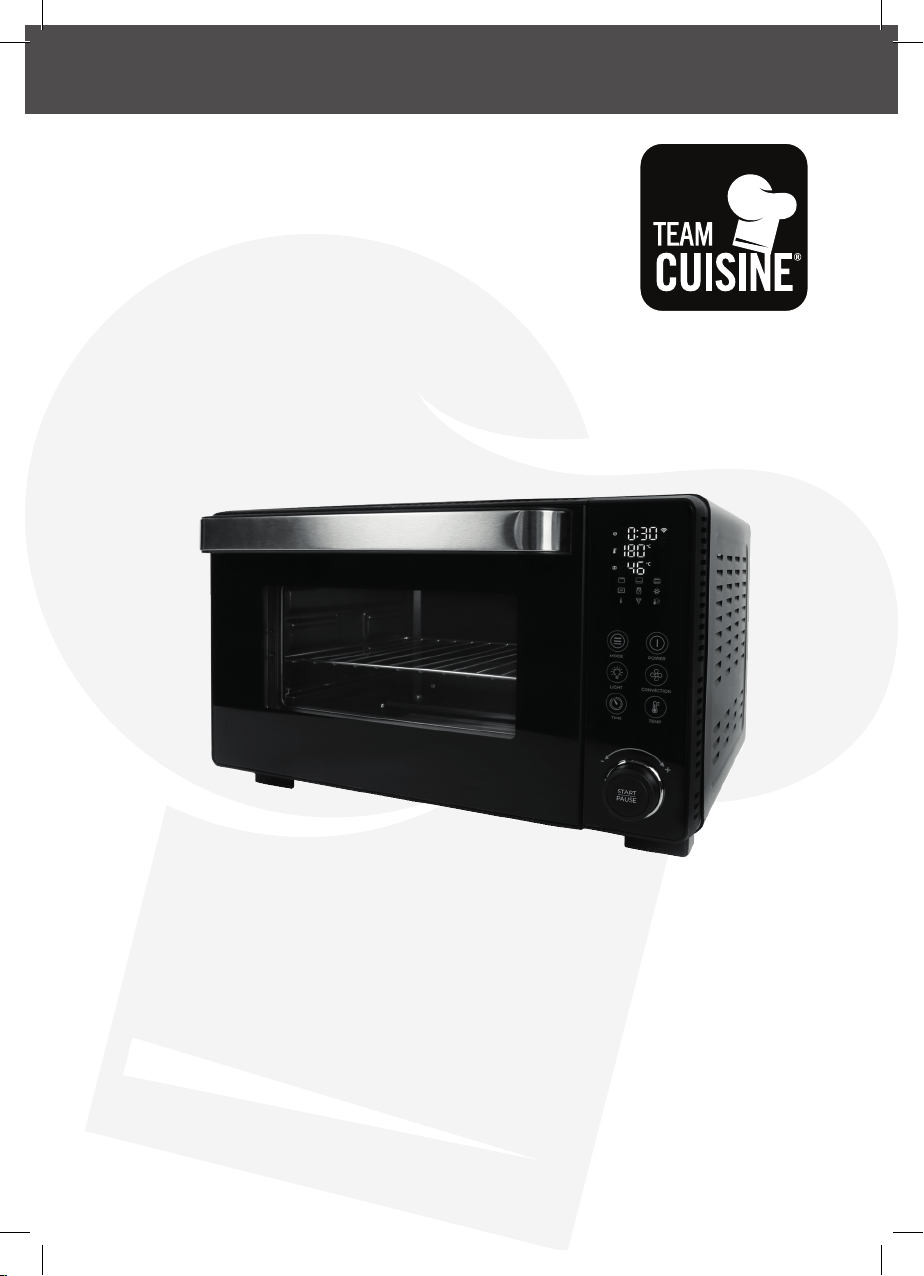
SMART CONVECTION OVEN
SKA-OVN-201-SMT

Thank you for choosing our product!
Congratulations on the purchase of your oven. It has been designed to help you cook
delicious meals using programs designed to suit different cooking methods.
To make sure you get the most out of this multi-functional oven, we recommend you
read all the instructions, including the safety warnings, before using the product. For
your own safety, please only use the product as described in this manual.
Keep the manual in a safe place so you can easily refer to it and pass it on to any future
owners of the product.
Intended purpose
Your appliance is used to broil, roast, bake, slow cook, cook pizza, reheat, defrost, keep
food warm and ferment foods. The Wi-Fi App can be linked to the appliance so you can
control your cooking remotely (only available on SKA-OVN-201-SMT models).
These user instructions describe the oven’s functions. For information on the preparation
of special dishes, refer to the recipe.
The appliance is designed for private, domestic use only. The appliance must only be
used indoors and must not be used for commercial purposes.

Content
1. Safety Guide.................................................................................................... 5
1.1 For Your Safety............................................................................................... 5
1.2 Signal Words.................................................................................................. 5
1.3 Hazards and safety instructions ..................................................................... 5
2. Overview......................................................................................................... 9
3. Screen display ................................................................................................. 10
4. Functions overview ......................................................................................... 11
5. Items supplied................................................................................................. 12
6. Beforerstuse................................................................................................ 12
6.1 Unpacking...................................................................................................... 12
6.2 Assembly ....................................................................................................... 13
6.3 Initial test run ................................................................................................. 13
7. Operating the appliance ................................................................................. 13
7.1 Turning the appliance on and off................................................................... 13
7.2 Selecting a mode........................................................................................... 14
7.3 Setting the time ............................................................................................. 14
7.4 Setting the temperature ................................................................................ 14
7.5 Changing the temperature scale – °C or °F................................................... 15
7.6 Starting and pausing the appliance............................................................... 15
7.7 Preheating and the cooking status indicator................................................. 15
7.8 Cancel ........................................................................................................... 16
7.9 Using the convection fan .............................................................................. 16
8. App for Smart Convection Oven
(only available on SKA-OVN-201-SMT models)............................................... 16
8.1 Downloading and registering the app........................................................... 16
8.2 Pairing the device with your oven ................................................................. 17
9. Cooking........................................................................................................... 17
9.1 Using the oven............................................................................................... 17
9.2 Manual mode................................................................................................. 18
9.3 Broil mode ..................................................................................................... 18
9.4 Roast mode.................................................................................................... 18
9.5 Bake mode..................................................................................................... 18
9.6 Reheat mode ................................................................................................. 18
9.7 Ferment mode............................................................................................... 19
9.8 Defrost mode................................................................................................. 19
9.9 Keep warm mode .......................................................................................... 19
9.10 Pizza mode..................................................................................................... 19
9.11 Slow mode..................................................................................................... 19
9.12 Mode settings................................................................................................ 19

Content
10.Cleaning ......................................................................................................... 20
10.1 Cleaning the oven exterior/interior ............................................................... 20
10.2 Cleaning the accessories ............................................................................... 20
11.Troubleshooting .............................................................................................. 21
12.Error codes on the screen ............................................................................... 22
13.Disposal........................................................................................................... 22
14.Technicalspecications ................................................................................... 23

5EN -
1. Safety Guide
1.1 For Your Safety
Safety is an essential part of every oven. However, the product safety of the oven can
only be ensured if this chapter and the warning notices in the following chapters are
followed.
Do not attempt to operate the appliance without reading and understanding the user
manual instructions to ensure all safety measures and features are in place and operating
correctly. Failure to follow the instructions in this manual may result in personal injury
and / or property damage.
1.2 Signal Words
Be aware of the signal words WARNING and NOTE as they relate to safety notes. These
are the signal words for the respective safety notes:
WARNING
Indicates a hazardous situation which, if not avoided, could result in death or serious
injury.
NOTE
Used to address best practices to avoid damage to your appliance, its accessories and
potential injury.
1.3 Hazards and safety instructions
• This appliance is intended for household use only. Do not use this appliance for
commercial purposes. Do not use the appliance outdoors or for anything other
than its intended use. Failure to do so may result in injury, property damage and
invalidate the warranty.
• This appliance is not to be used by children or by persons with reduced physical,
sensory or mental abilities, or lack of experience or knowledge. Close supervision
is necessary when any appliance is used near children or these individuals. Children
should not play with the appliance. Cleaning, maintenance or connecting the
appliance to the power supply should not be made by children.
• WARNING Keep the appliance and the power cord out of the reach of children
and pets.
• Always place the appliance on a dry, stable, non-combustible, level surface. Do not
place the appliance on a wooden table. To prevent potential damage to the surface,
place an appropriate protective hot pad underneath the appliance.
• WARNING Do not use or place the appliance on or near:
-towels, paper, curtains or other ammable materials.
-heat sources such as stoves, gas or electric burners, or ovens.
-naked ames such as a candle.
-water sources such as taps or sinks, or an area where water splashes.
• Do not block the vents. Use the appliance only in a well-ventilated area and allow
6 inches / 15 cm of space on all sides of the appliance.

6EN -
• WARNING Ensure that the voltage of the appliance is compatible with the
voltage in your home in order to avoid re, injury, or damage. The plug of the
appliance must be inserted into a suitable socket, which has been installed
and earthed in accordance with local regulations and requirements. DO NOT
DEFEAT THE SAFETY PURPOSE OF THE GROUNDED PLUG. It is normal for the
plug to get warm while the appliance is being used. However, a loose t between
the plug and the outlet may cause overheating. If this occurs, try inserting the plug
into a different electrical socket. If you have any queries on the plug or socket setup,
contact a qualied electrician.
• When plugging the power cord into the wall socket, never force the plug to t.
• WARNING To avoid an electrical shock, do not touch the plug with wet hands
or when you are standing in water. Do not immerse the oven housing, power cord, or
plug, in water or any other liquid. Do not rinse the appliance under a tap.
• WARNING For safety purposes, this appliance comes with a short power cord
(3 feet / 91.5 cm) to prevent hazards from tripping or becoming entangled with the
power cord.
• WARNING Do not use the appliance with below-counter power sockets, an
adapter or extension cord. Do not allow the power cord to hang over the edge of a
counter or table or touch hot surfaces or naked ames.
• Regularly check the appliance and the power cord for damage. Do not use
the appliance, power cord or plug if they have been damaged, dropped or
malfunctioning. If the appliance, power cord or plug have been damaged, they must
be replaced by the manufacturer, a service technician, or a similarly qualied person
in order to avoid hazards. Do not attempt to modify this appliance in any way.
• Before use, carefully inspect the appliance and its parts for damage. Do not use the
appliance if any damage is present.
• Always unplug the appliance from the wall socket when not in use, as well as before
adding or removing parts or accessories, and before cleaning. When unplugging the
appliance, gently pull the plug not the power cord out of the wall socket.
• Before cleaning or storing, be sure that the appliance has cooled completely.
• WARNING Only use parts that are authorized by the manufacturer in order to
avoid injury or damage.
• Do not use aluminum foil in the oven unless directed. If you are using aluminum foil,
t it tightly and make sure it is not touching the heating elements as this can cause
overheating and risk of re.
• Only use baking paper with food on top. If the baking paper touches the heating
elements, there is a risk of re.
• Always use oven-proof glass or metal dishes.
• WARNING Some of the appliance’s parts will become hot during operation and
for some time after use. Do not touch hot surfaces. Only touch handles, knobs and
buttons.
-Do not move the appliance when it is in use.
-When you open the oven door, be cautious of steam escaping from the oven.
Keep your hands and face at a safe distance from hot steam and hot food.
-Always use protective gloves such as oven mitts when handling hot items from
the oven, including trays, racks, accessories or containers. Place hot items on a
heat-resistant surface.

7EN -
• To avoid damaging or scratching the trays, use only wooden or heat-resistant plastic
utensils.
• WARNING To avoid the risk of re and injury, do not use this appliance for deep
or shallow frying.
• WARNING Clean the crumb tray after each use as accumulated crumbs and
grease can overheat and catch re.
• Never leave the appliance unattended while in use.
• Do not use the oven’s accessories in any other kitchen appliance such as a microwave
or oven.
• If the LED display on the control panel shows an error code, unplug the appliance
and refer to the "Error codes on the screen" section on page 22.
• To fully turn off the appliance, remove the plug from the power source.
• Do not attempt to repair, replace or modify the appliance and its safety mechanisms
as this may cause electric shock, re or injury, and will void the warranty. There are
no user serviceable parts.
• Never connect this appliance to an external timer switch or separate remote-control
system.
• Before and after use, follow the cleaning and maintenance guidelines in this manual.
Always make sure the appliance has cooled.
• Use extreme caution when removing a tray or cooking pot that contains hot fat or oil
as well as when disposing of hot oil or fat.
• If dark smoke or ames come from the oven, immediately turn it off at the wall socket.
Do not open the oven door or use water to put out ames. Cover the appliance with
a re blanket. Wait for the smoke to clear before opening the oven door.
• Do not store anything on top of the oven when it is in use.
• Store the appliance in a location that is cool and dry. Do not store any parts in the
oven other than the recommended accessories.
8EN -
21
1
3
2
4
5
6
7
8
12
13
14
15
20
19
18
16
17
9
10
11
22
*
* Not shown

9EN -
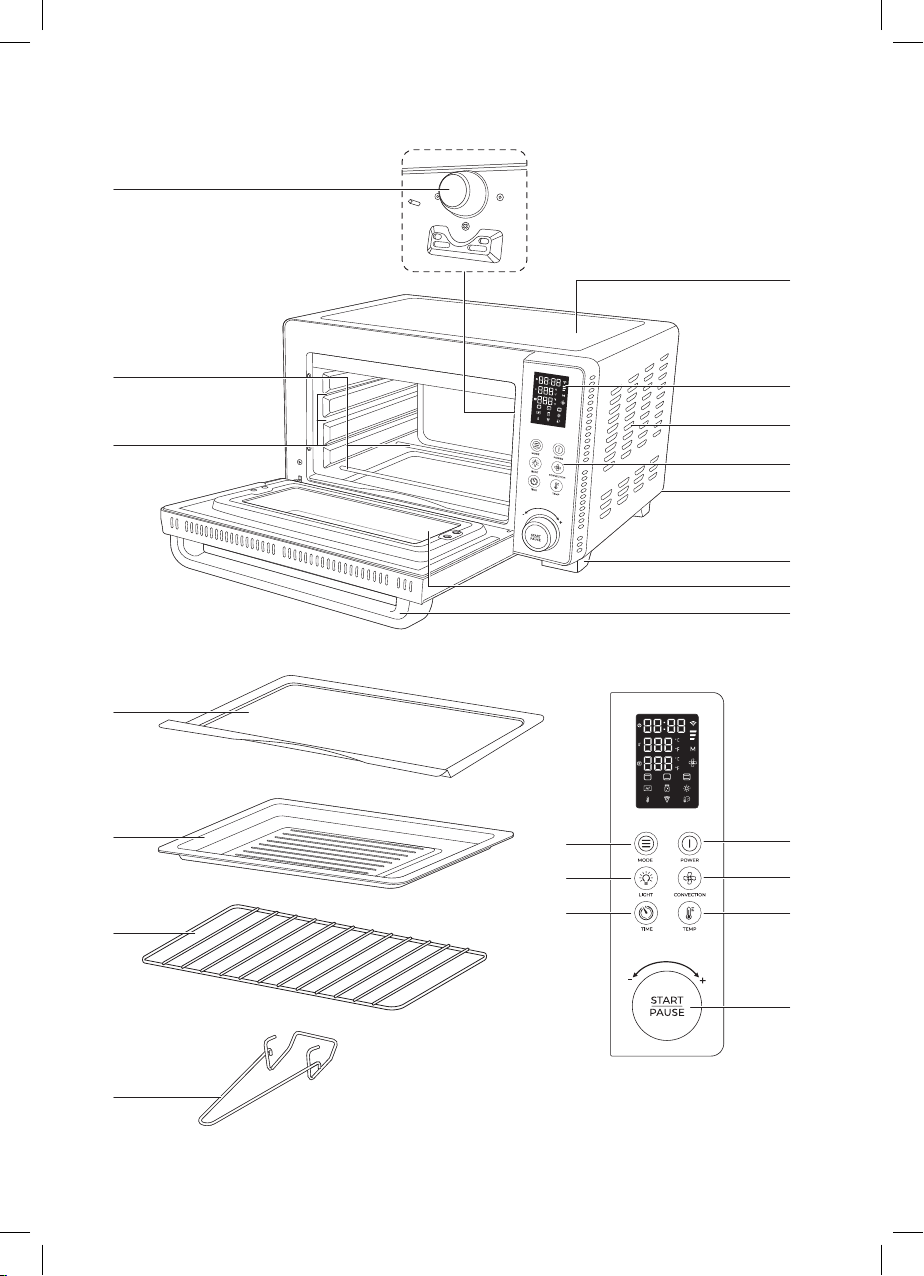
2. Overview
1Oven housing
2Handle
3Door with viewing window
4Non-slip feet
5LED screen
6Vent
7Control panel
8Power cord with plug (at the back)
9 MODE button
10 LIGHT button
11 TIME button
12 POWER button
13 CONVECTION button
14 TEMP button
15 START / PAUSE button and SETTINGS dial
16 Rack/tray runners
17 Heating elements
18 Light
19 Crumb tray
20 Food tray
21 Rack
22 Rack handle

10EN -
3. Screen display
B
A
C
E
F
D
H
G
I
K
J
L
M
N O P
ASet time or countdown time
BSet temperature (displays in Celsius or Fahrenheit)
CCurrent oven temperature
DBroil mode
EReheat mode
FKeep warm mode
GWi-Fi connection status indicator
(only available on SKA-OVN-201-SMT models)
H
-When preheating, the three status bars will light up
progressively
-During cooking, the three status bars will remain xed on
the screen

11EN -
IManual mode
JConvection fan
KBake mode
LDefrost mode
MSlow cook mode
NRoast mode
OFerment mode
PPizza mode
4. Functions overview
Button/Component Function Notes
POWER
button12 -Turn the unit on and off
MODE button 9 -Enter the mode settings
SETTINGS dial 15
-Select 1 of the 10
available modes
-Adjust the time or
temperature
-The selected mode icon
will ash when you are
in the setting mode and
will remain xed when
the program has started
START / PAUSE
button 15
-Press to start or pause the
cooking process
-Press and hold to
connect to the app (only
available on SKA-OVN-
201-SMT models)
-When using the oven,
always make sure the
crumb tray 19 is in
place and the door 3
is properly shut before
starting an operation
-If you cancel the
preheating and go
straight to cooking, you
cannot go back to the
programs preheating
function without
cancelling the current
program and starting a
new one
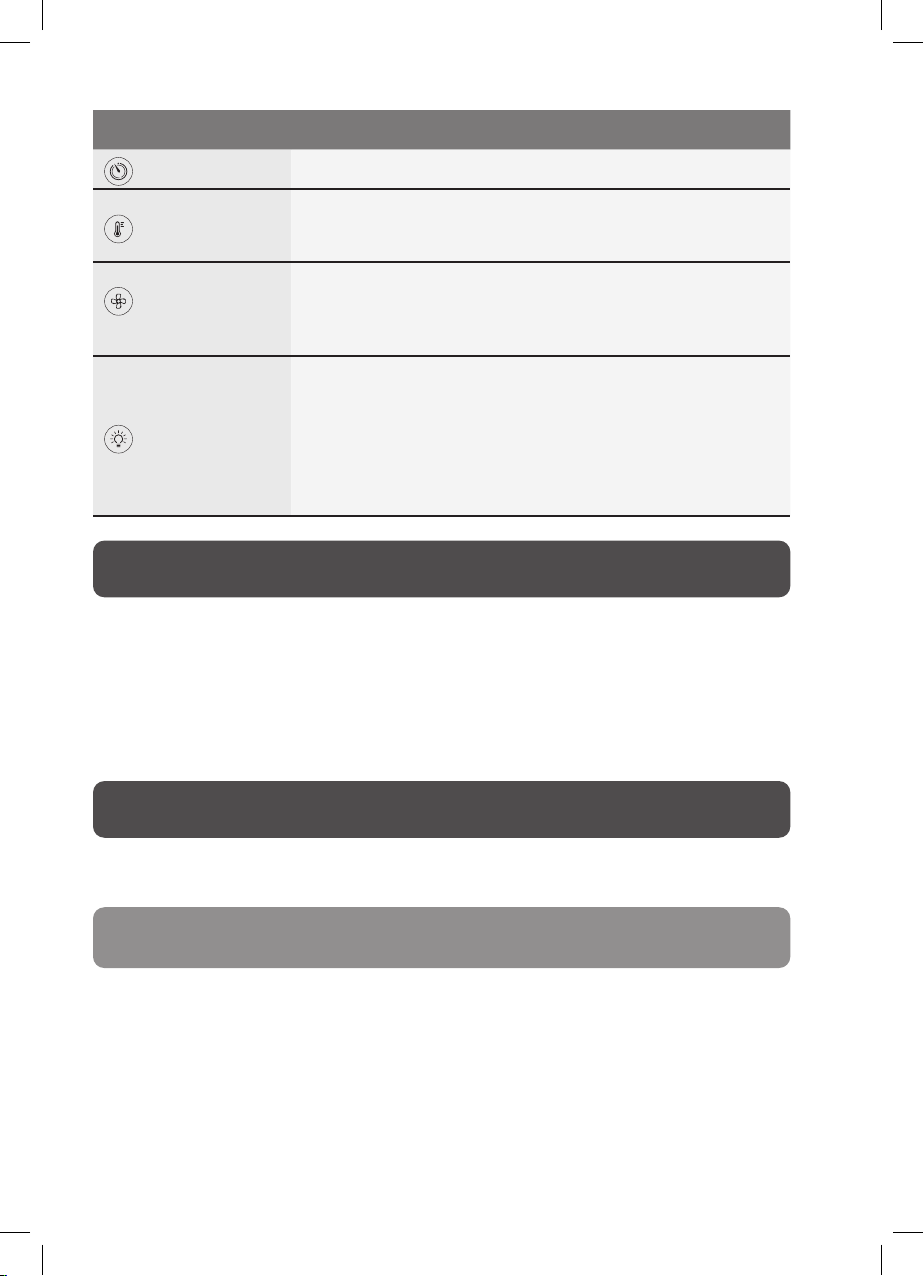
12EN -
Button/Component Function Notes
TIME button 11 -Enter the time settings
TEMP button 14
-Enter the temperature
settings
-Switch between °C and °F
CONVECTION
button 13
-Turn the convection fan
on or off
-The convection fan can
only be used in manual,
broil, roast, bake and
reheat modes
LIGHT button 10
-Turn the light on or off
-Press and hold to switch
between Celsius and
Fahrenheit measurements
-Displays for 2 minutes
and then automatically
turns off
-The light will
automatically turn on
1 minute before the end
of a program
5. Items supplied
• 1 oven housing 1
• 1 crumb tray 19
• 1 food tray 20
• 1 rack 21
• 1 rack handle 22
• 1 user instructions
• 1 recipe booklet
6. Beforerstuse
Read all the warning labels on the packaging and all safety instructions. Prior to the rst
use, follow all the steps in this section to unpack, clean, assemble and do a test run.
NOTE: When in operation for the rst time, some odor, smoke or steam may be
generated by the appliance. This is harmless. Please ensure adequate ventilation.
6.1 Unpacking
1. Unpack and remove all packing materials including any accessories stored in
the oven.
2. Make sure that all parts are present and undamaged.
3. Cleantheappliancepriortoitsrstuse! (See “Cleaning” on page 20.)
13EN -
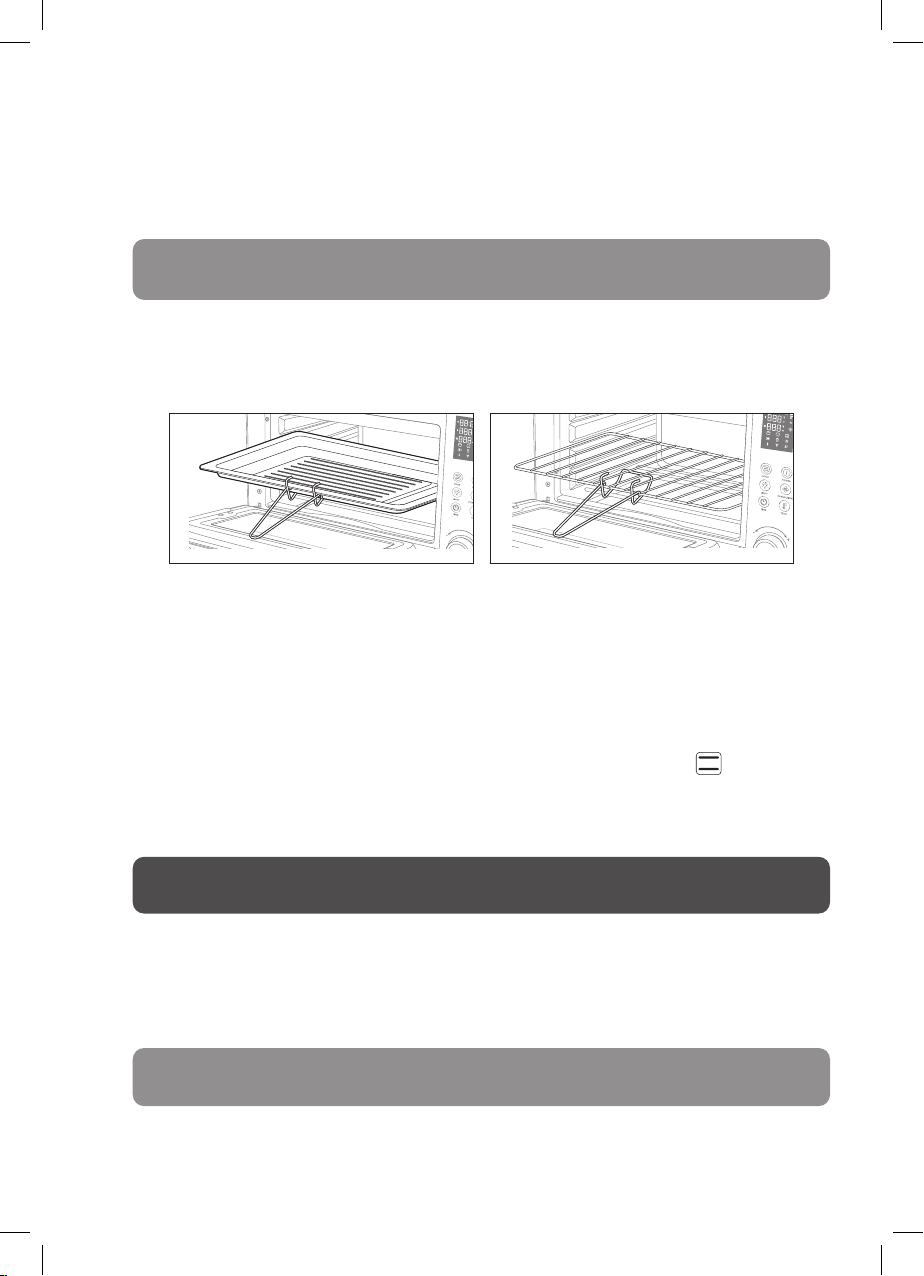
6.2 Assembly
1. Place the oven on a level, dry, non-slip, heatproof and waterproof surface where it
cannot easily fall or slip off.
2. Open the oven door 3.
3. Insert the crumb tray 19 into the runner 16 below the bottom heating elements 17.
NOTE: Always make sure the crumb tray 19 is in place before turning on the
appliance.
4. Slide the food tray/rack 20/21 onto the runners 16 at the desired height.
5. The rack handle 22 can be attached to the food tray 20 or rack 21 simply by hooking
the two metal prongs over the top edge of the food tray/rack 20/21. Once you have
nished with the rack handle 22, unhook it. Do not leave it in the oven.
6. Close the oven door 3.
6.3 Initial test run
Perform an initial test run to help you become familiar with the oven and remove any
residues or odors from the manufacturing process.
1. Assemble the oven with all trays and racks in place and no food.
2. Close the door and plug it in.
3. Press the POWER button 12 to turn on the oven.
4. Press the MODE button 9and turn the SETTINGS dial 15 to bake mode.
5. Press the START / PAUSE button 15 to start the program. When the program is
complete, the oven will stop heating and beep several times. (The default program
180°C/350°F for 30 minutes.)
7. Operating the appliance
7.1 Turning the appliance on and off
• Insert the plug into a suitable wall socket.
• A beep will sound, the full LED screen 5will display, and the oven light 18 will turn
on for 2 minutes.
NOTE: The wall socket must continue to be easily accessible after the appliance is
plugged in.
• After approximately 2 minutes of inactivity, the screen 5will turn off, and the
appliance will beep once and enter standby mode.
14EN -
• To activate the appliance and start using it, press the POWER button 12.
• To fully turn off the appliance, press the POWER button 12 (the screen 5and oven
light 18 will turn off). Unplug the oven from the wall socket.
7.2 Selecting a mode
When you turn on the appliance you enter standby mode.
• Press the MODE button 9to enter the mode settings.
• Turn the SETTINGS dial 15 clockwise or counterclockwise to select 1 of the 10
available modes. The selected mode icon will ash, and the display will show the
default settings for that program.
7.3 Setting the time
You can adjust the time in all modes.
• Press the TIME button 11 to enter the time settings.
• Turn the SETTINGS dial 15 clockwise to increase the time or counterclockwise to
decrease the time.
-You can adjust the timer in increments as follows:
Mode Increments
Manual, broil, roast, bake, reheat, defrost, keep warm
and pizza 1 minute
Ferment and slow cook 10 minutes
-The set time is shown on the screen 5.
-The timer will start the countdown when cooking begins, and preheating has nished.
-When the countdown is nished, the appliance stops and several beeps sound to
conrm that the cooking is complete.
7.4 Setting the temperature
You can adjust the temperature in all modes except for the defrost and keep warm
modes.
1. Press the TEMP button 14 to set the cooking temperature.
2. Turn the SETTINGS dial 15 clockwise to increase the temperature or counterclockwise
to decrease the temperature.
-You can adjust the temperature in increments as follows:
Mode Increments
Manual, broil, roast, bake, reheat, and pizza 5°C / 25°F
Ferment and slow cook 1°C / 5°F
15EN -
-The set temperature is shown on the screen 5.
-The current oven temperature is also displayed on the screen 5.
7.5 Changing the temperature scale – °C or °F
-Press and hold the TEMP button 14 for 5 seconds to switch between C(Celsius) and
F(Fahrenheit).
7.6 Starting and pausing the appliance
• When you have selected your settings, press the START / PAUSE button 15 to start
the program. The oven will beep to conrm that it is turned on and the screen 5will
display all the settings for the program.
• Press the START / PAUSE button 15 to stop the appliance cooking at any time.
7.7 Preheating and the cooking status indicator
• All modes have a preheating function that is activated when the START / PAUSE
button 15 is pressed to start a cooking program.
• Preheating takes up to 15 minutes depending on the set temperature and mode.
• When the preheating mode has nished, the oven will beep several times. The series
of beeps will repeat up to 5 times.
• Press the START / PAUSE button 15 to start the cooking process and the countdown
timer. The two dots between the hours and minutes will ash when the timer is
counting down.
• If the START / PAUSE button 15 is not pressed within 20 minutes of the preheating
mode nishing, the cooking function will cancel, the oven will stop heating and the
display will reset.
• During preheating, you can press the START / PAUSE button 15 to go straight to the
cooking process even if the set temperature has not yet been reached.
NOTE: Once you have overridden the preheating process, you cannot return to it.
You will need to redo the program settings and start a program from the beginning.
• During cooking, the status bar indicates which stage of the process the oven is
currently in.

16EN -
Stage Screen Meaning
Preheating The 3 status bars
progressively ashes.
The oven is heating up
to the set temperature
required for cooking.
Cooking The 3 status bars
constantly display.
The oven has reached the
temperature required
for cooking. The cooking
time counts down.
NOTE: If the oven is paused or stopped, the status indicator will no longer display
on the screen.
7.8 Cancel
• Press the POWER button 12 at any time to exit a setting or cancel a cooking program
that is in progress.
7.9 Using the convection fan
A convection fan circulates the air in the oven to cook the food faster and more evenly.
• When the preheating or cooking process has started, press the CONVECTION
button 13 to turn on the convection fan.
• Press the CONVECTION button 13 again to turn it off.
-The convection fan can be used as follows:
Mode Convection fan settings
Bake, roast Automatically on. Can be turned off.
Reheat Automatically on. Cannot be turned off.
Manual, broil, Can be manually turned on or off.
Ferment, defrost, keep warm,
pizza, slow cook No fan option.
8. App for Smart Convection Oven
(only available on SKA-OVN-201-SMT models)
The Smart Convection Oven (model number SKA-OVN-201-SMT only) can be paired
with your mobile device and controlled through an app, enabling you to cook, schedule,
adjust and monitor the progress of your meals on the go.
8.1 Downloading and registering the app
• Download the Team Cuisine app from the Play Store (Android) or App Store (iOS).
• Open the app.

17EN -
• When you rst use the app, you need to register. (If you have already registered you
will just need to log in to your account.)
• Tap the onscreen option to enter the registration page.
• Enter your mobile phone number (if it is not automatically recognized, enter it
manually) or your email address, and tap Next.
• If you chose the mobile phone number option, then enter the verication code that
is sent to you by SMS.
• Set a password as prompted and press Conrm to nish your registration.
8.2 Pairing the device with your oven
1. Turn on the oven.
2. Press and hold the START / PAUSE button 15 for 2 seconds until the Wi-Fi indicator
begins to blink rapidly.
3. Open the Team Cuisine app and tap + in the top right of the screen to add a new
device through the Wi-Fi network.
4. Check the Wi-Fi indicator on the oven is still rapidly ashing and then tap Go to
add on your mobile device.
5. Select and conrm the Oven to pair and click Next.
6. Select the Wi-Fi network and enter the password. The oven and the app will now
begin the pairing process
7. After successfully conguring the devices, the device will be shown on the home
page. Tap to enter its control page.
NOTE:
• The Wi-Fi network must use the 2.4GHz frequency.
• When the oven is connected to the mobile device and online, it can be
controlled remotely.
• When the oven is shown as Ofine, it cannot be controlled remotely.
Alternatively, the device can be paired with the oven using the Auto Scan option on the
app. Instead of tapping the +button on the top right, select the Auto Scan option, the
oven will pop up to ask the user to conrm if they want to pair and then follow steps
4-7 above.
9. Cooking
9.1 Using the oven
The instructions here advise how to change the program settings. Refer to the mode
settings table for specic information about each cooking mode.
1. Prepare the food and place it on the food tray 20 or in a heat-resistant dish.
2. Plug in and turn the appliance on.
3. Press the MODE button 9to enter the mode settings.
4. Turn the SETTINGS dial 15 clockwise or counterclockwise until your desired setting
icon ashes on the screen.
5. Press the TIME button 11 to enter the timer settings.
6. Turn the SETTINGS dial 15 to set the time.
7. Press the TEMP button 14 to enter the temperature settings.

18EN -
8. Turn the SETTINGS dial 15 to set the temperature.
9. Press the START / PAUSE button 15 to start the program. The oven will beep to
conrm that it is turned on and the screen 5 will display the settings. The preheating
status bars will light up progressively to conrm the oven is preheating.
10. If available in your chosen mode, press the CONVECTION button 13 to turn the
convection fan on or off.
NOTE: When using the convection fan, make the cooking temperature 20°C / 35°F
lower than the temperature you would use for a non-fan oven.
11. When the preheating is complete, the oven beeps to alert you that it has reached the
correct cooking temperature. Insert the food into the oven at the optimal cooking
position.
12. While the preheating beep is sounding, press the START / PAUSE button 15 to start
the cooking process and count down the time. The two dots between the hours and
minutes will ash when the timer is counting down.
13. When the cooking program has nished, it will beep three times and 30 seconds
later it will go into standby mode. If the full cooking time has not elapsed, press the
START / PAUSE button 15 to pause the program.
9.2 Manual mode
In this program you can manually set the time and temperature to suit your recipe.
The top and bottom heating elements will cycle on and off to maintain the set
temperature.
9.3 Broil mode
This program provides high direct heat from the top of the oven much like a grill. You
can use it to cook toast, thinner cuts of meat such as sausages, bacon, sh and chicken,
or brown tops of casseroles, gratins and desserts.
The top heating element is fully on and will cycle on and off to maintain the set
temperature. The bottom heating element is on but at a lower level.
9.4 Roast mode
This program provides the best conditions for roasting joints of meat such as a leg of
lamb, a whole chicken or a joint of beef. It browns the outside of the meat while keeping
the inside juicy and moist.
The bottom heating element is fully on and will cycle on and off to maintain the set
temperature. The top heating element is on but at a lower level.
9.5 Bake mode
This program evenly cooks cakes, pastries and breads. It is also a good mode to use for
cooking pre-packaged frozen meals.
The top and bottom heating elements will cycle on and off to maintain the set
temperature.

19EN -
9.6 Reheat mode
This program reheats food using lower temperatures to prevent it becoming burnt while
keeping it moist.
The top and bottom heating elements will cycle on and off to maintain the set
temperature.
9.7 Ferment mode
This program maintains a constant low temperature that can be used to ferment and
prove doughs for bread, rolls, pizza bases as well as make yogurt and other fermented
foods.
The bottom heating elements will cycle on and off to maintain the set temperature.
9.8 Defrost mode
This program allows you to efciently defrost food.
The top and bottom heating elements will cycle on and off to maintain the set
temperature.
9.9 Keep warm mode
This program keeps food warm for up to 1 hour. It is designed to keep the food
temperature at 70°C/160°F or above to prevent bacterial growth.
The top and bottom heating elements will cycle on and off to maintain the set
temperature.
9.10 Pizza mode
This program makes a pizza with the crucial crispy crust while melting the cheese and
cooking the toppings.
The top and bottom heating elements will cycle on and off to maintain the set
temperature.
9.11 Slow mode
This program is designed to cook low and slow and is particularly good for cooking
tough meats as it breaks down the chewy bers. Use for casseroles or cuts of meat such
as shoulder and belly.
The top and bottom heating elements will cycle on and off to maintain the set
temperature.
20EN -
9.12 Mode settings
Mode Icon
Default
temperature
Temperature
range Default
time Time range Convection
fan
Rack
or tray
position
in oven
°C °F °C °F
Manual 180 350 60-230 150-450 30 mins 1 min - 1 hr On/off Middle
Broil 180 350 150-200 300-400 30 mins 1 min - 1 hr
Automatically
off.
Can turn on
Top or
middle
Roast 180 350 150-200 300-400 1 hr 1 min - 1 hr
Automatically
on.
Can turn off.
Bottom
Bake 180 350 120-230 250-450 30 mins 1 min - 1 hr
Automatically
on.
Can turn off.
Bottom
Reheat 120 250 90-150 200-300 15 mins 1 min - 1 hr Always on Bottom
Ferment 40 105 30-60 85-140 1 hr 1 min - 12 hrs Not available Bottom
Defrost 65 150 Preset temp. only 30 mins 1 min - 1 hr Not available Middle or
bottom
Keep
Warm 95 200 Preset temp. only 20 mins 1 min - 1 hr Not available Middle or
bottom
Pizza 200 400 170-230 325-450 20 mins 1 min - 1 hr Not available Middle
Slow
Cook 85 175 70-120 150-250 2 hrs
30 min
1 min to
12 hrs Not available Bottom
10. Cleaning
WARNING!
• Risk of electric shock! Always disconnect the power cord 8from the appliance
and the wall socket and allow the oven to cool before cleaning.
• Never immerse the oven, power cord or plug in water.
• Make sure everything is completely dry before use and storage.
• Never use any abrasive, corrosive or scratchy cleaning agents as they might
damage the appliance.
Table of contents
Popular Convection Oven manuals by other brands

NUTRICHEF
NUTRICHEF PKCOV45 user manual

Zanussi
Zanussi FCF-20 2/1 FCF202E Brochure & specs

Equipex
Equipex SODIR FC-100 Specifications

turbofan
turbofan E35C Installation & operation manual

Aroma
Aroma Aeromatic AST-900E Instruction and recipe manual

Cuisinart
Cuisinart CSO-300C INSTRUCTION AND RECIPE BOOKLET


