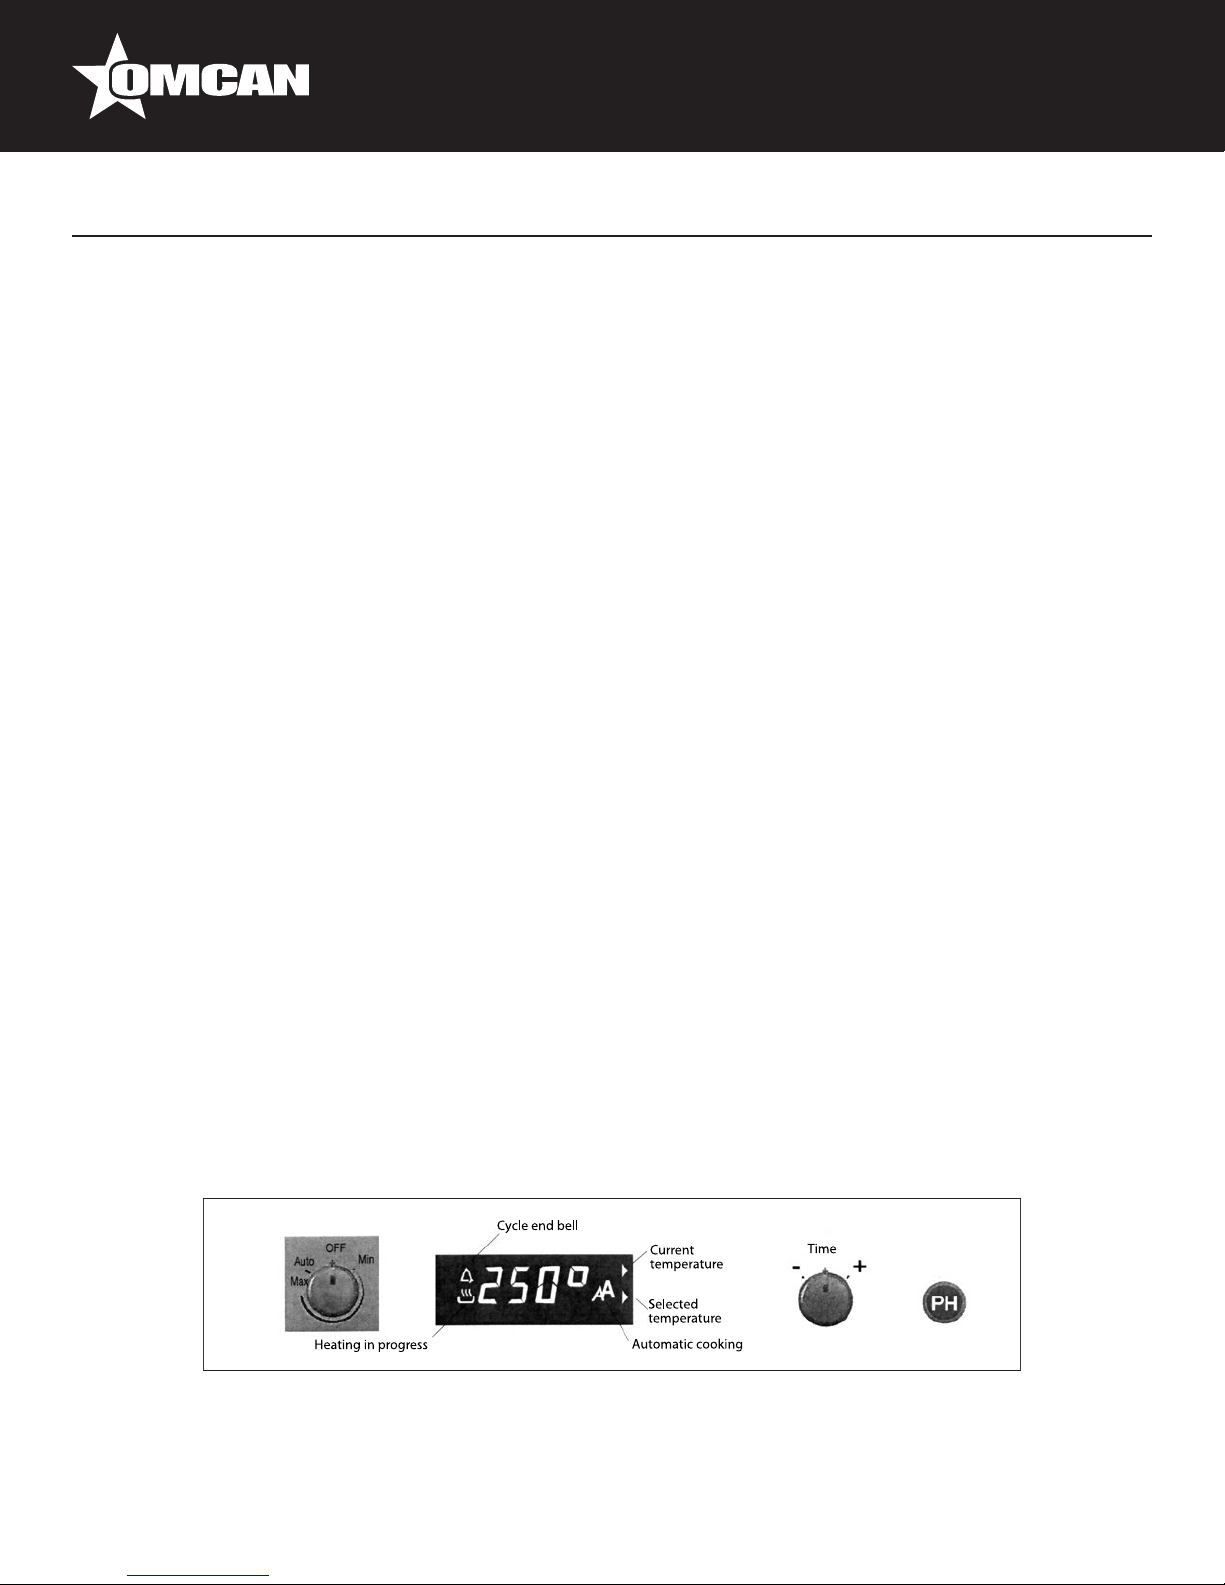
Omcan CE-ES-0004-RH User manual

Convection Oven
Model CE-ES-0004-RH
Instruction Manual
Revised - 9/15/2014
Toll Free: 1-800-465-0234
Fax: 905-607-0234
Email: [email protected]
www.omcan.com

2
Page
-------------------------------------------------------------------------------- 3
--------------------------------------------------------------------------- 3 - 4
--------------------------------------------------------------------------------------- 4 - 5
----------------------------------------------------------------------------------------- 5 - 9
----------------------------------------------------------------------------------------- 9
---------------------------------------------------------------------------- 10 - 11
---------------------------------------------------------------------------- 12
------------------------------------------------------------------------------------------- 13 - 14
---------------------------------------------------------------------------- 15
Table of Contents
Section
General Information
Safety and Warranty
Installation
Operation
Maintenance
Parts Breakdown
Electrical Schematics
Notes
Warranty Registration
Model CE-ES-0004-RH

3
General Information
Safety and Warranty
Omcan Manufacturing and Distributing Company Inc. and Food Machinery of America, Inc. dba Omcan
are not responsible for any harm or injury caused due to any person’s improper or negligent use of
this equipment. The product shall only be operated by someone over the age of 18, of sound mind, and
not under the inuence of any drugs or alcohol, who has been trained in the correct operation of this
machine, and is wearing authorized, proper safety clothing. Any modication to the machine voids any
warranty, and may cause harm to individuals using the machine or in the vicinity of the machine while
in operation.
TECHNICAL SERVICE
A technical check-up once or twice a year helps prolong the life of the appliance and guarantees better
operation. Make sure that assistance is carried out solely and exclusively by qualied personnel. For any spare
parts orders or for any information about the appliance, always mention the serial number and model (data
indicated on the “technical data” plate at the rear of the oven).
CHECK PACKAGE UPON ARRIVAL
Upon receipt of an Omcan shipment please inspect for external damage. If no damage is evident on the
external packaging, open carton to ensure all ordered items are within the box, and there is no concealed
damage to the machine. If the package has suffered rough handling, bumps or damage (visible or concealed),
please note it on the bill of lading before accepting the delivery and contact Omcan within 24 hours, so we may
initiate a claim with the carrier. A detailed report on the extent of the damage caused to the machine must be
lled out within three days, from the delivery date shown in the shipping documents. Omcan has no recourse
for damaged products that were shipped collect or third party.
GENERAL WARNINGS
Very Important: keep this instruction book together with the appliance for future consultation.
These warnings were drafted for your safety and for that of others. Please read them carefully before installing
or using the appliance:
If, on receipt of the goods, the packaging is damaged, write the following on the delivery note: “I REVERSE
THE RIGHT TO CONTROL THE GOODS”, specify the damage and get the driver to sign in acceptance; send
a claim in writing to the seller within 4 calendar days from the date of receipt. No claim shall be accepted after
such period.
The appliance is intended for professional use and must be utilized by qualied personnel trained to use it.
Any modication which may be necessary on the electrical system to enable installation of the appliance, must

4
Safety and Warranty
Installation
be carried out solely by competent personnel.
It is dangerous to modify or attempt to modify the characteristics of this appliance.
Never clean the appliance with direct water jets, because, if any water enters, it could limit the machine’s
safety.
Before doing any maintenance or cleaning jobs, disconnect the appliance from the electrical mains and allow it
to cool.
When the tilting door is wide open, do not put anything on the surface, because the door hinges could be
irreparably damaged.
Do not attempt to carry out the periodic controls or any repairs by yourself. Contact the nearest Service Centre
and use only original spare parts.
1 YEAR WARRANTY
WARNING:
The packaging components are classied as normal solid urban waste and can therefore be disposed of
without difculty.
In any case, for suitable recycling, we suggest disposing of the products separately (differentiated
waste) according to the current norms.
DO NOT DISCARD ANY PACKAGING MATERIALS IN THE ENVIRONMENT!
INSTRUCTIONS FOR THE INSTALLER
DOBRA convection ovens are recommended to be located in an open area. If it is necessary to install the oven
in an enclosed area due to space considerations, the back of the oven, where all the mechanisms, electric and
precision equipment are located, must be 10 - 12mm / 4 - 5” from any furniture or the wall. This allows oxygen
to circulate, ensuring that the DOBRA convection oven will function correctly.
It is recommended the oven to be installed by qualied personnel with knowledge of all regulatory
requirements. Please note the specications on the card attached to the DOBRA convection oven, indicating
the voltage, amperes, power rating and connection block.
Check that the electrical installation on the premises meets established requirements. If it does not, it would

5
Installation
Operation
be highly advisable to have a separate installation for the DOBRA convection oven which complies with all
existing regulations regarding fuses, differential circuit breaker and earth. If any of the sockets on the premises
comply with the aforementioned protocols, the DOBRA convection oven may be connected to them.
WARNING: before performing any technical service, it is absolutely essential to disconnect the power
supply and for the steam oven, turn the water off at the mains.
USE INSTRUCTIONS
For rst use, we advise you to let the appliance to run load-free at maximum temperature for about one hour. In
this way, any unpleasant smells due to thermal insulation and residual work grease are eliminated.
This appliance must be used solely for the purpose for which it was expressly designed, i.e. cooking foods in
the oven. Any other use is considered unsuitable and will void the warranty.
The appliance can be used: for all oven cooking of deserts, pizzas, meat, sh, vegetables, as well as for
gratinating, and for re-conditioning cooled and frozen foods.
When placing food in the cooking compartment, leave a space of at least 40mm / 2” between pans in order not
to over-obstruct air circulation.
Do not use pans with higher than necessary edges: edges are barriers which prevent the circulation of hot air.
Warm up the oven before every cooking operation to obtain maximum uniformity.
Do not salt foods in the cooking compartment.
RESIDUAL RISKS
After a cooking operation, open the door cautiously, to avoid a violent outow of heat which could cause burns.
While the oven is in operation, pay attention to the hot zones (marked on the appliance) of its external
surfaces.
Place the machine on a bench or similar support, at a height of at least 85cm / 33” from the oor.
The bench or support must be able to support the weight of the machine and house it correctly.
The appliance contains electrical parts and must never be washed with a jet of water or steam.

6
Operation
The appliance is electrically connected: before attempting any cleaning operation, cut power to the appliance.
To prevent incorrect connection of the appliance, the relevant electrical and water connections are marked by
identication plates.
Do not use the door handle to move the appliance (the glass panel may break).
When the tilting door is wide open, there is the risk that things could be placed on the surface with the risk of
irreparably damaging the door hinges.
COOKING ADVICE
TRADITIONAL COOKING: Heat is supplied from above and below and, therefore, it is preferable to use the
central guides. If cooking requires extra heat from above and below, use the top or bottom guides.
CONVECTION COOKING: Heat is transferred to the foods by pre-heated air, forced to circulate by in the
cooking chamber. The heat quickly and uniformly reaches all parts of the chamber, enabling simultaneous
cooking of different types of food (providing they have the same cooking temperature), placed on the shelves
without mixing tastes and smells. Convection cooking is particularly convenient for rapid de freezing, and for
sterilizing preserves and drying mushrooms and fruit.
COOKING WITH THE GRILL: Grilling is effected by the thermal radiation of an incandescent electrical
heating-element. The temperature produced by the infrared rays is very high and one way (downward from
above), and, therefore, food surfaces are immediately browned.
COOKING WITH THE VENTILATED GRILL: Forced circulation of air is combined with thermal radiation
produced by the grill, and this allows heat to gradually penetrate the inside of the food without burning the
surface.
COOKING DESSERTS: Desserts require a very high temperature (usually from 150 - 200°C / 302 - 392°F)
and a pre-heated oven (about ten minutes). The oven door must not be opened until at least 3/4 of the cooking
time has elapsed. Whipped dough must be difcult to detach from a spoon because excessive uidity would
prolong cooking time to no avail.
COOKING MEAT AND FISH: Meat to be cooked should weight at least 1 kg. / 2.2 lbs. to prevent it drying too
much. Very tender red meats to be cooked rare, which must be cooked on the outside to keep all their gravy,
require short cooking time at high temperature (200 - 250°C / 392 - 482°F). The gravy ingredients must be
placed immediately in the pan only if the cooking temperature is brief, otherwise they should be added during
the last half-hour. You can check the degree of cooking by squashing the meat with a spoon: if the meat does
not yield, it is correctly cooked. For roast beef and llet, which must remain pink inside, cooking time must
be very brief. Meats may be placed on a plate suitable for oven cooking or directly on the grill, under which
you should place a tray to collect the gravy. When cooking has nished, we advise you to wait for 15 minutes
before cutting the meat so that the gravy does not come out. Before being served, the dishes may be kept hot
in the oven at minimum temperature.

7
Operation
GRILLING: Almost all meats may be grilled, with the exception of some lean game meats and meat loaves.
Apply a little oil on the meat or sh to be cooked and always place them on the grill - put the grill in the guides
nearest or furthest from the grill heating element in proportion to the meat, in order to avoid burning the surface
and cooking the inside insufciently. It is useful to place a tray under the grill to collect drops of gravy and fat.
BAKING ADVICE
VERY IMPORTANT: To properly bake pre-baked bread in the dobra convection oven, the pre baked
bread must be completely defrost.
In convection ovens, cooking takes place through the circulation of hot air. Therefore, it is necessary to leave
space at the sides of and between the products. This will result in uniform, perfect baking, using less time and
energy.
PRE HEATING: It is advisable to preheat the cooking chamber. To do this, set the oven temperature 25 - 50ºC
/ 77 - 122ºF above the cooking temperature.
USING TRAYS: it is important to choose the right tray type for each type of product. For rolls and pastries, we
recommend a smooth, fat tray. For bread, we recommend a perforated aluminium tray. DOBRA has designed
a perforated tray with some larger square holes. This allows the air to circulate better, providing better cooking
and giving the pan more crust. This tray can be used for rolls and pastries by covering it with baking paper.
BAKING TEMPERATURE AND TIME
Standard temperature: 190°C / 374°F
Higher temperature and less time = SOFT BREAD
Lower temperature and more time = CRUNCHY BREAD
Standard breads:
• Baguettes bake in 18 minutes. The bread stays fresh for up to 12 hours.
• Gallega (Galician), chapata (fat) and pistola (French) style loaves cook in 25 minutes. The bread stays
fresh for up to 12 hours.
CONTROL PANEL
TURNING ON THE OVEN - MANUAL COOKING
To turn on the oven, turn the temperature selector knob and choose the desired temperature. In this case, the

8
Operation
predened mode of operation is manual cooking for an indenite length of time. The word “On” will appear
on the display for two seconds. The selected temperature will then appear for another ten seconds, and then
the current temperature followed by the “º’’ symbol. During the initial oven preheating stage, the “º’’ symbol
will blink. To change the selected temperature, use the temperature knob. While the knob is being turned, the
selected temperature appears for 10 seconds. During cooking, the display will indicate the temperature inside
the oven. This is updated every three seconds and shown to the nearest 1°. The oven in use light will remain lit
during the cooking phase.
TIMED COOKING FUNCTION WITH AUTOMATIC STOP
Turn the TIME selector in a clockwise or counterclockwise direction. The selected time will appear on
the display. To increase or decrease the cooking time by one-minute intervals, turn the knob clockwise or
counterclockwise. The display will alternate every 20 seconds, switching between the remaining cooking time
in “MMM” format followed by the “ ‘ “ symbol and the current oven temperature. During the nal minute of
cooking, the display will show the seconds remaining, followed by the “ ‘ “ symbol. When the cooking time is
complete, the display will indicate “End”, the bell icon will blink (A turns off) and the cycle end bell will sound
for a maximum of 20 seconds. To end the cooking cycle early, turn the TIME selector counterclockwise until it
reaches zero. The control will operate as if the entire time had passed. After the cooking time is complete, to
turn the oven back on in manual mode, turn the TIME selector counterclockwise. To turn the oven back on in
automatic mode, turn the TIME selector clockwise.
TURNING ON THE OVEN - AUTOMATIC COOKING
Turn the selector to the “AUTO” position. A cooking cycle with the memorized time and temperature will
automatically be activated. After the cooking time is complete, to turn the oven back on in manual mode, turn
the TIME selector counterclockwise. To turn the oven back on in automatic mode, turn the TIME selector
clockwise.
“PH” HUMIDIFY BUTTON
The humidify button is separate from the electronic controls.
TURNING OFF THE OVEN
To turn off the oven, turn the temperature selector knob to the “OFF” position.
ADDITIONAL DISPLAY INDICATORS
Triangular pilot lights on the right side of the display:
• The current temperature light goes on each time the display shows the current temperature.
• The selected temperature light remains on while the oven is heating and indicates the selected
temperature.
Only one pilot light at a time will appear on the display, making it easier to understand the value shown.

9
Operation
Maintenance
Icons on the display:
• Bell: This icon is normally off, but blinks when the oven has completed the cooking cycle.
• Casserole dish: This icon indicates that the oven is heating. It turns on each time the heating is ON.
• Auto: This icon lights up when the oven is in the automatic cooking cycle.
The status icons light up regardless of any other information shown on the display.
OPERATING PARAMETERS
ID FUNCTIONS PARAMETERS
1 Memorized temperature 190ºC / 374ºF
2 Maximum temperature 250ºC / 482ºF
3 Minimum temperature 50ºC / 122ºF
4 Temperature selection interval 1º
5 Duration of automatic cooking cycle 19 minutes
6 Maximum cycle duration 180 minutes
7 Duration of clockwise fan rotation 120 seconds
8 Duration of counterclockwise fan rotation 120 seconds
9 Pause in ventilation between clockwise and counterclockwise rotation 18 seconds
ROUTINE CLEANING AND MAINTENANCE
WARNING: cut power to the appliance before every operation
General cleaning: Clean the oven when it is cold. Wash enamelled parts with lukewarm water and soap, do
not use abrasive products, steel wool, or acids, which could ruin them. To clean the steel parts, do not use
products containing chlorine (sodium hypochlorite, hydrochloric acid, etc) even if diluted. Use specic off-the-
shelf products or a little hot vinegar. Rinse thoroughly with water and dry with a soft cloth. Clean the glass door
of the oven with hot water only, and do not use rough cloths. Do not allow foods (especially acid foods such as
salt, vinegar, lemon, etc) to stagnate on the stainless steel parts, because they could deteriorate. Do not wash
the appliance with direct jets of water, because if water enters, this could limit the appliance’s safety. Do not
use corrosive substances (e.g. hydrochloric acid) to clean the oven’s support bench.
Cleaning the oven: It is good practice to clean the oven interior at the end of every day of duty. In this way it
will be easier to remove cooking residues, preventing them from burning when the oven is next used. Clean it
accurately with hot water and soap or with the appropriate off-the-shelf products.

10
Parts Breakdown
Model CE-ES-0004-RH 39541

11
Parts Breakdown
Model CE-ES-0004-RH 39541
Description Position Description Position Description Position
Motor - Fan 1 Door Handle 8 15W Oven Light Bulb 14
1760W Resistor 2 Interior Door Glass 529 x 405 9 Circular Screen Printed Dial 15
3-Terminal Power Input Box 3 Exterior Door Glass 615 x 417 10 Silicone Door Gasket 16
Door Closure Magnet 4 Amber Thermostat Pilot Light 11 Digital Time Controller 17
Buzzer Board 5 Green Pilot Light 11 Digital Temperature Switch 18
Clock - Timer 645º–295º Thermostat 12 Digital Electronic Control Display 19
Selector Knob 7 Interior Light Socket 13

12
Electrical Schematics
Model CE-ES-0004-RH 39541

13
Notes
________________________________________________________________________________________
________________________________________________________________________________________
________________________________________________________________________________________
________________________________________________________________________________________
________________________________________________________________________________________
________________________________________________________________________________________
________________________________________________________________________________________
________________________________________________________________________________________
________________________________________________________________________________________
________________________________________________________________________________________
________________________________________________________________________________________
________________________________________________________________________________________
________________________________________________________________________________________
________________________________________________________________________________________
________________________________________________________________________________________
________________________________________________________________________________________
________________________________________________________________________________________
________________________________________________________________________________________
________________________________________________________________________________________
________________________________________________________________________________________
________________________________________________________________________________________
________________________________________________________________________________________
________________________________________________________________________________________
________________________________________________________________________________________

14
Notes
________________________________________________________________________________________
________________________________________________________________________________________
________________________________________________________________________________________
________________________________________________________________________________________
________________________________________________________________________________________
________________________________________________________________________________________
________________________________________________________________________________________
________________________________________________________________________________________
________________________________________________________________________________________
________________________________________________________________________________________
________________________________________________________________________________________
________________________________________________________________________________________
________________________________________________________________________________________
________________________________________________________________________________________
________________________________________________________________________________________
________________________________________________________________________________________
________________________________________________________________________________________
________________________________________________________________________________________
________________________________________________________________________________________
________________________________________________________________________________________
________________________________________________________________________________________
________________________________________________________________________________________
________________________________________________________________________________________
________________________________________________________________________________________

15
Warranty Registration
Thank you for purchasing an Omcan product. To register your warranty for this product, complete the information below, tear off the card at
the perforation and then send to the address specied below. You can also register online by visiting:
OMCAN INC.
PRODUCT WARRANTY REGISTRATION
3115 Pepper Mill Court,
Mississauga, Ontario
Canada, L5L 4X5
www.omcan.com/warrantyregistration.html
Thank you for choosing Omcan
Purchaser’s Information
Name: Company Name:
Address:
Telephone:
City: Province or State: Postal or Zip: Email Address:
Country: Type of Company:
Restaurant Bakery Deli
Dealer from which Purchased: Butcher Supermarket Caterer
Dealer City: Dealer Province or State: Institution (specify):
Invoice: Other (specify):
Model Name: Model Number: Serial Number:
Machine Description:
Date of Purchase (MM/DD/YYYY): Date of Installation (MM/DD/YYYY):
For mailing in Canada For mailing in the US
OMCAN
PRODUCT WARRANTY REGISTRATION
4450 Witmer Industrial Estates, Unit 4,
Niagara Falls, New York
USA, 14305

Over the last 65 years, Omcan has grown to become a leading supplier to the food
service industry in Canada and the USA. Our success over these many years is
directly attributed to our established relationships with all of our valued customers
and through providing them with Diverse, Dependable and Proven products.
Omcan continues to help our customers remain competitive.
With associates in North America, Europe, Asia, and South America, our global
footprint continues to expand as we hold to the principle that clients benet from
the accessibility and familiarity of our sales team. In 2013 as our geography and
brand recognition continued to grow, we changed to one name Omcan Food
Machinery.
In over 200,000 sq ft of warehouse space we stock over 2,500 quality food
equipment and supplies for the food preparation market.
Table of contents
Other Omcan Convection Oven manuals