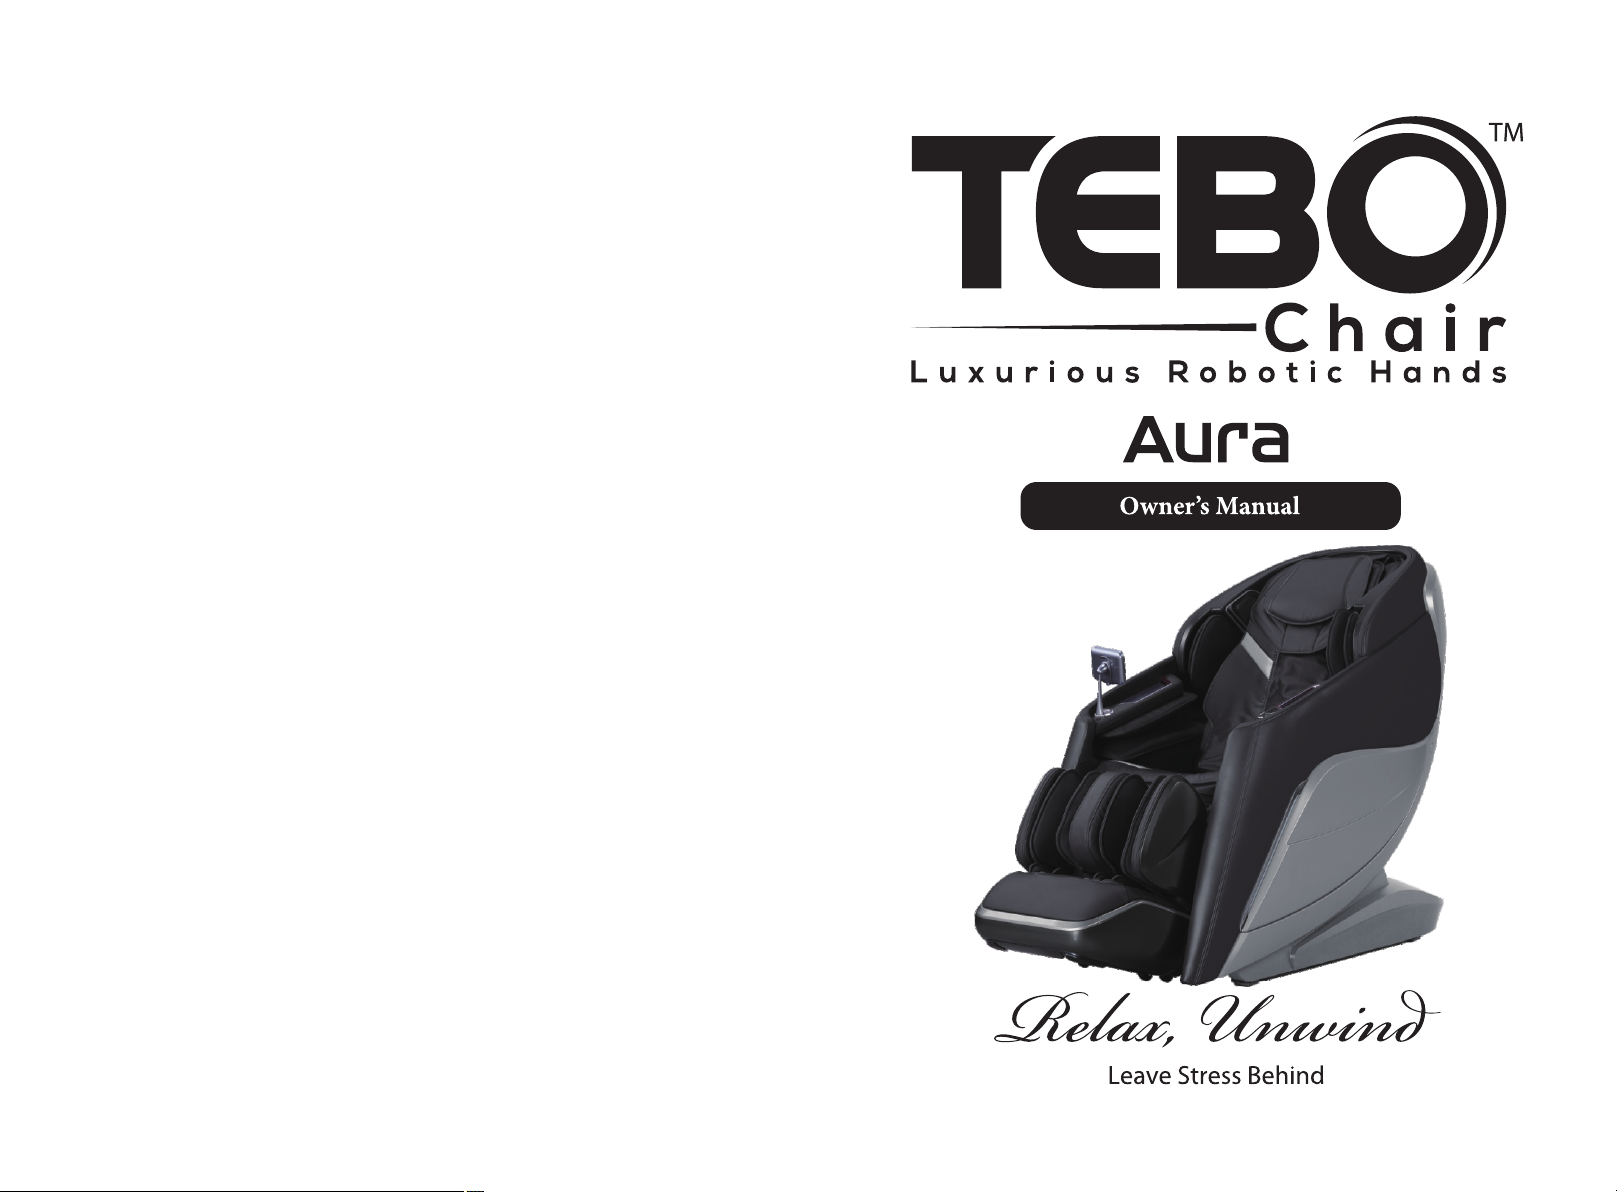
TEBO AURA User manual
SAVE THESE INSTRUCTIONS

01
Thanks for purchasing this product. Please read this manual instruction carefully in
order to know how to use this product correctly before operation. Please pay more
attention to some important safety warning and keep this manual book properly for
future use.
Note: Our Company reserves the right to revise the design and description of this
product without any further notice. Please refer to the actual picture of this product.
CONTENTS
Safety and Maintenance
Safety Warning
Name of Components
Function
Touch screen manual controller interface introduction
Method of Usage
I. Turn on the power supply of this product
II. Massage Function Control Operation
III. Introduction to Armrest Shortcut Keys
IV. Voice Control Mode
V. Turn off power, stop massage
VI. Installation Instructions for Armrests
VII. Installation Instructions for Legrest
VIII. Installation Instructions for Legrest
IX. Use of the shawl
X. Pillow Pad and backrest pad's dismounting and use manual
XI. Floor Protection
. Instruction for MovementⅫ
Product Specification
02-03
04-08
09
10-11
12
13
13
13-26
27-28
29
30
30-31
32-33
34
34
35
36
36
37

0302
Safety and Maintenance Safety and Maintenance
1.Important Safety Warnings
·Do not allow children to touch any movable part of this product.
·Use the well-grounded power supply unit suitable for this product.
·Pull out the plug after use or before cleaning to avoid any physical injury or damage to
the product.
·Operate this product as instructed in this manual.
·Do not use any parts or accessories which are not recommended.
·Do not use this product outdoors.
·Please read the Operation Instructions carefully before operation.
·Never use this product for any other purpose not listed herein.
·20 minutes of usage each time is recommended.
·Do not use this product if the leather is broken or damaged.
·Do not use this product if the cover or leather is broken or damaged.
·Do not use this product if the radiator hole is covered or blocked.
·Do not drop anything into this product.
·Never fall asleep while using this product.
·Do not use this product if you are drunk or feel unwell.
·Do not use this product within one hour after a meal.
·Do not use this product with excessive force to avoid any injury.
·Do not carry any fragile, explosive, or combustible material in your pocket, such as a
mobile phone and lighter when using the massage chair.
2. Operating Environment
·Do not use this product in a very moist environment such as the bathroom.
·Stop using this product immediately when the ambient temperature changes sharply.
·Do not use this product in any heavily-dusty or caustic environment.
·Do not use this product in a small space or a place without good ventilation.
·The normal room temperature ranges from 0 °C to 35 °C.
·Do not use this product in an excessively humid room such as a bathroom. Use it at a
relative humidity between 20% and 80%.
·Do not use this product outdoors.
·Avoid direct sunlight.
·Keep this product away from any heat source such as a stove and air outlet of an air
conditioner.
·Do not use this product during thunder or lightning weather.
·Do not use this product in dusty places.
3. The following populations should not use this product:
·Patients with osteoporosis.
·Patients with heart disease or wearing electronic medical devices such as a
pacemaker.
·People who have a fever.
·Pregnant women or women on their menstrual period.
·Patients who are injured or have a skin disease.
·When unsupervised, any children are under the age of 14 and those unconscious are
not allowed to use this product.
·People who are told by their physicians to have rest or who feel unwell.
·People whose bodies are wet are forbidden to use this product.
·This product has a hot surface. Persons insensitive to heat must pay attention when
using this product.
4. Safety Precautions
·Check whether voltage is consistent with the specification of this product.
·Never insert or pull out the plug with a wet hand.
·Do not let water flow into this product to avoid electric shock or cause damage to this
product.
·Do not pull the power cord when plugging or unplugging it. Rough handling is
forbidden.
·Do not damage the wire or modify the circuit of this product.
·Do not clean live parts of this product with a wet cloth such as a power switch and plug.
·Be away from this product in case of power failure to avoid any injury if power is
restored suddenly.
·Stop using this product at once while it works abnormal, and consult your local supplier.
·Stop using this product if you feel unwell, and consult your health care practitioner.
·This product is not intended for use by persons (including children) with reduced
physical, sensory or mental capabilities, or lack of experience and knowledge, unless
they have been given supervision or instruction concerning the use of this product by
the personnel responsible for their safety. Children should be supervised to ensure that
they do not play with this product.
·If the power cord is damaged, it must be replaced by the manufacturer, its service
agent or similarly qualified staff in order to avoid hazards.
5. Product Service and Maintenance
·This product should be maintained by the service center designated by the
manufacturer only. No user should disassemble or maintain it without permission.
·Do not forget to turn off the main power switch after usage.
·Do not use this product if the power socket becomes loose.
·If this product will be left unused for a long period of time, it is necessary to roll up the
power cord of this product and store this product in a dry and dust-free environment.
·Do not store this product at a high temperature or near open flame. Avoid prolonged
exposure to direct sunshine.
·Please clean this product with dry cloth. Never use thinner, benzene or alcohol.
·The mechanical components of this product are specially designed and manufactured,
so no special maintenance is needed.
·Do not use a sharp object to stab at this product.
·Do not roll or pull this product on any uneven ground. Instead, it should be lifted before
moving.
·Please use this product intermittently. Do not keep it working continuously for a long
period of time.
6. Solutions to Ordinary Malfunctions
·If the motor sounds during operation of this product, this is the normal operation sound.
·If the controller cannot work normally, check whether the plug and the power socket are
connected reliably, and whether the power switch is turned on.
·If the rated working time is over, this product will automatically activate the power-off
button; If this product keeps operating for a long period of time, the temperature
protector will stop this product automatically. The product can be used again after half
an hour.
7. Storage Conditions
·Storage room temperature: -5 °C to 35 °C.
·Relative humidity (RH) between 20% and 80%; free of corrosive gases, and a well-
ventilated room.

0504
Safety Warning Safety Warning
Warning Warning
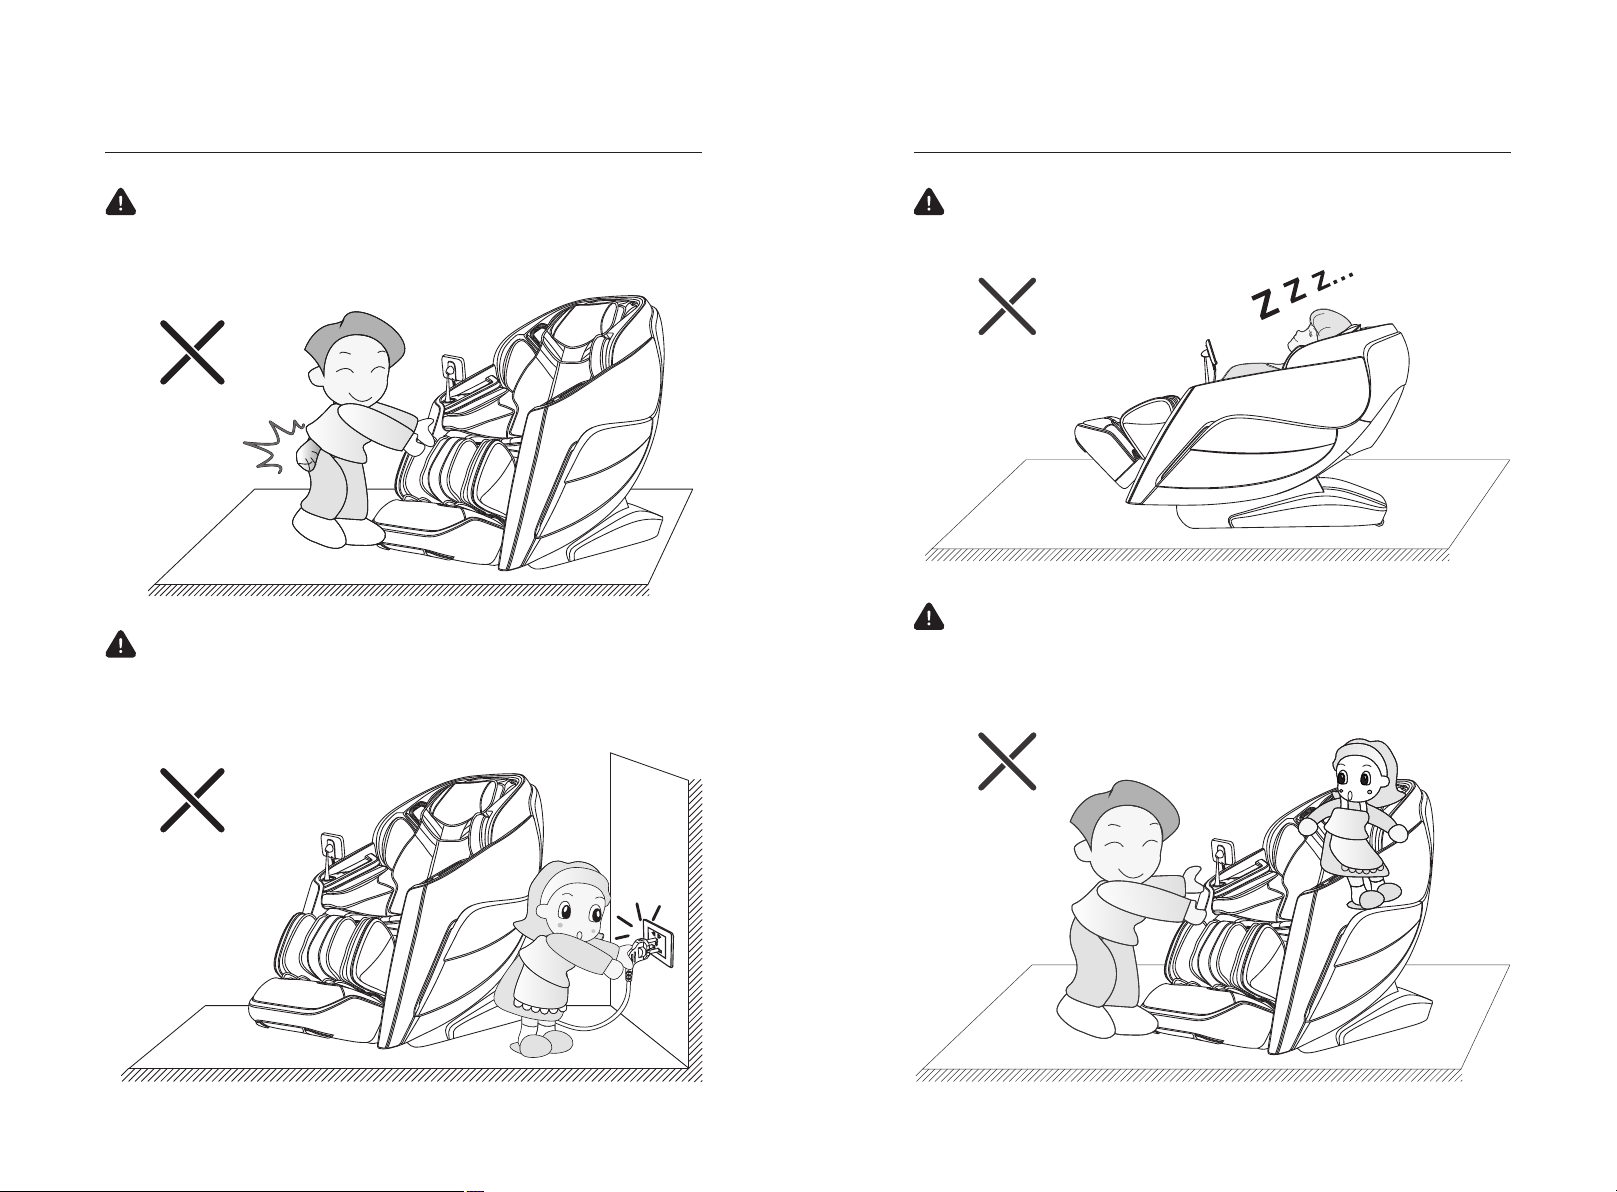
When the legrest of the massage chair is lifted, nobody should apply pressure on
the legrest to prevent the massage chair from falling forward which will damage this
product or result in personal injuries.
Do not remove or pull out the remote controller cable or the power cord in the
standby or power-on state to avoid any damage to this product or accidental electric
shock of a body part. You are advised to unplug the remote controller cable and the
power cord and put them away after you use the massage chair.
Warning
Before sitting on the massage chair, make sure that the massage chair manipulator
does not stay in the seat cushion position to avoid discomfort to the buttocks during
the body pressing down and any damage to the massage chair manipulator.
Warning
When the zero-gravity lying function is enabled, be sure to check whether there is
any child or pet staying or playing under the bottom of the legrest and backrest, in
order to avoid any damage to this product or physical injury.
No downward pressure
0706
Safety Warning
Warning
Before using the massage chair, remove any hard objects in your pocket(s) or any
jewelry carried with you (e.g. key, watch, other similar portable hard objects) to
avoid any damage to this product or physical injury during massage.
Warning
Do not unplug the power cord, or directly turn off the power switch on the back of
the massage chair during massage, in order to avoid any damage to this product or
physical injury.
Warning
Warning
Please do not fall asleep on the massage chair while using to avoid personal injury
caused by unconscious use.
The massage chair should not be used by more than two people at the same time to
avoid product failure or personal injury. In addition, do not let children play on the
massage chair or climb onto the lower leg, seat cushion, foot, backrest or armrest.
Otherwise, accidents or injuries may be caused.
Safety Warning

0908
1
2
4
7
15
10
22
24
18
20
21
23
17
14
12
3
16
6
19
9
8
11
13
25 26
电源输⼊ 开/关
5
Safety Warning
Warning
When adjusting the footrest retractable function or when footrest is declining, please
be sure not to put hard objects (such as keys, mobile phones, Etc.) or put the hand
into the gap of the footrest, and the intersection with the armrest; To avoid product
damage or personal injury caused during the process.
Warning
Before turning on the massage chair, check the surroundings to make sure
that there are no people, pets or other objects around the massage chair
Avoid damage to the product or other objects or personal injury during the
operation of the massage.
Name of Components
1. Head Cushion
2. 3D Digital Audio (built-in
voice control microphone
at the left side)
3. Negative Ion Generator
(right side)
4. Upper Arm Airbag Assembly
5. Item Placement Slot
6. Touch Screen Controller
7. Touch Screen Controller
Bracket
8. Arm Airbag Assembly
9. Bump Massage Belt and
Magnetic Therapy
10. Shawl Abdominal Heating
11.Leg Rest
12. Foot Rest
13. Shawl Assembly
14. Back Cushion
15. Mobile Phone Wireless
Charger
16. Armrest Shortcut Keys
17. Armrest
18. LED Mood Light
19. Armrest Decorative Part
20. Side Cover
21. Backrest Cover
22. Power Back Cover
23. Mobile Wheel
24. Power Cord and Plug
25. Power Input
26. Power Switch

10 11
FunctionFunction
·It is designed with automatic detection and micro-adjustment of shoulder position
and automatic detection of human body curve and Shiatsu point. These adjust the
stretch back and forth of the massage head according to the detected human
body curve and Shiatsu point, making massage more humanized and accurate.
·There are four groups of automatic massage programs in Auto mode: ·VIP Auto
Program, ·Healthcare Auto Program, ·Special Auto Program, and Relaxation Auto
Program. Within these 4 there are 23 automatic massage treatments in total.
·You can save 3 Customised massage programs for future use.
·There are five Back-massage areas for manual selection - Full, Partial, Spot,
Upper and Lower.
·You can select from 17 manual massage techniques: Knead (7 modes), Tap (2
modes), Knead &Tap, Shiatsu (2 modes), Grasp and 4D (4 modes).
·There are 8 massage adjustment functions: 4D Intensity, Back-massage speed,
Back-massage area, Back-massage width, Air pressure intensity, Foot roller
speed, Calf massage Speed and Massage Time.
·Air Pressure massage is available for the Arms (Upper and Lower), Hips, Leg calf
area and Feet. The Air Pressure is adjustable across 3 Levels.
·The TEBO has a unique shawl assembly, with innovative heating functions for the
shoulder, back, waist and abdomen with graphene. Users can place the shawl in
different positions to target specific areas. When the shawl assembly is placed at
the shoulder position, it will heat the acupoints such as Bingfeng, Tianzong,
Yunmen and Qihu around the shoulders and clavicle; when the shawl assembly is
placed on the abdomen and back, it can dispel cold and relieve pain, warming
channels, and removing blood stasis in the back and abdomen, distributing Qi and
blood of the back and abdomen meridian.
·It is provided with innovative heating function at the soles of the feet and toes,
using carbon fibre heating. Hot compress on toes can effectively relieve mental
fatigue of human body and clear the mind.
·The TEBO has Slide rail technology to minimise the distance the chair needs to
be from the wall (2.5cm) thus saving space.
·The massage-head guide rail of the backrest frame adopts “S” & “L” rail
technology, which completely conforms to the back of the human body and allows
people to enjoy a massage from the head to the top of the thigh.
·The TEBO has intelligent voice control recognition enabling control of the
massage with voice commands.
·3D digital audio is available through Bluetooth connectivity.
·Mobile phone wireless charging function is available in the left armrest.
·The left armrest has shortcut controls for: On/Off (Pause) key, 4D intensity
adjustment, zero-gravity mode, automatic mode selection, voice control wake-up,
footrest telescopic adjustment, leg rest telescopic adjustment, seatback-up adjust,
seatback-down adjust.
·The TEBO has a calf massage function: kneading and airbag squeezing around
the inside and outside of the calves, which can relieve the stiffness or tension of
the calf muscles.
·The TEBO includes foot roller massage to scrape and massage the arch and
toes.
·There is the option for ankle stretching: use the airbag squeezing function of the
footrest and leg rest to fix the calf and feet by airbag tension, and then stretch the
ankle by adjusting the footrest up and down, effectively alleviating muscle
stiffness, leg muscle soreness and ankle strain after long-term walking and
strenuous exercise.
·There is the option for leg traction massage: the lower leg air compression and
the back manipulators work together so the legs can be stretched for traction
massage.
·The footrest automatically detects the plantar position. When the calf frame rises
or falls to a different position, the footrest will automatically adjust the plantar
position.
·The footrest uses electronic telescopic adjustment, which adjusts to the leg length
of the user to achieve the most comfortable massage position and length for the
foot.
·The left and right armrests incorporate magnetic therapy areas for the palm of
your hand.
·When seated in the TEBO the Negative Oxygen ions are generated from the
right-side speaker area and the Voice control microphone is adjacent to the left-
side speaker. LED mood lighting is emitted from the exterior of the left and right
armrests.
·Massage selection and control is managed through a 7-inch TFT coloured touch
screen.
·If the massage is terminated before completion the TEBO will automatically return
to the upright position. If there is a power cut the TEBO will hold the position until
power is resumed.
2
06
Upper Air Lower Air
Manual Customise
Angle Setting
Stress Relieving
Energy
Good-night Sleep
Joint Care
Frozen Shoulder
Spine Massage
Thai Massage
More
1312
电源输⼊
开/关
电源输⼊
开/关
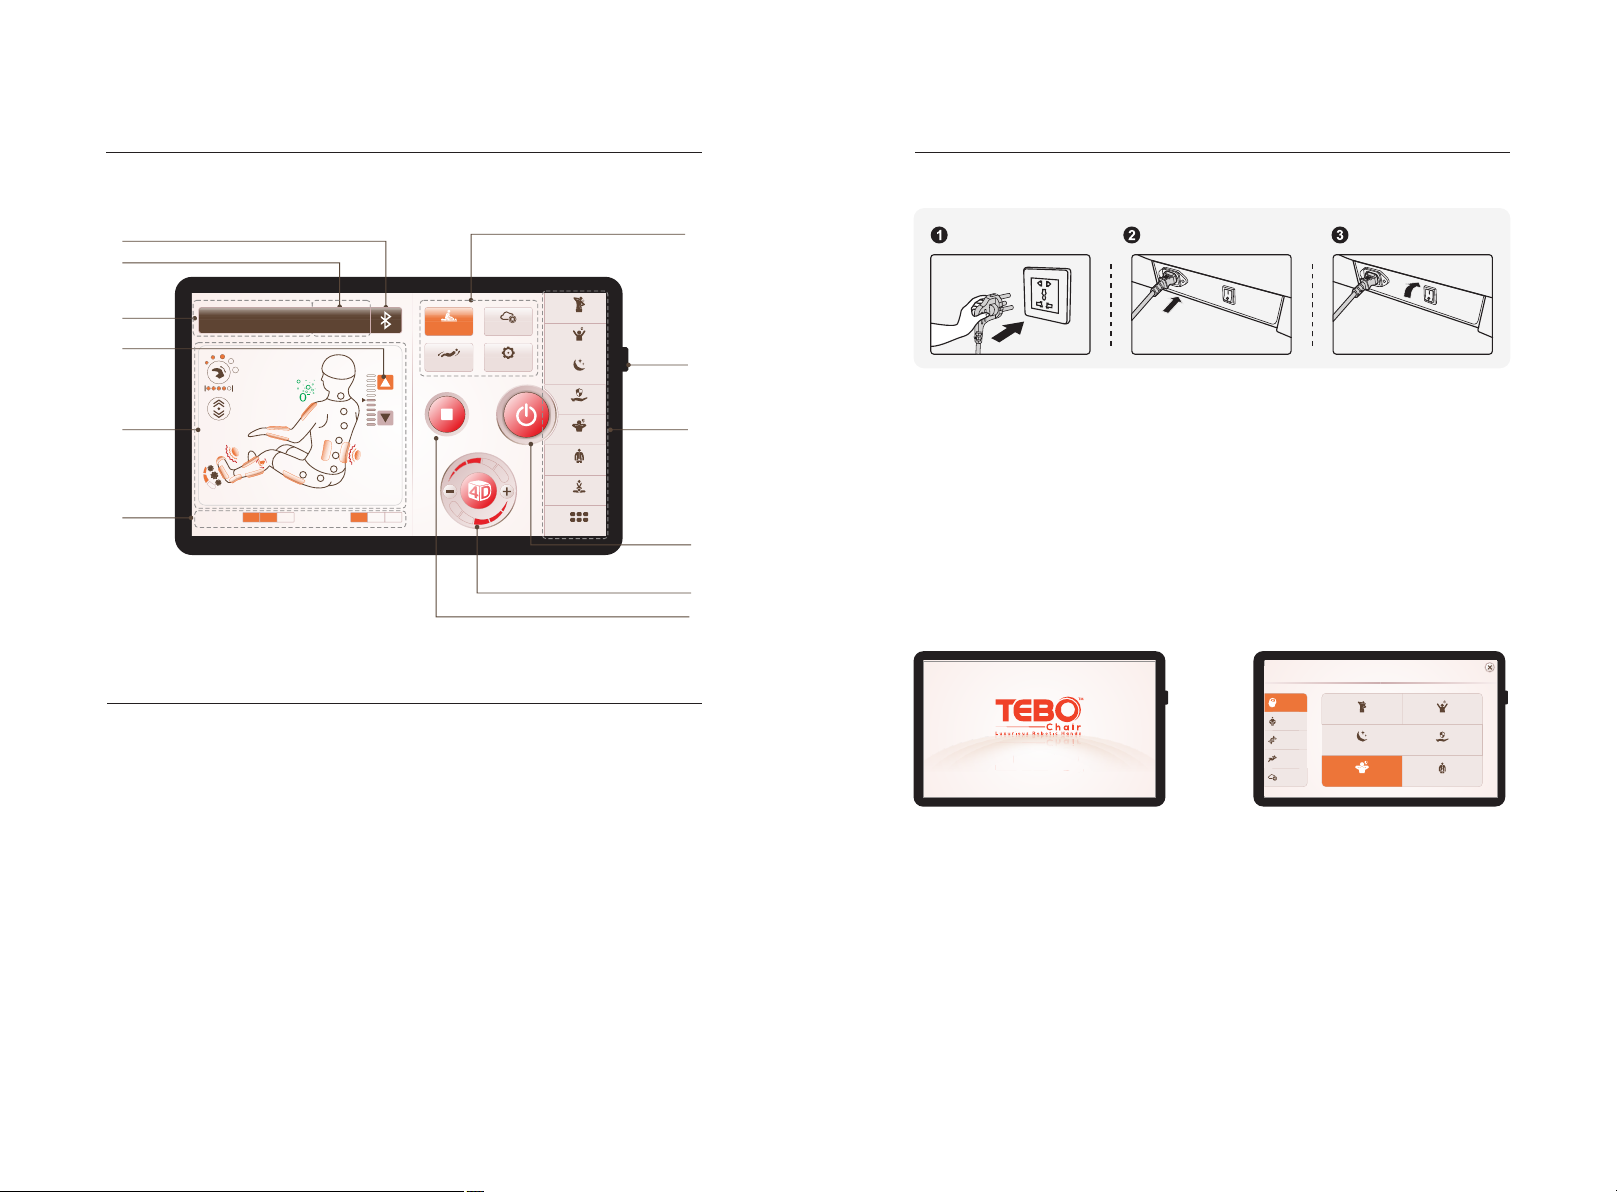
Method of UsageTouch screen manual controller interface introduction
Touch screen remote controller introduction
12
1
6
7
8
9
10
11
5
3
2
4
Note: The touch screen remote controller displays the Features in operation
(Massage status), 4D adjustment, Manual Massage, Customise and Settings
access and Automatic massage selection.
1.Bluetooth switch and display
2.Time adjustment button and display
3.The status bar
4.The shoulder position can be adjusted up and down
5.Massage status information display
6.Air pressure intensity display
7.Manual, intelligent storage, angle adjustment, settings and other massage function keys
8.The power switch
9.Automatic massage function
10.Massage switch
11.4D massage function keys
12.Operation / pause button
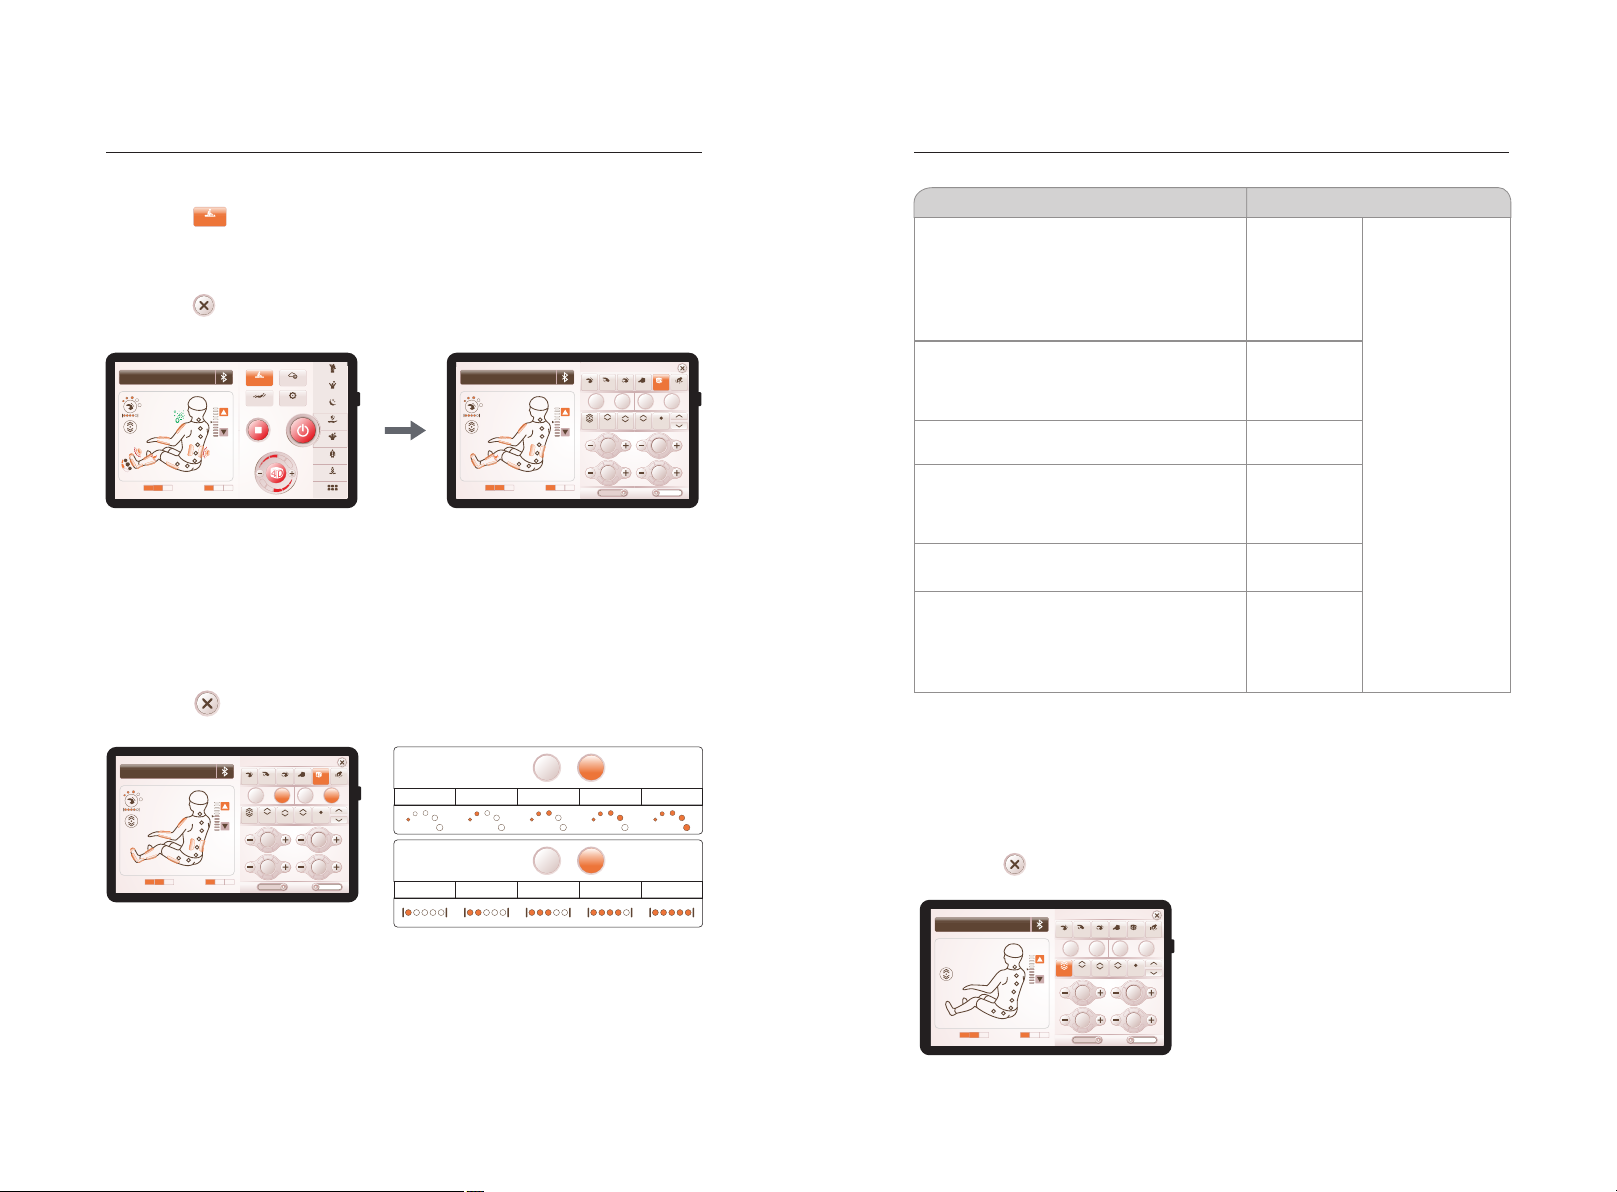
1)、Start to massage
Ⅰ、Switch power supply on
Ⅱ、Massage function control operation
Diagram of plug in Diagram of line
Diagram of the switch
position of power supply
·Once Power to the chair is switched on at the rear then switch the Chair on using
the Power button on the side of the touchscreen. The TEBO will now be in
Standby Mode.Select an Auto pre-set massage or a saved massage from the
Customise menu. This will start the Body scanning and Shoulder detection
process.If a selection isn’t made within 5 minutes the TEBO will shut down
automatically.
·VIP Auto Program: Stress Relieving, Energetic Morning, Good-night Sleep, Joint
Care, Frozen Shoulder, Spine Massage.
·Healthcare Auto Program: Office Regimen, Sport Recovery, Brain Refresh, Spine
Care, Waist Care, Legs Care.
·Special Auto Program: Health Recharge, Meridian Treatment, Keep Fit, Bottom
Toning, Restoration Massage, Tiredness Relief.
·Relaxation Auto Program: Full-body Stretch, Thai Massage, Chinese Massage,
Total Relax, Airbag.
Stress Relieving Energy
Good-night Sleep Joint Care
Frozen Shoulder Spine Massage
VIP
Healthcare
Special
Relaxation
Customise
Select an automatic function to start the massage
16min
Waist Care

1514
Method of usage Method of usage
·Once an Auto massage is selected the backrest and calf position will adjust for
the Body scanning and Shoulder detection process
·After adjusting the seat angle and calf position the TEBO will perform detection
of the acupressure points and shoulder position. Note If Frozen Shoulder
massage is selected then only Shoulder detection scanned. To skip the scan
process, press the “ ” button and the TEBO will operate with Default
settings.
06
Please adjust the position of the shoulder......
06
ShoulderPositionAdjust
OK
OK
·Position too low
·Proper position
·Position too high
Buttons Description
Press to adjust the massage heads higher.
Press to adjust the massage heads lower.
2)、The Pause button
·When the massage function is operating, press the “Pause” button to temporarily stop
all massage functions; Press the “Pause” button again to continue the massage. If the
pause time exceeds 20 minutes, all massage functions are automatically turned off.
Pause
Massage function pause Massage function operation
Run/pause Button Functional description
In the operation state, press this button to pause all current
massage functions.
In the pause state, press this button to continue the massage
function before the pause
·Under the massage information interface, click the “ ” or “ ” button on the
4D icon to adjust the massage intensity of the upper back muscles, Five levels
intensity.
3)、Upper body massage strength (4D key)
Speed
1 level 2 level 3 level 4 level 5 level
Note:
·Massage strength: To adjust 4D massage intensity, the massage head is
extended forward or is retracted. You can adjust the Intensity of a certain massage
point with this control in both automatic and manual massage techniques.
Auto lying down
Justamoment......
Body sensing progress
2
06
Upper Air Lower Air
Manual Customise
Angle Setting
Stress Relieving
Energy
Good-night Sleep
Joint Care
Frozen Shoulder
Spine Massage
Thai Massage
More
16min
Waist Care
2
06
Upper Air Lower Air
Manual Customise
Angle Setting
Stress Relieving
Energy
Good-night Sleep
Joint Care
Frozen Shoulder
Spine Massage
Thai Massage
More
16min
Waist Care
Pause
Operation
·Upon completion of scan, a beeping sound will be emitted from the chair for 10
seconds as the massage heads gently roll on your shoulders. During this period,
if you would like to further adjust the detected shoulder region, you can do so by
pressing the up or down shoulder button. There are 11 levels of adjustment, if no
adjustment required press the ENTER/OPERATION BUTTON to go to the massage.
1716
4)、Automatic function
Method of usage Method of usage
·There are four different automatic massage Groups in Auto mode:
·VIP Auto Program: Stress Relieving, Energetic Morning, Good-night Sleep, Joint
Care, Frozen Shoulder, Spine Massage.
·Healthcare Auto Program: Office Regimen, Sport Recovery, Brain Refresh,
Spine Care, Waist Care, Legs Care.
·Special Auto Program: Health Recharge, Meridian Treatment, Keep Fit,
Bottom Toning, Restoration Massage, Tiredness Relief.
·Relaxation Auto Program: Full-body Stretch, Thai Massage, Chinese
Massage, Total Relax, Airbag. Press the “More" icon to go to the Auto
massage groups, then Click the respective icon to select the preferred
massage. When in automatic massage, the speed and width cannot be
adjusted.
·Press “more" icon to select the corresponding automatic massage function.
Function Description
Auto mode
VIP
Special
Relaxation
Relieve fatigue and relax muscle, improve microcircu-
lation of back & limbs and quickly relieve stress.
Stress
Relieving
Energy
Good-night
Sleep
Joint Care
Frozen
Shoulder
Spine
Massage
The body is resting after a night’s sleep. Quickly
wakeup all the body functions by massaging whole
muscle to start a fresh day.
It helps balance your body, quickly improve sleep
quality by massaging the 12 health acupoints.
Care for the health of all joints by pushing, pulling,
stretching and other massage modes
The unique massage mode for neck and shoulder,
relieve neck and shoulder pain and improve blood
supply in the brain.
Massage the spine to protect its health, alleviate
slipped disc.
Legs Care
Healthcare
Office
Regimen
Sport
Recovery
Brain
Refresh
Spine Care
Waist Care
Increase circulation by massage, improve the body
functions affected by sedentary activity.
Restoring energy levels quickly after exercise.
Relieve neck and shoulder pain, promote blood supply
to the brain by massaging YUZHEN and DAZHU points.
Care for the health of spine and improve the lack of
exercise.
Focus on improving spine health and relieving stiffness
in the waist muscles.
Quickly relieve the soreness and muscle fatigue in
lower body.
Improve energy levels, similar to a nap.
Health
Recharge
Meridian
Treatment
Restoration
Massage
Tiredness
Relief
Dredge the meridians, improve the body's microcirculation
and immunity quickly。
Wake up all body functions quickly, replenish physical
strength and restore fatigue by massaging the 12
health acupoints.
Relieve fatigue, restore vitality and flush out lactic acid
produced after exercise.
Total Relax
Airbag
A relaxing, soothing massage for the whole body with
kneading and tapping to relieve fatigue.
Focusing on body pressure massage, it can fully relax
the body, restore fatigue, and calm the nerves.
206
Upper Air Lower Air
Manual Customise
Angle Setting
Stress Relieving
Energy
Good-night Sleep
Joint Care
Frozen Shoulder
Spine Massage
Thai Massage
More
16min
Waist Care
2
06
Upper Air Lower Air
Stress Relieving
Energy
Good-night Sleep
Joint Care
Frozen Shoulder
Spine Massage
VIP Auto Program
VIP
Healthcare
Special
Relaxation
16min
Waist Care
Full-body
Stretch
Thai
Massage
Chinese
Massage
Stretch the body to increasing its flexibility by Thai
massage.
Comprehensively relieve fatigue and soreness through
a deep massage for whole body.
According to the traditional Chinese medicine theory,
balance the body function to achieve physical fitness
and remove the disease.
Keep Fit
Bottom
Toning
Effectively massage buttocks and legs to shaping the
body, reduce the accumulation of body fat.
Improve overall blood circulation of body to enhance
vitality and immunity.
1918
·Under the manual massage function interface, select the manual massage
technique, back stretch, speed and width adjustment.
·Manual (manipulation): includes six different massage techniques: knead, tap,
knead & tap, shiatsu, 4D, and . Grasp The massage Speed and Intensity can be
adjusted in all modes. Width can be adjusted in Tapping, Shiatsu and 4D.
Click the “ ” icon to close the manual massage interface.
5)、Manual
01)、Manual - manipulation
02)、Manual - back massage
Method of usage Method of usage
·Click the “ ” icon to enter the manual function selection interface, including
Manual Massage techniques, Massage Intensity, Speed and Width, Back-
Massage area, Upper airbag massage, Lower air bag massage, Calf massage,
Foot rollers, Negative oxygen ions, Heat and other massage functions.
·Click the “ ” icon to close the manual massage interface.
Manual massage function selected interface Manual massage function interface
Speed
Width
Manual massage function - manual interface
Speed-
Speed+
Width- Width+
1 level 2 level 3 level 4 level 5 level
1 level 2 level 3 level 4 level 5 level
·Back massage-area options are; Full, Upper, Lower, Partial and Spot. Click on the
corresponding icon to select the massage area.
·Click the “ ” icon to close the manual massage interface.
Manual massage function - back massage interface
Manual
Kneading
·Type 1 – Forward kneading
Type 2 – Reverse kneading ·
Types 3 -7 – Forward kneading and ·
Reverse kneading at differing speeds
in each mode
Tapping
Type1 – Fixed speed, ·
Type 2 – speed can be adjusted·
Function
Description
Shiatsu
·Shiatsu 1 – single press
Shiatsu 2 double press·
Simultaneous kneading and tapping
Shoulder lifting
4D
4D I - Kneading + lower back stretch·
4D II - Kneading and tapping + lower back stretch·
4D III - Steady Tapping + lower back stretch·
4D IV - Various speed tapping + lower back stretch·
Speed
Intensity
Speed
Width
Intensity
·5 speed levels
adjustable
·5 width levels
adjustable
·5 Intensity levels
adjustable
Note: In 4D massage technique mode, the width of 4DⅠ and 4DⅡ cannot be
adjusted; the width of 4DⅢ and 4DⅣ can be adjusted.
206
Upper Air Lower Air
Manual Customise
Angle Setting
Stress Relieving
Energy
Good-night Sleep
Joint Care
Frozen Shoulder
Spine Massage
Thai Massage
More
16min
Waist Care
4D
Ⅳ
Ⅱ Ⅱ
Manual Mode
Knead Shiatsu Grasp
Speed-
Width-
Partial
Lower
Air
Foot
Roller
Spe ed+
Width+
Upper
Air
Full Upper Lower
Calf
Knead
06
Upper Air Lower Air
Tap
Knead&Tap
Spot
开启 O FFON
-Ion Heat
16min
Waist Care
4D
Ⅳ
Ⅱ Ⅱ
Manual Mode
Knead Shiatsu Grasp
Speed-
Width-
Partial
Lower
Air
Foot
Roller
Upper
Air
Full Upper Lower
Calf
Knead
Speed+
Width+
06
Upper Air Lower Air
Tap
Knead&Tap
Spot
开启 O FFON
-Ion Heat
16min
Waist Care
4D
Ⅳ
Ⅱ Ⅱ
Manual Mode
Knead Shiatsu Grasp
Speed-
Width-
Partial
Lower
Air
Foot
Roller
Spe ed+
Width+
Upper
Air
Full Upper Lower
Calf
Knead
06
Upper Air Lower Air
Tap
Knead&Tap
Spot
开启 O FFON
-Ion Heat
16min
Waist Care
Speed
Width
Intensity
Speed
Width
Intensity
Speed
Intensity
Speed
Intensity

2120
·Manual (air pressure): includes upper body airbag pressure and lower body air pressure
massage function. Click the air pressure function icon to turn the air pressure massage
function on or off. Adjust the intensity by clicking the " " or " "button. close the
manual massage interface by clicking the " " icon.
Function Description
Spot
Partial
Upper back
Lower back
Full
Upper adjust
Lower adjust
Press the icon, a single dot appears in the display. Massage
apparatus will stay stationary.
Press the icon, two arrows appear. Massage apparatus will
move in an approximately 3 inch range.
Press the icon for an Upper Back massage.
Press the icon for a Lower Back massage.
Full back massage.
Press and hold to move the range of the massage area up in the
Fixed or Partial Position.
Press and hold to move the range of the massage area down in the
Fixed or Partial Position.
03)、Manual - air pressure massage
In the upper body air pressure or lower body air
pressure open state, you can adjust the air
pressure massage three level strength.
Pressure
1level 2level 3level
Description
Lower Air
Turn the upper body air pressure massage function on or off.
Turns the lower body air pressure massage function on or off.
04)、 Manual - calf massage
Manual massage function – the
Calf Massage
Function Description
Press the switch on or off the calf squeeze massage function.
05)、Manual - foot rollers
Speed
Manual massage function - foot rollers
selection interface
1level 2level 3level
Function Description
Press to turn On or Off the foot rollers massage function.
Foot
Roller
Calf
Knead
· Press “ ” to switch on or off the foot rollers massage function. Click “ ” or
“ ” to adjust the speed of the roller. The speed can be adjusted in three levels.
click “ ” icon to close the manual massage interface.
Foot
Roller
Method of usage Method of usage
Manual massage function - air pressure
selection interface
Function
Upper Air
4D
Ⅳ
Ⅱ Ⅱ
Manual Mode
Knead Shiatsu Grasp
Speed-
Width-
Partial
Foot
Roller
Spe ed+
Width+
Full Upper Lower
Calf
Knead
Upper
Air
Lower
Air
06
Upper Air Lower Air
Tap
Knead&Tap
Spot
开启 O FFON
-Ion Heat
16min
Waist Care
·Turn the Calf Massage function on or off by pressing the “ICON ” button; There are
three calf massage speeds. Adjust the speed by pressing the " " or " "
button.Click the “ ” icon to close the manual massage interface.
4D
Ⅳ
Ⅱ Ⅱ
Manual Mode
Knead Shiatsu Grasp
Speed-
Width-
Full Back
Upper Back
Lower Back
Partial
Lower
Air
Spe ed+
Width+
Upper
Air
06
Upper Air Lower Air
Tap
Knead&Tap
Spot
开启 OF FON
-Ion Heat
16min
Waist Care Speed
1level 2level 3level
Foot
Roller
Calf
Knead
4D
Ⅳ
Ⅱ Ⅱ
Manual Mode
Knead Shiatsu Grasp
Speed-
Width-
Full Back
Upper Back
Lower Back
Partial
Lower
Air
Spe ed+
Width+
Upper
Air
06
Upper Air Lower Air
Tap
Knead&Tap
Spot
开启 OF FON
-Ion Heat
16min
Waist Care
Foot
Roller
Calf
Knead
2322
06)、Manual-negativeoxygenion
·Click the “Negative Ions ” button to switch on or off the negative oxygen ion
massage function. click the “ ” icon to close the manual massage interface.
ON
Manual massage function -
Negative Ions selection interface
Function Description
Press this button to switch on or off the negative oxygen ion function.
Negative oxygen ion
ON
07)、Manual-backheating
Manual massage function -
heating selection interface
·Click the “ ” button to enter the memory massage interface where you can
save a current massage for future use. There is the facility to save 3 massages,
simply click on one of the buttons in the “Save” area to store all current massage
methods, air pressure, angle, and other massage functions. To recall the
massage at a future point, navigate to this page and click the corresponding
numbered button in the “Use” area. Click the “ ” icon to close the memory
massage interface.
6)、Customise
Customise
Program memory selection interface Program memory interface
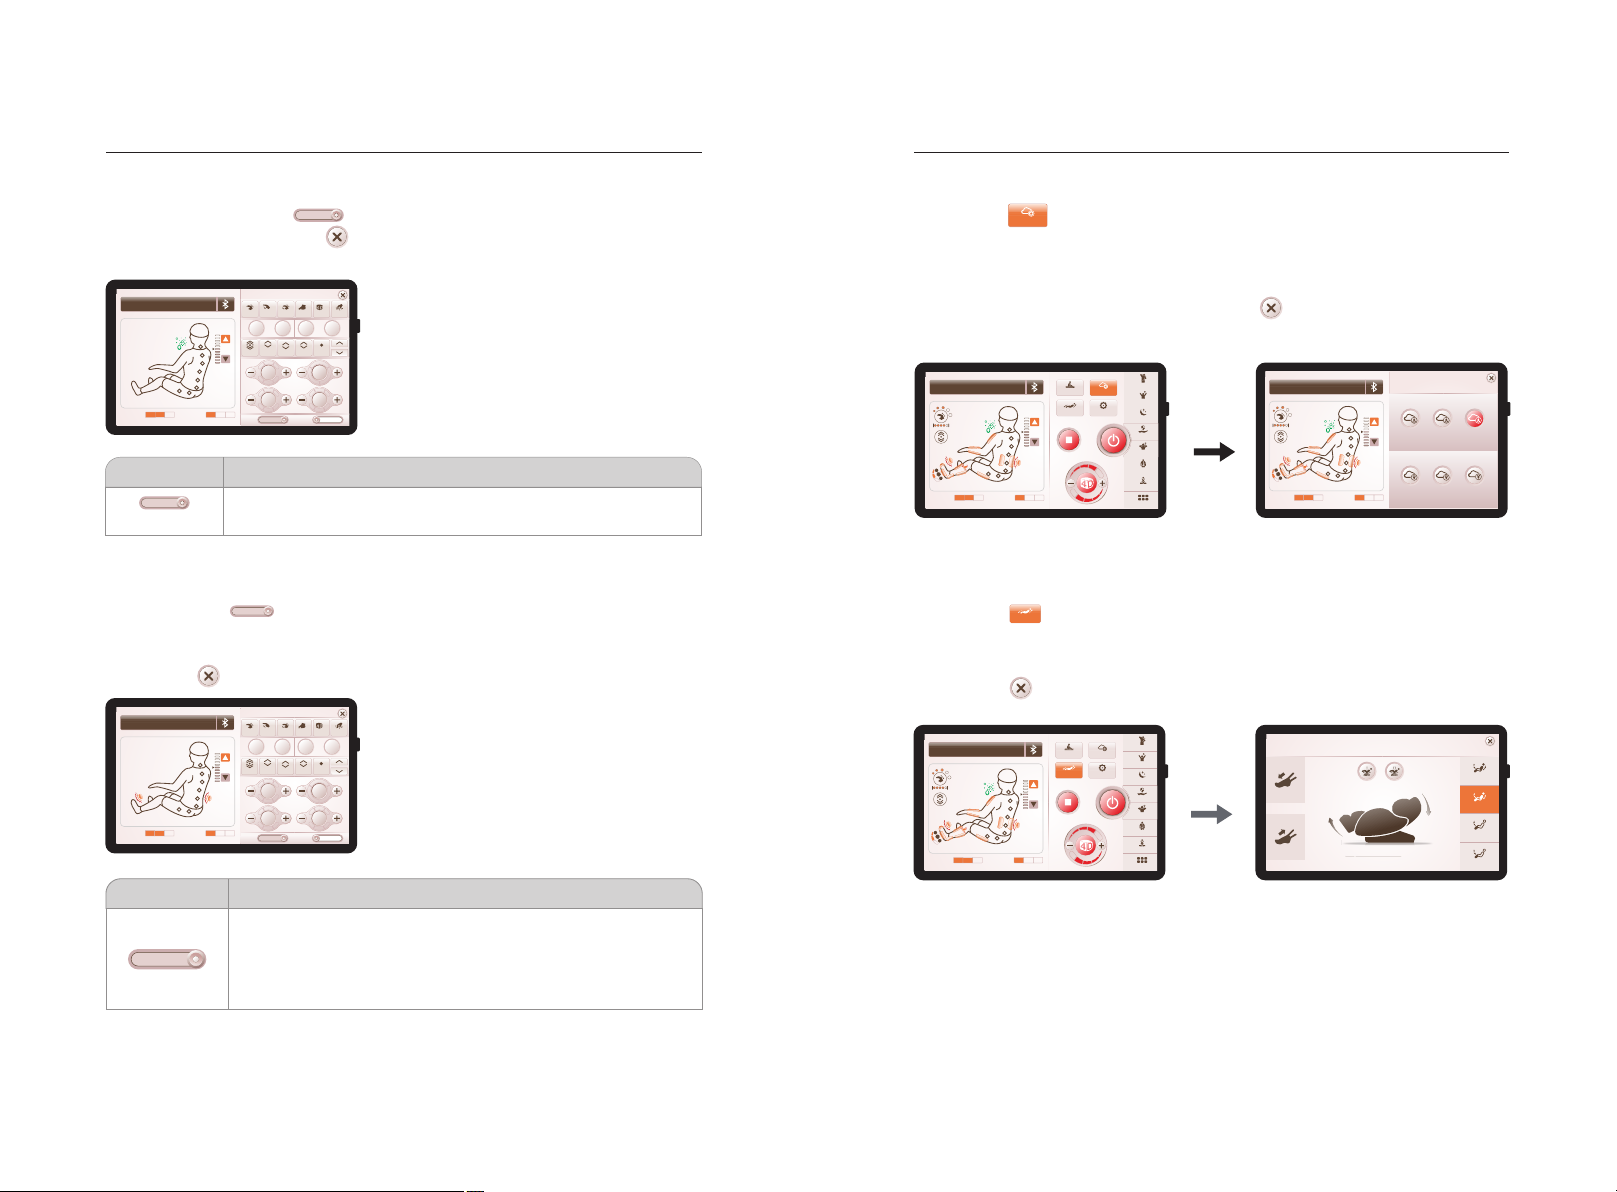
7)、ChairInclineAdjustment
Angle
Angle adjustment selected interface Angle adjustment interface
·Click the “ ” button to enter the adjustment interface where you can
adjust the inclination angle of the chair, the leg-rest position and leg-length
for the Footrest. You can also select and adjust either of the Zero G
positions.
·Click the “ ” icon to close the interface.
Method of usage Method of usage
2
06
Upper Air Lower Air
4D
Ⅳ
Ⅱ Ⅱ
Manual Mode
Knead Shiatsu Grasp
Speed-
Width-
Partial
Lower
Air
Foot
Roller
Spe ed+
Width+
Upper
Air
Full Upper Lower
Calf
Knead
开启 O FFON
-Ion Heat
Tap
Knead&Tap
Spot
16min
Waist Care
4D
Ⅳ
Ⅱ Ⅱ
Manual Mode
Knead Shiatsu Grasp
Speed-
Width-
Partial
Lower
Air
Foot
Roller
Spe ed+
Width+
Upper
Air
Full Upper Lower
Calf
Knead
06
Upper Air Lower Air
Tap
Knead&Tap
Spot
开启 O FFON
-Ion Heat
16min
Waist Care
206
Customise
Angle Setting
Upper Air Lower Air
Stress Relieving
Energy
Good-night Sleep
Joint Care
Frozen Shoulder
Spine Massage
Thai Massage
More
Manual
16min
Waist Care
2
06
Upper Air Lower Air
Ⅱ
Ⅰ
Ⅲ
Ⅰ
ⅡⅢ
Customise
Save
Use
16min
Waist Care
206
Customise
Angle Setting
Upper Air Lower Air
Stress Relieving
Energy
Good-night Sleep
Joint Care
Frozen Shoulder
Spine Massage
Thai Massage
More
Manual
16min
Waist Care Ang le adju stmen t
Foot Adjust
Seat-Up
Seat-Down
Calf-UP
Calf-Down
·Click the “Heat ” button to turn on or off the heating function of the cape
(graphene heating) and the heating function of the toes ( carbon fiber). it will be
warm 3 minutes after the heating function is turned on
·Click the “ ” icon to close the manual massage interface.
ON
Function Description
ON
Press this button to turn on or off the heating function. Press first
time to turn on the heating of shawls. Press the second time, turn
off the shawl heating, open the toe heating; Press the third time,
open the shawl heating and toe heating; Press the fourth time to
turn off the shawl back heating and the toes heating.
2524
02. Lying angle adjustment
Function Description
Calf-Up
Calf-Down
Leg up key: Press and hold to raise the calf unit independently of the
backrest, release to stop; After the calf rest up is completed,the calf
frame will automatically adjust the leg length.
Leg down key: Press and hold to lower the calf unit independently of
the backrest, release to stop; After the calf rest down is completed, the
calf frame will automatically adjust the leg length.
Seat-down
Seat-up
01). Zero gravity adjustment
Function Description
Zero gravityⅠ: Automatically adjust the calf and backrest position to
zero gravityⅠposition.
Zero gravityⅡ: Automatically adjust the calf and backrest position to
zero gravityⅡposition.
8)、Settings
· Click the “ ” button icon to enter the setting selection interface, including backlight
brightness adjustment, Display Auto-Lock time adjustment, button volume switch,
serial number, language selection and other settings.
·Click the “ ” icon to close the settings interface.
Setting
Setting selection interface Setting interface
201804150001
English
1Min 3Min 10Mi n 30M in
Setting
Brightness
Sound
Language
S/N
Chines e
Auto-Lock
02)、Auto-Lock
03)、Sound
04)、Language
05)、S/N
·Select brightness slider and slide left and right to adjust the backlight brightness.
·Select lock screen button and make choice with 1 minute, 3 minutes, 10 minutes or
30 minutes.
·Click the “ ” icon to turn off the button volume, and click “ ” to turn on the
button volume.
·Language selection
·Displays information such as current equipment.
01)、Brightness
Method of usage Method of usage
Seat-up key: press and hold this key to slowly rise the backrest frame
while slowly lowering the calf frame, and release it to stop rising of the
backrest frame or lowering of the calf frame; after the seat-up action is
completed, the calf frame will automatically adjust the leg length.
Seat-down key: press and hold this key to slowly lower the backrest
frame while slowly rising the calf frame, and release it to stop lowering
of the backrest frame or rising of the calf frame; after the seat-down
action is completed, the calf frame will automatically adjust the leg
length.
Function Description
Foot rest shortening key: manually adjust shortening of the foot rest;
press and hold this key to move the foot rest up slowly and stop when
released.
Foot rest extension key: manually adjust extension of the foot rest;
press and hold this key to move the foot rest down slowly and stop
when released.
03). Footrest Stretch adjust
Manual Customise
Ang le Setting
206
Upper Air Lower Air
Stress Relieving
Energy
Good-night Sleep
Joint Care
Frozen Shoulder
Spine Massage
Thai Massage
More
16min
Waist Care
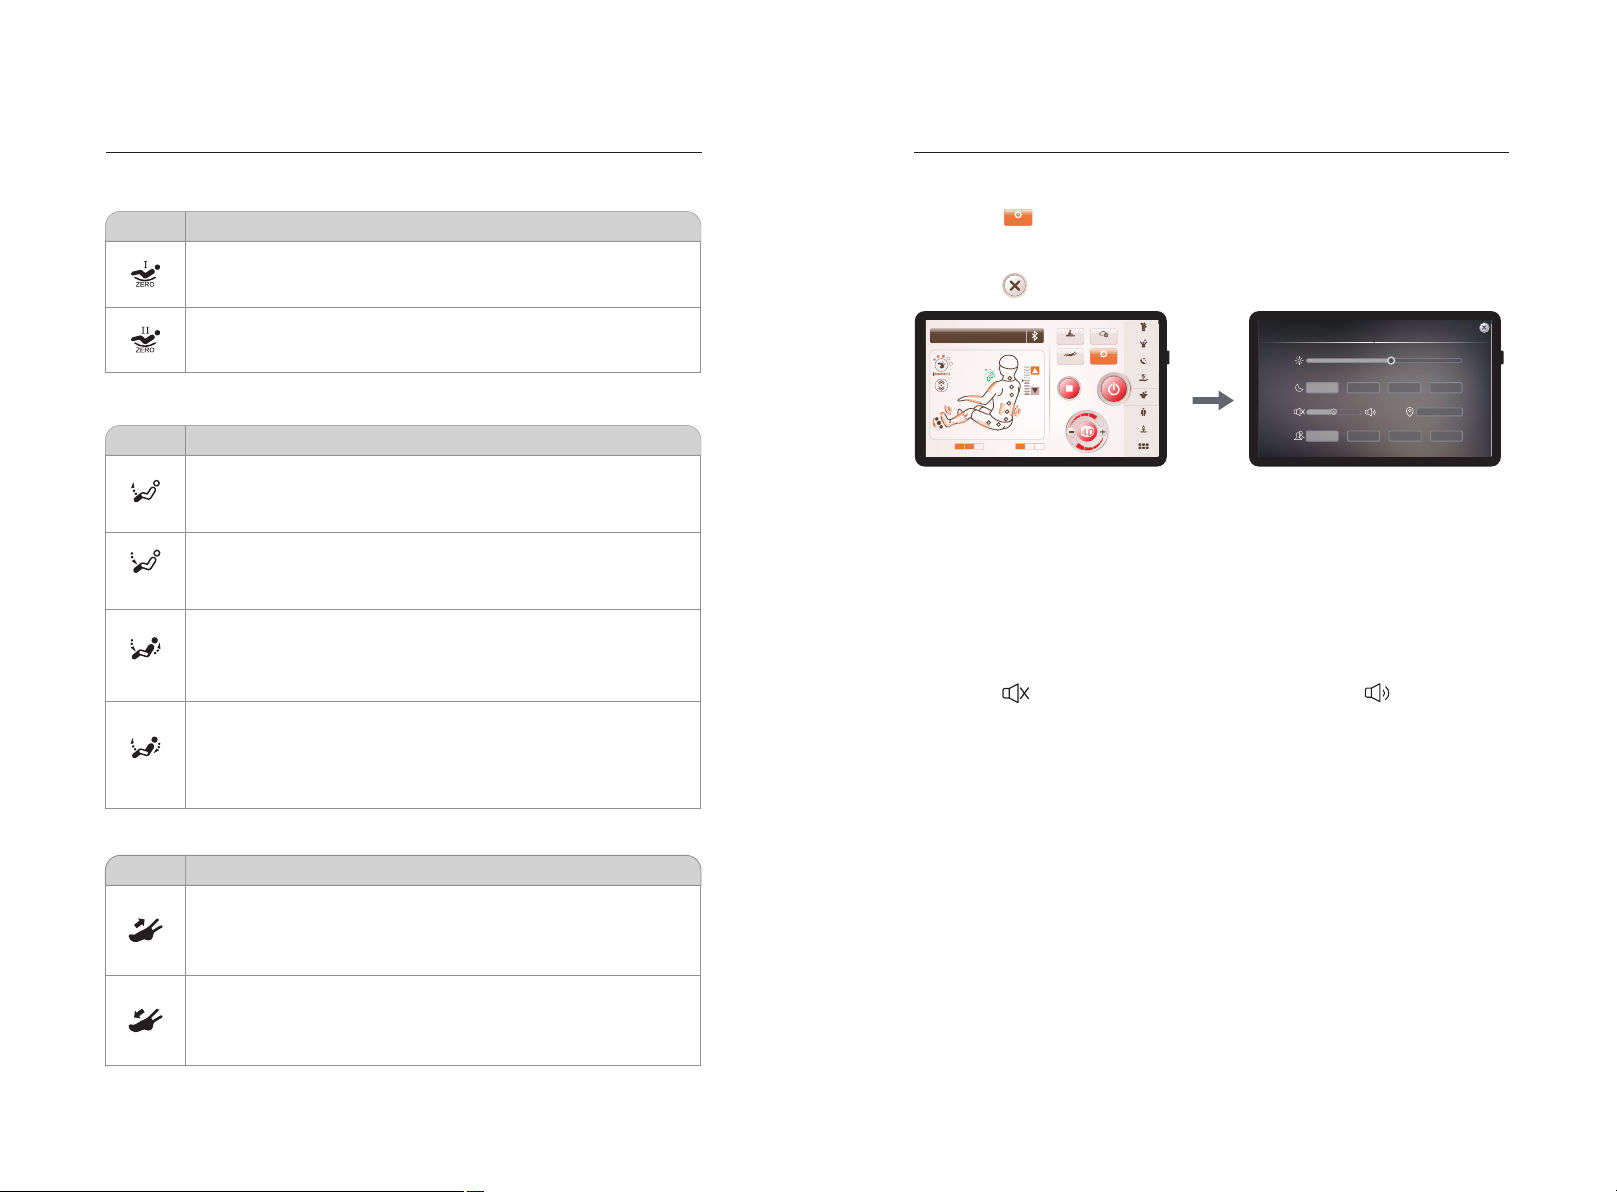
·Click the “ ” icon to adjust the massage time function. Each time you press it,
it will add 5 minutes. It cannot exceed 40 minutes. If it exceeds 40 minutes, it will
return to 5 minutes.
·Click the “ ” icon to switch on or off Bluetooth. “ ” is to switch off the Blue
tooth status, and “ ” is to switch on the Bluetooth status.
·After the Bluetooth-enabled audio source device (such as mobile phone, MID
tablet, etc.) is paired with the massage chair Bluetooth module, the music played
by the audio source device can be wirelessly transmitted to the massage chair
audio system for music playback via Bluetooth.
9)、Bluetooth‒MainDisplayinterface
10)、Timeadjustment
16 min
Method of usage
Bluetooth switch
Bluetooth
off state
Bluetooth
on state
Bluetooth interface not enabled
Time Setting
Time adjustment interface
Attentions: When adjusting the time, you should return to the main information
control interface. If you are in manual, angle adjustment or custom storage control
interface, the time cannot be controlled.
16min
Ease Ache
16min
Ease Ache
16min
Ease Ache
Method of usage
1
2
3
4
5
6
7
8
9
10
4D
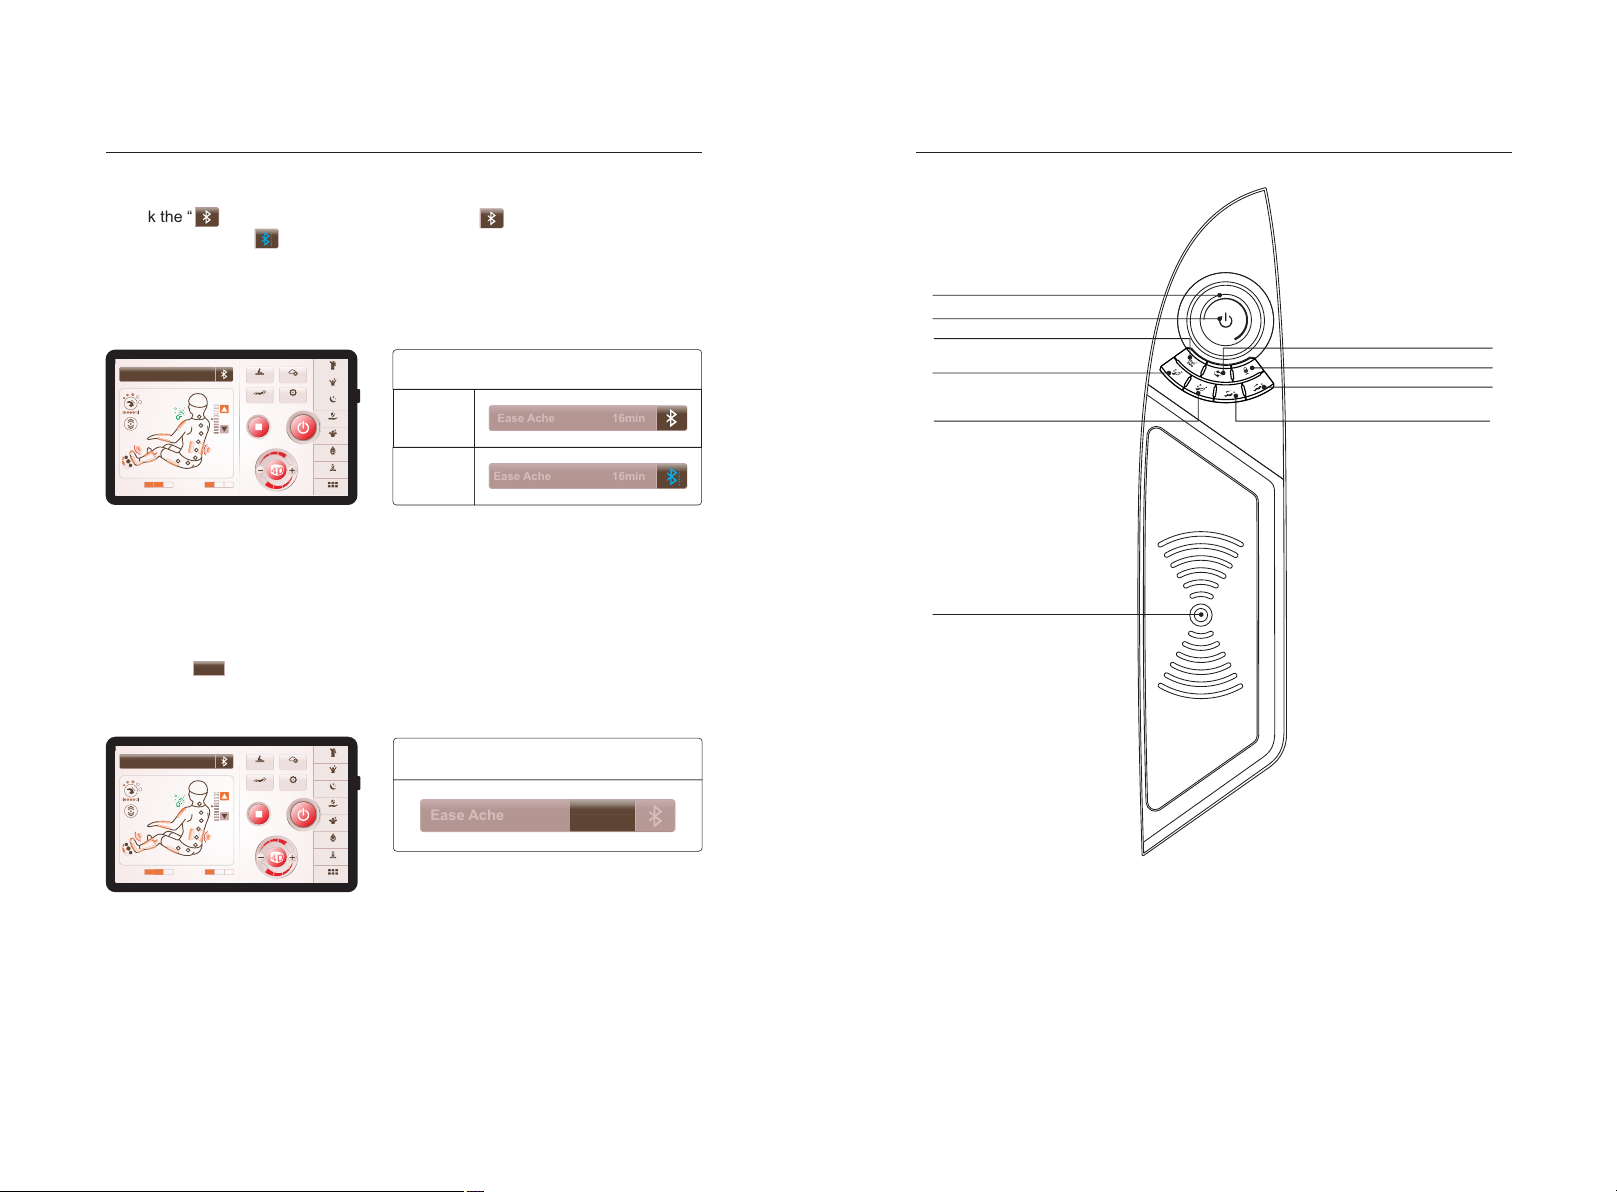
III.Introduction to Armrest Shortcut Keys
1. 4D Intensity rotation button: adjust the massage intensity of the 4D manipulator.
2. On/Off key: Turn on (short press to pause) or off the massage chair.
3. Zero Gravity key: adjust massage chair to the zero gravity angle.
4. Extension adjustment of the foot rest: extend the foot rest by adjustment.
5. Shortening adjustment of the foot rest: shorten the foot rest by adjustment.
6. Wireless Charging: Mobile Phone Wireless Charger.
7. Auto key: Adjust the automatic massage function, and cyclically switch the automatic
function every time you press it.
8. Voice Control Wake-up key: Short press this key to wake up the voice control, long
press for 3 seconds to turn on/off the voice control function.
9. Chair Angle adjustment Down.
10. Chair Angle adjustment Up.
2726
Manual Customise
Angle Setting
206
Upper Air Lower Air
Stress Relieving
Energy
Good-night Sleep
Joint Care
Frozen Shoulder
Spine Massage
Thai Massage
More
16min
Waist Care
Manual Customise
Angle Setting
206
Upper Air Lower Air
Stress Relieving
Energy
Good-night Sleep
Joint Care
Frozen Shoulder
Spine Massage
Thai Massage
More
16min
Waist Care
NOTE – Function will not work when in Manual, Incline Adjustment or Settings
interfaces.

4D
Method of usage Method of usage
Function Description
On/Off key: short press this key to suspend operations and press it for
3 seconds to turn it on and off. If the pause lasts for more than 20
minutes during massage, all massage functions will be automatically
turned off.
4D intensity knob key: Adjust the massage intensity of 4D manipulator
(weakened when rotating counterclockwise, enhanced when rotating
clockwise), and the intensity ranges from Level 1 to Level 5.
Zero-gravity key: each time the key is pressed, the position of the calf
frame and backrest frame will be automatically adjusted to the
zero-gravity position. There are two zero-gravity lying modes, which can
be switched in cycles.
Auto Mode key: Switch the automatic massage function every time
you press it.
Voice Control Wake-up key: Short press this key to wake up the voice
control, long press for 3 seconds to turn on/off this function.
Seat-up key: Press and hold this key to slowly rise the backrest frame
while slowly lowering the calf frame, and release it to stop rising of the
backrest frame or lowering of the calf frame; after the seat-up action is
completed, the calf frame will automatically detect Leg length.
Seat-down key: press and hold this key to slowly lower the backrest
frame while slowly rising the calf frame, and release it to stop lowering
of the backrest frame or rising of the calf frame; after the seat-down
action is completed, the calf frame will automatically detect Leg length.
IV. Voice Control Mode
1
2
3
4
5
6
7
8
9
10
11
12
13
14
15
No.
Voice Control Entry
Voice control entry
Answer entry
Entry: “Hi Alice” or “Hey Alice”. Answer: I am here.
Massage on
Massage close
Stress Relieving
Energy
Good-night Sleep
Neck & shoulder care
Full-body stretch
Spine Massage
Open the air pressure
Close the air pressure
Up the seat position
Down the seat position
Change the other mode
Go little down
Go little up
Answer: Ok, Massage on.
Answer: Ok, Massage close.
Answer: Ok, Stress Relieving.
Answer: Ok, Energy.
Answer: Ok, Good-night Sleep.
Answer: Ok, Neck & shoulder care.
Answer: Ok, Full-body stretch.
Answer: Ok, Spine Massage.
Answer: Ok, Open the air pressure.
Answer: Ok, Close the air pressure.
Answer: Ok, Up the seat position.
Answer: Ok, Down the seat position.
Answer: Ok, Change the other mode.
Answer: Ok, Go little down.
Answer: Ok, Go little up.
2928
Note: commands 14 and 15 can only be used after command 13.
Footrest shortening key: manually adjust the Footrest shortening;
Press this key to slowly shorten the movement of the Footrest up,
release to stop.
Footrest elongation key: manually adjust the Footrest elongation;
Press this key to slowly extend down the Footrest to move, release
to stop.
·When the massage chair is turned on or in standby mode, saying “Hi Alice” or “Hey
Alice” will enable the voice control function. Alternatively, you can press the voice
control button on the armrest to enable the voice control function. Long-press the
Voice control button 3 seconds to turn on or off the voice control function. After the
function is enabled successfully, the massage chair will reply “I am here.” Now a
voice control command can be given within six seconds, and the corresponding
voice control function will be performed after a confirmation reply is received from
the massage chair. If no correct voice control entry is given within six seconds, the
voice control function will turn off automatically and needs to be enabled again.
Note: When waking up the voice control function, please use English, the speech
rate is moderate.

3130
电源输⼊
开/关
电源输⼊
开/关
Method of usage Method of usage
·If during the massage the power switch button is pressed to end the massage. the
backrest and the calf will return to the upright Standby position. When the set
massage time is completed all massage functions will turn off and the backrest
and the calf-rest will remain in the current position. Use the Armrest button to
return to the upright position when you desire.
·If power to the TEBO is terminated at the wall-plug or through a power cut the
chair will immediately shut down and remain in the current position.
Schematic diagram of the whole machine power turning off.
Schematic diagram of unplugging the whole machine wiring.
Schematic diagram of unplugging the power plug.
1. Find out the connector and air tube from the bottom of the seat frame and pass
out from the middle of the seat frame (Figure 1).
2. Take out the armrest from the package and make the connector and air tube on
the armrest correspond to the connector and air tube at the bottom of the seat
frame one by one (butt joint according to the mark on the physical butt joint line)
(Figure 2).
Figure 1 Figure 2
Figure 3 Figure 4
3. The connector and air tube on the armrest are inserted into the connector and air
tube at the bottom of the seat frame, which should be in place and firm (Figure 3).
4. After the air tube and connector are docked, insert them into the bottom of the
seat frame and take care to avoid the air tube from being folded (Figure 4).
5. Hold the armrest with both hands, first hook the front end of the armrest, hang it
in the seat frame steel and press down the front end of the armrest. (Figure 5)
6. Then, align the male buckle on the rear end of the armrest with the female buckle
on the capsule, insert the rear end of the armrest into the female buckle of the
capsule and snap it tightly (note that the fit gap of the armrest capsule should be
even). (Figure 6)
Figure 5 Figure 6
7.Fix the rear end of the armrest tightly with a M6*20 screw (Figure 7).
8.Pull the upper arm holster away and fix it with a M6*20 screw (Figure 8);
Figure 7 Figure 8
9. Align the mounting holes that fix the steel frame at the front end of the armrest,
and then use the provided 4# Allen wrench to fix and tighten the armrest and the
seat frame steel piece with two M5×14 black zinc environmental friendly hexagon
socket head cap screws and a 6×12×1.5 black zinc environmental friendly flat pad
(Figure 9).
10. Install the screw hole plug at the back end of armrest (Figure 10).
Figure 9
Figure 10
V. Massage Completion
VI. Installation Instructions for Armrests

3332
Method of usage Method of usage
3
3. Firstly, insert the rotating inner sleeve and the rotating outer sleeve into the left
and right rotation shafts of the legrest (Note: The large step must face inward)
(Figure 3).
4. Then remove the rotation shaft cover supporting the legrest on the left and right
frames of the massage chair (Figure 4).
4
1.First of all, cut the connection wire and the air pipe tie fixed on the steel pipe
(Figure 1).
2.Connect the connection wire and the air pipe leading from the lower end of the
backrest to the legrest connectors. Confirm whether butt connection is OK. Then
insert the butt connection wire and air pipe into the bottom of the frame from the
lower hole of the backrest. Pay attention to avoiding any air pipe bending during
insertion (Figure 2).
1 2
56
5.Next, hang the legrest (left and right rotation shafts) into the rotation shaft cover
supporting such frames simultaneously (Figure 5).
6.Place the rotation shaft cover. Press the rotating outer sleeve of the legrest. Then
tighten the rotation shaft cover supporting the legrest with two M5×14 black zinc
environmentally-friendly hexagonal socket head screws and a 6×12×1.5 black
zinc environmentally-friendly flat pad by the supplied 4# hex wrench (Figure 6).
7. After the screws are tightened, hook the groove at the back end of the legrest
cover to the hinge pin. Then press down the front end of the legrest cover to make
it completely parallel to the rotation shaft cover. Hook the convex point at the side
of the legrest cover to the hole at the side of the legrest hook. Finally, the legrest
is installed (Figure 7)
7
VII. Installation Instructions for Legrest

3534
1. Align the positioning column of the bracket assembly with the positioning hole of
the armrest bracket support plate and lock it with 3 cross-recessed screws
(Figure 1).
2. Then fasten the decorative cover of the support (Figure 2).
Heating area
Heating area
Magnet area (only for fixing)
Method of usage Method of usage
Figure 1 Figure 2
·The TEBO has a unique heated-shawl feature, with innovative heating
applications using nano-carbon technology. Users can place the shawl at different
positions such as the shoulder, back, waist and abdomen according to
requirements. When the shawl assembly is placed over the shoulders, it will heat
the acupoints such as Bingfeng, Tianzong, Yunmen and Qihu around the
shoulder and clavicle effectively relieving symptoms such as scapulohumeral
periarthritis and cough and removing cold and moisture from shoulder joints.
·When the shawl assembly is placed on the back, and over the abdomen the
graphene heating plays the role of dispelling cold and relieving pain, warming
channels and removing blood stasis in the back and abdomen, distributing Qi and
blood of the back and abdomen meridian. This can relieve low back pain and
kidney discomfort, warming intestines and stomach and clearing intestinal cold,
with a good effect on some people with deficiency of qi and discomfort of spleen
and stomach.
Schematic diagram of back and waist Schematic diagram of shoulder
and abdomen
12
·The TEBO has separate cushioning for the Head and the Upper Back. They are
attached to the top of the backrest using zips and can be removed separately.
Using these cushions can reduce the kneading massage intensity on neck and
shoulder. You can decide whether these cushions are needed according to your
preference, we recommend using the Head and Upper Back cushions.
Zipper Zipper
VIII. Installation Instructions for Legrest
IX. Use of the shawl
X. Head Pillow and Backrest Pad removal

3736
Method of usage Product specifications
Caution: Do not use chair wheels to move it on wooden floors, rough ground or in a
narrow space. Two people are required to lift the chair. During the lifting period, take
the calf rest end sealing-plate, and backrest cover grooves as the lifting points
(Please do not lift using the armrests directly.)
·The TEBO AURA weighs approx. 132kg, so we recommend placing a carpet or
similar protection under the chair if placed on wooden flooring or similar hard
surfaces.
·First switch off power at the wall and remove the power cord from the TEBO.
Unplug the Remote controller from the TEBO and put it in a safe location. Then
press the backrest down until the chair is balanced on the rear wheels. You can
now push the massage chair forward to a suitable position, and slowly lower it to
the normal angle.
Warning : The rear moving wheels of the massage chair are only suitable for short-
distance and slow movement. For long-distance transportation, please use other
auxiliary moving tools to move this massage chair!
Model: TEBO Aura
Name: Massage Chair
Rated voltage: 110-120V~ 60Hz
220-240V~ 50Hz/60Hz
Rated power:220W
Rated time: 20min
Safety structure: Class I
Material description: PVC, PA, steel parts, electric and electron components
MATERIAL PU LEATHER CLOTH WOOD
XI. Floor Protection
Ⅻ. Instruction for Movement
Table of contents
Other TEBO Massager manuals


Popular Massager manuals by other brands


BASS POLSKA
BASS POLSKA BH12818 instruction manual

bathstore
bathstore Comfort Cushion User instructions

Robotouch
Robotouch OrthoLite RCF-O801 Operation instructions

MassaMAX
MassaMAX MD321 Operation instructions

Innov'SA
Innov'SA COCOON User guide and assembly instructions

Emporio Unique
Emporio Unique E-3008 manual