tecbot M1 User manual

User Manual
TECBOT M1
“The First Self-Rinsing, Roller Mop,
and Vacuum Robot.”

User Manual
“The First Self-Rinsing, Roller Mop,
and Vacuum Robot.”
TECBOT M1

1
Welcome
Thank you for purchasing our TECBOT M1, “The First Self-Rinsing, Roller Mop,
and Vacuum Robot.”
TECBOT M1 “Does It All” brings you multiple innovative advantages. It can
sweep, vacuum, mop, and self-rinse automatically without returning to the
charging dock.
We are TECBOT, “Expert Manufacturers of Cleaning Robots.” We make
cleaning easier and create more free time for you.

Package list 3
TECBOT M1 anatomy 4
Precautions 8
Installation 9
Wi-Fi Pairing 10
Charging 14
Cleaning path 15
Cleaning modes and surface settings 16
Regular maintenance 17
Restore factory settings 21
Troubleshooting and FAQs 22
Warnings and Restrictions 24
Hazardous materials 26
2
Table of content

Auto
Sweep
Mop
Heavy
Mop
WoodOutdoor
3
Package list
01 TECBOT M1
02 2 extra edge-cleaning brushes
03 Brush and hook knife cleaning tool
04 Remote control
05 2 AAA remote control batteries
06 Cylindrical cleaning brush
07 Power cord
08 Charging dock
09 1 extra HEPA
10 User Manual
11 Quick Start Guide
12 Warranty Card
01
04
02
08
07
05
09
121110
06
03
User Manual
TECBOT M1
“The First Self-Rinsing, Roller Mop,
and Vacuum Robot.”
Quick
Start Guide
TECBOT M1
“The First Self Rinse, Roller Mop,
and Vacuum Robot.”
Warranty Card
White (Right) Grey (Left)

4
TECBOT M1 anatomy
01 Collision bumper
02 ToF emitter sensor
03 ToF receiver sensor
04 ToF wall sensor
05 START/PAUSE button
06 Wi-Fi indicator
07 Charging button
08 LIDAR – Laser navigation system
09 Type-C USB Port
05
03
01 02 03
04
03
06 07 08
09

5
10 Contact points for the charging dock
11 ToF sensor
12 Driving wheel
13 V-shaped brush main cover
14 V-shaped brush
15 Edge-cleaning brush
White (Right)
Grey (Left)
16 Release clip for the
V-shaped brush main cover
17 Wheel
18 ON/OFF switch
19 Release clip for the roller mop
20 Roller mop
11
13
15
16
11
17
11
17
18
15
16
14
12 1010
19 20

6
Clean water tank
21 Pull handle
22 Water inlet
23 Air vent
Dust box
24 Handle
25 Cover
26 Filters
27 Cover release clip
Charging dock
28 Power indicator light
29 Signal emitter
30 Charging contact points
31 Power port (rear side)
Wastewater tank
32 Drain hole
33 Release clip
34 Wastewater inlet
21
32
23
33
34
24
28
25
29
26
30 31
27
22
Clean water tank
Dust box
Wastewater tank
Charging dock

Auto
Sweep
Mop
Heavy
Mop
WoodOutdoor
7
START/PAUSE
Single press to puase.
Press and hold for 3 seconds
to raise the rollermop.
Charging
Press to return your TECBOT M1
to the charging dock.
Start/Pause
Forward
Press andhold to move forward.
YourTECBOT M1 will stop
when the button releasesor
encounters an obstacle.
Backward
Press andhold to move
backward. Release to stop.
Left and Right
Press and hold to turn.
Release to stop.
Switch to sweeping and mopping
settings for outdoor
Automatic mode
Switch sweeping and mopping
settingsto default.
Switch to sweeping and mopping
settings for wood
Sweep mode
Press to start the sweep and
vacuum functions(the mopping
function is deactivated).
Mop mode
Press to start the
mopping function.
Heavy Mop mode
Press to start the heavy
(extra wet) mopping function.
Remote control

8
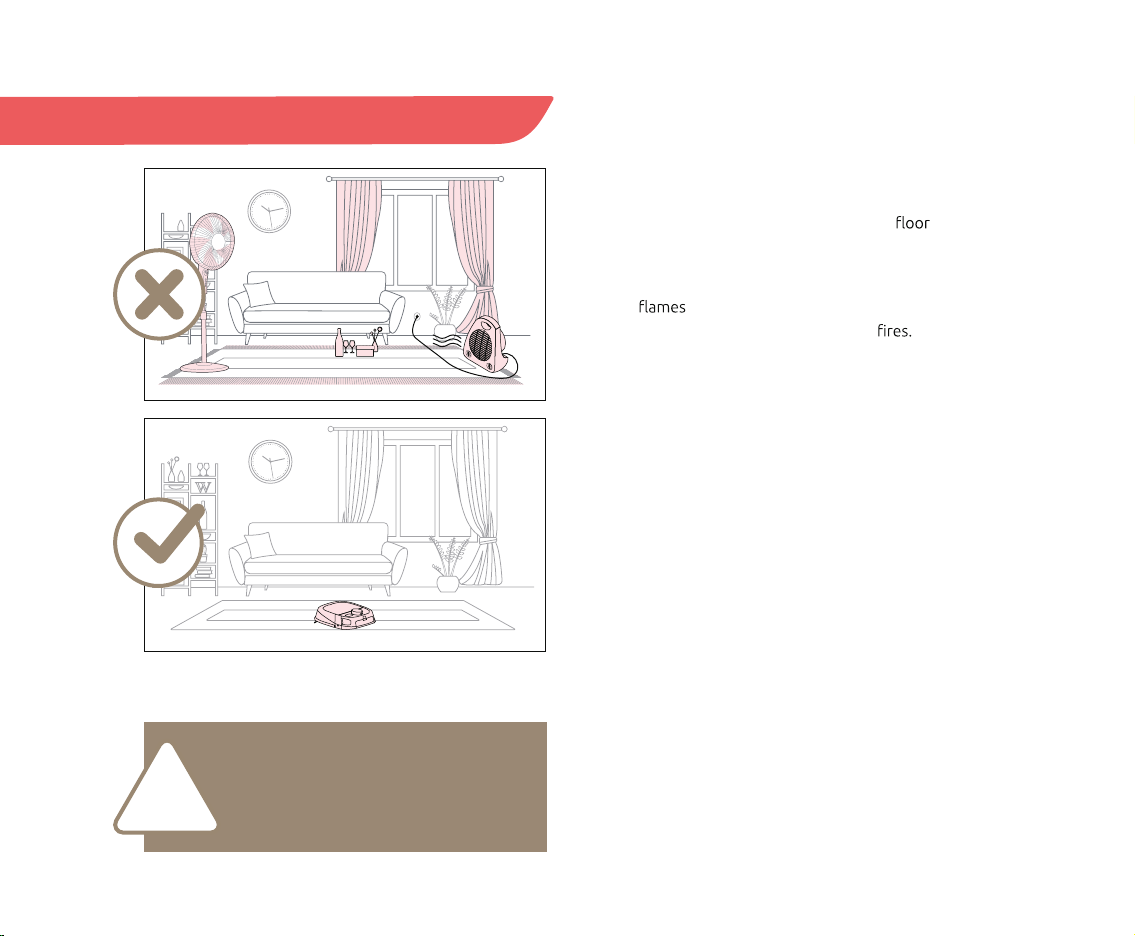
Before operating your TECBOT M1, please remove any
easy falling objects, easily broken valuables, litter, clothes,
cable, and potential safety hazards from the to
avoid personal or property damage.
Please prevent your TECBOT M1 from getting too close
to open or high-temperature equipment during
operation to extend its lifetime and avoid
Precautions
Please retrieve the clean water
and wastewater tanks when
turning over yourTECBOT M1.
!

9
NOTE:
The ON/OFF switch is at the bottom right side of yourTECBOT M1. (“I” position for ON and “O” for OFF,
see page 5.) Your TECBOT M1 will self-check for about10 seconds before turning on.
Installation
01 After taking your TECBOT M1 out of the box, remove
the protective foam on both sides.
02 Check whether all components are in place:
wastewater tank, V-shaped main brush, edge-cleaning
brushes, and dust box.
03 Place the charging dock against a wall on a
and connect it to a power source. Ensure there are
more than 5.3 feet of free space at the front and
2 feet to the sides of the charging dock.
04 Place your TECBOT M1 at the charging dock.
05 Turn on your TECBOT M1.
06 Open the top lid and remove the clean water tank by
pulling its pull handle. Open the water inlet, it with
water or foamless cleaner, close it, place it back,
and close the top lid.
07 Your TECBOT M1 is ready for Wi-Fi pairing.
2 ft
5.3 ft
2 ft
NOTE:
Floor cleanerwithmuch foam will affect the
water pump from functioning effectively, causes
water leakage, and decrease the performance of
the mopping function.
ON/OFF
switch

10
Wi-Fi Pairing
Download Tecbot Home App
Download our Tecbot Home App by scanning the QR
code or searching on the App Store or Google Play to
enjoy all the functions of your TECBOT M1 wherever
you are.
• Your Wi-Fi router supports 2.4 GHz frequency band.
• Your mobile device or tablet is connected to the Wi-Fi
network of 2.4 GHz frequency band.
• Your mobile device or tablet operating system is
up-to-date (iOS 8.0, Android 4.4, or newer versions).

11
05 Tap “Switch Pairing Mode”
to choose the pairing method:
AP mode
Your TECBOT M1 will create
a temporary Wi-Fi hotspot
(SmartLife-XXXX) to pair with
your device.
EZ mode
Your TECBOT M1 will use your
home Wi-Fi connection to pair
with your device.
01 Register an account
02 Tap “Add Device”
03 Tap “M1”
04 Enter your Wi-Fi
password
or
01 02 03
05
04

12
06 07 08
09 10 11
06 Restart your TECBOT M1 by switching it
and on. The switch is located at the bottom
of your TECBOT M1.
07 Press and hold the START/PAUSE button
until it "beeps" ONCE and release it
immediately to establish Wi-Fi connection.
08 the Wi-Fi indicator light is blinking,
then tap “NEXT.”
09 Search and select “SmartLife-XXXX” in
your Wi-Fi network list and return to the
Tecbot Home App.
10 Your TECBOT M1 Wi-Fi indicator light will
stop blinking to pairing.
11 Success! Your TECBOT M1 is ready to
do it all.
AP mode

13
06 07 08
09 10
06 Restart your TECBOT M1 by switching it
and on. The switch is located at the bottom
of your TECBOT M1.
07 Press and hold the START/PAUSE button
until it "beeps" TWICE and release, after
you hear a prompt please tap “NEXT.”
08 the Wi-Fi indicator light is blinking,
then tap “NEXT.”
09 Keep your device as close as possible to
your TECBOT M1. Wait 2 minutes.
10 Your TECBOT M1 Wi-Fi indicator light will
stop blinking to pairing.
11 Success! Your TECBOT M1 is ready to
do it all.
EZ mode

14
Your TECBOT M1 will automatically return to the charging
dock when its battery is lower than 20%. Press the
charging button on your TECBOT M1, remote control, or
the Tecbot Home App to start the recharge function.
Your TECBOT M1 will not turn on when its battery is low.
Please place your TECBOT M1 on the charging dock
manually. The indicator light on the charging dock will
blink to indicate that charging has started. Your TECBOT
M1 takes about 6 hours to be fully charged.
The roller mop will lift automatically to prevent leaking
on the during the charging process.
Battery
Your TECBOT M1 uses a high-performance lithium-ion
rechargeable battery pack. Please charge your TECBOT
M1 after daily use to maintain the battery performance.
Your TECBOT M1 will
automatically return to
the charging dock when its
battery is lower than 20%.
<20%
NOTE:
Turn offyourTECBOT M1 if you do notintend to use
it in the following 24 hours.
Charging

15
Cleaning path
TECBOT M1 will start with edge cleaning of the area.
It will then automatically plan a zigzag path to clean the
remaining space. It will avoid obstacles in its way.
15
Cleaning path
TECBOT M1 will start with edge cleaning of the area.
It will then automatically plan a zigzag path to clean the
remaining space. It will avoid obstacles in its way.

16
Cleaning modes and surface settings
You can select between 4 cleaning modes and 3 surface
settings: Automatic mode, Sweep mode, Mop mode,
Heavy Mop mode, Wood setting, Marble
setting, and Outdoor setting.
Depending on the selected cleaning
mode and surface settings, the
roller mop will rise ordescend.
Cleaning modes
Automatic mode
Activates all functions (sweep, vacuum, and mop.) Your
TECBOT M1 will rinse the roller mop It will one
room before starting another, and larger spaces will be
divided into sections.
Mop mode
Activates the mop function and deactivates the sweep
and vacuum functions. The roller mop will descend to
start mopping.
Sweep mode
Activates the sweep and vacuum functions, and the roller
mop will be lifted. Your TECBOT M1 will one room
before starting another, and larger spaces will be divided
into sections.
Heavy mop mode
Your TECBOT M1 will rinse the roller mop The roller
mop descends, and it will rotate for heavy mopping. The
wastewater tank pump will work in real-time, and the
roller mop will be rinsed every 6 minutes.
Surface settings
Your TECBOT M1 will rinse the roller mop
The vacuum function is activated, and the
water used for mopping is controlled.
Your TECBOT M1 will rinse the roller mop
The roller mop will rotate for mopping, and the
vacuum function is activated.
Your TECBOT M1 will rinse the roller mop
The roller mop will rotate for mopping, and the
vacuum function will work at maximum
suction power.
NOTE:
Please clean up the wastewater tank when
it is prompted full.

17
Regular maintenance
V-shaped main brush
Recommended to clean up at least once a week.
• Turn over your TECBOT M1, and remove the V-shaped
main brush cover by pushing on the clips at both sides.
• Retrieve the V-shaped main brush upwards.
• Use the cleaning tools to remove any entanglement.
• Reinstall the V-shaped main brush and its cover.
Edge-cleaning brushes
Recommended to replace every 6 months.
• Turn over your TECBOT M1 and remove the
edge-cleaning brushes screws.
• Retrieve and clean the edge-cleaning brushes with
a clean cloth.
• Reinstall the edge-cleaning brushes and tighten
the screws.
Please turn offyour TECBOT M1 andretrieve the clean water and wastewater tanks
when turning it over for maintenance.
!

18
Wastewater tank
Recommended to clean up after every use.
• Press down on the clip.
• Retrieve the wastewater tank
• Open the drain hole and pour out the wastewater.
• Rinse the wastewater tank and clean it with
a cylindrical brush.
• Rinse and shake loose any debris in the
wastewater tank water inlet.
• Dry the surface with a paper towel.
• Reinstall the wastewater tank. A “click”
sound means it is back in place.
Roller mop
Recommended to clean and dry the roller mop
at least once a week and replace it with a new
one every 6 months.
• Retrieve wastewater tank and clean water tank.
• Turn over your TECBOT M1, gently push
up the clips.
• Retrieve the roller mop.
• Rinse the roller mop with clean water.
• Wring dry the roller mop.
Other manuals for M1
2
Table of contents
Other tecbot Vacuum Cleaner manuals