Tech4o Traileader User manual

TRAILEADER INSTRUCTIONS

2
TABLE OF CONTENT
OVERVIEW
TIME MENU / SYSTEM SETTING
1.0 TIME/DATE MODE: p. 5
2.0 ALARM MODE: p. 9
3.0 CHRONOGRAPH MODE: p. 11
4.0 COUNTDOWN TIMER MODE: p. 13
5.0 DUAL TIME MODE: p. 14
TRaIl MENU
6.0 SPEED & DISTANCE. MODE: p. 15
7.0 ALTIMETER MODE: p20
8.0 BAROMETER MODE: p 26
9.0 COMPASS MODE: p. 29
10.0 TROUBLESHOOTING: p. 32
11.0 REGISTRATION: p. 37
12.0 WARRANTY: p. 37
13.0 FUNCTION INDEX: p. 38
see for ready reference
3
Thank you for purchasing the Tech4O Traileader. The Traileader represents the next generation of
outdoor watches in style and technology. The Traileader combines key outdoor functions as well as
your speed and distance measurements via accelerometer technology.
Follow this manual to guide you through the initial setup and calibration. Keep it for later reference as
you learn the more advanced features.
Your new Traileader watch contains many advanced sensors and components. In enjoying your new
watch, please use it in the manner in which it was intended and avoid exposing the watch to
extreme temperatures, impacts, and moisture. In addition, avoid using the watch near magnets,
or objects and appliances that contain magnets, as the watches sensors may be damaged and
inaccurate results may occur.
The Traileader has several functions per button. To see what they do, refer to fig.1.
ESC
Displays time or trail menu
Returns to previous screen
LIGHT
Illuminates backlight
MODE
Selects modes
Confirms selections
Enters settings modes
ST/STP
Toggles display up
Increases values
View alternative displays
Starts/stops timers
LAP/RESET
Toggles display down
Decreases values
Changes units
Starts/stops speed & distance mode
Enters laps and resets timers
ST/STP
ESC
LIGHT
MODE
L
A
P
/
R
E
S
E
T
+
_
PLUS
UP
MINUS
DOWN
OVERVIEW
fig. 1
4
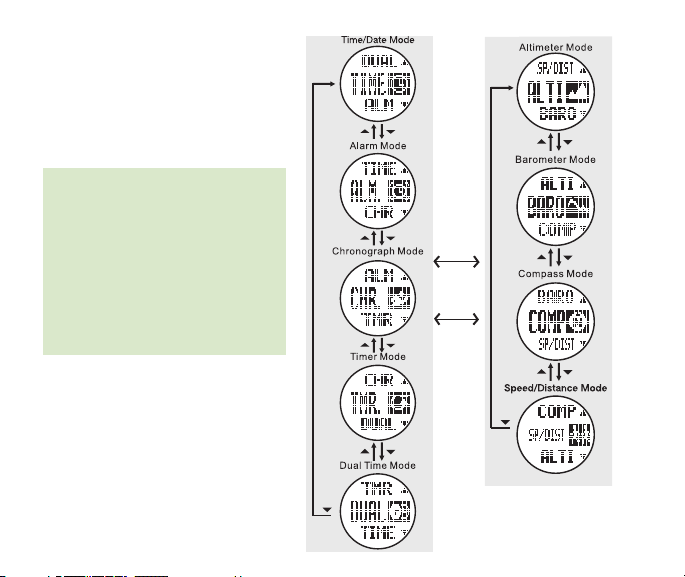
Note: The Traileader watch has
two main menus. See fig. 2 & 3.
Understanding the two menus
and their corresponding functions
will be the key to navigating and
understanding your new watch
and to aid you in your initial setup
and future use.
ESC
+
ESC
fig. 2
fig. 3
TImE mEnu TRaIl mEnu
5
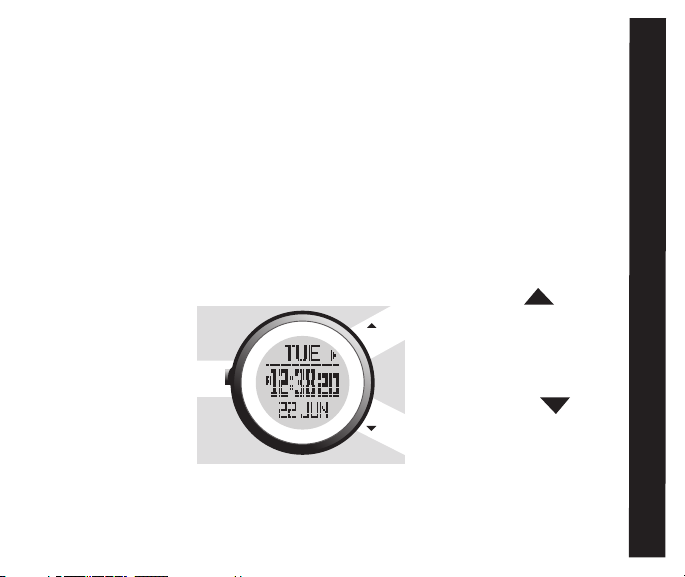
1.0 TIME/DATE MODE
The TraiLeader’s Time/Date mode not only
displays the current time and date , but also a
quick check of four other key environmental
elements: Altitude, Pressure, Weather, and
Temperature. The Time/Date mode is also
where many of the TraiLeader’s system
setting are adjusted.
1.1 TIME/DATE DISPLAy
• To access the Time/Date display while
currently in a:
* Time Menu function - continue
pressing Muntil the display in fig. 4 is
visible
* Trail Menu function - press ESC twice
to access the Time Menu and press ST/
STP(uP) or LAP/RST(DOwn) to scroll
to the TIME icon
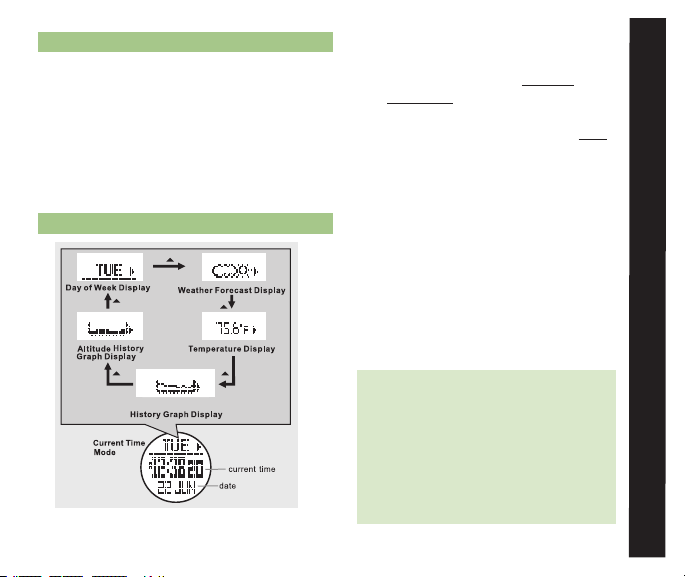
• Display Features:
* Top Row: One of the following: (day
of week, weather forecast, current
temperature, altitude graph, pressure
graph)
* Press ST/STP to scroll through the
various top row displays
* Middle Row: Current Time
* Bottom Row: Current Date
Note: The Traileader’s weather
forecasting system uses changes in
air pressure to predict future weather
conditions. Keep in mind that changes in
altitude also effect air pressure and will
skew the weather forecasting system’s
accuracy. The weather forecasts will be
most accurate when a relatively stable ¬
Pressure
fig.4
TImE/ DaTE mODE
6
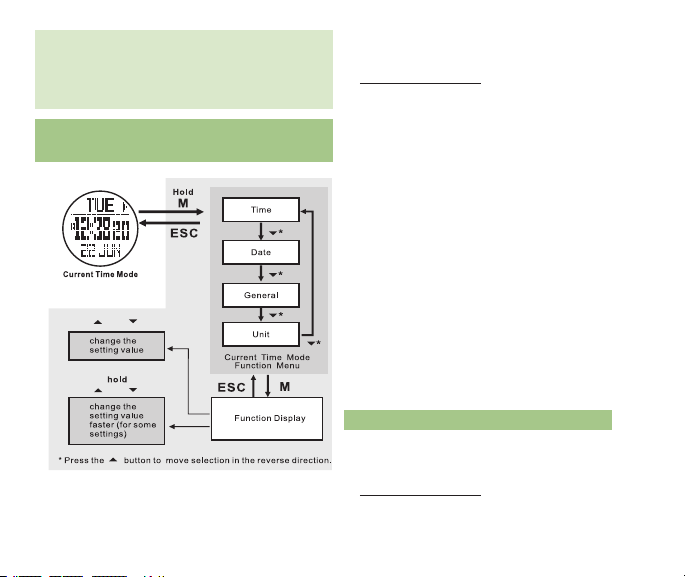
Access the Time/Date display (See section 1.1
for how to access the Time/Date display)
• Hold Mfor 3 seconds to enter Time/Date/
System set menu
• Press Mto select the Time
* Press ST/STP or LAP/RST to reset the
seconds to 00.
* Press Mto confirm your selection
* Press ST/STP(+) or LAP/RST( - )
to adjust the minutes
* Press Mto confirm your selection
* Press the ST/STP(+) or LAP/RST( - )
to adjust the hour
* Press Mto confirm your selection
* Press the ST/STP(+) or LAP/RST( - )
to adjust the time format (12 / 24hr)
* Press Mto confirm your selection
• Press ESC to exit Time
• Press ESC to exit the Time/Date/System set
menu
1.3 ADJuST DATE
Access the Time/Date display (See section 1.1
for how to access the Time/Date display)
• Hold Mfor 3 seconds to enter Time/Date/
System set menu ¬
or
or
fig.5
altitude is maintained for several hours. For
a more in depth explanation of the altitude/
pressure/weather relationship, reference
section 10.0 Troubleshooting.
SySTEM SETTInG See fig.5
1.2 ADJuST TIME

7
• Press LAP/RST(DOwn) to scroll to Date
• Press Mto select the Date
* Press ST/STP(+) or LAP/RST( - )
to adjust the year
* Press M to confirm your selection
* Press ST/STP(+) or LAP/RST( -
to adjust the month
* Press Mto confirm your selection
* Press ST/STP(+) or LAP/RST( - )
to adjust the day
* Press M to confirm your selection
• Press ESC to exit Date
• Press ESC to exit the Time/Date/System set
menu
1.4 ADJuST LCD SCREEn COnTRAST
Access the Time/Date display (See section 1.1
for how to access the Time/Date display)
• Hold Mfor 3 seconds to enter Time/Date/
System set menu
• Press LAP/RST(DOwn) to scroll to General
* Press Mto select General
* Press Mto select LCD
* Press ST/STP(+) or LAP/RST( - ) to
adjust contrast level of the display
* Press ESC to confirm your selection
and exit LCD
• Press ESC to exit General
• Press ESC to exit the Time/Date/System set
menu
1.5 TuRn On/OFF SOunD
Access the Time/Date display (See section 1.1
for how to access the Time/Date display)
•Hold Mfor 3 seconds to enter Time/Date/
System set menu
• Press LAP/RST(DOwn) to scroll to General
• Press Mto select General
* Press LAP/RST(DOwn) to scroll
to Sound
* Press Mto select Sound
* Press Mto select Keytone
* Press ST/STP(+) or LAP/RST( - )
to select keytone preference
* Press ESC to confirm your selection
and exit Keytone
*Press ESC to exit Sound
• Press ESC to exit General
• Press ESC to exit the Time/Date/System set
menu
TImE mEnu SYSTEm SETTInGS

8
1.6 TuRn On/OFF HOuRLy CHIME
Access the Time/Date display (See section 1.1 for
how to access the Time/Date display)
•Hold Mfor 3 seconds to enter Time/Date/System
set menu
• Press LAP/RST(DOwn) to scroll to General
• Press M to select General
* Press LAP/RST(DOwn) to scroll to Sound
* Press Mto select Sound
* Press LAP/RST(DOwn) to scroll to Chime
* Press Mto confirm your selection
* Press ST/STP(+) or LAP/RST( - ) to select
hourly chime preference
* Press ESC to confirm your selection and
exit Chime
* Press ESC to exit Sound
• Press ESC to exit General
• Press ESC to exit the Time/Date/System set menu
1.7 ADJuST BACKLIGHT SETTInG
Access the Time/Date display (See section 1.1 for
how to access the Time/Date display)
• Hold Mfor 3 seconds to enter Time/Date/System
set menu
• Press LAP/RST(DOwn) to scroll to General
• Press Mto select General
* Press LAP/RST(DOwn) to scroll
to Light
* Press Mto confirm your selection
* Press ST/STP(+) or LAP/RST( - )
to select light preference
* Press ESC to confirm your selection
and exit Light
• Press ESC to exit General
• Press ESC to exit the Time/Date/System set
menu
1.8 ADJuST TEMPERATuRE unITS
Access the Time/Date display (See section 1.1
for how to access the Time/Date display)
• Hold M for 3 seconds to enter Time/Date/
System set menu
• Press LAP/RST(DOwn) to scroll to Unit
• Press Mto select Unit
* Press Mto select Temp.
* Press ST/STP(+) or LAP/RST( - )
to select preferred unit of measure
* Press ESC to confirm your selection
and exit Temp ¬

9
• Press ESC to exit Unit
• Press ESC to exit the Time/Date/System set
menu.
1.9 ADJuST PRESSuRE unITS
Access the Time/Date display (See section 1.1
for how to access the Time/Date display)
• Hold Mfor 3 seconds to enter Time/Date/
System set menu
• Press LAP/RST(DOwn) to scroll to Unit
• Press Mto select Unit
* Press LAP/RST(DOwn) to scroll
to Pressure
* Press Mto select Pressure
* Press ST/STP(+) or LAP/RST( - ) to
select the preferred unit of measure
* Press ESC to confirm your selection
and exit Pressure
• Press ESC to exit Unit
• Press ESC to exit the Time/Date/System set
menu
1.10 ADJuST SPEED & DISTAnCE unITS
Access the Time/Date display (See section 1.1
for how to access the Time/Date display)
• Hold Mfor 3 seconds to enter Time/Date/
System set menu
• Press LAP/RST(DOwn) to scroll to Unit
• Press M to select Unit
* Press the LAP/RST(DOwn) to scroll
to Other
* Press M to select/other
* Press ST/STP(+) or LAP/RST( - ) to
select your preferred unit of measure
* Press ESC to confirm your selection
and exit Other
• Press ESC to exit Unit
• Press ESC to exit the Time/Date/System set
menu
2.0 ALARM MODE
The Traileader has several alarm features.
Alarm mode can be set for a specific day
of the week, daily, or turned off entirely
• To access the Alarm display while currently
in a:
* TIME MEnu function - continue
pressing Muntil the display in fig. 6 is
visible ¬
alaRm
TImE mEnu SYSTEm SETTInGS

10
* Press ST/STP(+) or LAP/RST( - )
to adjust the alarm hour
* Press Mto confirm your selection
* Press ST/STP(+) or LAP/RST( - )
to adjust the alarm minute
* Press ESC to confirm your selection
• Repeat the above steps to set additional
alarms
or or
ST/STP ALARM 1 OR 2
fig.7
* TRAIL MEnu function -
press ESC twice to access
the Time Menu and press
ST/STP(uP) or LAP/
RST(DOwn) to scroll to
the ALM icon
• Display Features:
* Top Row: Alarm number 1 or 2
* Press ST/STP to select between the
two alarms
* Middle Row: Alarm Time
* Bottom Row: Alarm Status
2.2 ALARM SETTInG See fig. 7
Access the Alarm display (See section 2.1 for how to
access the Alarm display)
• Press ST/STP to select the alarm you wish to set
• Hold Mfor 3 seconds to enter Alarm set mode
* Press ST/STP or LAP/RST to select the
frequency of the alarm or turn the alarm off
* Press Mto confirm your selection
* When an alarm is scheduled, the alarm
icon will appear at the bottom
of the display
fig.6
Table of contents
Other Tech4o Watch manuals


