Tech4o traileader pro User manual

Traileader PRO with Heart Rate Monitor & PC Link

All instructions that relate to the Heart Rate features
are in This Color.
Contents
Overview
Introduction
TIME MODE MENU
1.0 Time/Date/system/user/unit Mode
1.1 Time/Date Display
1.2 Set the Time
1.3 Set the Date
1.4 Set Up the System
1.5 Establish Units of Measure
1.6 Enter Your Personal Data
2.0 Alarm Mode
2.1 Set an Alarm
2.2 Alarm Function
3.0 Chronograph Mode
3.1 Chronograph Display
3.2 Start/Stop the Chronograph
3.3 Enter Lap/Split Times
3.4 Chronograph Recall
4.0 Countdown Timer Mode
4.1 Countdown Timer Display
4.2 Countdown Timer Setting
4.3 Countdown Timer Use
5.0 Dual Time Zone Mode
5.1 Dual Time Zone Display
5.2 Dual Time Zone Setting
TRAIL MODE MENU
6.0 Distance Mode
6.1 Distance Mode Display
6.2 Distance Use
6.3 Distance Mode Set Menus
Save (menu 1)
Session (menu 2)
Daily Record (menu 3)
Sleep (menu 4).
Sense (menu 5).
7.0 heart rate mode
7.1 Heart Rate Chest Strap
7. 2 Heart Rate Mode Display
7.3 Estimated Maximum Heart Rate & Percentage of
Maximum Heart Rate
7.4 Heart Rate Zone Alerts
7.5 Heart Rate Data AcquIsition
7.6 Heart Rate Set Menus
Save
Session
Daily Record
Zone

8.0 User Mode
8.1 User Mode Display
8.2 User Mode Use
8.3 User Mode Set Menus
Save
Session
Daily Record
View
9.0 Altimeter Mode
9.1 Altimeter Mode Display
9.2 Set a Reference Altitude
9.3 Use the Altitude Difference Calculator
9.4 Start the Ascent / Descent Calculator
9.5 Stop the AS/DS Calculator
9.6 Clear the AS/DS Calculator
9.7 Set an Altitude Alarm
9.8 View the Altimeter Log Book
9.9 Altimeter Graph Display
9.10 Switch Between Meters & Feet
9.11 Lock the Altimeter
10.0 Barometer Mode
10.1 Barometer Display
10.2 Barometer Setting Menu
Sea Level Pressure
Current Local Pressure
View Log
10.3 Change Units of Measure
11.0 Compass Mode
11.1 Compass Display
11.2 Compass Use
11.3 Compass Idle Refresh
11.4 Take a Reverse Bearing
11.5 Lock the Compass Bearing
11.6 Calibrate the Compass
11.7 Enter an Angle of Declination
12.0 LOGBOOK MODE
12.1 Logbook Display
12.2 Logbook Set Menus
View
Stop/Start
PC link
Log Rate
Auto
Erase
Mem )
13.0 Battery Replacement
13.1 Watch
13.2 Chest Strap
14.0 PC Link
15.0 Troubleshooting
16.0 Limited Warranty
Declination Map for North America
Declination Map for Europe
Contacts

Thank you for purchasing one of our Tech4o Traileader Watches.
Use this manual to guide you through the initial setup and calibration and keep it for
later reference.
Avoid exposing the watch to extreme temperatures, impacts, and moisture. Also, avoid
using the watch near magnets, or objects and appliances that contain magnets, as
inaccurate results will occur. The watch has several functions per button. See fig.1.
ST/STP ▲
Scrolls display up
Increases values
View alternative displays
Starts/Stops timers
LAP/RESET ▼
Scrolls display down
Decreases values
Changes units
Enters laps and resets timers
fig. 1
ESC
Escape- returns to the
previous screen
Provides the answer NO
Toggles between the
Time or Trail menu
LIGHT
Illuminates a backlight
modE m
Selects modes
Confirms selections
Enters settings modes

The Traileader Pro has two main
menus- Time & Trail. Learning
to navigate these is key to a
successful experience.
See fig. 2 & 3
To access any Time Function Display
when in another Time Mode
Menu function - press Muntil
the display you wish is visible.
To access a Time Function Display
when you're in any Trail Mode
Menu function - press ESC twice
to enter Time Menu then press
ST./STP. ▲ or LAP/RESET ▼
to scroll to the display you wish.
Press ESC to back out of any screen.
As a convention, we use ▲to
indicate pressing the ST./STP.
button and we use ▼ to indicate
pressing the LAP/RESET button.
Also, these icons appear in the
watch display whenever they are
available.
All instructions that relate to the
Heart Rate features are in
This Color.
ESC
ESC
fig. 3
TIME MODE MENU TRAIL MODE MENU
fig. 2

Time Mode Menu
1.0 TIME/DATE/SYSTEM/USER/UNIT MODE
The Traileader’s Time/Date Mode displays: Current
Time and Date, Altitude, Pressure, Weather, and
Temperature. This mode is where many of the
system setting are adjusted.
1.1 Time/Date Display
Access the Time/Date Mode Display. See fig. 4
Display Features:
* Top Row: One of the following- day of week,
weather forecast, current temperature, altitude
graph or pressure graph -Press ▲to scroll
through the displays
* Middle Row: Current Time
* Bottom Row: Current Date
NOTE: The weather forecasting system uses changes
in atmospheric pressure to predict the weather.
Changes in altitude will affect pressure and can
skew the forecast. For greatest accuracy maintain
a stable altitude for several hours.
1.2 Set the Time (second, minute, hour, 12/24)
Access the Time/Date Mode Display.
See fig. 5 next page.
• Hold Mfor 3 seconds to enter Time/Date set menu
• Press Mto select Time.
* Press ▲or ▼to reset the seconds to 00
* Press Mto confirm selection
* Press ▲or ▼to adjust minutes
* Press Mto confirm selection
* Press ▲or ▼to adjust hour
* Press Mto confirm selection
* Press ▲or ▼to set time format (12 / 24hr)
* Press Mto confirm selection
* Press ESC to exit Time
• Press ESC to exit the Time/Date set menu
fig. 4

1.3 Set the Date (year, month, day)
Access the Time/Date Mode Display.
• Hold M3 seconds to enter Time/Date set menu
• Press ▼to scroll to Date
• Press Mto select Date
* Press ▲or ▼to adjust year
* Press M to confirm selection
* Press ▲or ▼to adjust month
* Press Mto confirm selection
* Press ▲or ▼to adjust day
* Press M to confirm selection
* Press ESC to exit Date
• Press ESC to exit the Time/Date set menu
1.4 Set Up the System (LCD, Sound, Light, Pair)
Access the Time/Date Mode Display.
• Hold M3 seconds to enter Time/Date/ System
set menu
• Press ▼to scroll to System
• Press Mto enter System
* Press ▼to scroll to Pair
* Press Mto enter Pair
* Press ESC to confirm selection and exit Pair
NOTE: You must be wearing the heart rate chest
strap for this to work. See section 7.1
Continue to scroll through the remaining windows
in this screen- LCD, Sound, Light- press Mto
enter and use ▲or ▼to adjust the display
contrast, turn on /off keytone or chime and set
the backlight for normal /night.
• Press ESC to exit the Time/Date/System set menu
1.5 Establish Units of Measure for Temperature,
Pressure, Speed or Other
Access the Time/Date Mode Display.
• Hold M3 seconds to enter Time/Date/System/
User/Unit set menu
• Press ▼to scroll to Unit
• Press Mto select Unit
fig. 5

* Press ▼to scroll to Pressure
* Press Mto select Pressure
* Press ▲or ▼to select: mb, hPa or inHg
* Press ESC to confirm and exit Pressure
Continue to scroll through the remaining windows in
this screen- Temperature, Speed ,Other- and use
▲or ▼to select temp- ˚F or ˚C, speed- km/h,
m/h or knot, and metric or imperial
• Press ESC to exit the Time/Date/System/User/Unit
set menu
1.6 Enter Your Personal Data (Gender, Birth, Height,
Weight, Stride)
Access the Time/Date Mode Display.
• Hold Mfor 3 seconds to enter Time/Date/ System/
User set menu
• Press ▼to scroll to User
• Press Mto enter User
* Press Mto enter Gender
* Press ▲or ▼to scroll to Male or Female
* Press ESC to confirm and exit Gender
Continue to scroll through the remaining windows
in this screen- Birth, Height, Weight, Stride- and
press Mto enter and use ▲or ▼to enter your
personal data
• Press ESC to exit the Time/Date/System/User set
menu
See www.tech4o.com for our stride length calculator.
2.0 ALARM MODE
You can set two alarms for daily, weekly or never.
Access the Alarm Mode Display.
See fig. 6.
Display Features:
* Top Row: Alarm 1 or 2. Press ▲
to select between them
* Middle Row: Alarm Time
* Bottom Row: Alarm Status
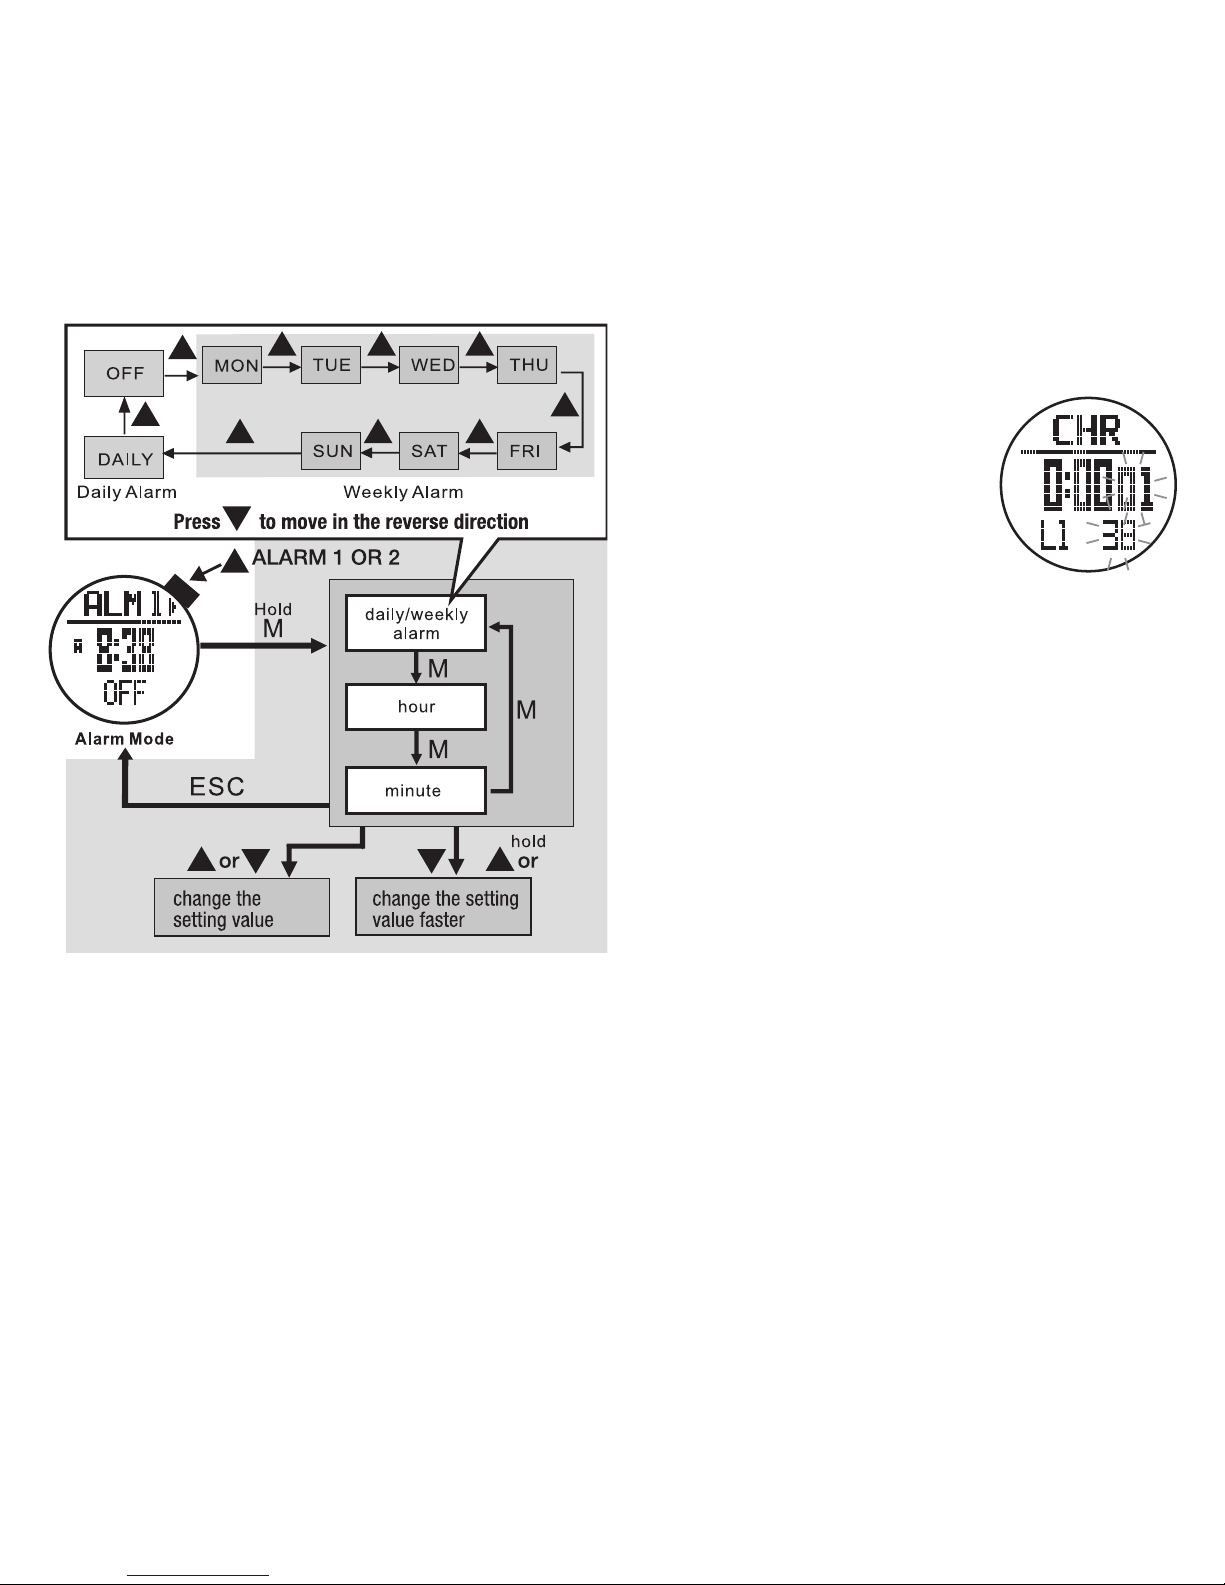
2.1 Set an Alarm Daily/Weekly/Off, Hour, Minute
Access the Alarm Mode Display.
See fig. 7 on the next page.
• Press ▲to select between alarm 1 or 2
• Hold Mfor 3 seconds to enter Alarm set mode
* Press ▲or ▼to select a daily or weekly alarm
or to turn off
* Press Mto confirm your selection
* When an alarm is scheduled, the alarm icon
will appear at the display bottom
* Press ▲or ▼to adjust the hour
* Press Mto confirm selection
* Press ▲or ▼to adjust minute
* Press ESC to confirm selection
• Repeat to set additional alarms
2.2 Alarm Function
a scheduled alarm will chime for 30 seconds and
then turn off.
fig. 6

3.1 Chronograph Display
Access the Chronograph Mode Display.
See fig. 8.
Display Features:
* Top Row: CHR indicator
* Middle Row: Running time /
most recent lap time in
hours, minutes and seconds
* Bottom Row: Lap number and
100th of a second lap time
3.2 Start/Stop the Chronograph
Access the Chronograph Mode Display
• Press ▲to start the Chronograph
• Press ▲again to stop the Chronograph
• Hold ▼for 3 seconds to clear the recorded time
3.3 Enter Lap/Split Times
• Press ▲to start the Chronograph
• Press ▼to record a lap
* The most recent recorded lap time will display for
10 seconds. The total elapsed time will continue
counting in the background
* After 10 seconds, total elapsed time will display
* Repeat the above to record additional laps
* Press ▲to stop the Chronograph
3.4 Chronograph Recall
NOTE: There must be recorded lap times for this to
work. Chronograph Recall is still accessible while
the Chronograph is recording.
During the chime, press any button to stop it.
The alarm will automatically reset and sound again
at the next scheduled time. See section 2.1 to disable
scheduled alarms
3.0 CHRONOGRAPH MODE
The Chronograph can record up to 50 laps. Stored
laps can be recalled while the Chrono is still running.
fig.7
fig. 8

4.0 COUNTDOWN TIMER MODE
The countdown timer counts backwards, toward zero
from a programmable time and sounds convenient,
interval beeps.
4.1 Countdown Timer Display
To access the Countdown Timer Display.
See fig.10.
Display Features:
* Top Row: TMR indicator
* Middle Row: Countdown time
* Bottom Row: Current time
4.2 Countdown Timer Setting
Access the Countdown Timer Display.
Countdown Timer has five preset timers - 3, 5, 10, 15,
and 45 min. and one programmable timer.
To select a preset timer:
• Continue pressing ▼to select the timer you wish
to use (skip to section 4.3)
To set your own countdown timer:
• Hold Mfor 3 seconds -the hour will flash
* Press ▲or ▼to adjust the hour
* Press M to confirm your selection
* Press ▲or ▼to adjust minutes
* Press Mto confirm your selection
* Press ▲or ▼to adjust seconds
• Press ESC to confirm your selection
Access the Chronograph Mode Display. See fig. 9.
• Hold Mfor 3 seconds to access Chronograph Recall
* Press ▲or ▼to scroll through the recorded lap
times and total time
• Press ESC to exit Chronograph Recall
fig. 9
fig. 10

4.3 Countdown Timer Use
Access the Countdown Timer Display.
• Press ▲to start the countdown timer
• Press ▲again to stop the countdown timer
• Press ▼to reset the countdown timer
• The countdown timer will chime at these intervals:
* Every minute during the last 10 minutes
* Every 10 seconds during the last minute
* Every second during the last 5 seconds
* For 30 seconds at the expiration of the timer
• Press ▲to stop the expiration chime
• The timer will automatically reset after it expires
5.0 DUAL TIME ZONE MODE
Use this to set and keep an alternate time zone
5.1 Dual Time Zone Display
Access Dual Time Zone Display.
See fig. 11
Display Features:
* Top Row: DUAL indicator
* Middle Row: Dual Zone time
* Bottom Row: Current time
5.2 Dual Time Zone Setting
Access the Dual Time Zone Display
• Hold Mfor 3 seconds to enter Dual Time Zone set
mode. See fig. 12.
* Press ▲or ▼to adjust the hour
* Press Mto confirm your selection
fig. 11
▲▼▲▼
fig. 12
* Press ▲or ▼to adjust the minutes
• Press ESC to confirm your selection
TRAIL MODE MENU
The following 7 sections are TRAIL MODE MENU
functions.
Understanding how to switch between
menus is important to navigating your watch.
press ESC twice to toggle between the
Time and Trail Mode Menus.

Also, you may:
* Press and Hold ▼3 seconds to manually reset
the current Screen or
* Continue Holding ▼to reset the current Session
or
* Continue holding ▼to reset the Timer
• The dots will flash on the right of the display when
Distance mode is ready
• Begin walking or running and Distance Mode will
start measuring your exercise data
6.0 DISTANCE MODE
Distance mode accurately tracks your Speed,
Distance, Pace, Calories, and Steps.
NOTE: Although your watch came programmed
with a generic profile, we recommend that you
calibrate a personal profile for the most accurate
results. See section 1.5
6.1 Distance Mode Display
Access Distance Mode Display. See fig.13
Display Features:
* Top Row: Exercise data (exercise time, moving
time, current speed, maximum speed, average
speed, pace, steps, and calories)
* Press ▲to scroll through the data
* Middle Row: Exercise distance
* Bottom Row: Current time
6.2 Distance Use
See fig. 14 on the next page.
Access the Distance Mode Display
• Distance mode automatically begins recording
after a pre-programmed 8 second delay
When in the Distance Mode you may:
* Press and Hold ▲3 seconds to manually Stop/
Start the Sensor or
* Continue Holding ▲to Start/Stop the Timer or
* Continue holding ▲to Start/Stop the Logbook
fig. 13

• Press ▲to scroll through the data in the
top row of the display
• Press and Hold ▲at any time to stop
recording
• Hold ▼3 seconds to clear all recorded
data for that session
• Distance continues to measure data;
* Unless you turn it off
* Unless no movement is sensed for a
period that exceeds the sleep timer
setting
* Until midnight, when the day’s statistics
are logged into memory and Distance
Mode turns off
6.3 Distance Mode Set Menus
The following 5 menus add supplemental
functions to the Distance Mode. See fig. 14.
Save (menu 1)
Saving the current data will add to any saved
data for that day and clear current statistics
from the Distance mode
Access the Distance Mode Display
• Hold M3 seconds to enter Distance set
menu
• Press Mto select Save
* Press ▲to save the current recorded
data or
* Press ESC to cancel and return
• Press ESC to exit Distance set menu
▲
▲
▼
▼
▲▼
▼
▼
▼
fig. 14

Session (menu 2)
Allows review of the 9 screens of collected statistical
data for this current session. See fig. 15.
Access the Distance Mode Display.
• Hold M3 seconds to enter Distance set menu
• Press ▼to scroll to Session
▲
▲
▼
▼
▼
▼
▼▼
▼
▼
▼
fig. 15
▼▼▼▼
▼
▼
▼
▼▼
▼▼
▲
▲
fig. 16
• Press Mto select the Session
* Press ▲or ▼to scroll through the collected data
* Press ESC to exit the records
*Press ESC to exit Session
• Press ESC to exit Distance set menu.
Daily Record (menu 3)
Allows review of the 7 screens of collected data for
each day up to and including day 10. See fig. 16.
Access the Distance Mode Display,
• Hold M3 seconds to enter Distance set menu
• Press ▼to scroll to Daily Record
• Press Mto select the Daily record
* Press ▼to scroll to the review day
* Press Mto access records

* Press ▲or ▼to scroll through the 7 screens
* Press ESC to exit the records
* Press ESC to exit the day
* Press ESC to exit Daily Record
• Press ESC to exit Distance menu.
Sleep (menu 4).
Distance Mode has an automatic sleep timer to
conserve battery power. If no movement is sensed
for a period that exceeds the programed time,
Distance Mode will turn off and stop recording
until you again accesses the Distance Mode.
Access the Distance Mode Display.
• Hold Mfor 3 seconds to enter Distance set
menu
• Press ▼to scroll to Sleep
• Press Mto select the Sleep
* Press ▲or ▼to adjust the sleep timer for
Distance Mode
* Press ESC to confirm and exit Sleep
• Press ESC to exit Distance set menu
Sense (menu 5).
The sensors that measure movement in Distance
Mode are adjustable. Level 1 (least sensitive)
works best for most users and will produce the
most accurate results. However, if you have a
very quiet/smooth gate, you may need a more
sensitive setting.
NOTE: A discrepancy between actual distance
measured and walked is not usually a
sensitivity issue but rather a need to adjust
your stride length. Unless, you have entered a
higher than necessary sensitivity.
Access the Distance Mode Display.
• Hold M 3 seconds to enter Distance set menu
• Press ▼to scroll to Sense
• Press Mto select the Sense
* Press the ▲or ▼to adjust the sensitivity
level
(1 = lease sensitive to 7 = most sensitive)
* Press ESC to confirm and exit Sense
• Press ESC to exit Distance set menu
7.0 HEART RATE MODE
The Traileader Pro's Heart Rate Mode supports
the following 6 data gathering functions.
• Shows in Beats Per Minute and % of estimated
max BPM
• Alerts when heart rate is out of target zone
• Shows number of calories burned
• Shows ave., min., max. HR
• Shows elapsed time HR is in the zone
• Logs data into a session, saves to a daily record
and shows current session

fig. 17
7.1 Heart Rate Chest Strap
The chest strap captures, displays and saves heart
rate data. This strap must be worn with good contact
on your bare skin. Moisture between the strap and
your skin aids in conductivity. See fig. 17.
7. 2 Heart Rate Mode Display
Access the Heart Rate Mode Display See fig. 18.
The display will auto-scroll until the heart rate is
captured. All screens will flash for 30 seconds if no
chest strap is found.
fig. 18

▲
▲
▲
▲
▲
▲
fig. 20
Tom is 53
Current heart
if his current heart rate is 100
Display Features:
* Top Row: Stats (exercise time, HR in-zone
time, max HR, min HR, average HR , and calories
burned). Press ▲to scroll through the 6 screens
* Middle Row: Beats per minute and % of
estimated max HR
* Bottom Row: Current time See fig. 19.
7.3 Estimated Maximum Heart Rate &
Percentage of Maximum Heart Rate
Your watch records and calculates heart rate data.
The data is based on your EMHR as determined by
the information entered in your personal profile.
See fig. 20.
fig. 19
NOTE: Before starting any exercise program involving
heart rate monitoring, please consult your physician
for an accurate measure of your actual maximum
heart rate.
7.4 Heart Rate Zone Alerts
There are 2 different heart rate zone alerts that sound
whenever the target beats per minute is exceeded at
either the upper or lower end. See fig. 21 on next page.

7.5 Heart Rate Data AcquIsition
Access the Heart Rate Mode Display.
Heart Rate mode automatically begins recording
after a pre-programmed 10 second delay. The
ic
on will flash when the mode is active.
It
will continue to record:
* Unless you manually turn it off
* Unless it no longer receives a signal from the
chest strap
NOTE: When in the Heart Rate Mode you may:
* Press and Hold ▲for 3 seconds to manually
Stop/Start the Sensor or
* Continue Holding ▲to Start/Stop Timer or
* Continue holding ▲to Start/Stop the
Logbook
Also you may:
* Press and Hold ▼3 seconds to manually
reset the current Screen or
* Continue Holding ▼to reset the current
Session or
* Continue holding ▼to reset the Timer
• Begin walking/running and it will record your
statistics
• Press ▲to scroll through the statistics in the
top row of the display
• Press and Hold ▲
at any time to stop recording
• Hold ▼3 seconds to clear all recorded data
for that session
fig. 21
▼
With the Heart Rate Mode running:
• Press ▼to toggle the Alerts ON/OFF
NOTE: The default Fitness Alert is pre-programed
and cannot be changed. In the Custom Alert you
set targets within a range of 40-239 bpm. on the
low end and 41- 240 bpm. on the upper end.
fig. 21

7.6 Heart Rate Set Menus
The following 4 menus add supplemental functions
and controls to the Heart Rate Mode.
Save (menu 1)
Saves the current session into today's record. If the
previous session has NOT been saved, the software
will automatically save it into today's record at
midnight.
Access the Heart Rate Mode Display.
• Hold M3 seconds to enter Heart Rate set menu
• Press Mto select Save
* Press ▲to save the current data OR
* Press ESC to cancel and return to Save
• Press ESC to exit Heart Rate set menu
Session (menu 2)
Allows review of the 9 screens of collected data for
the current session. See fig. 22.
Access the Heart Rate Mode Display.
• Hold Mfor 3 seconds to enter Heart Rate set
menu
• Press ▼to scroll to Session
• Press Mto select the Session
* Press ▲or ▼to scroll through the collected
data
* Press ESC to exit the records
•Press ESC to exit Session
fig. 22
▼
▼ ▼
▼
▼
▼
▼
▼
▼
▲
▲

Daily Record (menu 3)
Provides a review of the 7 screens of collected data
for each day up to and including day 10.
See fig. 23.
Access the Heart Rate Mode Display.
• Hold M3 seconds to enter Heart Rate set menu
• Press ▼to scroll to Daily Record
• Press Mto select the Daily record
* Press ▼to scroll to the day
* Press Mto access records
* Press ▲or ▼to scroll through the screens
* Press ESC to exit the records
* Press ESC to exit the day
• Press ESC to exit Daily Record
fig. 23
▲
▲
▼
▼
▼
▼
▼
▼▼▼▼
▼
▼
Table of contents
Other Tech4o Watch manuals