Techerific DeciVibe User manual

VIB£S
·rHAY
'ROCK
Yeua
D£CIB£L
WORLD
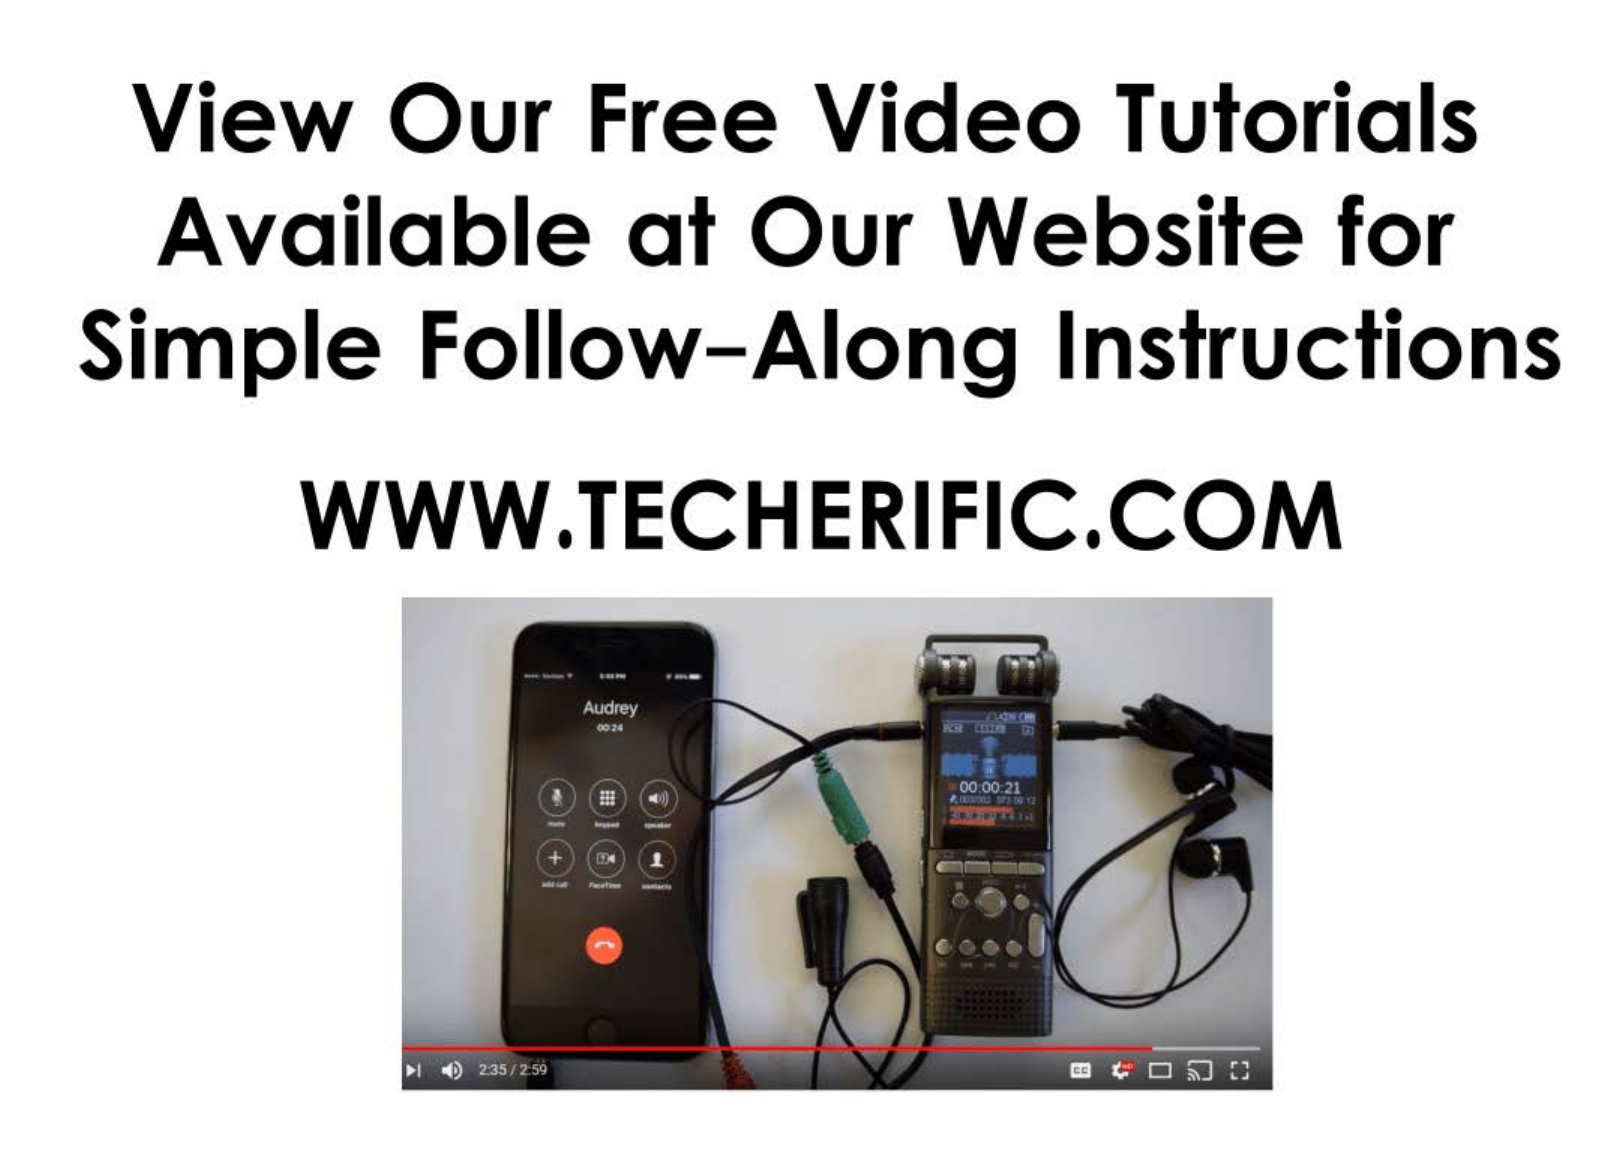
View
Our Free
Video
Tutorials
Available
at
Our Website for
Simple
Follow-Along
Instructions
WWW.TECHERIFIC.COM
Audrey
~,.
•
:::
~
,1;
-
+
!•i
t
.l
.....
_
--
e
•I •D
2'35/2
59

Mode
-
Recording
playback,
A/B/C
Folder
Change
During
Playback
Start Recording
Stop/Save
A
Recording
Delete
--
GC -
Previous/ 1 - - .,
Rewind
000000000000000
000000000000000
0000••···••0000
ooo••••
••••ooo
ooo••••
••••ooo
0000••·
··•00000
1
0000000
00000000
0000000
00000000
Speakers
---
Display
Screen
A-B
Repeat/
Return
to
Previous
Menu
Splitting a
Recording
Play/Pause
-Enter/Select
Volume
--
Increase
olume
Decrease
Mic
Sensitivity/
--
Audio
Gain
Control
Next/
Fast Forward

Left
Microphone
Port/Call
Recording
Noise
Cancelllation
On/Off
Earbuds Port
USB
Port for
Charging
S
Backu~
Micro
SD/
TF
Card
Port
Right

TF
use
<fib
~
fl>
~o
~
~
~
OFF-ON
NOISE C.
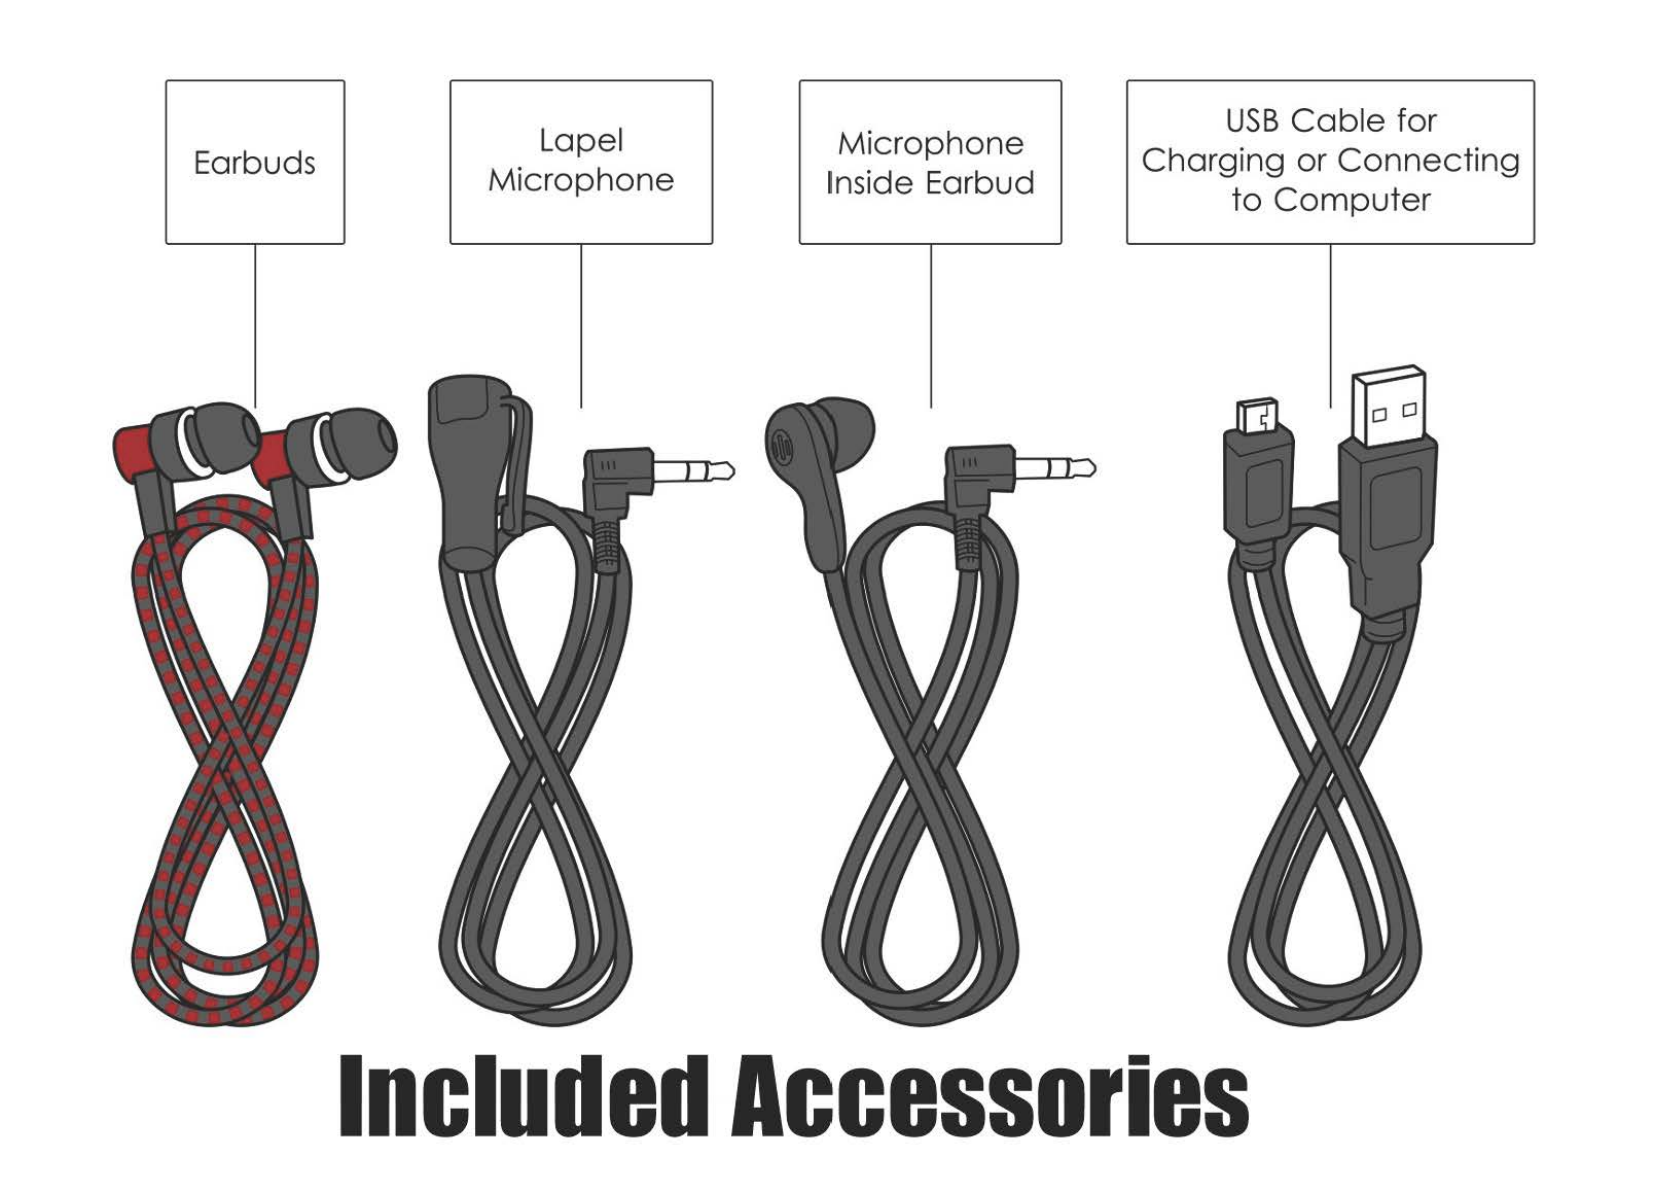
Earbuds Lapel
Microphone Microphone
Inside Earbud
USB
Cable
for
Charging
or
Connecting
to
Computer
Included
Accessories

L
and
line
Adapter
Box Landli
ne
Cab
le
Ma
le Aux
Cable
for Both
Landline
and
Smartphone
Adapters
F
ema
le
Red
and
Green
Smartphone
Adapter
Included
Accessories

DECIVIBE™
USER
MANUAL
©
2018
TECHERIFIC™
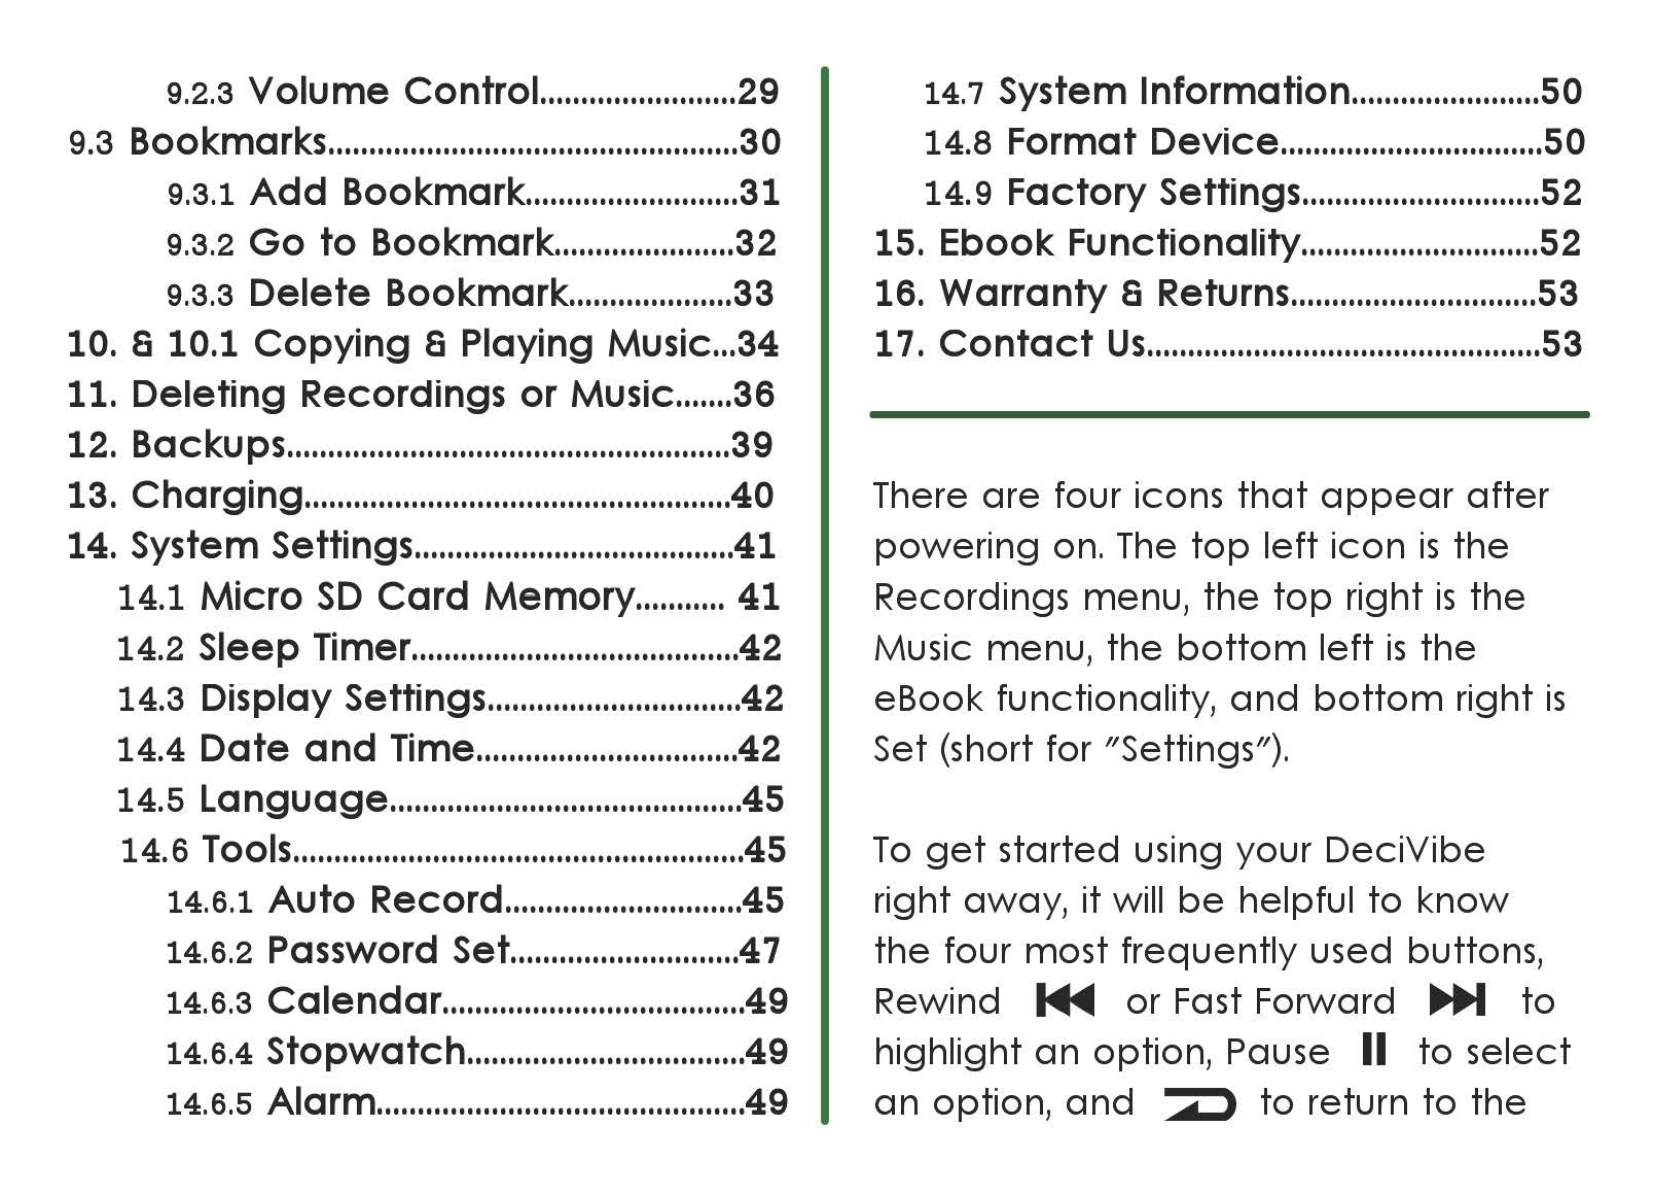
Table
of
Contents:
1.
Free 16GB
SD
Card
................................
1 6. Landline
Call
Recording
.................
12
2.
Power
On/Off
a
Standby
....................
2
7.
Smartphone
Call
Recording
.........
14
3.
Recording
Settings
..................................
2
8.
Troubleshooting Recordings
.........
18
3.1
Recording
Folder
.............................
3
9.
Playback
of
Recordings
..................
20
3.2
Recording
Format
.........................
4 9.1 Play
Mode
.......................................
21
3.3
Recording
Settings
.........................
4 9.1.1
Repeat
Settings
..................
21
3.3.1
Recording
Quality
..................
5
9.1.lA
Replay
lnterval
............
22
3.3.2
Voice
Activation
.....................
6 9.1.1B
Replay
Times
.................
22
3.3.3
Record
From
..............................
7
9.1.1c
Repeat
Mode
...............
23
3.3.4
Monitor
Setting
.........................
8
s.1.2
Shuffle
........................................
24
3.4
AGC
a Noise
Cancellation
........
8 9.1.3
Repeat
Single a All
............
24
3.5
Splitting a
Recording
.....................
9 9.2 Sound Settings
..............................
26
4.
Starting a
Recording
...........................
10 9.2.1 Equalizer
...................................
27
5.
Recording
Screen
Layout
................
11 9.2.2
Playback
Speed
..................
28
9.2.3
Volume
Control
........................
29
9.3 Bookmarks
..................................................
30
9.3.1
Add
Bookmark
..........................
31
9.3.2
Go
to
Bookmark
......................
32
9.3.3
Delete
Bookmark
....................
33
10. a 10.1
Copying
a Playing Music
...
34
11.
Deleting
Recordings
or
Music
.......
36
12. Backups
......................................................
39
13.
Charging
....................................................
40
14. System Settings
.......................................
41
14.1
Micro
SD
Card
Memory
...........
41
14.2
Sleep Timer
........................................
42
14.3
Display Settings
...............................
42
14.4
Date
and
Time
................................
42
14.5
Language
...........................................
45
14.6
Tools
.......................................................
45
14.6.1
Auto
Record
.............................
45
14.6.2
Password Set
............................
47
14.6.3
Calendar
.....................................
49
14.6.4
Stopwatch
..................................
49
14.6.5
Alarm
.............................................
49
14.7 System lnformation
.......................
50
14.8
Format
Device
................................
50
14.
9
Factory
Settings
.............................
52
15. Ebook Functionality
.............................
52
16.
Warranty
a Returns
..............................
53
17.
Contact
Us
................................................
53
There
are
four icons
that
appear
after
powering
on. The
top
left
icon
is
the
Recordings menu,
the
top
right
is
the
Music menu,
the
bottom
left
is
the
eBook functionality,
and
bottom
right
is
Set (short for "Settings").
To
get
started using your
DeciVibe
right
away,
it
will
be
helpful
to
know
the
four most
frequently
used buttons,
Rewind
~
or
Fast Forward
IJl,i,M
to
highlight
an
option, Pause II
to
select
an
option,
and
• 1
to
return
to
the
the
previous
menu
and
exit
out
of
your
current
location.
Manual
Layout:
This
manual
is
organized
chronologically
by
the
4
main
menus
(Recordings, Music, Settings, Ebook)
and
then
ordered
by
each
of
the
sub-menus inside
from
top
to
bottom.
Transcription
Extras:
We
recommend
purchasing
the
Express
Scribe Pro Transcription Kit on
Amazon. It includes a
USB
foot
pedal
and
USB
headset
with
the
Pro software.
But if you simply wish
to
control
playback
with your
keyboard
during
transcribing, you
can
go
to
www.nch.com.au/scribe
to
download
the
free
Express
Scribe transcription
software for
Mac
or Windows.
1
1. Free 16GB
SD
Card
Your
feedback
is
incredibly
valuable
to
us
in
helping
us
know
that
we
are
meeting
our
goals in
providing
a
phenomenal,
high
quality
product.
To
claim
your free 16GB SanDisk®
micro
SD
card,
simply email
us
at
screenshot
or
link
to
your online review.
This
can
be
done
on
Facebook,
Twitter,
etc.
Please
include
your mailing address
so
we
know
where
to
send your free
micro
SD
card.
Even
the
shipping
is
free.
This
card
will instantly
double
the
hours
of
recording
capacity
on
your
DeciVibe,
and
is
just
one
small
way
that
we
can
show you
our
appreciation
for
providing
us
your
honest
feedback!

2.
Power
On/Off
S
Standby
To
power
on, slide
the
switch
[OFF-
ON]
up. If you
do
not
make
a
selection within 5 minutes
the
DeciVibe
will
go
into
Standby
mode
to
preserve
the
battery
life.
To
manually
initiate Standby,
or
to
wake
from
Standby, press II for a
few
seconds.
To
power
off
completely,
slide
the
switch
back
down.
3.
Recording Settings:
After
powering
on, press II
to
enter
the
Recordings menu,
then
press
IJl,i,M
to
highlight a submenu,
and
press II
to
confirm
the
selection.
Once
you're
done,
press • •
to
save
and
exit
your settings. Your
newly
selected
settings will
be
saved,
even
after
powering
off, for all future use.
0
8
Recordings
D MODE • •
-/-/-
c
__
ll
11
__
1_1
_)
2
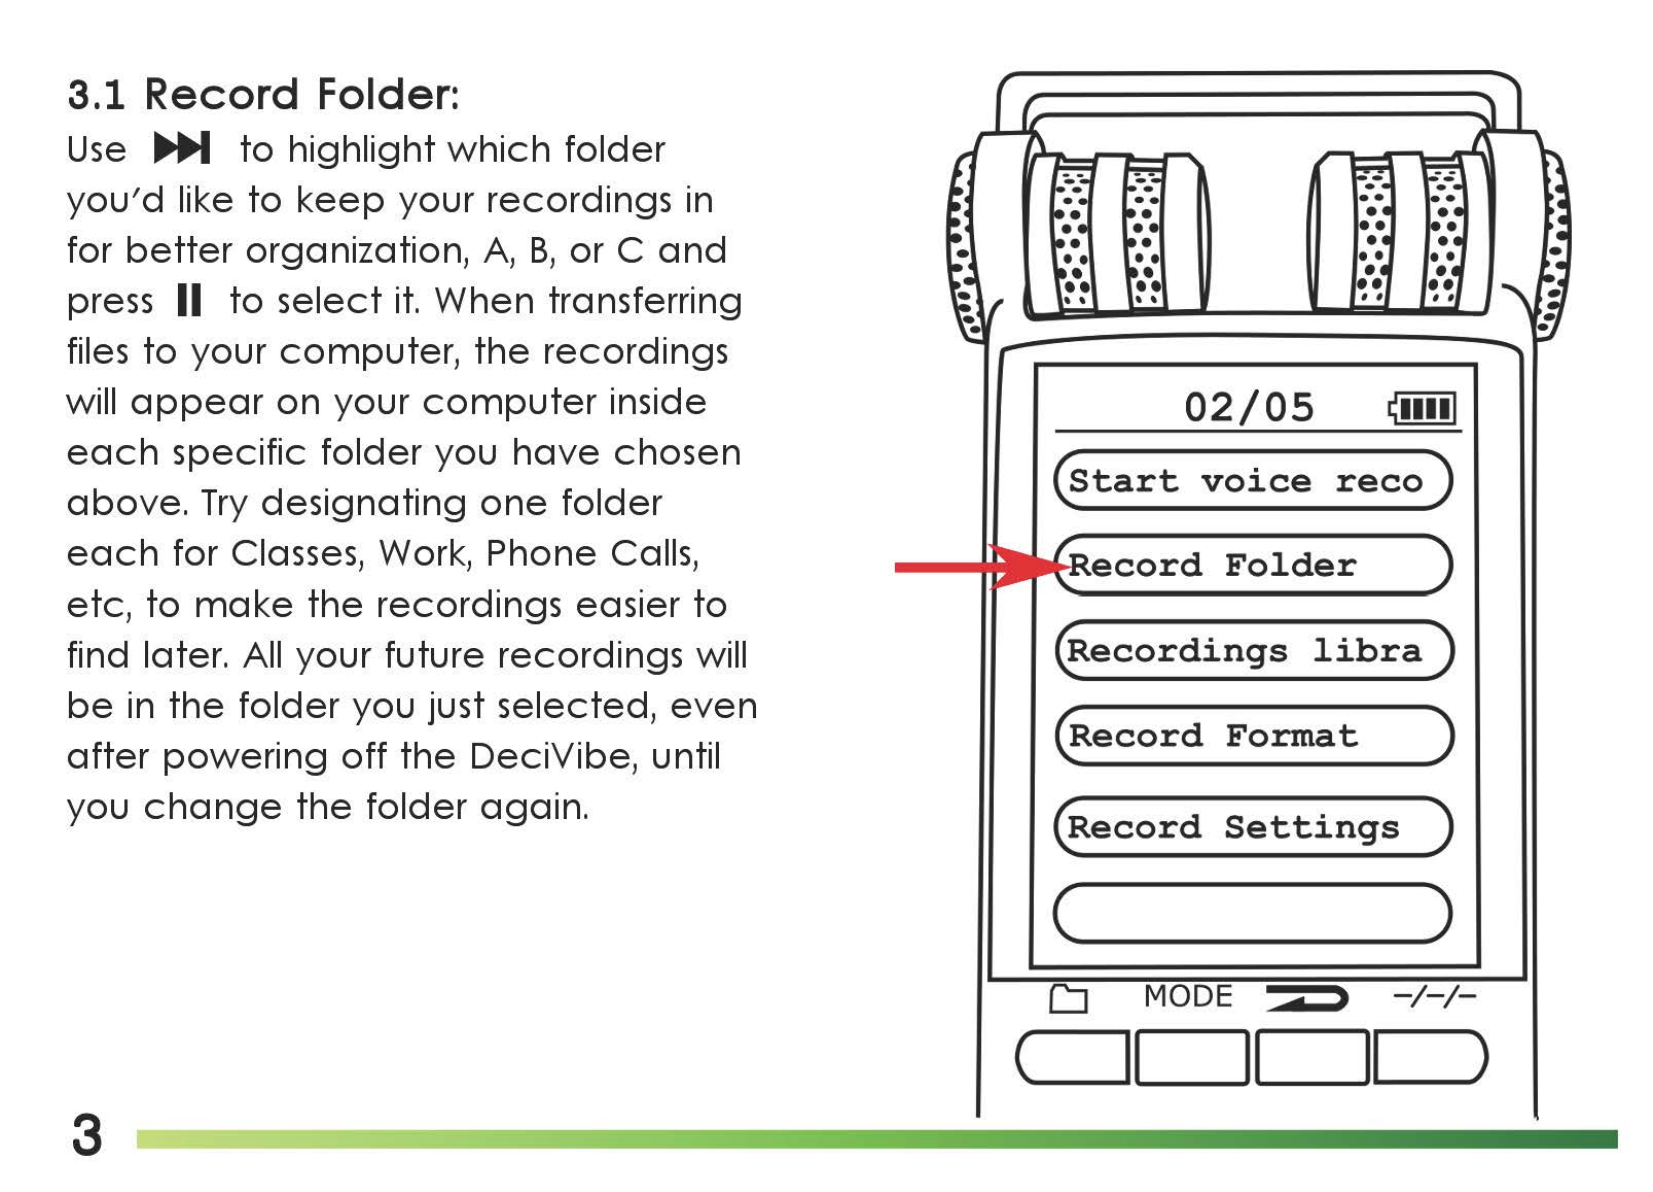
3.1
Record Folder:
Use
..,._
to
highlight
which
folder
you'd
like
to
keep
your recordings in
for
better
organization,
A,
B,
or C
and
press II
to
select
it.
When transferring
files
to
your
computer,
the
recordings
will
appear
on
your
computer
inside
each
specific
folder
you
have
chosen
above.
Try
designating
one
folder
each
for Classes, Work, Phone Calls,
etc,
to
make
the
recordings easier
to
find later. All your future recordings will
be
in
the
folder
you just selected,
even
after
powering
off
the
DeciVibe, until
you
change
the
folder
again.
3
02/05
ffi
(start
voice
reco)
ecord
Folder
(Recordings
libra)
(Record
Format
)
(Record
Settings
)
(
____
)
CJ
MODE • >
-/-/-
(
11
II
11
)
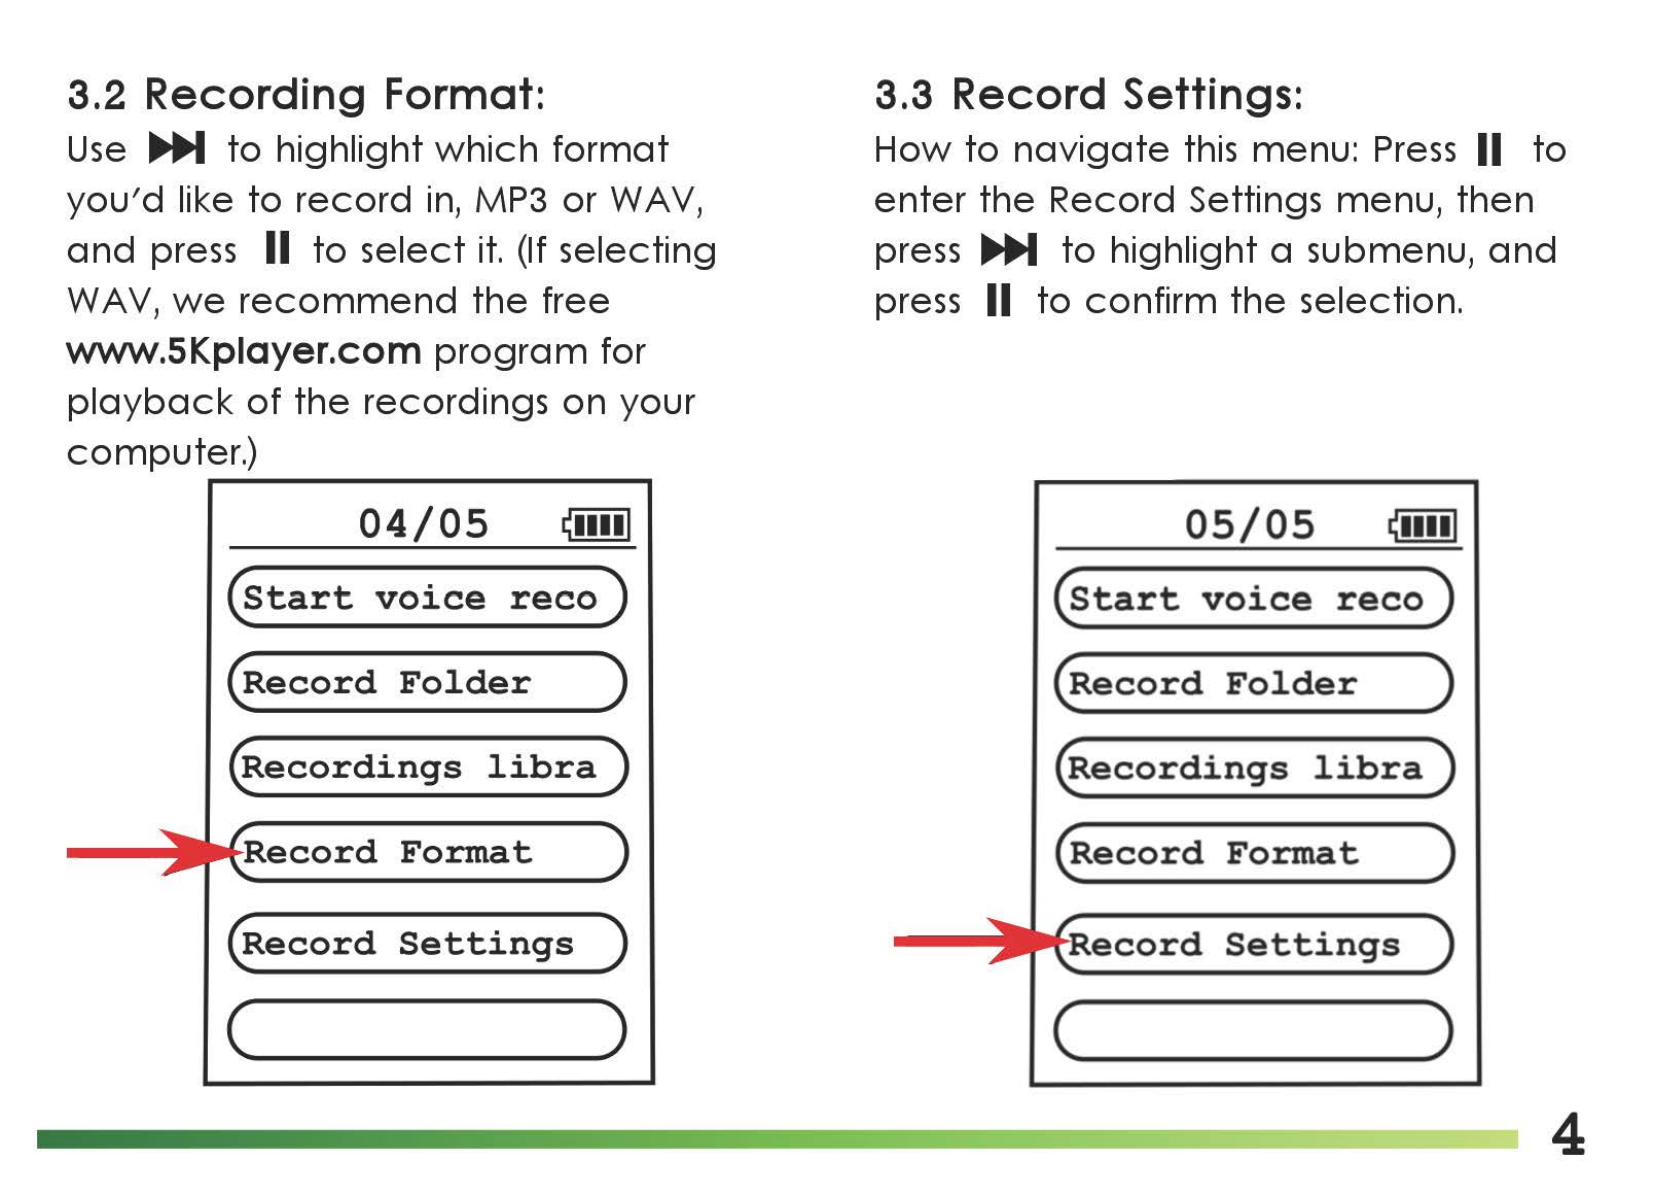
3.2
Recording Format:
Use
..,._
to
highlight
which
format
you'd
like
to
record
in,
MP3
or
WAV,
and
press II
to
select
it.
(If selecting
WA
V,
we
recommend
the
free
www.5Kplayer.com
program
for
playback
of
the
recordings
on
your
computer.)
04/05
(start
voice
reco)
(Record
Folder
)
(Recordings
libra)
Record
Format
(Record
Settings
)
(
____
)
3.3
Record Settings:
How
to
navigate
this menu:
Press
II
to
enter
the
Record Settings menu,
then
press ..,._
to
highlight a submenu,
and
press II
to
confirm
the
selection.
05/05
(start
voice
reco)
(Record
Folder
)
(Recordings
libra)
(Record
Format
)
ecord
Settings
(
____
)
4
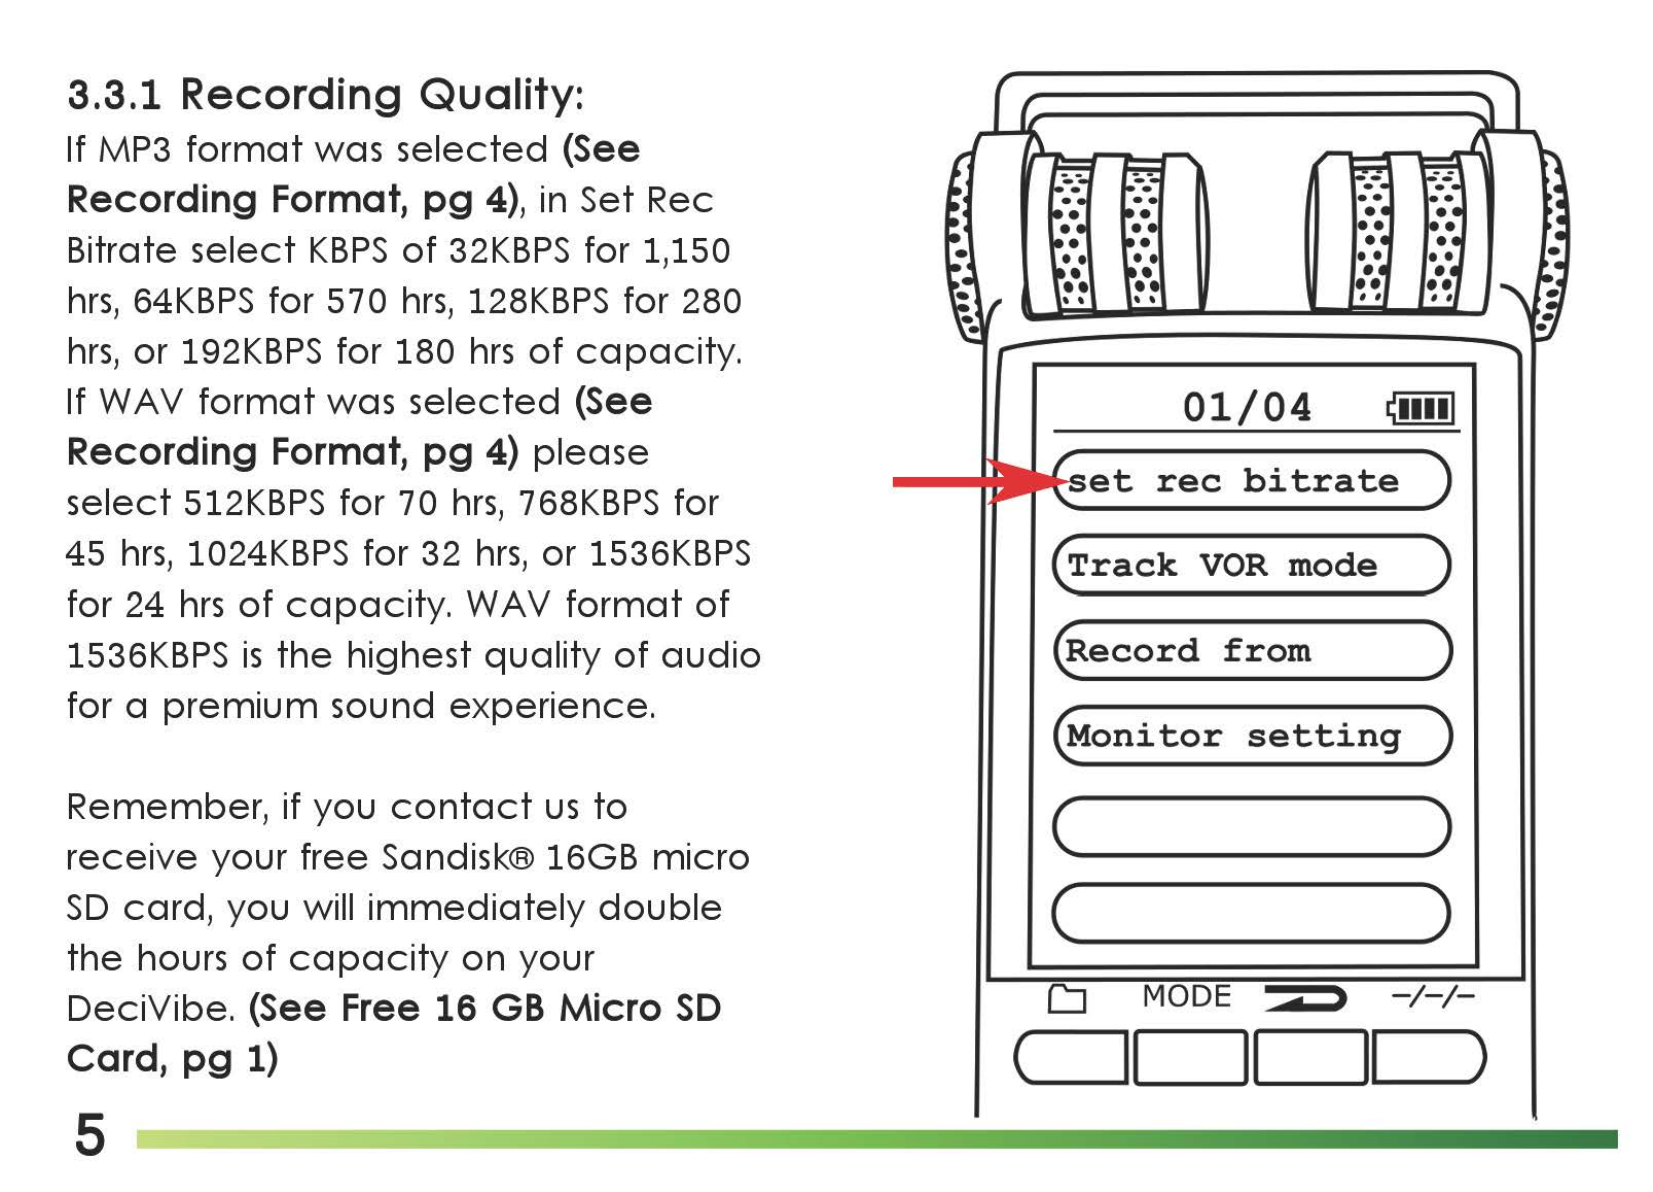
3.3.1
Recording Quality:
If MP3
format
was
selected
(See
Recording Format,
pg
4), in Set Rec
Bitrate
select
KBPS
of
32KBPS
for 1,150
hrs,
64KBPS
for 570
hrs,
128KBPS
for 280
hrs,
or
192KBPS
for 180
hrs
of
capacity.
If
WA
V
format
was
selected
(See
Recording Format,
pg
4)
please
select
512KBPS
for
70
hrs,
768KBPS
for
45
hrs,
1024KBPS
for 32
hrs,
or
1536KBPS
for 24
hrs
of
capacity.
WAV
format
of
1536KBPS
is
the
highest
quality
of
audio
for a
premium
sound
experience.
Remember, if you
contact
us
to
receive
your
free Sandisk® 16GB
micro
SD
card,
you will
immediately
double
the
hours
of
capacity
on
your
DeciVibe. (See Free 16
GB
Micro
SD
Card,
pg
1)
5
01/04
i!iiiil
et
rec
bitrate
(Track
VOR
mode
)
(Record
from
)
(Monitor
setting
)
(
____
)
c )
CJ
MODE • •
-/-/-
c_11
1
__
1
__
II
__
)

3.3.2
Voice
Activation:
To
enable
voice
activation, highlight
and
select
Track
VOR
Mode,
then
...._
and
press II
to
select
VOR
Mode.
Press
[REC]
to
begin
recording. The
duration
of
the
recording
will show
00:00:00
until a
voice
is
detected,
and
it will
activate
or
deactivate
continuously
accordingly.
"VOR" will
appear
at
the
top
of
your screen
as
(See pg 11)
Press
•
when
done.
To
disable
voice
activation, highlight
Normal inside
this
menu
and
press II .
CAUTION: Please test
voice
activation
in your
particular
location
first,
as
a
range
of
variables in
the
recording
environment
can
"trick"
the
activation
feature, causing it
to
miss
short
segments
of
what
you wish
to
record.
We
recommend
using
Auto-Record
instead for most situations. (See
pg
45)
Voice
activation
is
not
recommended
I
for
call
recording
as
the
lower
volume
frorn
the
caller
could
cause
it
to
miss
small portions
of
your conversation.
02/04
~••••I
(set
rec
bitrate
)
Track
VOR
mode
(Record
from
)
(Monitor
setting
)
(
____
)
c )
6
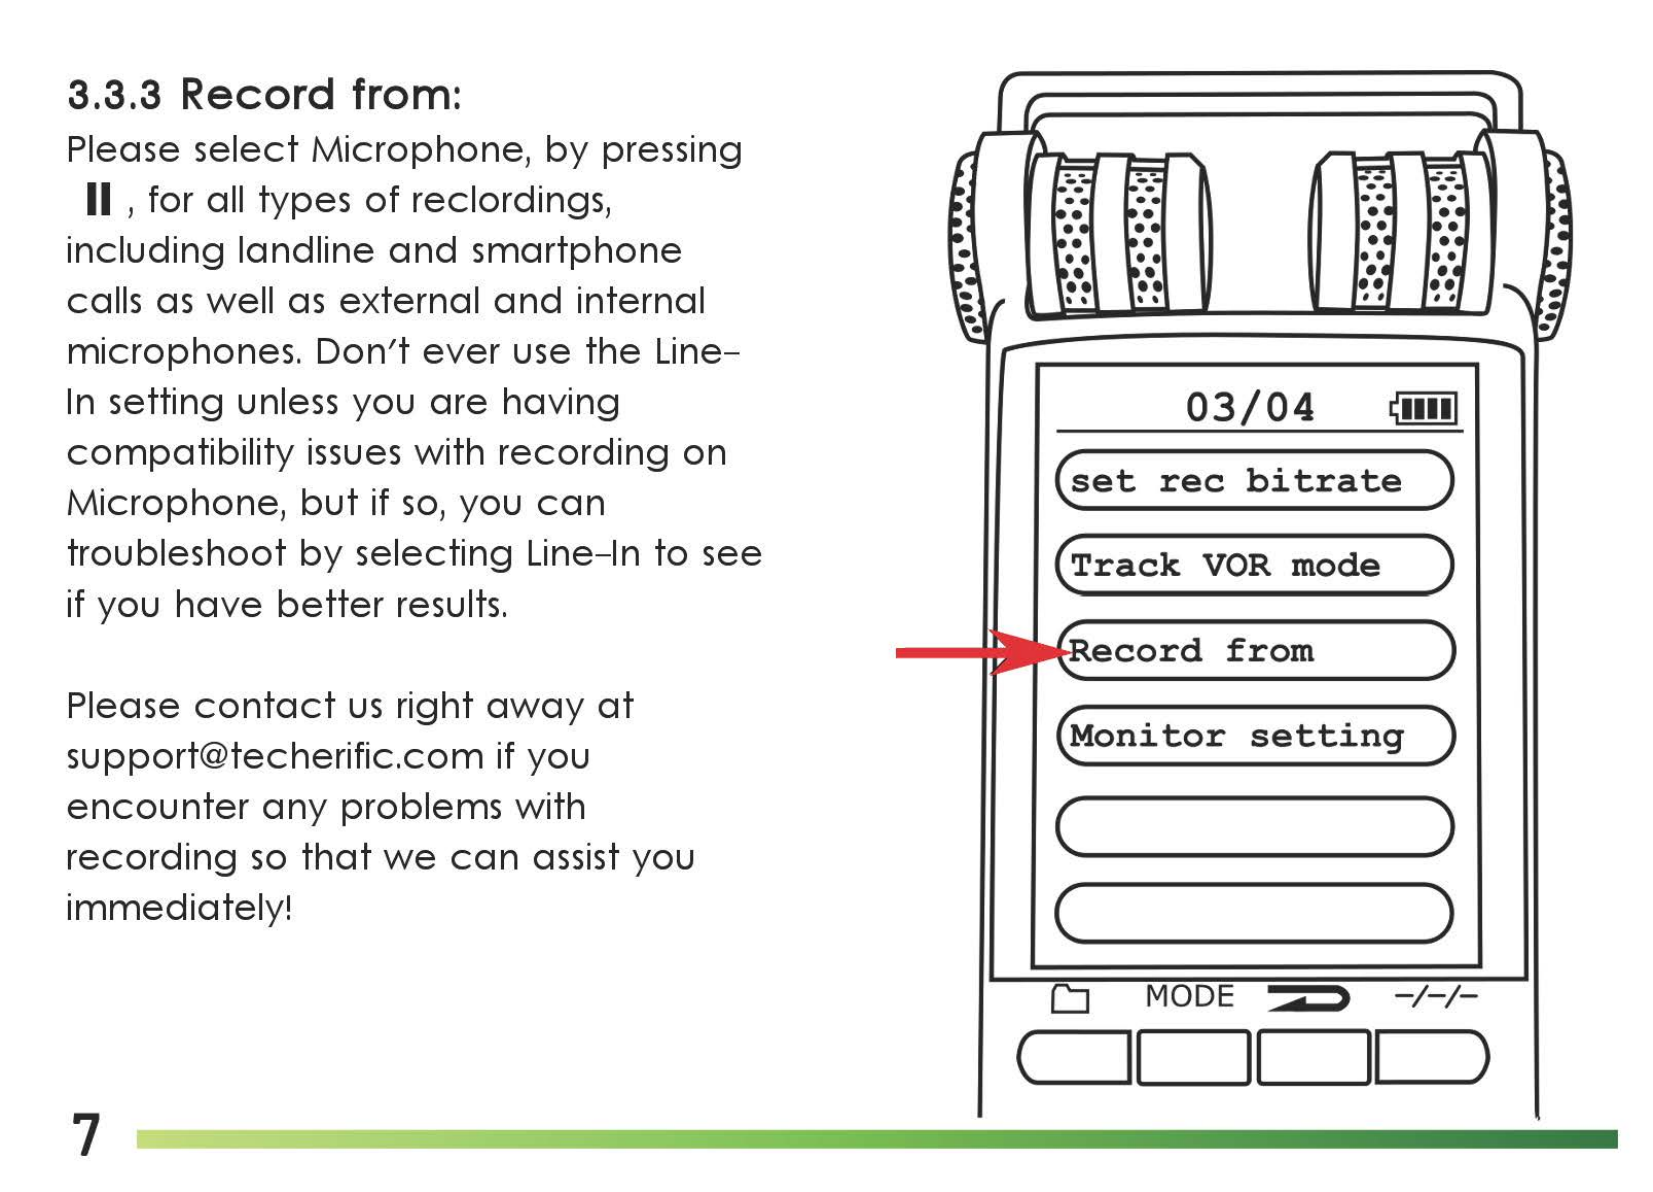
3.3.3 Record from:
Please
select
Microphone,
by
pressing
II ,for all types
of
reclordings,
including
landline
and
smartphone
calls
as
well
as
external
and
internal
microphones.
Don't
ever
use
the
Line-
In
setting unless you
are
having
compatibility
issues
with
recording
on
Microphone,
but
if
so,
you
can
troubleshoot
by
selecting Line-In
to
see
if you
have
better
results.
Please
contact
us
right
away
at
encounter
any
problems with
recording
so
that
we
can
assist you
immediately!
7
03/04
~••••I
(set
rec
bi
tra
te
)
(Track
VOR
mode
)
ecord
from
(Monitor
setting
)
(
____
)
( )
CJ
MODE • >
-/-/-
(
11
II
II
)

3.3.4
Monitor
Setting:
This
enables you
to
listen
to
your
recordings in
real-time
live
as
you
record,
through
your earbuds.
Press
IJli,,M
until
On
or
Off
is
highlighted
and
press II
to
select
it.
It must
be
turned
on
for all
call
recording.
04/04
~11111
(set
rec
bitrate
)
(Track
VOR
mode
)
(Record
from
)
setting
(
____
)
(..___
___
)
3.4 Audio
Gain
Control S Noise
Cancellation:
An
AGC
level
of
+3
is
often
beneficial
for landline recording.
To
enable
AGC,
to
increase
microphone
sensitivity, press
[AGC]
and
increase with
[+]
or
decrease
with
[-]
and
then
press II
to
set
it.
Please
sample
test Noise
Cancellation
and
varying
AGC
levels
on
a small
portion
of
a
recording
in
your
location
before
choosing
what
setting
to
keep
it
on for
best
results for
your
particular
location.
To
enable
Noise
Cancellation
slide
[NOISE C.] switch on
the
left
side up.
To
disable
it,
slide
it
down.
NOTE:
Please
keep
Noise
C.
disabled
for landline, smartphone,
and
voice
activated
recordings for
best
results. 8

3.5 Splitting a Recording.
Press
[-/-/-]
during
recording
to
have
your
recording
automatically
split
into
separate
files.
You
can
choose
segments
between
30-300 min.
Use
the
[
+]
and
[-]
to
adjust
the
desired
length
and
II
to
confirm
the
recording
duration. It will continuously
split into a
new
recording
at
this
specified interval until you turn this
feature
off
again
by
setting
it
to
0.
9
~11111
90
...6..
Record
Subsection
D MODE • •
-/-/-
c_11
11_1_1
_)
4.
Starting a Recording
To
start a recording,
power
on,
and
press
[REC] . You
can
immediately
start a
recording
anytime
regardless
what
menu
you
happen
to
be
in.
If you
need
to
pause
your
recording
at
any
time
press II
and
then
press
it
again
when
you
are
ready
to
continue
recording.
Once
you
are
finished
recording
press •
to
stop
and
save
it.
The
recording
file
name
will,
by
default,
include
the
time
and
date
it
was initiated,
but
can
be
changed
if desired. (See Backups,
pg
39)
To
enhance
recording
clarity
even
further, you
can
use
the
microphone
inside
earbud
or
the
lapel
microphone,
and
set
the
recording
quality
to
1536KBPS. (See Recording Quality,
pg
5)
10

5. Recording Screen Layout:
At
the
top
of
your screen during
recording
you will see if
VOR
(Voice Activation)
is
enabled,
as
well
as
the
volume
of
playback,
and
the
battery
life.
Note
that
the
playback
volume
does
not
affect
the
recording
volume
,
to
change
that
adjust
the
AGC. (See
pg
8)
Underneath
that
you will find your
current
settings,
including
the
recording
file
format
-
either
PCM (WAV) or MP3 -
the
KBPS,
and
the
Recording Folder
selected
for saving into.
Just
below
the
microphone
icon
you will see
the
current
duration
of
your recording.
Directly
underneath
that
you will also see
the
DeciVibe
file number,
and
beside
that
you will
see
how
many
hours
of
recording
capacity
are
rema1n1ng.
At
the
very
bottom
you will see
the
levels
of
volume
that
the
left
and
right
microphones
are
picking
up
in stereo sound.
11
••
•
••
, ,
IVORI
..
(\
(]38
~··••I
!PCM!
11536
KBI
[61
009:43:56
{)
020/019
012:
28:
37
L
-40-30-20-12-8-6-3+1
R
CJ
MODE d •
-/-/-
c
__
1CJ1_1_1
_)
Table of contents
Other Techerific Voice Recorder manuals


